Kali Linux: setting up and building ISO images
- Transfer
Downloading Kali Linux from a removable storage medium is useful in many situations. In its simplest form, such media, in the format of a DVD-ROM or flash drive, is created using a standard ISO-image of the system. However, much more opportunities are provided by assembling your own images and creating bootable media with a permanent data warehouse. In addition, system images configured in a special way can sometimes be useful. The third and fourth sections of the ninth chapter of the book “ Kali Linux Revealed ”, the translation of which we publish in this material, are devoted to all this .
The standard version of Kali Linux is flexible and has many features. Immediately after installing it, you can begin to solve many difficult problems. Of course, a certain level of knowledge of the tools included in the distribution, creativity, patience and experience will not hurt here. However, you can configure the Kali image, including what you need in it, or removing unnecessary ones, to set automatic execution of any actions during system boot.
Among the examples of such special images - Kali ISO of Doom and Kali Evil Wireless Access Point - interesting projects that rely on specially configured Kali Linux implementations. Take a look at the process of creating your own Kali Linux ISOs.
Official Kali images compiled usinglive-build . This is a set of scripts that makes it possible to fully automate and configure all aspects of creating ISO images. The set
Before continuing, you should be aware that the commands shown in this section are intended to be run on the current version of Kali Linux. If you try to use them in an OS other than Kali, or in an older version of Kali, they most likely will not work normally.
The first step in building your own ISO image is to install the necessary packages and download the Git repository with Kali configuration
After that, you can already create updated (but unmodified) ISO images of Kali. To do this, just use the command
The standard script
The script creates a directory
The folder
Option
For example, here's how to create a Kali Live Image using KDE as your desktop environment:
The above-described concept of options allows you to perform general system configuration using sets of standard presets. However, in fact, the images lend themselves to a much deeper customization. Read about this in the Debian Live System Manual . There you will find many other ways to customize images, which include changing the contents of the corresponding subdirectories in
Using
Meta-packages are empty packages that are used only because they include many dependencies on other packages. As a result, they simplify the installation of the sets of packages that are usually installed together. The source package
You can use these meta-packages when creating your own list of packages for
When working with
Binary hooks (
Another very common way to customize images is to add files to either the Live file system or the ISO image.
You can add files to the file system by placing them where they should be in the configuration directory
You can add files to the ISO image by placing them in the configuration directory
Here we will look at the steps necessary to add a permanent storage of information to a USB stick with Kali recorded on it. The essence of a live file system is its ephemerality. All data saved when working with such a system disappears after a reboot, the same goes for the system settings. In order to avoid this, you can use the feature
Since modifying the boot menu is not an easy task, Kali by default has two menu items that enable enabling persistent storage. This is as shown in the following figure,
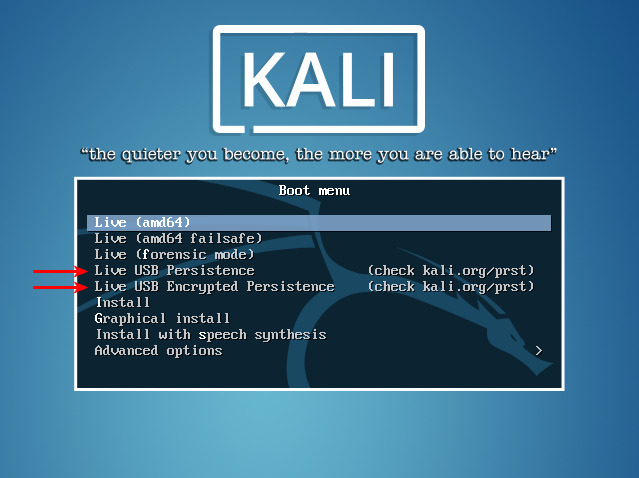
Fig. 9.1. Menu items for enabling persistent storage
When this function is enabled, it
Here it is assumed that you have prepared a USB flash drive with a Live system, following the instructions that can be found in Section 2.1.4., “ Copying an Image to a DVD-ROM or USB Flash Drive ”, and that the media size is sufficient to store the image ( about 3 GB) and for storing directory data that will end up in persistent storage. In addition, we assume that Linux sees the USB flash drive-like
In order to add a new partition to the disk, you need to know the size of the image that is already on the flash drive. This will give you the opportunity to make the new section begin immediately after the Live image. Then you need to use the command
When a new partition is
Now the USB flash drive is ready to boot from it using the menu item
If necessary, a permanent data storage can be organized on an encrypted partition,
Creating an encrypted storage starts with the same actions that we performed before. However, now, instead of formatting the partition in the file system
If you use the Kali Live image in various situations, you can create several file systems with different labels and, on the boot command line, indicate which file system to use in a particular session. This is done using the boot option
Suppose you are a professional pentester. When working with a client, you use persistent storage located on an encrypted partition. You do this to protect data in the event that a USB flash drive is stolen or hacked. At the same time, you would like to be able to demonstrate Kali and any advertising materials stored on an unencrypted partition on the same drive. Since you would not like to manually edit the parameters at each boot, you decide to build your own Live-image with individual items in the boot menu.
The first step is to build your own Live-ISO (in accordance with section 9.3., “ Building your own Kali Linux ISO images ”, and, in particular, with section 9.3.4., “ Using hooks to fine-tune image contents"). The most important thing to do at this stage is to modify the file
Next, we collect the ISO-image and copy it to a USB-stick. Then we create and initialize two partitions and file systems that will be used to organize permanent storage of information. The first section, with a label
That's all. Now you can boot from the USB drive and select the necessary items from the new boot menu.
Today we talked about how to create your own ISO-images, configure persistent storage on USB drives used to boot the system in Live mode, and protect data stored on removable media using partition encryption and self-destruction password. Next time we will take stock of the ninth chapter of Kali Linux Revealed and share the exercises for you with it.
Dear readers! Have you found yourself in a situation where you would need something like a Kali Linux self-destruction password?
Previous parts:
→ Part 1. Kali Linux: security policy, protecting computers and network services
→ Part 2. Kali Linux: filtering traffic using netfilter
→ Part 3.Kali Linux: monitoring and logging
→ Part 4. Kali Linux: exercises for protecting and monitoring the system
→ Part 5. Kali Linux: assessing the security of systems
→ Part 6. Kali Linux: types of checks of information systems
→ Part 7. Kali Linux: formalizing research and attack types
→ Part 8. Kali Linux: security questions on systems security research
→ Part 9. Kali Linux: package modifications
→ Part 10. Kali Linux: kernel assembly
9.3. Build your own Kali Linux ISOs
The standard version of Kali Linux is flexible and has many features. Immediately after installing it, you can begin to solve many difficult problems. Of course, a certain level of knowledge of the tools included in the distribution, creativity, patience and experience will not hurt here. However, you can configure the Kali image, including what you need in it, or removing unnecessary ones, to set automatic execution of any actions during system boot.
Among the examples of such special images - Kali ISO of Doom and Kali Evil Wireless Access Point - interesting projects that rely on specially configured Kali Linux implementations. Take a look at the process of creating your own Kali Linux ISOs.
Official Kali images compiled usinglive-build . This is a set of scripts that makes it possible to fully automate and configure all aspects of creating ISO images. The set
live-buiduses, when forming its configuration, the directory structure. This configuration and some related helper scripts can be found in the Git repository live-build-config. We will use this repository as the basis for constructing images customized in accordance with special requirements. Before continuing, you should be aware that the commands shown in this section are intended to be run on the current version of Kali Linux. If you try to use them in an OS other than Kali, or in an older version of Kali, they most likely will not work normally.
9.3.1. Installing the necessary software
The first step in building your own ISO image is to install the necessary packages and download the Git repository with Kali configuration
live-build:# apt install curl git live-build
[...]
# git clone git://git.kali.org/live-build-config.git
[...]
# cd live-build-config# ls
auto build_all.sh build.sh kali-config READMEAfter that, you can already create updated (but unmodified) ISO images of Kali. To do this, just use the command
./build.sh --verbose. The assembly will take a lot of time, since in its course all the packages that need to be included in the image will be downloaded. After completing this process, you can find the new ISO image in the directory images.9.3.2. Build a live image with various desktop environments
The standard script
build.shfrom the set is live-buildresponsible for preparing the directory config. Waiting for her presence live-build. The script helps to set various configurations, which depends on its option --variant. The script creates a directory
configby combining files from kali-config/commonand kali-config/variant-X, where X — is the name of the option specified with the parameter --variant. When this option is not specified explicitly, it is used as the name of the variant default. The folder
kali-configcontains directories for the most popular desktop environments:e17for enlightenment;gnomefor GNOME;i3wmfor frame manager i3;kdefor KDE;lxdefor LXDE;matefor the Mate Desktop Environment;xfcefor XFCE.
Option
lightis a special case. It is based on XFCE and is used to create an official lite ISO image that contains a stripped-down set of applications. For example, here's how to create a Kali Live Image using KDE as your desktop environment:
# ./build.sh --variant kde --verboseThe above-described concept of options allows you to perform general system configuration using sets of standard presets. However, in fact, the images lend themselves to a much deeper customization. Read about this in the Debian Live System Manual . There you will find many other ways to customize images, which include changing the contents of the corresponding subdirectories in
kali-config. Below we will look at a few examples.9.3.3. Change the set of installed packages
Live-build, after starting, installs all the packages listed in the files package-lists/*.list.chroot. The standard configuration includes a file package-lists/kali.list.chrootin which there is a record about the package kali-linux-full(this is the basic metapackage, the use of which leads to the inclusion of all Kali packages in the image). You can comment out the line with the mention of this package and use another metapackage or make your own list of other packages. In addition, you can combine both approaches, starting with a metapackage and adding additional necessary packages. Using
package-lists, you can include in the image only those packages that are already available in the official Kali repository. However, if you have your own packages, you can include them in a Live image by placing the corresponding .deb files in a directory packages.chroot(for example, inkali-config/config-gnome/packages.chroot(if you, during assembly, use the GNOME graphical environment option). Meta-packages are empty packages that are used only because they include many dependencies on other packages. As a result, they simplify the installation of the sets of packages that are usually installed together. The source package
kali-metais responsible for building all the meta-packages provided by Kali Linux:kali-linux: base system (it is used in all other meta-packages).kali-linux-full: standard installation of Kali Linux.kali-linux-all: a meta package that combines all the other meta packages, as well as other packages (here - almost everything that Kali has, so it's just a huge package!).kali-linux-sdr: Tools for Software Defined Radio (SDR).kali-linux-gpu: tools that use a graphics card (GPU) to perform heavy computing.kali-linux-wireless: Tools for research and analysis of wireless networks.kali-linux-web: Tools for researching web applications.kali-linux-forensic: digital forensics tools (they are used to search for evidence in the investigation of various incidents).kali-linux-voip: VoIP tools (Voice Over IP).kali-linux-pwtools: password cracking tools.kali-linux-top10: The ten most popular tools.kali-linux-rfid: RFID tools.
You can use these meta-packages when creating your own list of packages for
live-build. A complete list of available meta-packages and software tools that they include can be found here .▍Automation of setup of installed packages
To automate the configuration of installed packages, you can use Debconf answer files (for more details, see section 4.3.2., “ Creating an Answer File ”) by placing them inpreseed/*.cfg. They will be used to configure packages used to create a live image.
9.3.4. Using hooks to fine-tune image content
When working with
live-build, you can use hooks that run at various stages of the assembly process. Hooks chroot — are executable scripts that install as hooks/live/*.chrootin the configuration tree, and which are executed using chroot. While chroot — this is a command that allows you to temporarily change the root directory of the operating system to the selected directory, it is also used live-buildto assign a directory containing the full (alternative) file system tree. In the case of live-build, the chroot directory is the directory where the file system for the live image is prepared. Since applications running usingchroot, do not have access outside the selected directory, the same is true for chroot hooks: you can use and modify only what is available in the environment chroot. We rely on these hooks to do a lot of Kali-specific tweaks (take a look at kali-config/common/hooks/live/kali-hacks.chroot). Binary hooks (
hooks/live/*.binary) are executed in the context of the build process, at the end of the process. They are not called during assembly using chroot. With their help, you can modify the contents of the assembly of the ISO-image, but not the Live-file system, since at this point it has already been created. We use this feature in Kali to make some changes to the standard configuration isolinuxcreated live-build. For example, take a look atconfig/common/hooks/live/persistence.binarywhere we add boot menu items designed to enable persistent data storage.9.3.5. Adding Files to an ISO Image or Live File System
Another very common way to customize images is to add files to either the Live file system or the ISO image.
You can add files to the file system by placing them where they should be in the configuration directory
includes.chroot. For example, there is a standard file kali-config/common/includes.chroot/usr/lib/live/config/0031-root-password, which ends up being located in the Live-file system at the address /usr/lib/live/config/0031-root-password.▍Hooks live-boot
The scripts installed in/lib/live/config/XXXX-nameare executed by theinitpackage scriptlive-boot. They reconfigure many aspects of the system so that they are suitable for working in live mode. Here you can add your own scripts to configure your Live-system during operation. In particular, they are used, for example, to implement their own boot parameters.
You can add files to the ISO image by placing them in the configuration directory
includes.binary, in those places where they should be. For example, there is a standard file kali-config/common/includes.binary/isolinux/splash.pngthat overrides the background image used by the bootloader isolinux(it is stored in a file /isolinux/splash.pngin the file system of the ISO image).9.4. Adding persistent storage to Live-ISO when using a USB drive
9.4.1. Persistent Storage Features
Here we will look at the steps necessary to add a permanent storage of information to a USB stick with Kali recorded on it. The essence of a live file system is its ephemerality. All data saved when working with such a system disappears after a reboot, the same goes for the system settings. In order to avoid this, you can use the feature
live-bootcalled persistence information storage (persistence). This feature is activated if the download options include a keyword persistence. Since modifying the boot menu is not an easy task, Kali by default has two menu items that enable enabling persistent storage. This is as shown in the following figure,
Live USB Persistenceand Live USB Encrypted Persistence.Fig. 9.1. Menu items for enabling persistent storage
When this function is enabled, it
live-bootscans all partitions for file systems marked aspersistence(this can be changed using the boot optionpersistence-label=value), and the installer creates a repository for the directories listed in the filepersistence.conffound in this section (each directory indicated in a separate line). Special parameter/ unionAllows you to enable full preservation of all directories using a cascade-mounted mount (union mount). With this approach, an additional level of the file system is created in which only changes made to the data of the base file system are saved. Directory data that is not lost after a reboot is stored in the file system that contains the corresponding file persistence.conf.9.4.2. Create unencrypted storage on a USB drive
Here it is assumed that you have prepared a USB flash drive with a Live system, following the instructions that can be found in Section 2.1.4., “ Copying an Image to a DVD-ROM or USB Flash Drive ”, and that the media size is sufficient to store the image ( about 3 GB) and for storing directory data that will end up in persistent storage. In addition, we assume that Linux sees the USB flash drive-like
/dev/sdb, and that it contains only two sections that are part of the standard ISO-image ( /dev/sdb1and /dev/sdb2). When doing what is discussed below, be very careful. The fact is that if you accidentally re-partition the wrong disk, this may result in the loss of important data.In order to add a new partition to the disk, you need to know the size of the image that is already on the flash drive. This will give you the opportunity to make the new section begin immediately after the Live image. Then you need to use the command
partedto create the partition. The commands below analyze the ISO image kali-linux-2016.1-amd64.isothat is expected to be present on the USB stick:# parted /dev/sdb print
Model: SanDisk Cruzer Edge (scsi)
Disk /dev/sdb: 32,0GB
Sector size (logical/physical): 512B/512B
Partition Table: msdos
Disk Flags:
Number Start End Size Type Filesystem Flags
1 32,8kB 2852MB 2852MB primary boot, hidden
2 2852MB 2945MB 93,4MB primary
# start=$(du --block-size=1MB kali-linux-2016.1-amd64.iso | awk '{print $1}')# echo "Size of image is $start MB"Sizeof image is2946 MB
# parted -a optimal /dev/sdb mkpart primary "${start}MB" 100%
Information: You may need toupdate /etc/fstab.
# parted /dev/sdb printModel: SanDisk Cruzer Edge (scsi)
Disk /dev/sdb: 32,0GB
Sector size (logical/physical): 512B/512B
PartitionTable: msdos
Disk Flags:
Number Start End Size Type Filesystem Flags
1 32,8kB 2852MB 2852MB primary boot, hidden
2 2852MB 2945MB 93,4MB primary
3 2946MB 32,0GB 29,1GB primaryWhen a new partition is
/dev/sdb3created, format it in the file system ext4and assign a label persistenceto it using the command mkfs.ext4(and its options -Lfor label assignment). Then the section is mounted in the directory /mntand the file is added there persistence.conf. As with formatting any drive, use caution. If you format the wrong partition or the wrong drive, you may lose something important.# mkfs.ext4 -L persistence /dev/sdb3
mke2fs 1.43-WIP (15-Mar-2016)
Creating filesystem with70968324k blocks and1777664 inodes
Filesystem UUID: dede20c4-5239-479a-b115-96561ac857b6
Superblock backups storedon blocks:
32768, 98304, 163840, 229376, 294912, 819200, 884736, 1605632, 2654208,
4096000
Allocating grouptables: done
Writing inode tables: done
Creating journal (32768 blocks): done
Writing superblocks and filesystem accounting information: done
# mount /dev/sdb3 /mnt# echo "/ union" >/mnt/persistence.conf# ls -l /mnt
total 20
drwx------ 2 root root 16384 May 10 13:31 lost+found
-rw-r--r-- 1 root root 8 May 10 13:34 persistence.conf# umount /mntNow the USB flash drive is ready to boot from it using the menu item
Live USB Persistence.9.4.3. Creating Encrypted Storage on a USB Flash Drive
If necessary, a permanent data storage can be organized on an encrypted partition,
live-bootit supports. This approach allows you to protect data by creating an encrypted LUKS partition, on which they are stored. Creating an encrypted storage starts with the same actions that we performed before. However, now, instead of formatting the partition in the file system
ext4, use cryptsetupto initialize the partition as a LUKS container. Then open this container and configure the file system ext4in the same way you did when creating unencrypted storage, but instead of using the partition, /dev/sdb3use the virtual partition created cryptsetup. This virtual partition is the decrypted content of the encrypted partition, which is available in /dev/mapperunder the name you assigned to him. In the example below, we will use the name kali_persistence. Recall that when performing such operations, you should be vigilant and not accidentally format the wrong drive or partition.# cryptsetup --verbose --verify-passphrase luksFormat /dev/sdb3
WARNING!
========
This will overwrite data on /dev/sdb3 irrevocably.
Are you sure? (Type uppercase yes): YES
Enter passphrase:
Verify passphrase:
Command successful.
# cryptsetup luksOpen /dev/sdb3 kali_persistence
Enter passphrase for /dev/sdb3:
# mkfs.ext4 -L persistence /dev/mapper/kali_persistence
mke2fs 1.43-WIP (15-Mar-2016)
Creating filesystem with70963204k blocks and1774192 inodes
Filesystem UUID: 287892c1-00bb-43cb-b513-81cc9e6fa72b
Superblock backups storedon blocks:
32768, 98304, 163840, 229376, 294912, 819200, 884736, 1605632, 2654208,
4096000
Allocating grouptables: done
Writing inode tables: done
Creating journal (32768 blocks): done
Writing superblocks and filesystem accounting information: done
# mount /dev/mapper/kali_persistence /mnt# echo "/ union" >/mnt/persistence.conf# umount /mnt# cryptsetup luksClose /dev/mapper/kali_persistence9.4.4. Using multiple persistent information stores
If you use the Kali Live image in various situations, you can create several file systems with different labels and, on the boot command line, indicate which file system to use in a particular session. This is done using the boot option
persistence-label=label.Suppose you are a professional pentester. When working with a client, you use persistent storage located on an encrypted partition. You do this to protect data in the event that a USB flash drive is stolen or hacked. At the same time, you would like to be able to demonstrate Kali and any advertising materials stored on an unencrypted partition on the same drive. Since you would not like to manually edit the parameters at each boot, you decide to build your own Live-image with individual items in the boot menu.
The first step is to build your own Live-ISO (in accordance with section 9.3., “ Building your own Kali Linux ISO images ”, and, in particular, with section 9.3.4., “ Using hooks to fine-tune image contents"). The most important thing to do at this stage is to modify the file
kali-config/common/hooks/live/persistence-menu.binary, bringing it to something like this (pay attention to the parameters persistence-label):#!/bin/sh
if [ ! -d isolinux ]; then
cd binary
fi
cat >>isolinux/live.cfg <<END
label live-demo
menu label ^Live USB with Demo Data
linux /live/vmlinuz
initrd /live/initrd.img
append boot=live username=root hostname=kali persistence-label=demo persistence
label live-work
menu label ^Live USB with Work Data
linux /live/vmlinuz
initrd /live/initrd.img
append boot=live username=root hostname=kali persistence-label=work persistence-encryption=luks persistence
ENDNext, we collect the ISO-image and copy it to a USB-stick. Then we create and initialize two partitions and file systems that will be used to organize permanent storage of information. The first section, with a label
demo, is created without encryption, the second, with a label work, is encrypted. Here, based on the assumption that the USB disk is visible in the system as /dev/sdb, and the size of our ISO image is 3000 MB, you need to perform the following sequence of actions:# parted /dev/sdb mkpart primary 3000 MB 55%# parted /dev/sdb mkpart primary 55% 100%# mkfs.ext4 -L demo /dev/sdb3
[...]
# mount /dev/sdb3 /mnt# echo "/ union" >/mnt/persistence.conf# umount /mnt# cryptsetup --verbose --verify-passphrase luksFormat /dev/sdb4
[...]
# cryptsetup luksOpen /dev/sdb4 kali_persistence
[...]
# mkfs.ext4 -L work /dev/mapper/kali_persistence
[...]
# mount /dev/mapper/kali_persistence /mnt# echo "/ union" >/mnt/persistence.conf# umount /mnt# cryptsetup luksClose /dev/mapper/kali_persistenceThat's all. Now you can boot from the USB drive and select the necessary items from the new boot menu.
▍Setting a self-destruct password to enhance system security
In Kali there is a modifiedcryptsetupto implement a new feature. Namely, you can set the so-called self-destruction password (nuke password), which, when used, will destroy all the keys used to work with the encrypted partition.
This can be useful when you travel a lot and you need a quick way to make it impossible to access your data. When downloading, simply enter the self-destruct password instead of the real password, and no one (including you) will be able to access the data.
Before using this feature, it will be very useful to backup the encryption keys and save it in a safe place.
If you follow the logic of the example given in this section, then in order to enable the self-destruction password, you can use the following command:$ cryptsetup luksAddNuke /dev/sdb4 Enter any existing passphrase: Enter new passphrase for key slot: Verify passphrase:
For details about this feature, see here .
Summary
Today we talked about how to create your own ISO-images, configure persistent storage on USB drives used to boot the system in Live mode, and protect data stored on removable media using partition encryption and self-destruction password. Next time we will take stock of the ninth chapter of Kali Linux Revealed and share the exercises for you with it.
Dear readers! Have you found yourself in a situation where you would need something like a Kali Linux self-destruction password?
Previous parts:
→ Part 1. Kali Linux: security policy, protecting computers and network services
→ Part 2. Kali Linux: filtering traffic using netfilter
→ Part 3.Kali Linux: monitoring and logging
→ Part 4. Kali Linux: exercises for protecting and monitoring the system
→ Part 5. Kali Linux: assessing the security of systems
→ Part 6. Kali Linux: types of checks of information systems
→ Part 7. Kali Linux: formalizing research and attack types
→ Part 8. Kali Linux: security questions on systems security research
→ Part 9. Kali Linux: package modifications
→ Part 10. Kali Linux: kernel assembly