October 6, 2017 at 15:22
How to run a docker vote on Swarm, Kubernetes and Nomad
TL DR
In this article, we will be deploying a Docker application, voting on Swarm, Kubernetes and Nomad from Hashicorp. I hope you enjoy reading this article as much as I experimented with all of this.
If you work with technology, then be curious is necessary. This is necessary in order to constantly learn and keep abreast of what is happening in the field. Everything changes very quickly.
Container orchestration is such a hot topic for discussion that even if you have a favorite instrument, it’s still interesting to see how others work and learn something new about them.
I used the voting app in previous articles. The application runs on a microservice architecture and consists of 5 services.
As we see in the github repository, there are several compose files in the application: https://github.com/dockersamples/example-voting-app
Docker-stack.yml is a presentation of the application ready for use in production. Here is the file itself:
In general, there are 6 services in this file, and only 5 in the application architecture. An additional service is visualizer, a great tool that provides an interface that shows where the services are deployed.
Docker Swarm is a tool for managing and creating clusters of Docker containers. With Swarm, administrators and developers can create and manage a cluster of nodes as a single virtual system.
The Swarm cluster consists of several nodes, some working as managers, others as executors:
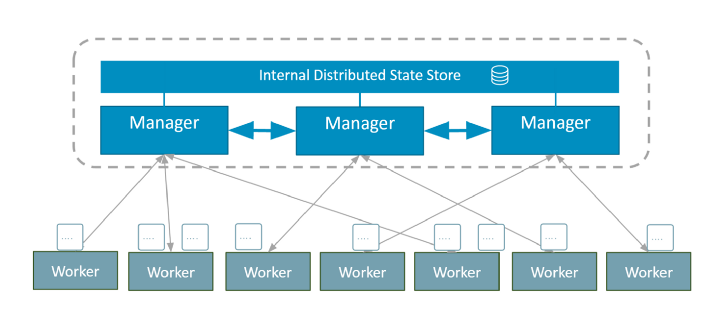
Managers share internal distributed storage to maintain consistent cluster state. This is ensured by the Raft logs.
In Swarm, services define how applications should be deployed and how they should work in containers.
If you don't already have Docker installed, you can download Docker CE (Community Edition) for your OS.
Once Docker is installed, only one team separates us from running Swarm.
That's all it takes for a Swarm cluster. Although this is a single-node cluster, it is still a cluster with all associated processes.
Among the compose files available in the application repository on github, we need docker-stack.yml to deploy the application through Swarm.
Since the stack is running on the docker for the Mac, I have access to the application immediately from the local machine. You can select cats or dogs using the voting interface (port 5000), and see the results on port 5001.
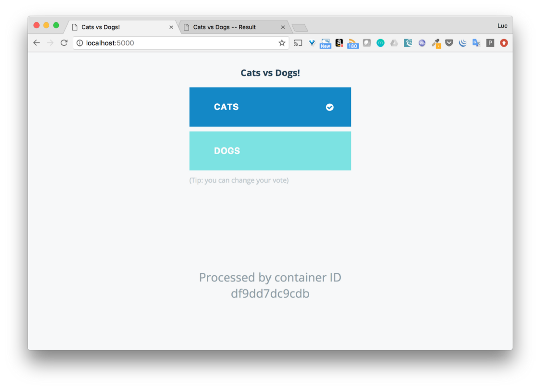
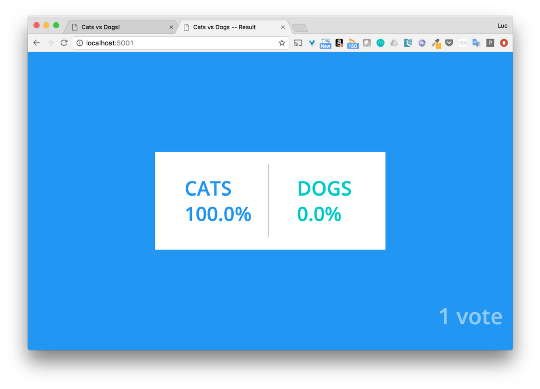
I will not go into details now, I just wanted to show how easy it is to deploy the application using Swarm.
If you need a more detailed discussion of how to deploy the application through Swarm with several nodes, then you can read this article .
Kubernetes is an open source platform for automating the deployment, scaling, and management of containerized applications.
The Kubernetes cluster consists of one or more Masters and nodes.
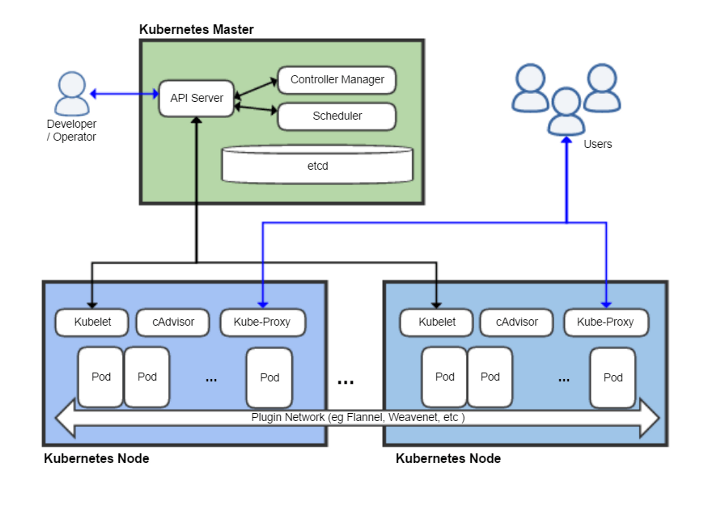
To enter commands, use the kubectl CLI. Below we will consider some examples of its use.
In order to understand how applications are deployed, you need to know about several high-level Kubernetes objects:
In this part, we will use Deployment and Service for each of the application services.
Kubectl is a command line for deploying and managing applications in Kubernetes.
For installation, we use the official documentation (https://kubernetes.io/docs/tasks/tools/install-kubectl/). For example, to install on a Mac, enter the following commands:
Minicube is Kubenetes's comprehensive setting. It creates local VMs and starts a node cluster on which all Kubernetes processes are running. Undoubtedly, this is not the tool that should be used to install the production cluster, but it is really convenient to use for development and testing.
Once Minicube is installed, you only need one command to install a cluster with one node.
In Kubernetes, containers are launched through the ReplicaSet , which is controlled by Deployment .
The following is an example .yml file that describes Deployment . ReplicaSet provides the launch of 2 Nginx replicas .
To create a deployment, you must use the kubectl CLI.
To create an application consisting of microservices, you need to create a deployment file for each service. You can do this manually, or you can use Kompose .
Kompose is a tool that converts Docker compose files to descriptor files used by Kubernetes. It’s more convenient with this service, and it speeds up the migration process.
Note:
Kompose is optional, everything can be written manually, but it significantly speeds up the deployment process.
Before starting docker-stack.yml in Kompose, we will modify it a bit and delete the deploy key of each service. This key is not perceived, and because of it errors may occur when generating descriptor files. You can also delete information about networks. In Kompose, we will give away a new file, which we will call docker-stack-k8s.yml .
From the docker-stack-k8s.yml file, we generate descriptors for the application using the following command: We see that a deployment file and a service file are created for each service. We received only one warning. It is connected with the visualizer , because the Docker socket cannot be connected. We will not try to launch this service, but focus on the rest.
Through kubectl create all of the components specified in the descriptor file. We indicate that the files are located in the current folder. Note: since we left the modified compose file in the current folder, we got an error because you can’t parse it. But this mistake can be ignored without any risk. Using these commands, you can see the created Services and Deployments .
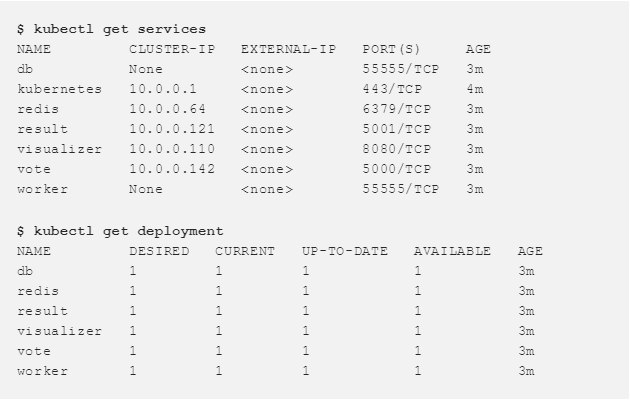
To get access to the vote and result interface, you need to slightly modify the services created for them.
Here is the generated descriptor for vote :
We will change the type of service and replace ClusterIP with NodePort . ClusterIP makes the service available internally, and NodePort allows the port to be published on each node of the cluster and makes it available to the whole world. We will do the same for result , because we want to vote and to result there was access from the outside.
Once changes are made to both services ( vote and result ), you can recreate them.
Now we get the details of the vote and result services and get the ports that they provide.

vote is available on port 30069, and result is 31873. Now we vote and see the results.
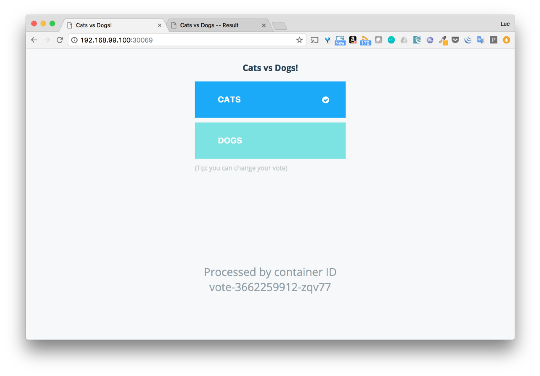
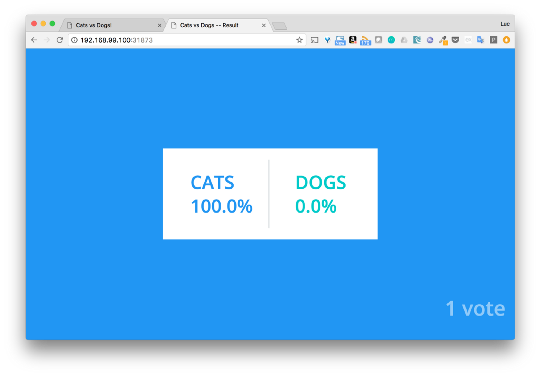
After we figured out the basic components of Kubernetes, we were able to easily deploy the application. And Kompose helped us a lot.
Nomad is a tool for managing a cluster of machines and running an application on them. It abstracts the machines and the application host and allows users to say what they want to run. And Nomad is responsible for where it will be launched and how.
The Nomad cluster consists of agents that can work in server (server) or client (client) mode .
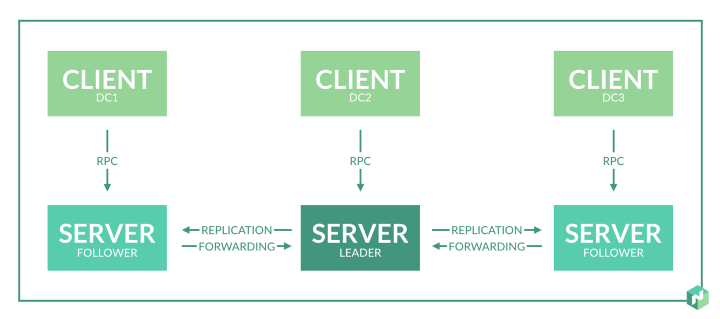
Several types of tasks can be run on a Nomad cluster.
In order to deploy the application, you need to understand the basic concepts of Nomad:
In this example, we will run the application on the Docker host created on using the Docker Machine. Local IP - 192.168.1.100. First, run Consul, which is used to discover and register services. We will launch Nomad and deploy the application as Job in Nomad.
To detect and register services, a tool, for example, Consul, which will not work as Job in Nomad, is recommended. Consul can be downloaded from the link .
This command starts the Consul server locally:
Let's take a closer look at the options used:
Nomad can be downloaded from this link .
We downloaded Nomad and now we can start the Agent with the following settings.
The agent will work both as a server and as a client. We point out that bind_addr must work with any interface so that tasks can be accepted from the outside world. Launch the Nomad Agent with the following settings: Note: by default, Nomad connects to the local Consul instance. We just installed a single node cluster. Here is information on a unique member:
To deploy the application using Swarm, you can use the compose file right away. To deploy via Kubernetes, descriptors from the same compose files are needed. How does all this happen through Nomad?
Firstly, there is no tool like Kompose for Hashicorp, so that it can simplify the migration of compose to Nomad (not a bad idea for an OpenSource project, by the way). Files describing Jobs , groups , tasks must be written manually.
We will analyze this in more detail when we describe Jobs for the Redis and Vote services . For other services, it will look something like this.
This file defines the part of Redis in the application:
Let's see what is written here:
In order to check whether Job will run correctly, use the plan command :
Everything seems to work. Now expand the task with this job:
We see that the placement is created. Check his status:
The container is started correctly. Let's check the Consul DNS server and make sure that the service is also correctly registered:
Task was hosted by IP 172.17.0.2, and its port is 6379, as we indicated.
Define Job for the vote service . We use the following file:
But there are a few differences from the file we used for Redis:
In this case, to get the IP container with redis, the container with vote must use the Consul DNS server. A DNS query from the container is performed through the Docker bridge (172.17.0.1). dns_search_domains determines that Service X is registered as X.service.dc1.consul inside Consul
We can do the same setup for other services: worker, postgres and result.
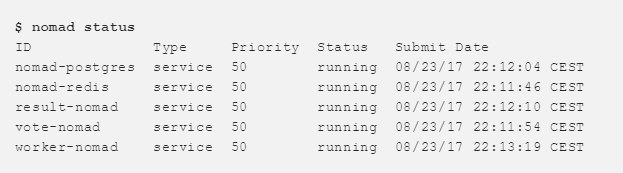
When all the Jobs are running, you can check their status and make sure that everything works.
We can also watch this through the Consul interface.
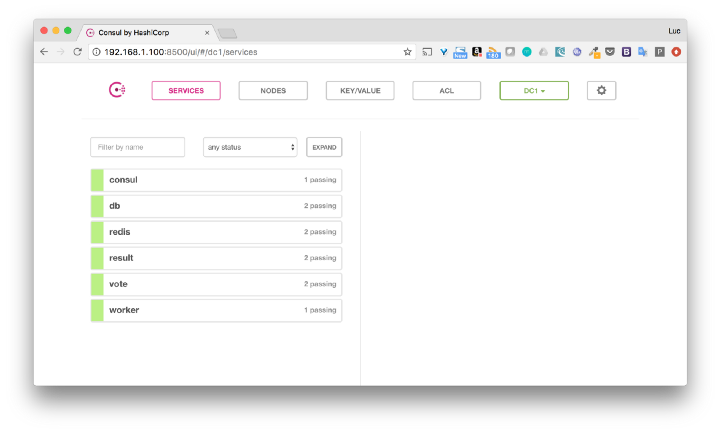
By IP nodes (in our case 192.168.1.100) we get access to the interfaces with vote and result .
Here is such a great voting app in terms of demonstration. I was interested to know if it can be deployed without changes in the code using some kind of orchestrator. And yes, you can, even without any special dances with a tambourine.
I hope this article helps you understand the basics of Swarm, Kubernetes, and Nomad. It would also be interesting to know what you run in Docker and how you use the orchestra.
In this article, we will be deploying a Docker application, voting on Swarm, Kubernetes and Nomad from Hashicorp. I hope you enjoy reading this article as much as I experimented with all of this.
If you work with technology, then be curious is necessary. This is necessary in order to constantly learn and keep abreast of what is happening in the field. Everything changes very quickly.
Container orchestration is such a hot topic for discussion that even if you have a favorite instrument, it’s still interesting to see how others work and learn something new about them.
Voting app
I used the voting app in previous articles. The application runs on a microservice architecture and consists of 5 services.
- Vote: frontend that allows the user to choose between dog and cat
- Redis: voice database
- Worker: a service that collects votes from Radish and stores the results in a Postgres database
- Db: Postgres database that stores voting results
- Result: frontend shows voting results
As we see in the github repository, there are several compose files in the application: https://github.com/dockersamples/example-voting-app
Docker-stack.yml is a presentation of the application ready for use in production. Here is the file itself:
version: "3"
services:
  redis:
    image: redis:alpine
    ports:
      - "6379"
    networks:
      - frontend
    deploy:
      replicas: 1
      update_config:
        parallelism: 2
        delay: 10s
      restart_policy:
        condition: on-failure
  db:
    image: postgres:9.4
    volumes:
      - db-data:/var/lib/postgresql/data
    networks:
      - backend
    deploy:
      placement:
        constraints: [node.role == manager]
  vote:
    image: dockersamples/examplevotingapp_vote:before
    ports:
      - 5000:80
    networks:
      - frontend
    depends_on:
      - redis
    deploy:
      replicas: 2
      update_config:
        parallelism: 2
      restart_policy:
        condition: on-failure
  result:
    image: dockersamples/examplevotingapp_result:before
    ports:
      - 5001:80
    networks:
      - backend
    depends_on:
      - db
    deploy:
      replicas: 1
      update_config:
        parallelism: 2
        delay: 10s
      restart_policy:
        condition: on-failure
  worker:
    image: dockersamples/examplevotingapp_worker
    networks:
      - frontend
      - backend
    deploy:
      mode: replicated
      replicas: 1
      labels: [APP=VOTING]
      restart_policy:
        condition: on-failure
        delay: 10s
        max_attempts: 3
        window: 120s
      placement:
        constraints: [node.role == manager]
  visualizer:
    image: dockersamples/visualizer:stable
    ports:
      - "8080:8080"
    stop_grace_period: 1m30s
    volumes:
      - "/var/run/docker.sock:/var/run/docker.sock"
    deploy:
      placement:
        constraints: [node.role == manager]
networks:
  frontend:
  backend:
volumes:
  db-data:
In general, there are 6 services in this file, and only 5 in the application architecture. An additional service is visualizer, a great tool that provides an interface that shows where the services are deployed.
Docker swarm
Docker Swarm is a tool for managing and creating clusters of Docker containers. With Swarm, administrators and developers can create and manage a cluster of nodes as a single virtual system.
Swarm Components
The Swarm cluster consists of several nodes, some working as managers, others as executors:
- Manager nodes are responsible for the internal state of the cluster
- Executing nodes perform tasks (= launch containers)
Managers share internal distributed storage to maintain consistent cluster state. This is ensured by the Raft logs.
In Swarm, services define how applications should be deployed and how they should work in containers.
Install Docker
If you don't already have Docker installed, you can download Docker CE (Community Edition) for your OS.
Creating Swarm
Once Docker is installed, only one team separates us from running Swarm.
$ docker swarm initThat's all it takes for a Swarm cluster. Although this is a single-node cluster, it is still a cluster with all associated processes.
Application Deployment
Among the compose files available in the application repository on github, we need docker-stack.yml to deploy the application through Swarm.
$ docker stack deploy -c docker-stack.yml app
Creating network app_backend
Creating network app_default
Creating network app_frontend
Creating service app_visualizer
Creating service app_redis
Creating service app_db
Creating service app_vote
Creating service app_result
Creating service app_worker
Since the stack is running on the docker for the Mac, I have access to the application immediately from the local machine. You can select cats or dogs using the voting interface (port 5000), and see the results on port 5001.
I will not go into details now, I just wanted to show how easy it is to deploy the application using Swarm.
If you need a more detailed discussion of how to deploy the application through Swarm with several nodes, then you can read this article .
Kubernetes
Kubernetes is an open source platform for automating the deployment, scaling, and management of containerized applications.
Kubernetes Concept
The Kubernetes cluster consists of one or more Masters and nodes.
- The wizard is responsible for managing the cluster (managing the state of the cluster, scheduling tasks, responding to events in the cluster, etc.)
- Nodes (previously called minions. Yes, as in the cartoon "Despicable Me") provide a runtime for launching the application container (via Pods)
To enter commands, use the kubectl CLI. Below we will consider some examples of its use.
In order to understand how applications are deployed, you need to know about several high-level Kubernetes objects:
- Pod is the smallest unit that can be deployed on a node. This is a group of containers that should work together. But quite often Pod contains just one container.
- ReplicaSet provides a specific number of pod replicas.
- Deployment manages ReplicaSet and allows rolling updates, blue / green deployments, testing, etc.
- Service defines a logical set of hearths and a policy for accessing them
In this part, we will use Deployment and Service for each of the application services.
Install kubectl
Kubectl is a command line for deploying and managing applications in Kubernetes.
For installation, we use the official documentation (https://kubernetes.io/docs/tasks/tools/install-kubectl/). For example, to install on a Mac, enter the following commands:
$ curl -LO https://storage.googleapis.com/kubernetes-release/release/$(curl -s https://storage.googleapis.com/kubernetes-release/release/stable.txt)/bin/darwin/amd64/kubectl

$ chmod +x ./kubectl

$ sudo mv ./kubectl /usr/local/bin/kubectl
Minicube Installation
Minicube is Kubenetes's comprehensive setting. It creates local VMs and starts a node cluster on which all Kubernetes processes are running. Undoubtedly, this is not the tool that should be used to install the production cluster, but it is really convenient to use for development and testing.
Once Minicube is installed, you only need one command to install a cluster with one node.
$ minikube start

Starting local Kubernetes v1.7.0 cluster…

Starting VM…

Downloading Minikube ISO

 97.80 MB / 97.80 MB [==============================================] 100.00% 0s

Getting VM IP address…

Moving files into cluster…

Setting up certs…

Starting cluster components…

Connecting to cluster…

Setting up kubeconfig…

Kubectl is now configured to use the cluster.
Descriptor Kubernetes
In Kubernetes, containers are launched through the ReplicaSet , which is controlled by Deployment .
The following is an example .yml file that describes Deployment . ReplicaSet provides the launch of 2 Nginx replicas .
// nginx-deployment.yml
apiVersion: apps/v1beta1
kind: Deployment
metadata:
  name: nginx-deployment
spec:
  replicas: 2 # tells deployment to run 2 pods matching the template
  template: # create pods using pod definition in this template
    metadata:
      labels:
        app: nginx
    spec:
      containers:
      - name: nginx
        image: nginx:1.7.9
        ports:
        - containerPort: 80
To create a deployment, you must use the kubectl CLI.
To create an application consisting of microservices, you need to create a deployment file for each service. You can do this manually, or you can use Kompose .
Using Kompose to create deployments and services
Kompose is a tool that converts Docker compose files to descriptor files used by Kubernetes. It’s more convenient with this service, and it speeds up the migration process.
Note:
Kompose is optional, everything can be written manually, but it significantly speeds up the deployment process.
- Kompose does not consider all options used in the Docker Compose file
- Kompose can be installed on Linux or Mac with the following commands:
# Linux

$ curl -L https://github.com/kubernetes/kompose/releases/download/v1.0.0/kompose-linux-amd64 -o kompose

# macOS

$ curl -L https://github.com/kubernetes/kompose/releases/download/v1.0.0/kompose-darwin-amd64 -o kompose


$ chmod +x kompose

$ sudo mv ./kompose /usr/local/bin/kompose
Before starting docker-stack.yml in Kompose, we will modify it a bit and delete the deploy key of each service. This key is not perceived, and because of it errors may occur when generating descriptor files. You can also delete information about networks. In Kompose, we will give away a new file, which we will call docker-stack-k8s.yml .
version: "3"
services:
  redis:
    image: redis:alpine
    ports:
      - "6379"
  db:
    image: postgres:9.4
    volumes:
      - db-data:/var/lib/postgresql/data
  vote:
    image: dockersamples/examplevotingapp_vote:before
    ports:
      - 5000:80
    depends_on:
      - redis
  result:
    image: dockersamples/examplevotingapp_result:before
    ports:
      - 5001:80
    depends_on:
      - db
  worker:
    image: dockersamples/examplevotingapp_worker
  visualizer:
    image: dockersamples/visualizer:stable
    ports:
      - "8080:8080"
    stop_grace_period: 1m30s
    volumes:
      - "/var/run/docker.sock:/var/run/docker.sock"
volumes:
  db-data:
From the docker-stack-k8s.yml file, we generate descriptors for the application using the following command: We see that a deployment file and a service file are created for each service. We received only one warning. It is connected with the visualizer , because the Docker socket cannot be connected. We will not try to launch this service, but focus on the rest.
$ kompose convert --file docker-stack-k8s.yml

WARN Volume mount on the host "/var/run/docker.sock" isn't supported - ignoring path on the host

INFO Kubernetes file "db-service.yaml" created

INFO Kubernetes file "redis-service.yaml" created

INFO Kubernetes file "result-service.yaml" created

INFO Kubernetes file "visualizer-service.yaml" created

INFO Kubernetes file "vote-service.yaml" created

INFO Kubernetes file "worker-service.yaml" created

INFO Kubernetes file "db-deployment.yaml" created

INFO Kubernetes file "db-data-persistentvolumeclaim.yaml" created

INFO Kubernetes file "redis-deployment.yaml" created

INFO Kubernetes file "result-deployment.yaml" created

INFO Kubernetes file "visualizer-deployment.yaml" created

INFO Kubernetes file "visualizer-claim0-persistentvolumeclaim.yaml" created

INFO Kubernetes file "vote-deployment.yaml" created

INFO Kubernetes file "worker-deployment.yaml" created
Application Deployment
Through kubectl create all of the components specified in the descriptor file. We indicate that the files are located in the current folder. Note: since we left the modified compose file in the current folder, we got an error because you can’t parse it. But this mistake can be ignored without any risk. Using these commands, you can see the created Services and Deployments .
$ kubectl create -f .

persistentvolumeclaim "db-data" created

deployment "db" created

service "db" created

deployment "redis" created

service "redis" created

deployment "result" created

service "result" created

persistentvolumeclaim "visualizer-claim0" created

deployment "visualizer" created

service "visualizer" created

deployment "vote" created

service "vote" created

deployment "worker" created

service "worker" created

unable to decode "docker-stack-k8s.yml":...
We give access to the application from the outside world
To get access to the vote and result interface, you need to slightly modify the services created for them.
Here is the generated descriptor for vote :
apiVersion: v1
kind: Service
metadata:
  creationTimestamp: null
  labels:
    io.kompose.service: vote
  name: vote
spec:
  ports:
  - name: "5000"
    port: 5000
    targetPort: 80
  selector:
    io.kompose.service: vote
status:
  loadBalancer: {}
We will change the type of service and replace ClusterIP with NodePort . ClusterIP makes the service available internally, and NodePort allows the port to be published on each node of the cluster and makes it available to the whole world. We will do the same for result , because we want to vote and to result there was access from the outside.
apiVersion: v1
kind: Service
metadata:
  labels:
    io.kompose.service: vote
  name: vote
spec:
  type: NodePort
  ports:
  - name: "5000"
    port: 5000
    targetPort: 80
  selector:
    io.kompose.service: vote
Once changes are made to both services ( vote and result ), you can recreate them.
$ kubectl delete svc vote

$ kubectl delete svc result

$ kubectl create -f vote-service.yaml

service "vote" created

$ kubectl create -f result-service.yaml

service "result" created
Access to the application
Now we get the details of the vote and result services and get the ports that they provide.
vote is available on port 30069, and result is 31873. Now we vote and see the results.
After we figured out the basic components of Kubernetes, we were able to easily deploy the application. And Kompose helped us a lot.
Hashicorp's nomad
Nomad is a tool for managing a cluster of machines and running an application on them. It abstracts the machines and the application host and allows users to say what they want to run. And Nomad is responsible for where it will be launched and how.
Nomad Concept
The Nomad cluster consists of agents that can work in server (server) or client (client) mode .
- The server is responsible for the consensus protocol , which allows the server to select a leader and replicate state.
- Clients are very light, because they interact with the server, while they themselves do almost nothing. Client nodes execute tasks.
Several types of tasks can be run on a Nomad cluster.
In order to deploy the application, you need to understand the basic concepts of Nomad:
- Job - determines what tasks Nomad should perform. This is described in the job file (hcl text file, Hashicorp Configuration Language). Job may contain one or more task groups.
- Group contains several tasks that are located on the same machine.
- Task - a running process, in our case it is a Docker container
- Mapping tasks in job is done using Allocations. Allocation is used to ensure that tasks in the job run on a particular node.
Installation
In this example, we will run the application on the Docker host created on using the Docker Machine. Local IP - 192.168.1.100. First, run Consul, which is used to discover and register services. We will launch Nomad and deploy the application as Job in Nomad.
Consul for registering and discovering services
To detect and register services, a tool, for example, Consul, which will not work as Job in Nomad, is recommended. Consul can be downloaded from the link .
This command starts the Consul server locally:
$ consul agent -dev -client=0.0.0.0 -dns-port=53 -recursor=8.8.8.8Let's take a closer look at the options used:
- - dev is the flag that sets the Consul cluster with the server and client. This option should only be used for development and testing.
- -client = 0.0.0.0 allows reaching Consul services (API and DNS server) through any host interface. This is necessary because Nomad will connect to Consul through the localhost interface, and containers through docker-bridge (something like 172.17.x.x).
- -dns-port = 53 defines the port that the Consul DNS server will use (default is 8600). We will install the standard 53 port so that DNS can be used from the container.
- -recursor = 8.8.8.8 defines another DNS server that will handle requests that Consul cannot handle
Nomad can be downloaded from this link .
Create a cluster with a node
We downloaded Nomad and now we can start the Agent with the following settings.
// nomad.hcl
bind_addr = "0.0.0.0"
data_dir  = "/var/lib/nomad"
server {
  enabled          = true
  bootstrap_expect = 1
}
client {
  enabled       = true
  network_speed = 100
}
The agent will work both as a server and as a client. We point out that bind_addr must work with any interface so that tasks can be accepted from the outside world. Launch the Nomad Agent with the following settings: Note: by default, Nomad connects to the local Consul instance. We just installed a single node cluster. Here is information on a unique member:
$ nomad agent -config=nomad.hcl

==> WARNING: Bootstrap mode enabled! Potentially unsafe operation.

 Loaded configuration from nomad-v2.hcl

==> Starting Nomad agent...

==> Nomad agent configuration:

Client: true

 Log Level: INFO

 Region: global (DC: dc1)

 Server: true

 Version: 0.6.0

==> Nomad agent started! Log data will stream in below:
$ nomad server-members
Name Address Port Status Leader Protocol Build Datacenter Region
neptune.local.global 192.168.1.100 4648 alive true 2 0.6.0 dc1 globalApplication Deployment
To deploy the application using Swarm, you can use the compose file right away. To deploy via Kubernetes, descriptors from the same compose files are needed. How does all this happen through Nomad?
Firstly, there is no tool like Kompose for Hashicorp, so that it can simplify the migration of compose to Nomad (not a bad idea for an OpenSource project, by the way). Files describing Jobs , groups , tasks must be written manually.
We will analyze this in more detail when we describe Jobs for the Redis and Vote services . For other services, it will look something like this.
Defining Job for Redis
This file defines the part of Redis in the application:
// redis.nomad
job "redis-nomad" {
  datacenters = ["dc1"]
  type = "service"
  group "redis-group" {
    task "redis" {
      driver = "docker"
      config {
        image = "redis:3.2"
        port_map {
          db = 6379
        }
      }
      resources {
        cpu    = 500 # 500 MHz
        memory = 256 # 256MB
        network {
          mbits = 10
          port "db" {}
        }
      }
      service {
        name = "redis"
        address_mode = "driver"
        port = "db"
        check {
          name     = "alive"
          type     = "tcp"
          interval = "10s"
          timeout  = "2s"
        }
      }
    }
  }
}
Let's see what is written here:
- Job Name - redis-nomad
- Job type - service (i.e. long operation)
- The group is given an arbitrary name; contains one operation
- Task Redis uses docker-driver, i.e. it will be running in the container
- Task will use the Redis image: 3.2
- In the resource block, the restrictions for CPU and memory are indicated.
- The network block indicates that the db port must be dynamic
- The service block defines how the Consul will register: the name of the service, IP address and health check definition
In order to check whether Job will run correctly, use the plan command :
$ nomad plan redis.nomad
+ Job: "nomad-redis"
+ Task Group: "cache" (1 create)
  + Task: "redis" (forces create)
Scheduler dry-run:
- All tasks successfully allocated.
Job Modify Index: 0
To submit the job with version verification run:
nomad run -check-index 0 redis.nomad
When running the job with the check-index flag, the job will only be run if the server side version matches the job modify index returned. If the index has changed, another user has modified the job and the plan's results are potentially invalid.
Everything seems to work. Now expand the task with this job:
$ nomad run redis.nomad
==> Monitoring evaluation "1e729627"
    Evaluation triggered by job "nomad-redis"
    Allocation "bf3fc4b2" created: node "b0d927cd", group "cache"
    Evaluation status changed: "pending" -> "complete"
==> Evaluation "1e729627" finished with status "complete"
We see that the placement is created. Check his status:
$ nomad alloc-status bf3fc4b2
ID                  = bf3fc4b2
Eval ID             = 1e729627
Name                = nomad-redis.cache[0]
Node ID             = b0d927cd
Job ID              = nomad-redis
Job Version         = 0
Client Status       = running
Client Description  =
Desired Status      = run
Desired Description =
Created At          = 08/23/17 21:52:03 CEST
Task "redis" is "running"
Task Resources
CPU        Memory           Disk     IOPS  Addresses
1/500 MHz  6.3 MiB/256 MiB  300 MiB  0     db: 192.168.1.100:21886
Task Events:
Started At     = 08/23/17 19:52:03 UTC
Finished At    = N/A
Total Restarts = 0
Last Restart   = N/A
Recent Events:
Time                    Type        Description
08/23/17 21:52:03 CEST  Started     Task started by client
08/23/17 21:52:03 CEST  Task Setup  Building Task Directory
08/23/17 21:52:03 CEST  Received    Task received by client
The container is started correctly. Let's check the Consul DNS server and make sure that the service is also correctly registered:
$ dig @localhost SRV redis.service.consul
; <<>> DiG 9.10.3-P4-Ubuntu <<>> @localhost SRV redis.service.consul
; (1 server found)
;; global options: +cmd
;; Got answer:
;; ->>HEADER<<- opcode: QUERY, status: NOERROR, id: 35884
;; flags: qr aa rd ra; QUERY: 1, ANSWER: 1, AUTHORITY: 0, ADDITIONAL: 2
;; OPT PSEUDOSECTION:
; EDNS: version: 0, flags:; udp: 4096
;; QUESTION SECTION:
;redis.service.consul.  IN SRV
;; ANSWER SECTION:
redis.service.consul. 0 IN SRV 1 1 6379 ac110002.addr.dc1.consul.
;; ADDITIONAL SECTION:
ac110002.addr.dc1.consul. 0 IN A 172.17.0.2
;; Query time: 0 msec
;; SERVER: 127.0.0.1#53(127.0.0.1)
;; WHEN: Wed Aug 23 23:08:36 CEST 2017
;; MSG SIZE  rcvd: 103
Task was hosted by IP 172.17.0.2, and its port is 6379, as we indicated.
Defining Job for Vote
Define Job for the vote service . We use the following file:
// job.nomad
job "vote-nomad" {
  datacenters = ["dc1"]
  type = "service"
  group "vote-group" {
    task "vote" {
      driver = "docker"
      config {
        image = "dockersamples/examplevotingapp_vote:before"
        dns_search_domains = ["service.dc1.consul"]
        dns_servers = ["172.17.0.1", "8.8.8.8"]
        port_map {
          http = 80
        }
      }
      service {
        name = "vote"
        port = "http"
        check {
          name = "vote interface running on 80"
          interval = "10s"
          timeout  = "5s"
          type     = "http"
          protocol = "http"
          path     = "/"
        }
      }
      resources {
        cpu    = 500 # 500 MHz
        memory = 256 # 256MB
        network {
          port "http" {
             static = 5000
          }
        }
      }
    }
  }
}
But there are a few differences from the file we used for Redis:
- Vote connects to redis using only the operation name. Here is an example of a portion of the app.py file used in the vote service :
// app.py
def get_redis():
    if not hasattr(g, 'redis'):
       g.redis = Redis(host="redis", db=0, socket_timeout=5)
    return g.redis
In this case, to get the IP container with redis, the container with vote must use the Consul DNS server. A DNS query from the container is performed through the Docker bridge (172.17.0.1). dns_search_domains determines that Service X is registered as X.service.dc1.consul inside Consul
- We set a static port so that the vote service on port 5000 is accessible from outside the cluster.
We can do the same setup for other services: worker, postgres and result.
Access to the application
When all the Jobs are running, you can check their status and make sure that everything works.
We can also watch this through the Consul interface.
By IP nodes (in our case 192.168.1.100) we get access to the interfaces with vote and result .
Total
Here is such a great voting app in terms of demonstration. I was interested to know if it can be deployed without changes in the code using some kind of orchestrator. And yes, you can, even without any special dances with a tambourine.
I hope this article helps you understand the basics of Swarm, Kubernetes, and Nomad. It would also be interesting to know what you run in Docker and how you use the orchestra.