Work with Talend Open Studio on the example of parsing a CSV file
Collecting data from various sources, converting to unify or convenience is a fairly common task. Of course, in most cases you can get by with your own solution, but to make it flexible and easily extensible, you will have to spend a lot of time. In this case, it will be wise to use a ready-made solution. Talend Open Studio (TOS) is one such solution.
I was somewhat surprised by the lack of articles about working with TOS on Habré. Perhaps there are reasons for this that I do not understand. Be that as it may, I will try to fill this gap.
Probably, when writing this article, I was too detailed in some questions, so I hid some of the instructions under the spoiler.
So, TOS is an Open Source data integration solution. The main way to configure the process of converting data to TOS is a special visual editor that allows you to add and configure individual nodes for data conversion and the relationship between them.
An interesting feature and significant advantage of TOS, in my opinion, is the fact that TOS converts our components and communications into Java code. In essence, we get a library in Java with the ability to generate code based on a data transformation graph. Plus, we can compile the package and run it on any machine where there is Java and where TOS may not be available.
Code generation gives us another plus - you can expand the capabilities of TOS by writing your own code (there are even special tools for this).
A separate holistic data transformation in Talend is called a job. A task consists of subtasks, which, in turn, consist of components and relationships. Components directly transform data or do input / output. Communications are of several types. The main means of exchanging data between the components are the connections of the “flow” type (flow). A stream is very similar to a table in a database. A stream has a schema (names, types and attributes of fields) and data (field values). Both the data itself and the flow diagram can be changed during processing. Streams in TOS are not synchronized with each other. They work independently of each other.
Next, I’ll try using an example to show how the data processing process is configured.
Suppose we have a CSV file of the form:
And we want to separate the data by different events (event field).
Before we start working with data, we need to create a task. I do not describe the creation process because of its triviality.
So, the first thing we need to do is read and parse the CSV. First, create a metadata record for our input CSV file - this will simplify further work (Metadata -> File delimited). The creation of File delimited is more or less intuitive, so the detailed description is hidden under the spoiler.
The only thing worth mentioning is the placement of quotation marks when substituting values in the form fields. This applies not only to creating File delimited but also to most other fields in forms. The fact is that most of the values in various fields will be substituted into the Java code “as is”, i.e. must be a Java expression of a certain type. If we specify a string constant, we will have to write it in quotation marks. This gives us extra flexibility. It turns out that wherever a value is required, you can substitute the value of a parameter or expression.
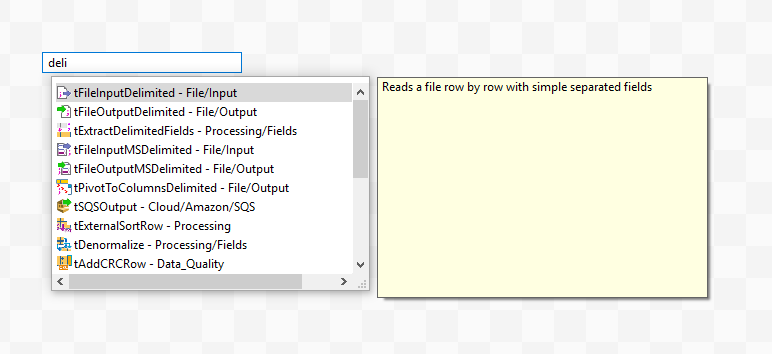
Next, add the component that will be engaged in parsing. The component we need is called tFileInputDelimited.
Next, configure our parser. For the tFileInputDelimited component in the settings, set the “Property type” to “Repository” and select the previously created template.
Now the parser is configured to parse the files of the format we need and if we start the work, we will see the contents of our original CSV file in the logs. The problem is that if the parser is associated with a template, it is hard-tuned to the file in the template. We cannot specify another file of the same format, which may not be very convenient when we do not know in advance what file we are going to process.
There are two ways out of this situation. The first is to always replace the file from the template with the desired file. The second is to untie the parser component and the template. In this case, the parsing settings can be saved, but it becomes possible to set the input file. The disadvantages of the first method are obvious, the disadvantages of the second include the lack of synchronization between the template and the parser. If we change the template, we will need to synchronize the parser settings manually. We will go the second way and untie the parser from the template. To do this, return the “Build-In” value in the “Property type” field. The settings were saved, but there was an opportunity to change them.
Change the name of the input file to the expression context.INPUT_CSV. Please note that the name was in quotation marks (string constant), and our expression without quotes. It is a context parameter. You also need to create this parameter in the context tab. You can set a default value for debugging. Context parameters can be set as command line parameters (something like --context_param INPUT_CSV = path). This applies to running a compiled Java package.
Further. We want to separate the data by event names.
This will require the tMap component and several tFilterRow. Let's restrict ourselves to two tFilterRow i.e. we will highlight only two different events. Connect them as shown in the figure:
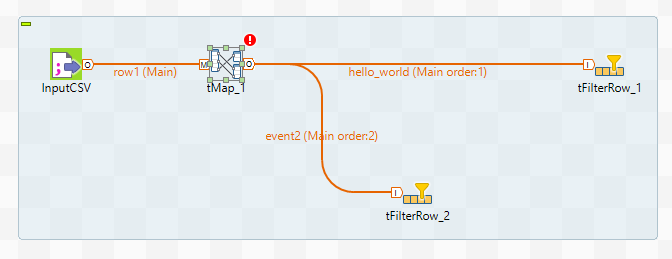
When connecting tMap and tFilterRow, you will need to enter a name for the connection. The name must be unique. Next, you need to configure the tMap component. To do this, enter the Map Editor menu either by double-clicking on the tMap icon, or by calling the editor from the component properties panel.
In our case, we only need to “copy” the stream, so just drag and drop all the input data fields (left) into each of the output streams (right).
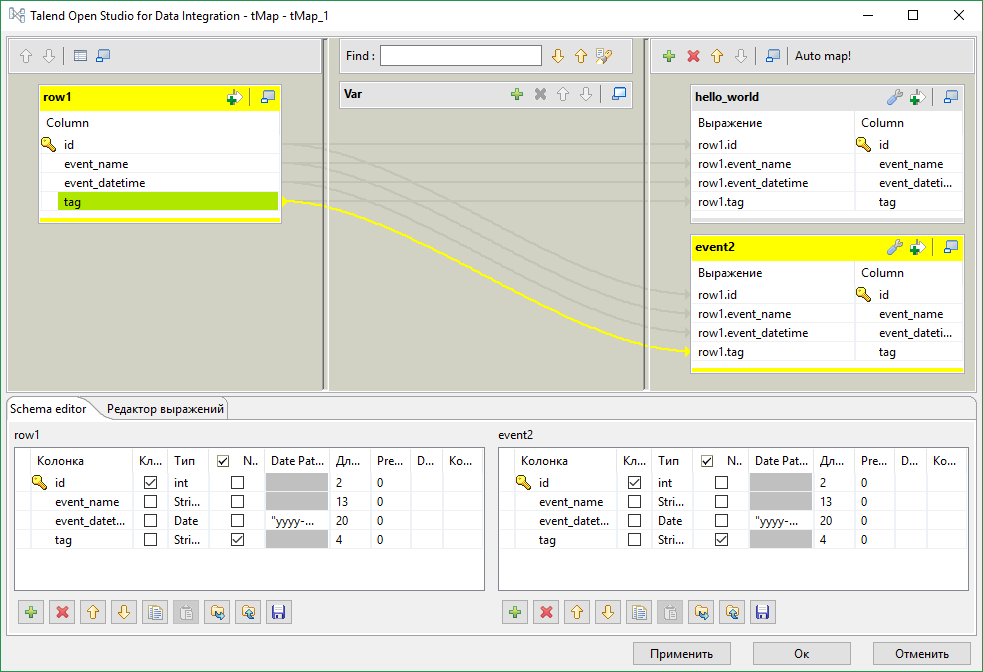
In the section in the middle, you can set an internal variable (can be used to generate new values, for example line numbers, or parameter substitution). In each cell of the editor, you can write an expression. In fact, the fact that we did this is a substitution of values. row1 in the screenshot is the name of the input stream. Now our mapper will divide the input into two streams.
Configuring tFilterRow filters is nothing special.
Add the tLogRow pair after the filters, run it and see that the data is being shared. The only thing is better to set the Mode for tLogRow to something different from the “Basic” one, otherwise the data will be mixed.
Instead of tLogRow, you can add any other data output component, for example tFileOutputDelimited for writing to a CSV file, or a database component for writing to a table.
There are many components to working with the database. Many of them have fields in the settings for setting access to the database. However, if you intend to access the database a lot from different components, it is best to use the following scheme:
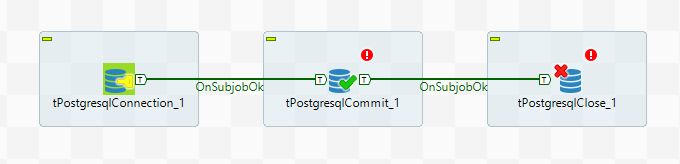
The Connection component sets the database access parameters and establishes a connection. The Close component is disconnected from the database. In the middle block, where the only Commit component is located in the figure, you can use the database without establishing new connections. To do this, in the component settings, select the option “Use an existing connection” and select the required Connection component.
Another TOS mechanism is also used here - subjob. By creating subtasks, some parts of the task can be completed before others begin. In this example, the Commit component does not start until a connection is established. An OnSubjobOk connection is made between subtasks (the Trigger item is available in the component context menu, inside which there is this connection). There are other relationships, such as ObSubjobError for error handling.
Let's go back to our CSV file example.
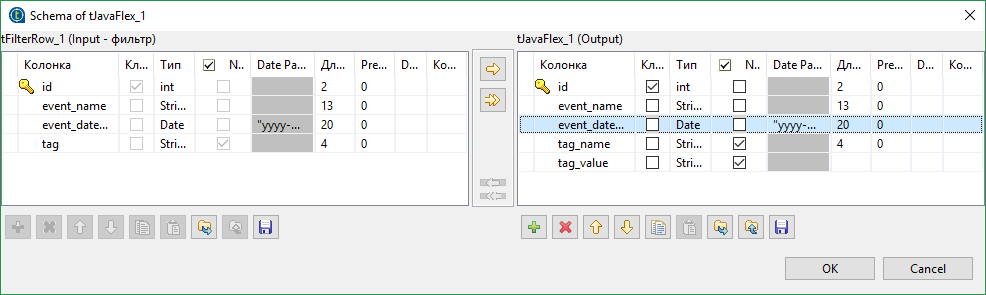
The tag field is not very suitable for writing to the database - tag2 = a. Surely we will want to split the key-value pair into different fields in the database. This can be done in many ways, but we will do it using the tJavaFlex component. tJavaFlex is a component whose behavior can be described in Java. There are three sections in its settings - the first one is performed before the data processing starts (initialization), the second one is engaged in data processing and the third one is executed after all the data has been processed. Also, like the rest of the components, there is a circuit editor. We will remove the tag field from the data scheme and add a couple of new ones - tag_name and tag_value (of type String).
Next, in the middle section of the component, write
The code is trivial, and perhaps the only thing worth explaining is the construction of the form row4.tag_value. tag_value is the name of the field that we created. Other fields can be accessed in the same way. row4 is the name of the outgoing stream (inbound row2). They can be changed.

Thus, the tags will be divided into two fields. However, you need to make sure that the “Auto-distribution of data" checkbox is checked in the tJavaFlex settings, otherwise all other data will disappear. In fact, we just added an additional transformation. Other fields are identical in name and will be copied automatically.
Next, I will talk about two slightly more complex and specific things.
Suppose we still want to put our data into a database. Accordingly, we have an Event label with fields: event name, event identifier, event date and a link to an entry in the tag table. There are two fields in the tag table - key and value. We want to add our key-value pair to the tag table only if it is not there. And we also want to add a link between the tag and event tables.
Those. we want:
In order to add an entry only if it is not in Postgres, you can use a construct of the form
INSERT
WHERE NOT EXISTS
You can do this using the tPostgresqlRow component. This component allows you to execute arbitrary SQL query. But we will have to substitute real data in our request. This can be done, for example, like this
Yes, the parameters are listed the same two times (maybe I know Java too poorly). Note that a semicolon at the end of Java code is not needed.
After that, you need to make a trivial query to get the id of the record in the table.
But in the case of Postgres, you can go the simpler way and use the RETURNING id. However, this mechanism will only return if data is added. But using a subquery can circumvent this limitation. Then our request will be converted to something like this:
A separate consideration deserves the case when we need to create a closed structure. TOS does not allow closed structures to be made, even if they are not cyclic. The fact is that data streams live on their own, are not synchronized, and can carry a different number of records. Surely, you can almost always do without the formation of closed loops. To do this, you will not have to share the threads and do everything in one. But if you really want to, then if you want, you can bypass the restriction on the creation of closed structures. We will need the tHashInput and tHashOutput components.
These components allow you to store streams in memory and then access them. You can, of course, use a temporary file, but the hash is probably faster (if you have enough RAM).
Add the tHashOutput component and the input stream that we want to save. The component can be configured to work independently, or to add data to another tHashOutput component. In this case, the component will work like union from sql, i.e. data will be recorded in one common stream. You will have to create a new subtask in which the merge will be performed. Remember to add the OnSubjobOk link.
For each thread working individually, you need to create the tHashInput component. This component has a drawback - even after specifying the tHashOutput component from which data will be taken, the scheme will not load automatically. Next, all tHashInput must be combined using tMap. Only one stream will be marked as Main, the rest of the incoming streams will be synchronized through it, as well as the outgoing, the rest of the incoming streams will be Lookup. In addition, we need to set the connection between the threads, otherwise we will get Cross Join.
Now, despite the fact that there are many streams on the left side of the mapper, we can assume that we have one input stream and use any fields of any streams for mapping.
That's all, thanks to everyone who read to the end.
I was somewhat surprised by the lack of articles about working with TOS on Habré. Perhaps there are reasons for this that I do not understand. Be that as it may, I will try to fill this gap.
Probably, when writing this article, I was too detailed in some questions, so I hid some of the instructions under the spoiler.
So, TOS is an Open Source data integration solution. The main way to configure the process of converting data to TOS is a special visual editor that allows you to add and configure individual nodes for data conversion and the relationship between them.
An interesting feature and significant advantage of TOS, in my opinion, is the fact that TOS converts our components and communications into Java code. In essence, we get a library in Java with the ability to generate code based on a data transformation graph. Plus, we can compile the package and run it on any machine where there is Java and where TOS may not be available.
Code generation gives us another plus - you can expand the capabilities of TOS by writing your own code (there are even special tools for this).
A separate holistic data transformation in Talend is called a job. A task consists of subtasks, which, in turn, consist of components and relationships. Components directly transform data or do input / output. Communications are of several types. The main means of exchanging data between the components are the connections of the “flow” type (flow). A stream is very similar to a table in a database. A stream has a schema (names, types and attributes of fields) and data (field values). Both the data itself and the flow diagram can be changed during processing. Streams in TOS are not synchronized with each other. They work independently of each other.
Next, I’ll try using an example to show how the data processing process is configured.
Suppose we have a CSV file of the form:
id,event_name,event_datetime,tag

1,"Hello, world!",2017-01-10T18:00:00Z,

2,"Event2",2017-01-10T19:00:00Z,tag1=q

3,Event3,2017-01-10T20:00:00Z,

4,"Hello, world!",2017-01-10T21:00:00Z,tag2=a

5,Event2,2017-01-10T22:00:00Z,

...
And we want to separate the data by different events (event field).
Before we start working with data, we need to create a task. I do not describe the creation process because of its triviality.
So, the first thing we need to do is read and parse the CSV. First, create a metadata record for our input CSV file - this will simplify further work (Metadata -> File delimited). The creation of File delimited is more or less intuitive, so the detailed description is hidden under the spoiler.
The only thing worth mentioning is the placement of quotation marks when substituting values in the form fields. This applies not only to creating File delimited but also to most other fields in forms. The fact is that most of the values in various fields will be substituted into the Java code “as is”, i.e. must be a Java expression of a certain type. If we specify a string constant, we will have to write it in quotation marks. This gives us extra flexibility. It turns out that wherever a value is required, you can substitute the value of a parameter or expression.
Creating File delimited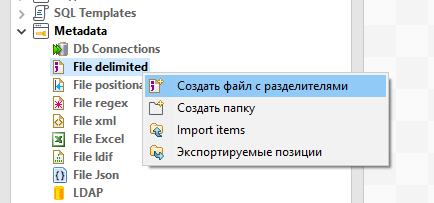
Next, you need to specify a name and select a file. We select our CSV file with input data.
The next step is to configure file parsing.

Interesting fields: Field
separator - we have a comma.
In the “Escape Char Settings” section, we are interested in the “Text Enclosure” field. Set the value to “\” ”- i.e. “Double quote”. Now all text inside double quotes will be interpreted as a single whole, even if there is a separator (comma) inside.
On the right side, you can configure line skipping and restrictions. This does not interest us.
Check the box “Set the title bar as column names” because we have the column names in the first row. These values will become field names.
The “Refresh Preview” button will update the preview area. We make sure that everything is in order and move on.
Next, we are required to configure the circuit for the output stream. A schema is a set of typed fields. Each field can also be assigned some attributes.
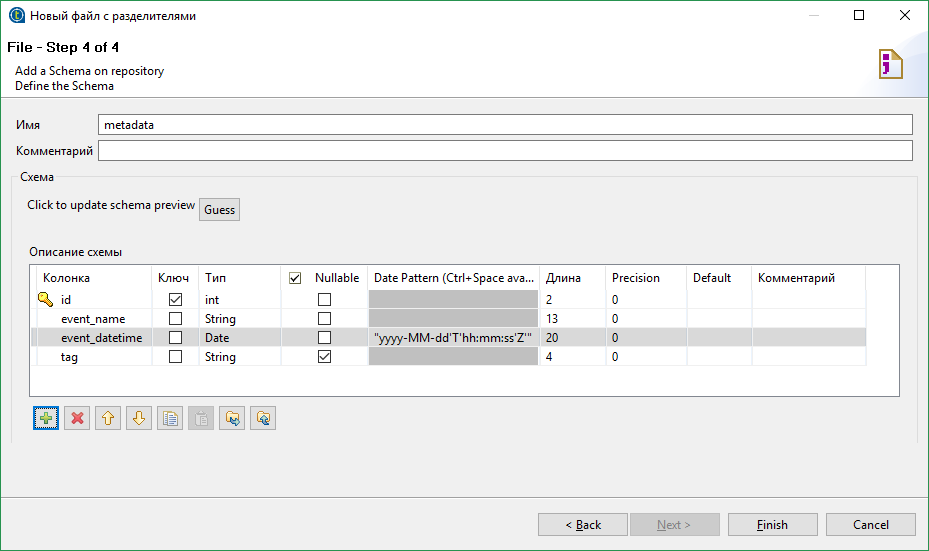
The headers from the CSV file have become field names. The type of each field is determined automatically based on the data in the file. Everything suits us here, except for the date format. The date in our file looks something like this 2017-01-10T22: 00: 00Z and for its parsing you need the template “yyyy-MM-dd'T'HH: mm: ss'Z '”. Pay attention to the quotation marks. The fact is that most of the values in various fields will be substituted into the java code “as is”, i.e. must be a Java expression of a certain type.
Now we have a parser template for CSV files of a given format.
Next, you need to specify a name and select a file. We select our CSV file with input data.
The next step is to configure file parsing.
Interesting fields: Field
separator - we have a comma.
In the “Escape Char Settings” section, we are interested in the “Text Enclosure” field. Set the value to “\” ”- i.e. “Double quote”. Now all text inside double quotes will be interpreted as a single whole, even if there is a separator (comma) inside.
On the right side, you can configure line skipping and restrictions. This does not interest us.
Check the box “Set the title bar as column names” because we have the column names in the first row. These values will become field names.
The “Refresh Preview” button will update the preview area. We make sure that everything is in order and move on.
Next, we are required to configure the circuit for the output stream. A schema is a set of typed fields. Each field can also be assigned some attributes.
The headers from the CSV file have become field names. The type of each field is determined automatically based on the data in the file. Everything suits us here, except for the date format. The date in our file looks something like this 2017-01-10T22: 00: 00Z and for its parsing you need the template “yyyy-MM-dd'T'HH: mm: ss'Z '”. Pay attention to the quotation marks. The fact is that most of the values in various fields will be substituted into the java code “as is”, i.e. must be a Java expression of a certain type.
Now we have a parser template for CSV files of a given format.
Next, add the component that will be engaged in parsing. The component we need is called tFileInputDelimited.
About adding components
Components can be found in the component menu (usually on the right) in the section (tFileInputDelimited in the “File-> Input” section) and drag to the workspace, but it’s easier to do this: click anywhere in the workspace and start typing the name of the component. A tooltip appears with a list of components.
About connecting components
A component can be selected by clicking on its icon. In this case, an “O” tab will appear near the icon and information on the current state will appear in the window for viewing component settings. “Tab” “O” (output) is the output. By pulling it, we can connect the component to another component.
Next, configure our parser. For the tFileInputDelimited component in the settings, set the “Property type” to “Repository” and select the previously created template.
Now the parser is configured to parse the files of the format we need and if we start the work, we will see the contents of our original CSV file in the logs. The problem is that if the parser is associated with a template, it is hard-tuned to the file in the template. We cannot specify another file of the same format, which may not be very convenient when we do not know in advance what file we are going to process.
There are two ways out of this situation. The first is to always replace the file from the template with the desired file. The second is to untie the parser component and the template. In this case, the parsing settings can be saved, but it becomes possible to set the input file. The disadvantages of the first method are obvious, the disadvantages of the second include the lack of synchronization between the template and the parser. If we change the template, we will need to synchronize the parser settings manually. We will go the second way and untie the parser from the template. To do this, return the “Build-In” value in the “Property type” field. The settings were saved, but there was an opportunity to change them.
Change the name of the input file to the expression context.INPUT_CSV. Please note that the name was in quotation marks (string constant), and our expression without quotes. It is a context parameter. You also need to create this parameter in the context tab. You can set a default value for debugging. Context parameters can be set as command line parameters (something like --context_param INPUT_CSV = path). This applies to running a compiled Java package.
Further. We want to separate the data by event names.
This will require the tMap component and several tFilterRow. Let's restrict ourselves to two tFilterRow i.e. we will highlight only two different events. Connect them as shown in the figure:
When connecting tMap and tFilterRow, you will need to enter a name for the connection. The name must be unique. Next, you need to configure the tMap component. To do this, enter the Map Editor menu either by double-clicking on the tMap icon, or by calling the editor from the component properties panel.
In our case, we only need to “copy” the stream, so just drag and drop all the input data fields (left) into each of the output streams (right).
In the section in the middle, you can set an internal variable (can be used to generate new values, for example line numbers, or parameter substitution). In each cell of the editor, you can write an expression. In fact, the fact that we did this is a substitution of values. row1 in the screenshot is the name of the input stream. Now our mapper will divide the input into two streams.
Configuring tFilterRow filters is nothing special.
About setting tFilterRow
Add an input column, select a condition type and enter a value. We will set filters on the event_name field. One filter will check for equality (==) "Hello, world!" (in quotation marks), and the second is Event2.
The “Function” parameter in the component settings sets the conversion of the input data and sets the conversion function F. Then the selection conditions will be: F (input_column) {comparator} value. We do not have a function F, {comparator} is equality, and value is "Hello, world!" We get in our case input_column == “Hello, world!”.
The “Function” parameter in the component settings sets the conversion of the input data and sets the conversion function F. Then the selection conditions will be: F (input_column) {comparator} value. We do not have a function F, {comparator} is equality, and value is "Hello, world!" We get in our case input_column == “Hello, world!”.
Add the tLogRow pair after the filters, run it and see that the data is being shared. The only thing is better to set the Mode for tLogRow to something different from the “Basic” one, otherwise the data will be mixed.
Instead of tLogRow, you can add any other data output component, for example tFileOutputDelimited for writing to a CSV file, or a database component for writing to a table.
There are many components to working with the database. Many of them have fields in the settings for setting access to the database. However, if you intend to access the database a lot from different components, it is best to use the following scheme:
The Connection component sets the database access parameters and establishes a connection. The Close component is disconnected from the database. In the middle block, where the only Commit component is located in the figure, you can use the database without establishing new connections. To do this, in the component settings, select the option “Use an existing connection” and select the required Connection component.
Another TOS mechanism is also used here - subjob. By creating subtasks, some parts of the task can be completed before others begin. In this example, the Commit component does not start until a connection is established. An OnSubjobOk connection is made between subtasks (the Trigger item is available in the component context menu, inside which there is this connection). There are other relationships, such as ObSubjobError for error handling.
Let's go back to our CSV file example.
The tag field is not very suitable for writing to the database - tag2 = a. Surely we will want to split the key-value pair into different fields in the database. This can be done in many ways, but we will do it using the tJavaFlex component. tJavaFlex is a component whose behavior can be described in Java. There are three sections in its settings - the first one is performed before the data processing starts (initialization), the second one is engaged in data processing and the third one is executed after all the data has been processed. Also, like the rest of the components, there is a circuit editor. We will remove the tag field from the data scheme and add a couple of new ones - tag_name and tag_value (of type String).
Next, in the middle section of the component, write
row4.tag_name = "";
row4.tag_value = "";
if(row2.tag.contains("="))
{
String[] parts = row2.tag.split("=");
row4.tag_name = parts[0];
row4.tag_value = parts[1];
}
The code is trivial, and perhaps the only thing worth explaining is the construction of the form row4.tag_value. tag_value is the name of the field that we created. Other fields can be accessed in the same way. row4 is the name of the outgoing stream (inbound row2). They can be changed.
Thus, the tags will be divided into two fields. However, you need to make sure that the “Auto-distribution of data" checkbox is checked in the tJavaFlex settings, otherwise all other data will disappear. In fact, we just added an additional transformation. Other fields are identical in name and will be copied automatically.
Next, I will talk about two slightly more complex and specific things.
Suppose we still want to put our data into a database. Accordingly, we have an Event label with fields: event name, event identifier, event date and a link to an entry in the tag table. There are two fields in the tag table - key and value. We want to add our key-value pair to the tag table only if it is not there. And we also want to add a link between the tag and event tables.
Those. we want:
- check if there is such a key-value pair in the tag table and if not add
- get the id of the record in the database matching our tag
- write event data, including the id of the entry in the tag table, to the event table
In order to add an entry only if it is not in Postgres, you can use a construct of the form
INSERT
WHERE NOT EXISTS
You can do this using the tPostgresqlRow component. This component allows you to execute arbitrary SQL query. But we will have to substitute real data in our request. This can be done, for example, like this
String.format("
INSERT INTO tag(tag_name, tag_value)
	SELECT \'%s\', \'%s\'
	WHERE NOT EXISTS
	(SELECT * FROM tag
	WHERE tag_name = \'%s\'
	AND tag_value = \'%s\');",
input_row.tag_name, input_row.tag_value,
input_row.tag_name, input_row.tag_value)
Yes, the parameters are listed the same two times (maybe I know Java too poorly). Note that a semicolon at the end of Java code is not needed.
After that, you need to make a trivial query to get the id of the record in the table.
But in the case of Postgres, you can go the simpler way and use the RETURNING id. However, this mechanism will only return if data is added. But using a subquery can circumvent this limitation. Then our request will be converted to something like this:
String.format("
WITH T1 AS (
	SELECT *
	FROM tag
	WHERE tag_name = \'%s\'
	AND tag_value = \'%s\'
), T2 AS (
	INSERT INTO tag(tag_name, tag_value)
	SELECT \'%s\', \'%s\'
	WHERE NOT EXISTS (SELECT * FROM T1)
	RETURNING tag_id
)
SELECT tag_id FROM T1
UNION ALL
SELECT tag_id FROM T2;",
input_row.tag_name, input_row.tag_value,
input_row.tag_name, input_row.tag_value)
How to get value from request
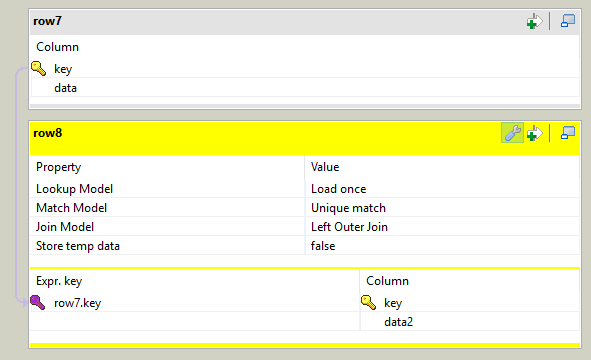
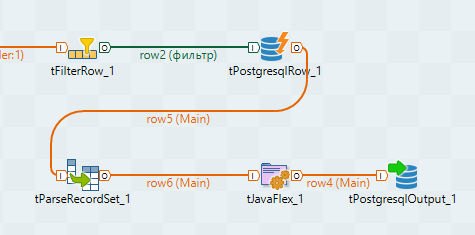
If the request should return values in the tPostgresqlRow component, we need to enable the “Propagate QUERY's recordset” option (on the “Advanced settings” tab), as well as in the outgoing stream, we need a field of type Object, which must be specified as a field for data distribution. To retrieve data from a recordset, we need the tParseRecordSet component. In the settings in the “Prev. Comp. Column list ”we need to select our field through which data is distributed. Next, in the attribute table for the fields, write the names of the fields returned by the request.
You should get something like the following:

Those. all our fields will be automatically set to the desired values, and the new dbtag_id field of type int will be taken from the query results using the tag_id key. You can add everything to the event table using the same tPostgresqlRow or tProstgresqlOutput.
The result is approximately the following scheme:
You should get something like the following:
Those. all our fields will be automatically set to the desired values, and the new dbtag_id field of type int will be taken from the query results using the tag_id key. You can add everything to the event table using the same tPostgresqlRow or tProstgresqlOutput.
The result is approximately the following scheme:
A separate consideration deserves the case when we need to create a closed structure. TOS does not allow closed structures to be made, even if they are not cyclic. The fact is that data streams live on their own, are not synchronized, and can carry a different number of records. Surely, you can almost always do without the formation of closed loops. To do this, you will not have to share the threads and do everything in one. But if you really want to, then if you want, you can bypass the restriction on the creation of closed structures. We will need the tHashInput and tHashOutput components.
How to find tHashInput and tHashOutput
By default, they are not displayed in the component panel and you will have to add them there first. To do this, go to the File menu -> Edit project properties -> Designer -> Palette Settings, then in the technical tab, find our components and add them to the working set.
These components allow you to store streams in memory and then access them. You can, of course, use a temporary file, but the hash is probably faster (if you have enough RAM).
Add the tHashOutput component and the input stream that we want to save. The component can be configured to work independently, or to add data to another tHashOutput component. In this case, the component will work like union from sql, i.e. data will be recorded in one common stream. You will have to create a new subtask in which the merge will be performed. Remember to add the OnSubjobOk link.
For each thread working individually, you need to create the tHashInput component. This component has a drawback - even after specifying the tHashOutput component from which data will be taken, the scheme will not load automatically. Next, all tHashInput must be combined using tMap. Only one stream will be marked as Main, the rest of the incoming streams will be synchronized through it, as well as the outgoing, the rest of the incoming streams will be Lookup. In addition, we need to set the connection between the threads, otherwise we will get Cross Join.
Now, despite the fact that there are many streams on the left side of the mapper, we can assume that we have one input stream and use any fields of any streams for mapping.
That's all, thanks to everyone who read to the end.