Microsoft Excel add-in development using Excel-DNA library
- Tutorial
Introduction
I present to you a step-by-step guide for developing add-ins for Excel.
Excel-DNA is a free open source library for creating Excel extensions. Project site excel-dna.net
Throughout this guide, we will develop an add-in that allows you to download data from a third-party site to the current page at the click of a button. So, let's begin.
Add-in development
First, create a new project of type Class Library, call it cryptostar. Connect the excel-dna library: Now we can start implementation. We will use the api.coinmarketcap.com/v1/ticker API as a data source , the request returns an array of objects containing information about various digital currencies.
Install-Package ExcelDna.AddIn

Install-Package ExcelDna.Integration

Install-Package ExcelDna.Interop
[
{
"id": "bitcoin",
"name": "Bitcoin",
"symbol": "BTC",
"rank": "1",
"price_usd": "4512.7",
"price_btc": "1.0",
"24h_volume_usd": "2711790000.0",
"market_cap_usd": "74640450605.0",
"available_supply": "16540087.0",
"total_supply": "16540087.0",
"percent_change_1h": "0.3",
"percent_change_24h": "-7.03",
"percent_change_7d": "3.95",
"last_updated": "1504391067"
},
{
"id": "ethereum",
"name": "Ethereum",
"symbol": "ETH",
"rank": "2",
"price_usd": "336.689",
"price_btc": "0.0740905",
"24h_volume_usd": "1402470000.0",
"market_cap_usd": "31781255657.0",
"available_supply": "94393508.0",
"total_supply": "94393508.0",
"percent_change_1h": "2.36",
"percent_change_24h": "-13.01",
"percent_change_7d": "0.84",
"last_updated": "1504391070"
}
]First, write a data loader:
    public class Ticker
    {
        public string id { get; set; }
        public string name { get; set; }
        public string symbol { get; set; }
        public decimal? rank { get; set; }
        public string price_usd { get; set; }
        public decimal? price_btc { get; set; }
        public string market_cap_usd { get; set; }
        public decimal? available_supply { get; set; }
        public decimal? total_supply { get; set; }
        public string percent_change_1h { get; set; }
        public string percent_change_24h { get; set; }
        public string percent_change_7d { get; set; }
        public long last_updated { get; set; }
    }
    public class DataLoader
    {
        public Ticker[] LoadTickers()
        {
            HttpWebRequest request = (HttpWebRequest)WebRequest.Create("https://api.coinmarketcap.com/v1/ticker/");
            request.Method = "GET";
            request.ContentType = "application/json";
            using (var response = request.GetResponse())
            using (var stream = response.GetResponseStream())
            using (var responseReader = new StreamReader(stream))
            {
                string data = responseReader.ReadToEnd();
                using (var sr = new StringReader(data))
                using (var jsonReader = new JsonTextReader(sr))
                {
                    var items = JsonSerializer.CreateDefault()
                            .Deserialize(jsonReader);
                    return items;
                }
            }
        }
    }
I will not explain this code, since it is quite simple and has a rather indirect relation to our topic.
Now we can receive data in the form of an array of objects of the Ticker class . It's time to learn how to display this data on the current page.
To display the data, we need an instance of the Microsoft.Office.Interop.Excel.Application class . It provides access to the Excel object model, through it we can get the page object (worksheet) and write our data to the desired cells. Let's write a class to write data to a page.
    public class DataRender
    {
        public void RenderData(Ticker[] tickers)
        {
            // используем dynamic что бы не привязываться к конкретной версии Excel
            dynamic xlApp = ExcelDnaUtil.Application;
            // получаем активную страницу
            var ws = xlApp.ActiveSheet;
	     // если страница не открыта ничего не делаем
            if (ws == null)
                return;
	     // очищаем содержимое страницы
            ws.Cells.Clear();
            // с использованием reflection заполняем страницу данными
            var props = typeof(Ticker).GetProperties();
            for (var j = 0; j < props.Length; j++)
            {
                var prop = props[j];
                var cell = ws.Cells[1, j + 1];
                cell.Value2 = prop.Name;
                cell.Font.Bold = true;
            }
            // предварительно запишем данные в двумерный массив, а затем присвоим этот массив объекту Range. Это позволит значительно ускорить работу плагина по сравнению с вариантом, в котором каждое значение по отдельности устанавливается в отдельную ячейку.
            object[,] data = new object[tickers.Length, props.Length];
            for (var i = 0; i < tickers.Length; i++)
            {
                for (var j = 0; j < props.Length; j++)
                {
                    var val = props[j].GetValue(tickers[i], null);
                    data[i, j] = val;
                }
            }
            var startCell = ws.Cells[2, 1];
            var endCell = ws.Cells[1 + tickers.Length, props.Length];
            var range = ws.Range[startCell, endCell];
            range.Value2 = data;
            var firstCell = ws.Cells[1, 1];
            // выравниваем колонки, чтобы все данные были на виду
            ws.Range[firstCell, endCell].Columns.AutoFit();
        }
    }
When working with the object model, we must remember that we work with links to COM objects. In the main Excel stream, we can safely use these objects and not worry about releasing links ( Marshal.ReleaseComObject ), however, if we want to use the object model from a separate stream, we have two options:
- Independently track all used objects and clear links to them. This approach is fraught with errors and I do not recommend using it.
- ExcelDna provides the ability to add a task to be executed in the main thread, the ExcelAsyncUtil.QueueAsMacro method is used for this , an example of use:
ExcelAsyncUtil.QueueAsMacro(() =>{
        Excel.Application xlApp = (Excel.Application)ExcelDnaUtil.Appplication;
        xlApp.StatusBar="Sending request...";
    });
Thus, we learned to display data on the page. Let's get started with the user interface. ExcelDna allows you to make changes to the standard Ribbon, add new tabs and buttons to it. Create your own tab and place a button on it. By clicking on the button, data will be loaded onto the current page. To do this, we must inherit from the ExcelRibbon class and override the GetCustomUI method, the method returns RibbonXML with a description of the interface of our add-in.
[ComVisible(true)]
public class RibbonController : ExcelRibbon
{
public override string GetCustomUI(string RibbonID)
{
return @"
We announced a button located on the bookmark and group called cryptostar. The onAction = 'OnButtonPressed' handler is set on the button; when the button is clicked , the OnButtonPressed method in the RibbonController class will be called .
In addition to the handler, we specified the image for the button: image = 'bitcoin'. The image name is specified in the configuration file - Cryptostar-AddIn.dna. This file is automatically added to the project when nuget is connected. Example:
![]()
Assembly and Debugging
Our plugin is ready, let's try to assemble it. Press F5. Then we get a set of * .xll files:
Cryptostar-AddIn64-packed.xll, Cryptostar-AddIn-packed.xll, Cryptostar-AddIn.xll, Cryptostar-AddIn64.xll
We see that the received files differ in both bit depth and presence words packed. With bit depth, everything is clear, you need to choose the one that matches the bit depth with Excel. But what is the difference between packed and not packed add-in? ExcelDNA allows you to pack plug-in dependencies into an .xll file. Dependencies can be any files used in the project, for example, external libraries or pictures. Dependencies are set in the configuration file, it looks like this:
![]()
Pay attention to the attribute Pack = ”true”, it indicates that this file should be packed.
If we use an unpacked add-in, then all its dependencies should be in the same directory with it.
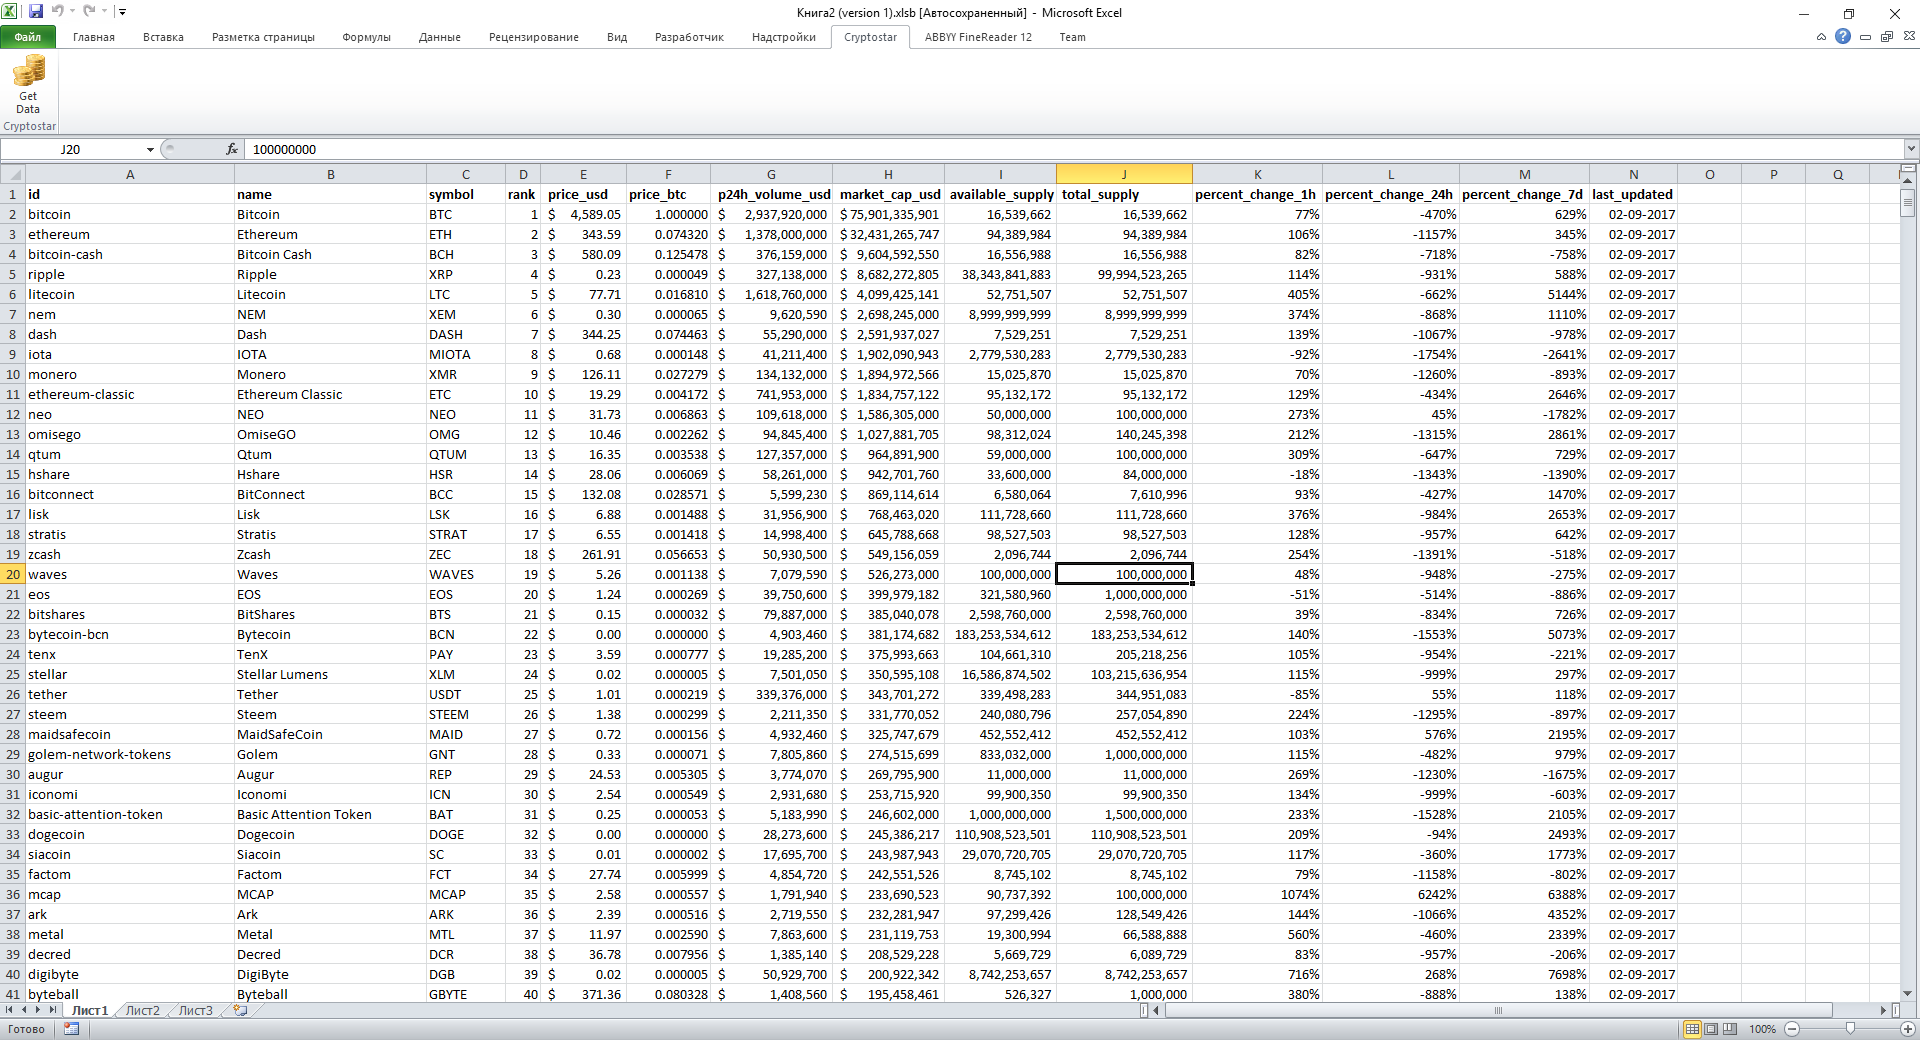
Now select the appropriate .xll file and run it. If you did everything correctly, then after opening Excel, you will see a new Cryptostart tab and the Get Data button, and when you click on it, the page will be filled with data on currencies:
Unfortunately, programs rarely work the first time, so we may need a debugger. Setting up ExcelDna add-in debugging is easy. To do this, in the project properties on the Debug tab, select Start External Program and write the path to Excel.exe, in my case it is G: \ Program Files \ Microsoft Office \ Office14 \ Excel.exe. In the start options, write the name of the packed add-in file, taking into account the width of Excel. For example, Cryptostar-AddIn64-packed.xll. That's it, now we can press F5 and fully debug the add-in.
Making the installer
So, the add-in is done, debugged, tested and ready to go. The question is in what form to distribute it. One of the options is to entrust the installation of add-in'a to the user. This is done through the Excel interface, on the developer tab-> Add-ins-> Browse tab, specify the path to the .xll file. This method will work only if the .xll file is signed with a certificate and the certificate is present in the trusted root certification authorities store . How to create a certificate and sign a file with it is well described here .
An alternative way is to write your add-in installation program, which would register the necessary keys in the registry and thus register our add-in. This task is not easy, because it is necessary to consider different versions of Excel in which the paths and keys in the registry are different. But fortunately, this problem has already been solved and there is a project template - an installer that performs the necessary actions. The template can be taken here .
Conclusion
As a result, we got acquainted with the Excel-DNA library and went all the way from developing add-in'a to debugging it and creating an installer.
The source code of the project is available here .