We make a toolbar on PyQt, export data to Excel and HTML
In the previous part, I talked about creating a module for running SQL queries and a shell in which these modules are launched. After a short work with queries, the obvious question arises - how to use the result of the selection, except how to look on the screen?
To do this, you should make additional tools for exporting and copying data. We will export to a file in Excel format, and copy to the system buffer in HTML format.
But first, we’ll stick the toolbar to our main window.

Let me remind you that our application is designed to be simple, universal and extensible. In order to make the toolbar universal and extensible, we will take out its definition in the configuration file, and the functions will be located in external modules that are not explicitly imported into the toolbar module. Thus, adding a new button and function will be reduced to writing them in the configuration file and adding the module to the program directory.
For toolbars in Qt there is a ready-made QToolBar class, from it we will spawn our ToolBar. Now one toolbar is enough for us, but we will lay on the possibility of adding several panels to the program. Each panel needs its own configuration file with its own set of buttons, so we will pass the file name as a parameter when creating the toolbar.
The configuration file will be traditionally in Ini format and UTF-8 encoded.
The syntax for defining buttons is in our hands, in the simplest case we need three things:
- the text on the button
- the module containing the button
function - the button function
Let us determine that the button function accepts one parameter - the current child window. What exactly the module will do with it is the task of the button module, and the task of the toolbar is limited only to its call.
Create the following tools.ini file:
Now in python we parse the definitions from the Ini file:
The execution method assigned to all buttons will import the desired module and call the function assigned to the button from it. In order not to register each module in the import list of the toolbar, we will use the importlib library. It remains only to find out what button was pressed and from which QAction the signal came - the standard method QObject.sender () is responsible for this, then we take the parameters stored in it and do what is intended in the module (whatever that is).
It remains to add our panel to our main window (tasktree.py module)
We can launch and check whether the panel appears:
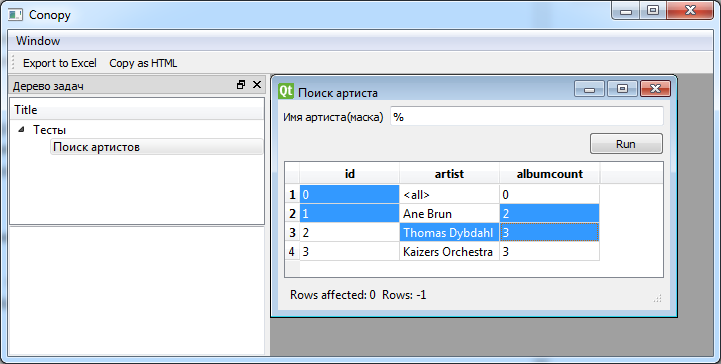
It may not be as pretty as in the first picture, the main thing is that it works.
Now is the time to make a module with button functions. We will have one module, because the export and copy functions will work with one data source and according to the same rules, it makes no sense to distribute them in different modules.
Our functions will work with QTableView data tables, which we used in modules to view query results. In order to maintain the independence of the modules, we will determine the desired component “on the fly” - either it is the currently selected (focused) QTableView component in the current window, or the first one of the desired class among the children of the current window.
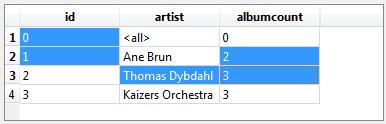
From the table we get a list of selected cells. If nothing is selected, then forcibly select everything.
You probably already know that in Qt you do not get an array of data directly, instead you work with indexes in the model. The QModelIndex index is a simple structure and indicates a specific data position (row () row and column () column, and in the hierarchy, an indication of the parent index parent ()). Having received the index, you can get the data itself from it using the data () method.
We got a list of indices of selected cells in the model, but the indices in this list follow in the order in which the user selects them, rather than sorted by row and column. It will be more convenient for us to work not with a list, but with a dictionary (position → index) and sorted lists of involved rows and columns.
It’s also worth considering that QTableView allows you to select unconnected cells by default, therefore there can be cells in the index list that are almost randomly located:
therefore, d.rows has every row used, d.columns has every column used, but their combination is not necessarily d.indexes.
For the sake of greater beauty, we also need a list of column names, which are displayed in QTableView. Get them from the model using the headerData method:
So far, the code for exporting and copying has been the same, but now the differences have gone.
To export to Excel files, I used the xlsxwriter package . It is installed, as usual, through pip:
The package documentation is quite detailed and understandable, with examples, so I will not dwell on it. The bottom line is that the record goes through the cells addressed by the row and column number. If additional formatting is needed, then you need to define the style and indicate it when writing the cell.
We will ask the user for the name of the xlsx file to which we will export, Qt has such a function. In PyQt, the function returns a list of the selected file name and the filter used. If a list of empty lines is returned, then this means that the user has refused the choice.
Actually export:
Dances around QDateTime are added because of different understanding of date / time in Python, Qt and Excel - firstly, the xlsxwriter package can work with the Python datetime, but it does not know how to use QDateTime from Qt, so you have to convert it additionally with the special function toPyDateTime; secondly, Excel can only work with dates from 01/01/1900, and everything that was before that time for Excel is just a string.
Result of exporting to Excel:
You do not always need a separate file with a selection, often, especially when there is not much data, it is more convenient to copy them in a tabular form to the system clipboard (clipboard), and then paste it into the right place, be it Excel, Word, a web page editor or something else .
The most universal way to copy tabular data through a buffer is to use the regular HTML format. On Windows, * nix and MacOS there are very different ways of working with the buffer (not to mention that there are several), so it’s good that Qt hides implementation details from us.
All we need to do is create a QMimeData object, fill it through the setHtml method with a piece of HTML markup, and give it to the system clipboard, which is accessible through QApplication
We collect the table line by line, starting with the headers.
The result is inserted into Word:
Here, the borders of the table are visible only thanks to the setting " Show text borders " enabled in Word , in fact they are invisible. To copy the table with explicit borders, you need to change the style of the table in the table tag. I give it to you.
So, we got a way to add new functions to our tool, and the functions are added and work regardless of what data sources we will use and how to display them - modules that work with data do not know anything about toolbars and their functions, toolbars are not connected neither with data modules, nor with button functions, but button functions, not knowing about toolbars or data modules, simply try to process the current visual component in a manner known to them.
The sources used in the examples, as before, are posted on github under the MIT license.
Start - We sharpen our tool in PyQt
Continued - We cut XML for XQuery markup
To do this, you should make additional tools for exporting and copying data. We will export to a file in Excel format, and copy to the system buffer in HTML format.
But first, we’ll stick the toolbar to our main window.
Toolbar
Let me remind you that our application is designed to be simple, universal and extensible. In order to make the toolbar universal and extensible, we will take out its definition in the configuration file, and the functions will be located in external modules that are not explicitly imported into the toolbar module. Thus, adding a new button and function will be reduced to writing them in the configuration file and adding the module to the program directory.
Toolbar.py file
#!/usr/bin/python3
# -*- coding: utf-8 -*-
import sys
from PyQt5.QtCore import *
from PyQt5.QtWidgets import *
import importlib
class ToolBar(QToolBar):
    def __init__(self, iniFile, parent=None):
        super(ToolBar, self).__init__(parent)
        ini = QSettings(iniFile, QSettings.IniFormat)
        ini.setIniCodec("utf-8")
        ini.beginGroup("Tools")
        for key in sorted(ini.childKeys()):
            v = ini.value(key)
            title = v[0]
            params = v[1:]
            a = self.addAction(title)
            a.params = params
            a.triggered.connect(self.execAction)
        ini.endGroup()
    def execAction(self):
        try:
            params = self.sender().params
            module = importlib.import_module(params[0])
            if len(params) < 2: func = "run()"
            else: func = params[1]
            win = self.focusTaskWindow()
            exec("module.%s(win)" % func)
        except:
            print(str(sys.exc_info()[1]))
        return
    def focusTaskWindow(self):
        try:
            return QApplication.instance().focusedTaskWindow()
        except:
            return None
if __name__ == '__main__':
    app = QApplication(sys.argv)
    ex = ToolBar("tools.ini")
    flags = Qt.Tool | Qt.WindowDoesNotAcceptFocus # | ex.windowFlags()
    ex.setWindowFlags(flags)
    ex.show()
    sys.exit(app.exec_())
For toolbars in Qt there is a ready-made QToolBar class, from it we will spawn our ToolBar. Now one toolbar is enough for us, but we will lay on the possibility of adding several panels to the program. Each panel needs its own configuration file with its own set of buttons, so we will pass the file name as a parameter when creating the toolbar.
The configuration file will be traditionally in Ini format and UTF-8 encoded.
class ToolBar(QToolBar):
    def __init__(self, iniFile, parent=None):
        super(ToolBar, self).__init__(parent)
        ini = QSettings(iniFile, QSettings.IniFormat)
        ini.setIniCodec("utf-8")
The syntax for defining buttons is in our hands, in the simplest case we need three things:
- the text on the button
- the module containing the button
function - the button function
Let us determine that the button function accepts one parameter - the current child window. What exactly the module will do with it is the task of the button module, and the task of the toolbar is limited only to its call.
Create the following tools.ini file:
[Tools]
001=Export to Excel,exportview,"exportToExcel"
002=Copy as HTML,exportview,"copyAsHtml"
Now in python we parse the definitions from the Ini file:
        ini.beginGroup("Tools")
        # Перебираем переменные в алфавитном порядке
        for key in sorted(ini.childKeys()):
            # Здесь мы получим list, т.к. ini позволяет указать
            # список значений, разделенных запятыми
            v = ini.value(key)
            title = v[0]
            params = v[1:]
            # создадим на панели кнопку и QAction, отвечающий за нее
            a = self.addAction(title)
            # остаток списка со второго элемента [модуль, функция] сохраним в QAction
            a.params = params
            # для всех кнопок у нас будет один метод выполнения
            a.triggered.connect(self.execAction)
        ini.endGroup()
The execution method assigned to all buttons will import the desired module and call the function assigned to the button from it. In order not to register each module in the import list of the toolbar, we will use the importlib library. It remains only to find out what button was pressed and from which QAction the signal came - the standard method QObject.sender () is responsible for this, then we take the parameters stored in it and do what is intended in the module (whatever that is).
    def execAction(self):
        try:
            params = self.sender().params
            module = importlib.import_module(params[0])
            func = params[1]
            win = self.focusTaskWindow()
            exec("module.%s(win)" % func)
        except:
            print(str(sys.exc_info()[1]))
        return
It remains to add our panel to our main window (tasktree.py module)
        self.tools = ToolBar("tools.ini",self)
        self.addToolBar(self.tools)
We can launch and check whether the panel appears:
It may not be as pretty as in the first picture, the main thing is that it works.
Tool Functions Module
Now is the time to make a module with button functions. We will have one module, because the export and copy functions will work with one data source and according to the same rules, it makes no sense to distribute them in different modules.
File exportview.py
#!/usr/bin/python3
# -*- coding: utf-8 -*-
import sys
import datetime
from PyQt5.QtCore import *
from PyQt5.QtWidgets import *
import xlsxwriter
class ob():
def test(self):
return 1
def exportToExcel(win):
if win == None:
print("No focused window")
return
view = focusItemView(win)
title = win.windowTitle() + '.xlsx'
if view == None:
print("No focused item view")
return
# Create a workbook and add a worksheet.
fileName = QFileDialog.getSaveFileName(None, 'Save Excel file', title,'Excel files (*.xlsx)')
if fileName == ('',''): return
indexes = view.selectionModel().selectedIndexes()
if len(indexes) == 0:
indexes = view.selectAll()
indexes = view.selectionModel().selectedIndexes()
model = view.model()
d = sortedIndexes(indexes)
headers = { col:model.headerData(col, Qt.Horizontal) for col in d.columns }
minRow = min(d.rows)
minCol = min(d.columns)
try:
workbook = xlsxwriter.Workbook(fileName[0])
worksheet = workbook.add_worksheet()
bold = workbook.add_format({'bold': True})
dateFormat = 'dd.MM.yyyy'
date = workbook.add_format({'num_format': dateFormat})
realCol = 0
for col in d.columns:
worksheet.write(0, realCol, headers[col], bold)
realRow = 1
for row in d.rows:
if (row, col) in d.indexes:
try:
v = d.indexes[(row,col)].data(Qt.EditRole)
if isinstance(v, QDateTime):
if v.isValid() and v.toPyDateTime() > datetime.datetime(1900,1,1):
v = v.toPyDateTime()
worksheet.write_datetime(realRow, realCol, v, date)
else:
v = v.toString(dateFormat)
worksheet.write(realRow, realCol, v)
else:
worksheet.write(realRow, realCol, v)
except:
print(str(sys.exc_info()[1]))
realRow += 1
realCol += 1
workbook.close()
except:
QMessageBox.critical(None,'Export error',str(sys.exc_info()[1]))
return
def copyAsHtml(win):
if win == None:
print("No focused window")
return
view = focusItemView(win)
if view == None:
print("No focused item view")
return
indexes = view.selectedIndexes()
if len(indexes) == 0:
indexes = view.selectAll()
indexes = view.selectedIndexes()
if len(indexes) == 0:
return;
model = view.model()
try:
d = sortedIndexes(indexes)
html = '\n'
headers = { col:model.headerData(col, Qt.Horizontal) for col in d.columns }
html += ''
for c in d.columns:
html += '' % headers[c]
html += '\n'
for r in d.rows:
html += ''
for c in d.columns:
if (r, c) in d.indexes:
v = d.indexes[(r,c)].data(Qt.DisplayRole)
html += '' % v
else:
html += ''
html += ''
html += '%s %s
'
mime = QMimeData()
mime.setHtml(html)
clipboard = QApplication.clipboard()
clipboard.setMimeData(mime)
except:
QMessageBox.critical(None,'Export error',str(sys.exc_info()[1]))
def sortedIndexes(indexes):
d = ob()
d.indexes = { (i.row(), i.column()):i for i in indexes }
d.rows = sorted(list(set([ i[0] for i in d.indexes ])))
d.columns = sorted(list(set([ i[1] for i in d.indexes ])))
return d
def headerNames(model, minCol, maxCol):
headers = dict()
for col in range(minCol, maxCol+1):
headers[col] = model.headerData(col, Qt.Horizontal)
return headers
def focusItemView(win):
    if win == None: return None
    w = win.focusWidget()
    if w != None and isinstance(w, QTableView):
        return w
    views = win.findChildren(QTableView)
    if type(views) == type([]) and len(views)>0:
        return views[0]
    return None
Our functions will work with QTableView data tables, which we used in modules to view query results. In order to maintain the independence of the modules, we will determine the desired component “on the fly” - either it is the currently selected (focused) QTableView component in the current window, or the first one of the desired class among the children of the current window.
def focusItemView(win):
if win == None: return None
w = win.focusWidget()
if w != None and isinstance(w, QTableView):
return w
views = win.findChildren(QTableView)
if type(views) == type([]) and len(views)>0:
return views[0]
return None
From the table we get a list of selected cells. If nothing is selected, then forcibly select everything.
   indexes = view.selectionModel().selectedIndexes()
   if len(indexes) == 0:
      indexes = view.selectAll()
      indexes = view.selectionModel().selectedIndexes()
   if len(indexes) == 0:
      return;
You probably already know that in Qt you do not get an array of data directly, instead you work with indexes in the model. The QModelIndex index is a simple structure and indicates a specific data position (row () row and column () column, and in the hierarchy, an indication of the parent index parent ()). Having received the index, you can get the data itself from it using the data () method.
We got a list of indices of selected cells in the model, but the indices in this list follow in the order in which the user selects them, rather than sorted by row and column. It will be more convenient for us to work not with a list, but with a dictionary (position → index) and sorted lists of involved rows and columns.
def sortedIndexes(indexes):
    d = ob() # объект-пустышка
    d.indexes = { (i.row(), i.column()):i for i in indexes }
    d.rows = sorted(list(set([ i[0] for i in d.indexes ])))
    d.columns = sorted(list(set([ i[1] for i in d.indexes ])))
    return d
It’s also worth considering that QTableView allows you to select unconnected cells by default, therefore there can be cells in the index list that are almost randomly located:
therefore, d.rows has every row used, d.columns has every column used, but their combination is not necessarily d.indexes.
For the sake of greater beauty, we also need a list of column names, which are displayed in QTableView. Get them from the model using the headerData method:
headers = { col:model.headerData(col, Qt.Horizontal) for col in d.columns }
So far, the code for exporting and copying has been the same, but now the differences have gone.
Export to Excel
To export to Excel files, I used the xlsxwriter package . It is installed, as usual, through pip:
pip3 install xlsxwriter
The package documentation is quite detailed and understandable, with examples, so I will not dwell on it. The bottom line is that the record goes through the cells addressed by the row and column number. If additional formatting is needed, then you need to define the style and indicate it when writing the cell.
We will ask the user for the name of the xlsx file to which we will export, Qt has such a function. In PyQt, the function returns a list of the selected file name and the filter used. If a list of empty lines is returned, then this means that the user has refused the choice.
   fileName = QFileDialog.getSaveFileName(None, 'Save Excel file', title,'Excel files (*.xlsx)')
   if fileName == ('',''): return
Actually export:
      workbook = xlsxwriter.Workbook(fileName[0])
      worksheet = workbook.add_worksheet()
      bold = workbook.add_format({'bold': True})
      dateFormat = 'dd.MM.yyyy'
      date = workbook.add_format({'num_format': dateFormat})
      realCol = 0
      for col in d.columns:
         worksheet.write(0, realCol, headers[col], bold)
         realRow = 1
         for row in d.rows:
            if (row, col) in d.indexes:
               try:
                  v = d.indexes[(row,col)].data(Qt.EditRole)
                  if isinstance(v, QDateTime):
                     if v.isValid() and v.toPyDateTime() > datetime.datetime(1900,1,1):
                        v = v.toPyDateTime()
                        worksheet.write_datetime(realRow, realCol, v, date)
                     else:
                        v = v.toString(dateFormat)
                        worksheet.write(realRow, realCol, v)
                  else:
                     worksheet.write(realRow, realCol, v)
               except:
                  print(str(sys.exc_info()[1]))
            realRow += 1
         realCol += 1
      workbook.close()
Dances around QDateTime are added because of different understanding of date / time in Python, Qt and Excel - firstly, the xlsxwriter package can work with the Python datetime, but it does not know how to use QDateTime from Qt, so you have to convert it additionally with the special function toPyDateTime; secondly, Excel can only work with dates from 01/01/1900, and everything that was before that time for Excel is just a string.
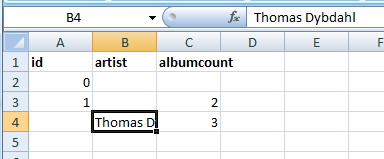
Result of exporting to Excel:
Copy to system buffer in HTML format
You do not always need a separate file with a selection, often, especially when there is not much data, it is more convenient to copy them in a tabular form to the system clipboard (clipboard), and then paste it into the right place, be it Excel, Word, a web page editor or something else .
The most universal way to copy tabular data through a buffer is to use the regular HTML format. On Windows, * nix and MacOS there are very different ways of working with the buffer (not to mention that there are several), so it’s good that Qt hides implementation details from us.
All we need to do is create a QMimeData object, fill it through the setHtml method with a piece of HTML markup, and give it to the system clipboard, which is accessible through QApplication
      mime = QMimeData()
      mime.setHtml(html)
      clipboard = QApplication.clipboard()
      clipboard.setMimeData(mime)
We collect the table line by line, starting with the headers.
html = '\n'
headers = { col:model.headerData(col, Qt.Horizontal) for col in d.columns }
html += ''
for c in d.columns:
html += '' % headers[c]
html += '\n'
for r in d.rows:
html += ''
for c in d.columns:
if (r, c) in d.indexes:
v = d.indexes[(r,c)].data(Qt.DisplayRole)
html += '' % v
else:
html += ''
html += ''
html += '%s %s
'
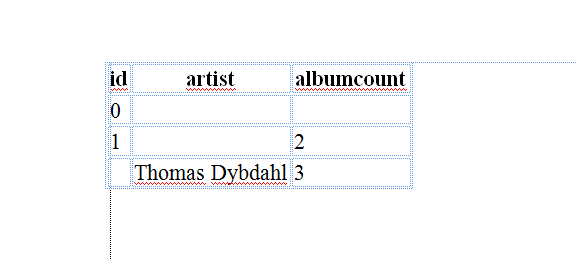
The result is inserted into Word:
Here, the borders of the table are visible only thanks to the setting " Show text borders " enabled in Word , in fact they are invisible. To copy the table with explicit borders, you need to change the style of the table in the table tag. I give it to you.
Conclusion
So, we got a way to add new functions to our tool, and the functions are added and work regardless of what data sources we will use and how to display them - modules that work with data do not know anything about toolbars and their functions, toolbars are not connected neither with data modules, nor with button functions, but button functions, not knowing about toolbars or data modules, simply try to process the current visual component in a manner known to them.
The sources used in the examples, as before, are posted on github under the MIT license.
Start - We sharpen our tool in PyQt
Continued - We cut XML for XQuery markup