Launch a GSM network at home
- Tutorial

In this article, I would like to describe in detail how I managed to launch my own GSM network using Osmocom and modest investments in equipment.
The instructions on the official website are out of date and I had to spend quite a lot of time adapting them. Fortunately, all problems have been resolved, and if you strictly follow the advice below, then you will succeed.
As a result, we will launch an experimental 2G cellular network within the room with support for SMS and voice calls, without GPRS. It can be used to study the operation and interaction of devices and components of a GSM network without interfering with commercial cellular networks.
Cycle articles:
Launch a GSM network at home.
Analyze the traffic of GSM networks in Wireshark.
Add GPRS to your home GSM network.
Practical examples of attacks inside a GSM network
Attention!
The author does not bear any responsibility for the actions of other users, their interference in commercial GSM networks and damage to their own equipment. Before you start anything, make sure that you understand what you are doing.
UPD: If you encounter problems when building or using my configuration files, I recommend installing everything that can be from the Nightly Builds deb packages to a newer OS. To build the osmocombb (jolly / testing branch) branches, you will need the old toolchain, as I wrote below. I installed everything on Debian 9 (32 bits), there are no problems with libdbi and something else, put the dependencies that apt offers. When building the toolchain, problems with texinfo may occur. There is already a couple of patches in the axilirator script for this, but for Debian 9 I needed more edits in gcc / doc / gcc.texi.
Iron and Software
Iron
- A computer with Ubuntu 14.04 32-bit installed (Not a virtual machine)
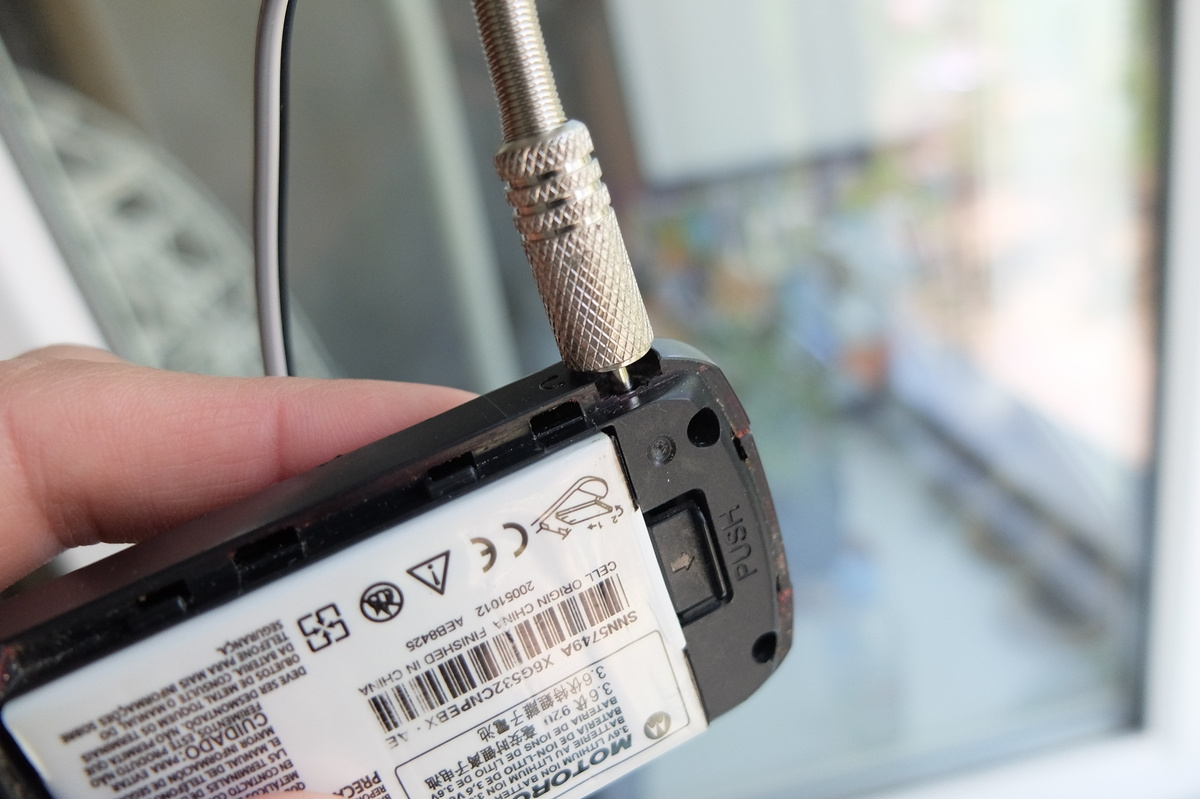
- 2 phones based on the TI Calypso chipset (Motorola c113, c118, c123, ...)
- 2 USB-TTL converters
- 2 wires (jack 2.5 mm + jumpers)
Software
- Transceivers based OsmocomBB
- OsmoBTS Base Station
- OsmoBSC Base Station Controller
- MSC, HLR, SMS center based on OsmoNTIB
We are buying

Phones based on the TI Calypso chipset will be easiest to look for on free classified sites in your city. The price varies from 300 to 700 rubles, depending on the condition and availability of the charger. The probability of buying a phone designed for Western GSM bands in Russia is very small, but if you decide to buy it abroad, I recommend paying attention to working GSM bands. You need phones that work with 900 MHz and 1800 MHz if you live in Russia.
You can see the list of supported models here .
Perhaps there are other compatible phones, in particular, Motorola c113 and c113a are fully compatible with OsmocomBB, although not presented on the official website.
SIM cards are not needed.

USB-TTL converterscan work on CP2102, FT232 or PL2303 chips.
I recommend using CP2102 since using a specialized utility you can make this converter work at non-standard speeds, which is required for some OsmocomBB branches.
You can buy it from 100 rubles on ebay or aliexpress, or 2-3 times more expensive in more or less large electronics stores. The second option is preferable if you do not want to wait.
The wire connecting the computer to the phone may look different, but I recommend buying a 2.5 mm jack from the

UPD radio parts store : As you later noticed, the photo shows a jack with 4 pins, you need the most common one with 3!
and wires with connectors, like the ones that are often used for Arduino or Raspberry Pi.

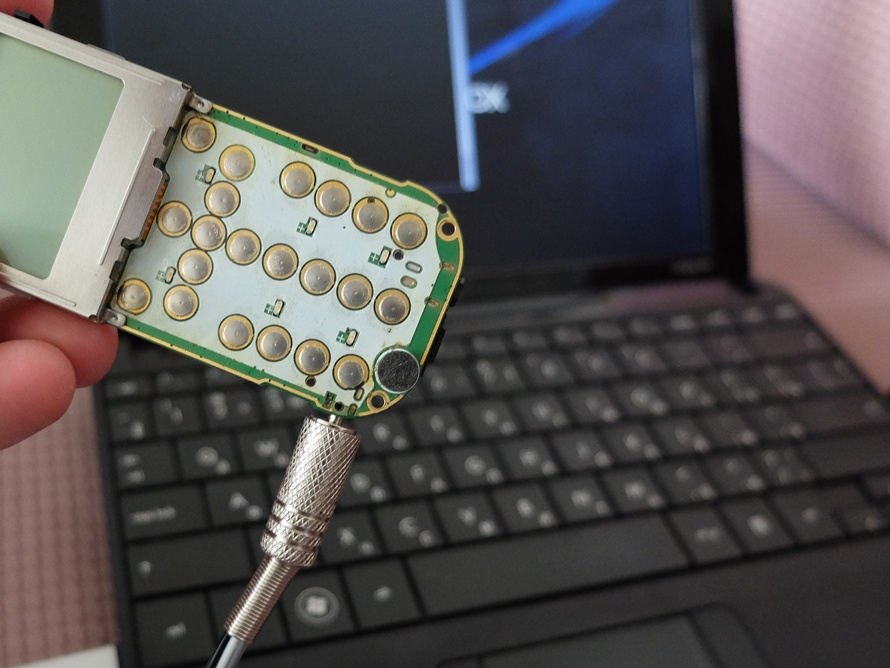
In the absence of the second, you can come up with something of your own. Your task is to connect the terminals Tx, Rx, GND of the converter with the contacts of the jack as follows:
TxD connect to the tip of the jack
RxD connect to the middle contact of the jack
GND connect to the lower contact of the jack.
You can take a bundle of three wires, bite the connectors from one end and solder the remaining wires with connectors at one end to the terminals of the jack.
Please note that to start a network with voice calls you will need 2 phones, 2 converters and 2 ready-made wires.
Unobvious problem
After purchasing a jack, make sure that it can be fully inserted into the headset jack. Otherwise, you may receive errors due to an unreliable connection to the phone or not at all.
The jacks that are most often sold in radio parts stores are not fully inserted into the socket, as they are disturbed by the case (yours / phone).

To make sure that the jack is fully inserted, you can take the phone out of the case and try to insert the jack.
If you later realized that the case is interfering with the jack, you will have to arm yourself with a pair of pliers and a file, turn on your wits and change the case of the jack or phone so that the contact is reliable.
You can check the reliability of the connection with PuTTY. You can find out the COM port number by looking at the Device Manager.
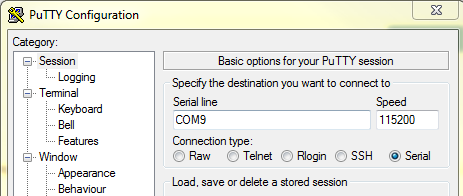
We connect the phone to the computer via the USB-TTL converter and the assembled wire, briefly press the power button and the message @ftmtoolerror should appear in the PuTTY window, among other symbols.
The same thing can be done under Linux using minicom.
Installation
As stated at the beginning, I recommend using Ubuntu 14.04, its 32-bit version. Perhaps you can install everything on the 64-bit Ubuntu 16.04, but then you will have to solve all the dependency problems yourself during installation and compatibility with the Osmocom project branches.
Also, you can try to use a virtual machine, but I still could not get a stable connection on the guest OS. Perhaps problems arise at the virtualization level of the USB port.
You can use the virtual machine to work with osmocombb and its individual applications, but if it comes to launching a GSM network, I advise you not to use virtualization.
Install the basic packages that we need to build Osmocom.
apt-get install build-essential libtool libtalloc-dev shtool autoconf automake git-core pkg-config make gcc libpcsclite-devInstall the libosmocore library
git clone git://git.osmocom.org/libosmocore.git
cd libosmocore/
autoreconf -i
./configure
make
make install
ldconfig -i
Install toolchain
To build programs for the phone we need a cross-compiler toolchain. A newer version is now available on the official site, but the old osmocombb branches that were written under the old compiler will not work with it.
Of course, you can slightly correct the code and fix errors that occur during compilation with the new toolchain, but I leave this outside the scope of this article and recommend using the following script to install the cross-compiler.
git clone https://github.com/axilirator/gnu-arm-installer.git
cd gnu-arm-installer
apt-get install libgmp3-dev libmpfr-dev libx11-6 libx11-dev flex bison libncurses5 libncurses5-dbg libncurses5-dev libncursesw5 libncursesw5-dbg libncursesw5-dev zlibc zlib1g-dev libmpfr4 libmpc-dev texinfo
./download.sh
./build.sh
The process can take a long time, up to several hours. Be patient and make sure that at least 3 GB is free on the file system.
After compilation is complete, add the path to the executables in the PATH, in my case / root / osmocom / gnu-arm-installer / install / bin
vi /etc/bash.bashrc
add in the end
export PATH=$PATH:/root/osmocom/gnu-arm-installer/install/bin
We collect the osmocombb
Master branch, we are involved in launching the GSM network, but it will be useful if you want to work with other applications, such as RSSI or cell_log (see further in the text).
If you want to be able to send something to the network, you need to uncomment the line in src / target / firmware / Makefile:
CFLAGS += -DCONFIG_TX_ENABLE
We collect
git clone git://git.osmocom.org/osmocom-bb.git osmocombb
cd osmocombb/src
make
Install the FFT package
wget http://www.fftw.org/fftw-3.3.6-pl2.tar.gz
tar -xvzf fftw-3.3.6-pl2.tar.gz
cd fftw-3.3.6-pl2
./configure --enable-threads --enable-float
make
make install
ldconfig
Install the libosmo-dsp library
git clone git://git.osmocom.org/libosmo-dsp.git
cd libosmo-dsp/
autoreconf -i
./configure
make
make install
ldconfig
Build the osmocombb branch for OsmoBTS
git clone git://git.osmocom.org/osmocom-bb.git trx
cd trx/
git checkout jolly/testing
cd src/
Uncomment the line in target / firmware / Makefile
CFLAGS += -DCONFIG_TX_ENABLE
We compile:
make HOST_layer23_CONFARGS=--enable-transceiver
Install libdbi for sqlite
apt-get install sqlite3 libsqlite3-dev libsctp-dev
Download: sourceforge.net/projects/libdbi/files/libdbi/libdbi-0.8.3
tar -xvzf libdbi-0.8.3.tar.gz
cd libdbi-0.8.3
autogen.sh
./configure --disable-docs
make
make install
ldconfig
cd ..
Download: sourceforge.net/projects/libdbi-drivers/files/libdbi-drivers/libdbi-drivers-0.8.3
tar -xvzf libdbi-drivers-0.8.3.tar.gz
cd libdbi-drivers-0.8.3
There is a typo in the driver that will lead to errors when connecting to the HLR. We fix it before compilation.
vi drivers/sqlite3/dbd_sqlite3.c
Change
_dbi_internal_error_handlerto _dbd_internal_error_handler. We collect:
./autogen.sh
./configure --disable-docs --with-sqlite3 --with-sqlite3-dir=/usr/bin --with-dbi-incdir=/usr/local/include
make
make install
ldconfig
Install ORTP
wget http://download.savannah.gnu.org/releases/linphone/ortp/sources/ortp-0.22.0.tar.gz
tar -xvf ortp-0.22.0.tar.gz
cd ortp-0.22.0/
./autogen.sh
./configure
make
make install
ldconfig
Install the libosmo-abis library
git clone git://git.osmocom.org/libosmo-abis.git
cd libosmo-abis
autoreconf -i
./configure
make
make install
ldconfig
Install the libosmo-netif library
git clone git://git.osmocom.org/libosmo-netif.git
cd libosmo-netif
autoreconf -i
./configure
make
make install
ldconfig
Install OpenBSC
apt-get install libssl0.9.8 libssl-dev
ldconfig
git clone git://git.osmocom.org/openbsc.git
cd openbsc/openbsc/
autoreconf -i
./configure
make
make install
Install OsmoBTS
git clone git://git.osmocom.org/osmo-bts.git
cd osmo-bts
autoreconf -i
./configure --enable-trx
make
make install
Configuration
I work with Osmocom from root, so my configuration files are in /root/.osmocom
mkdir /root/.osmocom;cd /root/.osmocom
touch ~/.osmocom/osmo-bts.cfg
touch ~/.osmocom/open-bsc.cfg
Then there are two options:
- Download manuals for OsmoNTIB and configure everything yourself
- Instead of empty files, use mine, modifying to your needs.
My osmo-bts.cfg and open-bsc.cfg configuration files are at the end of the article.
I intentionally removed the band setting for the GSM band and ARFCN from the files.
ARFCN - the radio channel on which your base station will operate.
A suitable ARFCN can be found using the RSSI program , the osmocombb package, or using the cell_log tool .
Remember that the signal from your base station should not interfere with the signals of commercial GSM networks. Depending on which channel you will use, select band.
To guarantee to limit the signal from your base station, you can build a Faraday Cage. True, in the case of Calypso BTS, it will not be possible to receive SCH bursts from a commercial cell. Then you need to figure out (and modify the code) how to accurately count.
Without adding ARFCN and band to my configuration files, OsmoNTIB will not start.
Launch
We connect both phones to the computer and check their availability.
ls -l /dev/ttyUSB*
You should see ttyUSB0 and ttyUSB1.
Next, each command must be executed in a separate terminal.
There may be differences in the osmocon syntax. For example, in your case there may be compal_e86 or e87 and not c123xor, but something else .
Initialize the first transceiver
cd /root/osmocom/trx/src
host/osmocon/osmocon -m c123xor -p /dev/ttyUSB0 -s /tmp/osmocom_l2 -c target/firmware/board/compal_e88/trx.highram.bin -r 99
Briefly press the power button of the phone that was connected first. After the download is complete, you will see TRX on the phone screen.
Initialize the second transceiver
cd /root/osmocom/trx/src
host/osmocon/osmocon -m c123xor -p /dev/ttyUSB1 -s /tmp/osmocom_l2.2 -c target/firmware/board/compal_e88/trx.highram.bin -r 99
Briefly press the power button of the phone that was connected second. After the download is complete, you will see TRX on the phone screen.
We configure the transceivers to follow the timer of the commercial BTS
Instead of ARFCN, you should indicate the channel number on which the commercial base station with a good signal is working. Again, can be found using RSSI or cell_log.
cd /root/osmocom/trx/src/host/layer23/src/transceiver/
./transceiver -a ARFCN -2 -r 99
Launch MSC, HLR and SMS Center
cd /root/.osmocom
osmo-nitb -c ~/.osmocom/open-bsc.cfg -l ~/.osmocom/hlr.sqlite3 -P -C --debug=DRLL:DCC:DMM:DRR:DRSL:DNM
Launch the base station
cd /root/.osmocom
osmo-bts-trx --debug DRSL:DOML:DLAPDM -r 99
All components of the GSM network should now be operational and you are ready to become the first subscriber!
Testing
Now you can connect to the network from any cell phone by selecting it manually. The network appears as 00101 or TestNet. The network may not be located the first time.
If something went wrong during the connection, turn on airplane mode, turn it off, and try connecting to the network again.
After connecting, you can find out your number using the USSD code * # 100 #.
You can connect to the OsmoNTIB console like this
telnet localhost 4242
You can connect to the OsmoBTS console like this
telnet localhost 4241
That's all. In the next article I will tell you how you can explore the traffic of mobile devices using the wireshark sniffer.
UPD: About adding support for GPRS read here
Success!
Configuration files
osmo-bts.cfg
!
! OsmoBTS (0.4.0.433-8913) configuration saved from vty
!!!
!
log stderr
logging filter all 1
logging color 1
logging print category 0
logging timestamp 0
logging level all everything
logging level rsl info
logging level oml info
logging level rll notice
logging level rr notice
logging level meas notice
logging level pag info
logging level l1c info
logging level l1p info
logging level dsp debug
logging level pcu notice
logging level ho notice
logging level trx notice
logging level loop notice
logging level abis notice
logging level rtp notice
logging level sum notice
logging level lglobal notice
logging level llapd notice
logging level linp notice
logging level lmux notice
logging level lmi notice
logging level lmib notice
logging level lsms notice
logging level lctrl notice
logging level lgtp notice
logging level lstats notice
logging level lgsup notice
logging level loap notice
logging level lss7 notice
logging level lsccp notice
logging level lsua notice
logging level lm3ua notice
log file OsmoBTS.log
logging filter all 0
logging color 1
logging print category 0
logging timestamp 1
logging level all everything
logging level rsl info
logging level oml info
logging level rll notice
logging level rr notice
logging level meas notice
logging level pag info
logging level l1c info
logging level l1p info
logging level dsp debug
logging level pcu notice
logging level ho notice
logging level trx notice
logging level loop notice
logging level abis notice
logging level rtp notice
logging level sum notice
logging level lglobal notice
logging level llapd notice
logging level linp notice
logging level lmux notice
logging level lmi notice
logging level lmib notice
logging level lsms notice
logging level lctrl notice
logging level lgtp notice
logging level lstats notice
logging level lgsup notice
logging level loap notice
logging level lss7 notice
logging level lsccp notice
logging level lsua notice
logging level lm3ua notice
!
line vty
no login
!
e1_input
e1_line 0 driver ipa
e1_line 0 port 0
no e1_line 0 keepalive
phy 0
osmotrx ip 127.0.0.1
osmotrx fn-advance 30
osmotrx rts-advance 5
instance 0
bts 0
band [ЗАДАТЬ GSM900 ИЛИ DCS1800]
ipa unit-id 1801 0
oml remote-ip 127.0.0.1
rtp jitter-buffer 0
paging queue-size 200
paging lifetime 0
uplink-power-target -75
min-qual-rach 50
min-qual-norm -5
ms-power-loop -65
timing-advance-loop
setbsic
trx 0
power-ramp max-initial 0 mdBm
power-ramp step-size 2000 mdB
power-ramp step-interval 1
ms-power-control dsp
phy 0 instance 0
open-bsc.cfg
!
! OpenBSC (0.15.0.763-5121) configuration saved from vty
!!!
!
log stderr
logging filter all 1
logging color 1
logging print category 0
logging timestamp 0
logging level all everything
logging level rll everything
logging level cc everything
logging level mm everything
logging level rr everything
logging level rsl everything
logging level nm everything
logging level mncc notice
logging level pag notice
logging level meas notice
logging level sccp notice
logging level msc notice
logging level mgcp notice
logging level ho notice
logging level db notice
logging level ref notice
logging level gprs debug
logging level ns info
logging level bssgp debug
logging level llc debug
logging level sndcp debug
logging level nat notice
logging level ctrl notice
logging level smpp debug
logging level filter debug
logging level ranap debug
logging level sua debug
logging level lglobal notice
logging level llapd notice
logging level linp notice
logging level lmux notice
logging level lmi notice
logging level lmib notice
logging level lsms notice
logging level lctrl notice
logging level lgtp notice
logging level lstats notice
logging level lgsup notice
logging level loap notice
logging level lss7 notice
logging level lsccp notice
logging level lsua notice
logging level lm3ua notice
log file OsmoBSC.log
logging filter all 0
logging color 1
logging print category 0
logging timestamp 1
logging level all info
logging level rll notice
logging level cc notice
logging level mm notice
logging level rr notice
logging level rsl notice
logging level nm info
logging level mncc notice
logging level pag notice
logging level meas notice
logging level sccp notice
logging level msc notice
logging level mgcp notice
logging level ho notice
logging level db notice
logging level ref notice
logging level gprs debug
logging level ns info
logging level bssgp debug
logging level llc debug
logging level sndcp debug
logging level nat notice
logging level ctrl notice
logging level smpp debug
logging level filter debug
logging level ranap debug
logging level sua debug
logging level lglobal notice
logging level llapd notice
logging level linp notice
logging level lmux notice
logging level lmi notice
logging level lmib notice
logging level lsms notice
logging level lctrl notice
logging level lgtp notice
logging level lstats notice
logging level lgsup notice
logging level loap notice
logging level lss7 notice
logging level lsccp notice
logging level lsua notice
logging level lm3ua notice
!
stats interval 5
!
line vty
no login
!
e1_input
e1_line 0 driver ipa
e1_line 0 port 0
no e1_line 0 keepalive
network
network country code 1
mobile network code 1
short name TestNet
long name TestNet
auth policy accept-all
authorized-regexp .*
location updating reject cause 13
encryption a5 0
neci 1
paging any use tch 0
rrlp mode none
mm info 1
handover 0
handover window rxlev averaging 10
handover window rxqual averaging 1
handover window rxlev neighbor averaging 10
handover power budget interval 6
handover power budget hysteresis 3
handover maximum distance 9999
timer t3101 10
timer t3103 0
timer t3105 40
timer t3107 0
timer t3109 0
timer t3111 0
timer t3113 60
timer t3115 0
timer t3117 0
timer t3119 0
timer t3122 10
timer t3141 0
dyn_ts_allow_tch_f 0
subscriber-keep-in-ram 0
bts 0
type sysmobts
description calypso
band DCS1800
cell_identity 0
location_area_code 1
base_station_id_code 63
ms max power 30
cell reselection hysteresis 4
rxlev access min 0
periodic location update 30
radio-link-timeout 32
channel allocator ascending
rach tx integer 9
rach max transmission 7
channel-descrption attach 1
channel-descrption bs-pa-mfrms 5
channel-descrption bs-ag-blks-res 1
early-classmark-sending forbidden
ip.access unit_id 1801 0
oml ip.access stream_id 255 line 0
neighbor-list mode automatic
codec-support fr amr
amr tch-h modes 0
amr tch-h start-mode 1
gprs mode none
no force-combined-si
trx 0
rf_locked 0
arfcn [ЗАДАТЬ]
nominal power 23
max_power_red 0
rsl e1 tei 0
timeslot 0
phys_chan_config CCCH+SDCCH4
hopping enabled 0
timeslot 1
phys_chan_config TCH/H
hopping enabled 0
timeslot 2
phys_chan_config TCH/H
hopping enabled 0
timeslot 3
phys_chan_config TCH/H
hopping enabled 0
timeslot 4
phys_chan_config TCH/H
hopping enabled 0
timeslot 5
phys_chan_config TCH/H
hopping enabled 0
timeslot 6
phys_chan_config TCH/H
hopping enabled 0
timeslot 7
phys_chan_config TCH/H
hopping enabled 0
mncc-int
default-codec tch-f amr
default-codec tch-h amr
nitb
subscriber-create-on-demand
assign-tmsi
UPD: they write a lot of questions - practical examples of creating a base station and analysis of mobile traffic I will tell and show (on a stand) at the Pentestit Security Conference in my report: “Implementation of the GSM protocol stack”.
UPD: Another my text on the topic Osmocom defcon.ru/wireless-security/4716