Recovering Data from a Seagate FreeAgent Go External Hard Drive
The Seagate FreeAgent Go 500Gb external hard drive served its owner faithfully, but one of the bad days it was a victim of human emotions, when the owner threw the device into the object, causing her great irritation - in her husband in the heat of family drama. The husband was not seriously injured, but things were worse with the drive. When connected to the computer’s USB port, the drive made quiet buzzing sounds and did not start shaft rotation.
fig. 1
In this state, the external hard drive entered our data recovery lab. Visual inspection does not reveal any deformation of the box itself. Given that a blow appears in the prehistory, such a drive is subject to mandatory opening in a laminar box without any attempt to turn it on to avoid further damage. Seagate ST9500325AS (Momentus 5400.6), a representative of the Wyatt family, is removed from the box. The case of the hard drive without deformation and dents on the cover. We take measures to remove dust from all possible places and go to the laminar box. Removing the cover, we find that the block of magnetic heads is located outside the parking ramp.

fig. 2
Using pullers, we carry out the BMG output to the ramp. Next, we extract BMG and carefully examine all 4 sliders and suspensions under the microscope for deformations and the presence of foreign particles. We also inspect the recirculation filter and the surface of the upper plate at the place where BMG sticks. In our case, it was found that there are no deformations of the suspensions, and there are no contamination of the slider. There is a “spot” on the surface of the plate with damage that cannot be seen with the naked eye. There are no metal particles on the recirculation filter. There is no damage to the plastic parking ramp, there is no skew disc package.
Based on the results of this inspection, it was established that it is acceptable to attempt to read the magnetic heads by the original unit, but it is necessary to take into account the presence of damage at the outer edge of the plates. We install the block of magnetic heads back into the drive and collect. Knowing that the drive has been subjected to shock loading, we will replace the original printed circuit board 100536286 Rev E with a known-good donor drive board with ROM transfer. This measure is recommended in order not to get unpleasant surprises due to potential microcracks.
We connect the drive to the SATA port and terminal and apply power. In our case, the drive began to rotate the shaft without any beating. The normal sound of the calibration test was heard and after a few seconds the drive announced its readiness to exchange data in the registers.

fig. 3
The terminal also has a normal drive start log with optional event logging disabled.
Rst 0x08M
(P) SATA Reset
Immediately in the RAM drive, you need to find the HDD configuration module (ID = 0x2A) and remove from it all the keys that are responsible for launching offline scanning procedures, offline and deferred defect concealment, as well as disable auto-unlocking procedures for reading and writing. This measure is necessary so that the drive, when problems are detected, does not try to start defect maintenance procedures, since they will lead to a long delay of BMG over the problem area, which can provoke an avalanche-like destruction (flashing of the plate). The structure of the 0x2A module (system file FC36608F) is quite simple (the order of writing parameters is fairly obvious). In the study (the studies were and continue to be carried out for all drives F3 architecture) the main difficulty was to establish the purpose of each of the parameters and acceptable values.
We reserve the drive firmware (ROM, modules, “system files”). We check on the test modules, which are not important for the functioning of the drive, the ability to write and read recorded by each of the heads. After verifying that all the heads work correctly, let us move on to assessing the quality of their reading in the user zone. To do this, we construct a map of the zone distribution within the boundaries of the entire logical space (from 0 to 976 773 167 sectors of the LBA range). After assessing the size of the mini-zones, we can conclude that to assess the readability of the heads in this instance, it is enough to continuously read about 300,000 sectors at the end of the logical space, about 450,000 sectors in the middle and about 600,000 at the beginning of the disk (knowing about the presence of damage to the plates, the beginning of the disk is not tested).
After making sure that all heads can read, we will configure the reading parameters: UDMA mode, read operation timeout no more than 500 milliseconds, in the absence of readiness a soft reset and skipping of the mini-zone. Having built the list of mini-zones in the reverse order, we proceed to the sequential reading of mini-zones (creating a sector-by-sector copy).
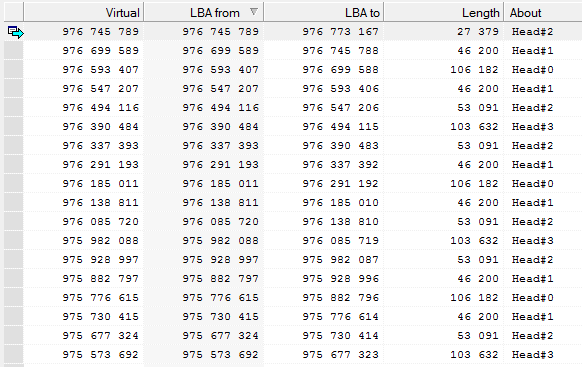
fig. 4
99% of the logical space was read without any difficulty. Beginning with LBA 6 541 xxx on head No. 1, the first delay was detected. Reading was immediately interrupted and the drive was sent to sleep mode (head parking on a ramp, shaft stop, but the firmware remains loaded in the RAM of the hard disk. We rebuild the list of zones in a direct order and proceed to sequential reading.
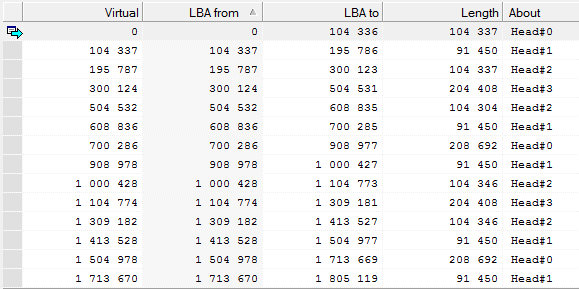
fig. 5
With LBA 2,518 xxx, a reading delay on head No. 1 was also detected. We also quickly send the drive to sleep mode. We carry out a rough assessment of the boundaries of the defective zone and the size of 6 541 000 - 2 518 000 = 4 023 000, which is approximately equal to 2 GB.
Further analysis is carried out exclusively copies on a working drive. Let's evaluate the contents of LBA 0.

fig. 6
The value 0x07 at offset 0x1C2 tells us that the partition type is NTFS (or ExFAT).
A value of 0x00000800 at offset 0x1C6 indicates that the partition starts at sector 2 048.
A value of 0x3A384800 at offset 0x1CA says that the partition is 976,766,976 sectors long.
Let's move on to sector 2 048
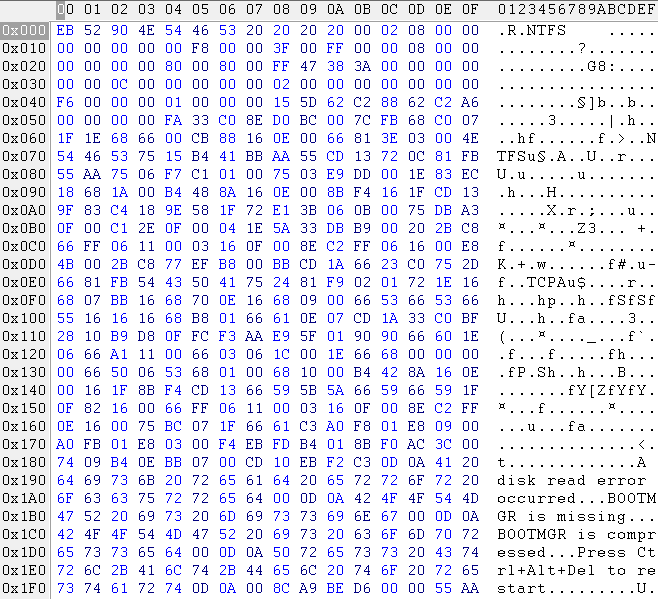
fig. 7
From the NTFS parameters we see that the sector is 512 bytes, the sectors in cluster 8, the cluster size is 512 * 8 = 4096 bytes. MFT is located from cluster 0x00000000000C0000 (786 432) or from sector 6 293 504 (786 432 * 8 + 2048). MFT Mirror is located in cluster 0x0000000000000002 (2) or originates from sector 2 064 (2 * 8 + 2048).
Knowing the boundaries of defect formation, we can notice that with a high probability defects will occur in the area with MFT. To do this, evaluate the first MFT record (in MFT Mirror, which duplicates the first 4 MFT records as it is read). In our case, this file is located in a single fragment, starting from sector 6,293,504 and length 277,092 sectors.

fig. 8
Note that the main difficulties in reading were recorded on the head number 1, so we will start reading from the zone on the head number 0. We wake the drive from sleep mode and read the MFT fragment on the zero head. In this case, it did not cause difficulties and allowed to obtain more than 75% of the most important structure. Next, we use the PIO mode for better control of read operations and try to read the remaining 68,400 sectors from the problem area. Manipulating the size of the jumps, the timeouts of waiting for readiness, the size of the block when reading in several passes, we read the problem area. There are 18 unread sectors in the MFT area, which are repeated in their location (the cyclicality corresponds to the SPT for these zones), which indicates a scratch on this plate.
Again, sending the drive to sleep mode, we will analyze the records in the MFT for copies and evaluate the location of the files in order to understand which of them fall into the defective zone. About 50 affected files are detected. We check the technical specifications and find out what can be discarded from the script for reading more than 35 files. For the rest, we construct the chains of their location and sort them in the order they follow.
When reading, we note that in addition to problems on the surface read by the first head, problems are found on the surface read by head No. 3. We exclude the reading of chains along problematic surfaces and read the sections along surfaces 0 and 2.
Next, we will try to resume reading the problem chains with the heads No. 1 and No. 3, and in less than 30 seconds a fairly loud knock is heard from the drive. We are trying to file a reset, but the drive does not respond and continues to knock. We decide to turn off the power. Re-starting the power starts with a knock from the drive. We turn off the power and make a conclusion about the development of degradation processes due to the reading of the damaged zone.
We go to the laminar box and examine what happened. The upper surface looks perfect, but under the microscope, an avalanche-like process of plate destruction (washed down) is detected. The presence of metal particles on the sliders No. 1 and No. 3 clarifies the diagnosis.
From a sector-by-sector copy, we create a file copy with the transfer of files that have unread fragments to a separate folder (with the original hierarchy). We are also making a precise analysis of the MFT to understand what the loss of 18 sectors led to. From the damage analysis, it can be clearly established that no more than 7 files are lost. Unfortunately, Bitmap is also in the defective area, and its contents cannot be used for analysis.
When accepting the result, the owner of the disk was satisfied with the result (more than 99.9% of the required data) and considered that there was no need to conduct additional analysis of regular expressions to search for missing files due to MFT damage.
In conclusion, I want to draw the attention of many users that it is not so simple in the case of drives in which the "heads" are stuck outside the parking ramp. And how dangerous are the proposals of people who are far from understanding the principles of operation of a hard disk drive, open the device on their own and remove their heads, and then use a dd from Linux or WinHex under Windows to make a “safe” sector-by-sector copy. If such measures were applied to the drive described in the publication, it would turn into a corpse without the possibility of data recovery when reading a second gigabyte.
Next post: Is Prestigio Data Safe II data encryption or recovery from an external hard drive always reliable
Previous post: A bit of reverse engineering USB flash on the SK6211 controller
Publication outside habrahabr: Recovering data from a faulty HDD WD4000FYYZ-01UL1B1
fig. 1
In this state, the external hard drive entered our data recovery lab. Visual inspection does not reveal any deformation of the box itself. Given that a blow appears in the prehistory, such a drive is subject to mandatory opening in a laminar box without any attempt to turn it on to avoid further damage. Seagate ST9500325AS (Momentus 5400.6), a representative of the Wyatt family, is removed from the box. The case of the hard drive without deformation and dents on the cover. We take measures to remove dust from all possible places and go to the laminar box. Removing the cover, we find that the block of magnetic heads is located outside the parking ramp.
fig. 2
Using pullers, we carry out the BMG output to the ramp. Next, we extract BMG and carefully examine all 4 sliders and suspensions under the microscope for deformations and the presence of foreign particles. We also inspect the recirculation filter and the surface of the upper plate at the place where BMG sticks. In our case, it was found that there are no deformations of the suspensions, and there are no contamination of the slider. There is a “spot” on the surface of the plate with damage that cannot be seen with the naked eye. There are no metal particles on the recirculation filter. There is no damage to the plastic parking ramp, there is no skew disc package.
Based on the results of this inspection, it was established that it is acceptable to attempt to read the magnetic heads by the original unit, but it is necessary to take into account the presence of damage at the outer edge of the plates. We install the block of magnetic heads back into the drive and collect. Knowing that the drive has been subjected to shock loading, we will replace the original printed circuit board 100536286 Rev E with a known-good donor drive board with ROM transfer. This measure is recommended in order not to get unpleasant surprises due to potential microcracks.
We connect the drive to the SATA port and terminal and apply power. In our case, the drive began to rotate the shaft without any beating. The normal sound of the calibration test was heard and after a few seconds the drive announced its readiness to exchange data in the registers.
fig. 3
The terminal also has a normal drive start log with optional event logging disabled.
Rst 0x08M
(P) SATA Reset
Immediately in the RAM drive, you need to find the HDD configuration module (ID = 0x2A) and remove from it all the keys that are responsible for launching offline scanning procedures, offline and deferred defect concealment, as well as disable auto-unlocking procedures for reading and writing. This measure is necessary so that the drive, when problems are detected, does not try to start defect maintenance procedures, since they will lead to a long delay of BMG over the problem area, which can provoke an avalanche-like destruction (flashing of the plate). The structure of the 0x2A module (system file FC36608F) is quite simple (the order of writing parameters is fairly obvious). In the study (the studies were and continue to be carried out for all drives F3 architecture) the main difficulty was to establish the purpose of each of the parameters and acceptable values.
We reserve the drive firmware (ROM, modules, “system files”). We check on the test modules, which are not important for the functioning of the drive, the ability to write and read recorded by each of the heads. After verifying that all the heads work correctly, let us move on to assessing the quality of their reading in the user zone. To do this, we construct a map of the zone distribution within the boundaries of the entire logical space (from 0 to 976 773 167 sectors of the LBA range). After assessing the size of the mini-zones, we can conclude that to assess the readability of the heads in this instance, it is enough to continuously read about 300,000 sectors at the end of the logical space, about 450,000 sectors in the middle and about 600,000 at the beginning of the disk (knowing about the presence of damage to the plates, the beginning of the disk is not tested).
After making sure that all heads can read, we will configure the reading parameters: UDMA mode, read operation timeout no more than 500 milliseconds, in the absence of readiness a soft reset and skipping of the mini-zone. Having built the list of mini-zones in the reverse order, we proceed to the sequential reading of mini-zones (creating a sector-by-sector copy).
fig. 4
99% of the logical space was read without any difficulty. Beginning with LBA 6 541 xxx on head No. 1, the first delay was detected. Reading was immediately interrupted and the drive was sent to sleep mode (head parking on a ramp, shaft stop, but the firmware remains loaded in the RAM of the hard disk. We rebuild the list of zones in a direct order and proceed to sequential reading.
fig. 5
With LBA 2,518 xxx, a reading delay on head No. 1 was also detected. We also quickly send the drive to sleep mode. We carry out a rough assessment of the boundaries of the defective zone and the size of 6 541 000 - 2 518 000 = 4 023 000, which is approximately equal to 2 GB.
Further analysis is carried out exclusively copies on a working drive. Let's evaluate the contents of LBA 0.
fig. 6
The value 0x07 at offset 0x1C2 tells us that the partition type is NTFS (or ExFAT).
A value of 0x00000800 at offset 0x1C6 indicates that the partition starts at sector 2 048.
A value of 0x3A384800 at offset 0x1CA says that the partition is 976,766,976 sectors long.
Let's move on to sector 2 048
fig. 7
From the NTFS parameters we see that the sector is 512 bytes, the sectors in cluster 8, the cluster size is 512 * 8 = 4096 bytes. MFT is located from cluster 0x00000000000C0000 (786 432) or from sector 6 293 504 (786 432 * 8 + 2048). MFT Mirror is located in cluster 0x0000000000000002 (2) or originates from sector 2 064 (2 * 8 + 2048).
Knowing the boundaries of defect formation, we can notice that with a high probability defects will occur in the area with MFT. To do this, evaluate the first MFT record (in MFT Mirror, which duplicates the first 4 MFT records as it is read). In our case, this file is located in a single fragment, starting from sector 6,293,504 and length 277,092 sectors.
fig. 8
Note that the main difficulties in reading were recorded on the head number 1, so we will start reading from the zone on the head number 0. We wake the drive from sleep mode and read the MFT fragment on the zero head. In this case, it did not cause difficulties and allowed to obtain more than 75% of the most important structure. Next, we use the PIO mode for better control of read operations and try to read the remaining 68,400 sectors from the problem area. Manipulating the size of the jumps, the timeouts of waiting for readiness, the size of the block when reading in several passes, we read the problem area. There are 18 unread sectors in the MFT area, which are repeated in their location (the cyclicality corresponds to the SPT for these zones), which indicates a scratch on this plate.
Again, sending the drive to sleep mode, we will analyze the records in the MFT for copies and evaluate the location of the files in order to understand which of them fall into the defective zone. About 50 affected files are detected. We check the technical specifications and find out what can be discarded from the script for reading more than 35 files. For the rest, we construct the chains of their location and sort them in the order they follow.
When reading, we note that in addition to problems on the surface read by the first head, problems are found on the surface read by head No. 3. We exclude the reading of chains along problematic surfaces and read the sections along surfaces 0 and 2.
Next, we will try to resume reading the problem chains with the heads No. 1 and No. 3, and in less than 30 seconds a fairly loud knock is heard from the drive. We are trying to file a reset, but the drive does not respond and continues to knock. We decide to turn off the power. Re-starting the power starts with a knock from the drive. We turn off the power and make a conclusion about the development of degradation processes due to the reading of the damaged zone.
We go to the laminar box and examine what happened. The upper surface looks perfect, but under the microscope, an avalanche-like process of plate destruction (washed down) is detected. The presence of metal particles on the sliders No. 1 and No. 3 clarifies the diagnosis.
From a sector-by-sector copy, we create a file copy with the transfer of files that have unread fragments to a separate folder (with the original hierarchy). We are also making a precise analysis of the MFT to understand what the loss of 18 sectors led to. From the damage analysis, it can be clearly established that no more than 7 files are lost. Unfortunately, Bitmap is also in the defective area, and its contents cannot be used for analysis.
When accepting the result, the owner of the disk was satisfied with the result (more than 99.9% of the required data) and considered that there was no need to conduct additional analysis of regular expressions to search for missing files due to MFT damage.
In conclusion, I want to draw the attention of many users that it is not so simple in the case of drives in which the "heads" are stuck outside the parking ramp. And how dangerous are the proposals of people who are far from understanding the principles of operation of a hard disk drive, open the device on their own and remove their heads, and then use a dd from Linux or WinHex under Windows to make a “safe” sector-by-sector copy. If such measures were applied to the drive described in the publication, it would turn into a corpse without the possibility of data recovery when reading a second gigabyte.
Next post: Is Prestigio Data Safe II data encryption or recovery from an external hard drive always reliable
Previous post: A bit of reverse engineering USB flash on the SK6211 controller
Publication outside habrahabr: Recovering data from a faulty HDD WD4000FYYZ-01UL1B1