Implementation of a custom UI element for timing. Part 1
- Tutorial
On November 17, in Moscow, as part of the International Conference on Mobile Developers MBLTdev, Alexander Zimin made a presentation on “Visualizing Beyond the Standard Components of UIKit”. First of all, this report will interest iOS developers who want to learn more about developing custom UI elements. He interested me in the example of custom control, which I decided to implement and refine taking into account the theses voiced in the report. An example has been implemented on
The report was an example of a custom

This component is similar to
Take it
It is necessary:
We create
The hierarchy consists of the following elements:
Let’s set it up
Create a class
We redefine initializers for cases when ours
We place our hierarchy. This cannot be done in initializers, because we do not know the actual sizes of the views at the moment. We can find them in the method
We enter a flag indicating that the initialization has been completed.
Since scrolling leads to a challenge
Done. We look at the result of building a hierarchy. Let's create

Now we look at the living hierarchy.

The hierarchy is built correctly, we continue.
Background
Next step: make support
We make a public property that contains information about
Now we define how it will be added to the hierarchy. Redefinable
What is the logic here? We remove the previous one
Also consider the case when
Consider a new hierarchy. Add

Everything is good!
To implement the dial we use
The method allows you to place
Done. Now you need to add a method
We make a constant
The step will be calculated when setting the numbers on the dial.
Now add a public property to set the number of digits on the dial.
And we determine for it
Done. When
Now the
Let's look at the hierarchy
The hierarchy turned out to be true - all the inscriptions are located on
Please note that some applications use horizontal screen orientation. To handle this situation, we will track the notification (class
Add
Since blocks are implicitly capturing
Do not forget to unsubscribe from notifications in the method
The dial is implemented. Read about the mathematics of rotation and the next steps in creating custom controls in the second part of the article .
The whole project is available on gita .
Swift, I am implementing it on Objective-C.How to develop custom UI elements:
- It is necessary to understand how the basic element works: to study all its properties, methods,
delegateand methodsdataSource. - Design dependent
UIView+elements. You need to make a universal solution that anyone will displayUIView. For example, our item hascontentView. It should be designed so that the user can assign any thereUIViewwithout thinking about the implementation of our UI element. - Do not forget about
UIControl. If you need any custom button or other control, it’s better to inherit fromUIControlthan fromUIView. ThereUIControlis aTarget-Actionsystem that allows you to "stretch"IBActionfromInterface Builderthe button directly into the code. Its advantage overUIViewis the presence of states and better touch tracking. - You should study the components close to yours.
- Do not forget about the features of different devices, in particular, the tactile vibration of the iPhone 7 (class
UIImpactFeedbackGenerator) when working with action components.
What will be implemented
The report was an example of a custom
UIViewthat resembles UIPickerView. It was intended for timing. This component is similar to
UIPickerView. Accordingly, we need to implement:- auto-spin;
- the drum stops at the element;
- iPhone 7 needs feedback vibration (not implemented by me).
How to implement?
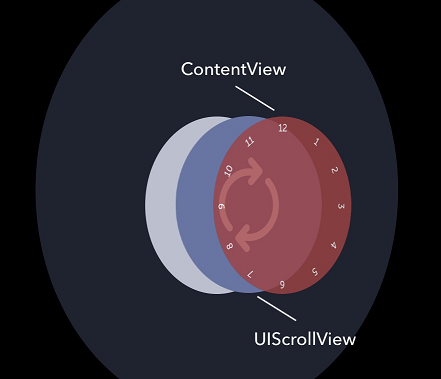
Take it
UIView, make it round and hang it on it UILabelwith numbers. For rotation, we add UIScrollViewwith infinite contentSizeand based on the shift we will consider the rotation angle. It is necessary:
- calculate the shift
x,ybyUIScrollView, - recognize the direction
- twist
contentView, - screw to the desired item
- give the opportunity to substitute any
UIView.
Hierarchy preparation
We create
AYNCircleView. This will be the class that contains our entire custom element. At this stage, he has nothing public, we are doing everything privately. Next, we begin to create a hierarchy. First, build our viewc Interface Builder. Let's do it AYNCircleView.xiband deal with the hierarchy. The hierarchy consists of the following elements:
contentView- a circle on which everyone else will besubviews,scrollViewwill provide rotation.
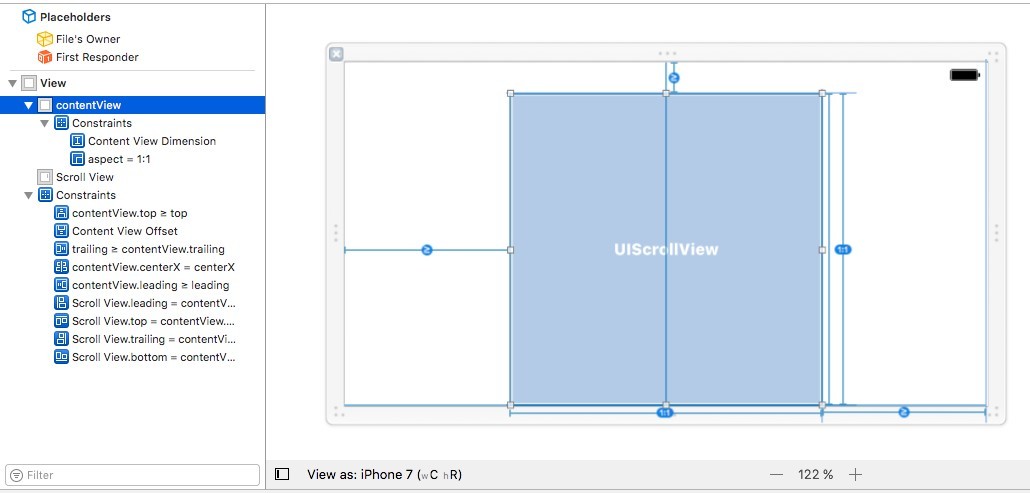
Let’s set it up
constraints. We are most interested in height contentViewand bottom space. They will provide the size and position of our circle. The rest constraintsdo not allow to get out contentViewof bounds superview. For convenience, we denote by the constant the side of contentSizey scrollView. This will not greatly affect performance, but it simulates the “infinity” of rotation. If you are attentive to little things, you can implement a “jump” system to significantly reduce contentSizey scrollView. Create a class
AYNCircleView.@interface AYNCircleView : UIView
@end
static CGFloat const kAYNCircleViewScrollViewContentSizeLength = 1000000000;
@interface AYNCircleView ()
@property (assign, nonatomic) BOOL isInitialized;
@property (assign, nonatomic) CGFloat circleRadius;
@property (weak, nonatomic) IBOutlet UIView *contentView;
@property (weak, nonatomic) IBOutlet UIScrollView *scrollView;
@property (weak, nonatomic) IBOutlet NSLayoutConstraint *contentViewDimension;
@property (weak, nonatomic) IBOutlet NSLayoutConstraint *contentViewOffset;
@end
We redefine initializers for cases when ours
viewwill be initialized from Interface Builderand in the code.@implementation AYNCircleView
#pragma mark - Initializers
- (instancetype)initWithFrame:(CGRect)frame {
self = [super initWithFrame:frame];
if (self) {
[self commonInit];
}
return self;
}
- (instancetype)initWithCoder:(NSCoder *)aDecoder {
self = [super initWithCoder:aDecoder];
if (self) {
[self commonInit];
}
return self;
}
#pragma mark - Private
- (void)commonInit {
UIView *nibView = [[NSBundle mainBundle] loadNibNamed:NSStringFromClass([self class]) owner:self options:nil].firstObject;
[self addSubview:nibView];
self.scrollView.contentSize = CGSizeMake(kAYNCircleViewScrollViewContentSizeLength, kAYNCircleViewScrollViewContentSizeLength);
self.scrollView.contentOffset = CGPointMake(kAYNCircleViewScrollViewContentSizeLength / 2.0, kAYNCircleViewScrollViewContentSizeLength / 2.0);
self.scrollView.delegate = self;
}
We place our hierarchy. This cannot be done in initializers, because we do not know the actual sizes of the views at the moment. We can find them in the method
- (void)layoutSubviews, so we adjust the sizes there. To do this, enter the radius of the circle, which depends on the minimum width and height.@property (assign, nonatomic) CGFloat circleRadius;We enter a flag indicating that the initialization has been completed.
@property (assign, nonatomic) BOOL isInitialized;Since scrolling leads to a challenge
- (void)layoutSubviews, it would be wrong to constantly calculate the position of our hierarchy. We update constraints to set the correct sizes of ours views.#pragma mark - Layout
- (void)layoutSubviews {
[super layoutSubviews];
if (!self.isInitialized) {
self.isInitialized = YES;
self.subviews.firstObject.frame = self.bounds;
self.circleRadius = MIN(CGRectGetWidth(self.bounds), CGRectGetHeight(self.bounds)) / 2;
self.contentView.layer.cornerRadius = self.circleRadius;
self.contentView.layer.masksToBounds = YES;
[self setNeedsUpdateConstraints];
}
}
- (void)updateConstraints {
self.contentViewDimension.constant = self.circleRadius * 2;
self.contentViewOffset.constant = self.circleRadius;
[super updateConstraints];
}Done. We look at the result of building a hierarchy. Let's create
view controlleron which our control will be located. Now we look at the living hierarchy.
The hierarchy is built correctly, we continue.
Background UIView
Next step: make support
backgroundView. Our custom control is conceived so that any can be put on the background view, and the user of this control does not think about implementation. We make a public property that contains information about
backgroundView:@property (strong, nonatomic) UIView *backgroundView;Now we define how it will be added to the hierarchy. Redefinable
setter.- (void)setBackgroundView:(UIView *)backgroundView {
[_backgroundView removeFromSuperview];
_backgroundView = backgroundView;
[_contentView insertSubview:_backgroundView atIndex:0];
if (_isInitialized) {
[self layoutBackgroundView];
}
}What is the logic here? We remove the previous one
viewfrom the hierarchy, add a new one backgroundViewto the lowest level of the hierarchy and change its size in the method.- (void)layoutBackgroundView {
self.backgroundView.frame = CGRectMake(0, 0, self.circleRadius * 2, self.circleRadius * 2);
self.backgroundView.layer.masksToBounds = YES;
self.backgroundView.layer.cornerRadius = self.circleRadius;
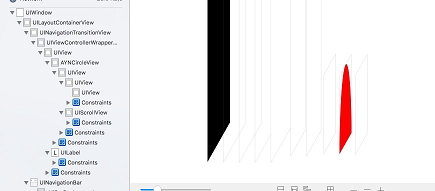
}Also consider the case when
viewit is just created. To resize correctly, add a call to this method in - (void)layoutSubviews. Consider a new hierarchy. Add
UIViewred color and look at the hierarchy.UIView *redView = [UIView new];
redView.backgroundColor = [UIColor redColor];
self.circleView.backgroundView = redView;Everything is good!
Dial implementation
To implement the dial we use
UILabel. If you need to increase productivity, we go down to the level CoreGraphicsand add signatures already there. Our solution is a category over UILabelwhere we define “rotated” label. I added a bit of customization to the method: text color and font.@interface UILabel (AYNHelpers)
+ (UILabel *)ayn_rotatedLabelWithText:(NSString *)text angle:(CGFloat)angle circleRadius:(CGFloat)circleRadius offset:(CGFloat)offset font:(UIFont *)font textColor:(UIColor *)textColor;
@endThe method allows you to place
labelon a circle. circleRadiusdetermines the radius of this circle, offsetdetermines the offset relative to this circle, angle- the central angle. Create a rotated labelat the center of the circle, and then use xOffsetand yOffsetmove the center of this labelin the right place.#import "UILabel+AYNHelpers.h"
@implementation UILabel (AYNHelpers)
+ (UILabel *)ayn_rotatedLabelWithText:(NSString *)text angle:(CGFloat)angle circleRadius:(CGFloat)circleRadius offset:(CGFloat)offset font:(UIFont *)font textColor:(UIColor *)textColor {
UILabel *rotatedLabel = [[UILabel alloc] initWithFrame:CGRectZero];
rotatedLabel.text = text;
rotatedLabel.font = font ?: [UIFont boldSystemFontOfSize:22.0];
rotatedLabel.textColor = textColor ?: [UIColor blackColor];
[rotatedLabel sizeToFit];
rotatedLabel.transform = CGAffineTransformMakeRotation(angle);
CGFloat angleForPoint = M_PI - angle;
CGFloat xOffset = sin(angleForPoint) * (circleRadius - offset);
CGFloat yOffset = cos(angleForPoint) * (circleRadius - offset);
rotatedLabel.center = CGPointMake(circleRadius + xOffset, circleRadius + yOffset);
return rotatedLabel;
}
@end
Done. Now you need to add a method
- (void)addLabelsWithNumber:to our contentViewlabels. For this, it is convenient to store the step of the angle at which the signatures are located. If you take a circle of 360 degrees, and 12 signatures, then the step will be 360/12 = 30 degrees. We create a property, it is useful to us to normalize the angle of rotation.@property (assign, nonatomic) CGFloat angleStep;
Делаем константый offset для лейблов, который тоже понадобится позже.
static CGFloat const kAYNCircleViewLabelOffset = 10;We make a constant
offsetfor labels, which will also be needed later.- (void)addLabelsWithNumber:(NSInteger)numberOfLabels {
if (numberOfLabels > 0) {
[self.contentView.subviews enumerateObjectsUsingBlock:^(__kindof UIView * _Nonnull obj, NSUInteger idx, BOOL * _Nonnull stop) {
if ([obj isKindOfClass:[UILabel class]]) {
[obj removeFromSuperview];
}
}];
self.angleStep = 2 * M_PI / numberOfLabels;
for (NSInteger i = 0; i < numberOfLabels; i++) {
UILabel *rotatedLabel = [UILabel ayn_rotatedLabelWithText:[NSString stringWithFormat:@"%ld", i]
angle:self.angleStep * i
circleRadius:self.circleRadius
offset:kAYNCircleViewLabelOffset
font:self.labelFont
textColor:self.labelTextColor];
[self.contentView addSubview:rotatedLabel];
}
}
}
The step will be calculated when setting the numbers on the dial.
@property (assign, nonatomic) NSUInteger numberOfLabels;
Now add a public property to set the number of digits on the dial.
- (void)setNumberOfLabels:(NSUInteger)numberOfLabels {
_numberOfLabels = numberOfLabels;
if (_isInitialized) {
[self addLabelsWithNumber:_numberOfLabels];
}
}And we determine for it
setterby analogy with backgroundView. Done. When
viewalready created, set the number of digits on the dial. Do not forget about the method - (void)layoutSubviewsand initialization AYNCircleView. Signatures should also be put there.- (void)layoutSubviews {
[super layoutSubviews];
if (!self.isInitialized) {
self.isInitialized = YES;
….
[self addLabelsWithNumber:self.numberOfLabels];
...
}
}
Now the
- (void)viewDidLoadcontroller on viewwhich our control is depicted looks like this:- (void)viewDidLoad {
[super viewDidLoad];
UIView *redView = [UIView new];
    redView.backgroundColor = [UIColor redColor];
    self.circleView.backgroundView = redView;
self.circleView.numberOfLabels = 12;
self.circleView.delegate = self;
}
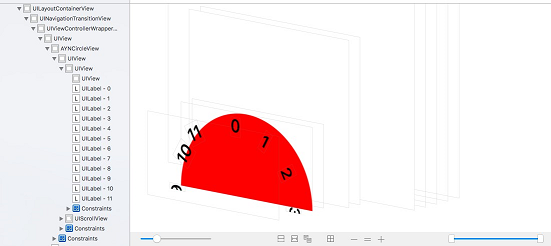
Let's look at the hierarchy
viewsand arrangement of numbers. The hierarchy turned out to be true - all the inscriptions are located on
contentView.Interface rotation support
Please note that some applications use horizontal screen orientation. To handle this situation, we will track the notification (class
NSNotification) about a change in the orientation of the interface. We are interested UIDeviceOrientationDidChangeNotification. Add
observerthis notification in the initializer of our control and process it in the same block.__weak __typeof(self) weakSelf = self;
[[NSNotificationCenter defaultCenter] addObserverForName:UIDeviceOrientationDidChangeNotification object:nil queue:nil usingBlock:^(NSNotification * _Nonnull note) {
__strong __typeof(weakSelf) strongSelf = weakSelf;
strongSelf.isInitialized = NO;
[strongSelf setNeedsLayout];
}];Since blocks are implicitly capturing
self, this can lead to retain cycle, so weaken the link to self. When changing the orientation, we initialize the control, as it were, to recalculate the radius of the circle, the new center, etc. Do not forget to unsubscribe from notifications in the method
- (void)dealloc.- (void)dealloc {
[[NSNotificationCenter defaultCenter] removeObserver:self name:UIDeviceOrientationDidChangeNotification object:nil];
}The dial is implemented. Read about the mathematics of rotation and the next steps in creating custom controls in the second part of the article .
The whole project is available on gita .