An easy way to create an IoT application for monitoring remote servers on the IBM Bluemix platform
The Internet of things is becoming more familiar not only for IT professionals, but also for ordinary people. The systems "Smart Home", "Smart Home Appliances and Lighting Systems" - all this already surprises few people. In production and in telecommunications, this technology is very useful, because it allows you to read data in real time, work with remote systems. IoT is gradually finding its place in business, agriculture, science, healthcare.
Creating an IoT application is not as difficult as you might think. This article describes how you can customize your IBM Bluemix workspace by creating a demo application for monitoring remote servers or managing a distributed network.
What technologies are required to get started?
- IBM Bluemix - IBM's cloud offering on
- Cloud Foundry (open source implementation of the concept of “platform as
- service")
- Node-RED - an open tool
- source code specifically designed to work with the Internet of things
- Twilio - SMS messaging service
- Mobile phone number and the phone itself for receiving SMS notifications
- Introducing JavaScript Programming
The application itself will be called pingGo, under this name it will appear in the material.
The main functions of the created application are monitoring the state of machines by monitoring network and machine ports. If the machine crashes, then the application notifies the operator / user of this with an SMS message. Applications of this type will be very useful for a wide range of technical workers, data center operators, engineers who need to remotely control servers or distributed computer networks. We must not forget that the application is a demo, that is, it shows the capabilities of the system.
We create an application for the Bluemix platform based on Node-RED
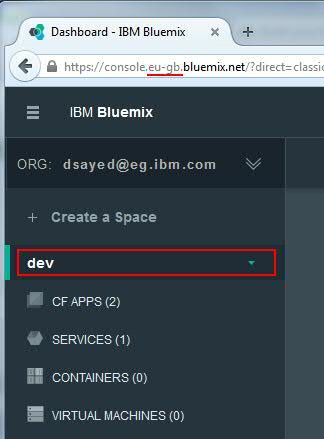
1. Log in using your Bluemix account or register to create a free account. We make sure that the dev space is created.
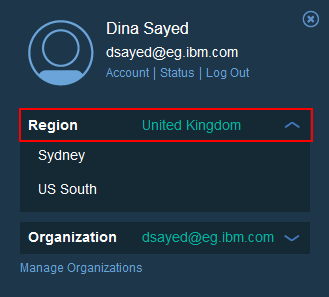
2. Open your profile page, make sure that the active region is configured correctly. You need to deploy your own application in one of the existing Bluemix regions, the choice of the region does not really matter. The demonstration selected the region of Europe United Kingdom.
3. We search and select the Node-RED Starter service in the catalog.
4. Enter a unique name for the application, which automatically specifies the host name and click Create. We are waiting for the following message to appear: Your app is running. YourAppName.eu-gb.mybluemix.net. If you receive an error message of the form: Error: Lost connectiontoserver, you should make sure that you are using an HTTPS connection. At the same time, your URL should look something like this: pinggo.eu-gb.mybluemix.net/red.
Create a two-node application
Now, let's get started with Node-RED by creating a simple two-node application.
1. Open the URL link for your Bluemix application and click Go to your Node-RED flow editor. In the stream editor, you will see a blank sheet in the center of the screen and several available nodes in the palette on the left.
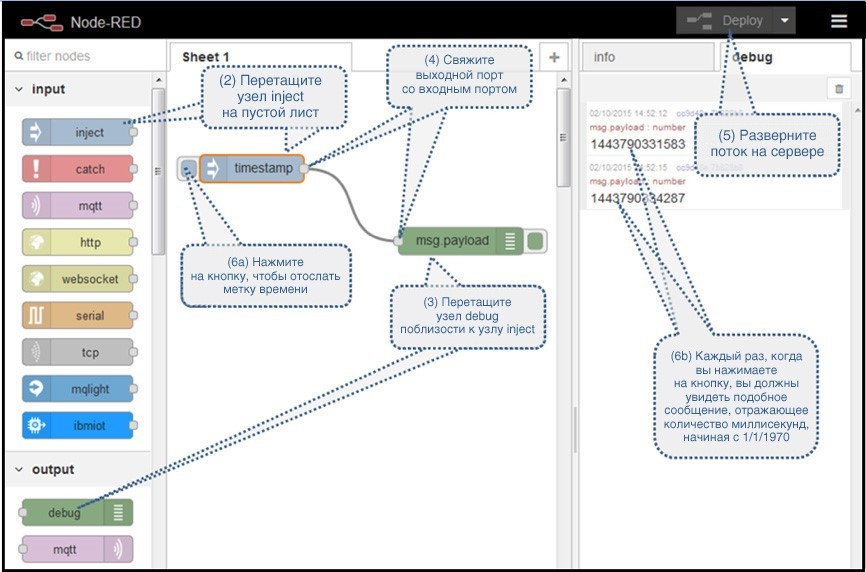
2. Find the Inject node in the palette (in the Input section). Drag it onto a blank sheet. This node has a button that will send the current time stamp to the connected nodes.
3. Find the Debug node in the palette (in the Output section). Drag it and place it next to the Inject node. This node allows you to see incoming messages on the Debug tab of your application.
4. Associate the output port of the Inject node with the input port of the Debug node. Messages with timestamps for the Inject node will be routed to the Debug node. At the same time, the Debug node displays the text msg.payload (timestamp) on the Debug tab (link these two nodes by clicking on the gray square on the right side of the Inject node and, without releasing the button, move the cursor to the gray square on the left side of the Debug node)
5. Expand the Node-RED stream by clicking the Deploy button in the upper right corner of the page.
Click the button on the left side of the Inject node.
The time stamp of the moment of pressing will be displayed on the Debug tab, as shown in the figure below.
Add a custom node to the palette.
At this stage, add the Ping node to the palette. To add a custom node, edit the JSON file with the name package.json.
1. Return to the Bluemix dashboard.
2. In the left navigation pane, open the Files page.
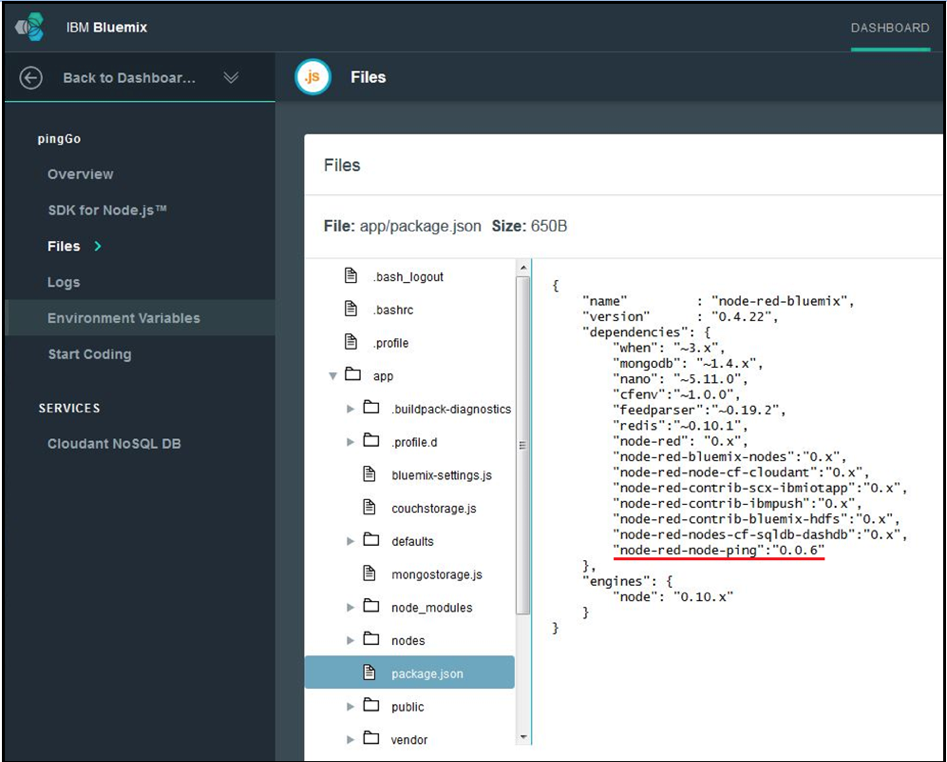
3. Browse to the app / package.json file.
We see a file that is similar to the file in this listing:
{ «name»: «node-red-bluemix», «version»: «0.4.22», «dependencies»: { «when»: "~3.x", «mongodb»: "~1.4.x", «nano»: "~5.11.0", «cfenv»:"~1.0.0", «feedparser»:"~0.19.2", «redis»:"~0.10.1", «node-red»: «0.x», «node-red-bluemix-nodes»:«0.x», «node-red-node-cf-cloudant»:«0.x», «node-red-contrib-scx-ibmiotapp»:«0.x», «node-red-contrib-ibmpush»:«0.x», «node-red-contrib-bluemix-hdfs»:«0.x», «node-red-nodes-cf-sqldb-dashdb»:«0.x» }, «engines»: { «node»: «0.10.x» } }4. Modify the application files. You need to edit the app / package.json file and add the entry “node-red-node-ping”: “0.0.6” to the list of required packages in the dependencies section of this file.
There are two ways to modify application files. You can download the application, edit the files locally, and then transfer the changes back to the Bluemix environment. You can also use the IBM DevOpsServices services to edit and deploy your changes directly from a web browser.
To download and edit application files locally, follow the instructions on the Start Coding page in the Bluemix toolbar. This page provides instructions for deploying the application using the CloudFoundry command line interface.
To use the IBM DevOps services, follow the instructions in this tutorial . It describes how to configure integration with Git, how to transfer the changes made to the environment, and how to deploy them to your workspace.
However, if you choose a way to edit the package.json file, the new file should look like this.
5. Return to the stream editor.
6. We update the stream editor, we see that at the bottom of the palette a new Ping node has appeared.
Add the Ping node to our stream.

1. Drag the Ping node onto the sheet in the stream editor;
2. Double-click on this node in order to edit its configuration. Enter the IP address of the machine you want to monitor in the Target field. Specify a short descriptive name for this node, for example, pingmyServer. After that, click OK.
3. We observe the output of the Ping node, for this we need to connect the Debug node to this output.

4. We deploy the Node-RED application with the nodes that are currently defined. Debug messages are displayed on the Debug tab in the right pane of the figure above.
Checking ping responses
If the ping request passes successfully, the Ping node returns the duration of its passage in the msg.payload property. If no response is received from the server within 5 seconds, this node returns false. You can configure the Function node to check the msg.payload value.
1. Locate the Function section in your palette and drag the Function node near the Ping node on the sheet.
2. Connect the output of the Ping node to the input of the Function node.
3. Double-click on this node to edit it. In the Name field, enter the text: is Alive? ..
In the function block, add the following code:
msg.tripTime = msg.payload; msg.payload = msg.payload !== false? «Your server is running»: «Your server is down»; return msg;4. Click OK to edit the dialog.
The Function node will create a string that contains the text “Yourserverisrunning” (your server is up) if it received a response within 5 seconds, or the text “Yourserverisdown” (your server is down) if your server is unavailable.
5. Since you most likely If you don’t want to receive new SMS messages every 20 seconds, add a node to the application’s thread to handle exceptions
a. Drag the “ReportbyException” node onto the sheet
b. Double-click on this node and select the blockunlessvaluechanges option.
Now messages will not be received until as long as the property msg.payload does not differ from the analogue ary properties of the previous message.
c. In the Name field for the site, type the sendonce.
d. Click OK.
Send SMS alerts using Twilio
At this stage, almost everything is ready, it remains only to add the Twilio node to the application stream.
1. Write down your Twilio number and credentials from the Twilio account you created.
a. Open the Twilio messaging page.
b ... Click GetyourfirstTwilioNumber. Remember this SMS sender number; for example, you can copy it to a text file.
c. Click ChoosethisNumber.
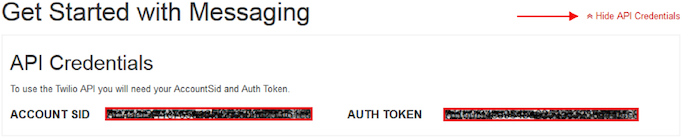
d. On the Twilio messaging page, find and click on the little link called Show API Credentials. Remember the SID and authentication token of your account; for example, copy them to a text file.
2. Return to the stream editor.
3. Locate the Twilio node in the Output section of the palette and drag it onto your sheet.
4. Double-click the Twilio node to configure its settings.
a. In the Service field, select ExternalService.
b. Click the edit icon to open the Addnewtwilio-apiconfignode dialog box.
c. In this dialog box, enter the SID of the account, the phone number of the SMS sender, and the authentication token that you copied from the Twilio messaging page.
d. Click Add to return to the Edit dialog box.
e. In the SMS to field, enter your mobile phone number (the mobile phone number of your SMS recipient).
5. In the Name field, enter: SMS alert to admin and click OK.
6. Click Deploy in the stream editor.
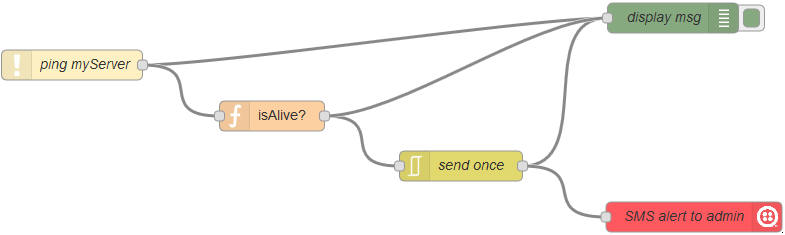
Deploying a Node-RED Application
Click Deploy in the stream editor. All is ready. Now you can deploy and use the application to monitor your computer or your network. You, as the user of the application, linked the standard and user nodes into a single stream, indicating your mobile phone as an SMS notification.