The basics of Juniper Contrail, and how to put it in your own lab
- Tutorial
It was unexpectedly discovered that on Habr there is practically no information about Juniper Contrail (yes, SDN) - and I decided to make up for the omission on my own.
In this article I want to briefly talk about what Contrail is, in what forms it is available and how to put it in your own lab. More specifically, we will install Contrail Cloud 3.2.0.

The challenge Solved by Contrail is building flexible and scalable virtual networks. A virtual network can be understood as a replacement for the good old VLAN, in this case implemented approximately as a provider L3VPN / EVPN. At the same time, from the point of view of connected clients, everything looks as if all their virtual machines and physical servers are connected through a regular switch.
The easiest way to describe Contrail is as an overlay SDN. Software-Defined Networking here is understood in the sense of the classic definition of ONF - the separation of the forwarding plane and the control plane, plus the centralization of the control plane in this case in the Contrail controller.
The word “overlay” indicates that there are actually two networks:
Contrail-controller is engaged in managing a virtualized overlay network in the data center or provider cloud, and does not crawl into the factory at all. Answering the questions “why?” and “why exactly?”, the Contrail's strengths include:
Here is a picture from the Contrail Architecture whitepaper showing how the system is structured as a whole:
At the top level, an infrastructure orchestra works - most often it will be OpenStack (there are options for integrating Contrail with vCenter and Kubernetes). In it, the network is configured through high-level commands (Neutron API) - while the implementation details remain the concern of the SDN controller.
The SDN controller itself consists of four main types of nodes:
Several roles can be launched on one physical (or even virtual) server, in the lab you can even make an all-in-one controller (plus computing nodes separately).
Now a little about forwarding. All traffic between virtual machines or containers in the system runs through tunnels terminated on vRouter, physical router or OVSDB switch (I do not consider this option here). vRouter is a software component (Linux kernel module by default, user space if using DPDK), the second important part of the Contrail solution (the first is the controller itself). vRouter-s are installed and run on the computing nodes of the cluster (Virtualized Server in the picture) - in the same place where the machines / containers are launched.
Once again, vRouter's primary goal is to terminate the overlay tunnel. vRouter in function corresponds to the PE (provider edge) router in MPLS VPN.
We have the following options for using Contrail (while the features and code are the same everywhere and only the support options differ):
In addition, there is an option with support for OpenContrail from Mirantis.
In this article I will follow the path of least resistance and show how to install the Contrail Cloud.
We will install Contrail Cloud 3.2.0 - the latest version, at the time of writing. For installation, I used one ESXi 6.0 server with a 4-core hyper-threading CPU and 32GB RAM. This is enough for tests, even with a margin (you can still run a couple of vMX).
The virtual laboratory diagram will look like this:

Note that the Compute nodes (as well as the controller nodes) are virtualized in our lab, that is, virtual computers will run inside other virtual machines. You should go to the settings of the hypervisor and check the "Expose hardware assisted virtualization to the guest OS" option for each Compute node there. As can be seen from testbed.py, the first two are for virtual machines, and use KVM, and the third for Docker containers.
We deploy all 5 virtual machines with parameters as indicated in the diagram. At the same time, for compute nodes, the parameters are actually determined by how many and which machines / containers you are going to run, but for the controller, the parameters are specified close to the minimum allowable.
We put on all machines the minimum Ubuntu 14.04.4 (ubuntu-14.04.4-server-i386.iso). Strictly this version, as indicated in the Contrail 3.2.0 documentation - this is very important! Otherwise, it is very easy to run into incompatibility packages. And it’s minimal, for the same reason. A bare minimum plus only OpenSSH Server. For some reason, many people do not seriously take such simple instructions and then it doesn’t work for them :)
Next, we write the addresses in / etc / network / interfaces, and set them in / etc / hosts so as not to bother with DNS,
We will install Contrail using Fabric scripts. This option is the simplest for the lab, for production there is also Server Manager (with Puppet under the hood), but it's somehow another time. For Fabric, we need to enable root login for SSH, for example like this
It is also desirable to enable ntp on all nodes:
Next, on the first node, copy the contrail-install-packages_3.2.0.0-19-ubuntu-14-04mitaka_all.deb package to / tmp and install it:
Run the installation script:
Now the important point. We need to create the file /opt/contrail/utils/fabfile/testbeds/testbed.py, which will describe our cluster. Here is a working example:
The meaning of the various sections, I think, should be clear without further explanation.
Just a few more steps. Install packages on the remaining nodes:
Change the kernel to the recommended one:
(the kernel version will change from 4.2.0-27-generic to 3.13.0-85-generic and the nodes will reboot).
Next, go to the first node and:
And finally, the last step (the longest, takes about an hour in my case):
In principle, that's all. But in this form, with the given virtualka settings, Contrail Cloud slows down. We’ll use a few tricks to speed it up (use only for the lab):
(after which the server needs to be rebooted; everything in total gives a decrease in memory use by one and a half times and the response to actions like launching virtual machines is significantly improved).
Now you can go to the web interface. Openstack Horizon should be available on 10.10.10.230/horizon, and Contrail Web UI on 10.10.10.230:8080. With our settings, the username is admin, the password is contrail.

I hope this article helps interested people begin to understand and work with Contrail 3.2. Full product documentation is available on the Juniper website . Some examples of how to pull Contrail through the API, I try to collect here .
All success in work and good mood!
In this article I want to briefly talk about what Contrail is, in what forms it is available and how to put it in your own lab. More specifically, we will install Contrail Cloud 3.2.0.
The basics of Contrail
The challenge Solved by Contrail is building flexible and scalable virtual networks. A virtual network can be understood as a replacement for the good old VLAN, in this case implemented approximately as a provider L3VPN / EVPN. At the same time, from the point of view of connected clients, everything looks as if all their virtual machines and physical servers are connected through a regular switch.
The easiest way to describe Contrail is as an overlay SDN. Software-Defined Networking here is understood in the sense of the classic definition of ONF - the separation of the forwarding plane and the control plane, plus the centralization of the control plane in this case in the Contrail controller.
The word “overlay” indicates that there are actually two networks:
- A physical “factory” that is required to “only” ensure IP accessibility between connected physical devices (servers, gateway routers), and
- Overlay - a network composed of tunnels laid between servers and gateway routers. The tunnels can be MPLS over UDP, MPLS over GRE, or VXLAN (listed in priority order by default; although there are some nuances, in general, the specific type of tunnel used is an implementation detail).
Contrail-controller is engaged in managing a virtualized overlay network in the data center or provider cloud, and does not crawl into the factory at all. Answering the questions “why?” and “why exactly?”, the Contrail's strengths include:
- Scalability - the system is built on the same principles as the proven BGP / MPLS VPN solution.
- Flexibility - changing the configuration of a virtual network does not require changes in the physical network. This is a natural consequence of overlay and the use of the principle of “smart edge - simple core”.
- Programmability - Applications can manage the network as a system through the Contrail API.
- NFV (virtualization of network functions) aka service chains is a very important aspect, it allows you to drive traffic through specified virtualized network services (virtual firewall, cache, etc.). At the same time, both Juniper VNF (vSRX, vMX) and any products of other vendors are absolutely equal.
- Powerful analytics and visualization of results, including “Underlay Overlay Mapping”, is when Contrail shows you how traffic between virtual networks goes “really” across the physical network.
- Open Source - all source codes are open, plus only standard protocols are used for the interaction of parts. The project website is www.opencontrail.org .
- Easy integration with existing MPLS VPNs.
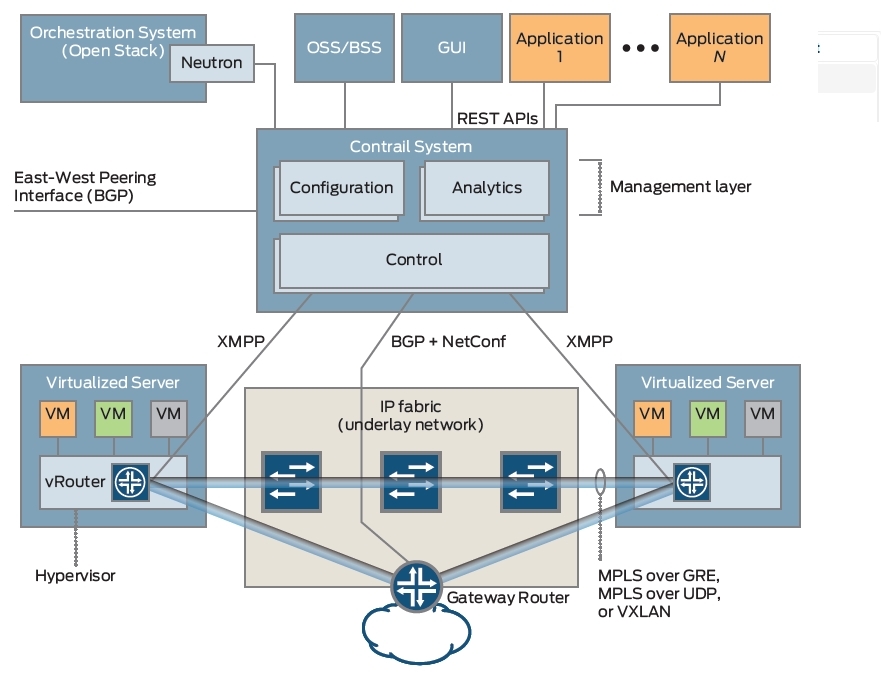
Here is a picture from the Contrail Architecture whitepaper showing how the system is structured as a whole:
At the top level, an infrastructure orchestra works - most often it will be OpenStack (there are options for integrating Contrail with vCenter and Kubernetes). In it, the network is configured through high-level commands (Neutron API) - while the implementation details remain the concern of the SDN controller.
The SDN controller itself consists of four main types of nodes:
- Configuration nodes - responsible for providing the REST API to the orchestrator and other applications. "Compiles" the instructions coming "from above" in the configuration, applicable in a particular network at a low level.
- Control nodes - take configuration from configuration nodes and program vRouter-s (see below) and physical routers.
- Analytics - nodes that collect statistics of flows, logs, and more.
- Database (not shown in the picture) - Cassandra database, which stores the configuration and information collected by the analyst.
Several roles can be launched on one physical (or even virtual) server, in the lab you can even make an all-in-one controller (plus computing nodes separately).
Now a little about forwarding. All traffic between virtual machines or containers in the system runs through tunnels terminated on vRouter, physical router or OVSDB switch (I do not consider this option here). vRouter is a software component (Linux kernel module by default, user space if using DPDK), the second important part of the Contrail solution (the first is the controller itself). vRouter-s are installed and run on the computing nodes of the cluster (Virtualized Server in the picture) - in the same place where the machines / containers are launched.
Once again, vRouter's primary goal is to terminate the overlay tunnel. vRouter in function corresponds to the PE (provider edge) router in MPLS VPN.
What happens to Contrail
We have the following options for using Contrail (while the features and code are the same everywhere and only the support options differ):
- OpenContrail is an option available for free. Installation is described in the Quick Start Guide .
- Contrail Networking is a commercial option supported by Juniper TAC.
- Contrail Cloud is again a commercial option, including both Contrail itself and Canonical / Ubuntu OpenStack - both supported by Juniper TAC.
In addition, there is an option with support for OpenContrail from Mirantis.
In this article I will follow the path of least resistance and show how to install the Contrail Cloud.
Install Contrail Cloud
We will install Contrail Cloud 3.2.0 - the latest version, at the time of writing. For installation, I used one ESXi 6.0 server with a 4-core hyper-threading CPU and 32GB RAM. This is enough for tests, even with a margin (you can still run a couple of vMX).
The virtual laboratory diagram will look like this:
Note that the Compute nodes (as well as the controller nodes) are virtualized in our lab, that is, virtual computers will run inside other virtual machines. You should go to the settings of the hypervisor and check the "Expose hardware assisted virtualization to the guest OS" option for each Compute node there. As can be seen from testbed.py, the first two are for virtual machines, and use KVM, and the third for Docker containers.
We deploy all 5 virtual machines with parameters as indicated in the diagram. At the same time, for compute nodes, the parameters are actually determined by how many and which machines / containers you are going to run, but for the controller, the parameters are specified close to the minimum allowable.
We put on all machines the minimum Ubuntu 14.04.4 (ubuntu-14.04.4-server-i386.iso). Strictly this version, as indicated in the Contrail 3.2.0 documentation - this is very important! Otherwise, it is very easy to run into incompatibility packages. And it’s minimal, for the same reason. A bare minimum plus only OpenSSH Server. For some reason, many people do not seriously take such simple instructions and then it doesn’t work for them :)
Next, we write the addresses in / etc / network / interfaces, and set them in / etc / hosts so as not to bother with DNS,
10.10.10.230 openstack
10.10.10.231 control
10.10.10.233 compute-1
10.10.10.234 compute-2
10.10.10.235 compute-3
We will install Contrail using Fabric scripts. This option is the simplest for the lab, for production there is also Server Manager (with Puppet under the hood), but it's somehow another time. For Fabric, we need to enable root login for SSH, for example like this
echo -e "contrail\ncontrail" | sudo passwd root
sudo sed -i.bak 's/PermitRootLogin without-password/PermitRootLogin yes/' /etc/ssh/sshd_config
sudo service ssh restart
It is also desirable to enable ntp on all nodes:
sudo apt-get install ntpNext, on the first node, copy the contrail-install-packages_3.2.0.0-19-ubuntu-14-04mitaka_all.deb package to / tmp and install it:
dpkg -i /tmp/contrail-install-packages_3.2.0.0-19-ubuntu-14-04mitaka_all.deb Run the installation script:
cd /opt/contrail/contrail_packages
./setup.sh
Now the important point. We need to create the file /opt/contrail/utils/fabfile/testbeds/testbed.py, which will describe our cluster. Here is a working example:
from fabric.api import env
# FOR LAB ONLY, DEFAULT IS 250
minimum_diskGB = 10
# MANAGEMENT USERNAME/IP ADDRESSES
host1 = 'root@10.10.10.230'
host2 = 'root@10.10.10.231'
host3 = 'root@10.10.10.233'
host4 = 'root@10.10.10.234'
host5 = 'root@10.10.10.235'
# EXTERNAL ROUTER DEFINITIONS
ext_routers = []
# AUTONOMOUS SYSTEM NUMBER
router_asn = 64512
# HOST FROM WHICH THE FAB COMMANDS ARE TRIGGERED
# TO INSTALL AND PROVISION
host_build = 'root@10.10.10.230'
# ROLE DEFINITIONS
env.roledefs = {
    'all': [host1, host2, host3, host4, host5],
    'cfgm': [host1],
    'openstack': [host1],
    'control': [host2],
    'compute': [host3, host4, host5],
    'collector': [host1],
    'webui': [host1],
    'database': [host1],
    'build': [host_build]
}
# DOCKER
env.hypervisor = {
    host5 : 'docker',
}
# NODE HOSTNAMES
env.hostnames = {
    'host1': ['openstack'],
    'host2': ['control'],
    'host3': ['compute-1'],
    'host4': ['compute-2'],
    'host5': ['compute-3'],
}
# OPENSTACK ADMIN PASSWORD
env.openstack_admin_password = 'contrail'
# NODE PASSWORDS
env.passwords = {
    host1: 'contrail',
    host2: 'contrail',
    host3: 'contrail',
    host4: 'contrail',
    host5: 'contrail',
    host_build: 'contrail',
}
The meaning of the various sections, I think, should be clear without further explanation.
Just a few more steps. Install packages on the remaining nodes:
cd /opt/contrail/utils/
fab install_pkg_all:/tmp/contrail-install-packages_3.2.0.0-19-ubuntu-14-04mitaka_all.deb
Change the kernel to the recommended one:
fab upgrade_kernel_all(the kernel version will change from 4.2.0-27-generic to 3.13.0-85-generic and the nodes will reboot).
Next, go to the first node and:
cd /opt/contrail/utils/
fab install_contrail
And finally, the last step (the longest, takes about an hour in my case):
fab setup_all
In principle, that's all. But in this form, with the given virtualka settings, Contrail Cloud slows down. We’ll use a few tricks to speed it up (use only for the lab):
echo 'export JAVA_OPTS="-Xms100m -Xmx500m"' > /etc/zookeeper/java.env
sed -i.bak 's/workers = 40/workers = 1/' /etc/nova/nova.conf
sed -i.bak 's/#MAX_HEAP_SIZE="4G"/MAX_HEAP_SIZE="1G"/' /etc/cassandra/cassandra-env.sh
sed -i.bak 's/#HEAP_NEWSIZE="800M"/HEAP_NEWSIZE="500M"/' /etc/cassandra/cassandra-env.sh
(after which the server needs to be rebooted; everything in total gives a decrease in memory use by one and a half times and the response to actions like launching virtual machines is significantly improved).
Now you can go to the web interface. Openstack Horizon should be available on 10.10.10.230/horizon, and Contrail Web UI on 10.10.10.230:8080. With our settings, the username is admin, the password is contrail.
conclusions
I hope this article helps interested people begin to understand and work with Contrail 3.2. Full product documentation is available on the Juniper website . Some examples of how to pull Contrail through the API, I try to collect here .
All success in work and good mood!