BLE under the microscope. Part 3

BLE under the microscope. Part 3
In the first and second parts, we examined the principles of building BLE networks, and also touched on the necessary tools for working with them. In the third part we will deal with the practical application of the knowledge gained. For these purposes, we will consider this project on the Nordic nRF51822 chip .
The project implements data transfer on advertising channels without using a stack.
In order to start the project, you need the nrf51822 chip on any KIT, the J-LINK programmer, as well as the installed SDK. Unpack the project and place it in the SDK directory, in the folder where examples of peripherals are. This is necessary so as not to rewrite the paths to libraries. Received data can be seen using the nRF Connect program.

Today we will look at how a packet is formed for transmission over BLE channels. The most interesting thing for us is in the ble_radio.c file. I borrowed the radio_init () function in the sniffer program from Nordic-a. This is the most crucial part. Without proper radio channel initialization, we will not see any packages at all. Every 100 ms, the program broadcasts three frames on advertising channels. How the packages are formed, we will now consider.
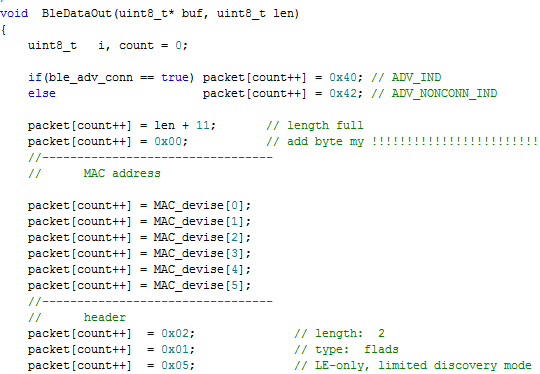
The package starts with the header. Depending on the ble_adv_conn flag, our device will be seen as being connected (ADV_IND) or not being connected (ADV_NONCONN_IND). The difference between them was given in the first part. Here I just want to note that in both cases the flag of the randon-th MAC address is already set. If we want to get a public MAC address, then the header byte will be 0x00 and 0x02, respectively. This is followed by a byte of the length of the entire packet and service zero byte. I have not figured out why this is necessary. It is not broadcast, but if it is not, we will get a byte shift in the package.
This is followed by six bytes of the MAC address and a block of flags. Here you must specify the general format of the data to be filled. First comes the length byte (LEN), then the content identifier (TYPE), and then the data itself (VALUE). The flag block is the first data block that we can see in nRF Connect.
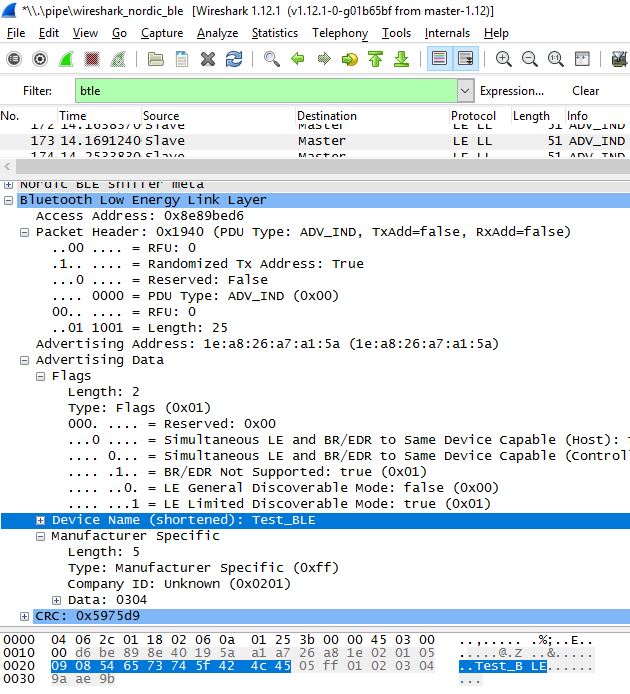
Next, the device name is recorded. In this case, after the length byte, the identifier is 0x08. It means that it is the abbreviated name of the device. If you make the identifier equal to 0x09, the name will be seen as complete. For us, this is not important, because We work without a stack and we process all requests ourselves. In the case of working with the stack, upon request of the telephone with the full name, it will be set in the response package. Following the name is a block of factory data and a checksum. It should be noted that the identifier of the factory data is byte 0xFF, followed by 2 bytes of the manufacturer ID and the data itself. This is the field in which we can transfer any of our data.

Similarly, a BLE packet may contain other data, such as a device UUID or device power (TYPE = 0x0A). View all identifiers here . And here is what this premise looks like in Wireshark. We see that this program provides significantly more information for the developer than nRF Connect.
However, that is not all. If we form a package in the format of a beacon (ADV_NONCONN_IND), then it will be received on the phone with a special program. In order for the phone to see the device in ADV_IND format, it is necessary to correctly execute the SCAN_REQ request. As indicated in the second part, for this we must promptly set the response SCAN_RSP. We can see these packages only with the help of a sniffer. They look as follows.
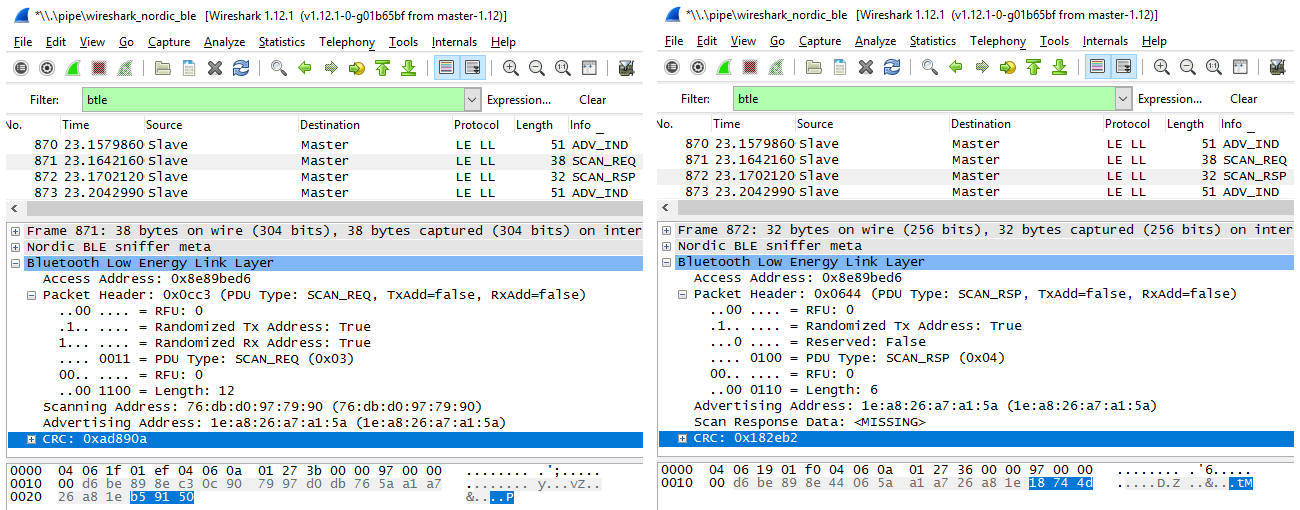
In this case, there is nothing interesting in them. The first (SCAN_REQ), in addition to the header, contains the MAC addresses of the phone itself and our device. The second (SCAN_RSP) - only the header and MAC address of the gadget. However, the response may also contain data. As mentioned earlier, this allows you to transfer more information to the phone. In this case, the principle of filling the parcel is similar to what we examined above. On this, the third part, devoted to the study of BLE premises, is completed.
Pecherskikh Vladimir
PS If you carefully look at the CheckData () function, you can see that it has two parts. It fulfills both SCAN_REQ requests (header 0x03) and CONNECT_REQ (header 0x05) This makes it possible not only to receive data on the phone, but also send one command to the gadget. In this case, the device beeps and the LED blinks. Unfortunately, the command will be only one and will be executed when trying to join the device. Thus, we can, for example, turn on / off the light bulb without installing any applications on our smartphone. This can be done directly from the Settings-> Bluetooth menu of the phone.