Kamailio SIP proxy: installation example and minimal setup

In the work of the system administrator involved in the implementation of Asterisk-based telephony systems, sooner or later a situation may arise when the hardware capabilities of one server to handle all calls are no longer enough. Accordingly, there is a need to divide the load on several servers. One way to solve this problem is to use SIP proxy, but it is worth recognizing that, unlike Asterisk, information on SIP proxy, forums, examples and descriptions, is at least an order of magnitude smaller. The purpose of this article is to show, with a simple example, the possibility of using the SIP proxy Kamailio in conjunction with Asterisk in such a way as to maximally facilitate the development of SIP proxy for beginners.
All the settings for this example we will make on virtual machines located on the local network, although if they had public addresses and were in the cloud, there would be no fundamental difference.
Assume that Asterisk is already installed in the organization, and employees process a large number of incoming calls, which the server can no longer cope with. We will add another Asterisk server (more precisely, we clone the existing one), and the SIP proxy will assume the role of a “distributor” of incoming calls.
Let's start by choosing the SIP proxy. There is a good article on this subject on the topic in which the history of the development of major projects is examined. Unlike the author of this article, my choice fell on Kamailio and a web-interface for it called Siremis.
Install Kamailio. We will use CentOs 6.8 as the OS.
First of all, you need to disable SELinux, update packages and install the necessary dependencies:
yum -y update && yum -y groupinstall core && yum -y groupinstall base && yum -y install epel-release
yum -y install httpd mysql-server php php-mysql php-gd php-curl
We will need access to port 80 for working with the web interface and 5060 udp for working with sip, so we add the IPTables rules:
iptables -A INPUT -m state --state NEW -m tcp -p tcp --dport 80 -j ACCEPT
iptables -A INPUT -m state --state NEW -m udp -p udp --dport 5060 -j ACCEPT
Create the file /etc/yum.repos.d/kamailio.repo with the contents:
[kamailio]
name=RPMs for Kamailio on CentOS 6
type=rpm-md
baseurl=http://rpm.kamailio.org/stable/CentOS_6/
gpgcheck=1
gpgkey=http://rpm.kamailio.org/stable/CentOS_6/repodata/repomd.xml.key
enabled=1
And install kamailio:
yum install kamailio kamailio-presence kamailio-mysqlDo not forget to add daemons to startup:
chkconfig mysqld on
chkconfig httpd on
chkconfig kamailio on
Edit the file / etc / kamailio / kamctlrc: you need to uncomment the line
DBENGINE=MYSQLand specify SIP_DOMAIN. Due to the fact that we are setting up the system on a local network, it will be enough to specify the ip address, in my case
SIP_DOMAIN=192.168.0.237Below you can edit the settings for connecting to the database, but in the case of a training stand, changing them is not necessary.
Run MySQL and generate the necessary tables:
service mysqld start
kamdbctl create
We answer all the questions of the master in the affirmative.
Now edit the main configuration file /etc/kamailio/kamailio.cfg. Logically, it is divided into several sections: global parameters, loading modules, setting module parameters and routes. Each Kamailio module performs a specific function, so you can download only the libraries necessary for a specific task. The beginning of the file is reduced to the following:
#!KAMAILIO
#!define WITH_MYSQL
#!define WITH_AUTH
#!define WITH_USRLOCDB
#!define WITH_PRESENCE
#!define WITH_ACCDB
As you can see from the comments below, these directives include the necessary modules, for example WITH_MYSQL, which is defined at the beginning of the file; below, it loads the mysql.so module:
#!ifdef WITH_MYSQL
loadmodule "db_mysql.so"
#!endif
Of course, you can download all the modules manually, but using the directive is much more convenient. WITH_AUTH, for example, allows users to register on Kamailio using a username and password, and you can see all the options in the comments below.
For further correct operation of the web-based interface and statistics, we
’ll make a few more changes: After all the loadmodule lines, add two more loads:
loadmodule "rtimer.so"
loadmodule "sqlops.so"
Before the routes section, which is separated by the line ####### Routing Logic ########, we add the parameters of the loaded modules:
modparam("rtimer", "timer", "name=cdr;interval=300;mode=1;")
modparam("rtimer", "exec", "timer=cdr;route=CDRS")
modparam("sqlops", "sqlcon", "cb=>mysql://kamailio:kamailiorw@localhost/kamailio")
And add an additional route after the last section of the route in the 910 line of the file:
route[CDRS] {
    sql_query("cb","call kamailio_cdrs()","rb");
    sql_query("cb","call kamailio_rating('default')","rb");
    }
Launch Kamailio and verify that it starts:
service kamailio start
ps aux | grep kamailio
If Kamailio does not start, you need to look at the log / var / log / messages - this is where Kamailio errors will get there, unless you additionally configure rsyslog, which is not very difficult.
By default, the kamailio MySQL database is used with the kamailio user and the kamailiorw password, unless of course you change the default settings in the / etc / kamailio / kamctlrc file before creating the database. In the event that you change these settings, it will be useful to go through auto-replacement in the main configuration file kamailio.cfg and enter the correct data for connecting to the database.
In principle, Kamailio can work without a database - all the necessary values for the modules can be set in the configuration file or stored in external files, but using the database, especially on large projects, is much more convenient, plus the Siremis web interface will work with the database, which we will install now.
You need to download, unzip the files, copy them to the directory with which apache will work and give the correct rights:
cd /usr/src
wget http://siremis.asipto.com/pub/downloads/siremis/siremis-4.3.0.tgz
tar zxvf siremis*
cp -a siremis*/. /var/www/html
cd /var/www/html
make prepare
rm -rf /var/www/html/Makefile
rm -rf /var/www/html/Changelog
rm -rf /var/www/html/README
chown -R apache. /var/www/html
In the VirtualHost section in the apache configuration for Siremis, add
        Options Indexes FollowSymLinks MultiViews
        AllowOverride All
        Order allow,deny
        Allow from all

            Order deny,allow
            Deny from all

            Order deny,allow
            Deny from all

    AllowOverride All
    Order deny,allow
    Deny from all

    AllowOverride All
    Order deny,allow
    Deny from all
If you later install the latest version of Siremis 4.3.0 at the time of writing, you may encounter problems if you do not have date.timezone set, so it is recommended that you immediately make changes to php.ini:
date.timezone = Europe/MoscowSiremis will require a separate database. Add user:
mysql -e "GRANT ALL PRIVILEGES ON siremis.* TO siremis@localhost IDENTIFIED BY 'siremisrw';"You can change the settings for connecting to the database, but then remember to set the correct values in the future.
Now you can restart apache and go to the final stage of installing Siremis - already through the browser. Go to your-ip / siremis.

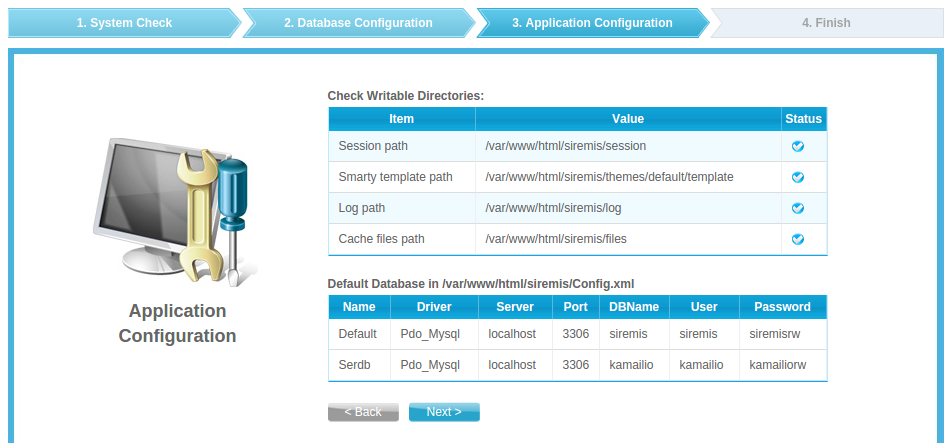
If the system check is passed, you can start the installation.

Please note: by default, default passwords are hidden under the asterisks from Kamailio and Siremis users, so if you have not made changes before, then at this step you can also not forget the passwords manually.
Be sure to check all boxes - Create Siremus DB, Import Dafault Data, Update SIP DB, Replace DB config.

Verify that the correct data is provided.
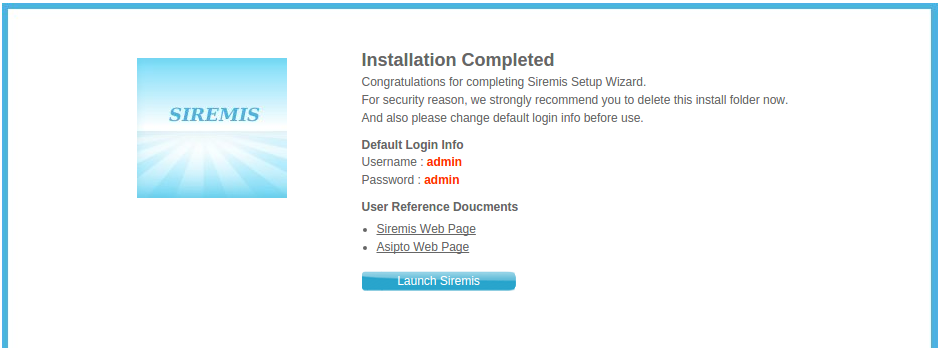
And this completes the installation.
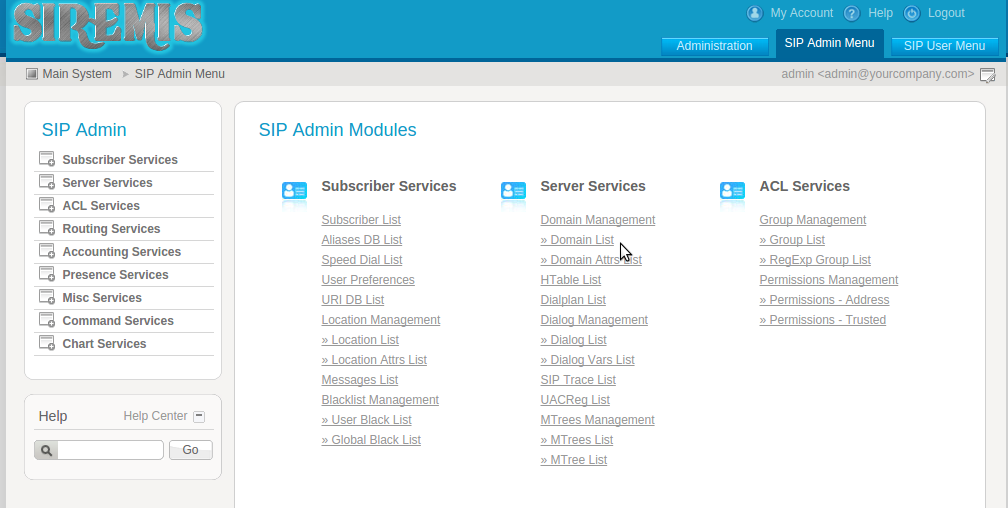
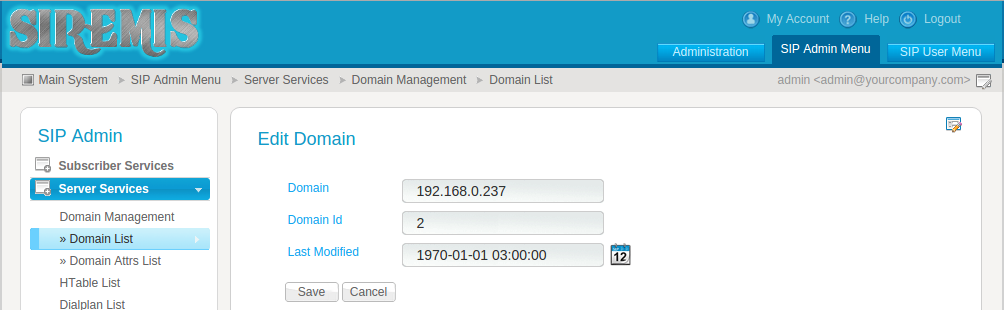
Let's try to make the first call through Kamailio. To do this, go to the SIP Admin menu tab and add a new domain to the Domain List. Kamailio will only service the domains (or ip addresses) listed here.
If a domain is attached to the address, and users can register both by specifying the ip-address and specifying the domain, the domain name should also be added to the list. In our case, we add only the ip-address of the server to which the clients will access.
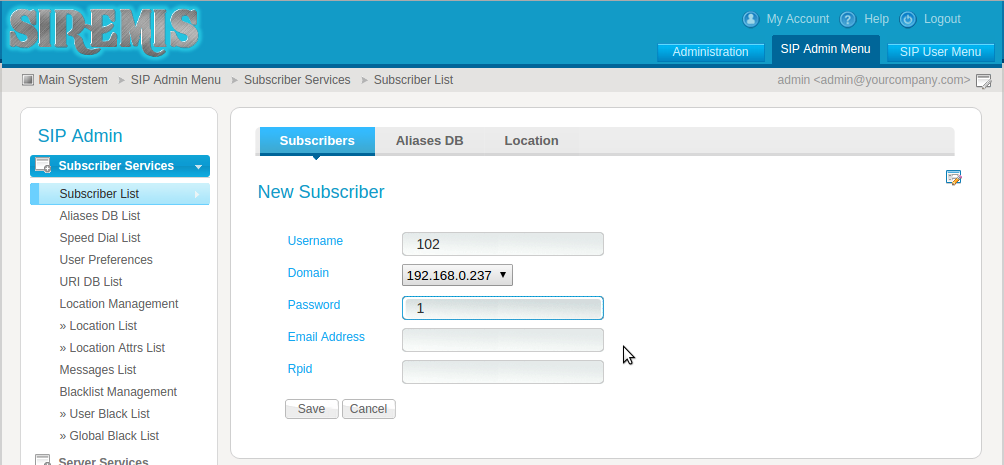
To create an internal subscriber or subscriber, go to Subscriber Services -> Subscribers and add two numbers - 101 and 102, indicating passwords and a gray address for them as a domain (in our case 192.168.0.237).
Now, using a softphone, for example Zoiper, we can register on the server and make a call from 101 to 102 number or vice versa and make sure that all the previous steps were performed correctly.
Let's move on to setting up the distribution of incoming calls. In the local network, we have 2 virtual machines with Asterisk at the addresses 192.168.0.234 and 192.168.0.235, and we need to evenly distribute incoming calls between them. In this situation, we will use the dispatcher module, which provides the necessary functionality.
Let's go back to the console, and add in the kamailio.cfg module loading section
loadmodule "dispatcher.so"as well as two parameters - connecting to the database, in which the list of Asterisk servers will be stored, and the frequency of checking these servers so that the call will in no case go to the switched off server:
modparam("dispatcher", "db_url", "mysql://kamailio:kamailiorw@localhost/kamailio")
modparam("dispatcher", "ds_ping_interval", 30)
In general, a full list of modules, their parameters and functions can always be viewed on the official website . After connecting the module, restart Kamailio and make sure that it starts. In case of problems (the modules may depend on others, require the installation of certain parameters both for the module itself and for those on which it depends) we will see an error in the log.
Now let's move on to the route section. The default routes created in principle provide the necessary minimum, for example, when trying to register with the wrong password, Kamailio will give a 401 error, and when trying to call a non-existent direction - 404. The variables and functions used by various used modules present a difficulty in understanding Kamailio routing , and it’s not always straightforward to understand which variable or function belongs to which module. For our training purposes, the route will be very simple - at the very beginning of the main route we add the condition:
if ( method=="INVITE" ) {
  ds_select_dst("1","4");
  sl_send_reply("100","Trying");
  forward();
  exit();
}
If a request of type INVITE arrives, that is, an invitation to start a conversation, then we select one of the servers that we will later add to the table from group 1 according to selection strategy 4 - round-robin. Then we send the answer to the caller and transfer the call to the selected destination. Please note that now absolutely any INVITE will be processed in this way, so that the ability to call from 101 numbers to 102 that we created earlier will be lost - calls from them will also fly to one of the Asterisk servers, and INVITE requests from outside will also be go directly to Asterisk without any verification of the source of the request.
In order for Asterisk to handle such calls, you need to add the peer of the following form to each of the servers:
[kamailio]
host=192.168.0.237
port=5060
insecure=invite
type=friend
context=from-pstn
Now you can add the Asterisk server to the Kamailio database through the web interface:

Setid will determine which server group the new server belongs to, Priority is not used in the round-robin selection strategy, but can be used in other strategies, and Flags in this case determines that By default, we consider the server inactive and check its status.
After adding the servers, you can either restart Kamailio, which is unacceptable on production, or run the command
kamcmd dispatcher.reload. The list of commands for each module can also be viewed on the official website .You can proceed to testing. Using a softphone, for example, Zoiper, you can make a call directly to Kamailio, without any accounts and registrations. It is enough to enter sip in the dialing field: 1@192.168.0.237. Immediately after this, the call will be forwarded to one of the Asterisk and processed in accordance with the dialplan. The next call will go to the second server.
In principle, the training task before us - to distribute incoming calls equally between servers - we decided. However, not every telecom operator is ready to send calls to your ip-address directly, without registration, and it will be necessary to send requests like REGISTER. This functionality implements the uac module. Add one more Asterisk to our scheme - it will act as a provider. On it we will create some kind of internal number, for example, 200200, which will require registration.
Download the module in the configuration file:
loadmodule "uac.so"And we’ll set a couple of required parameters in our case:
modparam("uac", "reg_db_url", "mysql://kamailio:kamailiorw@localhost/kamailio")
modparam("uac", "reg_contact_addr", "192.168.0.237")
In addition, you will need to make a change to the parameter of another module. Find the line in the file
modparam("rr", "append_fromtag", 0)
and replace with:
modparam("rr", "append_fromtag", 1)Now you can configure the registration by restarting Kamailio first so that the module boots up:
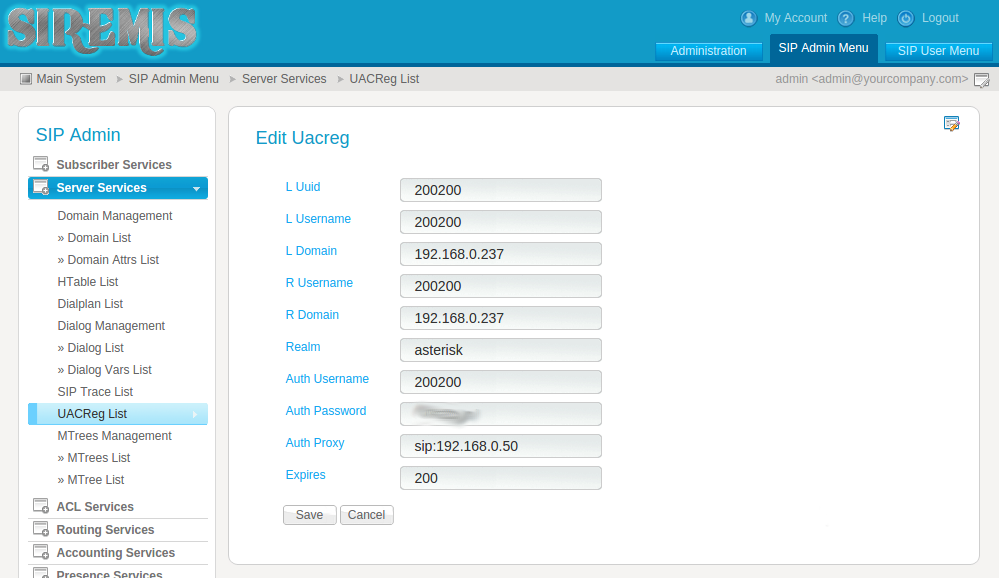
Pay attention to the Realm field. By default, you can enter anything into it, but then registration will not take place, and in the log you will see something like:
kamailio /usr/sbin/kamailio[26277]: ERROR: uac [uac_reg.c:799]: uac_reg_tm_callback(): realms do not match. requested realm: [asterisk]That is why if you encounter any problems, you should not immediately re-read the manual, look for other instructions and doubt your abilities - most often the explanation can be found in the log.
It remains only to make sure that the subscriber 200200 is registered on Asterisk, playing the role of provider, and make a call from any other number to
200200. We finish the Kamailio setup example, but note that the article does not cover work on NAT, security, routing outgoing calls and much more that may be required in a real situation. However, I hope this article makes it easier for you to learn Kamailio.