Start with React and Bootstrap in 2 days. Day number 1
- Tutorial
At once I will say that the site will work faster if you replace Bootstrap with pure CSS and JS. This article is about how to quickly start developing beautiful web-applications, and optimization is a separate issue beyond the scope of this article.
First you need to at least understand a bit about HTML, CSS, JavaScript, XML, DOM, OOP and be able to work in the terminal (command line).
In this article I will make the squeeze of the minimum necessary for work and we will do the following timer:
First we need a package manager. I chose npm , and it is in Node.js.
So, first of all, install Node.js on your operating system from the official site: nodejs.org/en/download . With the installation you can figure it out, so I will not describe the installation process. I note only that under Ubuntu it is installed simply:
We check through the terminal that Node.js and npm were successfully installed:
If any errors occur during the output, it means that something went wrong and you need to understand, and it is possible to reinstall them. If vc is displayed in numbers and dots, then everything is fine.
Install the Create-react-app so that you can quickly create application frameworks:
Next, create an application framework for React. Let's call our application new-app . If you want to create an application in a folder other than a user folder, then first go to the terminal via the terminal using the cd command . So, in the terminal just enter 3 commands:
Create a new-app application . Go to the folder new-app . Run the application. After these lines, the browser should start with the React application at http: // localhost: 3000 The
terminal should remain open, the application page will not open without it. If you suddenly closed - it does not matter. It is enough to use the cd command to go to the application folder and start it with the npm start command.
Now, install Bootstrap
It is also advised to install jquery and popper.js dependencies on it, but they are needed only for the JS part of Bootstrap. I tried without them - the CSS part of Bootstrap works fine, so the following lines in the terminal are optional:
Next, you need to make changes to the application files, to do this, go to the new-app folder, where the application is located, add the line to the src / index.js file, it should be the first:
If you use jQuery, popper.js or the JS part of Bootstrap (modal windows, animations, etc.), then you will need to add 3 more lines under the first line:
Now it remains to run the project:
And the browser will open again at http: // localhost: 3000 already with the application improved by using Bootstrap:
You can also install the browser React Developer Tools extension for debugging React . Actual links to the extension for Chrome and Firefox and other uses are listed in the official repository github.com/facebook/react-devtools
Installation and initial configuration is complete.
Let's see what create-react-app generated for us - the source files are in the src directory. First, let's look at the index.js file - there are several import lines. The lines make it clear what they are doing, so I will not comment.
The most important line in this file is:
It draws an application page. The source HTML file contains a <div> element with id = root. This <div> displays the App component , which is drawn by the render function of the ReactDOM class . In this case, the component is drawn in a form similar to XML, which is called JSX (about which later).
Now let's move to the App.js file , where the implementation of the App class is located, which is inherited from the React.Component class .
JSX is very similar to HTML, with JS-code inserts in curly brackets {}. And there must be one root element, in this case <div>.
To better understand, let's erase all the code for the render () method , and write the simplest component:
Now back to the index.js file and fix it.
After saving the files - the page will be updated in the browser. And now we will understand.
Conceptually, components are similar to JavaScript functions. They accept arbitrary data (called props) and return React elements describing what should appear on the screen. Components allow you to divide the UI into independent, reusable parts and work with each of them separately.
When React sees that an element is a custom component, it passes all JSX attributes to that component as a single object. Such an object is called props.
In the example, the name parameter is passed to the component as an attribute of the <App> tag with the value “ World ”. Next in the render () method of the App class .as a result of the function inside JSX, which is actually an HTML template - in curly brackets {} this is indicated - the current class, props - a custom object, name - the name of an object parameter.
In addition to the parameters stored in props, you can store the state of an object in state .
Let's make a timer. The timer does not need parameters, so remove the parameters in index.js :
And now in the App.js file we replace all the text between import and export :
After inserting and saving this code, a timer will appear on the page and automatically start.
Let's disassemble this code. Before the class, they declared a constant, thanks to which you can adjust the frequency of updating the timer.
Further, inside the class there is a mandatory constructor of the class to which the props is passed. Further, the standard processing of the super class constructor for super (props) and the definition of the state value using this is the current object. This is the only place where you can directly set the state. In other places, only reading is available, or the state is set using the special setState () method , which is used in the next increment () method to increase the statevalue per unit.
In applications with many components, it is very important to release the resources occupied by the components when they are destroyed. We need to set a timer each time the DOM is first drawn. In React, this is called “mount / mount.” We also need to clear this timer every time the DOM created by the component is deleted. In React, this is called dismounting / dismounting.
For this purpose, the methods componentDidMount () and componentWillUnmount () are used . In documentation, these methods are called " lifecycle hooks ". For simplicity, we will call them life-cycle methods. ComponentDidMount () methodtriggered after the component has been rendered in the DOM. This is a good place to set a timer. We will clear the timer in the life cycle componentWillUnmount () method .
Notice how we in the componentDidMount () store the timer ID directly into this using the arrow function. While this.props are independently set by React and this.state has a specific value, you can freely add additional fields to the class manually if you need to store something that is not used for visual output. If you are not using something in render () , it should not be in a state .
Next at runtimerender () in the local constant value is fixed value of the state value. And further, using the mathematical function floor () , which rounds the number down, dividing ( / ) and getting the remainder of the division ( % ) we get the parts of the timer, which are then displayed in one line after the word Timer. You can see the results of our work.
It is not convenient that the timer works immediately when the page is updated. I would like it to start and stop when you click on the appropriate buttons. And I would also like it to be in the center and large.
Let's start with the design. To do this, add the following lines to the App.css file :
Thanks to the container-fluid adaptive rubber container built into Bootstrap , which helps to create a completely flexible page layout or some block. This container is 100% wide. Let's make a flex container , with the direction of alignment of elements vertically - so that it takes up all the space and it can be centered.
Now we will refine the render () method in App.js to apply the Bootstrap styles and add a couple of buttons. To do this, replace the return value of the method with the following:
In the first line , 2 classes of Bootstrap were added to the root <div> : container-fluid (about which I wrote above) and the align-items-center - which exactly aligns the elements of the container in the center.
Then two <div> with the display-1 class - this class is just for displaying large text.
Next on the numbers added a new tag <kbd> - which is usually used to highlight the keys that need to be pressed. In this case, it is great for contrasting the numbers shown.
In the last digit, showing parts of a second, a conditional expression is added, allowing for single digits (<10) to output 0 at the beginning, and not to output it for two-digit numbers. It is necessary that the numbers do not twitch every second. To do this, use the ternary JavaScript operator: condition? true: false
Next, in a separate <div> I placed 2 buttons with the class Display-4 - this class was selected as the most suitable in size so that the buttons match the size of the timer. Between the buttons, I inserted a symbol - a non-breaking space, so that the buttons do not merge.
You can run, but the buttons do not work yet. Teach buttons to work.
To begin with, we will add a call to the corresponding functions in the output code of the buttons:
Please note that in the event handler React the onClick , instead of the onclick , in JavaScript, and the called function is indicated in braces without parentheses and specifying the object from which the method is called, in this case, the this .
Now we define the specified stopTimer () and resetTimer () methods :
But this is still not enough and if left so, then when you press the button, an error will appear, because this when calling the function will be undefined . This is due to the fact that in JavaScript, class methods are not bound by default. As a rule, if you refer to a method without () after it, for example, onClick = {this.resetTimer} , you need to bind this method.
We tie the methods in the class constructor, adding 2 lines there:
Great, earned! But only the stop button can be used only once, and after that the buttons stop working. And this is logical, because by calling stopTimer () we disabled the regular function call by calling clearInterval () .
In the comments advised to use the arrow function. I tried it, it works. So you can not add 2 lines to the constructor, and replace the functions themselves with the following arrow functions:
To solve this, let's make the “Stop” button also work as “Start”.
To begin with, we add to the constructor a boolean stopped state in order to understand the mode in which the button works:
Now we completely replace the contents of the stopTimer () method :
At the beginning of the method, we change the stopped state to the opposite through setState () .
Further, if the timer should be stopped (i.e., stopped = true ), then we disable the regular function call through clearInterval () , and if the timer should be started (i.e., stopped = false ), then we start the regular function call in the same way as componentDidMount () .
You also need to fix the increment () method so that it stops when stopped = true :
And finally, we change the name of the button depending on the status of stopped by inserting the following instead of “Stop”:
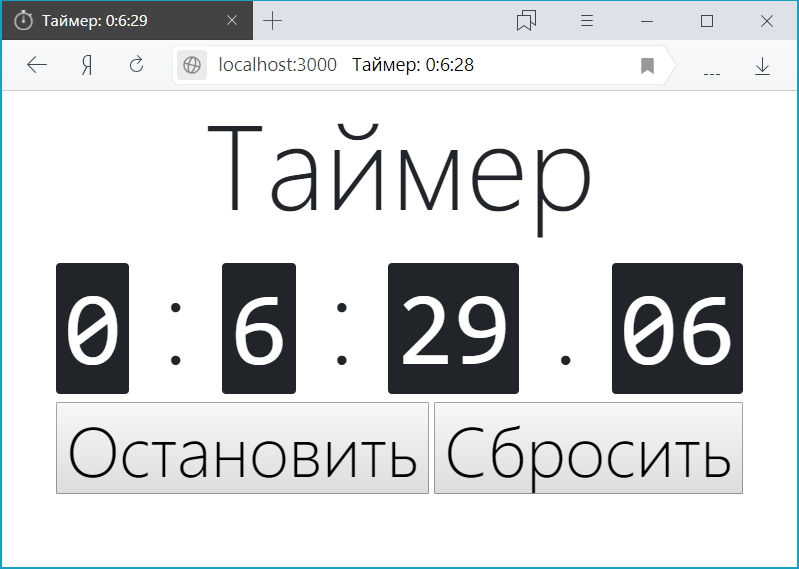
Now we have a beautiful, convenient timer.
Finally, I would like to change the standard title and window icon to ours.
You can change the header by setting document.title in the componentDidMount () method , but we will go further and make sure that the page header displays the time with an accuracy of seconds. To do this, add the document.title setting to the special componentDidUpdate () method :
Now the page header repeats the timer to seconds, and when the timer is stopped, only the word Timer is displayed.
Everything is simple with the icon. It is enough to prepare a picture in jpg , bmp , gif , png format , drop it into the public folder (and not src , in which we mostly worked), calling, for example, favicon.png and change the line in public \ index.html :
per line:
Today, this is all I wanted to tell. In the next article I will tell you more about Bootstrap, which I only touched on in this article. In addition to Bootstrap, there are still important topics: lists, tables, forms and thinking in the style of React.
Finally, the repository in BitBucket, which has all the code for this article
First you need to at least understand a bit about HTML, CSS, JavaScript, XML, DOM, OOP and be able to work in the terminal (command line).
Where to get materials to study?
Для изучения HTML и CSS рекомендую htmlbook.ru
Для изучения JavaScript рекомендую learn.javascript.ru
Для изучения XML рекомендую msiter.ru/tutorials/uchebnik-xml-dlya-nachinayushchih
Про DOM можно почитать в уроке по JavaScript learn.javascript.ru/dom-nodes
Для изучения ООП рекомендую видеокурс proglib.io/p/oop-videocourse
Для изучения командной строки Windows рекомендую cmd.readthedocs.io/cmd.html
Для изучения терминала в Mac рекомендую ixrevo.me/mac-os-x-terminal
Если вы работаете в Linux, то bash и аналоги знаете, в крайнем случае man или help вам помогут.
Для изучения React использую learn-reactjs.ru (который является переводом официальной документации React: reactjs.org).
Для изучения Bootstrap использую bootstrap-4.ru (который является переводом официальной документации Bootstrap: getbootstrap.com).
Для того, чтобы подружить React и Bootstrap нашёл отличную статью webformyself.com/kak-ispolzovat-bootstrap-s-react
In this article I will make the squeeze of the minimum necessary for work and we will do the following timer:
Installation
First we need a package manager. I chose npm , and it is in Node.js.
So, first of all, install Node.js on your operating system from the official site: nodejs.org/en/download . With the installation you can figure it out, so I will not describe the installation process. I note only that under Ubuntu it is installed simply:
sudo apt update
sudo apt install nodejs
sudo apt install npm
We check through the terminal that Node.js and npm were successfully installed:
nodejs -v
npm -v
If any errors occur during the output, it means that something went wrong and you need to understand, and it is possible to reinstall them. If vc is displayed in numbers and dots, then everything is fine.
Install the Create-react-app so that you can quickly create application frameworks:
npm install -g create-react-appNext, create an application framework for React. Let's call our application new-app . If you want to create an application in a folder other than a user folder, then first go to the terminal via the terminal using the cd command . So, in the terminal just enter 3 commands:
create-react-app new-app
cd new-app
npm start
Create a new-app application . Go to the folder new-app . Run the application. After these lines, the browser should start with the React application at http: // localhost: 3000 The
terminal should remain open, the application page will not open without it. If you suddenly closed - it does not matter. It is enough to use the cd command to go to the application folder and start it with the npm start command.
Now, install Bootstrap
npm install bootstrapIt is also advised to install jquery and popper.js dependencies on it, but they are needed only for the JS part of Bootstrap. I tried without them - the CSS part of Bootstrap works fine, so the following lines in the terminal are optional:
npm install jquery popper.jsNext, you need to make changes to the application files, to do this, go to the new-app folder, where the application is located, add the line to the src / index.js file, it should be the first:
import'bootstrap/dist/css/bootstrap.min.css';If you use jQuery, popper.js or the JS part of Bootstrap (modal windows, animations, etc.), then you will need to add 3 more lines under the first line:
import $ from'jquery';
import Popper from'popper.js';
import'bootstrap/dist/js/bootstrap.bundle.min';
Now it remains to run the project:
npm startAnd the browser will open again at http: // localhost: 3000 already with the application improved by using Bootstrap:
You can also install the browser React Developer Tools extension for debugging React . Actual links to the extension for Chrome and Firefox and other uses are listed in the official repository github.com/facebook/react-devtools
Installation and initial configuration is complete.
JSX, components and properties
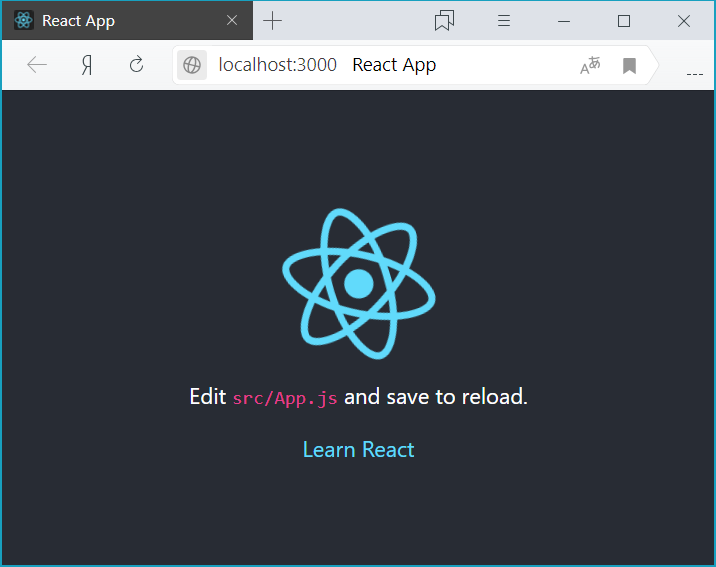
Let's see what create-react-app generated for us - the source files are in the src directory. First, let's look at the index.js file - there are several import lines. The lines make it clear what they are doing, so I will not comment.
The most important line in this file is:
ReactDOM.render(<App />, document.getElementById('root'));It draws an application page. The source HTML file contains a <div> element with id = root. This <div> displays the App component , which is drawn by the render function of the ReactDOM class . In this case, the component is drawn in a form similar to XML, which is called JSX (about which later).
Now let's move to the App.js file , where the implementation of the App class is located, which is inherited from the React.Component class .
classAppextendsReact.Component{
В классе вызывается метод <b>render()</b>, который рисует страницу на JSX:
<div className="App">
  <header className="App-header">
    <img src={logo} className="App-logo" alt="logo" />
    <p>
      Edit <code>src/App.js</code> and save to reload.
    </p>
    <a
      className="App-link"
      href="https://reactjs.org"
      target="_blank"
      rel="noopener noreferrer"
    >
      Learn React
    </a>
  </header>
</div>
JSX is very similar to HTML, with JS-code inserts in curly brackets {}. And there must be one root element, in this case <div>.
To better understand, let's erase all the code for the render () method , and write the simplest component:
classAppextendsReact.Component{
  render() {
    return<h1>Привет, {this.props.name}!</h1>;
  }
}
Now back to the index.js file and fix it.
ReactDOM.render(<Appname="Мир" />, document.getElementById('root'));After saving the files - the page will be updated in the browser. And now we will understand.
Conceptually, components are similar to JavaScript functions. They accept arbitrary data (called props) and return React elements describing what should appear on the screen. Components allow you to divide the UI into independent, reusable parts and work with each of them separately.
When React sees that an element is a custom component, it passes all JSX attributes to that component as a single object. Such an object is called props.
In the example, the name parameter is passed to the component as an attribute of the <App> tag with the value “ World ”. Next in the render () method of the App class .as a result of the function inside JSX, which is actually an HTML template - in curly brackets {} this is indicated - the current class, props - a custom object, name - the name of an object parameter.
Constructor, life cycle and state change
In addition to the parameters stored in props, you can store the state of an object in state .
Let's make a timer. The timer does not need parameters, so remove the parameters in index.js :
ReactDOM.render(<App/>, document.getElementById('root'));And now in the App.js file we replace all the text between import and export :
const INTERVAL = 100;
classAppextendsComponent{
  constructor(props) {
    super(props);
    this.state = {value: 0};
  }
  increment(){
    this.setState({value: this.state.value + 1});
  }
  componentDidMount() {
    this.timerID = setInterval(() =>this.increment(), 1000/INTERVAL);
  }
  componentWillUnmount() {
    clearInterval(this.timerID);
  }
  render() {
    const value = this.state.value
    return (
      <div><p>Таймер:</p><p><span>{Math.floor(value/INTERVAL/60/60)} : </span><span>{Math.floor(value/INTERVAL/60) % 60} : </span><span>{Math.floor(value/INTERVAL) % 60} . </span><span>{value % INTERVAL}</span></p></div>
    );
  }
}
After inserting and saving this code, a timer will appear on the page and automatically start.
Let's disassemble this code. Before the class, they declared a constant, thanks to which you can adjust the frequency of updating the timer.
Further, inside the class there is a mandatory constructor of the class to which the props is passed. Further, the standard processing of the super class constructor for super (props) and the definition of the state value using this is the current object. This is the only place where you can directly set the state. In other places, only reading is available, or the state is set using the special setState () method , which is used in the next increment () method to increase the statevalue per unit.
In applications with many components, it is very important to release the resources occupied by the components when they are destroyed. We need to set a timer each time the DOM is first drawn. In React, this is called “mount / mount.” We also need to clear this timer every time the DOM created by the component is deleted. In React, this is called dismounting / dismounting.
For this purpose, the methods componentDidMount () and componentWillUnmount () are used . In documentation, these methods are called " lifecycle hooks ". For simplicity, we will call them life-cycle methods. ComponentDidMount () methodtriggered after the component has been rendered in the DOM. This is a good place to set a timer. We will clear the timer in the life cycle componentWillUnmount () method .
Notice how we in the componentDidMount () store the timer ID directly into this using the arrow function. While this.props are independently set by React and this.state has a specific value, you can freely add additional fields to the class manually if you need to store something that is not used for visual output. If you are not using something in render () , it should not be in a state .
Next at runtimerender () in the local constant value is fixed value of the state value. And further, using the mathematical function floor () , which rounds the number down, dividing ( / ) and getting the remainder of the division ( % ) we get the parts of the timer, which are then displayed in one line after the word Timer. You can see the results of our work.
Decorating with Bootstrap
It is not convenient that the timer works immediately when the page is updated. I would like it to start and stop when you click on the appropriate buttons. And I would also like it to be in the center and large.
Let's start with the design. To do this, add the following lines to the App.css file :
.container-fluid {
  display: flex;
  flex-direction: column;
}
Thanks to the container-fluid adaptive rubber container built into Bootstrap , which helps to create a completely flexible page layout or some block. This container is 100% wide. Let's make a flex container , with the direction of alignment of elements vertically - so that it takes up all the space and it can be centered.
Now we will refine the render () method in App.js to apply the Bootstrap styles and add a couple of buttons. To do this, replace the return value of the method with the following:
<divclass="container-fluid align-items-center"><h1class="display-1">Таймер</h1><h1class="display-1"><span><kbd>{Math.floor(value/INTERVAL/60/60)}</kbd> : </span><span><kbd>{Math.floor(value/INTERVAL/60) % 60}</kbd> : </span><span><kbd>{Math.floor(value/INTERVAL) % 60}</kbd> . </span><span><kbd>{value % INTERVAL < 10 ? '0' : ''}{value % INTERVAL}</kbd></span></h1><div><buttonclass="display-4">Остановить</button>
    <buttonclass="display-4">Сбросить</button></div></div>
In the first line , 2 classes of Bootstrap were added to the root <div> : container-fluid (about which I wrote above) and the align-items-center - which exactly aligns the elements of the container in the center.
Then two <div> with the display-1 class - this class is just for displaying large text.
Next on the numbers added a new tag <kbd> - which is usually used to highlight the keys that need to be pressed. In this case, it is great for contrasting the numbers shown.
In the last digit, showing parts of a second, a conditional expression is added, allowing for single digits (<10) to output 0 at the beginning, and not to output it for two-digit numbers. It is necessary that the numbers do not twitch every second. To do this, use the ternary JavaScript operator: condition? true: false
Next, in a separate <div> I placed 2 buttons with the class Display-4 - this class was selected as the most suitable in size so that the buttons match the size of the timer. Between the buttons, I inserted a symbol - a non-breaking space, so that the buttons do not merge.
You can run, but the buttons do not work yet. Teach buttons to work.
Event handling
To begin with, we will add a call to the corresponding functions in the output code of the buttons:
<buttonclass="display-4"onClick={this.stopTimer}>Остановить</button>
<buttonclass="display-4"onClick={this.resetTimer}>Сбросить</button>
Please note that in the event handler React the onClick , instead of the onclick , in JavaScript, and the called function is indicated in braces without parentheses and specifying the object from which the method is called, in this case, the this .
Now we define the specified stopTimer () and resetTimer () methods :
stopTimer(){
  clearInterval(this.timerID);
}
resetTimer(){
  this.setState({value: 0});
}
But this is still not enough and if left so, then when you press the button, an error will appear, because this when calling the function will be undefined . This is due to the fact that in JavaScript, class methods are not bound by default. As a rule, if you refer to a method without () after it, for example, onClick = {this.resetTimer} , you need to bind this method.
We tie the methods in the class constructor, adding 2 lines there:
this.stopTimer = this.stopTimer.bind(this);
this.resetTimer = this.resetTimer.bind(this);
Great, earned! But only the stop button can be used only once, and after that the buttons stop working. And this is logical, because by calling stopTimer () we disabled the regular function call by calling clearInterval () .
In the comments advised to use the arrow function. I tried it, it works. So you can not add 2 lines to the constructor, and replace the functions themselves with the following arrow functions:
stopTimer = () => {
  this.timerID = setInterval(() =>this.increment(), 1000/INTERVAL);
}
resetTimer = () => {
  this.setState({value: 0});
}
To solve this, let's make the “Stop” button also work as “Start”.
To begin with, we add to the constructor a boolean stopped state in order to understand the mode in which the button works:
this.state = {value: 0, stopped: false};Now we completely replace the contents of the stopTimer () method :
this.setState({stopped: !this.state.stopped});
  if(this.state.stopped){
    clearInterval(this.timerID);
  }
  else
  {
    this.timerID = setInterval(() =>this.increment(), 1000/INTERVAL);
  };
At the beginning of the method, we change the stopped state to the opposite through setState () .
Further, if the timer should be stopped (i.e., stopped = true ), then we disable the regular function call through clearInterval () , and if the timer should be started (i.e., stopped = false ), then we start the regular function call in the same way as componentDidMount () .
You also need to fix the increment () method so that it stops when stopped = true :
increment(){
  if(!this.state.stopped) (this.setState({value: this.state.value + 1}));
}
And finally, we change the name of the button depending on the status of stopped by inserting the following instead of “Stop”:
{this.state.stopped?'Продолжить':'Остановить'}Now we have a beautiful, convenient timer.
Instead of the conclusion or cherry on the cake
Finally, I would like to change the standard title and window icon to ours.
You can change the header by setting document.title in the componentDidMount () method , but we will go further and make sure that the page header displays the time with an accuracy of seconds. To do this, add the document.title setting to the special componentDidUpdate () method :
componentDidUpdate(){
const value = this.state.value;
if (this.state.stopped) document.title = "Таймер";
elsedocument.title = "Таймер: "+Math.floor(value/INTERVAL/60/60)+":"
+Math.floor(value/INTERVAL/60) % 60+":"+Math.floor(value/INTERVAL) % 60;
}
Now the page header repeats the timer to seconds, and when the timer is stopped, only the word Timer is displayed.
Everything is simple with the icon. It is enough to prepare a picture in jpg , bmp , gif , png format , drop it into the public folder (and not src , in which we mostly worked), calling, for example, favicon.png and change the line in public \ index.html :
<linkrel="shortcut icon"href="%PUBLIC_URL%/favicon.ico">per line:
<linkrel="shortcut icon"type="image/png"href="/favicon.png"/>Today, this is all I wanted to tell. In the next article I will tell you more about Bootstrap, which I only touched on in this article. In addition to Bootstrap, there are still important topics: lists, tables, forms and thinking in the style of React.
Finally, the repository in BitBucket, which has all the code for this article