Introduction to Android TV App Development
This article will introduce you to the development of a simple application for Android TV. First of all, it is aimed at those who already had any experience in developing applications for Android, so I will not explain here what Activity, Fragments, etc.
On the Internet there is a lot of Russian-language information on the development of applications for Android and not a few articles on writing HelloWord for him. Interested in developing applications for Android TV, I immediately began to study this topic on English-language sites. To my surprise, the material was not so much, and I decided to see what is in Russian. I could not find anything in Russian (maybe I was looking badly). In general, I intend to rectify this situation.
Since the application interface for phones and Android TV has significant differences, we must create an application interface suitable for interaction on TV. For example, we should create applications with which we can interact using only the keys - ↑ ↓ → ←. The LeanbackSupport library can help us in implementing this interface, which makes it quite easy to create a UI that will be convenient when working with applications on Android TV.
Starting Android Studio, you need to create a new project. When creating, select the TV platform and specify the minimum version of the SDK. Android Studio will offer us to create “Android TV Activity”, but at the moment, you should select “Add No Activity”, because if you choose to create an Activity, then AS will create many classes and files that are harder to understand from the start.
First you need to create a new XML file called activity_main.xml, which will contain the markup for our Activity. We will change the markup code later.
Now you should create a class inherited from Activity. To do this, create a new class named MainActivity and inherit it from the Activty class. Define the onCreate (Bundle SIS) method and set the contents for Activity from the created markup file in it.
If you try to run the application at this stage, then it naturally will not start, since in the AndroidManifest.xml file we have not declared a single Activity.
The following code needs to be added to the manifest file.
Now let's look at some points. Part of the code below disables the touch.
In this part, you indicate that the application should only run on Android TV. If you are developing an application not only for TV, then you should set the value to false.
When declaring an Activity, we indicate in the intent-filter that the Activity should run on Android TV.
Now you need to create a Java class named MainFragment and inherit from the BrowseFragment class from the LeanbackSupport library. BrowseFragment allows you to create a standard application interface for Android TV.
Now we can bind the created fragment to our Activity. To do this, put the following markup code in the Activity markup file (in my case, activity_main.xml).
To run the application, you need to create an Android TV emulator. It can be created in Android Virtual Device Manager.
After creating the emulator, you can run our application on it. At the moment it has the following form.
Here you see an empty BrowseFragment. You can see RowsFragment on the left side of the application (the fragment is responsible for displaying the list of headers) and HeaderFragment on the right side of the screen (it is responsible for displaying the content of the headers).
Next, we will fill in HeaderFragment, RowsFragment and consider them in more detail. Before that, set the primary colors of the UI and the title for the application.
Here I added the setupUI () method to MainFragment.java and called it in the onActivityCreated predefined method.
If you run the application at this stage, then you should see such a UI.
Let's first look at the example of a finished Android TV application, the contents of BrowseFragment. Each title on the left side of the fragment (HeaderItem) has a row with content on the right side. The combination “header (HeaderItem) + content on the right side of the application” contains the ListRow class. The contents of BrowseFragment is a list from a ListRow. The title and the list with content on the right side are related to one to one.
Let's consider ListRow in more detail. ArrayObjectAdapter is responsible for the list with content. In this case, CardInfo is a content item. CardInfo can be any object. How to create and display CardInfo we will consider later.

Now we can draw the following conclusions:
ArrayObjectAdapter - responsible for the list from the ListRow
ListRow = HeaderItem (header) + ArrayObjectAdapter (list of content on the right)
The filling of content elements is determined using the Presenter class from the LeanbackSupport library. It defines the display of the content item. Presenter is an abstract class, so we need to create a new class and inherit it from Presenter. When you create a new class, you must predefine at least 3 methods:
Presenter contains an internal ViewHolder class that allows you to reference a View (content item). We can access View through ViewHolder for specific events, for example, in the methods of the class Presenter onBind () or onUnbind ()
Let's get down to business. Here we create the GridItemPresenter class inherited from the Presenter class. In this application, an Object (content element) displays a string, and the ViewHolder contains a TextView to display this string. View is created in the onCreateViewHolder () method, and its filling is done in the onBindViewHolder () method.
Add the loadRows () method to the MainFragment class and call it in the onActivityCreated () predefined method
Now you can launch the application and see the screen below.
That's all for now. In this article, I tried to explain some of the basic principles of creating an application for Android TV.
The basis for this article were taken this and this manual.
On the Internet there is a lot of Russian-language information on the development of applications for Android and not a few articles on writing HelloWord for him. Interested in developing applications for Android TV, I immediately began to study this topic on English-language sites. To my surprise, the material was not so much, and I decided to see what is in Russian. I could not find anything in Russian (maybe I was looking badly). In general, I intend to rectify this situation.
Since the application interface for phones and Android TV has significant differences, we must create an application interface suitable for interaction on TV. For example, we should create applications with which we can interact using only the keys - ↑ ↓ → ←. The LeanbackSupport library can help us in implementing this interface, which makes it quite easy to create a UI that will be convenient when working with applications on Android TV.
Creating a project in Android Studio
Starting Android Studio, you need to create a new project. When creating, select the TV platform and specify the minimum version of the SDK. Android Studio will offer us to create “Android TV Activity”, but at the moment, you should select “Add No Activity”, because if you choose to create an Activity, then AS will create many classes and files that are harder to understand from the start.
Create Activity
First you need to create a new XML file called activity_main.xml, which will contain the markup for our Activity. We will change the markup code later.
Now you should create a class inherited from Activity. To do this, create a new class named MainActivity and inherit it from the Activty class. Define the onCreate (Bundle SIS) method and set the contents for Activity from the created markup file in it.
public class MainActivity extends Activity {
    @Override
    protected void onCreate(Bundle savedInstanceState) {
        super.onCreate(savedInstanceState);
        setContentView(R.layout.activity_main);
    }
}
Activity declaration in application manifest file
If you try to run the application at this stage, then it naturally will not start, since in the AndroidManifest.xml file we have not declared a single Activity.
The following code needs to be added to the manifest file.
Now let's look at some points. Part of the code below disables the touch.
In this part, you indicate that the application should only run on Android TV. If you are developing an application not only for TV, then you should set the value to false.
When declaring an Activity, we indicate in the intent-filter that the Activity should run on Android TV.
Fragment Creation
Now you need to create a Java class named MainFragment and inherit from the BrowseFragment class from the LeanbackSupport library. BrowseFragment allows you to create a standard application interface for Android TV.
Now we can bind the created fragment to our Activity. To do this, put the following markup code in the Activity markup file (in my case, activity_main.xml).
Application launch
To run the application, you need to create an Android TV emulator. It can be created in Android Virtual Device Manager.
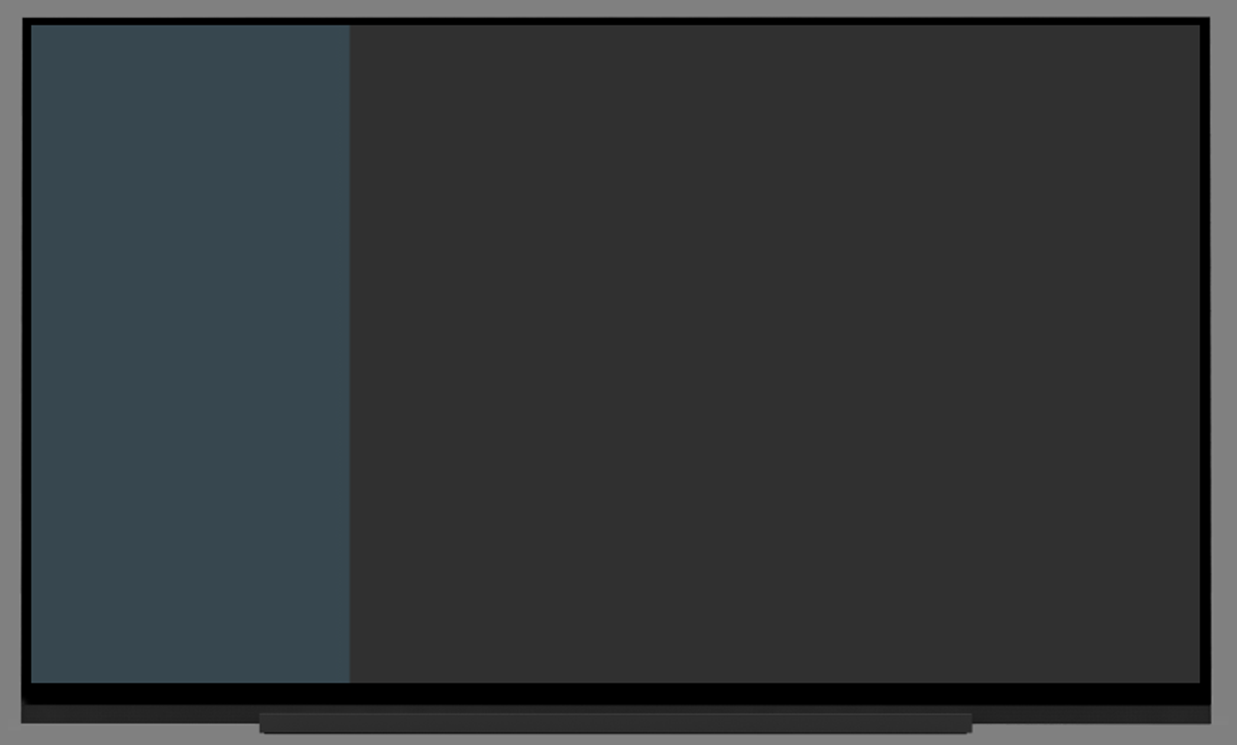
After creating the emulator, you can run our application on it. At the moment it has the following form.
Here you see an empty BrowseFragment. You can see RowsFragment on the left side of the application (the fragment is responsible for displaying the list of headers) and HeaderFragment on the right side of the screen (it is responsible for displaying the content of the headers).
Next, we will fill in HeaderFragment, RowsFragment and consider them in more detail. Before that, set the primary colors of the UI and the title for the application.
App style customization
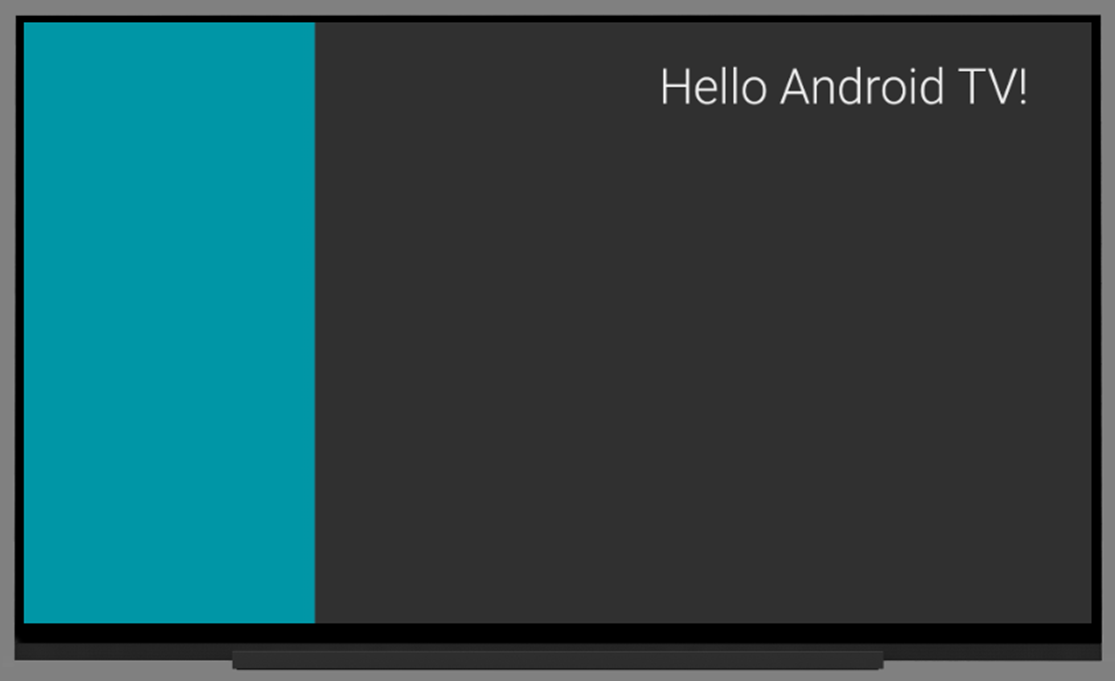
Here I added the setupUI () method to MainFragment.java and called it in the onActivityCreated predefined method.
   @Override
    public void onActivityCreated(Bundle savedInstanceState) {
        super.onActivityCreated(savedInstanceState);
        setupUI();
    }
    private void setupUI() {
        setTitle("Hello Android TV!");
        int color = ContextCompat.getColor(getActivity(), R.color.fastlane_background);
        setBrandColor(color);
    }
If you run the application at this stage, then you should see such a UI.
BrowseFragment Fill
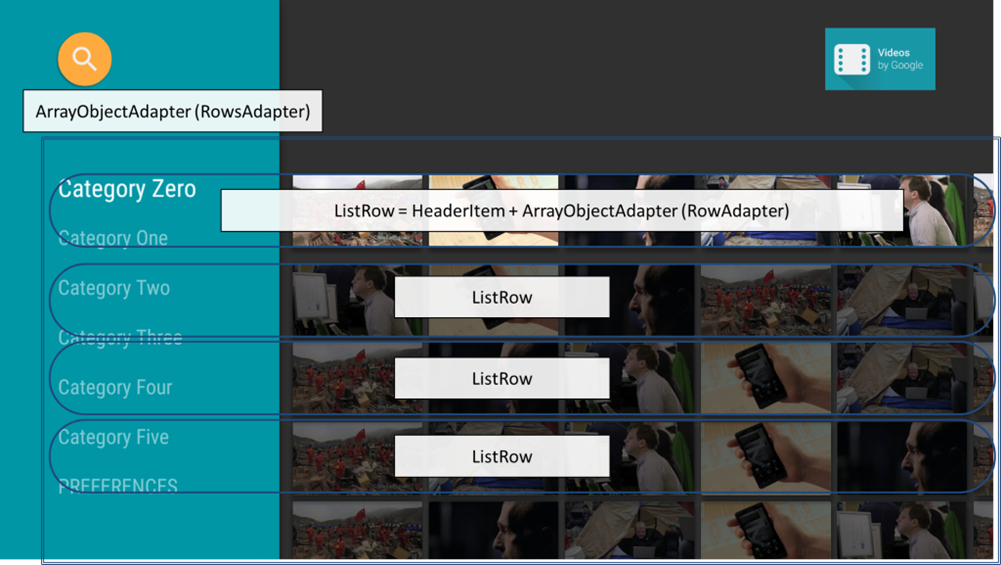
Let's first look at the example of a finished Android TV application, the contents of BrowseFragment. Each title on the left side of the fragment (HeaderItem) has a row with content on the right side. The combination “header (HeaderItem) + content on the right side of the application” contains the ListRow class. The contents of BrowseFragment is a list from a ListRow. The title and the list with content on the right side are related to one to one.
Let's consider ListRow in more detail. ArrayObjectAdapter is responsible for the list with content. In this case, CardInfo is a content item. CardInfo can be any object. How to create and display CardInfo we will consider later.
Now we can draw the following conclusions:
ArrayObjectAdapter - responsible for the list from the ListRow
ListRow = HeaderItem (header) + ArrayObjectAdapter (list of content on the right)
Class presenter
The filling of content elements is determined using the Presenter class from the LeanbackSupport library. It defines the display of the content item. Presenter is an abstract class, so we need to create a new class and inherit it from Presenter. When you create a new class, you must predefine at least 3 methods:
onCreateViewHolder(ViewGroup parent);
onBindViewHolder(ViewGolder, viewHolder, Object item);
onUnbindViewHolder(ViewHolder viewHolder);
Presenter contains an internal ViewHolder class that allows you to reference a View (content item). We can access View through ViewHolder for specific events, for example, in the methods of the class Presenter onBind () or onUnbind ()
Filling HeadersFragment and RowsFragment
Let's get down to business. Here we create the GridItemPresenter class inherited from the Presenter class. In this application, an Object (content element) displays a string, and the ViewHolder contains a TextView to display this string. View is created in the onCreateViewHolder () method, and its filling is done in the onBindViewHolder () method.
public class GridItemPresenter extends Presenter {
private static final int WIDTH_ITEM = 300;
private static final int HEIGHT_ITEM = 200;
@Override
public ViewHolder onCreateViewHolder(ViewGroup parent) {
TextView view = new TextView(parent.getContext());
view.setLayoutParams(new ViewGroup.LayoutParams(WIDTH_ITEM, HEIGHT_ITEM));
view.setFocusable(true);
view.setFocusableInTouchMode(true);
view.setGravity(Gravity.CENTER);
view.setBackgroundColor(ContextCompat.getColor(parent.getContext(), R.color.default_background));
view.setTextColor(Color.WHITE);
return new ViewHolder(view);
}
@Override
public void onBindViewHolder(ViewHolder viewHolder, Object item) {
TextView textView = (TextView) viewHolder.view;
String str = (String) item;
textView.setText(str);
}
@Override
public void onUnbindViewHolder(ViewHolder viewHolder) {
}
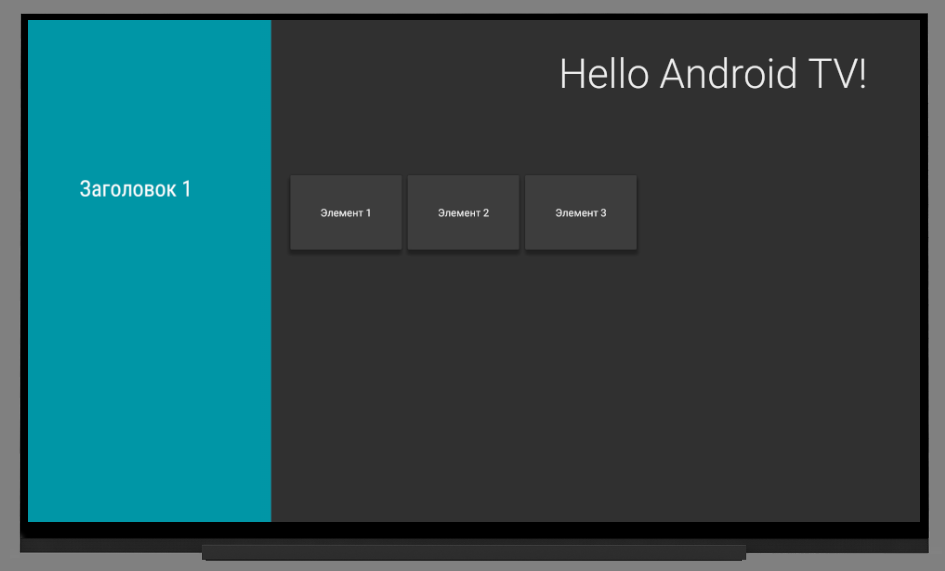
}Add the loadRows () method to the MainFragment class and call it in the onActivityCreated () predefined method
 private void loadRows() {
        // адаптер, отвечающий за ListRow (ListRow = заголовок + контент)
        ArrayObjectAdapter rowsAdapter = new ArrayObjectAdapter(new ListRowPresenter());
        // класс отвечает за заголовок, в конструкторе указываем что это первый заголовок в списке,
        // и сам заголовок содержит текст "Заголовок 1"
        HeaderItem headerItem = new HeaderItem(0, "Заголовок 1");
        // наш класс, отвечающий за заполнение элементов контента
        GridItemPresenter itemPresenter = new GridItemPresenter();
        // адаптер, отвечает за отображение контента в правой части
        ArrayObjectAdapter gridAdapter = new ArrayObjectAdapter(itemPresenter);
        // добавление трех элементов контента
        gridAdapter.add(0, "Элемент 1");
        gridAdapter.add(1, "Элемент 2");
        gridAdapter.add(2, "Элемент 3");
        // в адаптер, отвечающий за ListRows, добавляем ListRow.
        // в конструктор передаем класс, отвечающий за заголовок и адаптер, отвечающий за
        // отображение списка контента
        rowsAdapter.add(new ListRow(headerItem, gridAdapter));
        setAdapter(rowsAdapter);
    }
Now you can launch the application and see the screen below.
That's all for now. In this article, I tried to explain some of the basic principles of creating an application for Android TV.
The basis for this article were taken this and this manual.