Canon Laser Shot LBP-1120 printer and Raspberry Pi-based print server
I got an old Canon Laser Shot LBP-1120 printer for free. They gave it to me with the explanation “something cannot be connected, probably the drivers are buggy”. I tried to connect it to my computer with Windows 7 x64 - Windows Update could not pull up the drivers. I went to the site of the printer manufacturer - for this model, drivers are available starting with Windows XP, but only for 32-bit versions. I tried many drivers from other Canon printers, universal drivers from the “Generic Drivers” section, HP LaserJet 2200, 2300 drivers - in all cases the printer does not respond to computer commands.
A study of the instruction manual and bits of information on the forums gave the following: it is a GDI or winprinter printer, where all calculations when printing are performed by the driver on the computer’s processor itself, due to which a “brainless” printer is cheaper to manufacture (no processor and large memory required) . The LBP-1120 model is a clone of the Hewlett-Packard (HP) LaserJet 1100 (only it does not have “brains”, unlike the source), and the remaining models of the Canon Laser Shot family are built in the same way, which was positioned by the manufacturer as “home printers application ”. Why Canon decided that there can only be a 32-bit version of Windows at home is unknown to me. Personally, I have 3 Windows computers at home and all have a 64-bit version and at least 4GB of RAM.
I considered it inappropriate to make a virtual machine with 32-bit Windows or even create a separate print server under it, although on the Internet all the discussions I have found on this issue end with just one of these two options. “Tales” about the fact that some driver from another manufacturer might come up immediately dropped, searches for an “alternative” 64-bit driver lead to pages located in the “dark gateways”. One such one was downloaded for the sake of interest or, more precisely, to confirm the well-known truth about free cheese - it turned out to be a “worm”.
So we will build a print server based on the existing and used for other purposes Raspberry Pi ver 1 rev B running under Raspbian (Debian 7 Wheezy clone). Fortunately, a driver for Linux 32/64 bit is available on the printer manufacturer's website, although it is sneezed in the English segment of the Internet for slowness and devouring resources. By installing the printer driver and CUPS (Common UNIX Printing System) on the Raspberry Pi, I will get a full-fledged Linux print server, to which other clients can connect as a network printer using some kind of “universal” driver.
There are 5 driver versions available for download (1.6, 1.8, 2.0, 2.2, 2.7 - all were updated in the second half of July 2015, the differences between them are not known). The downloaded archive contains the compiled deb and rpm packages for the i386 architecture in 32- and 64-bit versions and the source files. Compiled packages are not suitable for Raspberry running on ARMv6L architecture. The source files of versions 1.6 and 2.7 were also not compiled for two reasons: the driver is “sharpened” for Intel commands and provides for the mandatory presence of a graphical shell (GTK2.0 by default), but on my Raspberry they aren’t important. But there is an alternative freeware driver written in 2004 by an enthusiast using the reverse engineering method of driver data exchange protocol for Windows with a printer. You can download it from the author’s page herewww.boichat.ch/nicolas/capt . Currently, driver support from the author is no longer there. He also wrote a driver for Canon LBP-660 / LBP-460 printers.
We pass from “a lot of text” directly to installing the printer driver and CUPS:
About the speed of this solution: on a “warmed up” printer, a job to print a 2-page document containing only text and a table from MS Word 2010 takes about 5 ... 10 sec. The devices are interconnected via a Wi-Fi router (laptop “over the air” and Raspberry via Ethernet).
Naturally, according to this “technology”, this printer can be used in MacOs (there are no drivers for it from the manufacturer at all), and in any other OS that supports printing over the network.
Added 06/08/2017: From devices running Android it is fashionable to use this print server using the free program from the play market CUPS Printing
Failed to send a text file to print from the console - “printer or class not registered”. I have not yet understood the reasons and methods for eliminating this problem. Yes and no, I do not need to print from the console.
Here the method is described how to install the “native” driver on the i386 platform running Ubuntu (in Ukrainian).
On the support site, Arclinux met the claim that the Canon Laser Shot LBP-1120 can be operated through the Xerox Phaser 6000B printer driver. The Xerox website has drivers for it for 64-bit Windows, but I did not check the performance of this statement.
PS. I was surprised to learn that Apple is developing CUPS :)
A study of the instruction manual and bits of information on the forums gave the following: it is a GDI or winprinter printer, where all calculations when printing are performed by the driver on the computer’s processor itself, due to which a “brainless” printer is cheaper to manufacture (no processor and large memory required) . The LBP-1120 model is a clone of the Hewlett-Packard (HP) LaserJet 1100 (only it does not have “brains”, unlike the source), and the remaining models of the Canon Laser Shot family are built in the same way, which was positioned by the manufacturer as “home printers application ”. Why Canon decided that there can only be a 32-bit version of Windows at home is unknown to me. Personally, I have 3 Windows computers at home and all have a 64-bit version and at least 4GB of RAM.
I considered it inappropriate to make a virtual machine with 32-bit Windows or even create a separate print server under it, although on the Internet all the discussions I have found on this issue end with just one of these two options. “Tales” about the fact that some driver from another manufacturer might come up immediately dropped, searches for an “alternative” 64-bit driver lead to pages located in the “dark gateways”. One such one was downloaded for the sake of interest or, more precisely, to confirm the well-known truth about free cheese - it turned out to be a “worm”.
So we will build a print server based on the existing and used for other purposes Raspberry Pi ver 1 rev B running under Raspbian (Debian 7 Wheezy clone). Fortunately, a driver for Linux 32/64 bit is available on the printer manufacturer's website, although it is sneezed in the English segment of the Internet for slowness and devouring resources. By installing the printer driver and CUPS (Common UNIX Printing System) on the Raspberry Pi, I will get a full-fledged Linux print server, to which other clients can connect as a network printer using some kind of “universal” driver.
There are 5 driver versions available for download (1.6, 1.8, 2.0, 2.2, 2.7 - all were updated in the second half of July 2015, the differences between them are not known). The downloaded archive contains the compiled deb and rpm packages for the i386 architecture in 32- and 64-bit versions and the source files. Compiled packages are not suitable for Raspberry running on ARMv6L architecture. The source files of versions 1.6 and 2.7 were also not compiled for two reasons: the driver is “sharpened” for Intel commands and provides for the mandatory presence of a graphical shell (GTK2.0 by default), but on my Raspberry they aren’t important. But there is an alternative freeware driver written in 2004 by an enthusiast using the reverse engineering method of driver data exchange protocol for Windows with a printer. You can download it from the author’s page herewww.boichat.ch/nicolas/capt . Currently, driver support from the author is no longer there. He also wrote a driver for Canon LBP-660 / LBP-460 printers.
We pass from “a lot of text” directly to installing the printer driver and CUPS:
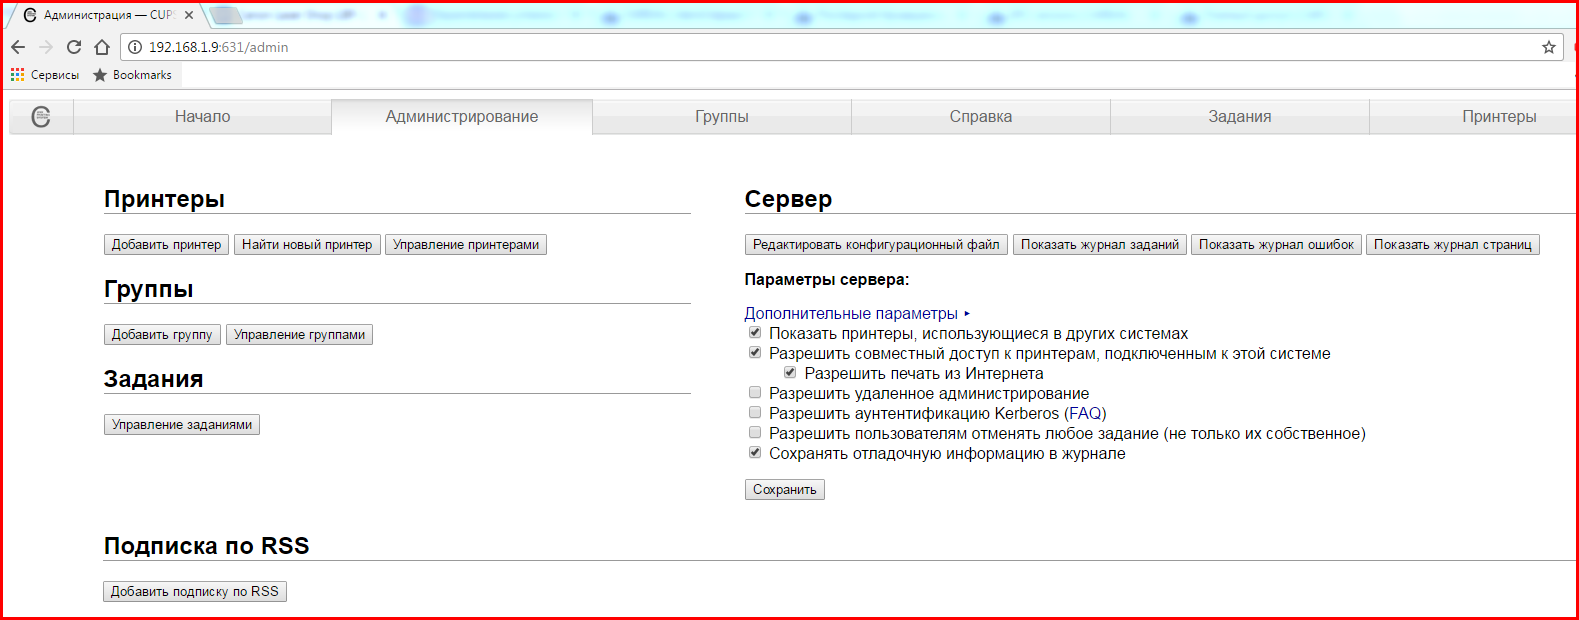
- We install CUPS according to the recommendations from the wiki.debian.org/ru/SystemPrinting page up to the “Add a printer” stage - the driver is not worth it yet :)
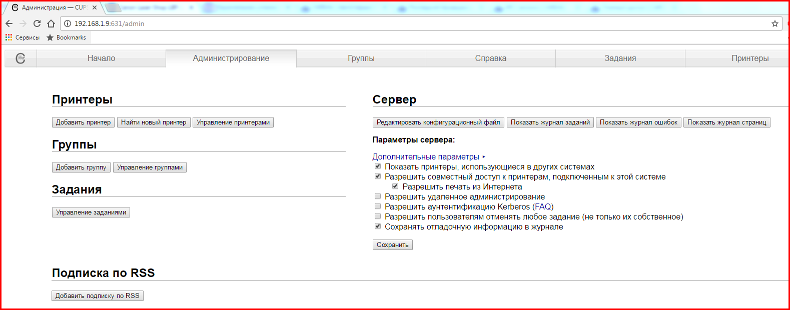
- To ease the difficulties of administering CUPS, we add to the group of print administrators a user who will be the administrator:
# usermod -a -G lpadmin MY_USER - We compile and install the driver: unpack the archive with the driver files in the / usr / src / folder and execute the commands:
$ cd /usr/src/capt-0.1
# make
# make install
# modprobe usblp
# chmod a+rw /dev/usb/lp0
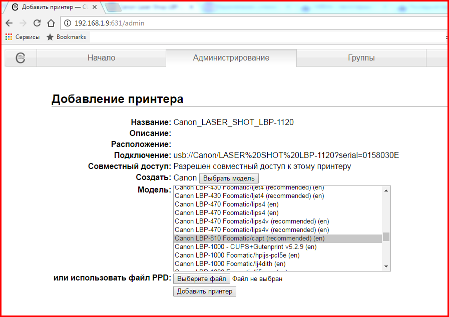
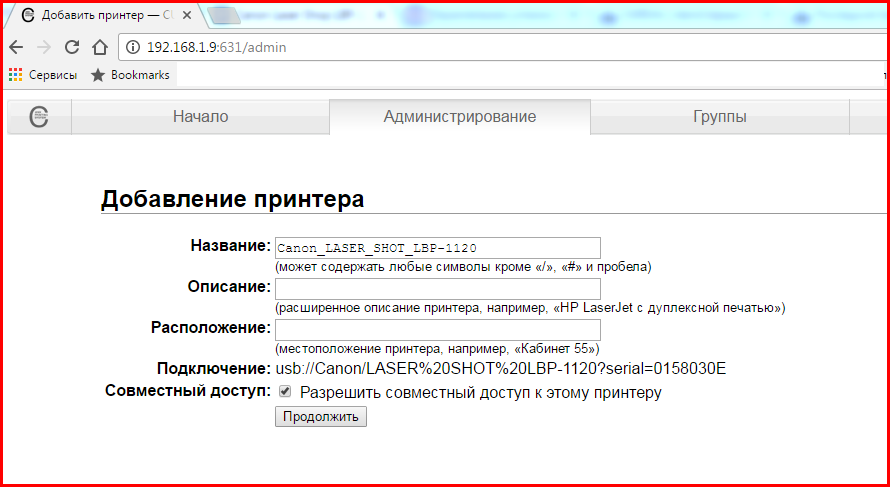
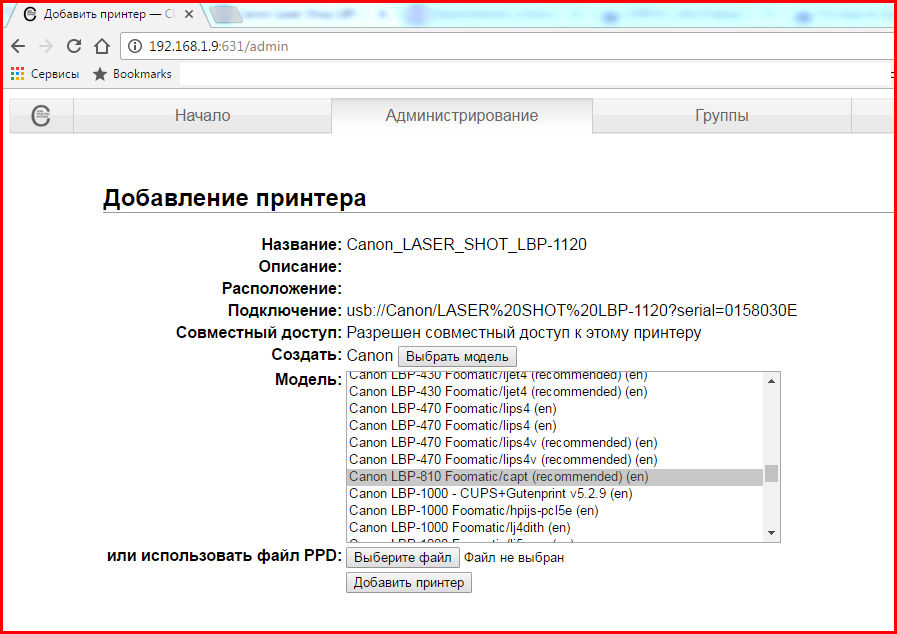
Overloading CUPS:# /etc/init.d/cups restart - We return to the instructions from paragraph 1 and add the printer; You must add the printer driver “Canon Laser Shot LBP-810”; Yes, yes - they are almost like twin brothers, differing only in the presence of duplex in the LBP-810; Naturally, the entire procedure in this material is applicable to LBP-810;

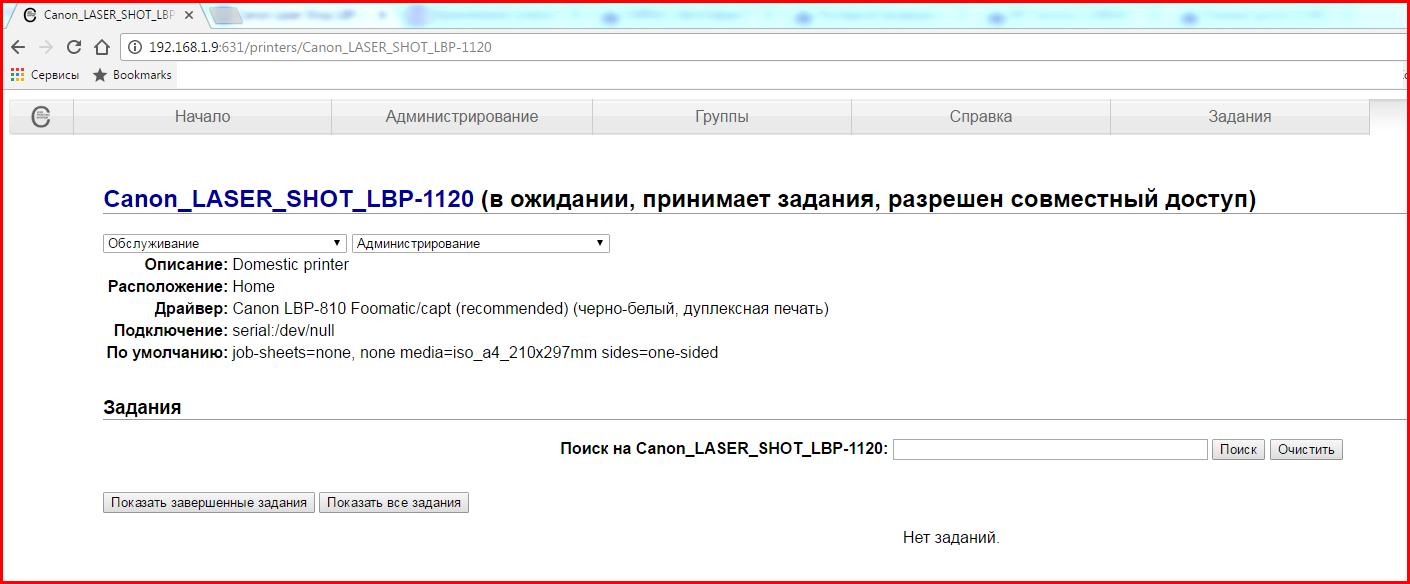
- DeviceURI, which is assigned by default to the printer, does not suit us - the output should be anywhere, preferably “into the void”, but not into USB; Therefore, you must go to the CUPS printer configuration file (/etc/cups/printers.conf) and make the following changes:
Replace the line:DeviceURI usb://Canon/LASER%20SHOT%20LBP-1120?serial=0158030E
Per line:DeviceURI serial:/dev/null
Now print jobs will be output to the missing COM port; - Overloading CUPS:
# /etc/init.d/cups restart
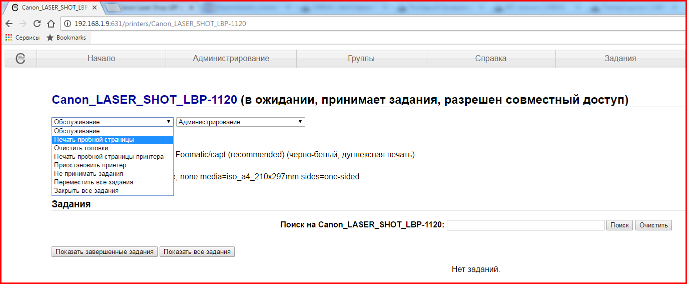
In the printer properties, the “Connection” parameter should look like in the picture:
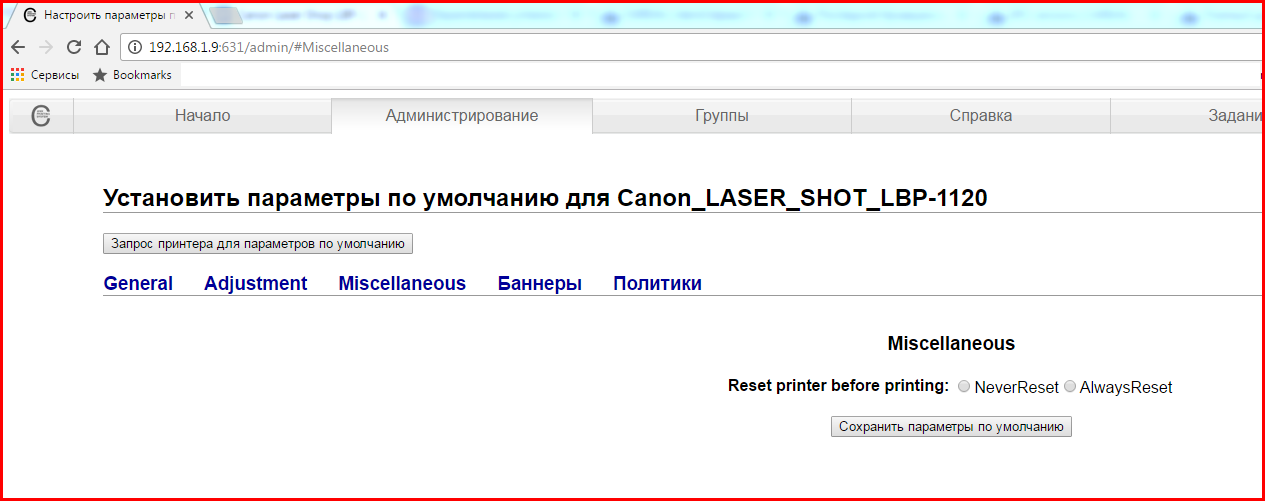
- Be sure to reset the status before each job in the printer settings; Otherwise, it will print the first job, and subsequent ones will only go after turning the printer off / on;
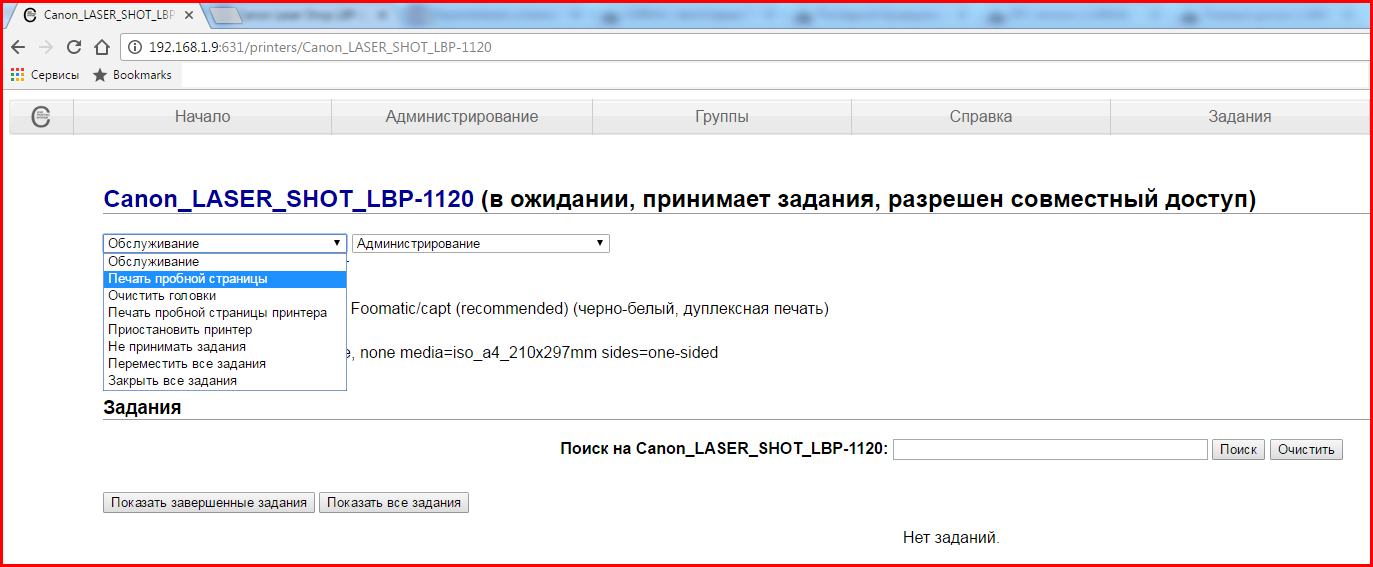
- We go to the CUPS printer control panel and in the installed printer we send the CUPS test page to print; Do not be alarmed: it will print surprisingly long - 3 ... 6 minutes elapse before the start of the withdrawal; It’s useless to print a printer’s test page (4th item of the Maintenance menu) - the printer still has no brains, and the driver’s developer didn’t provide it (as was done in the original Windows driver), so the task will immediately go to the “Completed” state and that’s all :)
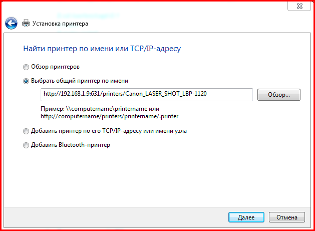
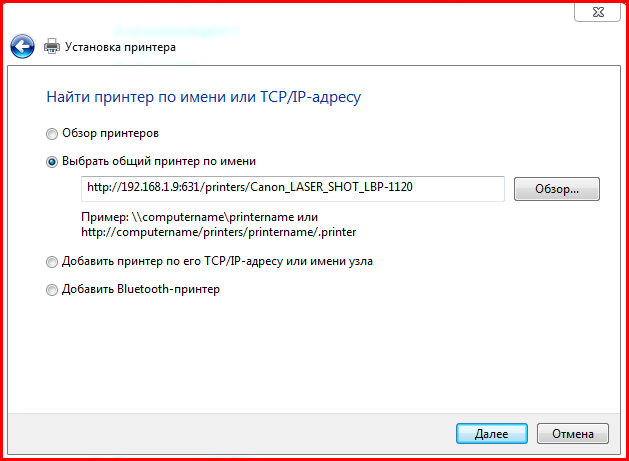
- In Windows, go to the printer control panel and add a network printer. The connection string can be taken from the address bar of the browser in step 7, replacing the protocol from https to http; The printer driver can be selected from almost any of the supporting PS (PostScript); I got the perfect driver from the HP LaserJet 2300; PCL5 / 6 printer drivers will not work.
About the speed of this solution: on a “warmed up” printer, a job to print a 2-page document containing only text and a table from MS Word 2010 takes about 5 ... 10 sec. The devices are interconnected via a Wi-Fi router (laptop “over the air” and Raspberry via Ethernet).
Naturally, according to this “technology”, this printer can be used in MacOs (there are no drivers for it from the manufacturer at all), and in any other OS that supports printing over the network.
Added 06/08/2017: From devices running Android it is fashionable to use this print server using the free program from the play market CUPS Printing
Failed to send a text file to print from the console - “printer or class not registered”. I have not yet understood the reasons and methods for eliminating this problem. Yes and no, I do not need to print from the console.
$ lp -d printers.conf
lp: The printer or class does not exist.
Here the method is described how to install the “native” driver on the i386 platform running Ubuntu (in Ukrainian).
On the support site, Arclinux met the claim that the Canon Laser Shot LBP-1120 can be operated through the Xerox Phaser 6000B printer driver. The Xerox website has drivers for it for 64-bit Windows, but I did not check the performance of this statement.
PS. I was surprised to learn that Apple is developing CUPS :)