Microservice architecture on a modern stack of Java technologies
- Tutorial
We had JDK 11, Kotlin, Spring 5 and Spring Boot 2, Gradle 5 with production-ready Kotlin DSL, JUnit 5, and another half a dozen Spring Cloud stack libraries for Service discovery, creating API gateway, client balancing, implementing the Circuit breaker pattern , writing declarative HTTP clients, distributed tracing and all that. Not that all this was needed to create a microservice architecture - only just for fun ...
In this article, you will see an example of a microservice architecture on the actual technologies in the Java world, the main of which are given below (the versions indicated are used in the project at the time of publication):
The project consists of 5 microservices: 3 infrastructure (Config server, Service discovery server, UI gateway) and examples of the front-end (Items UI) and back-end (Items service):
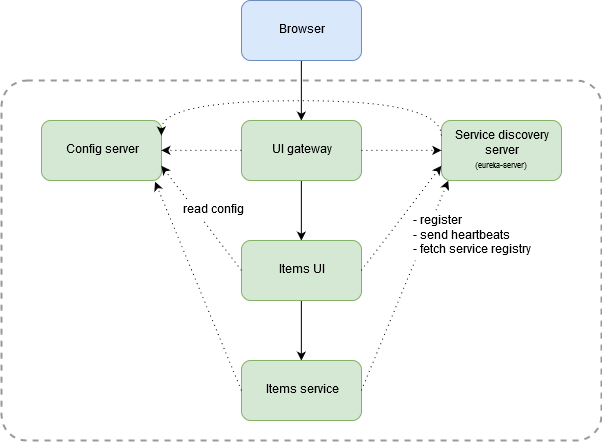
All of them will be discussed below. In the “combat” project, obviously, there will be much more microservices implementing any business functionality. Their addition to a similar architecture is technically similar to the Items UI and Items service.
The article does not consider the tools for containerization and orchestration, since at present they are not used in the project.
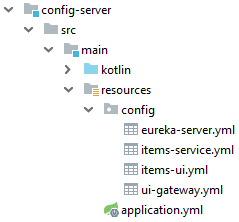
Spring Cloud Config was used to create a centralized repository for application configurations. Configs can be read from various sources, for example, a separate git repository; In this project, for simplicity and clarity, they are in the application resources:
At the same time, the config of the Config server (
Using port 8888 allows Config server clients not to explicitly specify its port in their own
The program code of this microservice consists of just one file containing the declaration of the application class and the main method, which, unlike the equivalent Java code, is a top-level function:
Application classes and main methods in other microservices have a similar appearance.
Service discovery is a microservice architecture pattern that allows you to simplify the interaction between applications in terms of a possible change in the number of their instances and network location. The key component in this approach is the Service registry - a database of microservices, their instances and network locations (more here ).
In this project, Service discovery is implemented on the basis of Netflix Eureka, which is Client-side service discovery: Eureka server performs the function of the Service registry, and Eureka client, before executing a request to any microservice, calls the Eureka server for the list of instances of the called application and performs load balancing on its own (using the Netflix Ribbon). Netflix Eureka, like some other components of the Netflix OSS stack (for example, Hystrix and Ribbon), integrates with Spring Boot applications using Spring Cloud Netflix .
In the Service discovery server configuration, located in its resources (
The rest of the application
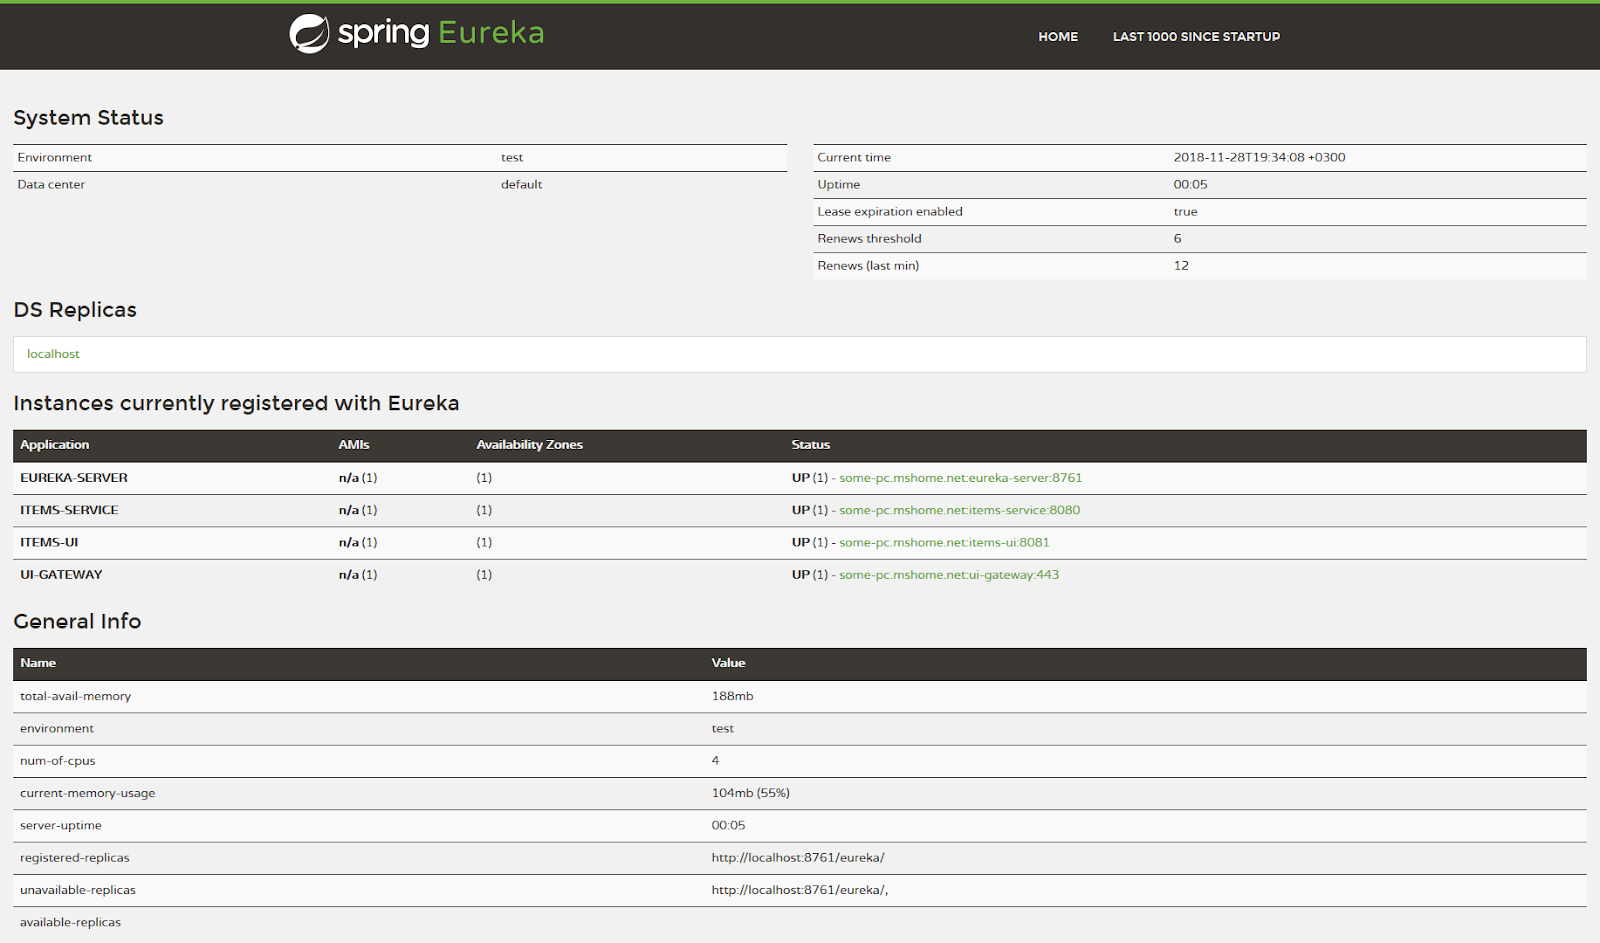
Eureka server uses port 8761, which allows all Eureka clients not to specify it using the default value. The parameter value
List of registered applications and other information are available by
Alternative options for implementing Service discovery are Consul, Zookeeper, and others.
This application is an example of a back-end with a REST API implemented using the WebFlux framework that appeared in Spring 5 (the documentation is here ), or rather Kotlin DSL for it:
Processing received HTTP requests is delegated to a class bin
The application becomes a client of the Eureka server, i.e., it registers and receives data from the Service registry, due to the presence of a dependency
Consider one of the ways to send additional metadata to the Eureka server:
Make sure that the Eureka server receives this data by accessing
This microservice, besides showing interaction with the UI gateway (will be shown in the next section), performs the front-end function for the Items service, with which REST API can interact in several ways:
The fact that all three methods return the same result can be verified by going to

I prefer the option using OpenFeign, because it gives the opportunity to develop a contract for interaction with the called microservice, which Spring takes on the implementation of. The object implementing this contract is injected and used as an ordinary bin:
If the request for any reason fails, the corresponding class method will be called that implements the interface
For the Feign client to work, you need to annotate the application class
To use Hystrix fallback in the Feign client, you need to enter the configuration file:
To test the work of Hystrix fallback in the Feign client, just go to
The API gateway pattern allows you to create a single entry point for API provided by other microservices (more here ). The application implementing this pattern performs routing (routing) of requests to microservices, and can also perform additional functions, for example, authentication.
In this project, for greater clarity, a UI gateway is implemented, that is, a single entry point for different UIs; obviously, the API gateway is implemented in a similar way. Microservice is implemented on the basis of the Spring Cloud Gateway framework. An alternative option is Netflix Zuul, which is included with Netflix OSS and integrated with Spring Boot using Spring Cloud Netflix.
The UI gateway works on port 443 using the generated SSL certificate (located in the project). SSL and HTTPS are configured as follows:
User logins and passwords are stored in the Map-based implementation of the WebFlux-specific interface
Security settings are configured as follows:
The given config determines that a part of web resources (for example, static) is available to all users, including those who are not authenticated, and everything else (

This page uses the tools of the Bootstrap framework connected to the project using Webjars, which allows you to manage client-side libraries as normal dependencies. Thymeleaf is used to generate HTML pages. Access to the login page is configured using WebFlux:
Spring Cloud Gateway routing can be configured in a YAML or java-config. Routes to microservices are either set manually or are created automatically based on data received from the Service registry. With a sufficiently large number of UIs that require routing, it will be more convenient to use the integration with the Service registry:
The value of the parameter
Consider the example of creating routes in the java-config manually (without integration with the Service registry):
The first route routes to the previously shown home page of Eureka server (
All the routes created by the application are available at
In the underlying microservices, it may be necessary to gain access to the login and / or user roles authenticated in the UI gateway. To do this, I created a filter that adds the appropriate headers to the request:
Now let's turn to Items UI using the UI gateway -

Spring Cloud Sleuth is a solution for tracing requests in a distributed system. Trace Id (pass-through identifier) and Span Id (identifier of unit of work) are added to the headers of the request passing through several microservices (for easier perception, I simplified the scheme; here is a more detailed explanation):

This functionality is connected by simply adding a dependency
Specifying the appropriate logging settings, you can see something like the following in the console of the corresponding microservices (after the name of the microservice, Trace Id and Span Id are displayed):
For a graphical representation of distributed tracing, you can use, for example, Zipkin, which will function as a server that aggregates information about HTTP requests from other microservices (more here ).
Depending on the OS is running
Given the possibility of using the Gradle wrapper , there is no need for a locally installed Gradle.
The build and subsequent launch successfully pass to JDK 11.0.1. Prior to this, the project worked on JDK 10, so I admit that there will be no problems with build and launch on this version. I have no data about earlier versions of the JDK. In addition, you need to consider that the Gradle 5 used requires at least JDK 8.
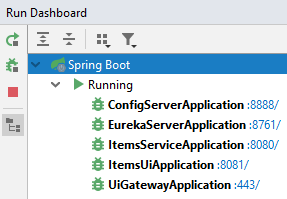
I recommend to start applications in the order of their description in this article. If you use Intellij IDEA with Run Dashboard enabled, you should get something like the following:
The article reviewed an example of microservice architecture on the current technology stack in the Java world, its main components and some features. I hope for someone the material will be useful. Thank you for attention!
Introduction
In this article, you will see an example of a microservice architecture on the actual technologies in the Java world, the main of which are given below (the versions indicated are used in the project at the time of publication):
| Technology type | Title | Version |
|---|---|---|
| Platform | Jdk | 11.0.1 |
| Programming language | Kotlin | 1.3.10 |
| Application framework | Spring framework | 5.0.9 |
| Spring boot | 2.0.5 | |
| Assembly system | Gradle | 5.0 |
| Gradle kotlin dsl | 1.0.4 | |
| Unit Testing Framework | Junit | 5.1.1 |
| Spring cloud | ||
| Single access point (API gateway) | Spring cloud gateway | Included in the Spring Cloud Release train Finchley SR2 |
| Centralized configuration | Spring cloud config | |
| Request Tracing (Distributed tracing) | Spring cloud sleuth | |
| Declarative HTTP client | Spring cloud openfeign | |
| Service discovery | Spring cloud netflix eureka | |
| Circuit breaker | Spring cloud netflix hystrix | |
| Client load balancing | Spring Cloud Netflix Ribbon | |
The project consists of 5 microservices: 3 infrastructure (Config server, Service discovery server, UI gateway) and examples of the front-end (Items UI) and back-end (Items service):
All of them will be discussed below. In the “combat” project, obviously, there will be much more microservices implementing any business functionality. Their addition to a similar architecture is technically similar to the Items UI and Items service.
Disclaimer
The article does not consider the tools for containerization and orchestration, since at present they are not used in the project.
Config server
Spring Cloud Config was used to create a centralized repository for application configurations. Configs can be read from various sources, for example, a separate git repository; In this project, for simplicity and clarity, they are in the application resources:
At the same time, the config of the Config server (
application.yml) itself looks like this:spring:
profiles:
active: native
cloud:
config:
server:
native:
search-locations: classpath:/config
server:
port: 8888Using port 8888 allows Config server clients not to explicitly specify its port in their own
bootstrap.yml. At startup, they load their config by executing a GET request to the HTTP API Config server. The program code of this microservice consists of just one file containing the declaration of the application class and the main method, which, unlike the equivalent Java code, is a top-level function:
@SpringBootApplication@EnableConfigServerclassConfigServerApplicationfunmain(args: Array<String>) {
   runApplication<ConfigServerApplication>(*args)
}
Application classes and main methods in other microservices have a similar appearance.
Service discovery server
Service discovery is a microservice architecture pattern that allows you to simplify the interaction between applications in terms of a possible change in the number of their instances and network location. The key component in this approach is the Service registry - a database of microservices, their instances and network locations (more here ).
In this project, Service discovery is implemented on the basis of Netflix Eureka, which is Client-side service discovery: Eureka server performs the function of the Service registry, and Eureka client, before executing a request to any microservice, calls the Eureka server for the list of instances of the called application and performs load balancing on its own (using the Netflix Ribbon). Netflix Eureka, like some other components of the Netflix OSS stack (for example, Hystrix and Ribbon), integrates with Spring Boot applications using Spring Cloud Netflix .
In the Service discovery server configuration, located in its resources (
bootstrap.yml), only the application name and the parameter determining that the microservice launch will be interrupted is indicated if it is impossible to connect to the Config server:spring:
application:
name: eureka-server
cloud:
config:
fail-fast: trueThe rest of the application
eureka-server.ymlconfig is located in a file in the Config server resources:server:
port: 8761
eureka:
client:
register-with-eureka: true
fetch-registry: falseEureka server uses port 8761, which allows all Eureka clients not to specify it using the default value. The parameter value
register-with-eureka(indicated for clarity, since it is also used by default) indicates that the application itself, like other microservices, will be registered with the Eureka server. The parameter fetch-registrydetermines whether the Eureka client will receive data from the Service registry. List of registered applications and other information are available by
http://localhost:8761/:Alternative options for implementing Service discovery are Consul, Zookeeper, and others.
Items service
This application is an example of a back-end with a REST API implemented using the WebFlux framework that appeared in Spring 5 (the documentation is here ), or rather Kotlin DSL for it:
@BeanfunitemsRouter(handler: ItemHandler) = router {
   path("/items").nest {
       GET("/", handler::getAll)
       POST("/", handler::add)
       GET("/{id}", handler::getOne)
       PUT("/{id}", handler::update)
   }
}
Processing received HTTP requests is delegated to a class bin
ItemHandler. For example, the method for getting a list of objects of some entity looks like this:fungetAll(request: ServerRequest) = ServerResponse.ok()
.contentType(APPLICATION_JSON_UTF8)
.body(fromObject(itemRepository.findAll()))The application becomes a client of the Eureka server, i.e., it registers and receives data from the Service registry, due to the presence of a dependency
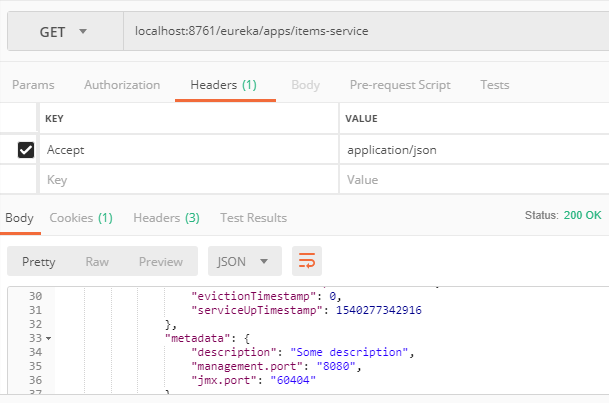
spring-cloud-starter-netflix-eureka-client. After registration, the application sends hartbits to the Eureka server with a certain periodicity, and if over a certain period of time the percentage of the Hearbits received by the Eureka server relative to the maximum possible value is below a certain threshold, the application will be deleted from the Service registry. Consider one of the ways to send additional metadata to the Eureka server:
@PostConstructprivatefunaddMetadata() = aim.registerAppMetadata(mapOf("description" to "Some description"))Make sure that the Eureka server receives this data by accessing
http://localhost:8761/eureka/apps/items-servicevia Postman:Items UI
This microservice, besides showing interaction with the UI gateway (will be shown in the next section), performs the front-end function for the Items service, with which REST API can interact in several ways:
- Client to REST API, written using OpenFeign:
@FeignClient("items-service", fallbackFactory = ItemsServiceFeignClient.ItemsServiceFeignClientFallbackFactory::class)interfaceItemsServiceFeignClient{ @GetMapping("/items/{id}")fungetItem(@PathVariable("id") id: Long): String @GetMapping("/not-existing-path")funtestHystrixFallback(): String @ComponentclassItemsServiceFeignClientFallbackFactory : FallbackFactory<ItemsServiceFeignClient> { privateval log = LoggerFactory.getLogger(this::class.java)overridefuncreate(cause: Throwable) = object : ItemsServiceFeignClient { overridefungetItem(id: Long): String { log.error("Cannot get item with id=$id") throw ItemsUiException(cause) } overridefuntestHystrixFallback(): String { log.error("This is expected error") return"{\"error\" : \"Some error\"}" } } } } - Class Bean
RestTemplate
In a java-config, a bin is created:@Bean@LoadBalancedfunrestTemplate() = RestTemplate()
And is used in this way:funrequestWithRestTemplate(id: Long): String = restTemplate.getForEntity("http://items-service/items/$id", String::class.java).body ?: "No result" - Class
WebClientbean (the way is specific for the WebFlux framework)
In the java-config, a bin is created:@BeanfunwebClient(loadBalancerClient: LoadBalancerClient) = WebClient.builder() .filter(LoadBalancerExchangeFilterFunction(loadBalancerClient)) .build()
And is used in this way:funrequestWithWebClient(id: Long): Mono<String> = webClient.get().uri("http://items-service/items/$id").retrieve().bodyToMono(String::class.java)
The fact that all three methods return the same result can be verified by going to
http://localhost:8081/example:I prefer the option using OpenFeign, because it gives the opportunity to develop a contract for interaction with the called microservice, which Spring takes on the implementation of. The object implementing this contract is injected and used as an ordinary bin:
itemsServiceFeignClient.getItem(1)If the request for any reason fails, the corresponding class method will be called that implements the interface
FallbackFactoryin which you need to handle the error and return the default response (or forward an exception further). In the event that some number of consecutive calls fail, the Fuse will open the circuit (for more on Circuit breaker here and here ), giving time to restore the fallen microservice. For the Feign client to work, you need to annotate the application class
@EnableFeignClients:@SpringBootApplication@EnableFeignClients(clients = [ItemsServiceFeignClient::class])classItemsUiApplicationTo use Hystrix fallback in the Feign client, you need to enter the configuration file:
feign:
 hystrix:
   enabled: true
To test the work of Hystrix fallback in the Feign client, just go to
http://localhost:8081/hystrix-fallback. The feign client will attempt to execute the query on the path that does not exist in the Items service, which will lead to the return of respons:{"error" : "Some error"}Ui gateway
The API gateway pattern allows you to create a single entry point for API provided by other microservices (more here ). The application implementing this pattern performs routing (routing) of requests to microservices, and can also perform additional functions, for example, authentication.
In this project, for greater clarity, a UI gateway is implemented, that is, a single entry point for different UIs; obviously, the API gateway is implemented in a similar way. Microservice is implemented on the basis of the Spring Cloud Gateway framework. An alternative option is Netflix Zuul, which is included with Netflix OSS and integrated with Spring Boot using Spring Cloud Netflix.
The UI gateway works on port 443 using the generated SSL certificate (located in the project). SSL and HTTPS are configured as follows:
server:
 port: 443
 ssl:
   key-store: classpath:keystore.p12
   key-store-password: qwerty
   key-alias: test_key
   key-store-type: PKCS12
User logins and passwords are stored in the Map-based implementation of the WebFlux-specific interface
ReactiveUserDetailsService:@BeanfunreactiveUserDetailsService(): ReactiveUserDetailsService {
val user = User.withDefaultPasswordEncoder()
.username("john_doe").password("qwerty").roles("USER")
.build()
val admin = User.withDefaultPasswordEncoder()
.username("admin").password("admin").roles("ADMIN")
.build()
return MapReactiveUserDetailsService(user, admin)
}Security settings are configured as follows:
@BeanfunspringWebFilterChain(http: ServerHttpSecurity): SecurityWebFilterChain = http
       .formLogin().loginPage("/login")
       .and()
       .authorizeExchange()
       .pathMatchers("/login").permitAll()
       .pathMatchers("/static/**").permitAll()
       .pathMatchers("/favicon.ico").permitAll()
       .pathMatchers("/webjars/**").permitAll()
       .pathMatchers("/actuator/**").permitAll()
       .anyExchange().authenticated()
       .and()
       .csrf().disable()
       .build()
The given config determines that a part of web resources (for example, static) is available to all users, including those who are not authenticated, and everything else (
.anyExchange()) is only authenticated. If you try to enter a URL that requires authentication, you will be redirected to the login page ( https://localhost/login):This page uses the tools of the Bootstrap framework connected to the project using Webjars, which allows you to manage client-side libraries as normal dependencies. Thymeleaf is used to generate HTML pages. Access to the login page is configured using WebFlux:
@Beanfunroutes() = router {
   GET("/login") { ServerResponse.ok().contentType(MediaType.TEXT_HTML).render("login") }
}
Spring Cloud Gateway routing can be configured in a YAML or java-config. Routes to microservices are either set manually or are created automatically based on data received from the Service registry. With a sufficiently large number of UIs that require routing, it will be more convenient to use the integration with the Service registry:
spring:
 cloud:
   gateway:
     discovery:
       locator:
         enabled: true
         lower-case-service-id: true
         include-expression: serviceId.endsWith('-UI')
         url-expression: "'lb:http://'+serviceId"
The value of the parameter
include-expressionindicates that the routes will be created only for microservices whose names end with -UI , and the value of the parameter url-expressionis that they are accessible via the HTTP protocol, unlike the UI gateway working via HTTPS, and when accessing them, client balancing will be used load (implemented using the Netflix Ribbon). Consider the example of creating routes in the java-config manually (without integration with the Service registry):
@BeanfunrouteLocator(builder: RouteLocatorBuilder) = builder.routes {
   route("eureka-gui") {
       path("/eureka")
       filters {
           rewritePath("/eureka", "/")
       }
       uri("lb:http://eureka-server")
   }
   route("eureka-internals") {
       path("/eureka/**")
       uri("lb:http://eureka-server")
   }
}
The first route routes to the previously shown home page of Eureka server (
http://localhost:8761), the second one is needed to load the resources of this page. All the routes created by the application are available at
https://localhost/actuator/gateway/routes. In the underlying microservices, it may be necessary to gain access to the login and / or user roles authenticated in the UI gateway. To do this, I created a filter that adds the appropriate headers to the request:
@ComponentclassAddCredentialsGlobalFilter : GlobalFilter {privateval loggedInUserHeader = "logged-in-user"privateval loggedInUserRolesHeader = "logged-in-user-roles"overridefunfilter(exchange: ServerWebExchange, chain: GatewayFilterChain) = exchange.getPrincipal<Principal>()
           .flatMap {
               val request = exchange.request.mutate()
                       .header(loggedInUserHeader, it.name)
                       .header(loggedInUserRolesHeader, (it as Authentication).authorities?.joinToString(";") ?: "")
                       .build()
               chain.filter(exchange.mutate().request(request).build())
           }
}
Now let's turn to Items UI using the UI gateway -
https://localhost/items-ui/greeting, fairly assuming that the Items UI has already implemented the processing of these headers:Spring Cloud Sleuth is a solution for tracing requests in a distributed system. Trace Id (pass-through identifier) and Span Id (identifier of unit of work) are added to the headers of the request passing through several microservices (for easier perception, I simplified the scheme; here is a more detailed explanation):
This functionality is connected by simply adding a dependency
spring-cloud-starter-sleuth. Specifying the appropriate logging settings, you can see something like the following in the console of the corresponding microservices (after the name of the microservice, Trace Id and Span Id are displayed):
DEBUG [ui-gateway,009b085bfab5d0f2,009b085bfab5d0f2,false] o.s.c.g.h.RoutePredicateHandlerMapping   : Route matched: CompositeDiscoveryClient_ITEMS-UI
DEBUG [items-ui,009b085bfab5d0f2,947bff0ce8d184f4,false] o.s.w.r.function.server.RouterFunctions  : Predicate "(GET && /example)" matches against "GET /example"
DEBUG [items-service,009b085bfab5d0f2,dd3fa674cd994b01,false] o.s.w.r.function.server.RouterFunctions  : Predicate "(GET && /{id})" matches against "GET /1"
For a graphical representation of distributed tracing, you can use, for example, Zipkin, which will function as a server that aggregates information about HTTP requests from other microservices (more here ).
Assembly
Depending on the OS is running
gradlew clean buildor ./gradlew clean build. Given the possibility of using the Gradle wrapper , there is no need for a locally installed Gradle.
The build and subsequent launch successfully pass to JDK 11.0.1. Prior to this, the project worked on JDK 10, so I admit that there will be no problems with build and launch on this version. I have no data about earlier versions of the JDK. In addition, you need to consider that the Gradle 5 used requires at least JDK 8.
Launch
I recommend to start applications in the order of their description in this article. If you use Intellij IDEA with Run Dashboard enabled, you should get something like the following:
Conclusion
The article reviewed an example of microservice architecture on the current technology stack in the Java world, its main components and some features. I hope for someone the material will be useful. Thank you for attention!
Links
- The source code of the project on GitHub
- Articles about Chris Richardson microservices
- An article on Martin Fowler microservices
- Guide on materials about Martin Fowler microservices