Linux print server with AD integration
In this article, I wanted to share my experience in creating a linux-based print server with integration into AD. Integration means entering a linux server into a Windows domain and sharing Cups printers through Samba, including printer drivers. Perhaps it was clumsily put it, but it looks like this - in order to install a printer for a Windows user, just click "install a new printer", display a list of printers in AD and click on the desired printer - the printer will install automatically with all the necessary drivers installed. At the same time, all rights to manage, access, print will be pulled from AD.
Suppose linux is already installed and all the necessary packages are installed.
I will not focus much attention on entering linux into the Winodws domain, especially since there are plenty of articles on this subject. I will provide a link to a pretty good article - https://habrahabr.ru/post/143190/ I will
dwell only on important points. Also, below I will lay out all my working configs of the above services. Customized for various articles and manuals.
The time on the linux server must be identical with the domain controller, otherwise it cannot be driven into the domain.
There are several options for this: specify the same ntp time synchronization server on the domain of the controller and our print server, or specify the controller's IP domain as the ntp server on the print server. I set up the second option.
You can check the synchronization as follows:
Many argue that these settings are not needed at all for samba, as well as kerberos and LDAP, but I love Feng Shui))). Earlier, I configured samba as a PDC (Primary Domain Controller) without kerberos and LDAP, and all this worked with WinXP clients, I confirm.
These settings are not recommended by samba itself, starting with some versions 3.X, but in many articles they are indicated. If you specify these parameters in new versions of samba, then testparm will display:
parameter realm - the domain name must be indicated in capital letters!
Section realms - the domain name must be indicated in capital letters!
Otherwise, you can get such an error when checking kerberos
Suppose that you have configured the necessary services and successfully entered the linux machine into the Windows domain. Let's move on to the CUPS settings.
I’ll explain here.
At the expense of the latter. I noticed the following in the logos:
I found two recommendations on this subject:
- disable sharing of printers in samba completely (very useful, especially for the print server)
- replace Basic with None wherever this option is in cupsd.conf (didn’t feel the difference)
I read on cups.org that the values of this option can be 2 - Basic and Negotiate, the latter for authentication using kerberos.
In any case, this error does not affect cups'a in any way.
I have indicated access for all local subnets. In principle, you can specify different subnets in the Allow directive, just as I did in BrowseAddress.
Next, we configure access to the administrative panel and configuration files. Here you can also register the Allow directive (in each section) indicating the subnets or a separate IP address from which printers can be administered. If you do not add this directive - you can administer from any LAN subnet - the equivalent of Allow all.
This completes the setup of cups. Restart it. In OpenSUSE, this is done through systemctl
Now you can start setting up printers through the cups'a web interface. There is a slight subtlety - to change, add, delete printers, you need to go to the cups web interface via ssl ( https ), i.e. open in a web browser
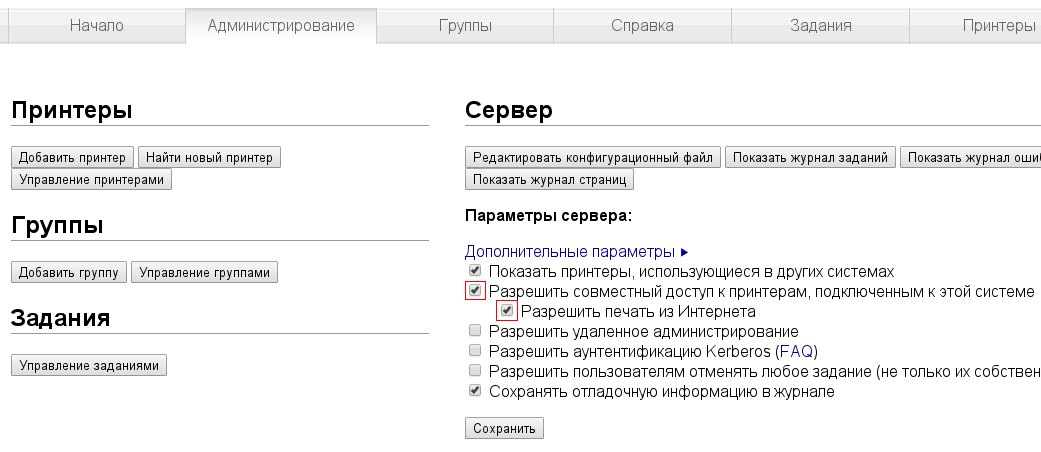
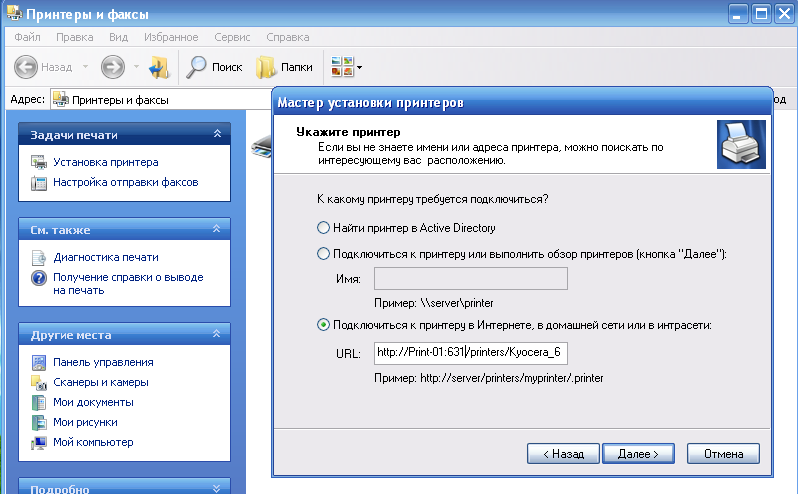
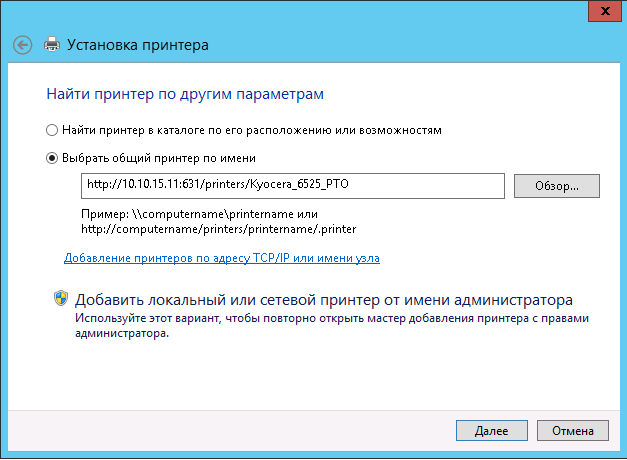
Otherwise, we get the following error: To add printers to cups via the web interface is a rather trivial task, so I will not describe it. The only thing I recommend on the "Administration" tab is to check whether the options are enabled: - Allow sharing of printers connected to this system - Allow printing from the Internet And when installing a printer, remember to enable the option "Allow sharing of this printer." Who does not want to bother with samba, in cups there is the possibility of printing using the protocol ipp (Internet Printing Protocol). In Windows, the printer is installed as follows: control panel → printers → printer installation → network printer → connect to the printer on the Internet (“select a shared printer by name” for Win7 / 8/10), specify the full path as the url:

The full path to the printer can be copied from the address bar of the browser in the web interface cups. The only thing with this method, the system will request a printer driver. It will need to be pre-downloaded and fed to her during installation. RAKE_№1: in WinXP, the ipp protocol is enabled by default in the service pack starting with SP2, in Windows7 / 8/10 the “Internet printing” component may not be enabled. Installed via the control panel → programs and components - enable or disable Windows components. In server Windows, this protocol is definitely disabled by default. Turn on through the server manager → components → add components → print client via the Internet.
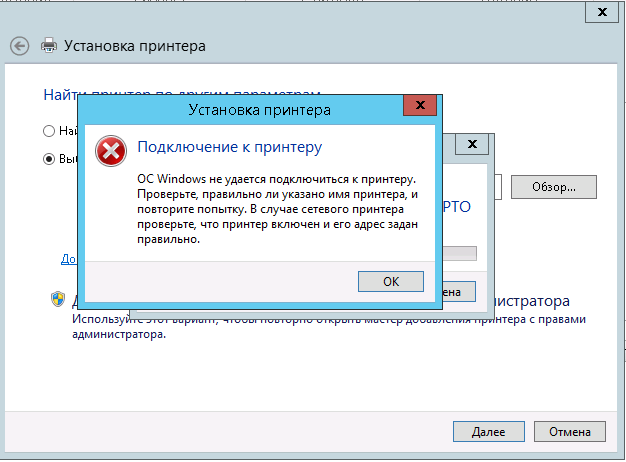
I was tormented with this problem for 2 days. When I tried to install the printer in this way, an error popped up - "Windows cannot connect to the printer." At the same time, there is nothing criminal in the cups and samba logs. It was a megatresh. I got to the point of analyzing the entire flow of the network interface using tcpdump and wireshark, but the casket just opened. The problem was on the Windows side.
Assuming that the printers in cups are installed, now let's start copying and registering printer drivers for Windows.
You can manually copy the installed drivers in Windows -% WINDIR% \ system32 \ spool \ drivers \ W32X86 and \ x64 to the folder with the samba driver balloon - / var / lib / samba / drivers / W32X86 and ./x64 and then register them using console utility rpcclient, but this is an unrealistic quest and activity is not for the faint of heart.
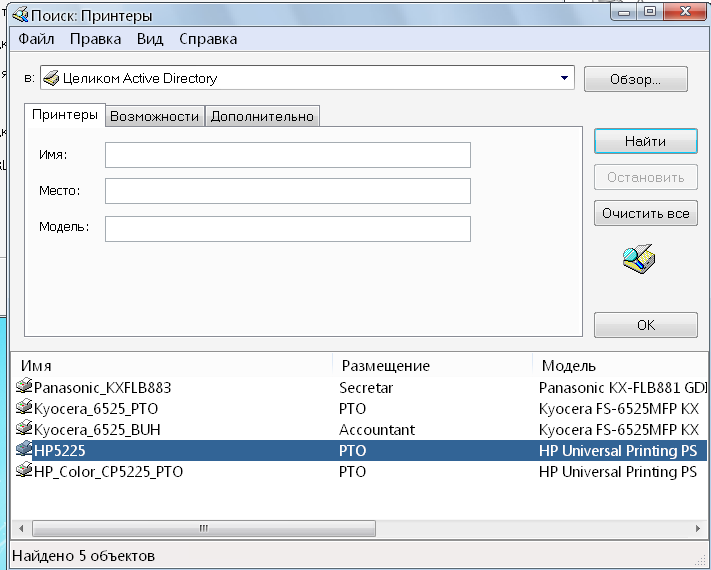
We will go the simpler way. We are logged in on a Windows machine with the Domain Admin account in our domain. I will show WinXP as an example (hereinafter I will tell you how to work with Win7). Open the explorer, in the address bar we drive in the address of the print server by IP or name: \\ Print-01 \ or \\ 10.10.15.11 \, go to the Printers and Faxes folder. Right-click on the printer → properties.
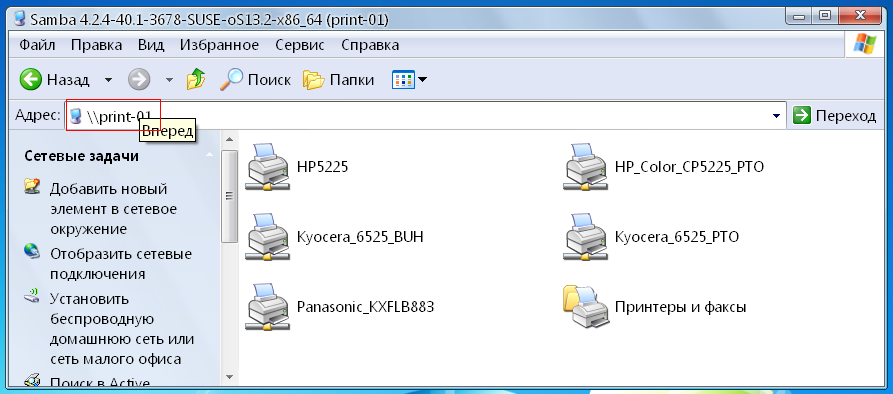
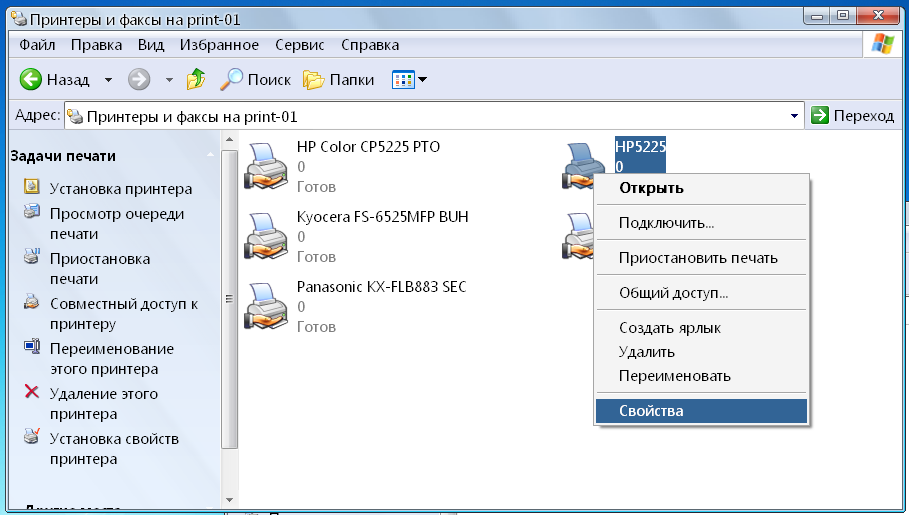
On the offer to install the driver, we say No. Go to the “advanced” tab → change.

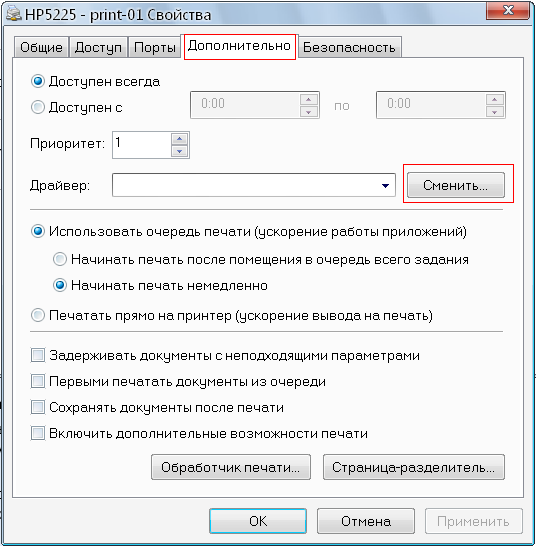
Install from disk and specify the folder with the driver. Select the printer in the list and click OK.
IMPORTANT - at the beginning, you must specify the dad with 32-bit drivers, even if your system is 64-bit! 64-bit firewood can be installed after.

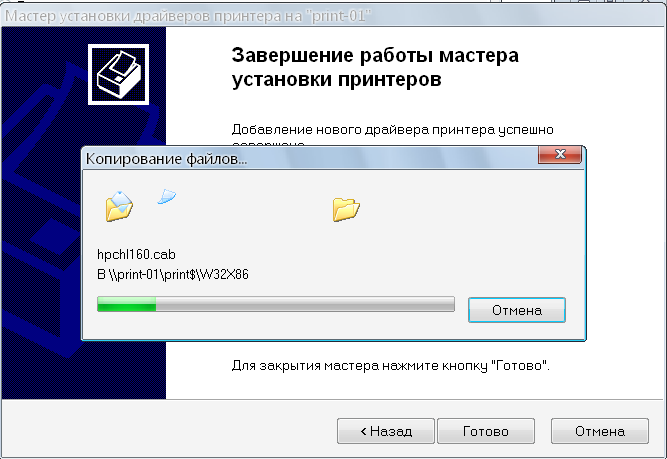
Drivers are being copied to the shared samba folder.
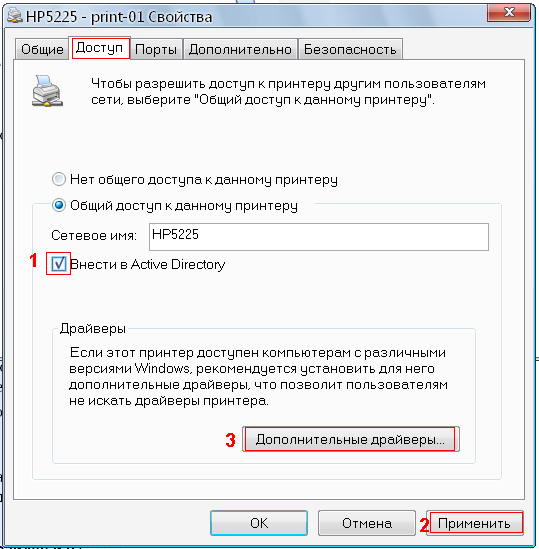
Go to the “access” tab → check the box “Add to Active Diectory” → apply. If you need 64-bit drivers, click Additional drivers "
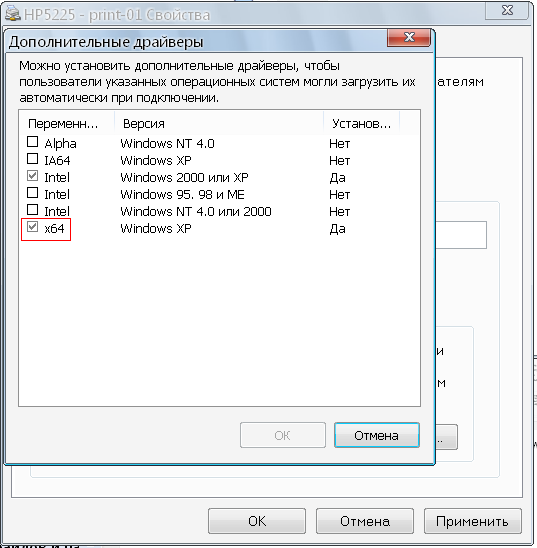
And check the box x64 → OK. The system will request a folder with drivers - similarly we feed it to it.
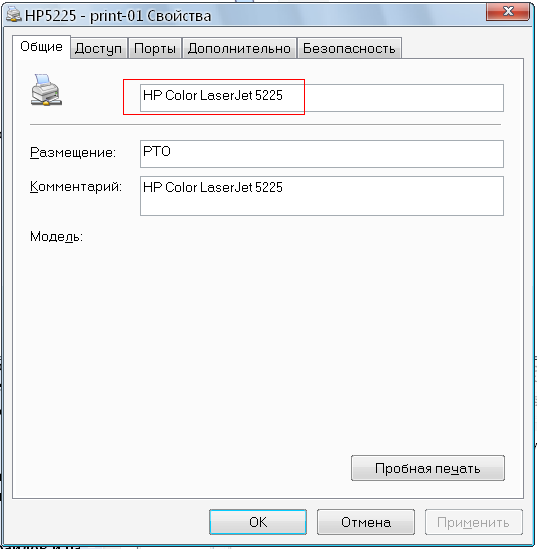
If desired, on the General tab, you can rename the network printer. These names will be displayed when you switch to the print server \\ Print-01 \ or \\ 10.10.15.11 \ in the explorer.
In AD, the printer names will be the same as you called them in cups.
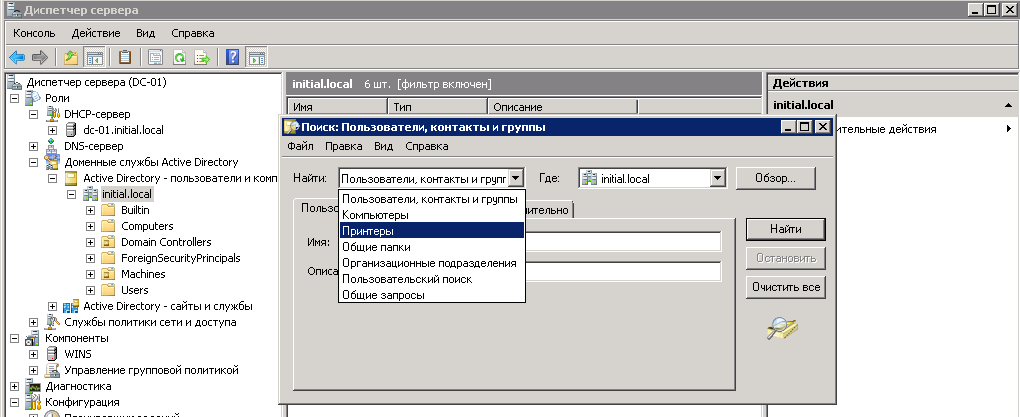
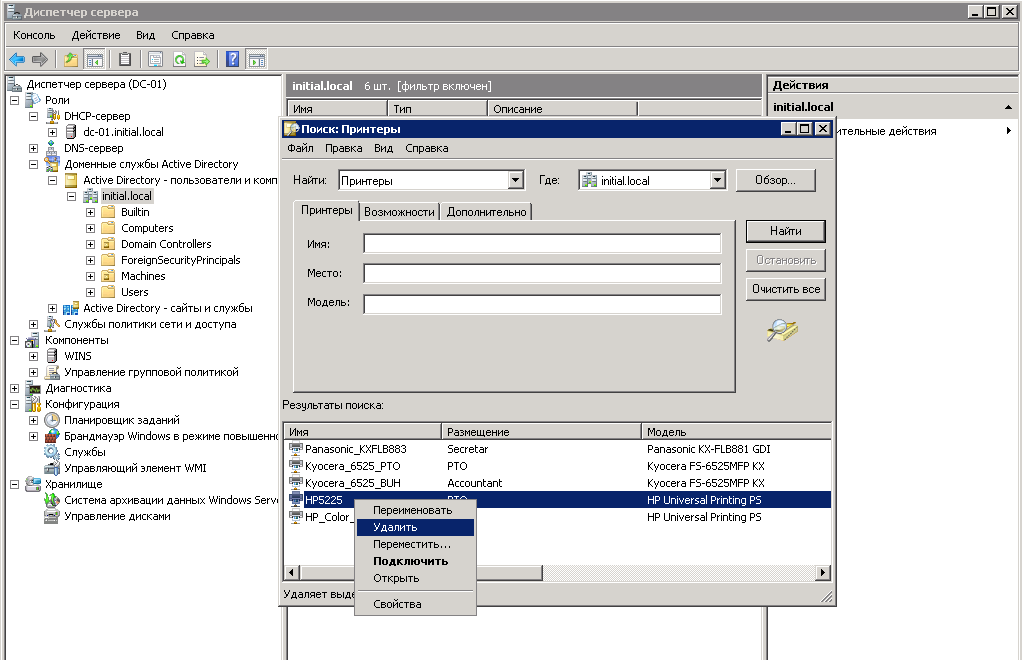
Server Manager → Active Directory Domain Services → Active Directory Users and Computers → select a domain with the right mouse button → find → select a group from the “printers” drop-down list → find. We find in the list the printer that we want to delete → right-click “delete”
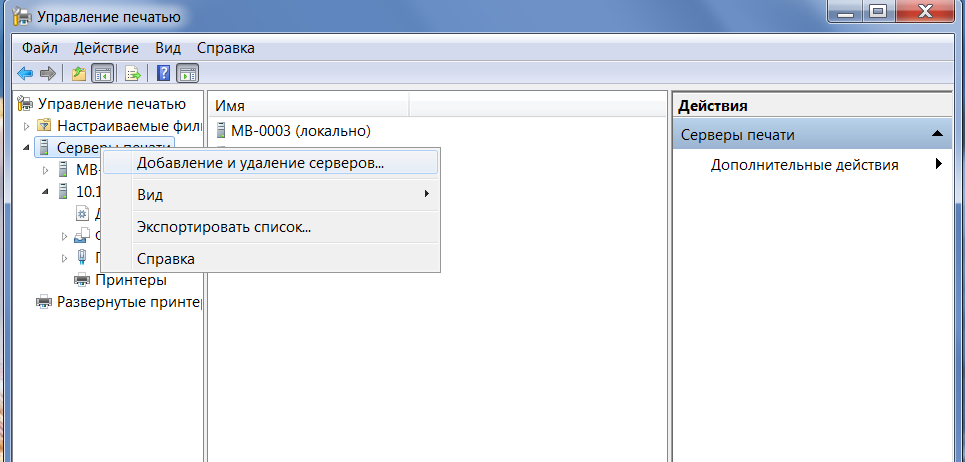
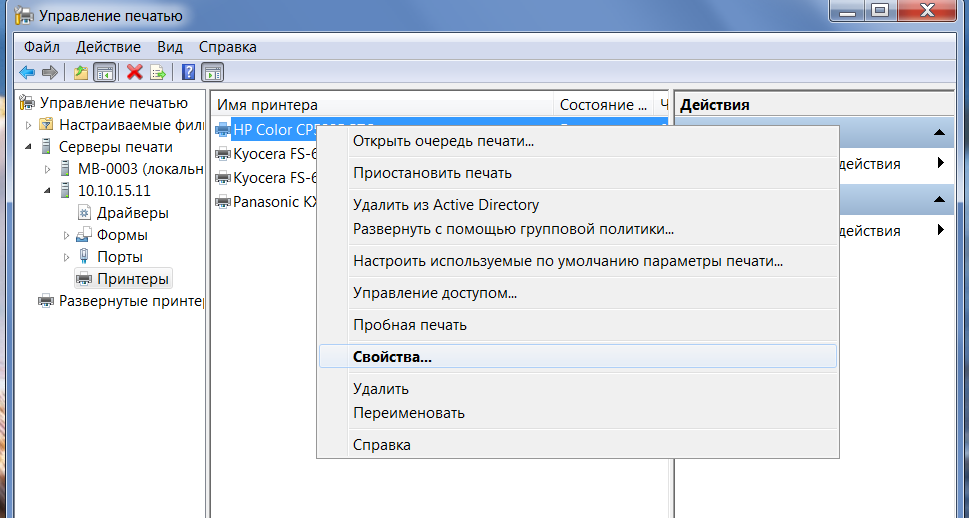
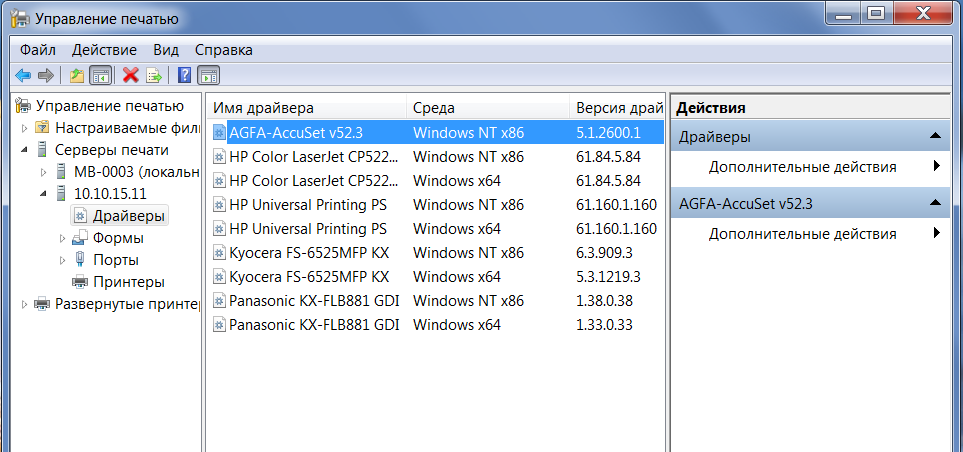
In Windows 7/8/10, you can install drivers on the print server from the printmanagement.msc snap-in. Start → execute → printmanagement.msc
NOTE In Home and Home Premium this tool does not exist. You need to run this snap-in from under Domain Admin. First you need to add our print server by IP or name. Further, here you can manage the printers of the print server by analogy with the above instructions. It is also convenient to manage print server drivers here - delete / add.
In Windows Server 2012 R2, well, shared printers do not want to be installed. There are no errors in the cups and samba logs. The priner starts to install, the drivers are copied, but at the stage of "completing the installation" the above error pops up: "Windows cannot connect to the printer." I think this is some kind of jamb of Windows and most likely of the ipp protocol, although the "Internet Print Client" component is installed.
In conclusion, I will share the secret of installing the Panasonic KX-FLB883RU printer in CUPS. There are no drivers for linux for this printer, but ljet2p.ppd (Panasonic KX-P4410 Foomatic / ljet2p), which is part of the standard OpenPrintingPPDs package, miraculously came up. Setting up the printer in CUPS via socket: // IP_address /. Everything works without glitches. I hope someone comes in handy.
My next article will be devoted to a remote automated printer installation system for domain users. Or something like that)
My work configs see below.
Thanks for attention!
Part 1. Subtleties of settings
Initial data
- Domain controller - Windows Server 2008 R2 (AD, DNS, DHCP) IP - 10.10.15.31
- Domain Name - INITIAL
- Print server - linux OS (I use OpenSUSE 13.2 x64, kernel 3.16.7-42-default) IP - 10.10.15.11
- kerberos 1.12.2-24.1
- winbind 4.2.4-40.1
- LDAP 2.4.39-8.9.1
- Samba 4.2.4-40.1
- CUPS 1.5.4-21.9.1
Suppose linux is already installed and all the necessary packages are installed.
I will not focus much attention on entering linux into the Winodws domain, especially since there are plenty of articles on this subject. I will provide a link to a pretty good article - https://habrahabr.ru/post/143190/ I will
dwell only on important points. Also, below I will lay out all my working configs of the above services. Customized for various articles and manuals.
Time synchronization
The time on the linux server must be identical with the domain controller, otherwise it cannot be driven into the domain.
There are several options for this: specify the same ntp time synchronization server on the domain of the controller and our print server, or specify the controller's IP domain as the ntp server on the print server. I set up the second option.
/etc/ntp.conf
server 10.10.15.31 iburst
You can check the synchronization as follows:
print-01:~ # ntpq -p
     remote           refid      st t when poll reach   delay   offset  jitter
==============================================================================
*10.10.15.31     85.236.191.80    3 u  888 1024  377    0.698    6.690   7.232
Winbind
/etc/nsswitch.conf
passwd: files winbind
group: files winbind
shadow: files winbind
hosts:	files [dns] wins
Many argue that these settings are not needed at all for samba, as well as kerberos and LDAP, but I love Feng Shui))). Earlier, I configured samba as a PDC (Primary Domain Controller) without kerberos and LDAP, and all this worked with WinXP clients, I confirm.
/etc/samba/smb.conf
winbind separator = /
winbind enum users = Yes
winbind enum groups = Yes
winbind use default domain = Yes
winbind nss info = rfc2307
winbind refresh tickets = Yes
Samba
/etc/samba/smb.conf
idmap uid = 500-10000000
idmap gid = 500-10000000
idmap backend = ldap:ldap://10.10.15.31
These settings are not recommended by samba itself, starting with some versions 3.X, but in many articles they are indicated. If you specify these parameters in new versions of samba, then testparm will display:
print-01:/etc/samba # testparm -v
Load smb config files from /etc/samba/smb.conf
WARNING: The "idmap backend" option is deprecated
WARNING: The "idmap gid" option is deprecated
WARNING: The "idmap uid" option is deprecated
parameter realm - the domain name must be indicated in capital letters!
realm = DOMAIN.COM
Kerberos
Section realms - the domain name must be indicated in capital letters!
/etc/krb5.conf
[realms]
DOMAIN.COM = {...
Otherwise, you can get such an error when checking kerberos
kinit username@DOMAIN.COM
kinit(v5): KDC reply did not match expectations while getting initial credentials
Suppose that you have configured the necessary services and successfully entered the linux machine into the Windows domain. Let's move on to the CUPS settings.
Cups
/etc/cups/cupsd.conf
# Изменим уровень логирования на период отладки
LogLevel debug
# Системная группа (добавлять, удалять принтеры, менять их конфигурацию может только root)
SystemGroup root
# Слушаем соединения на порту 631 / Listen for connections on Port 631.
Port 631
Listen /run/cups/cups.sock
BrowseLocalProtocols CUPS
BrowseRemoteProtocols CUPS
# Расшариваем принтеры в локальной сети / Show shared printers on the local network.
Browsing On
BrowseOrder allow,deny
BrowseAllow all
BrowseAddress 10.10.15.0/24
BrowseAddress 172.19.2.0/24
BrowseAddress 172.19.3.0/24
BrowseAddress 172.19.4.0/24
# Default authentication type, when authentication is required...
DefaultAuthType Basic
WebInterface Yes
I’ll explain here.
BrowseOrder allow, deny - the order in which the system considers allowing and prohibiting directives: everything that is not allowed is prohibited.
BrowseAllow all - displays all available printers on the local network
BrowseAddress - specify all subnets from which access to printers is
required DefaultAuthType - authentication type. The default is Basic.
At the expense of the latter. I noticed the following in the logos:
/var/log/cups/error_log
cupsdAuthorize: No authentication data provided.
I found two recommendations on this subject:
- disable sharing of printers in samba completely (very useful, especially for the print server)
- replace Basic with None wherever this option is in cupsd.conf (didn’t feel the difference)
I read on cups.org that the values of this option can be 2 - Basic and Negotiate, the latter for authentication using kerberos.
In any case, this error does not affect cups'a in any way.
# Разрешаем доступ к серверу печати со всех машин локальной сети.

  # Allow remote access...
  Order allow,deny
  Allow all
I have indicated access for all local subnets. In principle, you can specify different subnets in the Allow directive, just as I did in BrowseAddress.
Next, we configure access to the administrative panel and configuration files. Here you can also register the Allow directive (in each section) indicating the subnets or a separate IP address from which printers can be administered. If you do not add this directive - you can administer from any LAN subnet - the equivalent of Allow all.
 Order allow,deny

  AuthType Default
  Require user @SYSTEM
This completes the setup of cups. Restart it. In OpenSUSE, this is done through systemctl
systemctl restart cups.service
Now you can start setting up printers through the cups'a web interface. There is a slight subtlety - to change, add, delete printers, you need to go to the cups web interface via ssl ( https ), i.e. open in a web browser
https://10.10.15.11:631/
Otherwise, we get the following error: To add printers to cups via the web interface is a rather trivial task, so I will not describe it. The only thing I recommend on the "Administration" tab is to check whether the options are enabled: - Allow sharing of printers connected to this system - Allow printing from the Internet And when installing a printer, remember to enable the option "Allow sharing of this printer." Who does not want to bother with samba, in cups there is the possibility of printing using the protocol ipp (Internet Printing Protocol). In Windows, the printer is installed as follows: control panel → printers → printer installation → network printer → connect to the printer on the Internet (“select a shared printer by name” for Win7 / 8/10), specify the full path as the url:


Например http://10.10.15.11:631/printers/Kyocera_6525_PTO
Или http://Print-01:631/printers/Kyocera_6525_PTO


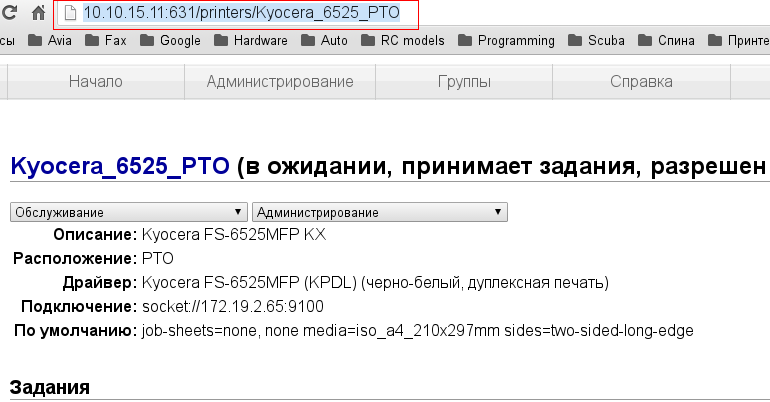
The full path to the printer can be copied from the address bar of the browser in the web interface cups. The only thing with this method, the system will request a printer driver. It will need to be pre-downloaded and fed to her during installation. RAKE_№1: in WinXP, the ipp protocol is enabled by default in the service pack starting with SP2, in Windows7 / 8/10 the “Internet printing” component may not be enabled. Installed via the control panel → programs and components - enable or disable Windows components. In server Windows, this protocol is definitely disabled by default. Turn on through the server manager → components → add components → print client via the Internet.

I was tormented with this problem for 2 days. When I tried to install the printer in this way, an error popped up - "Windows cannot connect to the printer." At the same time, there is nothing criminal in the cups and samba logs. It was a megatresh. I got to the point of analyzing the entire flow of the network interface using tcpdump and wireshark, but the casket just opened. The problem was on the Windows side.

Part 2. Installing drivers
Assuming that the printers in cups are installed, now let's start copying and registering printer drivers for Windows.
You can manually copy the installed drivers in Windows -% WINDIR% \ system32 \ spool \ drivers \ W32X86 and \ x64 to the folder with the samba driver balloon - / var / lib / samba / drivers / W32X86 and ./x64 and then register them using console utility rpcclient, but this is an unrealistic quest and activity is not for the faint of heart.
We will go the simpler way. We are logged in on a Windows machine with the Domain Admin account in our domain. I will show WinXP as an example (hereinafter I will tell you how to work with Win7). Open the explorer, in the address bar we drive in the address of the print server by IP or name: \\ Print-01 \ or \\ 10.10.15.11 \, go to the Printers and Faxes folder. Right-click on the printer → properties.


On the offer to install the driver, we say No. Go to the “advanced” tab → change.


Install from disk and specify the folder with the driver. Select the printer in the list and click OK.
IMPORTANT - at the beginning, you must specify the dad with 32-bit drivers, even if your system is 64-bit! 64-bit firewood can be installed after.

Drivers are being copied to the shared samba folder.

Go to the “access” tab → check the box “Add to Active Diectory” → apply. If you need 64-bit drivers, click Additional drivers "

And check the box x64 → OK. The system will request a folder with drivers - similarly we feed it to it.

If desired, on the General tab, you can rename the network printer. These names will be displayed when you switch to the print server \\ Print-01 \ or \\ 10.10.15.11 \ in the explorer.

In AD, the printer names will be the same as you called them in cups.

Removing printers from AD.
Server Manager → Active Directory Domain Services → Active Directory Users and Computers → select a domain with the right mouse button → find → select a group from the “printers” drop-down list → find. We find in the list the printer that we want to delete → right-click “delete”


Installing drivers in Windows 7/8/10.
In Windows 7/8/10, you can install drivers on the print server from the printmanagement.msc snap-in. Start → execute → printmanagement.msc
NOTE In Home and Home Premium this tool does not exist. You need to run this snap-in from under Domain Admin. First you need to add our print server by IP or name. Further, here you can manage the printers of the print server by analogy with the above instructions. It is also convenient to manage print server drivers here - delete / add.


What could not be decided yet
In Windows Server 2012 R2, well, shared printers do not want to be installed. There are no errors in the cups and samba logs. The priner starts to install, the drivers are copied, but at the stage of "completing the installation" the above error pops up: "Windows cannot connect to the printer." I think this is some kind of jamb of Windows and most likely of the ipp protocol, although the "Internet Print Client" component is installed.
In conclusion, I will share the secret of installing the Panasonic KX-FLB883RU printer in CUPS. There are no drivers for linux for this printer, but ljet2p.ppd (Panasonic KX-P4410 Foomatic / ljet2p), which is part of the standard OpenPrintingPPDs package, miraculously came up. Setting up the printer in CUPS via socket: // IP_address /. Everything works without glitches. I hope someone comes in handy.
My next article will be devoted to a remote automated printer installation system for domain users. Or something like that)
My work configs see below.
/etc/krb5.conf
[libdefaults]
	ticket_lifetime = 24000
	default_realm = INITIAL.LOCAL
	dns_lookup_realm = false
	dns_lookup_kds = false
	clockskew = 300
# -------------------------------------
	kdc_timesync = 1
	ccache_type = 4
	forwardable = true
	proxiable = true
[realms]
INITIAL.LOCAL = {
	kdc = dc-01.initial.local
	default_domain = initial.local
#	admin_server = kerberos.initial.local:749
	admin_server = dc-01.initial.local
}
# EXAMPLE.COM = {
# 	kdc = kerberos.example.com
# 	admin_server = kerberos.example.com
# }
[logging]
	kdc = FILE:/var/log/krb5/krb5kdc.log
	admin_server = FILE:/var/log/krb5/kadmind.log
	default = SYSLOG:NOTICE:DAEMON
[domain_realm]
	.initial.local = INITIAL.LOCAL
	.INITIAL.local = INITIAL.LOCAL
	.INITIAL = INITIAL.LOCAL
	initial.local = INITIAL.LOCAL
[appdefaults]
pam = {
	debug = false
	ticket_lifetime = 1d
	renew_lifetime = 1d
	forwardable = true
	proxiable = false
	retain_after_close = false
	minimum_uid = 1
	use_shmem = sshd
	clockskew = 300
}
/etc/nsswitch.conf
# /etc/nsswitch.conf
#
# An example Name Service Switch config file. This file should be
# sorted with the most-used services at the beginning.
#
# The entry '[NOTFOUND=return]' means that the search for an
# entry should stop if the search in the previous entry turned
# up nothing. Note that if the search failed due to some other reason
# (like no NIS server responding) then the search continues with the
# next entry.
#
# Legal entries are:
#
#       compat                  Use compatibility setup
#       nisplus                 Use NIS+ (NIS version 3)
#       nis                     Use NIS (NIS version 2), also called YP
#       dns                     Use DNS (Domain Name Service)
#       files                   Use the local files
#       [NOTFOUND=return]       Stop searching if not found so far
#
# For more information, please read the nsswitch.conf.5 manual page.
#
# passwd: files nis
# shadow: files nis
# group:  files nis
# passwd:	compat winbind
# group:	compat winbind
# shadow:	compat winbind
passwd:	files winbind
group:	files winbind
shadow:	files winbind
# hosts:	files mdns4_minimal [NOTFOUND=return] dns wins
hosts:	files [dns] wins
networks:	files dns
services:	files
protocols:	files
rpc:	files
ethers:	files
netmasks:	files
netgroup:	files nis
publickey:	files
bootparams:	files
automount:	files nis
aliases:	files
/etc/openldap/ldap.conf
#
# LDAP Defaults
#
# See ldap.conf(5) for details
# This file should be world readable but not world writable.
#BASE	dc=example,dc=com
#URI	ldap://ldap.example.com ldap://ldap-master.example.com:666
#SIZELIMIT	12
#TIMELIMIT	15
#DEREF		never
URI	ldap://10.10.15.31
BASE	DC=initial,DC=local
/etc/samba/smb.conf
# smb.conf is the main Samba configuration file. You find a full commented
# version at /usr/share/doc/packages/samba/examples/smb.conf.SUSE if the
# samba-doc package is installed.
[global]
	workgroup = INITIAL
#	passdb backend = smbpasswd
	printing = cups
	printcap name = cups
	printcap cache time = 750
	cups options = raw
	map to guest = Bad User
	logon path = \\%L\profiles\.msprofile
	logon home = \\%L\%U\.9xprofile
	logon drive = P:
	usershare allow guests = Yes
	add machine script = /usr/sbin/useradd  -c Machine -d /var/lib/nobody -s /bin/false %m$
	domain logons = No
	domain master = No
	security = ADS
	encrypt passwords = yes
#	idmap backend = ldap:ldap://10.10.15.31
	ldap admin dn = admin@initial.local
	ldap group suffix = ou=Groups
	ldap idmap suffix = ou=Idmap
	ldap machine suffix = ou=Computers
	ldap passwd sync = Yes
	ldap suffix = DC=initial,DC=local
	ldap user suffix = ou=Users
	ldap ssl = Off
	ldapsam:trusted = yes
	ldapsam:editposix = yes
#	idmap gid = 500-10000000
#	idmap uid = 500-10000000
	netbios name = print-01
	name resolve order = lmhost wins host bcast
	wins server = 10.10.15.31
	wins support = No
	usershare max shares = 100
	kerberos method = system keytab
## --------------------------------------
	winbind separator = /
	winbind enum users = yes
	winbind enum groups = yes
	winbind nested groups = yes
	winbind use default domain = yes
	winbind nss info = rfc2307
	winbind uid = 10000-20000
	winbind gid = 10000-20000
	realm = INITIAL.LOCAL
	template homedir = /home/%D/%U
	winbind refresh tickets = yes
	template shell = /bin/bash
# [homes]
#	comment = Home Directories
#	valid users = %S, %D%w%S
#	browseable = No
#	read only = No
#	inherit acls = Yes
# [profiles]
#	comment = Network Profiles Service
#	path = %H
#	read only = No
#	store dos attributes = Yes
#	create mask = 0600
#	directory mask = 0700
# [users]
#	comment = All users
#	path = /home
#	read only = No
#	inherit acls = Yes
#	veto files = /aquota.user/groups/shares/
#	guest ok = No
# [groups]
#	comment = All groups
#	path = /home/groups
#	read only = No
#	inherit acls = Yes
[printers]
	comment = All Printers
	path = /var/spool/samba
	printable = Yes
	create mask = 0664
	browseable = Yes
	read only = No
	guest ok = Yes
[print$]
	comment = Printer Drivers
	path = /var/lib/samba/drivers
	write list = @ntadmin root
	force group = ntadmin
	create mask = 0664
	directory mask = 0700
	read only = No
	guest ok = Yes
	writable = yes
#	inherit permissions = yes
# --------------------------------
	use client driver = yes
# [netlogon]
/etc/cups/cupsd.conf
LogLevel debug
SystemGroup root
# Allow remote access
Port 631
Listen /run/cups/cups.sock
Browsing On
BrowseLocalProtocols CUPS
BrowseRemoteProtocols CUPS
BrowseOrder allow,deny
BrowseAllow all
BrowseAddress 10.10.15.0/24
BrowseAddress 172.19.2.0/24
BrowseAddress 172.19.3.0/24
BrowseAddress 172.19.4.0/24
DefaultAuthType Basic
WebInterface Yes

  # Allow remote access...
  Order allow,deny
  Allow all

  Order deny,allow

  AuthType Default
  Require user @SYSTEM

  JobPrivateAccess default
  JobPrivateValues default
  SubscriptionPrivateAccess default
  SubscriptionPrivateValues default

    Order deny,allow

    Require user @OWNER @SYSTEM
    Order deny,allow

    AuthType Default
    Require user @SYSTEM
    Order deny,allow

    AuthType Default
    Require user @SYSTEM
    Order deny,allow

    Require user @OWNER @SYSTEM
    Order deny,allow

    Order deny,allow

  JobPrivateAccess default
  JobPrivateValues default
  SubscriptionPrivateAccess default
  SubscriptionPrivateValues default

    AuthType Default
    Order deny,allow

    AuthType Default
    Require user @OWNER @SYSTEM
    Order deny,allow

    AuthType Default
    Require user @SYSTEM
    Order deny,allow

    AuthType Default
    Require user @SYSTEM
    Order deny,allow

    AuthType Default
    Require user @OWNER @SYSTEM
    Order deny,allow

    Order deny,allow

  JobPrivateAccess all
  JobPrivateValues none
  SubscriptionPrivateAccess all
  SubscriptionPrivateValues none

    Order deny,allow
    Allow from all

DefaultPolicy default
Thanks for attention!
