We make a simple sonar antenna out of the garbage.
- Tutorial
Hello dear!
In one of the previous articles, we told how you can simply transfer the “video” sound through the water, we even gave the source text and I described in detail how and why it works, but didn’t provide people with the most important thing to check - with instructions on how to quicklywithout registration and SMS make the simplest antennas to emit sound into water and receive sound from water.
If in normal life we use speakers (such as in your laptop or car) for sound emission and a microphone for sound recording, then I hurry to please you: under water and playback (we say “radiation”) and sound recording (conversion ) are often performed by the same device, which is called a sonar antenna.
In the overwhelming majority of cases, a hydroacoustic antenna consists of one or several piezo elements: plates, disks, rings, spheres, hemispheres, etc.
Piezo elements possess so-called. piezoelectric effect: if a variable electric signal is applied to an element, the element begins to oscillate, and if the element oscillates, for example, an acoustic wave, then an alternating electric signal starts to be generated on it.
That is, the piezoelectric element converts an electrical signal into acoustic waves (mechanical vibrations) and vice versa - acoustic waves into an electrical signal.
As the saying goes: theory without practice is dead! Let's not waste time and make a pair of hydroacoustic antennas.
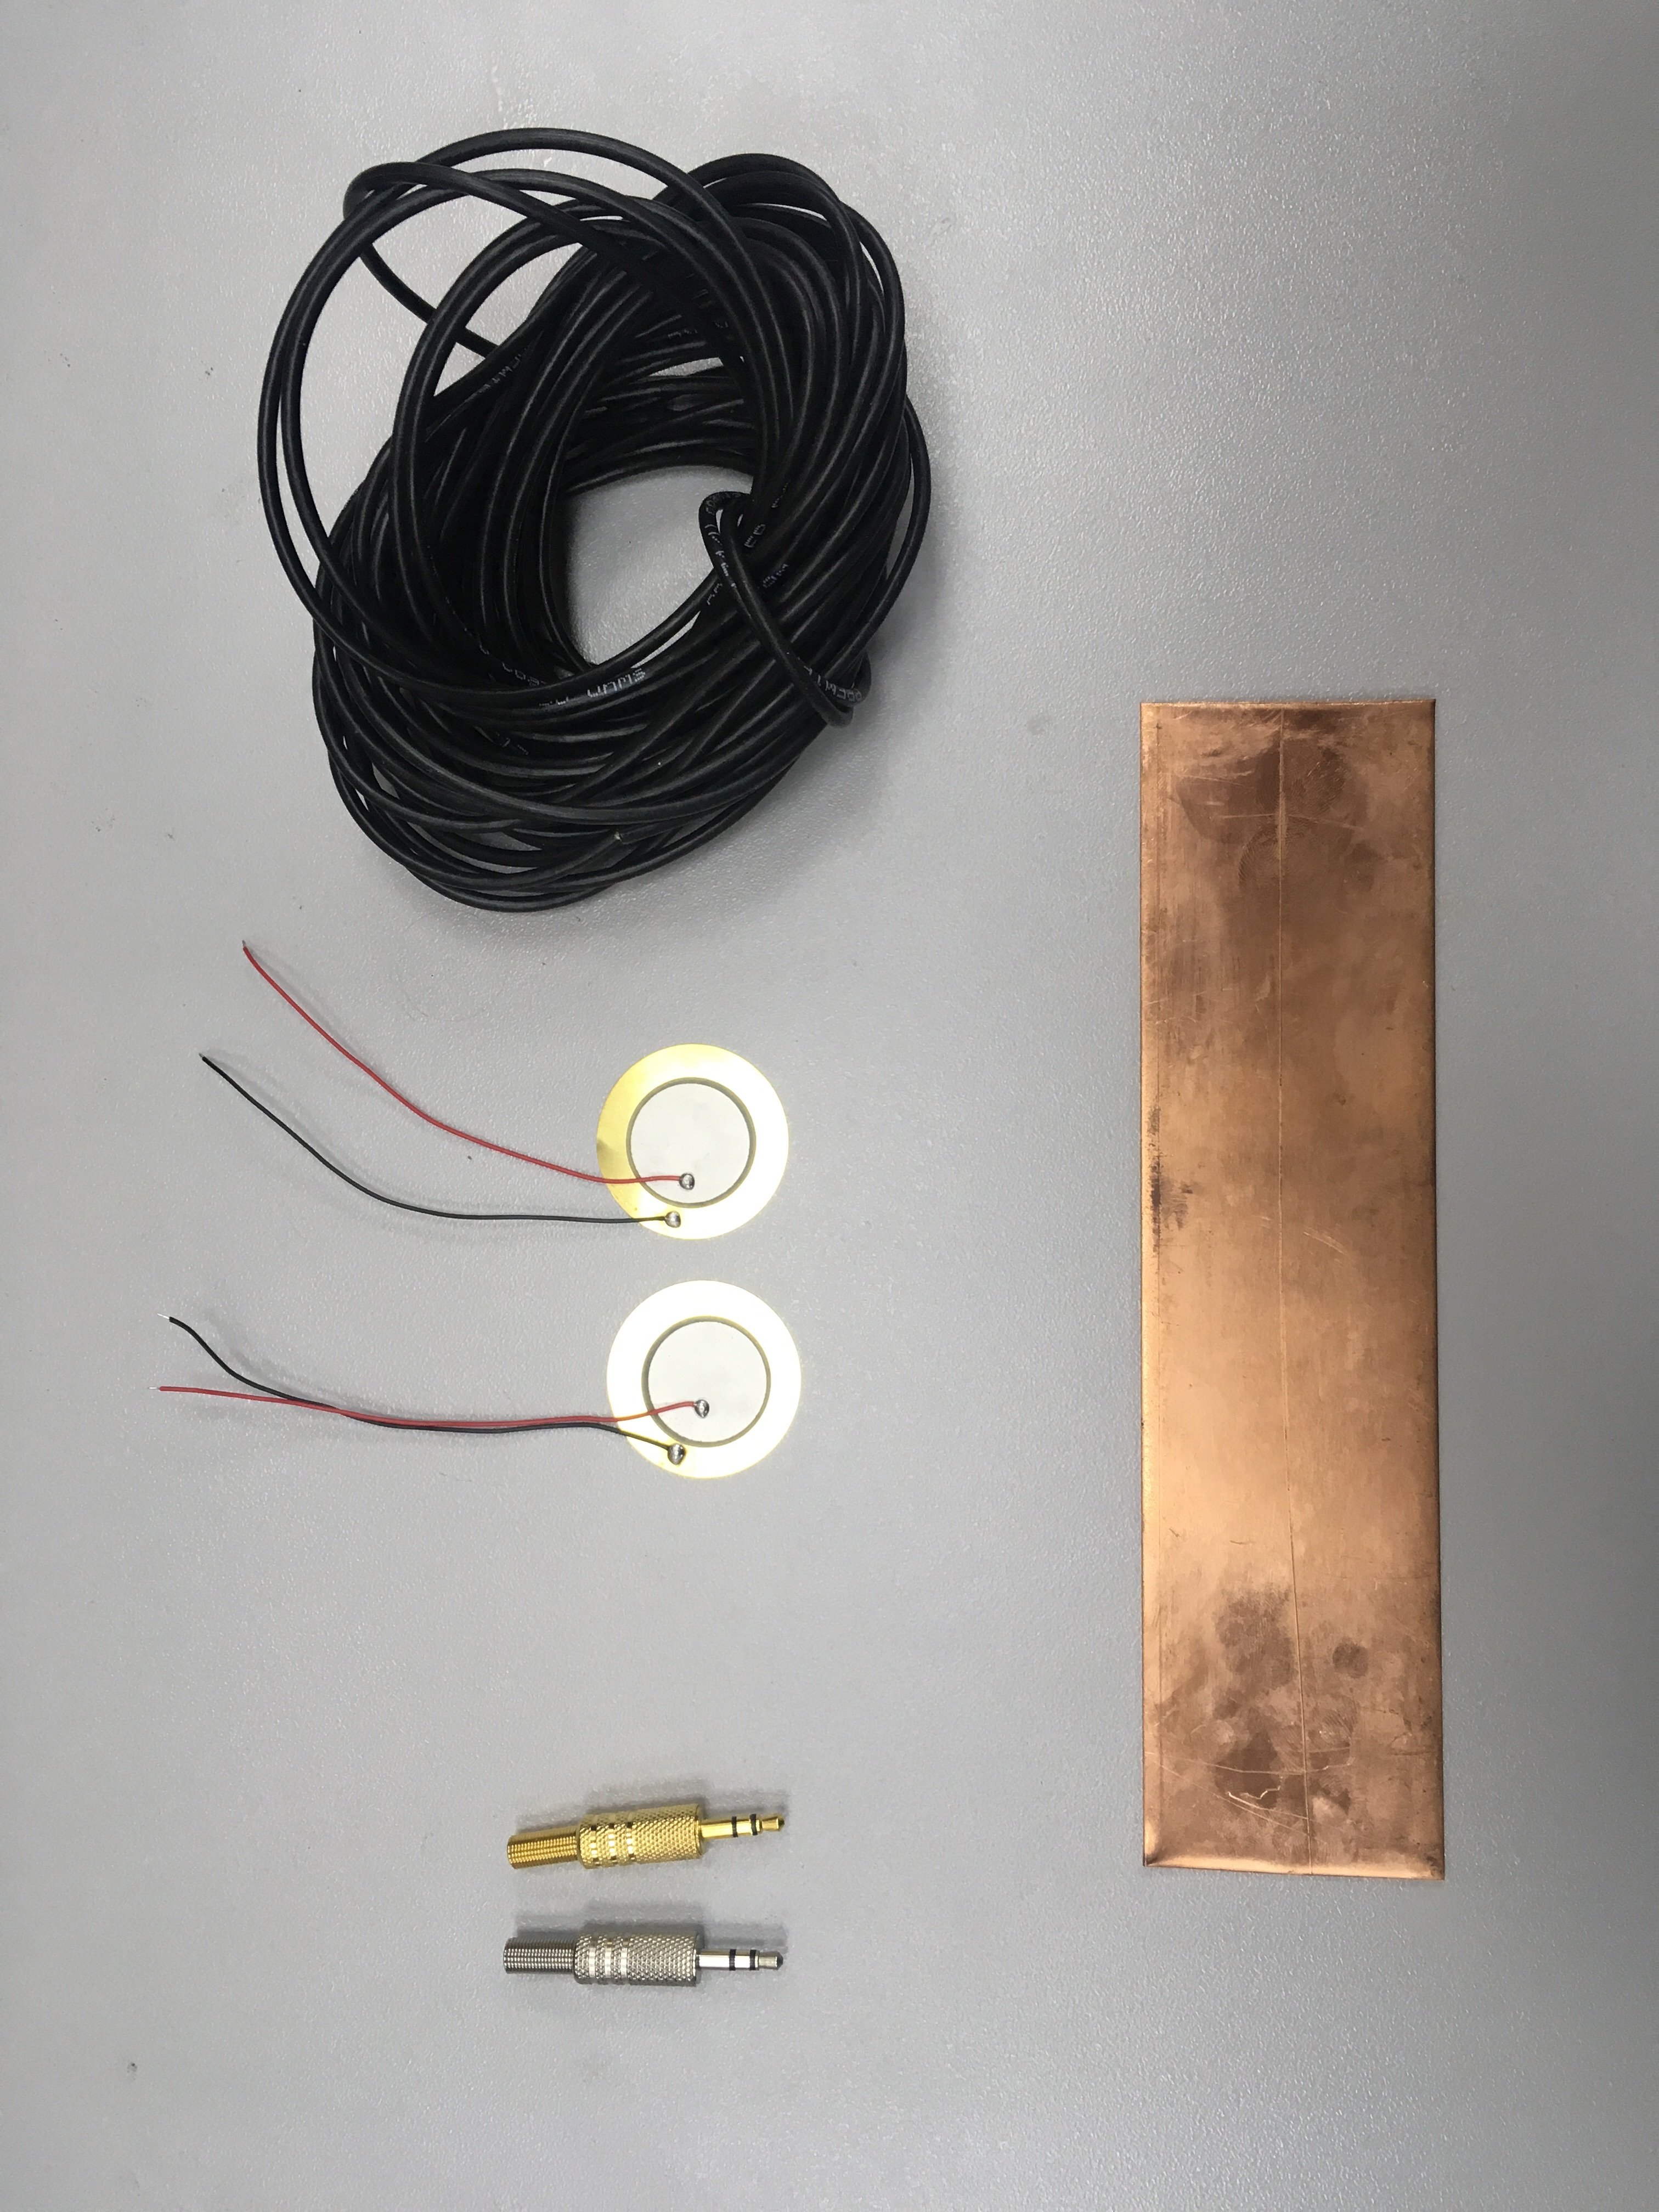
Materials that we need:
Instruments:
It’s just not possible to connect a piezo element to a sound card, laptop or tablet - firstly, the piezoelectric element can accumulate a large enough charge that can damage the electronics when connected, and secondly, when connected to a line or microphone input of a sound card, you need to protect the input cascade of the input because again, the piezoelectric element can produce a signal with a sufficiently large voltage with a strong mechanical effect.
In order for an unconnected antenna not to accumulate a charge, a resistor with a nominal value of 0.5-1 MΩ (R1) is placed in parallel to it.
In the receiving antenna, to limit the maximum voltage, a simple threshold limiter can be assembled from diodes D1, D2 and a 100 Ohm resistor (R2). As diodes, we can take 1N4934, and the resistors R1, R2, we took MF25 nominal 470 kOhm. Please note that if you plan to connect the receiving antenna to the microphone input (and not to the linear), then you will additionally need a capacitor C1 with a nominal value of 0.1 ... 1 uF, otherwise the power supplied by the sound card to the electret microphone will be short-circuited through the D1 diode.
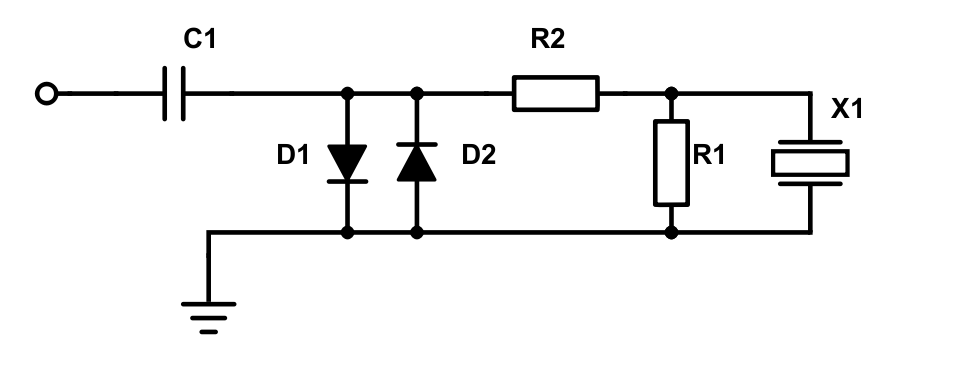
The simple connection diagram of the piezo
Piezo elements themselves need to be glued to metal plates with epoxy. First, it will lower the resonant frequency of the piezoelectric element (the unsprung mass was added), and secondly, being glued by one side to a rigid metal plate, the piezoelectric element will not be able to contract and stretch and it will have to bend.
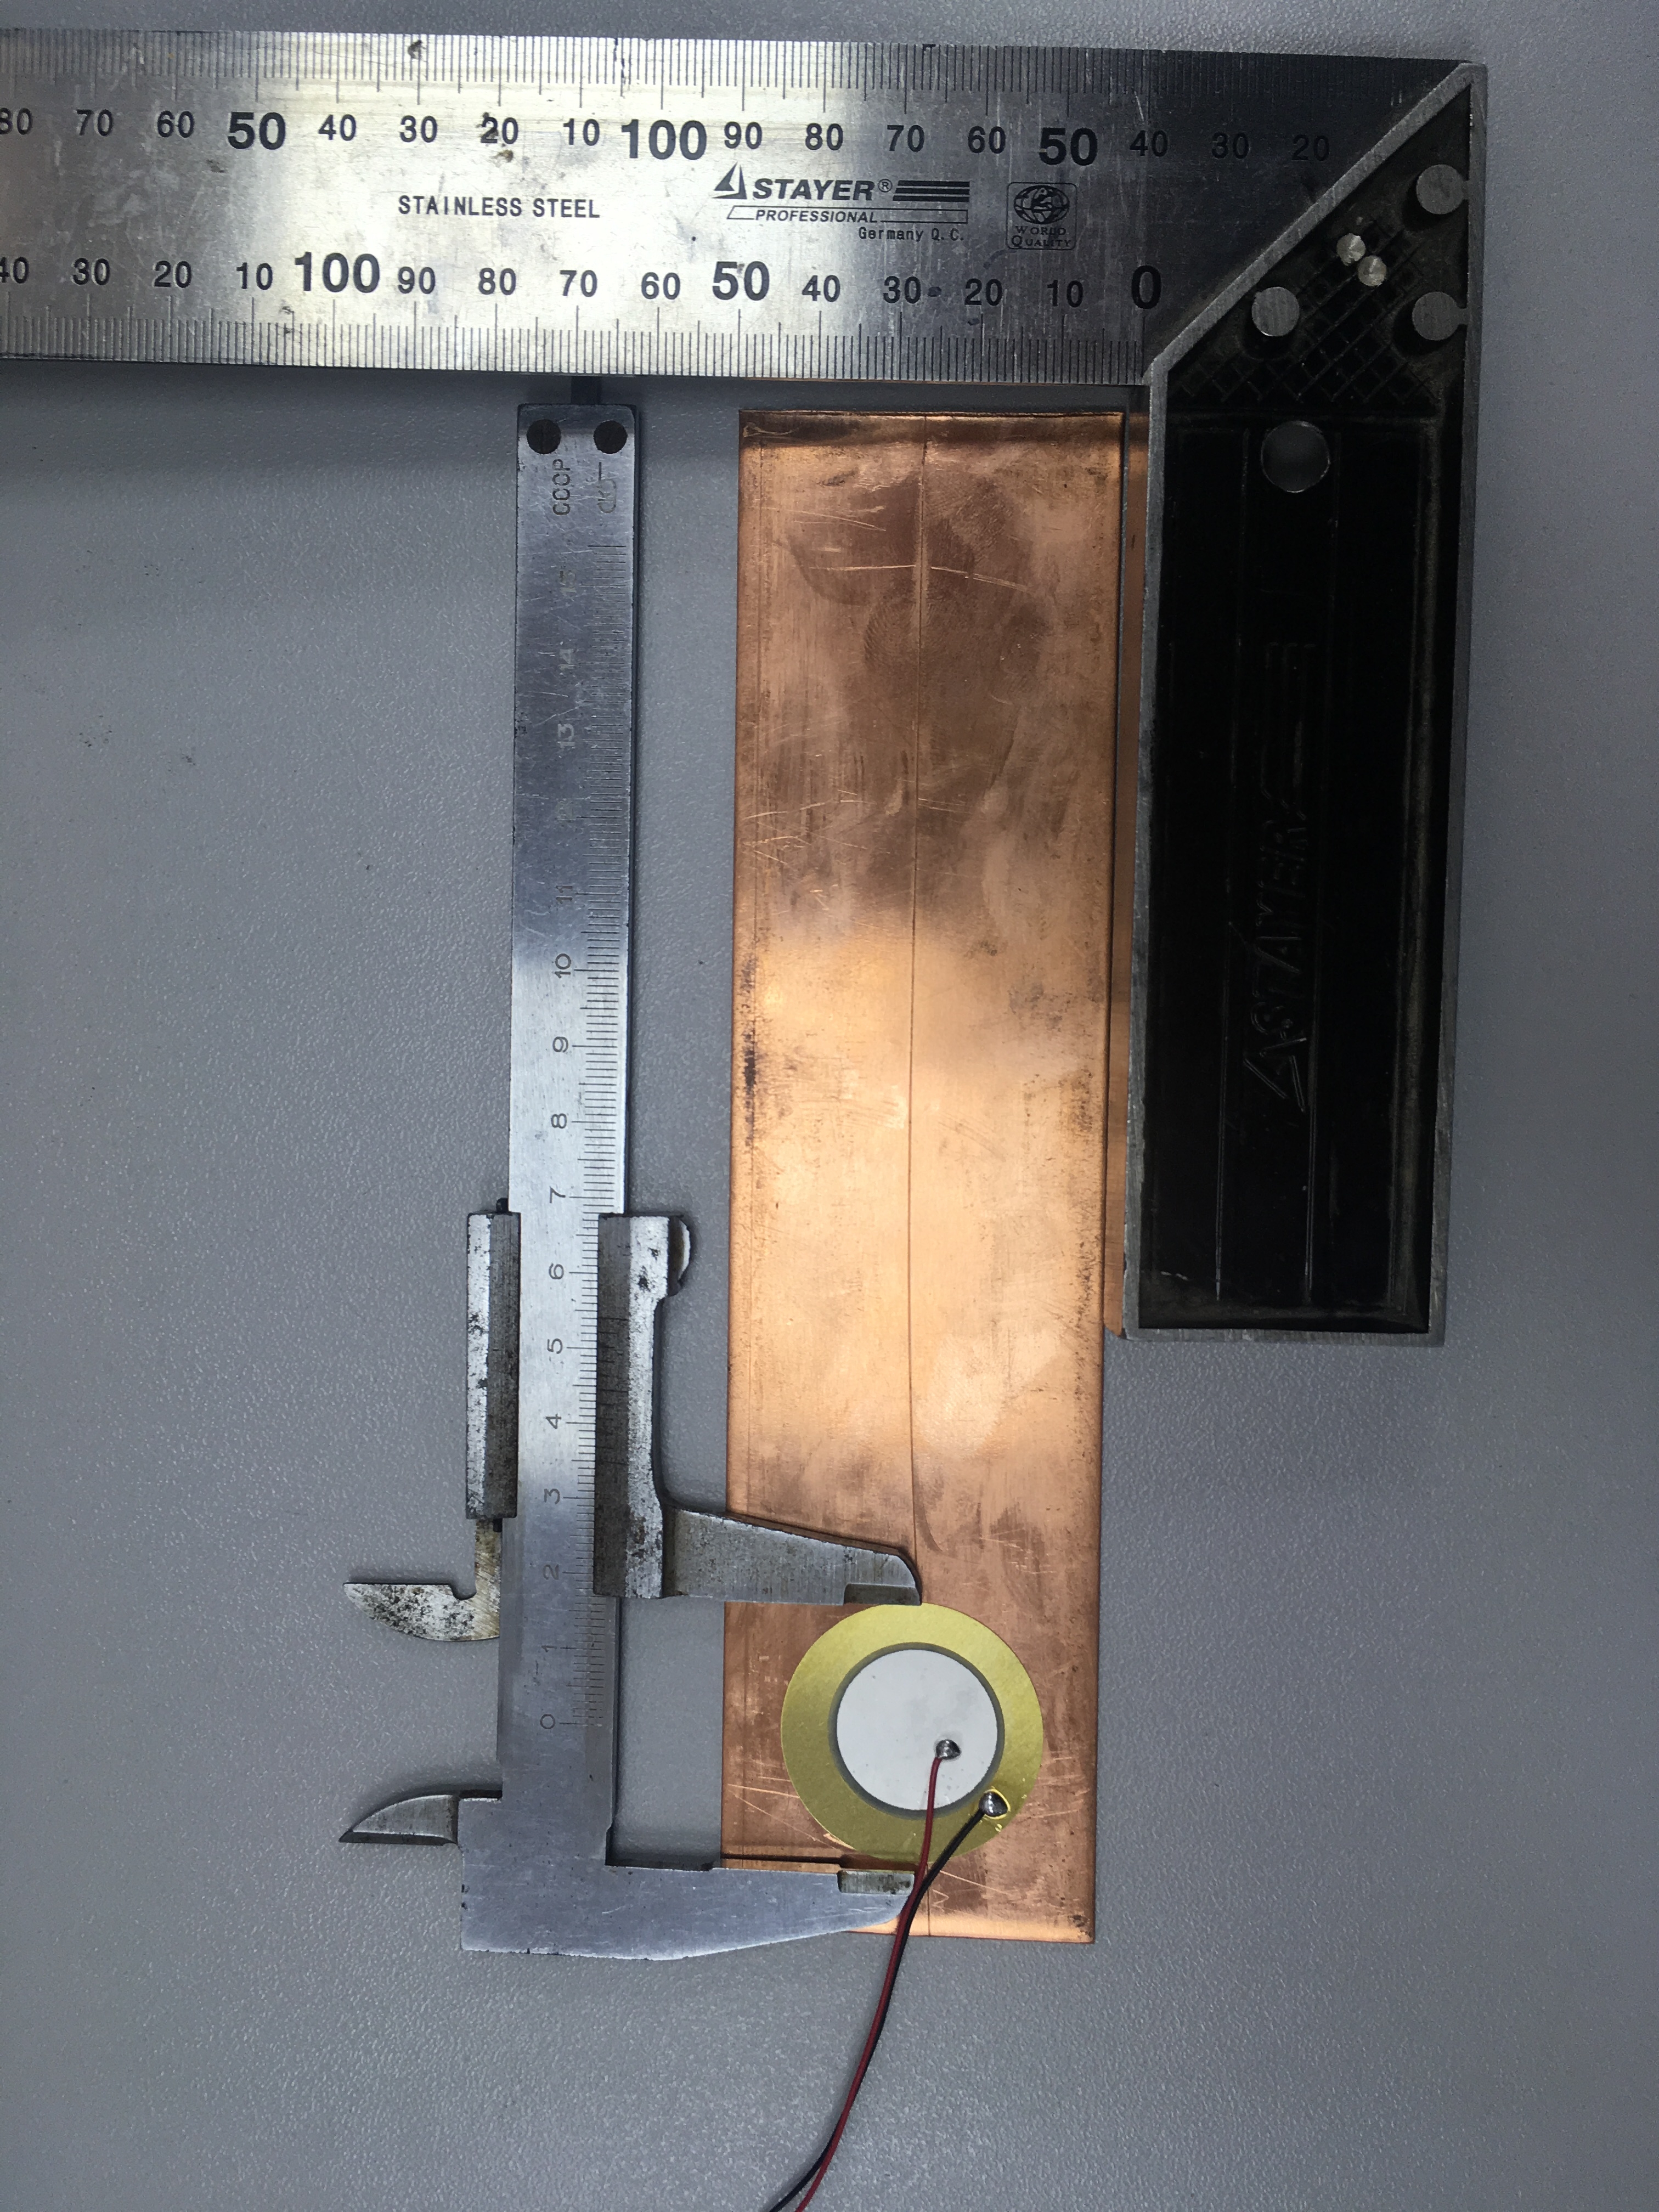
We mark the metal plate according to the size of the piezoelectric element.
We cut two square plates 50 x 50 mm and drilled holes for the cable (3 mm in diameter) and two holes for fixing the cable with a thin nylon thread, it turned out like this:

Almost assembled antenna =)
We bought 10 - one meter piece of cable cut off two pieces of 3 meters, the rest left in reserve.
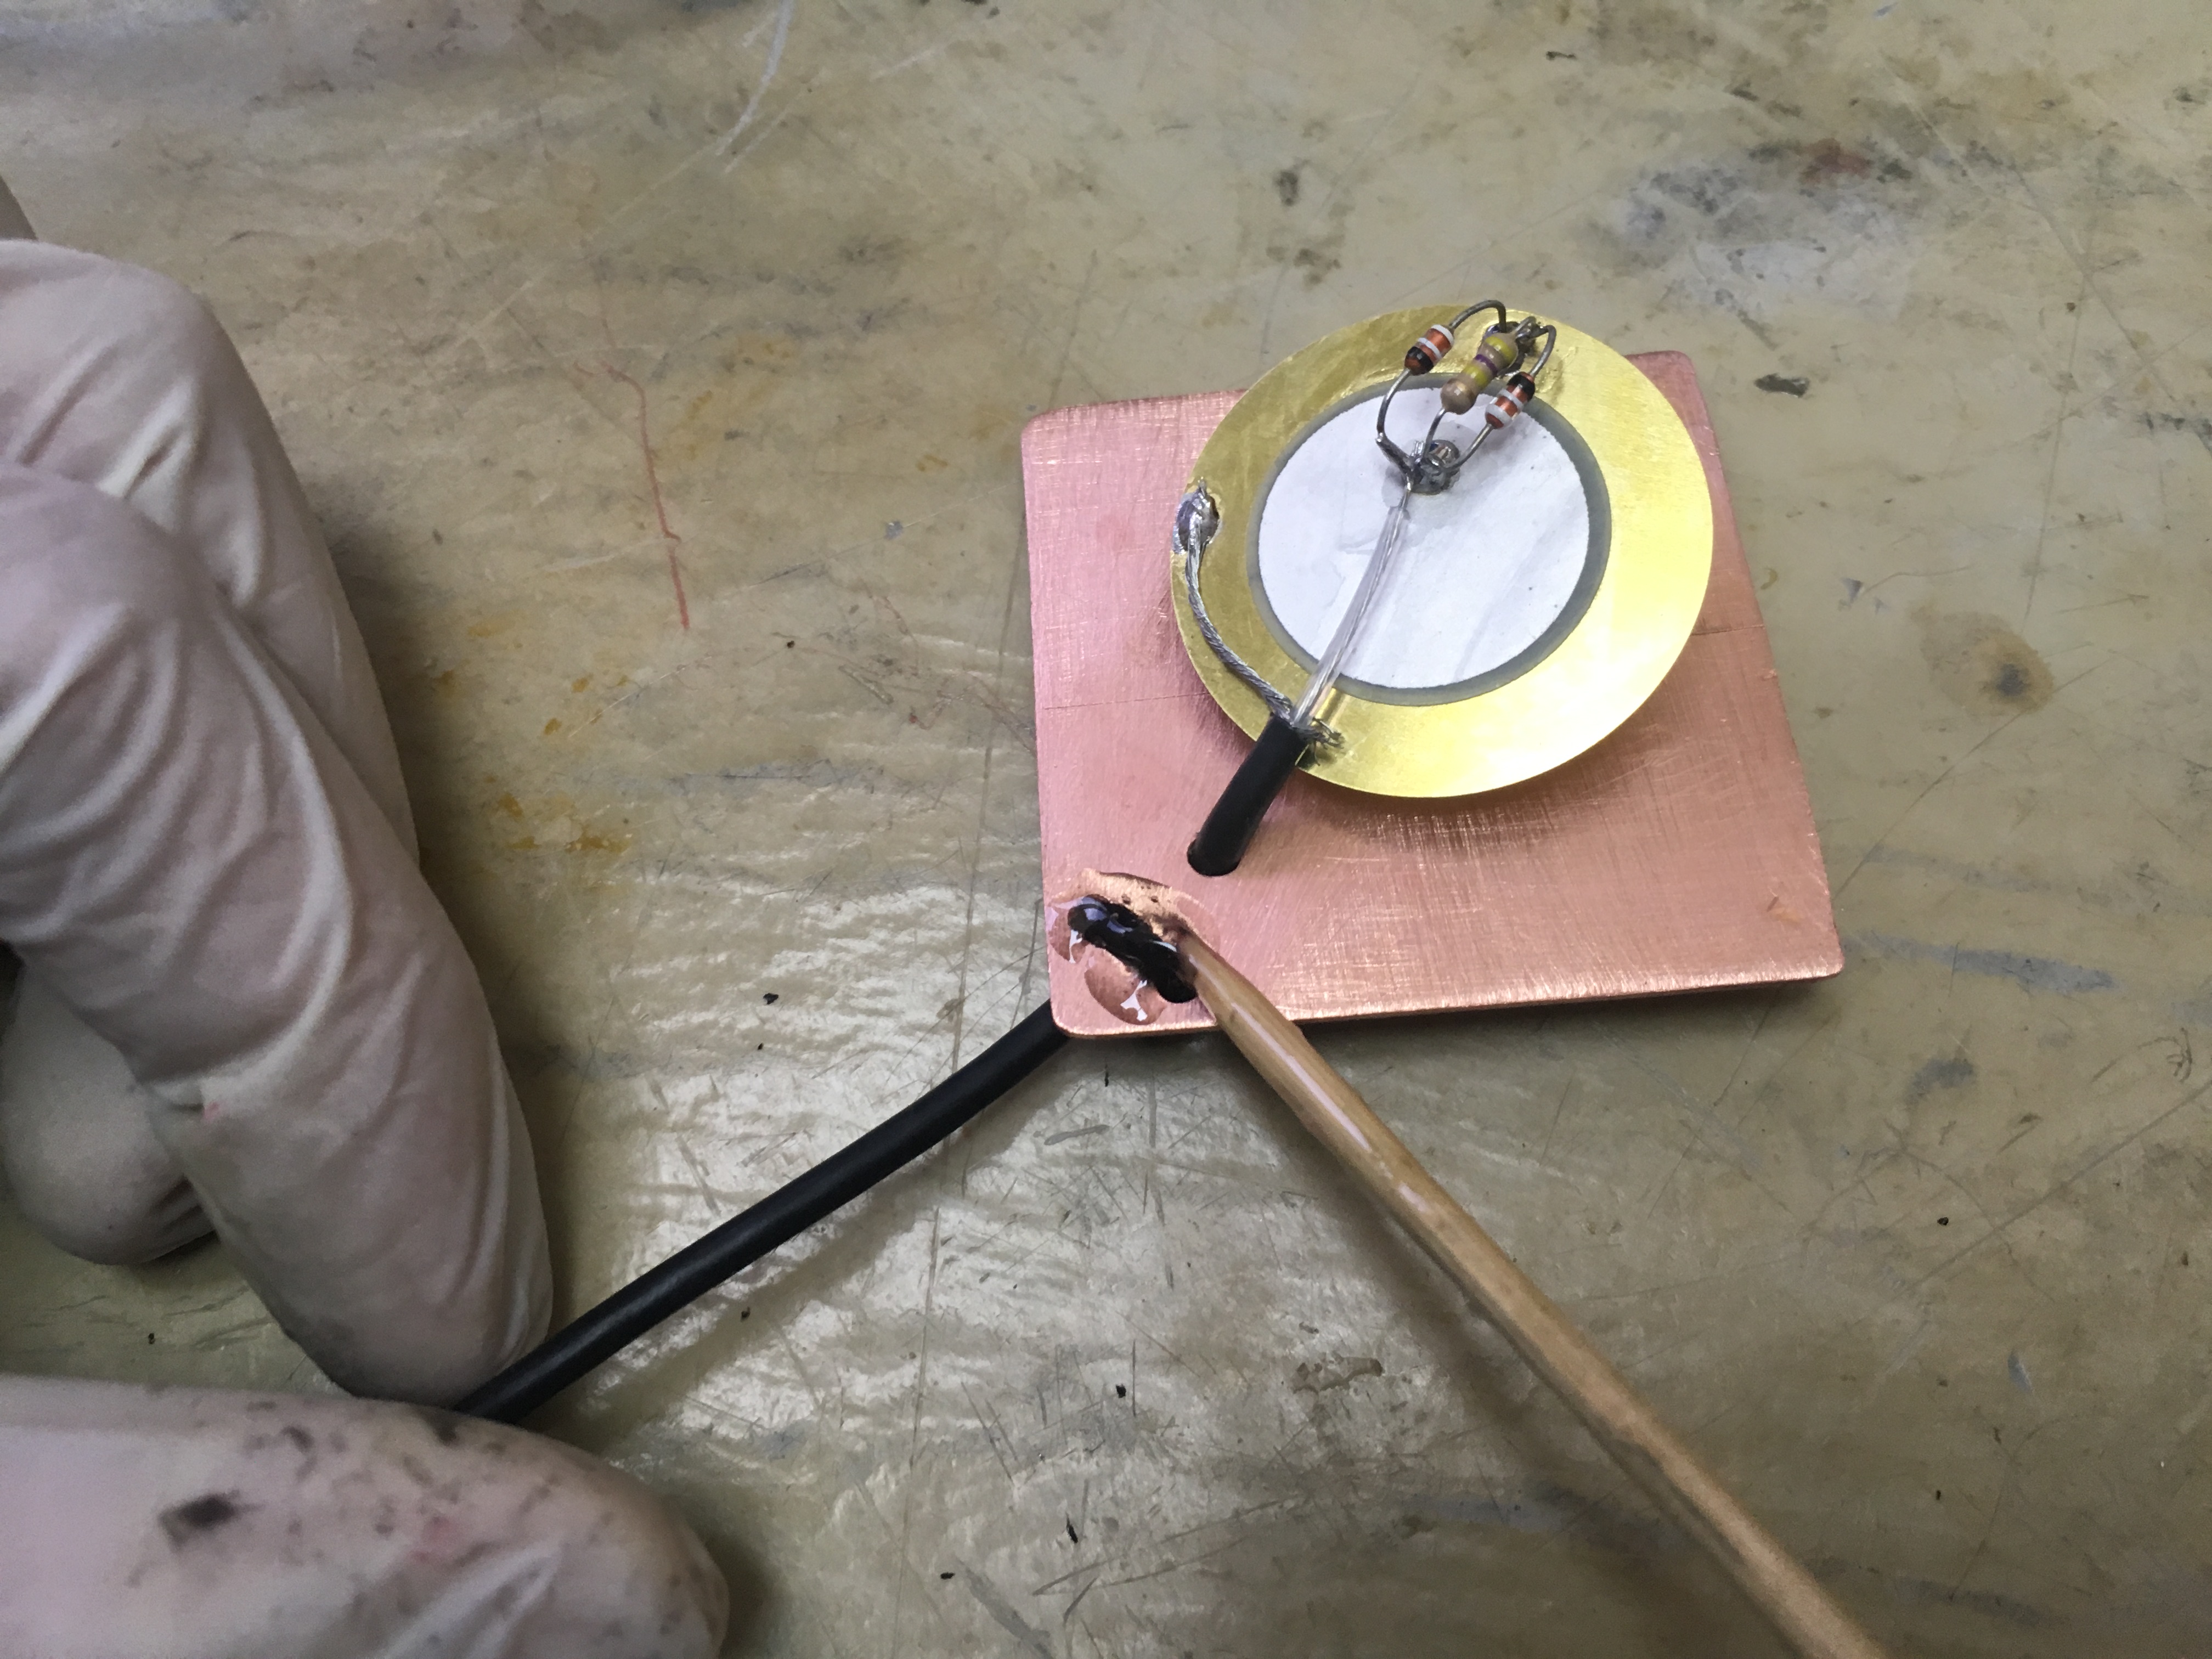
We wind the cable into the hole, solder its central core to the metallization of the piezoelectric element, and the screen - to its metal substrate. In parallel, as agreed, we solder a resistor of 470 kΩ.
We clean the other end of the cable and assemble the connector: we

solder the central core to the central contact (the very tip of the connector), leave the middle one intact, and solder the connector body to the cable sheath. I always forget to put the connector case on the cable and I have to re-solder everything two times - do not repeat my mistake) It is
very important to clean the flux after soldering - especially on the piezoelectric element. If this is not done, then over time he will eat the solder.
So, we have prepared two antennas (on one of them there is a threshold limiter). Now is the time to knead the epoxy and wear latex gloves.
Before gluing the piezoelectric elements to the copper plates, both should be thoroughly degreased with alcohol (ethyl or isopropyl) or acetone. Do not use anything else - gasoline or kerosene for these purposes - these substances leave greasy traces that impair adhesion.
It is worth recalling that all work with alcohols, acetone and epoxy should be carried out in a well-ventilated contact, protect hands and eyes. Do not neglect safety regulations!
Apply the epoxy
Impregnate the nylon thread that holds the cable to the plate.

We continue to apply epoxy
For gluing the piezoelectric element to the plate quite a bit of epoxy glue. Do not overdo it - the epoxy should not get to the top, otherwise it can destroy a thin layer of piezoceramics during polymerization, plus the whole epoxy deteriorates in water.
The result should be something like this: The

piezo elements are glued, leaving everything to full polymerization.
Usually, epoxy adhesives polymerize completely within 24 hours. We, for example, did just that - left our antennas until the next day.
... we wait 24 hours
When we arrived at the laboratory in the morning, we first connected the first antenna (without a threshold limiter) to the headphone jack of the laptop. If you turn on the music and bring our antenna to your ear, then you can be sure that at least the audible frequency range it reproduces quite well - there is even a hint of bass - this is how the copper substrate affected.
It is clear that in this form it is already an acoustic transmitting antenna, but still not a hydroacoustic one. To correct this misunderstanding, the antenna must be degreased again and covered with a thin layer of sealant.
Important note: Do not use the acetate-containing sanitary sealant, the acetic acid contained in it will corrode the solder, the cable and the metallization of the piezoelectric element.
We recommend KimTek liquid rubber for boats and boats. If someone already has in stock instead of a sealant, you can use excellent polyurethane compounds from Smooth-On or 3M - that is much more technological and fashionable.

Silicone sealant based on MS polymer is perfect for our purposes.
For convenience, we first fill the medical disposable syringe with the sealant, and
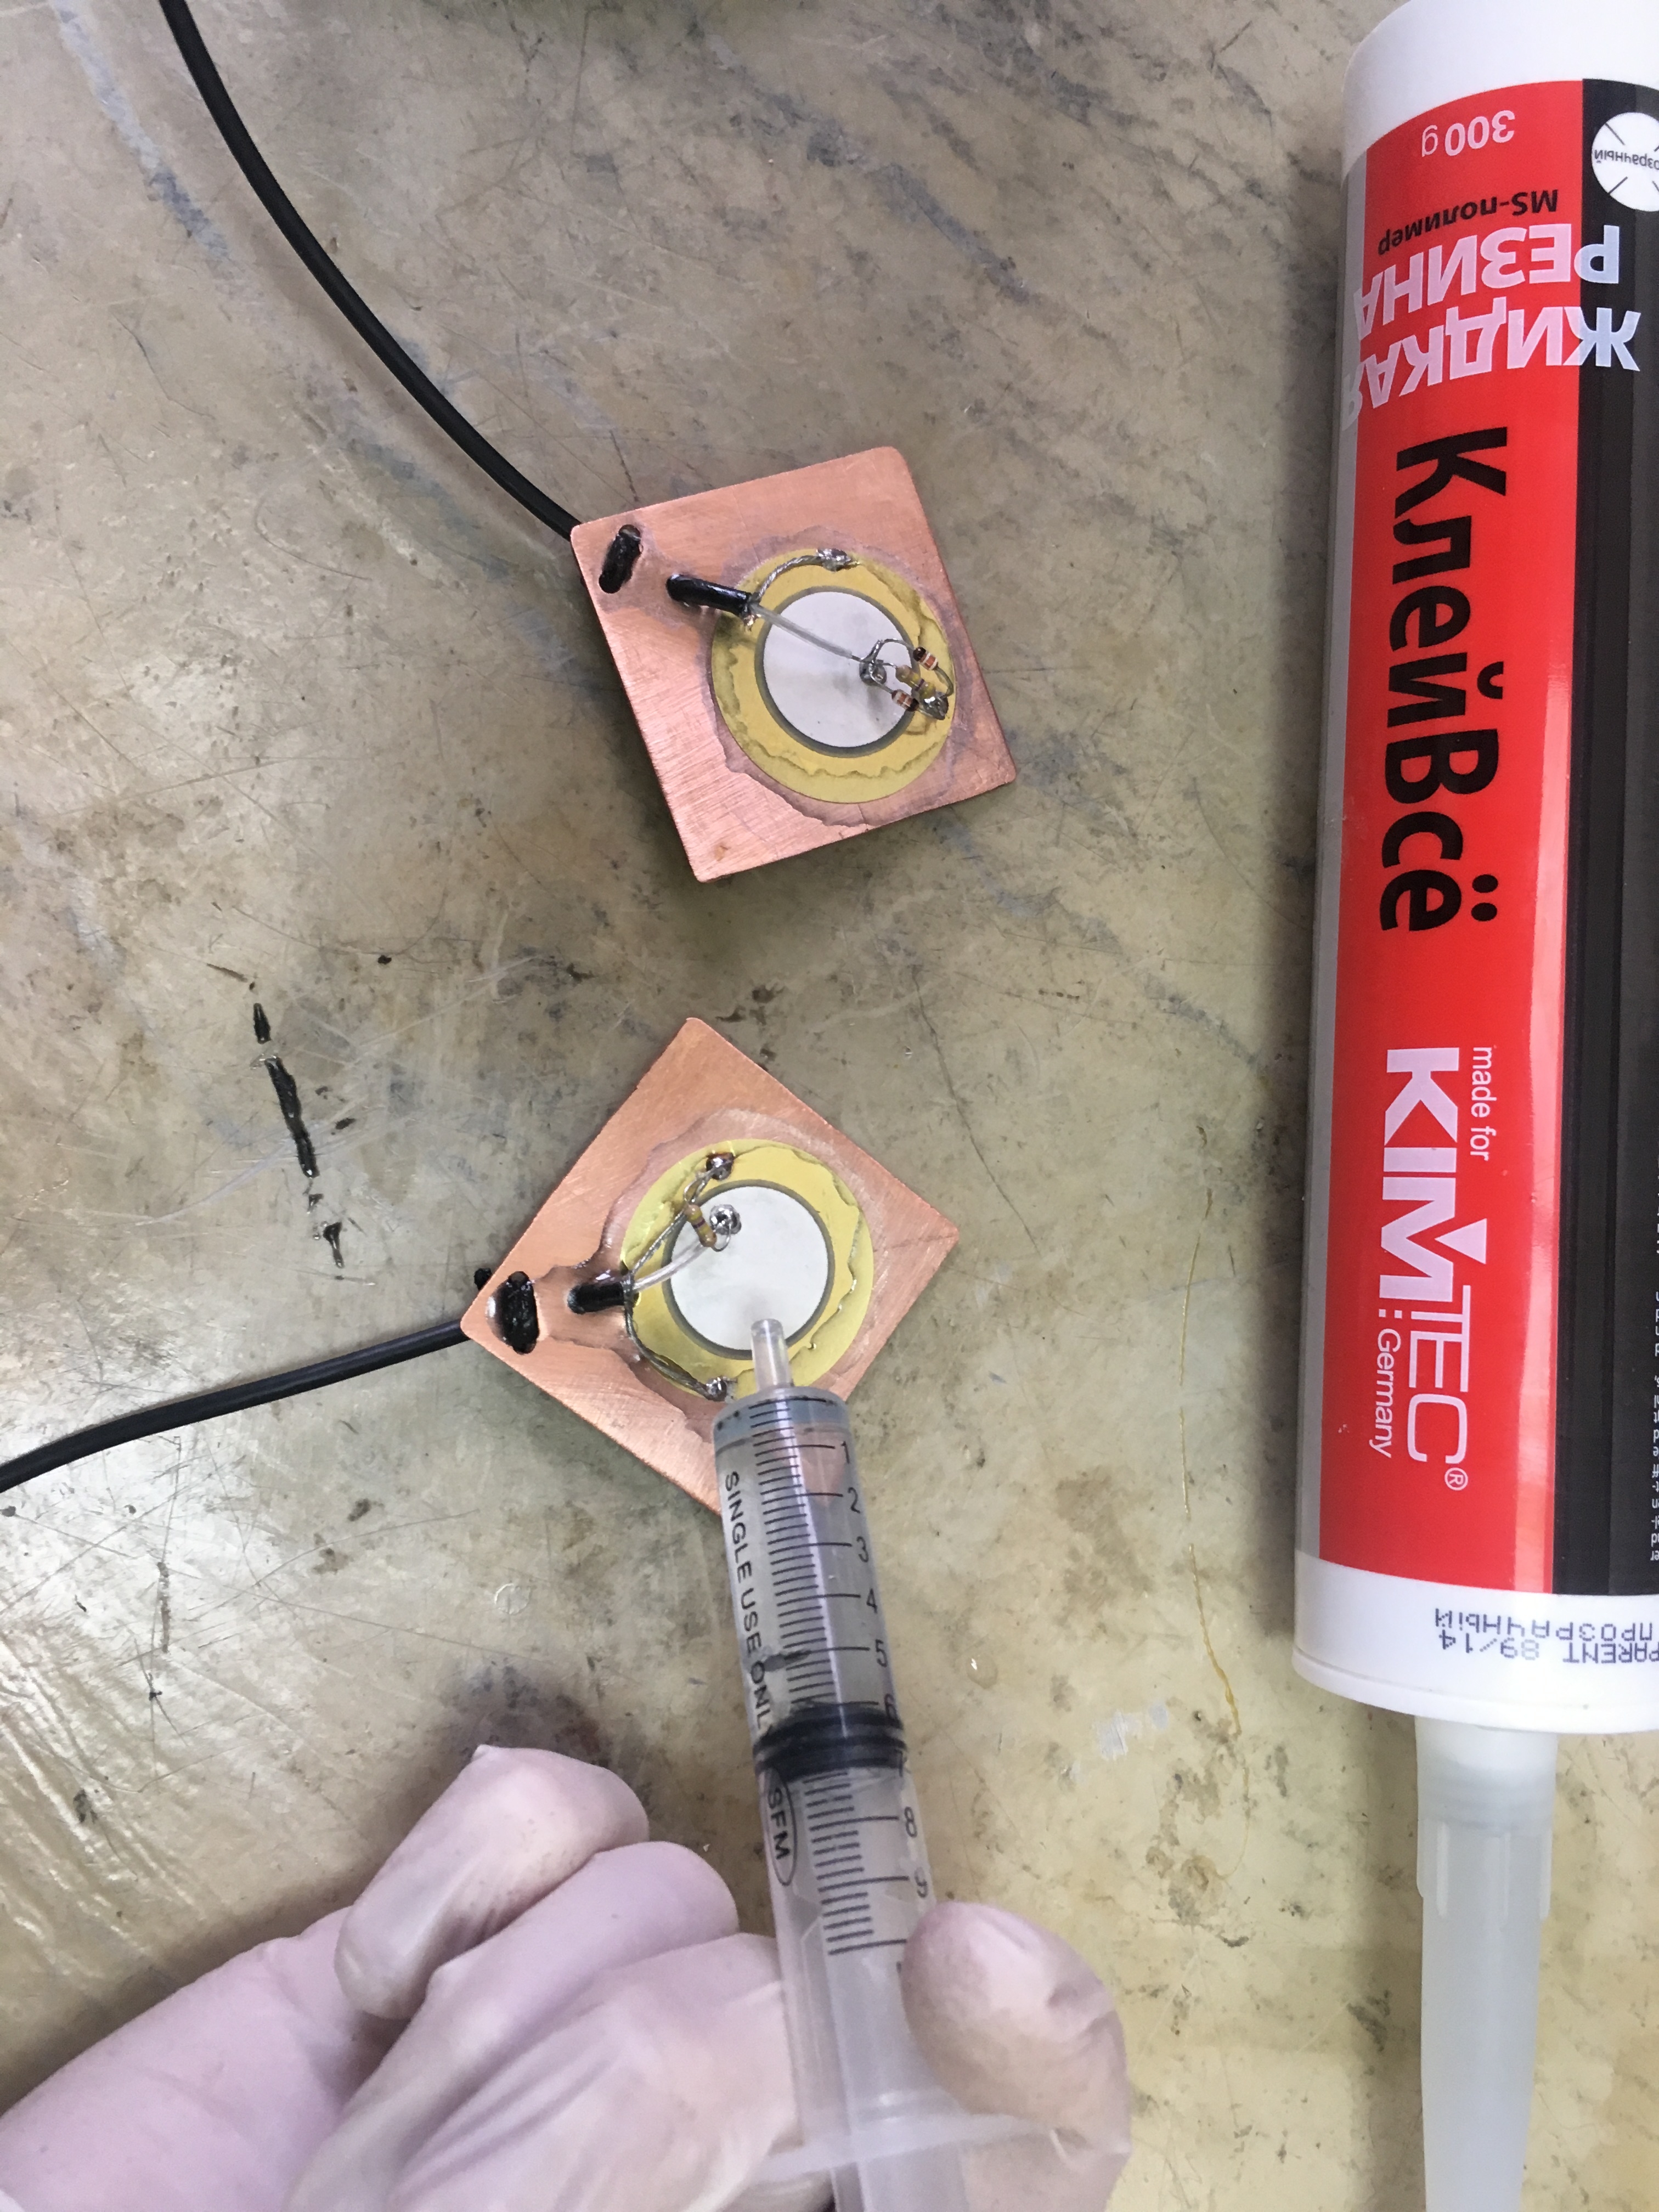
apply the sealant to the piezoelectric element and the solder joints from it: We start to apply the sealant, so that there are no air bubbles
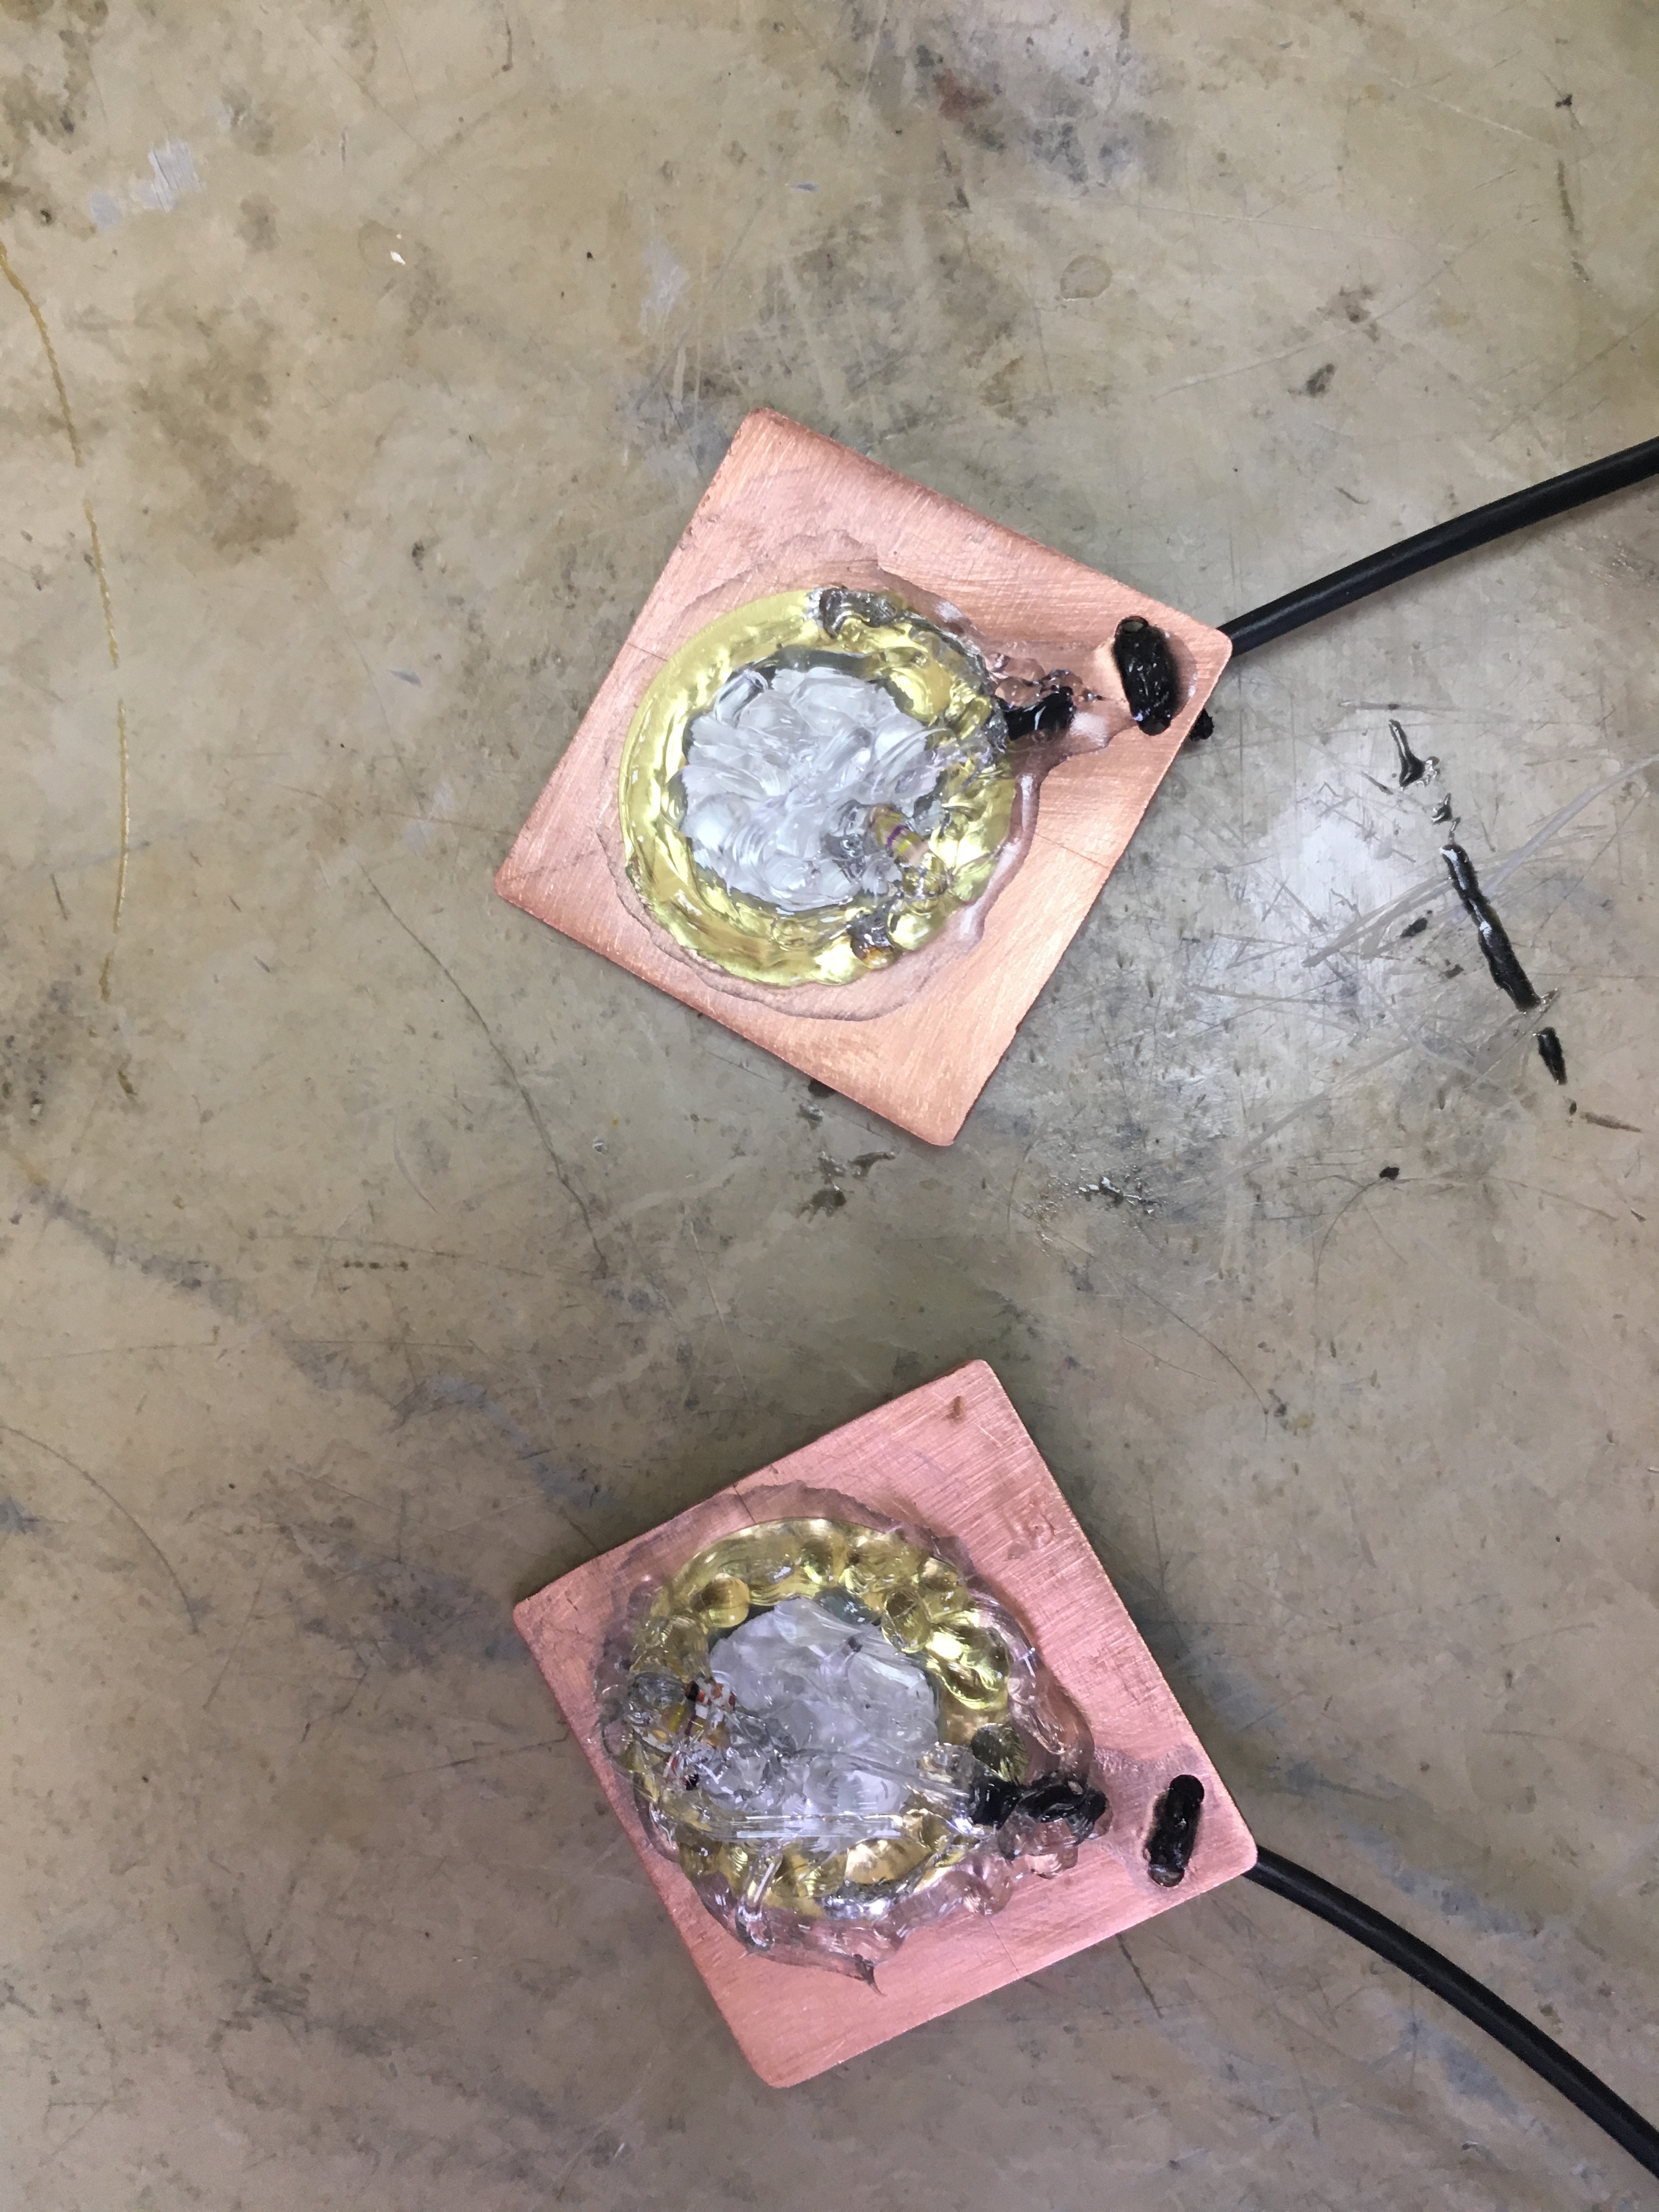
after applying the sealant we level it with a dental A spatula or someone else is comfortable (you can even use your finger). As a result, we did it like this:
Aesthetic perfection =)
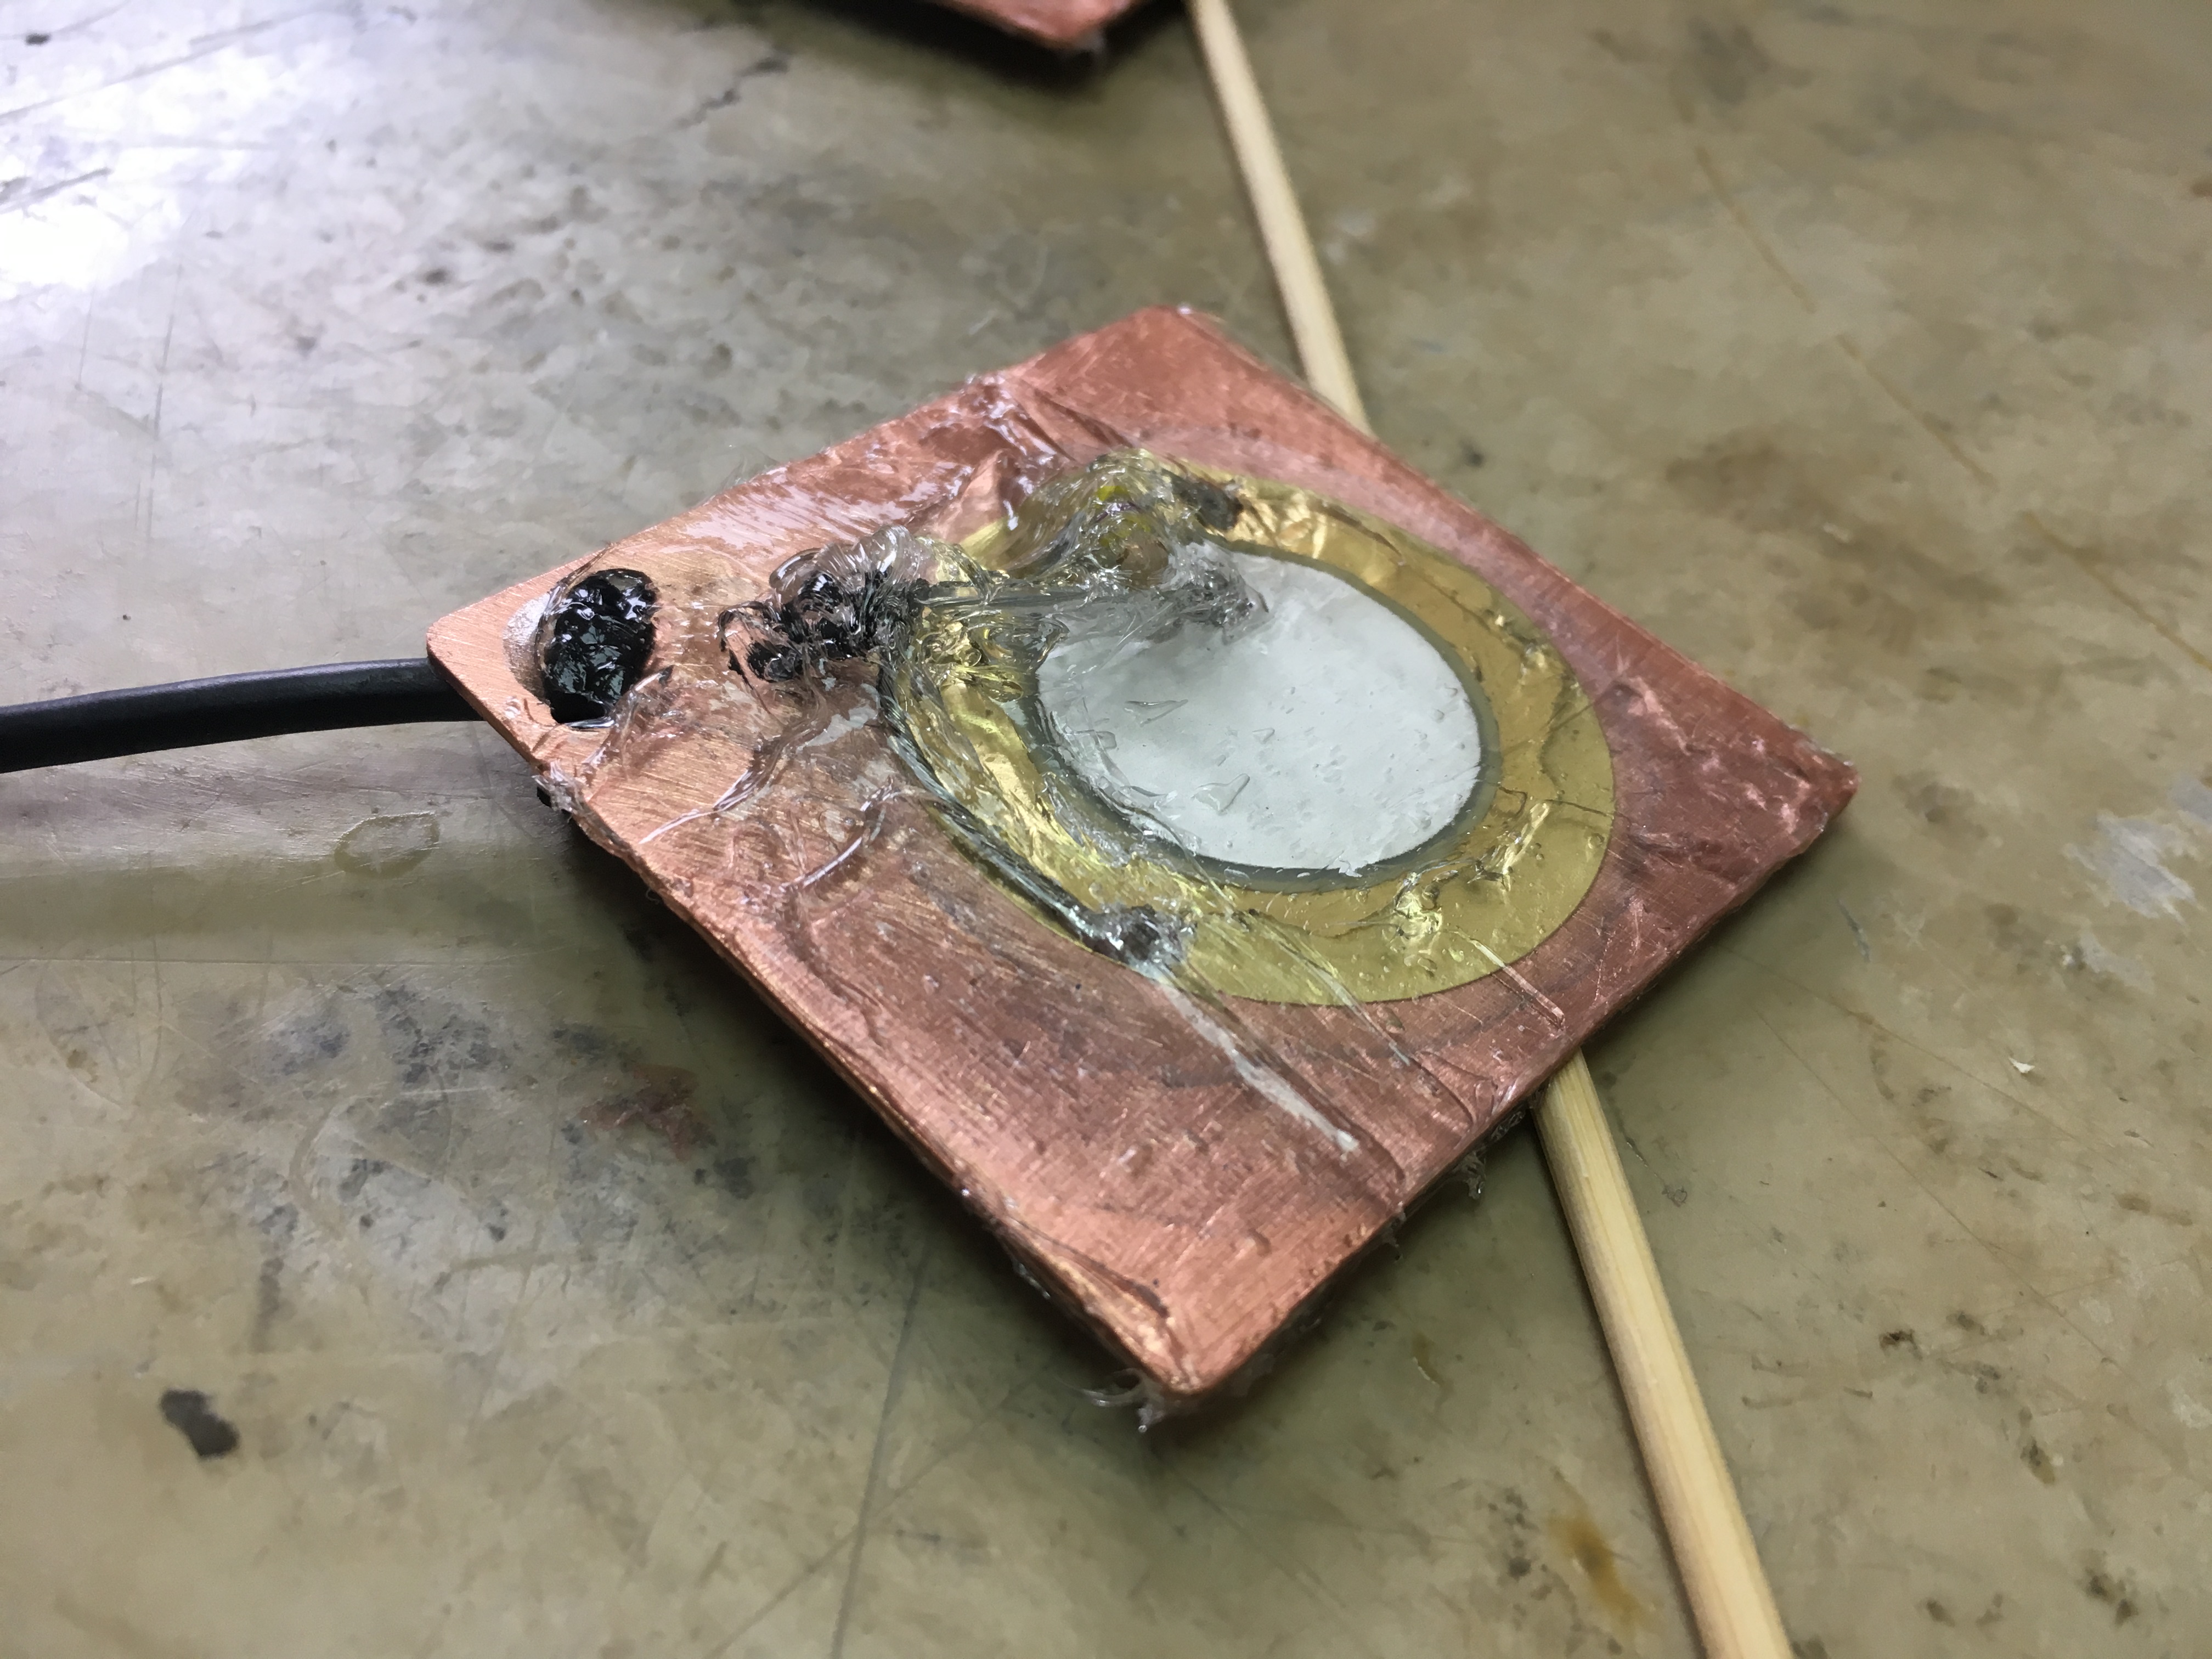
You should not make a layer of sealant too thick - the antenna will lose sensitivity. A layer of 1 mm is sufficient. Carefully protect sealant solders, resistors and diodes.
It is possible to cover the back side of the plate with a sealant - we did it on one antenna and did not on the other.
If you move the resistors and diodes closer to the cable, then the piezoelectric element will be much more convenient to smear with sealant and the layer will be smoother.
After completing the sculptor's work, we again leave the antennas for 24 hours.
2 P35 mm piezopischalki - 20 rubles
10 meters of cable RG-174 - 300 rubles
2 Jack 3.5 mm connectors - 70 rubles
copper plate 100x50x1 mm - 120 rubles
Total: 510 rubles
True, if you take into account the cost of epoxy glue, degreaser and especially silicone sealant , 500 ml of which cost 900 rubles total costs are slightly higher.
Actually, now it is safe to transmit video by sound through the water. My conscience is clear)
We are pleased to accept substantiated criticism and substantive questions, if you are interested in a topic - let us know, this is very motivating, including for new articles.
So one of you is not working out! (C) Colonel of one departmentThis short tutorial was designed to eliminate my long-standing flaw - it has long been necessary for amateurs to tell how to make the simplest and cheapest hydrophone and transmitting hydroacoustic antenna, if you read something in your heart, something was stirred up!
In one of the previous articles, we told how you can simply transfer the “video” sound through the water, we even gave the source text and I described in detail how and why it works, but didn’t provide people with the most important thing to check - with instructions on how to quickly
If in normal life we use speakers (such as in your laptop or car) for sound emission and a microphone for sound recording, then I hurry to please you: under water and playback (we say “radiation”) and sound recording (conversion ) are often performed by the same device, which is called a sonar antenna.
In the overwhelming majority of cases, a hydroacoustic antenna consists of one or several piezo elements: plates, disks, rings, spheres, hemispheres, etc.
Piezo elements possess so-called. piezoelectric effect: if a variable electric signal is applied to an element, the element begins to oscillate, and if the element oscillates, for example, an acoustic wave, then an alternating electric signal starts to be generated on it.
That is, the piezoelectric element converts an electrical signal into acoustic waves (mechanical vibrations) and vice versa - acoustic waves into an electrical signal.
As the saying goes: theory without practice is dead! Let's not waste time and make a pair of hydroacoustic antennas.
Materials that we need:
- a pair of piezopischalok F35mm (we bought 10 pieces for 100 rubles at Alieksperse)
- 10 meter length of cable RG-174
- two jack connectors 3.5 mm stereo
- copper / brass / stainless plate 50x100 mm wide 1-2 mm thick
- epoxy adhesive
- silicone sealant (non-acetic)
- solder and flux
- alcohol for degreasing
and wiping IP packets - any two resistors with nominal values of ~ 100 ohms and another 470-1000 kΩ (we took 0.25 W MF25)
- two diodes 1N4934
Instruments:
- drill and drills Ф3 and 2.5 mm (to drill copper plastic)
- hacksaw or dremel (to cut a copper plate)
- sandpaper 200-600 grit (to strip the copper plate)
- knife, wire cutters (for stripping wires)
- soldering iron or soldering station
- dental pad for leveling sealant
It’s just not possible to connect a piezo element to a sound card, laptop or tablet - firstly, the piezoelectric element can accumulate a large enough charge that can damage the electronics when connected, and secondly, when connected to a line or microphone input of a sound card, you need to protect the input cascade of the input because again, the piezoelectric element can produce a signal with a sufficiently large voltage with a strong mechanical effect.
In order for an unconnected antenna not to accumulate a charge, a resistor with a nominal value of 0.5-1 MΩ (R1) is placed in parallel to it.
In the receiving antenna, to limit the maximum voltage, a simple threshold limiter can be assembled from diodes D1, D2 and a 100 Ohm resistor (R2). As diodes, we can take 1N4934, and the resistors R1, R2, we took MF25 nominal 470 kOhm. Please note that if you plan to connect the receiving antenna to the microphone input (and not to the linear), then you will additionally need a capacitor C1 with a nominal value of 0.1 ... 1 uF, otherwise the power supplied by the sound card to the electret microphone will be short-circuited through the D1 diode.
The simple connection diagram of the piezo
Piezo elements themselves need to be glued to metal plates with epoxy. First, it will lower the resonant frequency of the piezoelectric element (the unsprung mass was added), and secondly, being glued by one side to a rigid metal plate, the piezoelectric element will not be able to contract and stretch and it will have to bend.
We mark the metal plate according to the size of the piezoelectric element.
We cut two square plates 50 x 50 mm and drilled holes for the cable (3 mm in diameter) and two holes for fixing the cable with a thin nylon thread, it turned out like this:
Almost assembled antenna =)
We bought 10 - one meter piece of cable cut off two pieces of 3 meters, the rest left in reserve.
We wind the cable into the hole, solder its central core to the metallization of the piezoelectric element, and the screen - to its metal substrate. In parallel, as agreed, we solder a resistor of 470 kΩ.
We clean the other end of the cable and assemble the connector: we
solder the central core to the central contact (the very tip of the connector), leave the middle one intact, and solder the connector body to the cable sheath. I always forget to put the connector case on the cable and I have to re-solder everything two times - do not repeat my mistake) It is
very important to clean the flux after soldering - especially on the piezoelectric element. If this is not done, then over time he will eat the solder.
So, we have prepared two antennas (on one of them there is a threshold limiter). Now is the time to knead the epoxy and wear latex gloves.
Before gluing the piezoelectric elements to the copper plates, both should be thoroughly degreased with alcohol (ethyl or isopropyl) or acetone. Do not use anything else - gasoline or kerosene for these purposes - these substances leave greasy traces that impair adhesion.
It is worth recalling that all work with alcohols, acetone and epoxy should be carried out in a well-ventilated contact, protect hands and eyes. Do not neglect safety regulations!
Apply the epoxy
Impregnate the nylon thread that holds the cable to the plate.
We continue to apply epoxy
For gluing the piezoelectric element to the plate quite a bit of epoxy glue. Do not overdo it - the epoxy should not get to the top, otherwise it can destroy a thin layer of piezoceramics during polymerization, plus the whole epoxy deteriorates in water.
The result should be something like this: The
piezo elements are glued, leaving everything to full polymerization.
Usually, epoxy adhesives polymerize completely within 24 hours. We, for example, did just that - left our antennas until the next day.
... we wait 24 hours
When we arrived at the laboratory in the morning, we first connected the first antenna (without a threshold limiter) to the headphone jack of the laptop. If you turn on the music and bring our antenna to your ear, then you can be sure that at least the audible frequency range it reproduces quite well - there is even a hint of bass - this is how the copper substrate affected.
It is clear that in this form it is already an acoustic transmitting antenna, but still not a hydroacoustic one. To correct this misunderstanding, the antenna must be degreased again and covered with a thin layer of sealant.
Important note: Do not use the acetate-containing sanitary sealant, the acetic acid contained in it will corrode the solder, the cable and the metallization of the piezoelectric element.
We recommend KimTek liquid rubber for boats and boats. If someone already has in stock instead of a sealant, you can use excellent polyurethane compounds from Smooth-On or 3M - that is much more technological and fashionable.
Silicone sealant based on MS polymer is perfect for our purposes.
For convenience, we first fill the medical disposable syringe with the sealant, and
apply the sealant to the piezoelectric element and the solder joints from it: We start to apply the sealant, so that there are no air bubbles
after applying the sealant we level it with a dental A spatula or someone else is comfortable (you can even use your finger). As a result, we did it like this:
Aesthetic perfection =)
You should not make a layer of sealant too thick - the antenna will lose sensitivity. A layer of 1 mm is sufficient. Carefully protect sealant solders, resistors and diodes.
It is possible to cover the back side of the plate with a sealant - we did it on one antenna and did not on the other.
If you move the resistors and diodes closer to the cable, then the piezoelectric element will be much more convenient to smear with sealant and the layer will be smoother.
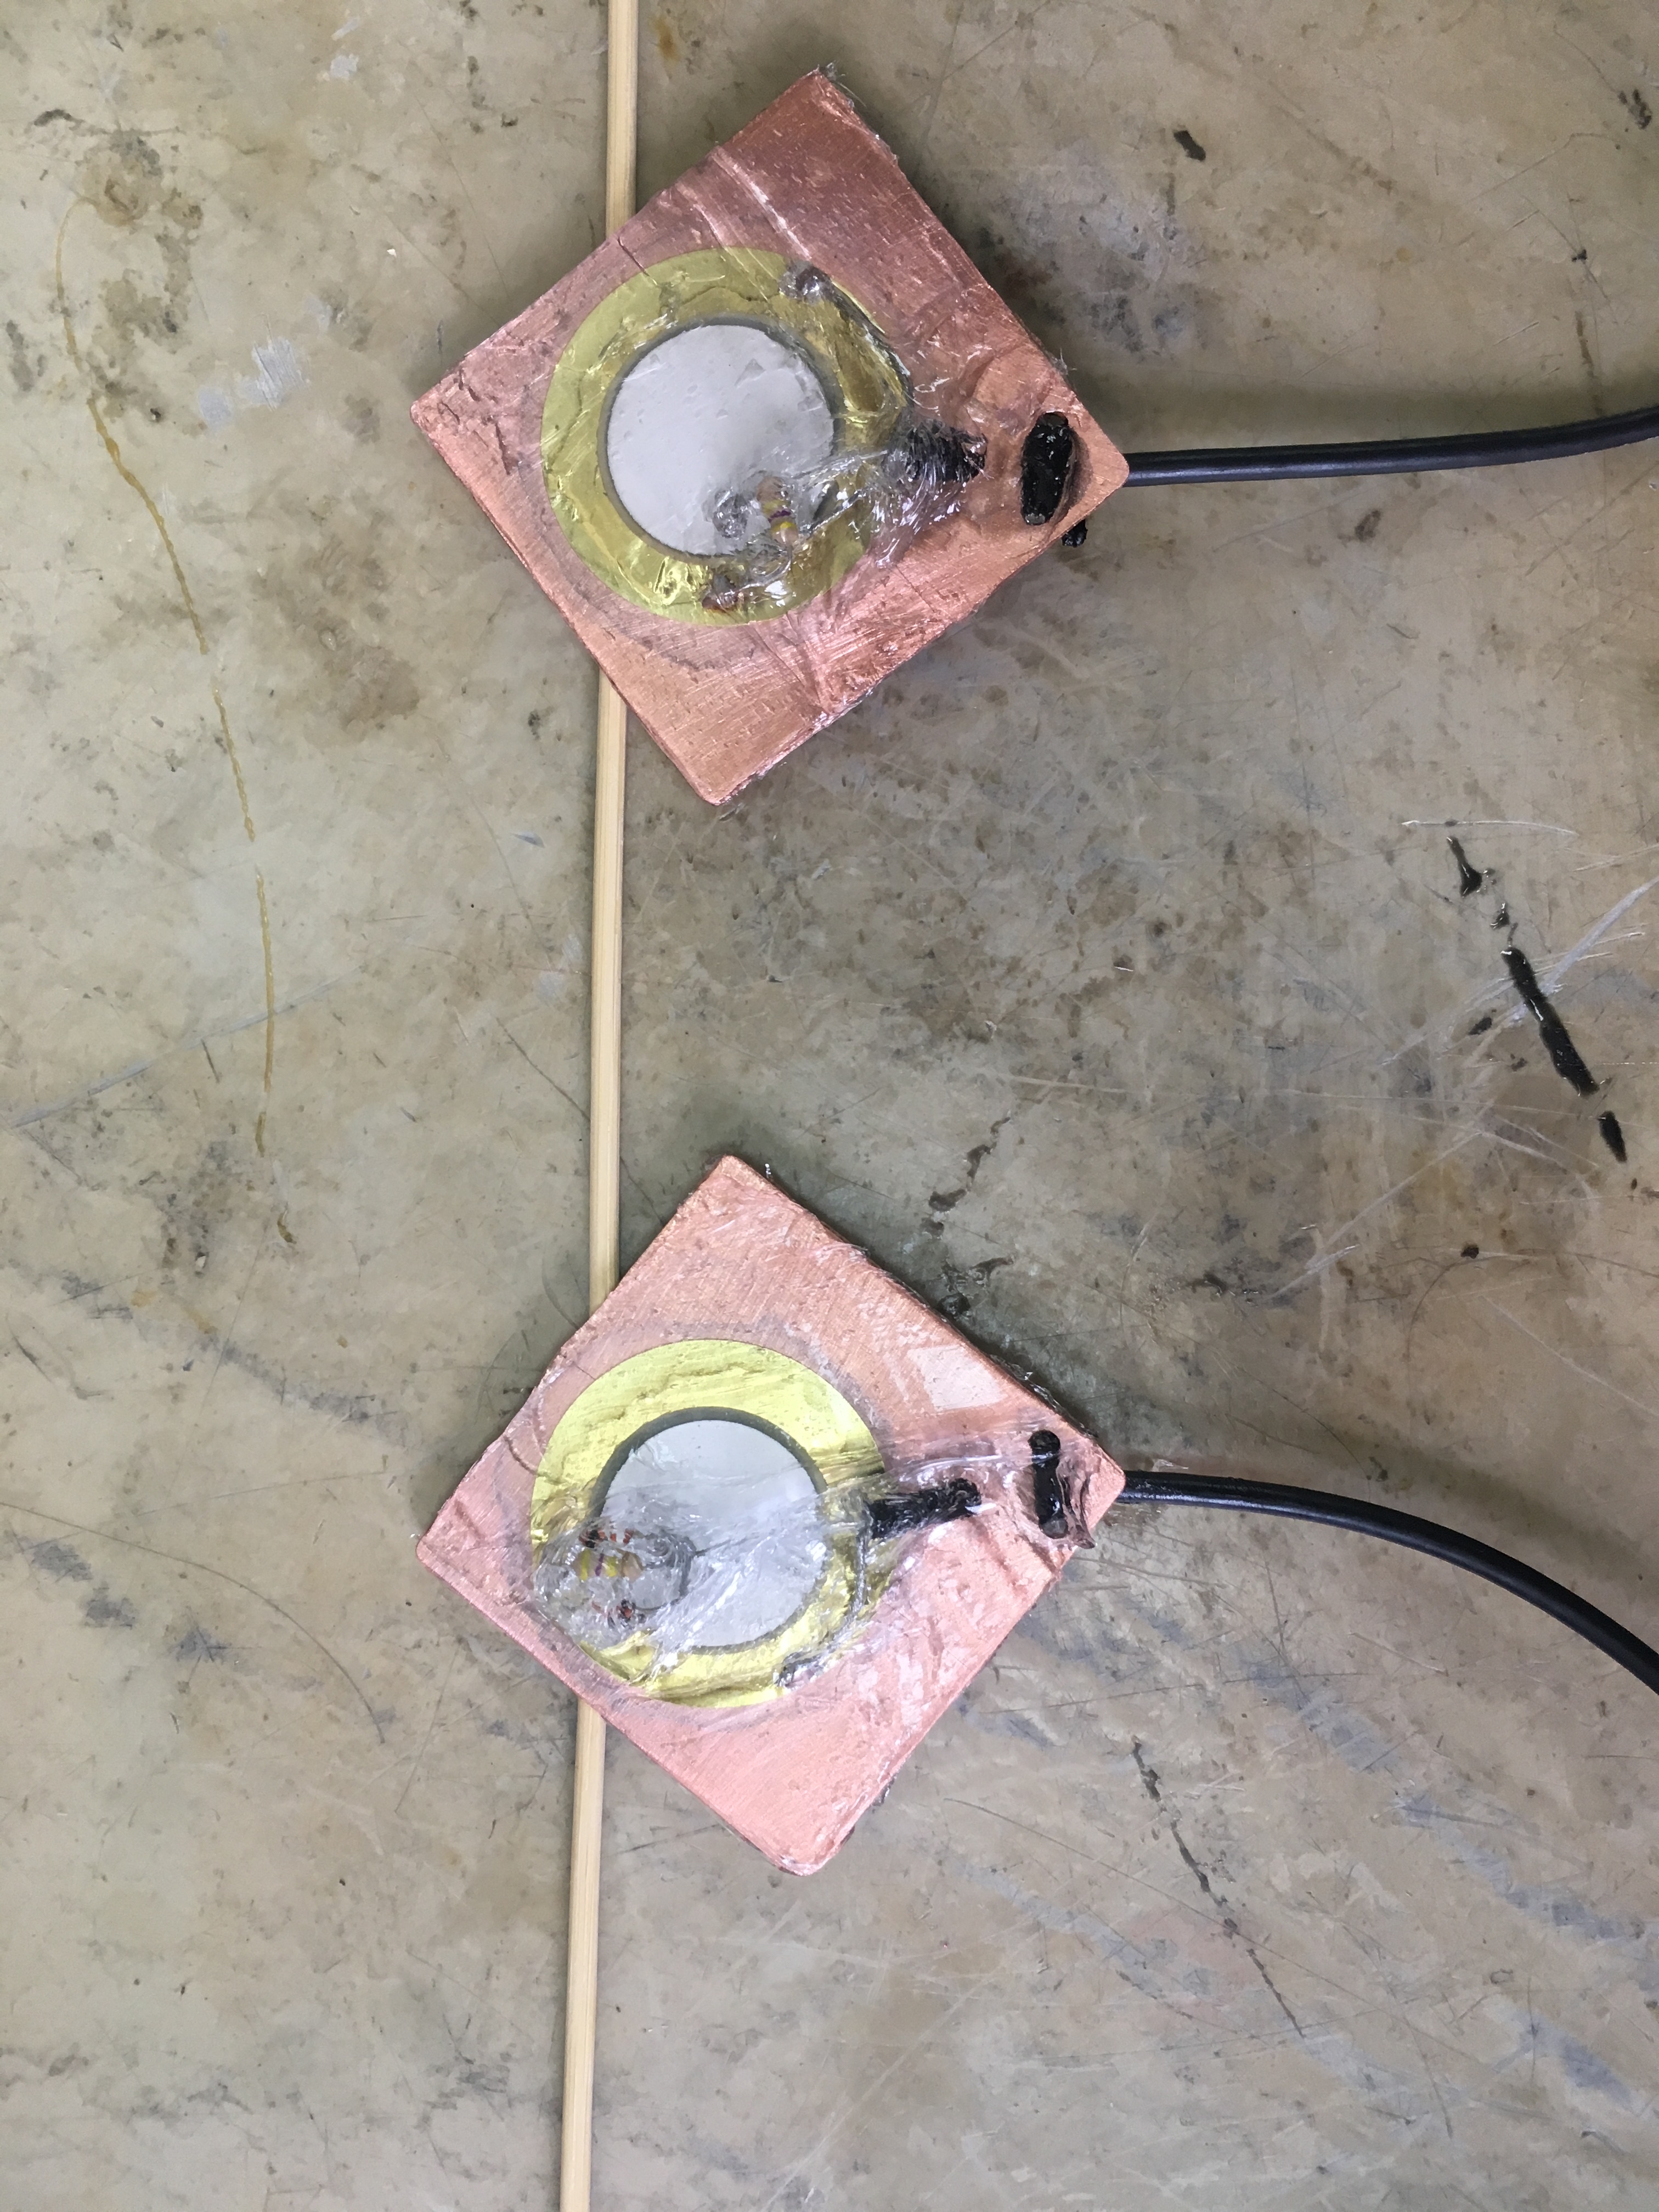
After completing the sculptor's work, we again leave the antennas for 24 hours.
Let's calculate what these two antennas cost us:
2 P35 mm piezopischalki - 20 rubles
10 meters of cable RG-174 - 300 rubles
2 Jack 3.5 mm connectors - 70 rubles
copper plate 100x50x1 mm - 120 rubles
Total: 510 rubles
True, if you take into account the cost of epoxy glue, degreaser and especially silicone sealant , 500 ml of which cost 900 rubles total costs are slightly higher.
PS
Actually, now it is safe to transmit video by sound through the water. My conscience is clear)
Pps
We are pleased to accept substantiated criticism and substantive questions, if you are interested in a topic - let us know, this is very motivating, including for new articles.