Gitlab-CI and Ansible-lint Syntax Validation

Hello! We continue a series of articles about DevOps and look for the most effective ways to manage your configuration, sharing experience with you. In previous articles, we looked at how to build Ansible configuration management using Jenkins and Serverspec, and now, at your request, we will consider how to organize configuration management using GitLab-CI.
Ansible-lint is a utility for checking the correctness of playbook syntax and code style, which can be integrated into the CI service. In our case, we implement it in gitlab-ci for checking playbooks at the stage of accepting Merge-Request and setting the status of checks.
Gitlab(GitLab Community Edition) is an open source project, a git repository manager, initially developed as an alternative to the paid corporate version of Github.
Installing GitLab CE is described in this article .
Install gitlab-ci-multirunner
curl -L https://packages.gitlab.com/install/repositories/runner/gitlab-ci-multi-runner/script.rpm.sh | sudo bash
yum install gitlab-ci-multi-runner
Register runner
gitlab-ci-multi-runner registerNow you need to answer the questions:
Running in system-mode.
Please enter the gitlab-ci coordinator URL (e.g. https://gitlab.com/ci):
http://domain.example.com/ci
Please enter the gitlab-ci token for this runner:
your_token
Please enter the gitlab-ci description for this runner:
[domain.example.com]:
Please enter the gitlab-ci tags for this runner (comma separated):
ansible
Registering runner... succeeded                     runner=
Please enter the executor: docker-ssh+machine, docker, docker-ssh, parallels, shell, ssh, virtualbox, docker+machine:
shell
Runner registered successfully. Feel free to start it, but if it's running already the config should be automatically reloaded!
We take the token and URL from the project settings page.
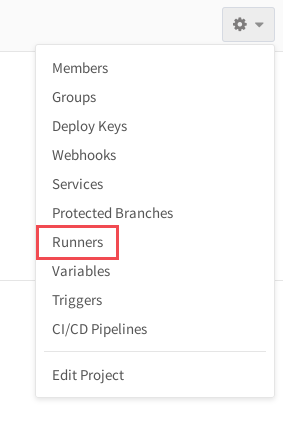
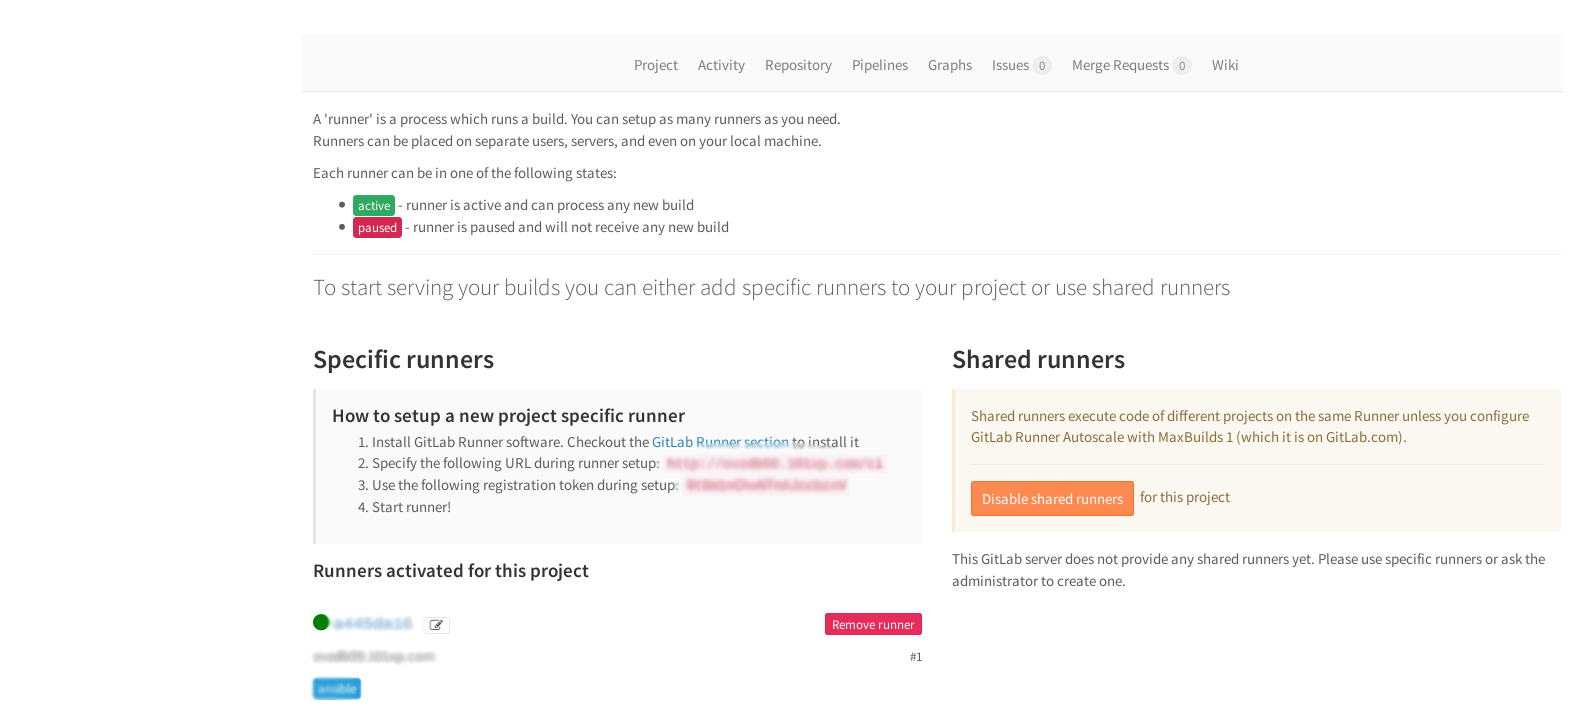
Features of multi-runner setup.
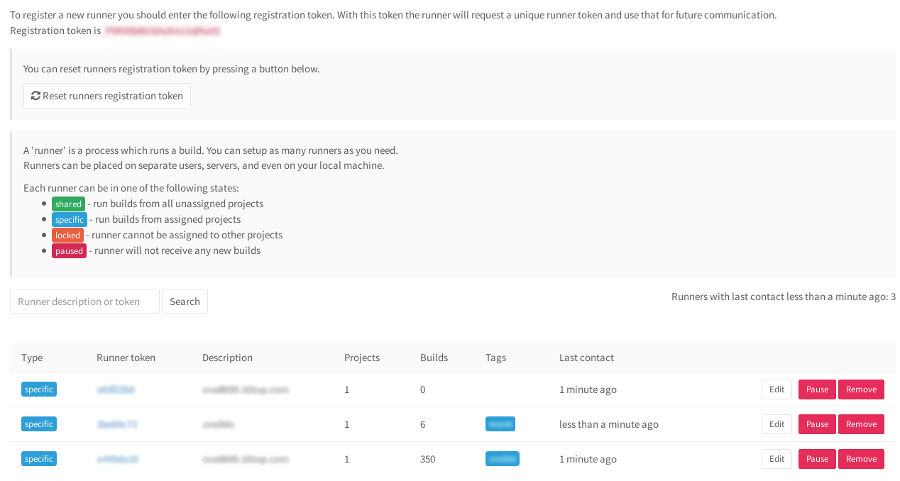
One runner can handle multiple projects. In order for one runner to process everything, you just need to register a new runner without specifying tags. We take the token for the shared runner in the Admin Area:
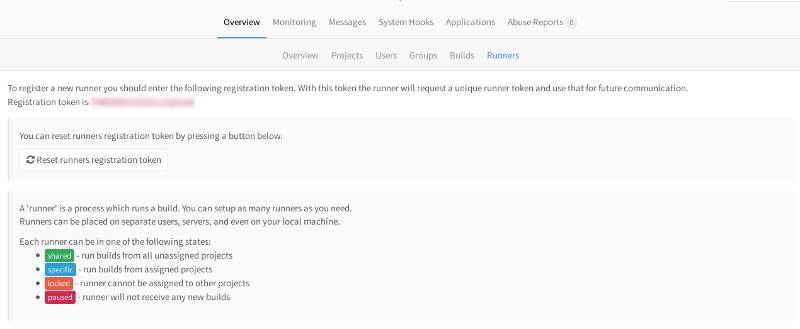
You can distribute the stack of runners to different servers. And also: in gitlab, as in Jenkins, there is such a thing as tags. A project with the ansible tag will process the runner marked with the ansible tag, and for other projects without a tag or with another tag, this runner will not work.
Also in the admin panel, you can configure the correspondence of the runner and the project.
domain.example.com/admin/runners
Install Ansible-lint
Ansible-lint is installed via python-pip or from the EPEL repository.
First way:
First, install python-pip, then install ansible-lint through it:
sudo yum groupinstall @Development Tools
sudo yum install python-pip
sudo pip install --upgrade pip
sudo pip install ansible-lint
Second way
It's simple - install epel-release and install ansible-lint through the package manager:
sudo yum install epel-release
sudo yum install ansible-lint
Pipeline setup.
Create the .gitlab-ci.yml file in the root of the repository . It is important to observe the number of spaces, otherwise there will be a mistake - yaml doesn’t forgive this, yeah.
stages:
[два пробела]- test
test_job:
[два пробела]stage: test
[два пробела]script:
[четыре пробела]- ansible-lint *.yml
[два пробела]tags:
[четыре пробела]- ansible
stages - be sure to describe the stages of assembly.
stages:
  - stagename
test_job is an arbitrary name for the job.
stage: test — Be sure to describe the stage test specified in the stages section.
jobname:
  stage: stagename
script - run a test in the root of the
tags repository - a label for the runner.
The stage: test stage name can be anything, for example: converge, pre-test, post-test, deploy.
The name of the test_job job can also be any.
GitLab has a built-in linter for pipelines. You can check the correctness of the pipeline syntax at the domain.example.com/ci/lint URL .
Insert the pipeline, click Validate.
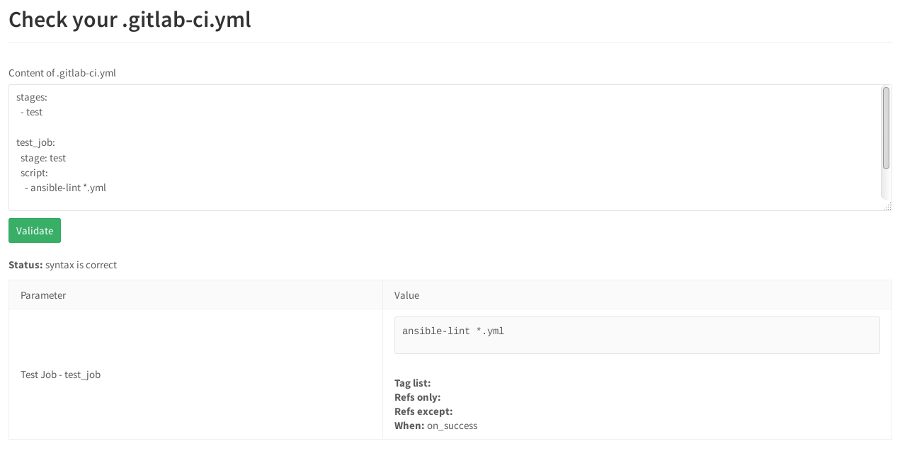
If an error occurs, the linter will swear and indicate an error.
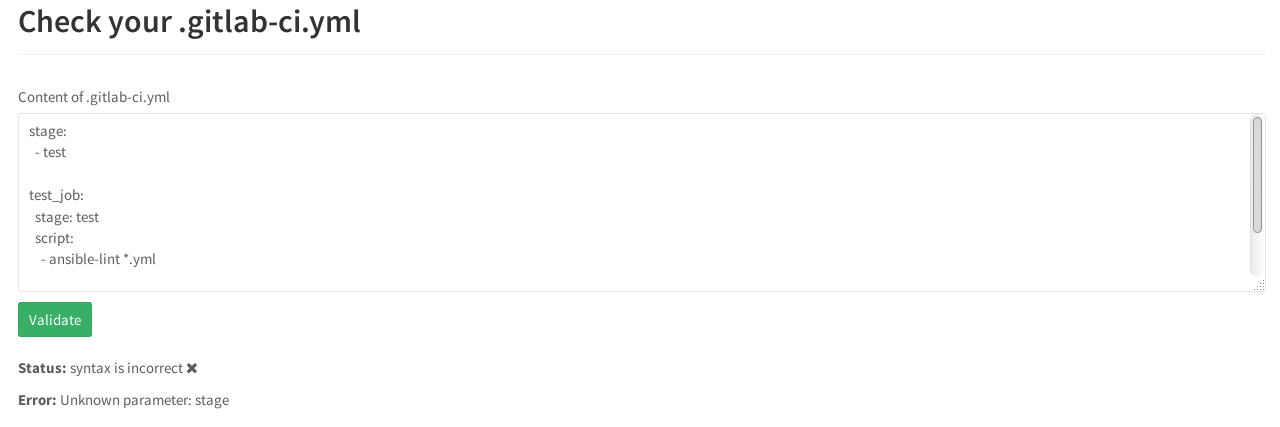
It should be stages , not stage .
Thus, ansible-lint will automatically check every playbook with the extension .yml from the root of the repository every time it commits .
We have two roles in the repository:
roles
├── monit
└── openssh
And two playbooks rolling these roles:
├── monit.yml
├── openssh.yml
├── README.md
└── roles
openssh.yml
---
- hosts: all
  user: ansible
  become: yes
  roles:
    - openssh
monit.yml
---
- hosts: all
  user: ansible
  become: yes
  roles:
    - monit
Therefore, checking the playbook that assigns the role, we check all its contents:
roles/openssh/tasks/
├── configure_iptables.yml
├── configure_monitoring.yml
├── configure_ssh.yml
└── main.ym
roles/monit/tasks/
├── configure_monit.yml
├── configure_monit_checks.yml
├── install_monit.yml
└── main.ymlNow, when you commit, ansible-lint will be launched automatically and will check all the roles listed in the playbooks.
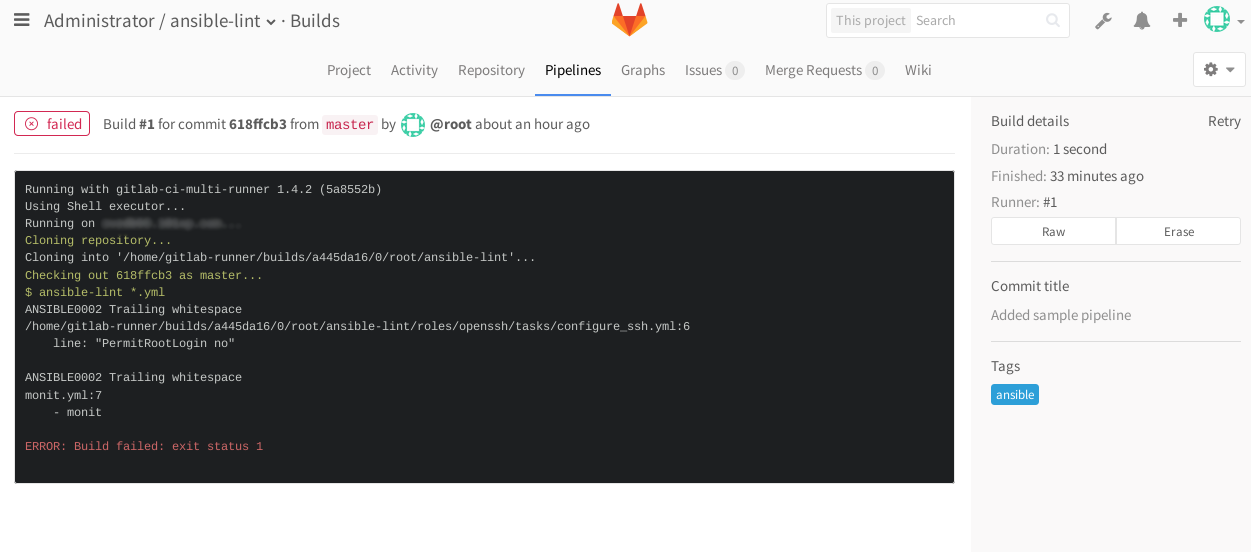
If you try to commit something and go to the web interface ( pipelines tab ), you can see the job in failed status .
In order to disable lint checks when pushing to the repository, it is enough to clean out all the stages in the .gittab-ci.yml file related to running ansible-lint checks .
Playbook verification options are also configurable:
╰─>$ ansible-lint --help
Usage: ansible-lint playbook.yml
Options:
  --version             show program's version number and exit
  -h, --help            show this help message and exit
  -L                    list all the rules
  -q                    quieter, although not silent output
  -p                    parseable output in the format of pep8
  -r RULESDIR           specify one or more rules directories using one or
                        more -r arguments. Any -r flags override the default
                        rules in /usr/local/lib/python2.7/dist-
                        packages/ansiblelint/rules, unless -R is also used.
  -R                    Use default rules in /usr/local/lib/python2.7/dist-
                        packages/ansiblelint/rules in addition to any extra
                        rules directories specified with -r. There is no need
                        to specify this if no -r flags are used
  -t TAGS               only check rules whose id/tags match these values
  -T                    list all the tags
  -v                    Increase verbosity level
  -x SKIP_LIST          only check rules whose id/tags do not match these
                        values
  --nocolor             disable colored output
  --exclude=EXCLUDE_PATHS
                        path to directories or files to skip. This option is
                        repeatable.
╰─>$ ansible-lint -L
ANSIBLE0002: Trailing whitespace
There should not be any trailing whitespace
ANSIBLE0004: Git checkouts must contain explicit version
All version control checkouts must point to an explicit commit or tag, not just "latest"
ANSIBLE0005: Mercurial checkouts must contain explicit revision
All version control checkouts must point to an explicit commit or tag, not just "latest"
ANSIBLE0006: Using command rather than module
Executing a command when there is an Ansible module is generally a bad idea
ANSIBLE0007: Using command rather than an argument to e.g. file
Executing a command when there is are arguments to modules is generally a bad idea
ANSIBLE0008: Deprecated sudo
Instead of sudo/sudo_user, use become/become_user.
ANSIBLE0009: Octal file permissions must contain leading zero
Numeric file permissions without leading zero can behavein unexpected ways. See http://docs.ansible.com/ansible/file_module.html
ANSIBLE0010: Package installs should not use latest
Package installs should use state=present with or without a version
ANSIBLE0011: All tasks should be named
All tasks should have a distinct name for readability and for --start-at-task to work
ANSIBLE0012: Commands should not change things if nothing needs doing
Commands should either read information (and thus set changed_when) or not do something if it has already been done (using creates/removes) or only do it if another check has a particular result (when)
ANSIBLE0013: Use shell only when shell functionality is required
Shell should only be used when piping, redirecting or chaining commands (and Ansible would be preferred for some of those!)
ANSIBLE0014: Environment variables don't work as part of command
Environment variables should be passed to shell or command through environment argument
ANSIBLE0015: Using bare variables is deprecated
Using bare variables is deprecated. Update yourplaybooks so that the environment value uses the full variablesyntax ("{{your_variable}}").Some tasks can be skipped when checking ansible-lint does not really like the command and shell modules , since in the ansible ideology it is believed that there are enough regular core-modules for all tasks. In fact, this is not always the case.
For example, we have a task in the role that uses the command module :
- name: Installing monit
  command:
    yum -y install monit
  tags: monit
And if we shed a playbook with this role, then ansible-lint will complain that we use the command module
╰─>$ ansible-lint monit.yml
[ANSIBLE0002] Trailing whitespace
monit.yml:7
    - monit
[ANSIBLE0012] Commands should not change things if nothing needs doing
/tmp/ansible-lint/roles/monit/tasks/install_monit.yml:8
Task/Handler: Installing monit
[ANSIBLE0006] yum used in place of yum module
/tmp/ansible-lint/roles/monit/tasks/install_monit.yml:8
Task/Handler: Installing monit
To avoid this, you can mark the task with the tag skip_ansible_lint :
- name: Installing monit
  command:
    yum -y install monit
  tags: monit,skip_ansible_lint
Now, when running lint on a playbook, it will not swear at the command module used :
╰─>$ ansible-lint monit.yml
[ANSIBLE0002] Trailing whitespace
monit.yml:7
    - monit
Features Merge Request.
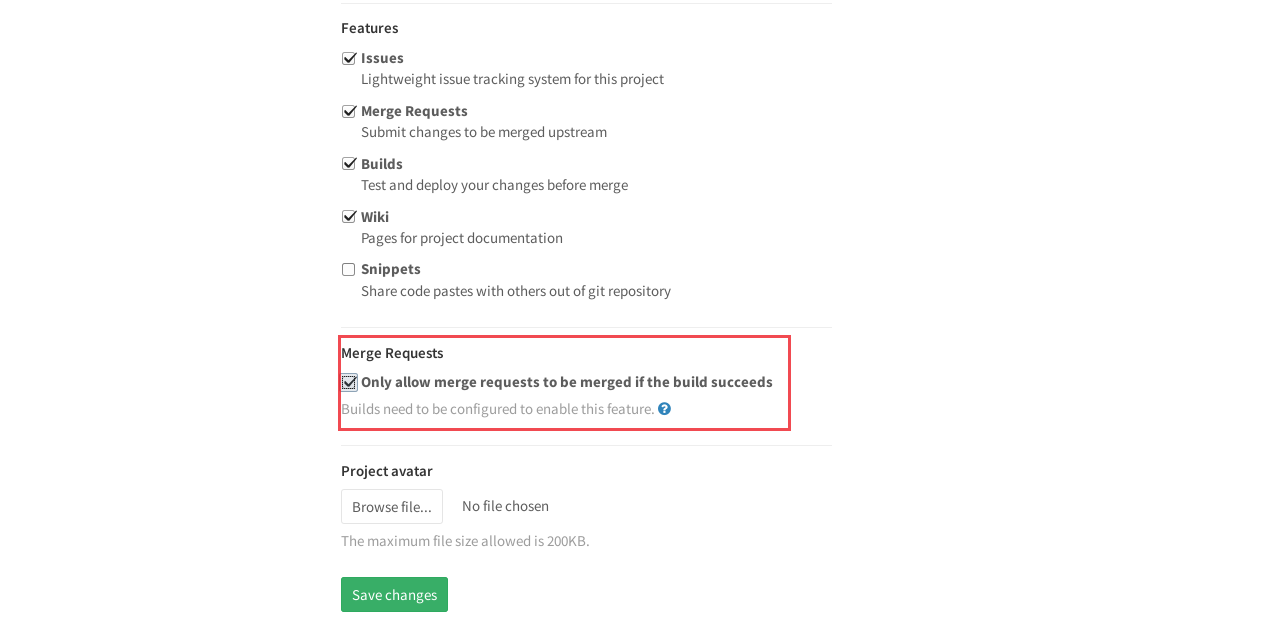
Looking ahead, a few words about the functionality of checks in MR. By default, merge-request is accepted only upon successful verification. You can disable this in the project settings, in the Merge Requests:
Ansible-lint section, you can also run it on a localhost without making commits and without waiting for verification by the CI service. If you have Linux or OS X on your desktop, just install it on your computer.
Examples of commits with an error, as it looks in gitlab.
1. Open the file in the built-in GitLab editor:
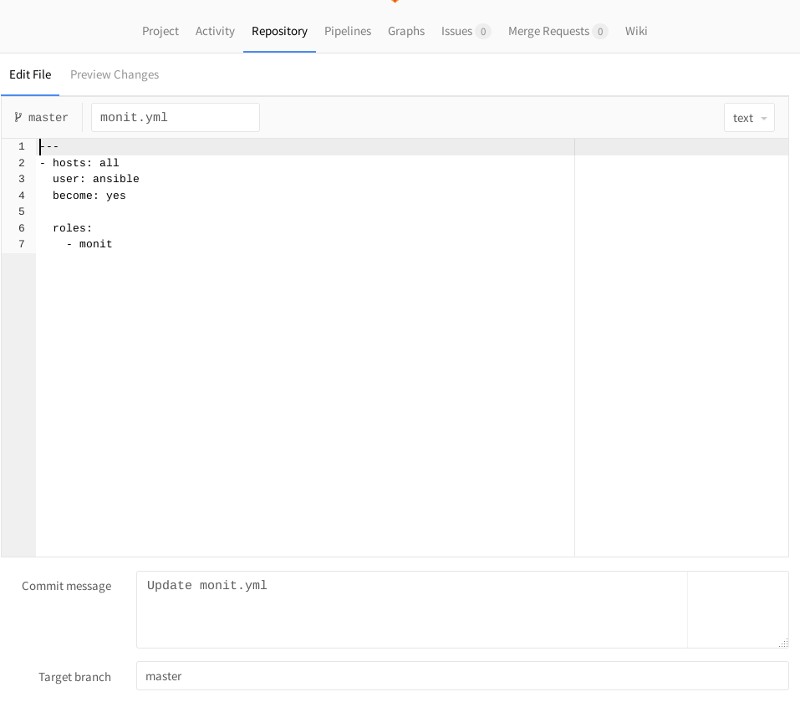
2. Make changes. For example, yaml is very sensitive to spaces, try adding an extra space at the beginning of a line:

Click Commit Changes, return to the modified file. An icon with the verification status will appear at the top right:
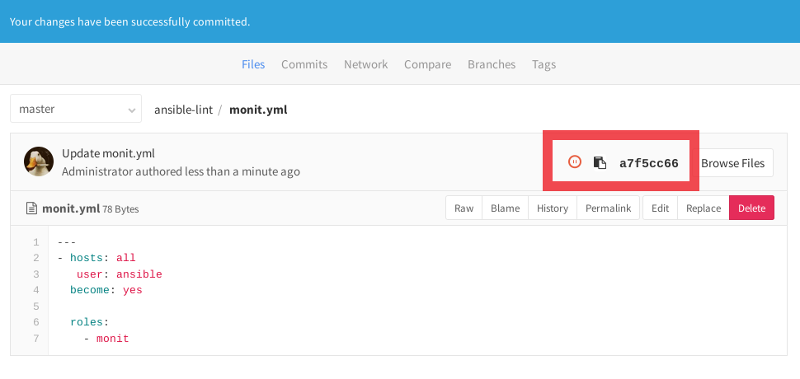
Now it is in the Pending status, since the verification has not yet been completed. If we click on the icon, we will move on to the verification status of our freshly made commit:
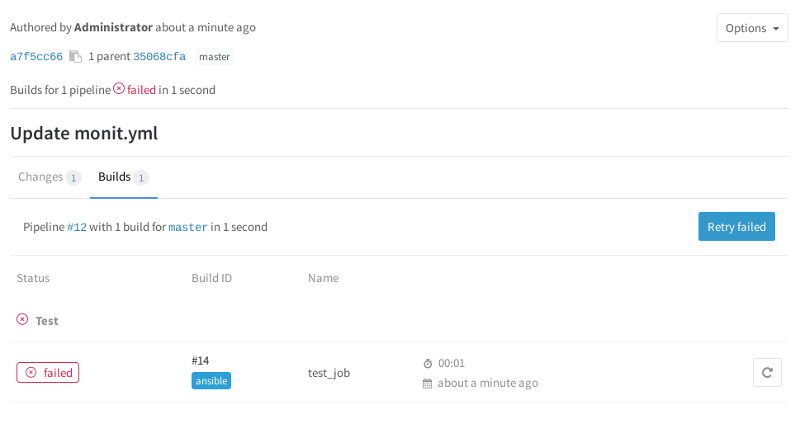
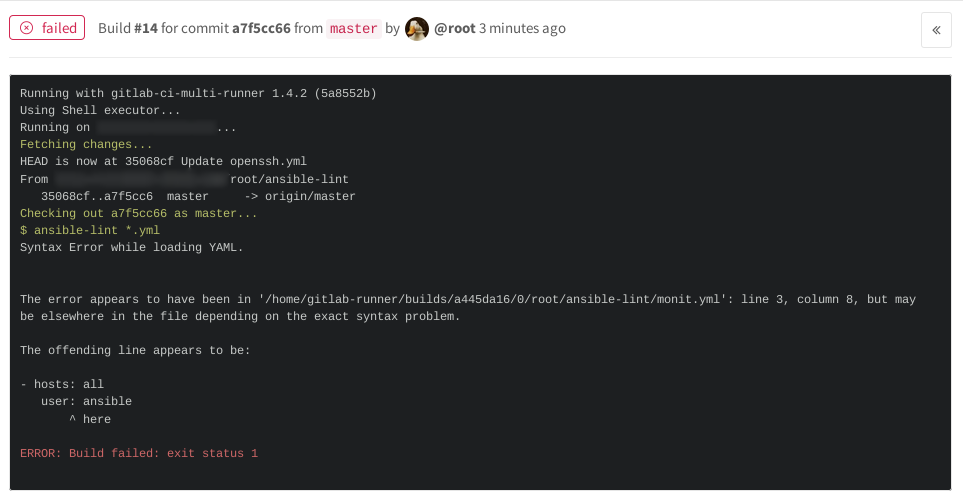
It is now in the Failed status, since we deliberately made a mistake in the syntax. If you click on the Failed icon, we can see the result of ansible-lint:
You can stick a nice badge with build status in README.md
[](http://domain.example.com/projectname/commits/master)You can take it in the project settings, in the CI / CD Pipelines
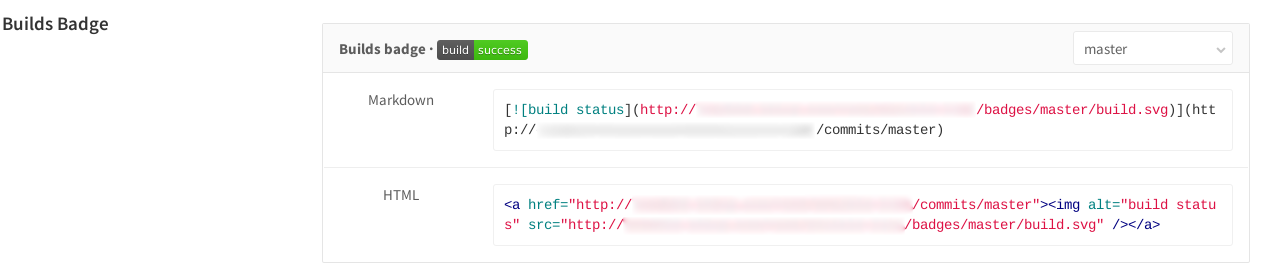
section Copy-paste Markdown and add to README.md in the project root, commit, now the verification status is displayed on the project main page:

Green / Passed - if the verification was successful.
Red / Failed - if the check failed.
In the Pipelines tab, you can see the statuses of all commits:

Thus, we have built the process of controlling syntax correctness during configuration management. Thank you for your attention and all the successful automation!
Author: DevOps-Administrator Centos-admin - Victor Batuev.