About 3D graphics in simple words
- Transfer
Part 1. Introduction
Hi my name is baldurk. I’ve been working as a graphics programmer for several years now, so although I’m by no means an expert, I think I already understand a lot about everything related to working with graphics.
The idea of this series of posts has long been hovering somewhere on the periphery of my mind, and re-emerged after reading an interesting article with an analysis of the latest Deus Ex .
It seems to me that the graphics, and especially the complexity that it reaches in modern games - this is an interesting topic. Very few people are curious to immerse themselves deeply in all its details, but I believe that there are topics that are interesting to everyone. I think that most of the people who played the games were curious how these or other effects are obtained, or with what technology they managed to create such amazing graphics in some new game.
There are many components needed to create even a simple 3D game, not to mention a project like Watch Dogs.
I only have a general idea of what needs to be covered in this article, but it will depend on which topics are of interest. However, the basic idea is to create a general description of what is going on inside a modern game without scaring away any of the readers - I will assume that you do not have knowledge of mathematics and programming. If you know the difference between the CPU and the graphics card, and distinguish the RAM from the hard disk, then this will be quite enough, and I will explain the rest.
This article will be developed in accordance with its video passage Chip & Ironicus's Let's Play of Watch Dogs , to structure the presentation a bit. The game is well-known for its graphics (and opinions about it can be completely opposite), and there are many aspects to it that can be considered with some examples. Maybe I will talk about other games.
I will begin by explaining the basics, which are almost the same for each game, but I will also consider some of the techniques and visual effects of Watch Dogs.
I will use a tool called RenderDoc , which I wrote in my spare time. It is used to debug problems with graphics - the tool allows you to decompose a frame of graphics into parts, and thanks to this we will see how it comes together.
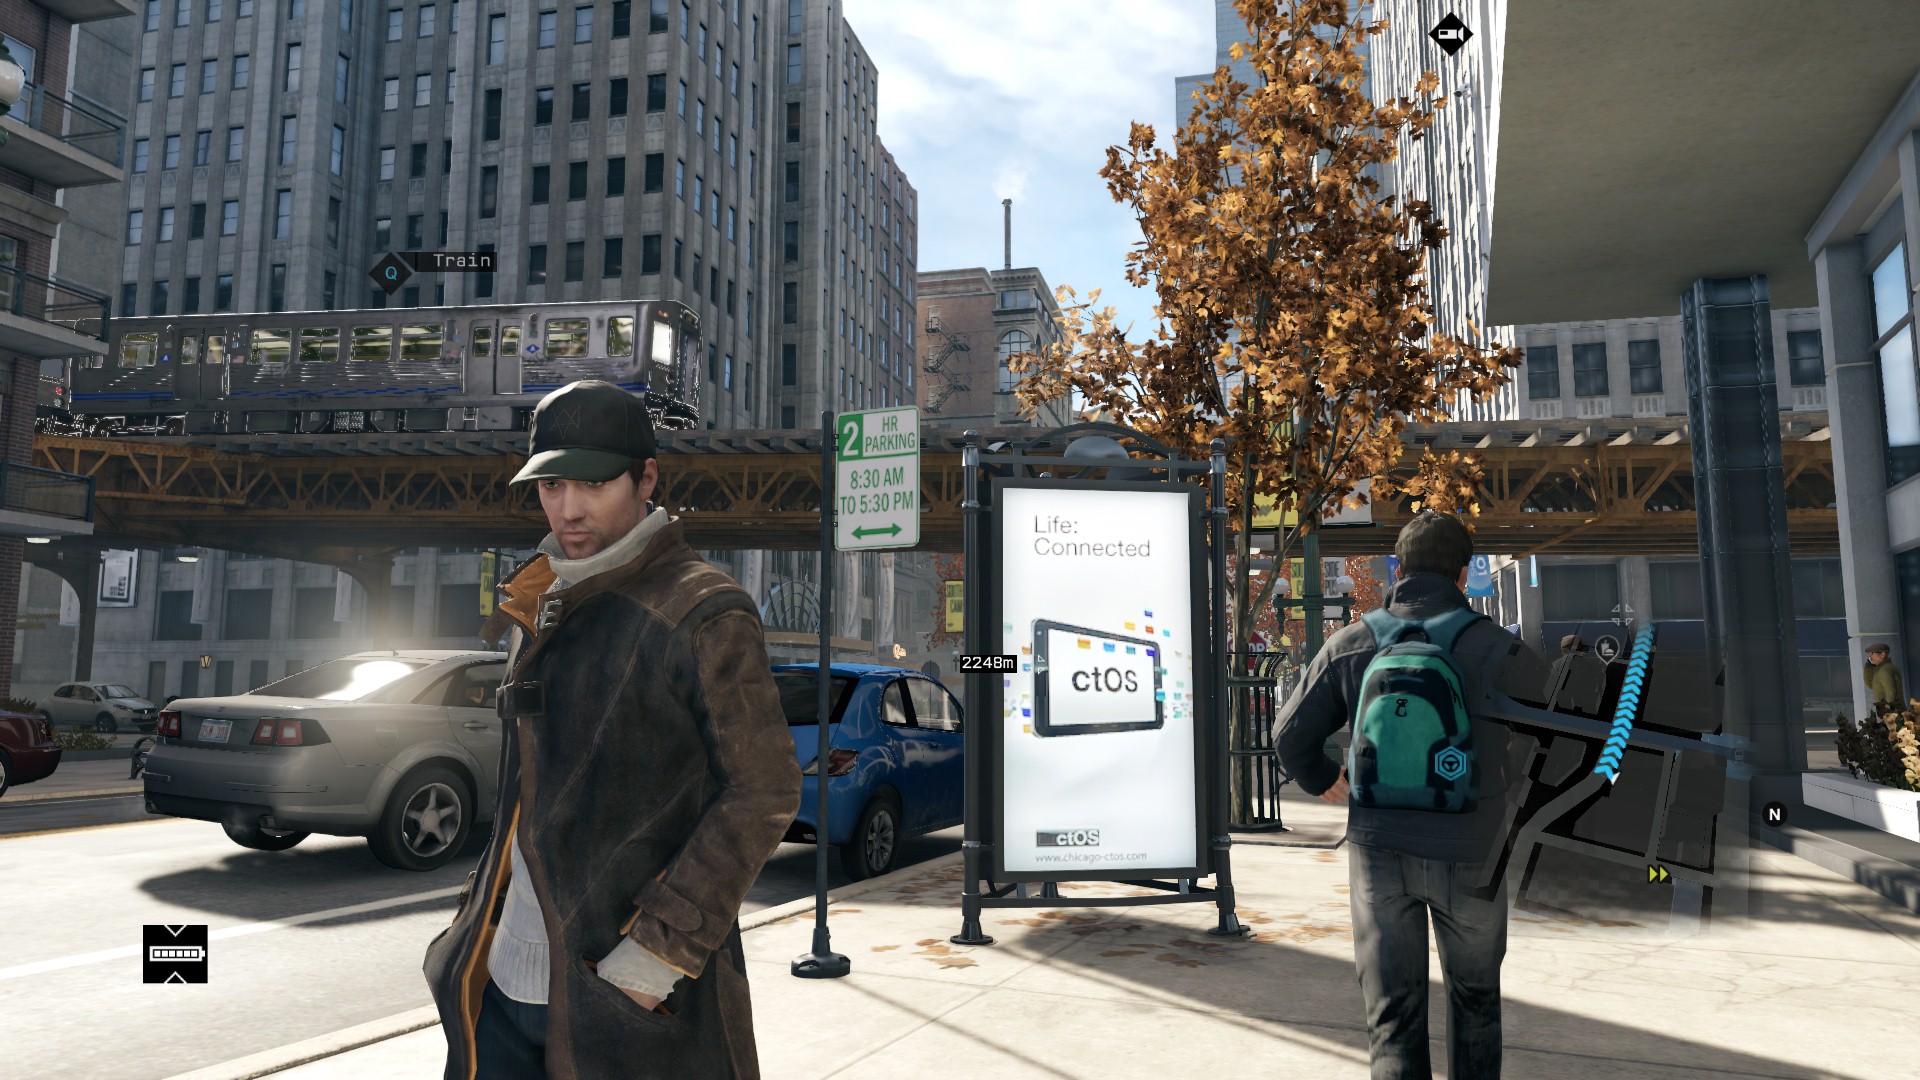
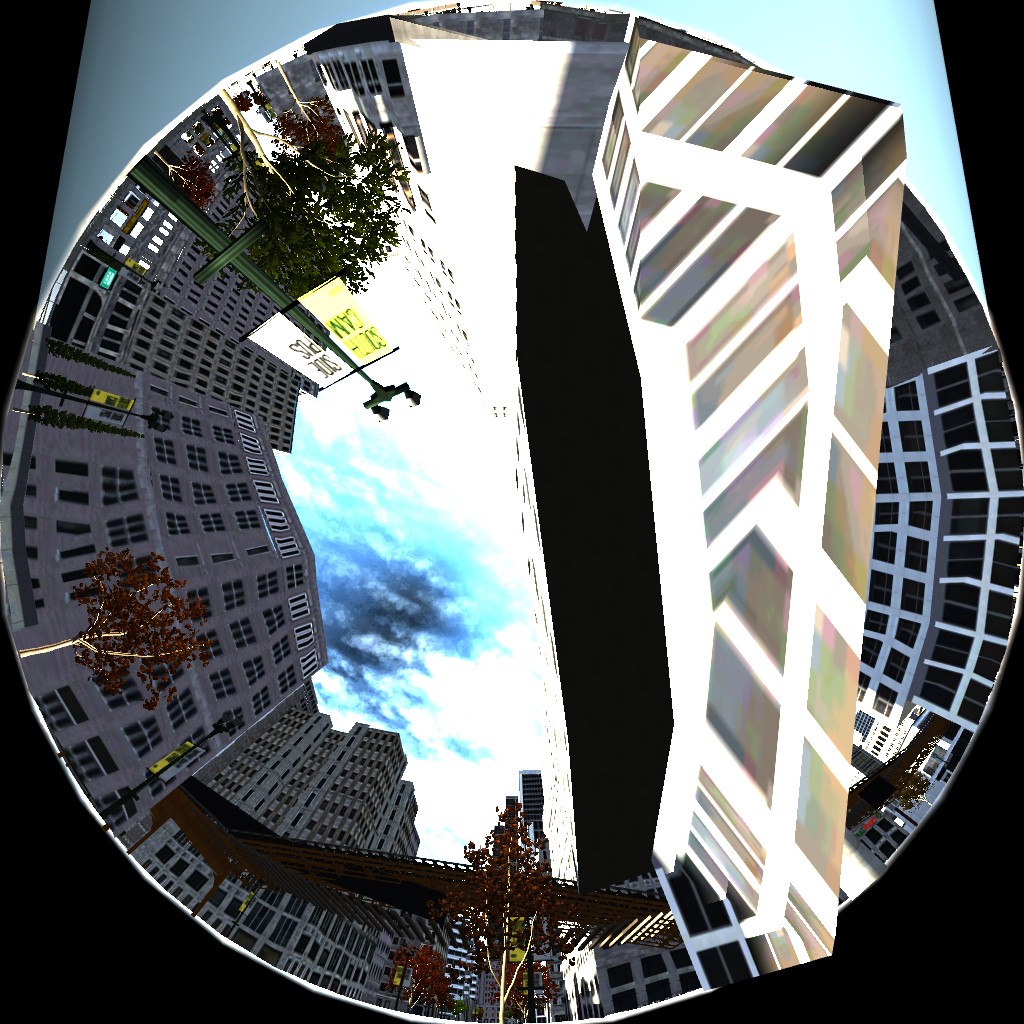
This animation shows a part of a gradually created frame in the process of drawing it with a graphic card.
Most people know that computer graphics (and any other video graphics) consist of a series of still frames, each of which is displayed for a certain fraction of a second. The cinema traditionally used 24 frames per second (frames per second, FPS), in television the frequency is about the same, about 24-30 frames. In games, FPS can be changeable, because a lot of work is done in every frame. A drop in frequency below 30 is undesirable, although it happens quite often. Usually the upper limit for console games is 60 FPS. Developers tend to realize the frequency of 30 or 60, which depends on the goals of the game. On a PC, with a high frame rate display, you can achieve 90, 120, or even higher. The reason for these particular numbers is vertical synchronization (vsync), which we describe below.
Mentally, we can look at this task from the opposite side - instead of looking at how high the FPS frequency is, we look at how short the time allocated for each frame is. If we want the game to work with a frequency of 30 FPS, then we have only 33 milliseconds to perform all the work necessary for a frame. At 60 FPS, the time is two times less — about 17 milliseconds. Even for a computer, such a period of time is not very large, given the amount of work that needs to be done. To give you an idea of the magnitudes, then according to approximate calculations, the bullet moves about 1 meter per millisecond.
Basically, we'll talk about the PC, because this platform is open, and I can't talk about consoles without fear of violating non-disclosure agreements (NDA). Anyway, basically, I will talk about what is not very different on consoles, and if something will still be different, then I will emphasize it. As for mobile platforms, most of the differences between PC hardware / consoles and mobile hardware are not related to the topic of my article.
Honestly, I put this picture here so that you understand that the article will not only have text.
It is this task that interests us - we will not worry about how all the AI calculations are performed, or how a physical simulation is performed to move objects. The boundaries of the discipline called “graphics programming” are rather blurred, but I will say that graphics programming begins when we have all the information necessary for building a frame: we know what happens, all the textures and models are in memory (not on disk ), the animations are already animated, the physics is calculated, and it remains for us to render the finished frame for display on the screen.
I’ll add that I’ll look at a 3D game with fairly traditional rendering, like Watch Dogs - many of the basic principles apply to 2D games, but it’s a little harder to demonstrate concepts on them. I will also explain (especially to programmers of graphics) that I primarily strive for understanding, therefore, I will probably use rather dubious explanations if they allow me to achieve my goal.
Part 2. What is the frame
Most of the time, we will consider only one frame and talk about the building blocks that the game uses to create the finished frame. Also in this part will be some new beautiful pictures.
There are several ways in which a frame is assembled from building blocks. The finished image that the player sees is not drawn instantly. It was immediately drawn many years ago, but in modern graphics engines almost always some kind of pre-processing is used. Before displaying the finished frame on the screen, the graphics engine renders a number of intermediate images of various types that help in the calculation of the final image.
These images are highly dependent on the type of engine and on the techniques that the graphics programmer needs to apply. For example, if he wants the sunlight to create the correct shadows, then one type of image is required for the shadows. Also, he may need the right reflections on the controlled player car, and for this, too, need another image with reflections.
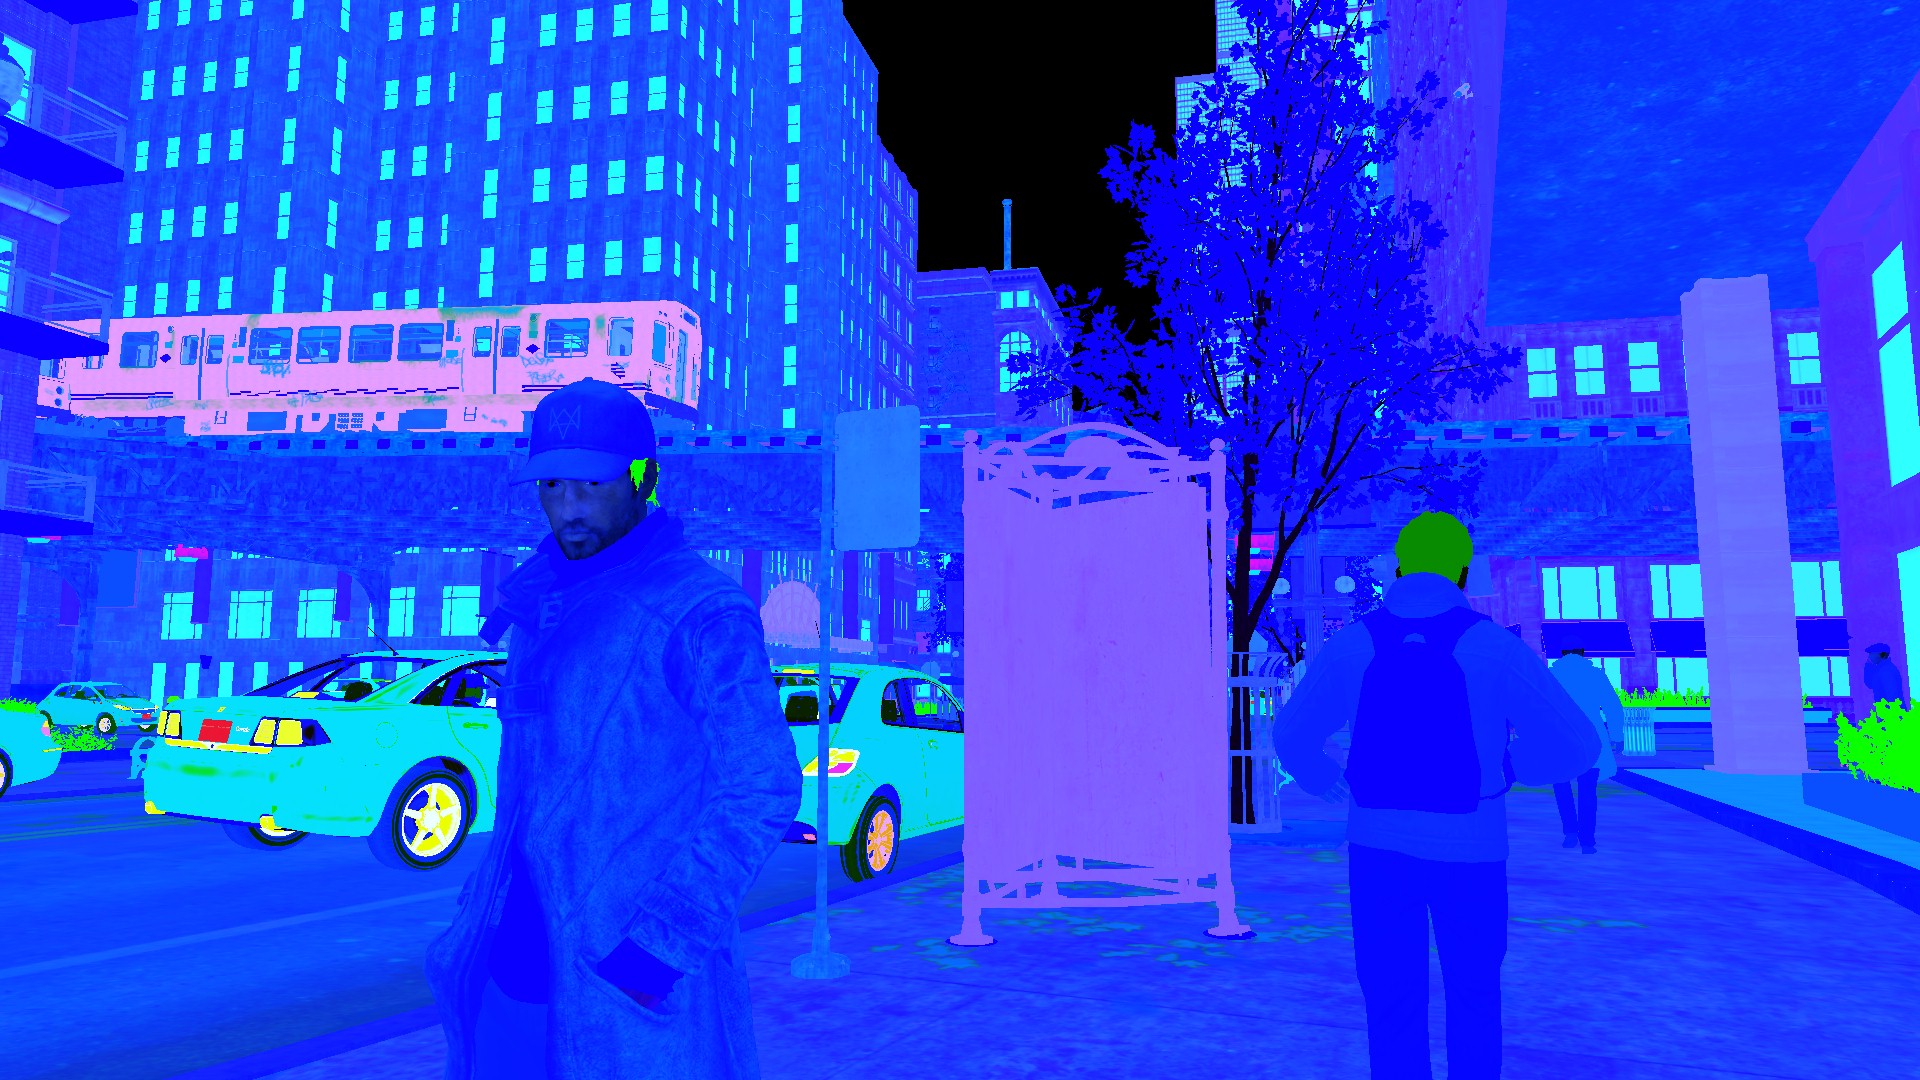
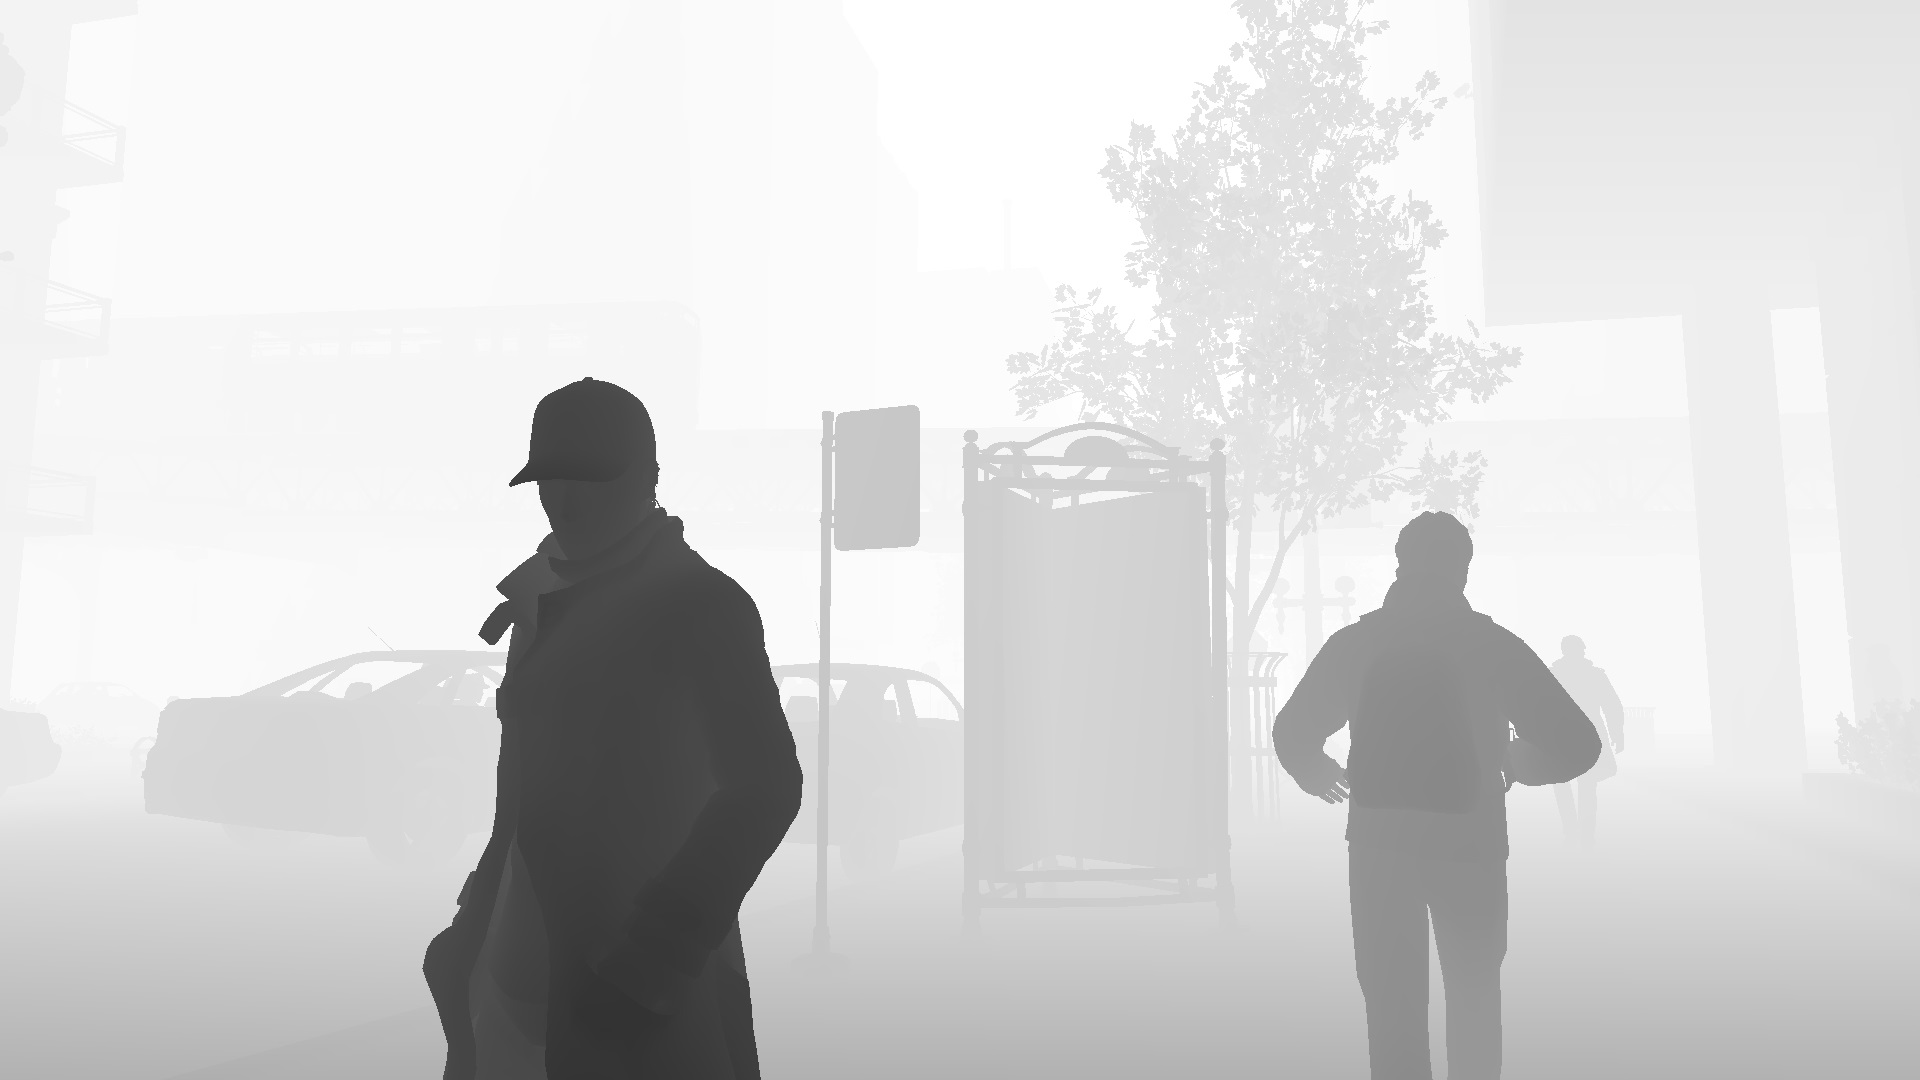
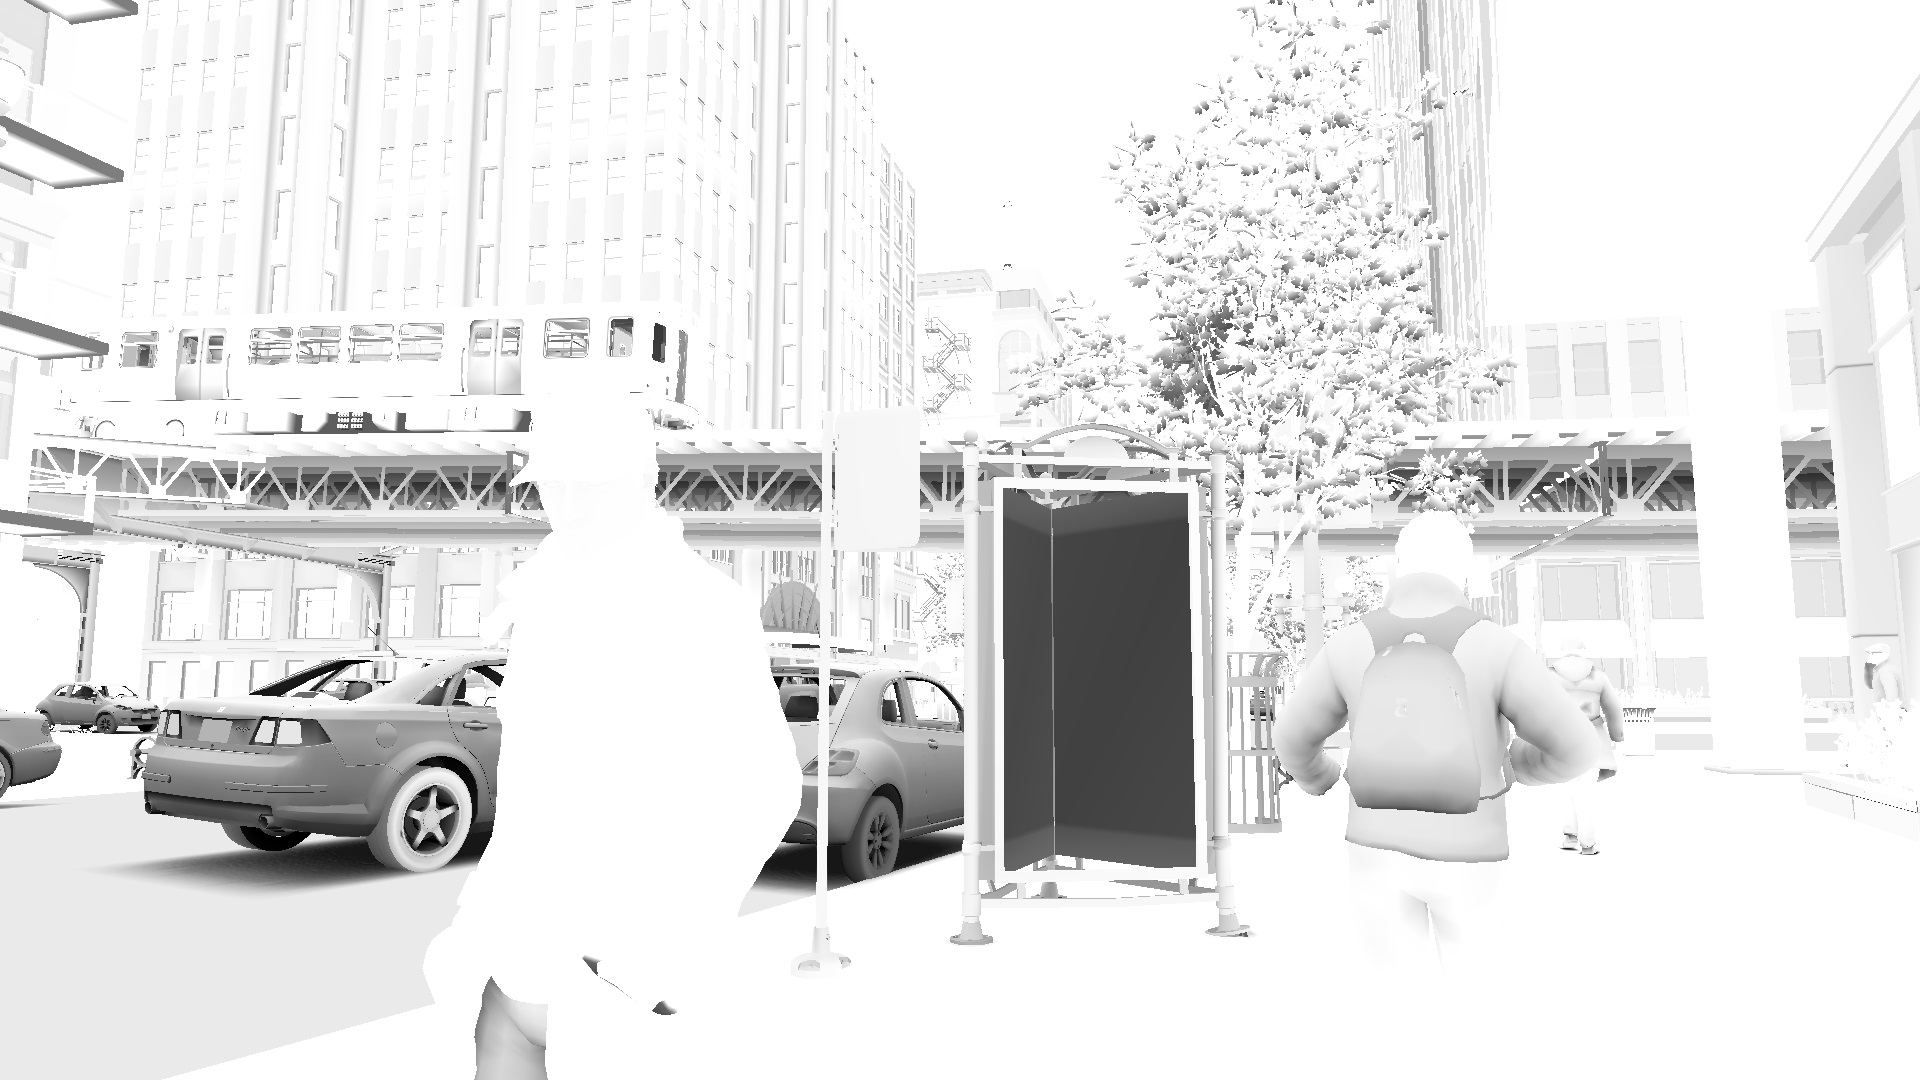
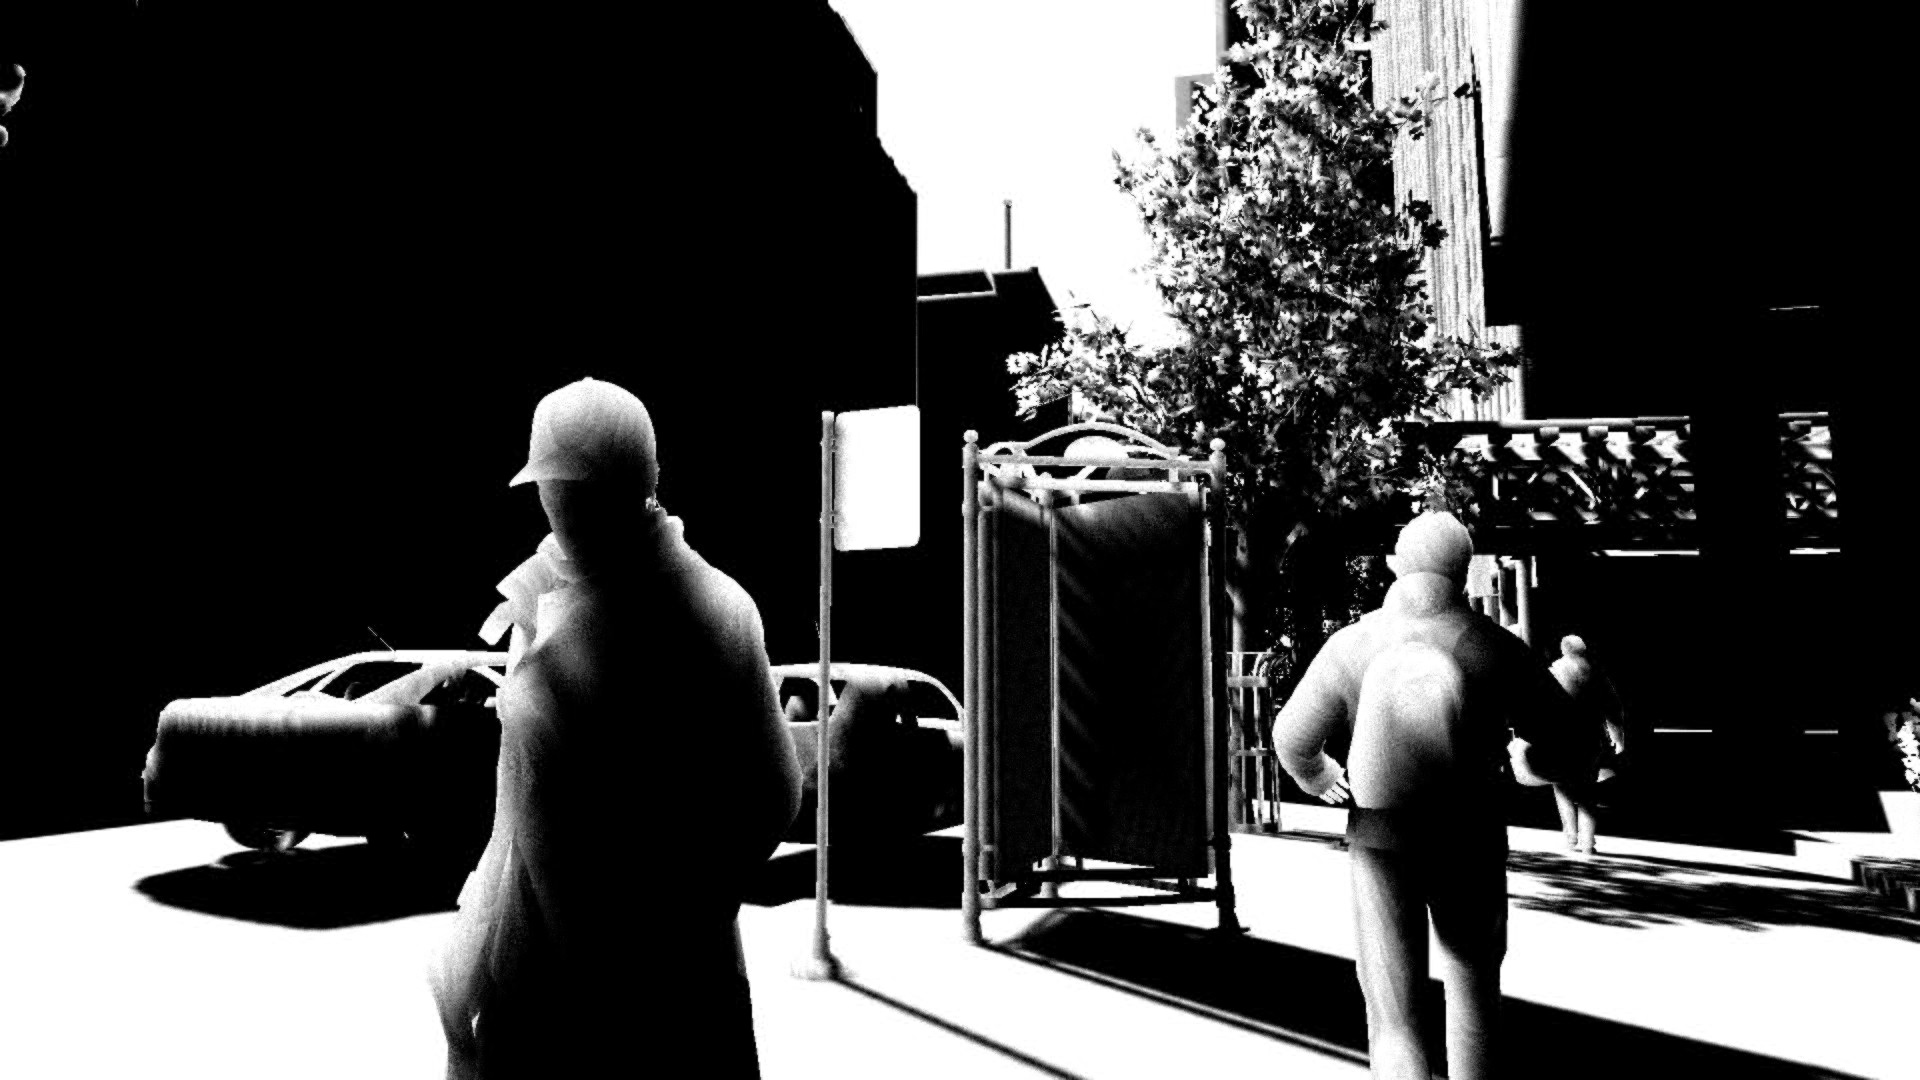
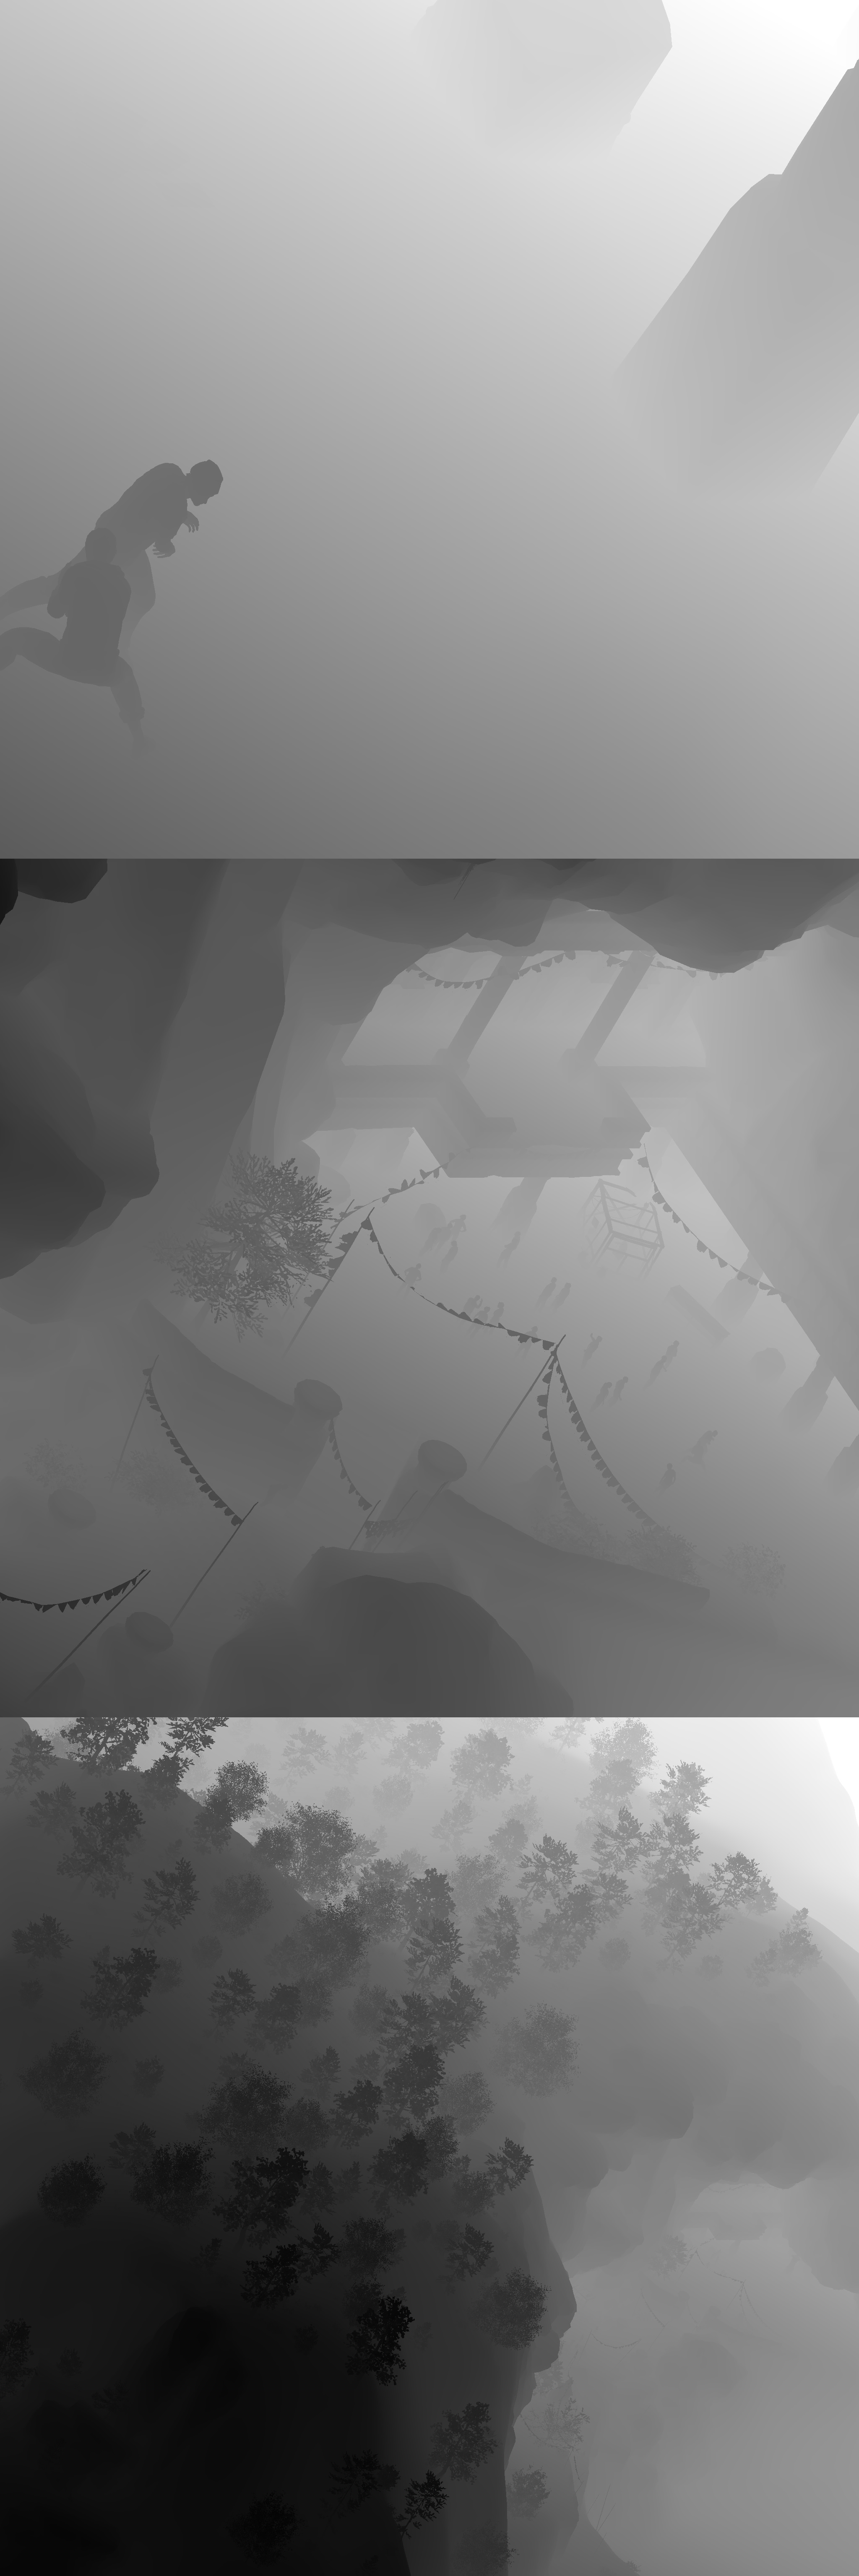
Various examples of intermediate images used in the construction of the frame Watch Dogs.
In this article I will not consider each of the images used in the frame of Watch Dogs, but I will tell only about the main ones so that you can learn something. This is an area in which graphics are constantly being researched and new techniques are emerging. Innovations also arise at smaller levels, but when marketing tells you about some kind of new graphical function, then it is usually these improvements that are meant.
Each of these intermediate images is also built from even smaller fragments. Each object in the scene or a group of related objects is created separately as a textured model . When designing a game, artists build these models in a 3D editor and create all the necessary resources for them. Then these models are placed in the world with the help of a level editor and a virtual city is gradually built from them.
Probably, this is known to almost everyone, and if during the last 20 years you have watched the development of real-time 3D graphics, you know how much more complex the models have become today. At the very first stages of the formation of graphics, the imposition of textures was a costly process, and, if possible, they got rid of it, painting objects with the same color. Textures were left only for elements such as eyes or faces that really needed detail.
The 3D-model consists entirely of interrelated triangles that form the shape of the object. Each triangle has three points, called vertices, and since the triangles are connected to each other, the vertices can be common to several triangles. We'll come back to this later, because vertices and triangles are important enough. It is also worth remembering that some objects, such as characters or trees, must be animated before rendering. The model is created in the standard static form, and the animations are applied in each frame. We will return to this too.
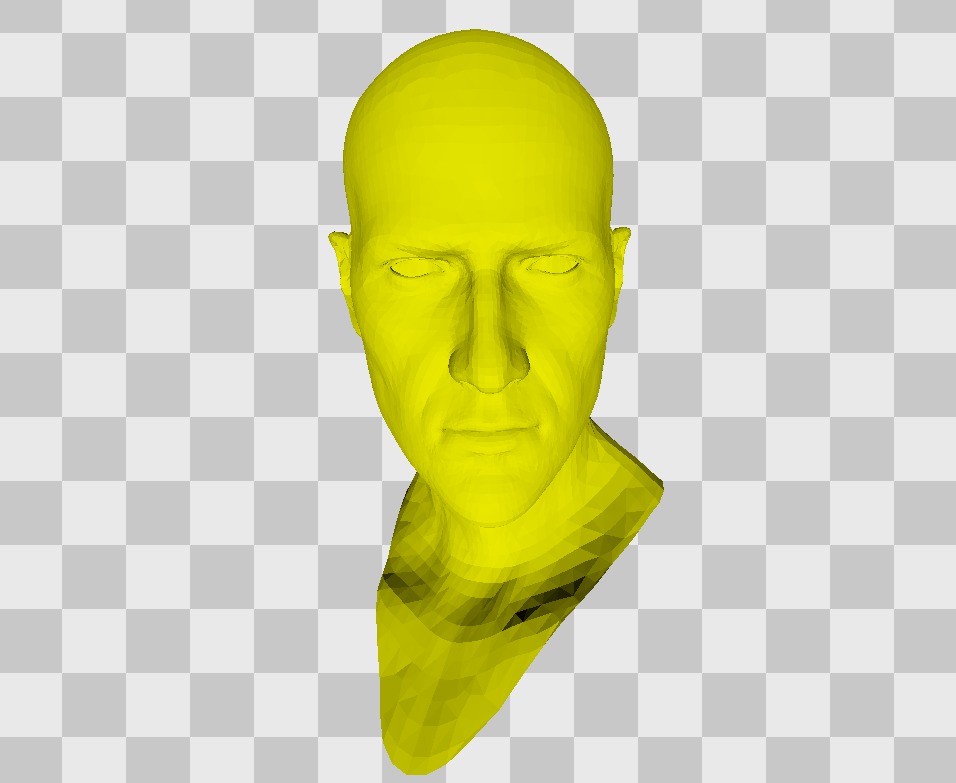
This is a 3D model of Aiden Pierce's head after animating. Triangles are visible because they are drawn flat and not smoothed, as is usually the case.
To add more details to a 3D model, textures are superimposed. Textures are ordinary flat image files, usually square or with simple dimensions, for example, rectangles with a 2: 1 ratio. Textures are superimposed on a 3D model using a more complex process, which I will discuss in more detail below, but conceptually it is similar to the process of wrapping a gift. Instead of a simple repeating pattern of a paper wrapper, the image exactly matches the size of the wrapper. If you have seen paper models for assembly with glue, the principle here is the same.
This analogy is more appropriate than one might think, because these textures are usually created by “unfolding” a 3D model into a flat blank, as is done with a paper model, after which a texture is drawn on top of it. This deployment is often done automatically, but in the case of particularly complex objects it can be done manually.

This is the texture corresponding to the Aiden Pierce head model shown above. There are parts for the teeth and tongue. Notice that the area above his forehead is not textured because it is permanently closed by Aiden Pierce Legendary Baseball Cap ™.
Note
When deployed, some parts of the object that require more detail increase, while others decrease.
Very often people talk about different “skins” of models, especially in the case of custom characters. Today, what is called a “skin” usually refers to small changes in the model — a new belt or other hat — but this term originally arose because the same model was used, but the texture changed (or “skin” — literally translated as "Skin") to create a character that looks different. Even today, with the help of such textures, you can create a large variety of NPC or objects, which saves time and money - you do not need to create a lot of unique 3D models. Different clothes that Aiden can wear are most often just different textures of the same model.
Here is a brief fragment of the head rotation of the 3D model. Imposed only texture, and nothing more.
In the frame we are examining there are approximately 1700 objects drawn in the part of the main rendering. Some of them will be the same models - objects such as flowers in pots and garbage cans are never actually created separately, they are one model or several models placed in different places. However, the approximate number of objects drawn to complete the frame is close to 4700 - this gives us an idea of how much additional work needs to be done in addition to drawing all these models.
Let's look at another example of an object - a baseball cap worn by Aiden.

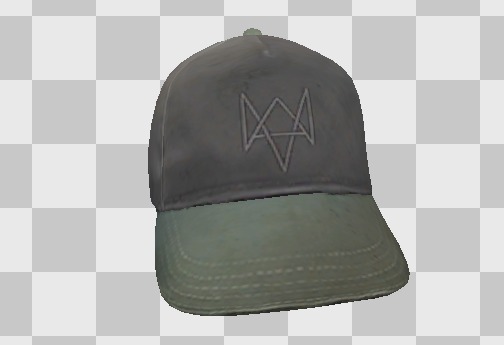
This is a texture and textured model of a baseball cap. It can be seen that the texture is constructed from separate parts that are combined on the model.
Note
The visor and the main part of the baseball cap on the texture does not touch, because the scan can be quite complicated and, if necessary, can be performed in several different parts. Sometimes, texturing a complex shape without visible problems and seams requires considerable skill.
The same principles that we saw in the case of Aiden’s head also apply to the cap. In fact, if we abstract away from the concrete texture and the numbers needed to perform the unfolding, the principle is always the same.
To show what can go wrong during development, and demonstrate how to have fun while programming graphics, we can do a little experiment. Since most textures have a standard square size, and the method of wrapping and unfolding textures on the model is also the same, then why not play with them a little? What happens if we apply Aiden's head texture to a baseball cap model?
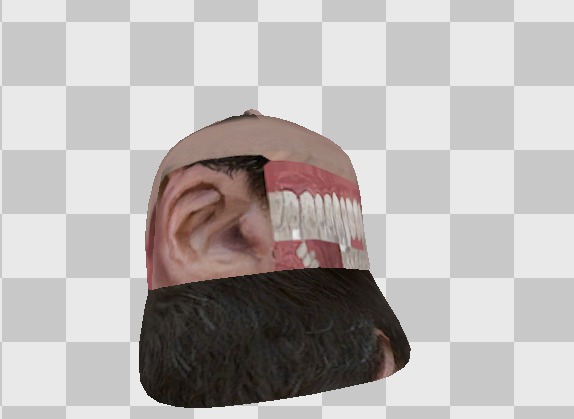
Already not very much like Aiden Pierce Legendary Baseball Cap.
Where there was a logo on the baseball cap texture, ear and teeth are located on the head texture. Where there was a visor, only hair is on the texture of the head. The overlay is made exactly the same, but a different texture is used. Of course, this example will be a mistake in the game, but think about what you can do if you animate a texture or make it flicker - in games such things are used for various effects that you can now notice. In particular, the game Saint's Row 4 uses a similar for the special effects of "simulation".
It will also be useful to reflect on the consequences of this - the games very carefully combine pairs of models and textures, that is, the most unique models should match their own unique textures.
Of course, this rule is not absolute - in some cases, to save space, texture is a standard repeating pattern that can be used for many objects. Associated sets of objects — for example, newsstands — can use the same texture for different newspapers, with each newspaper occupying a small portion of the texture.
However, this means that to build the final image, you must have all the building blocks, that is, as a result, you can get a lot of mandatory models and textures. In the next part we will talk about why some aspects, such as reflections, are very difficult to implement correctly. I will also talk about how games use small tricks to save time and resources.
Part 3. What you do not need to draw
Often, graphics programming is the task of balancing a dozen different constraints to achieve the perfect compromise. In the last part, we saw that each time a scene was drawn, it was assembled from a multitude of small building blocks - people, cars, road signs, buildings. Everything on the screen is made up of individual components that need to be drawn. There are several subtle balancing operations that we will look at here.
Above the drawing of the frame work together the CPU and graphics card. The rest of the game is executed in the CPU, so it decides which objects should be drawn in the current frame, where the camera is looking, and which animations are played. A graphics card is a “workhorse” that does all the hard work associated with drawing pixels, which is why it is a separate specialized device.
It turns out that both the CPU and the graphics card have restrictions on the speed or amount of computation, but these are different types of restrictions.
In general, the CPU is more interested in its own part of the work: how many objects do we need to draw everything? How differentAre these objects 100 identical lamps, or 100 bushes / plants / trees? Are these objects animated, moving dynamically, and which of them are static or fixed?
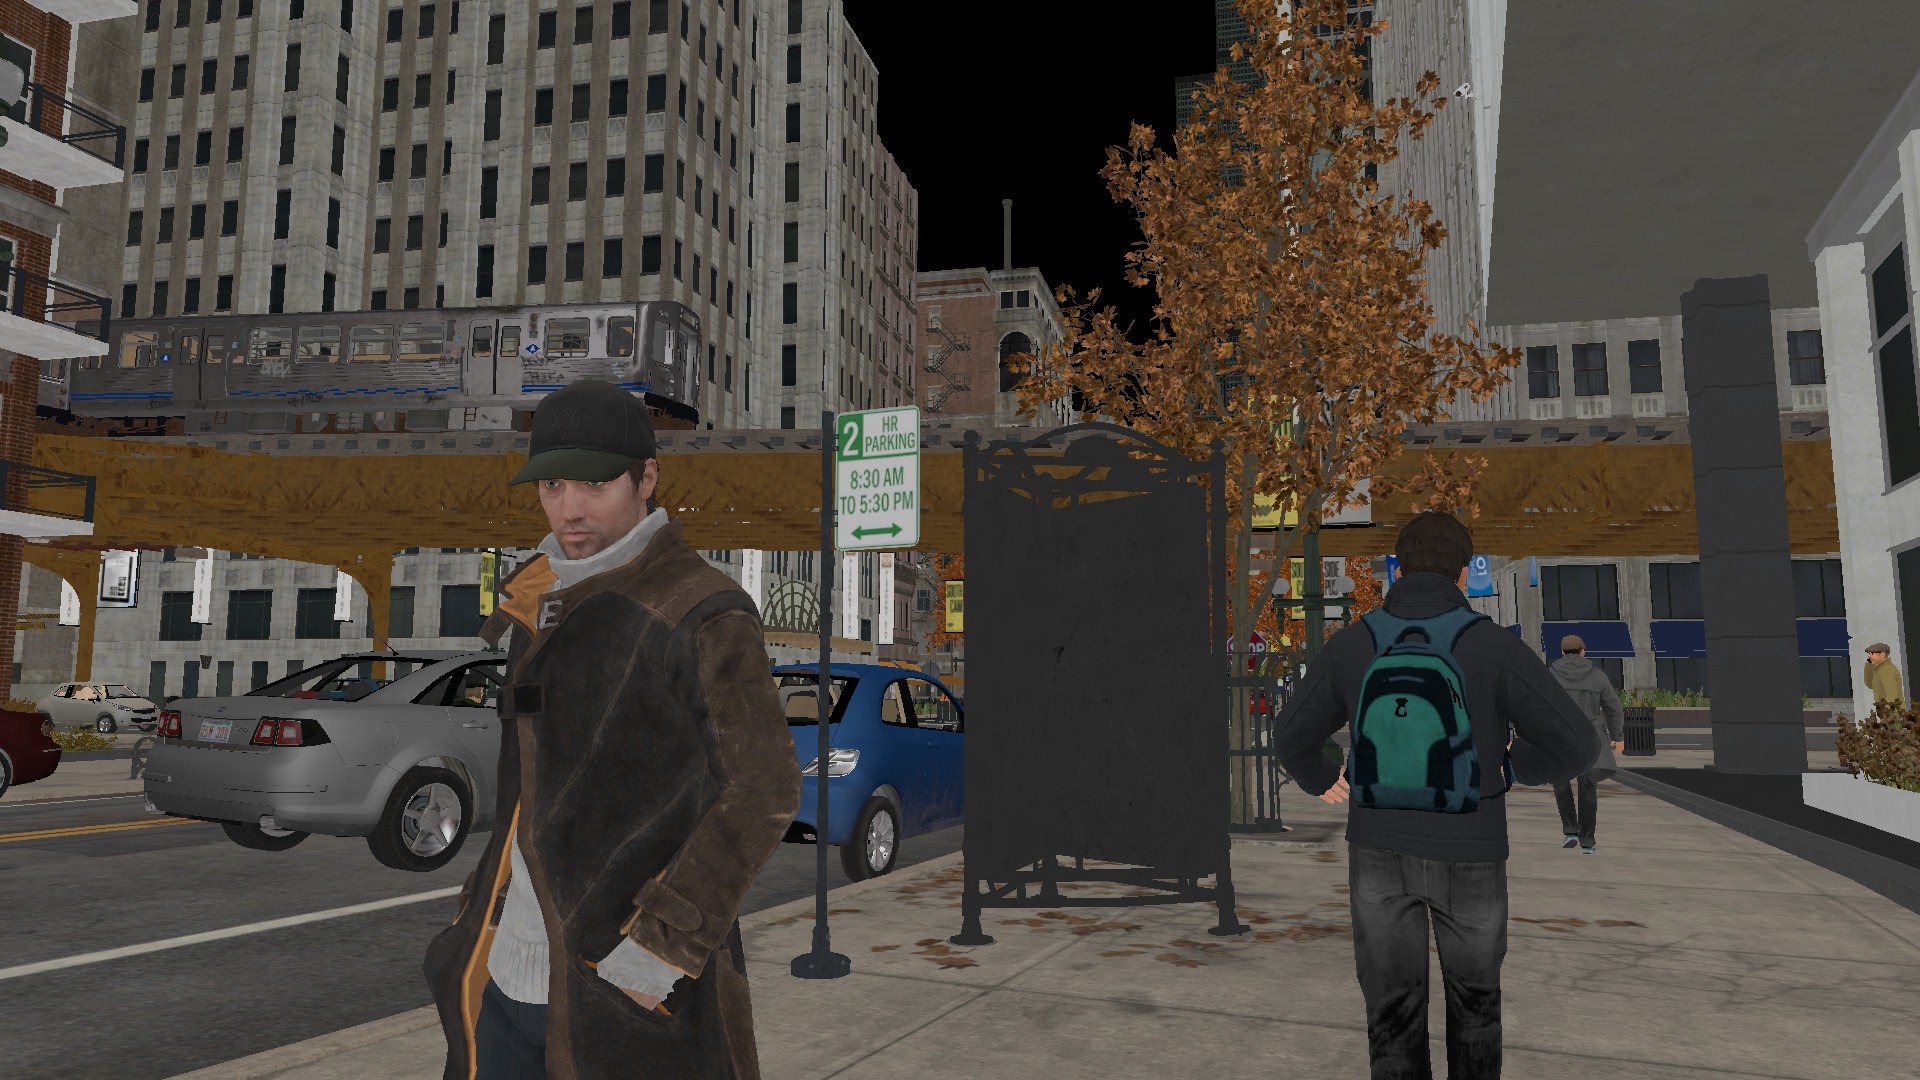
The first thing we do is to reduce the load as much as possible - we draw only what is visible on the screen. This seems obvious, but implementation requires careful work. Do not forget that we are building each frame from scratch, so in each frame we need to look at each object and determine whether we see it or not. This means that in every game there is a black void, following the player everywhere, and when he does not look at objects and people, they cease to exist.
In this animation, we are turning the camera, showing the emptiness behind the player. Attentive viewers will notice that it is not completely empty ...
It is difficult to work out some practical rules in this case, but in general, about 1000 objects can be drawn in the scene without worrying about the lack of space. However, if you need to render 5000 objects, then you should think about the use of tricks. Do not forget that in most games where the player can control the camera, we cannot know at what angle he looks, so you need to save space for maneuver.
It turns out that there are quite a few tricks that make it possible to use the permitted resource almost completely, and they are especially important in games like Watch Dogs. The closer you get to the borders and the more visual quality you can get from the same number of objects, the better the game will look.
Even if you look at what is in front of you in the scene, this does not mean that it is necessary to draw the entire city completely. If there is a huge building to the left or to the right, then everything behind it becomes invisible, so you can not draw it. Similarly, some objects in the distance become very small, so we do not need to worry about drawing tiny plants and shrubs in the distance.
This animation shows that if you walk down the street beyond what we see, then there is nothing in the side streets, but at a great distance there is less detail.
In fact, in this scene, there are still a lot of objects that will end up invisible. In this area there is still much to be investigated and it is necessary to use various complex techniques. You always have to make compromises, but if you can spend a little time, or come up with a very clever way to avoid drawing 100 objects with almost no extra effort, then we can make the scene even more complex or denser than the full.
There is also another small problem. In some cases, we have to draw a building that is barely visible on the screen and goes far beyond its limits. It wastes resources in vain. We can always break these objects into several parts, then each part can be drawn or skipped, that is, there will be less waste. However, now we have increased the total number of objects drawn when they are on the screen, and created the opposite problem!
This example is one of hundreds, but it is easy to explain what decisions you have to make and which experiments to make in order to find an ideal equilibrium point for each game.
Since the action of our frame from Watch Dogs takes place in the city, we can look at it from above to understand approximately what exactly is drawn. In this static picture, it is especially noticeable that Watch Dogs performs work quarterly.
Now we are moving away to show the visible area in front of the camera (sorry for mounting to save time).
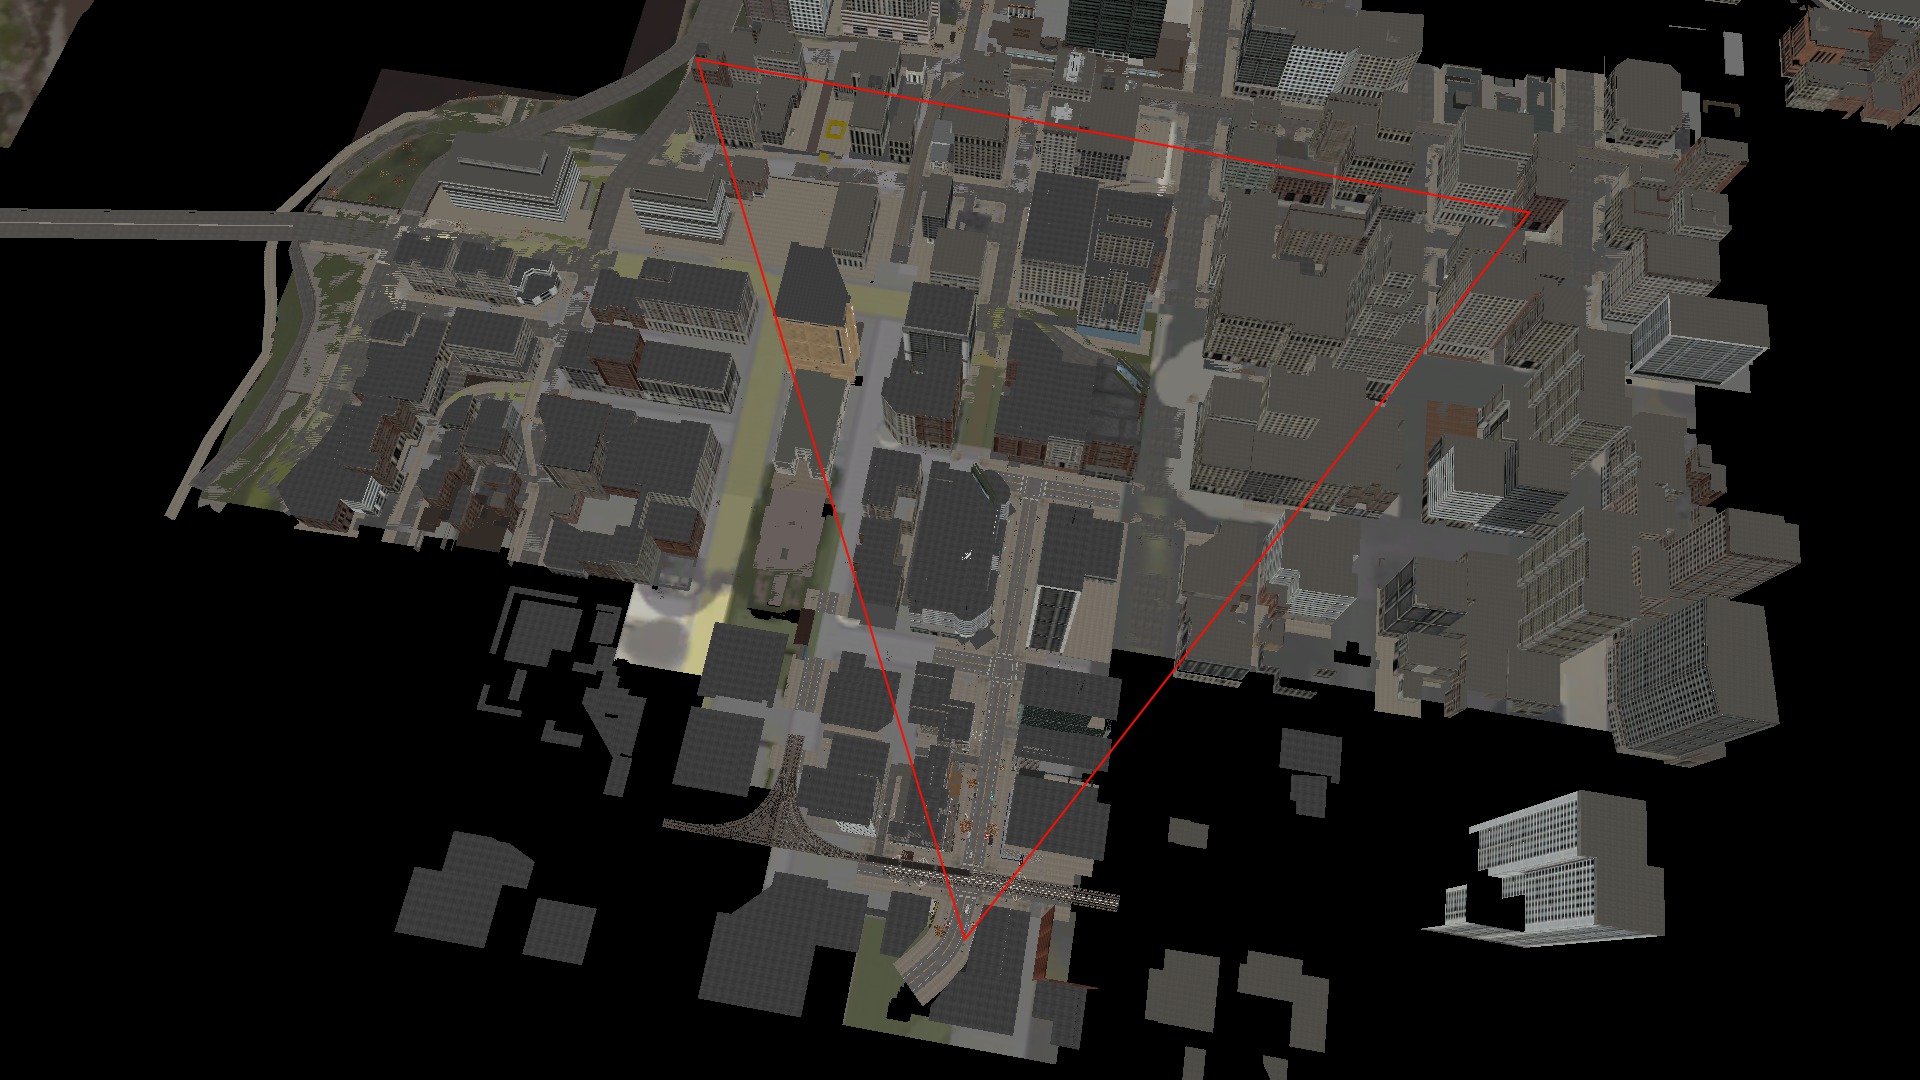
An approximate area of view of the camera is superimposed on the image. The width of this triangle depends on the field of view (Field of View) - sometimes in games this is a configurable option, sometimes a constant value.
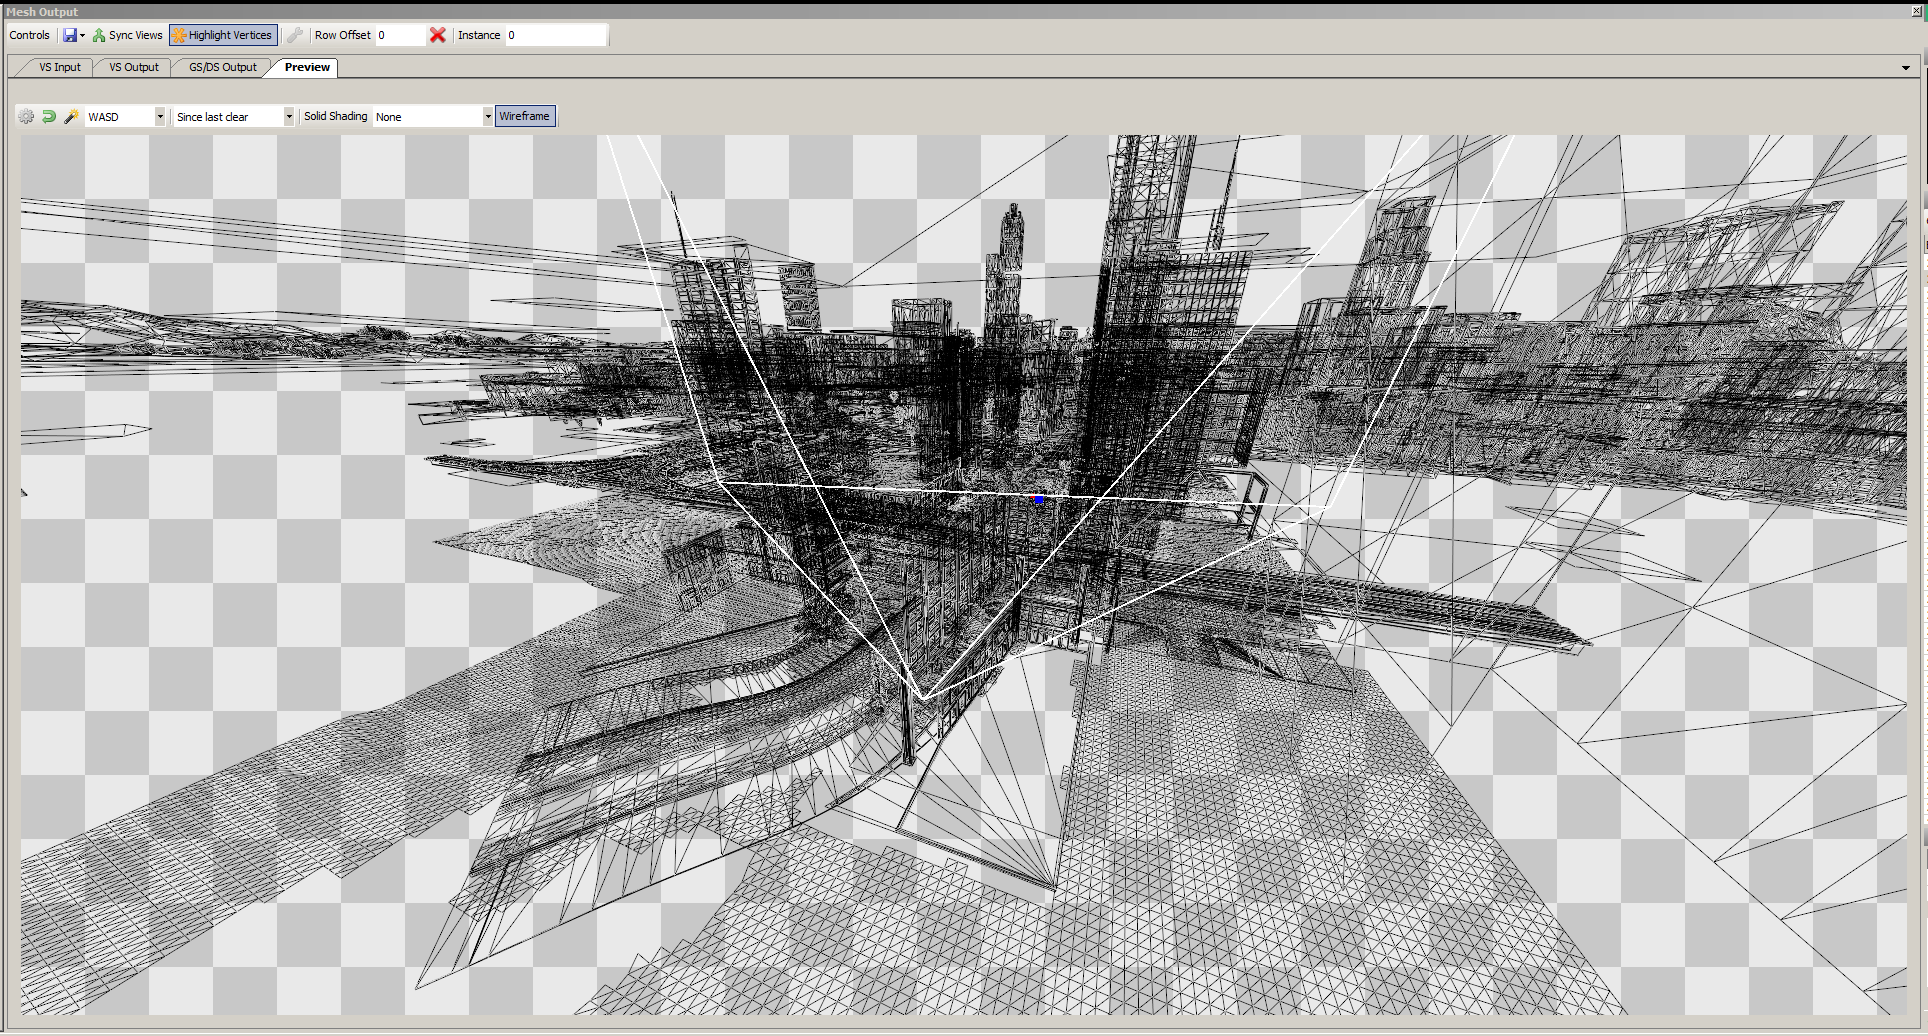
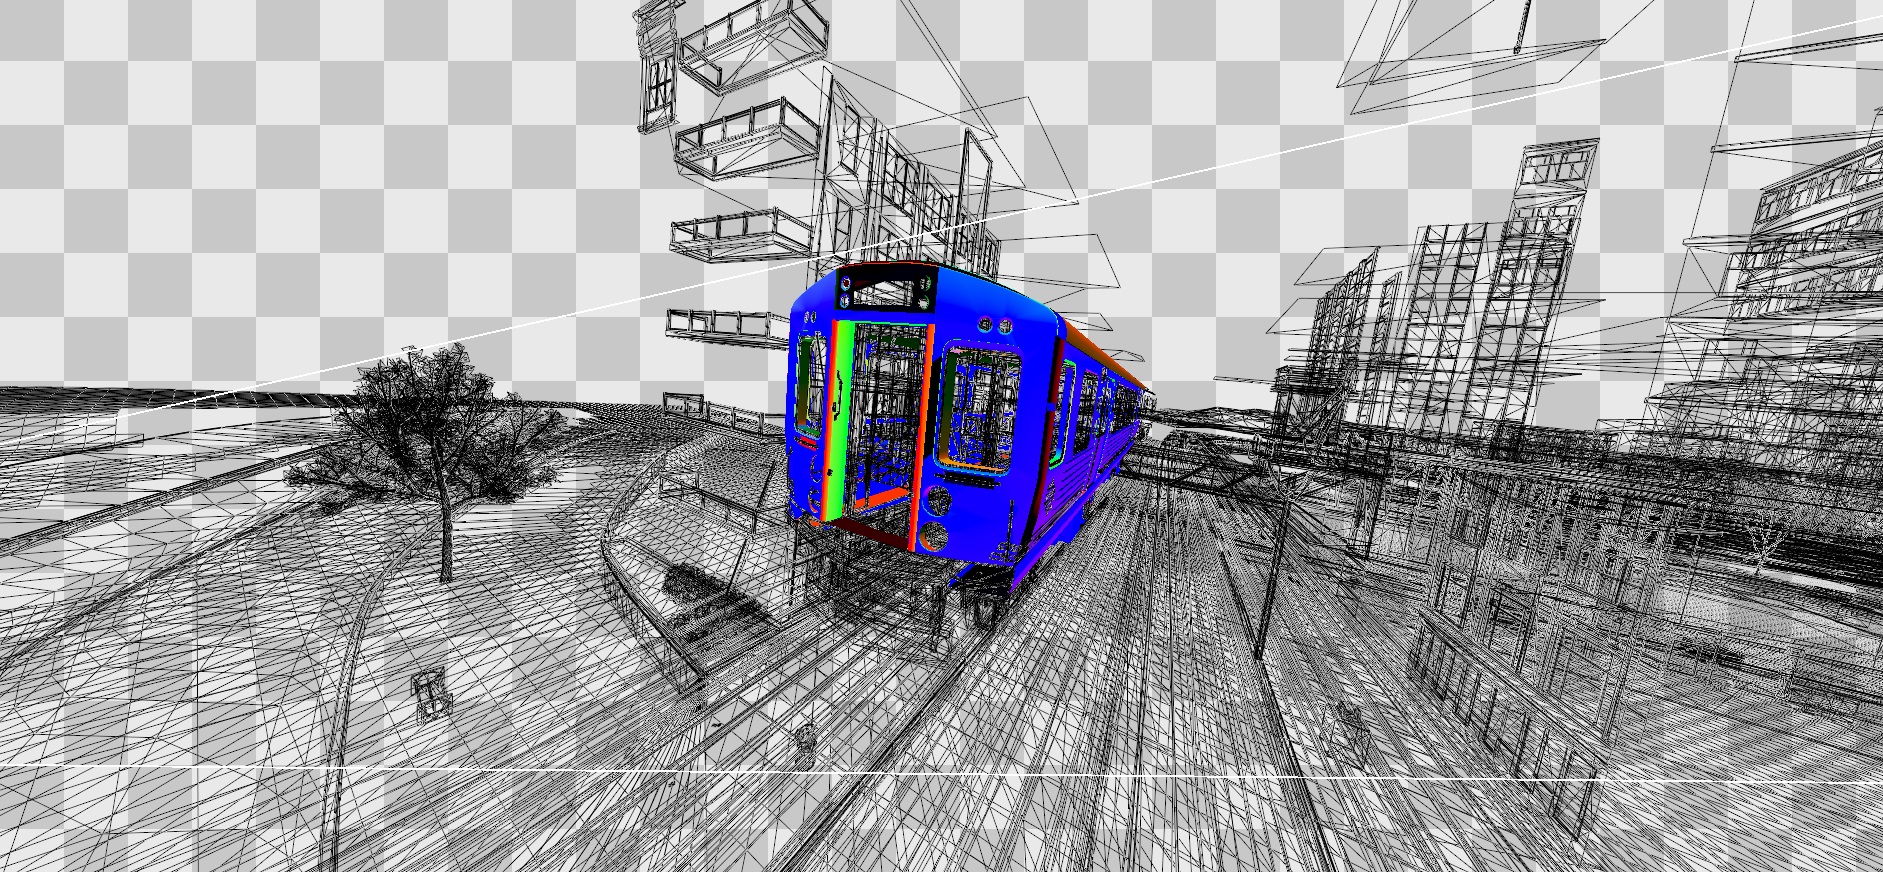
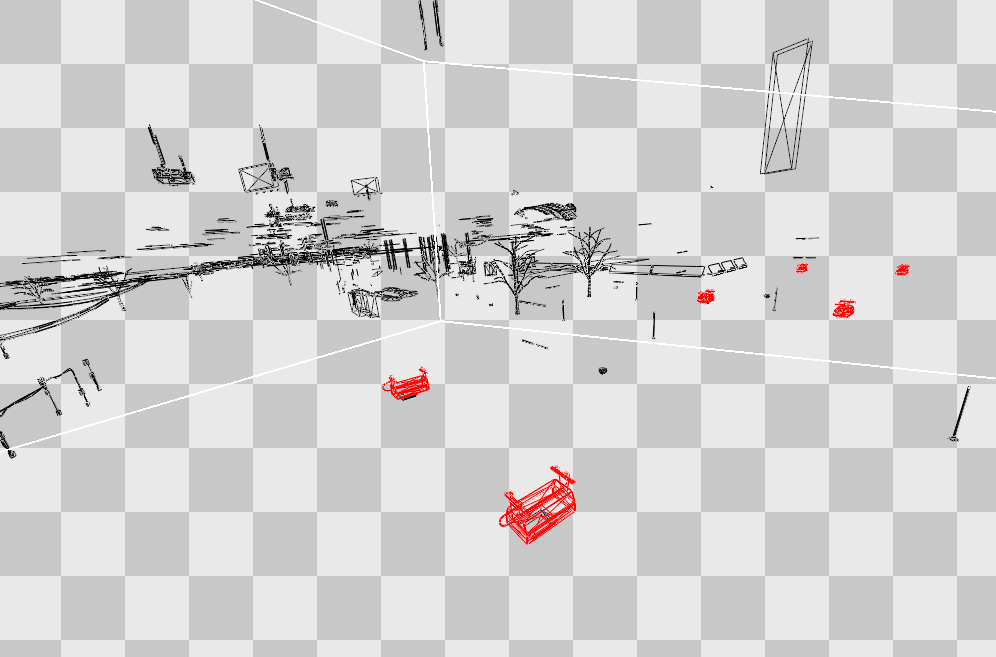
Here is a wireframe scene display, the camera's scope is limited to white.
Some of you have already thought of a little trick that would allow you to bypass the limit on drawing a certain number of objects - why not make objects a very complex combination in just a small area, down to individual leaves? Then drawing 1000 objects will be more than enough.
But here we are faced with a completely different set of constraints - graphics cards have limited performance, and the more complex the object, the longer it will take to render it. That is, even one object, if it is rather complicated, can reduce the frame rate of the game to 20 FPS. Including therefore I said that the limit on the number of objects is rather fuzzy.
The amount of time spent on an object depends on the complexity and detail of the models and textures, as well as on the sophistication of lighting and shadows. That is why games that try to implement more complex or sophisticated graphics tend to use less complex and detailed scenes - balancing the scales in one direction or the other, so you can secure more room for maneuver by sacrificing what is not so important for playing .
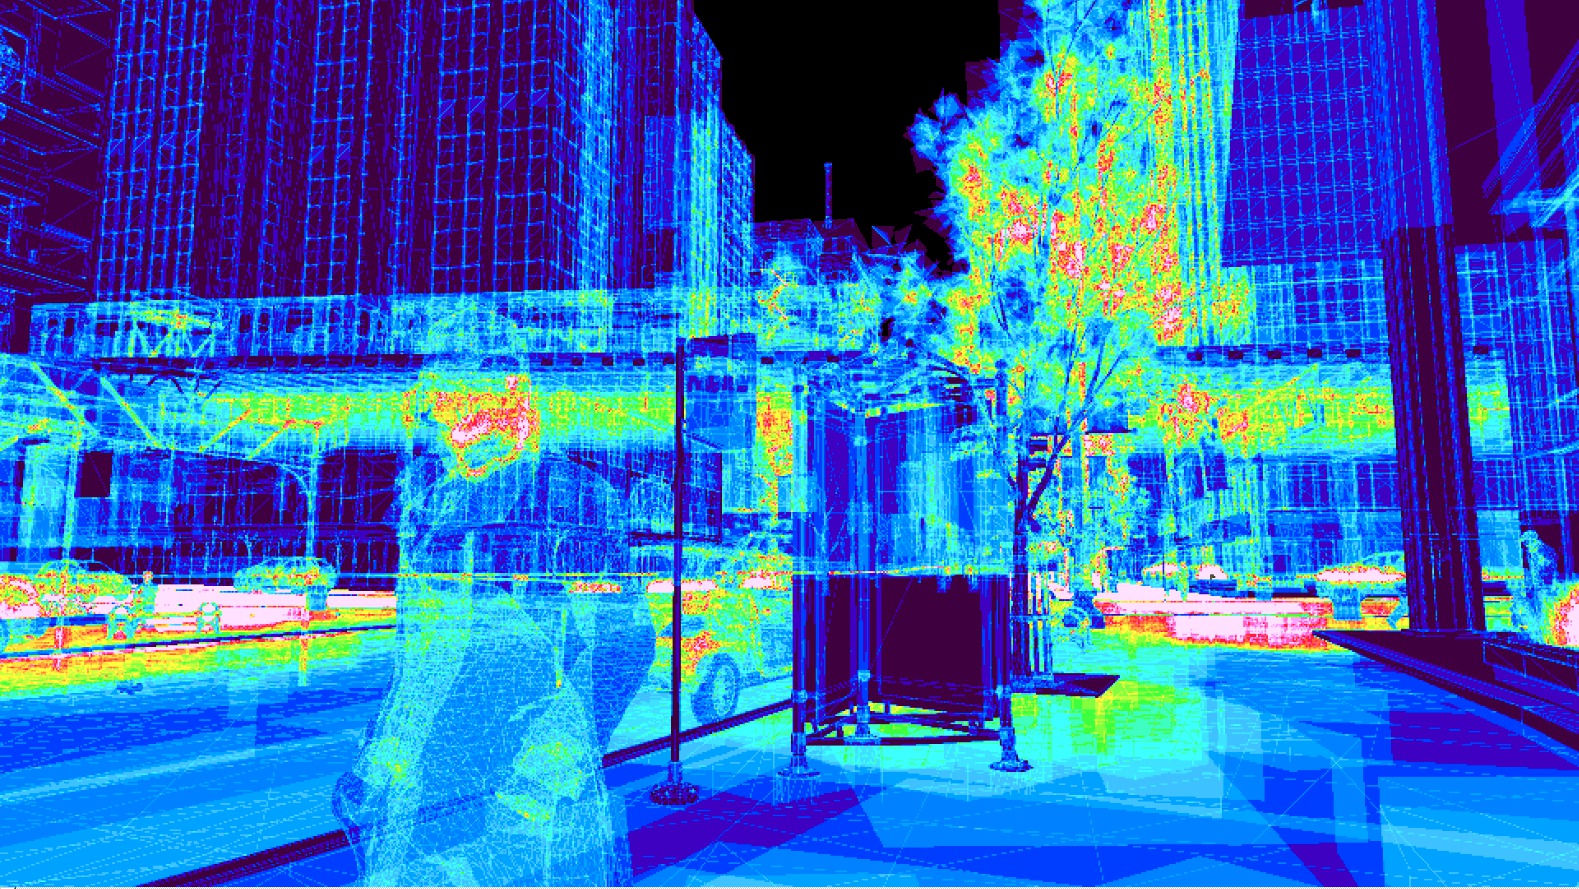
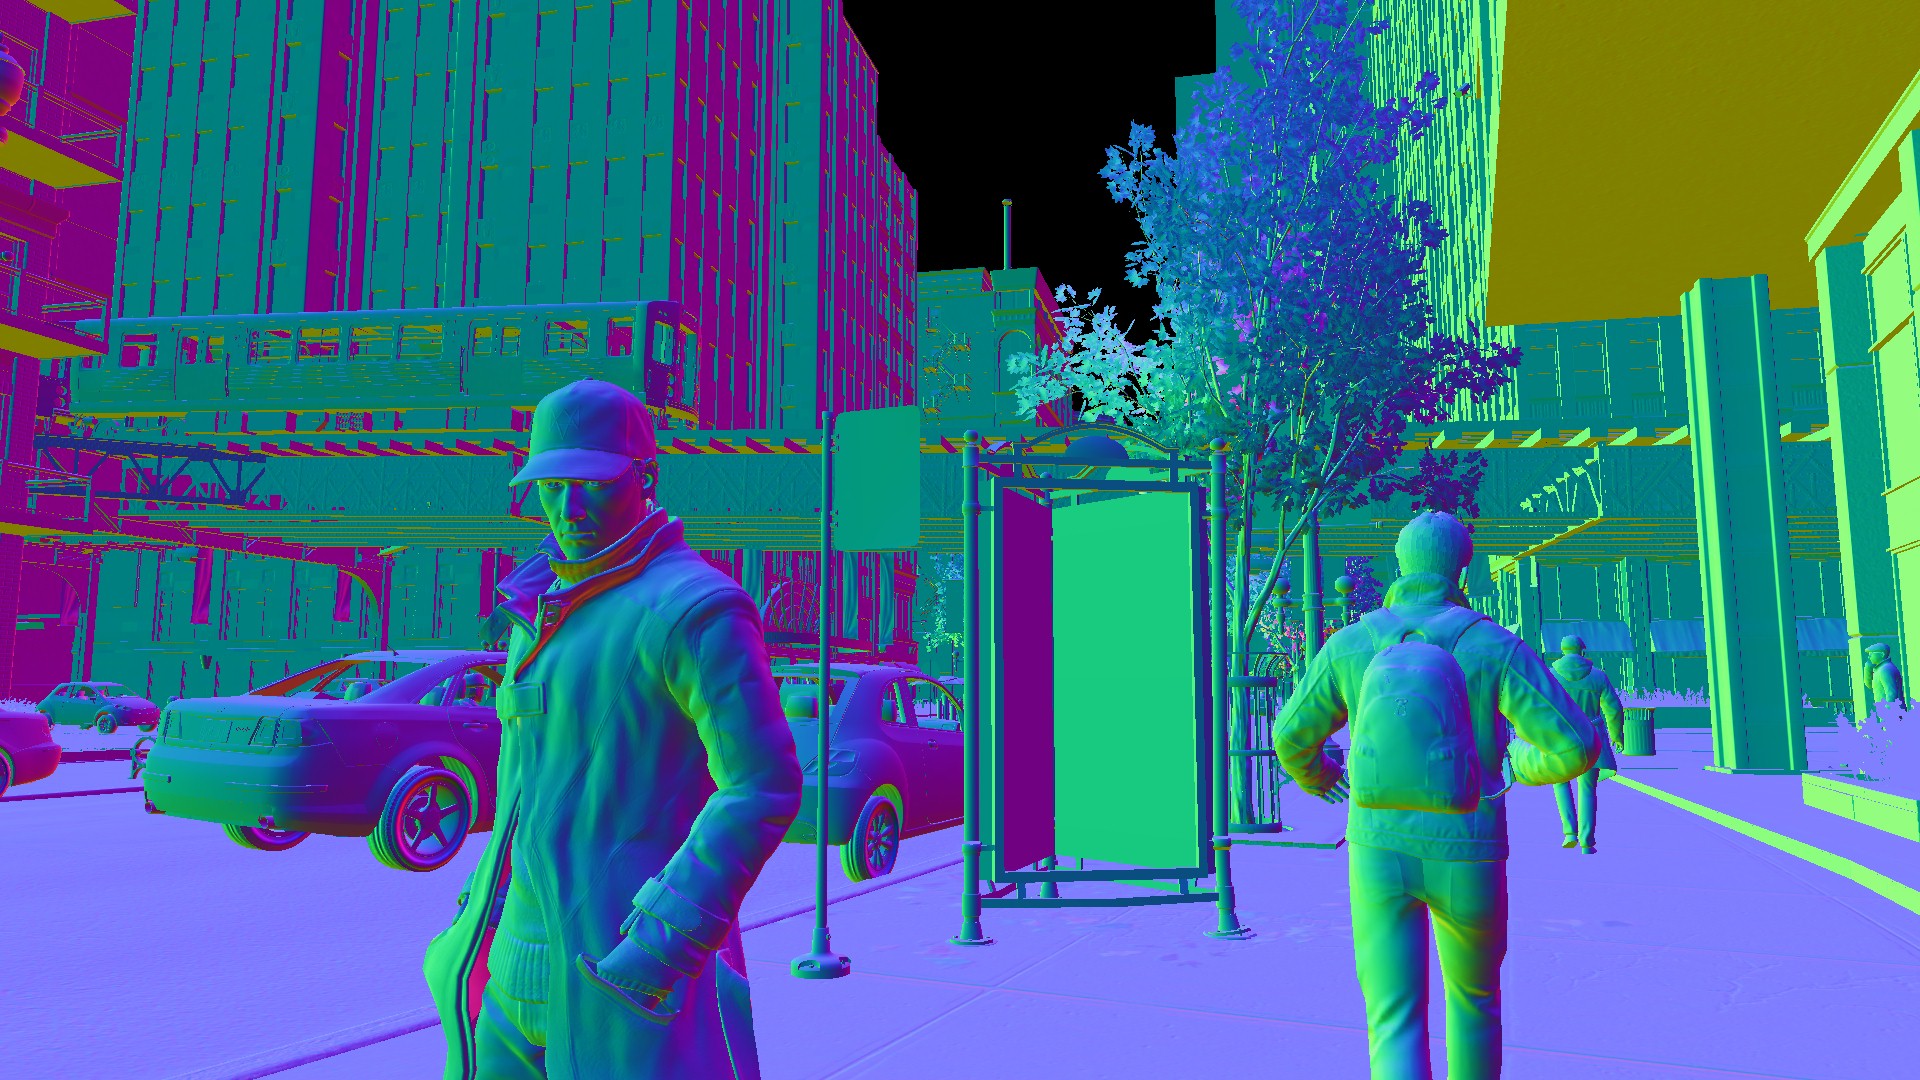
This is a kind of heat map showing which parts of the scene are particularly complex models. Notice how many problems trees and vegetation can cause.
There is another set of techniques called "levels of detail" (level of detail, LOD), which is specifically designed to solve such problems. Similar to the fact that we can optimize the number of objects, cutting off all unnecessary, we can increase the supply of "complexity" by eliminating unnecessary.
One of the techniques is actually well known - this is a change in the resolution of textures. This topic is usually intersected with many others, so I will try to explain it is available.
Textures in games are usually rectangles with sizes equal to the power of two - 512, 1024, 2048, 4096. There are many reasons for this, but one of the advantages of this is that you can take a texture of 1024x1024 and easily create its reduced version of 512x512 .
For reasons that I will discuss below, it is always necessary that the texture has all sorts of smaller versions. That is, a 1024x1024 texture will have smaller versions of 512x512, 256x256, 128x128, 64x64, 32x32, 16x16, 8x8, 4x4, 2x2 and 1x1. However, one of the advantages of this is that if distant objects have a small size on the screen, then laying a 1024x1024 texture on them means wasting resources. We can save by using smaller versions of the same texture.
Similarly, even close objects can be considered not very significant and use smaller textures for them.
Note
Usually, when a player approaches an object, the greatest texture is used, but as most people saw in a particular game, this is not always the case and the textures look too blurry before loading. Usually this happens because textures cannot be loaded from a DVD or hard disk immediately into the memory of a graphics card for rendering. Most often this happens when a player drastically changes his position, for example, during respawn, loading a new level or very fast movement. In all other cases, textures are usually loaded gradually, in the process of moving a player around the world.
You can also apply this simplification process to the models used in the game, although it is much more difficult to do this. Creating simplified versions of complex objects, one can make it so that at a great distance they do not eat off a part of a limited margin of complexity.
Thanks to simplified objects and cropped models, you can save a lot and this approach has to be used in any game like Watch Dogs. But at the same time, it can be a huge waste of resources. It is necessary to make a very thoughtful and balanced decision on how much simplified versions of models will be required. If there are too few of them, then either you will not be able to save too much, or there will be noticeable quality jumps when changing them. If there are too many of them, then you will take up the memory in vain and spend the man-hours needed to create the objects.
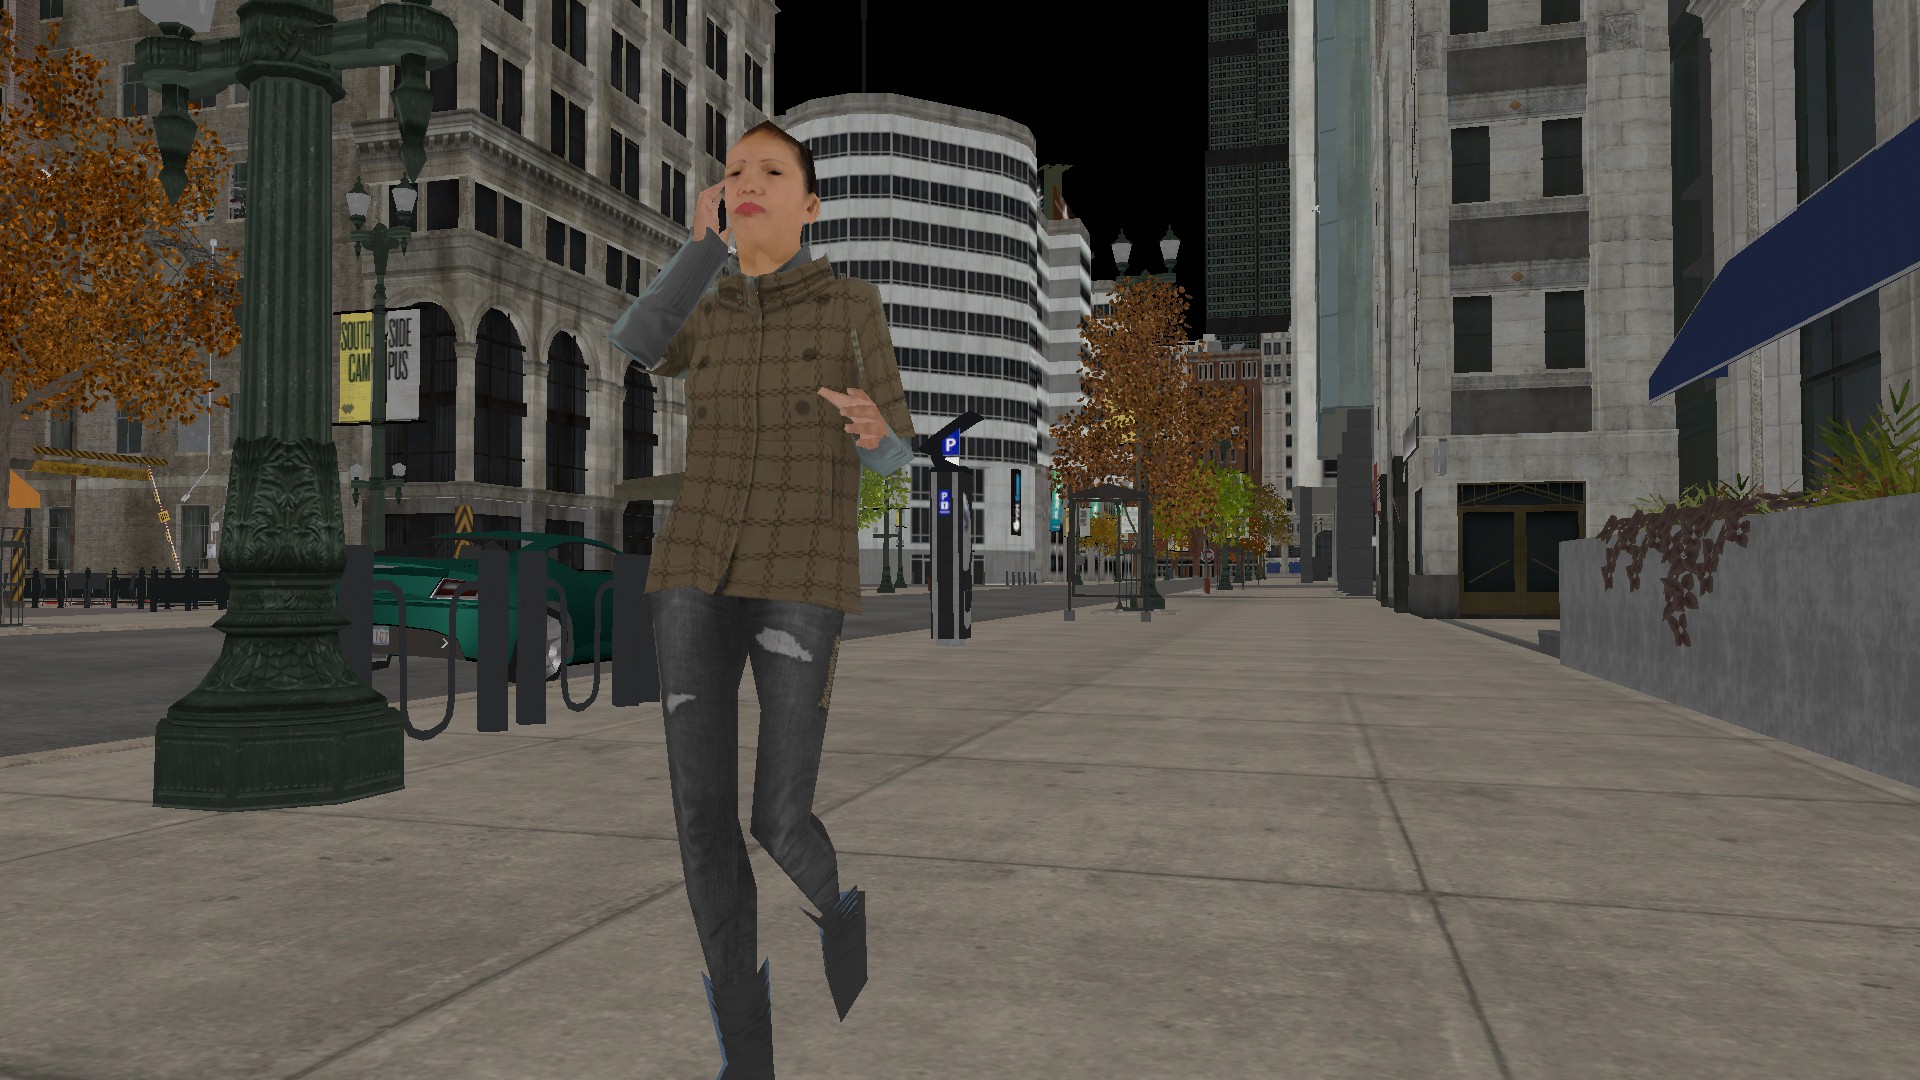
Here is how complex objects and characters look at a distance when they are indistinguishable from their highly detailed versions.
I hope you now have some insight into the problems that graphics programmers, artists and level designers encounter in trying to combine maximum graphics quality with high speed. On consoles, this equation is slightly easier to solve than on a PC, because the equipment is invariable.
In the previous part, I said that I will talk about why it is very difficult to properly implement reflections and other similar things. The reason is quite simple - the performance reserves and resources that I constantly talk about do not change depending on whether you have reflections or not. If you want to create a reflection that can re-display the entire scene, then you have to re-do all the work I was talking about. In addition, reflections are very dependent on the angle at which we look at them, so they must be their own to get accurate reflections from each reflecting object!
This can get out of control very quickly, and usually games with reflections allow themselves certain liberties or assumptions. Games very rarely create reflections in complex environments, the maximum that can be - a mirror in the bathroom, where there are not so many objects, the complexity of the scene is small, and therefore you can afford to spend too much. It is possible that the true reflections in the game will only be on uneven or wavy water surfaces, so that even a very rough and low-detailed scene is quite enough to create convincing reflections.
It is usually difficult to completely avoid reflective surfaces, so the games use pre-rendered images of the nearest environment, which gives a “good enough” result. But they do not withstand close study, and if you look closely at the reflections, you will see that it is an imitation. There are modern techniques that help create reflections in certain conditions, and maybe later I will tell about them, but such pre-rendered (“pre-rendered”) images are still needed.
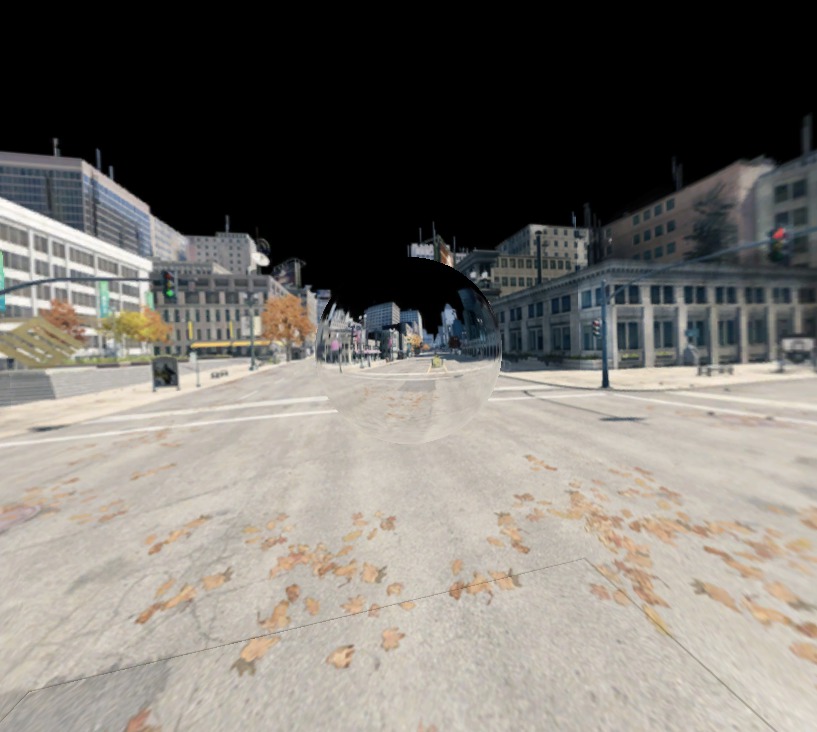
This pre-rendered image is called a “cube map”. It’s not quite accurate as to where Aiden stands, but close enough to him.
Watch Dogs renders reflections in real time. I didn’t explore this question in detail, but I believe that they are always rendered when a character is on the street, and are mainly used to get his exact reflections on the car in which he sits to improve the image and give it a slight sense of reality. . Since the player is always focused on his car and the immediate environment, the fact of incorrect reflection on other cars is hardly noticeable.
There are many approximations to speed up the rendering of these reflections. For example, in reflection, a lot less objects are rendered than there are in the real scene - about 350 in total - and many of them are very simplified compared to the full versions. I suspect that complex objects, such as people, are completely discarded, regardless of distance, but I have not tested this theory. In addition, there are no shadows on these objects, and the lighting is very simple - only what comes from the sun and sky. Reflections are rendered from the ground as in a fisheye lens, that is, reflections of the earth itself are impossible, and what is next to it has very low details.
But even with all these simplifications, reflections only deal with what was intended. If you drive under the rails, you can get the right reflection with a view over the car, which in practice could not be achieved.
This decision was intentional and not easy. The stock is a constant value, so if you leave room for these reflections, then you need to sacrifice something else.
Here is a very "fake" display of the scene around Aiden with a bottom view made for reflections. You can navigate through the two lanterns and train rails.
There is another part of the work that I want to mention here - the shadows. Later, I plan to talk about how the shadows work, because this is an interesting topic, but now the most important thing is to remember that the shadows are very similar to reflections. Each light source casting a shadow must render an image of the scene from its point of view. This time there are not so many ways to simplify the work - each source of lighting must have this image to correctly calculate shadows .
Note
Here I speak only about the lighting calculated during the game. Previously, part of the lighting was calculated by pre-rendering of all the necessary information before starting the game, that is, shadows and lighting were “baked” into the level, they were constant and could not be changed or reacted to them dynamically. Such technology in modern games is not used as often, and it is obvious that it can not be applied to moving light sources.
The most obvious and most significant source of shadow-giving illumination is the sun (or the moon, if it happens at night). Since the sun is huge, 3-5 images are usually rendered for it, and not one, as in the case of headlights or a flashlight.
Unfortunately, this is one of the cases when Watch Dogs cannot be a good example. The calculation of shadows in the game is rather complicated and, it seems to me, specially optimized for the case of shadow casting in the city. Therefore, I would rather switch to Far Cry 4 and consider the calculation of shadows using the frame from this game as an example.

Here is a scene from Far Cry 4 that I use just for example.
Here is an image with information about the shadows of this scene - each of them requires a completely new rendering of the scene.
So when we need to add shadow casting to the light source, we have to render the scene one more time. Here you can also use some of the approximations used in the case of reflections, only they are much smaller. You can skip small or distant objects, but you need to take into account that these objects will seem to not cast shadows. You can render the image very small, but then the shadows will be grainy and low detail. Usually it is impossible to use a very simplified version of the object, because then it will seem that the object casts a shadow on itself, or gaps appear between the object and its shadow.
Another consequence that is very easy to miss is the need to create a shading image for each light source. In many cases, it is possible to simplify the sources of lighting by combining them - in Watch Dogs this happens with car headlights.
When both lights are turned on, only one light source is drawn, but with a special shape, because of which it looks like two beams. If the headlights have shadows, then this is not so easy to do, and it will be much more noticeable - when the player passes in front of the car, the light will come from somewhere between the two headlights. Perhaps, then it is necessary to divide headlights, but thus not only there will be additional expenses for calculation of shadows, but also it is necessary to draw new lighting.
The main thing that I wanted to emphasize to all of this is compromises. We can definitely get rid of all these approximations, but we have to spend our resources for this, that is, to sacrifice something else. Each game developer must decide what it is important for him to focus on in the game, and what will be the most impressive or most annoying to the player.
Part 4. Move the vertices.
In this part, I will discuss in more detail the technical details of animating objects in the scene.
Graphic programmers often talk about the "graphics pipeline". 3D graphics are a bit like an assembly line with a clearly defined movement from one stage to another, but it does not work simultaneously with only one object.
All modern graphics cards have approximately the same conveyor, they have special equipment and software, stitched directly "in silicon", for maximum acceleration of the conveyor. Of course, there are many variations between different manufacturers and graphics card families, but usually we don’t need to worry about how they work at this level.
Note
If you are interested in how everything works on an abstract hardware level, then I recommend Fabian Gisin’s series of articles on the graphics pipeline . This series of articles is much more detailed and requires much more understanding than my post.
I will skip many details to explain interesting and important principles. In this part we will look at the first part of the pipeline, which is called the “vertex shader” (Vertex Shader) .
Shaders became widespread about 16 years ago, after the release of DirectX 9, in which vertex and pixel shaders appeared. To explain what shaders are and compare them with what was previously, I will talk about the work they are doing.
Aiden’s framed head is back with us.
Let me remind you that in Part 2, we considered the models from which the game world is created. These models consist of individual points, called vertices, which are connected in triangles. I said that I will tell you more about them later, and now I keep my promise.
Since everything in the game world consists of vertices, everything that needs to be done with these models must be performed with vertices. When it comes to a graphics card, all that it sees is a long list of vertices. For her, there are no such things as running animation, or swaying leaves of trees, or any other abstract concepts.
Let's consider a simple example of what we have to do - the movement and location of objects in the world. First, take a simple case, not a character.
When creating objects in 3D editors like Maya and 3D Studio Max, artists always build from in their own separate world. These objects are not created immediately in the Chicago entourage; rather, their surroundings look like an “empty white room” from the Matrix. Each object is located in the center of absolute emptiness.

Here is some kind of traffic light in the game somewhere under the rails, and it is located in its own world.
When saving to disk, the model has no idea where it will be in the world and when it will be loaded and transferred to the graphics card. This means that when it is time to draw objects, we need to move it from our own world to the scene that we draw. This happens with each object being drawn, and even such fixed objects as buildings and bridges also move from their own world to the scene in each frame.
Here we see several traffic lights already placed in a partially constructed final scene.
As I mentioned above, the only thing we can work with is vertices. We can't just say to the graphics card: “Can you put this traffic light under the bridge? And then put another one a little further? Great! ”
So instead of telling the graphic map what it needs to do with the object itself, we need to say what to do with all its vertices. It turns out that in this case, everything becomes very simple. If we change all the vertices in exactly the same way and they remain stationary relative to each other, then this is similar to moving the object as a whole. All we need is to figure out what “change” is, which is called transformation.
Note
Mathematical calculations of all this is not particularly complicated, but are beyond the scope of the article. If you have already studied linear algebra, then you probably know everything you need - basically everything comes down to matrix multiplication of vectors.
Before the advent of vertex shaders, the possible options for converting vertices in a graphics card were very limited. Moving and turning objects were available, as well as some other operations, but nothing particularly unnecessary or difficult.
Vertex shaders are small computer programs running in a graphics card. They take one vertex, perform any necessary actions with it , and return the output vertex. They can not just move it, but also make it jump up and down, move away from the nearest peak, swing depending on the wind, animate and much more.
I took one of the vertex shaders that are used in Watch Dogs, and experimented a bit with it to show what it does. This is a rather painstaking job, but I managed to find the vertex shader used for the characters and change it. There is another vertex shader used for skin, for example, for faces and hands, but you will quickly understand the principle.
I made a very simple change that adds a bend to the character models, but everything else is used as usual.
In the animation shown above, you can see that the characters are somehow strangely distorted. This brings us back to the principle of “if you move each vertex, then this is similar to moving the entire object.” The change made to the vertex shader only works for one vertex at a time, but since they all work with the same distortion, the effect is applied to the entire object as a result.
You can also make changes to the part of the transformation that is responsible for “just moving into place” so that instead of placing the character in the right place, she would lift him above the ground. This is not simulated with the help of physics, so it has nothing to do with gravity or collisions with other objects - if you wish, we can make everyone float in the air.
In this animation, we forced the vertex shader to gradually raise and lower the object.
Obviously, this is not very constructive, but it gives us a general idea of how vertex shaders work - if now we wanted to animate the leaves on the trees so that they sway, they would do about the same. Only instead of raising and lowering they would swing in the direction of the wind. Then we can change the strength of the wind so that the trees swing more or less.
Here we see what happens when everything increases about seven times.
I simplify a little, but the main task of most vertex shaders is “moving objects into place”. The exception is all animated objects - people, animals, as well as items such as rocking ropes, flowing clothes, etc.
Animation of people associated with the idea of using the skeleton and the "skin." The skeleton is a simple description of a moving character. At this stage, we are not worried about animated buckles, hats or jeans - only important movements that are most relevant to the human skeleton are important to us.

Shown here is a simple skeleton of a human figure. It is not taken from Watch Dogs, because the skeleton is difficult to visualize outside of the 3D editor.
Image licensed by Attribution-ShareAlike CC BY-SA © MakeHuman team 2001-2014
This is a binding pose or T-pose, showing how a character looks like without the use of animations.
Animations - running, walking, jumping - apply only to this skeleton. This makes the whole process very simple, because we only need to consider about a hundred bones instead of thousands and thousands of vertices.
After creating the skeleton, each vertex binds to one or more bones in this static pose, and this connection is called skinning. At the time of Half-Life 1, when this technology began to be used, each vertex was associated with only one bone. Nowadays, even four bones can join, and each bone is given a weight, on which the degree of influence of the bone on the top depends. Thanks to this, you can get a smoother animation, allowing the bones to intersect in different areas without creating sharp corners when moving arms or legs.

This is the skeleton shown above with the hip bone turned. The colors show the weight of the hip bone relative to the model's tops.
Image is licensed by Attribution-ShareAlike CC BY-SA © MakeHuman team 2001-2014
This technology has its limitations, especially in places where clothing and skin are compressed or stretched in the hinges, for example, on the elbows and shoulders. This is an imperfect, but very effective way to animate. The most serious limitation is that it is very difficult to create convincing facial animations. You can create a lot of “fake” bones on your face, for example, for eyebrows and around your mouth, but this will only be a rough approximation of muscles and skin.
Another important feature of this technique is that the mapping of tops and bones is very specific and related to how this mapping is performed. It is possible to use animations for several different models, but each individual model in which the skeleton is to be used must be associated with bones. The reason is that the animations move the vertices from their original position relative to their skeletons. If the vertices are not in the expected positions, then problems will arise.
If the model does not match the skeleton it uses, then the animations will be completely wrong.
If we make the character two times wider, we will get an effect similar to “Drake's donated donuts,” but it is noticeable that the animations become irregular closer to the brushes, because it is here that they are farthest from their original positions.
The first animation may seem strangely familiar to you - such animation glitches occur in games very often. Usually they are caused by the fact that incorrect animations are applied to the skeleton, or the wrong skeleton is used in the model. As in the case of textures and models, the skeleton, skinning and model need to be very carefully compared, otherwise the results will quickly turn out to be sad.
I hope you got some idea of the purpose of the vertex shaders and understood how animations are used to turn a static model into a live character.