We generate a beautiful Google spreadsheet from our program (using the Google Sheets API v4)
- Tutorial
Formulation of the problem
Let us need to create a table in Python like this : Features of this table:

- set column width;
- the top cell is a union A1: E1 ;
- in some cells are configured: display format, font size, boldness, text alignment and background color;
- the values in the last column are calculated by the formula (for example, in E4 it says = D4-C4 );
- the border is drawn under cells A3: E3 ;
- Pikachu is present (but it will remain as homework for enthusiasts).
Interesting? Then welcome to cat.
Decision
Immediately discard inappropriate libraries. For example, gspread . This is a wrapper over the Google Sheets API v3 , in which there are no methods for customizing the design of the table. Even the column width cannot be set.
We will use the Google Sheets API v4 .
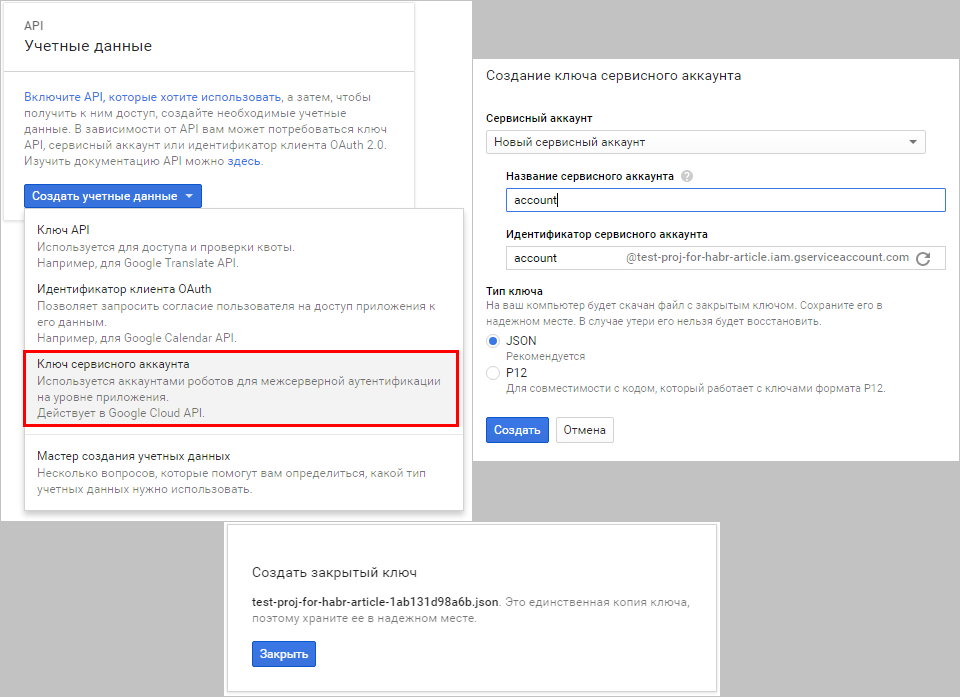
Step 1. Create a service account
- Go to the Google Developers Console and create a new project (or use some of those that already exist).
- Include the Drive API and Sheets API for this project.
- Create credentials and save the private key:
Step 2. Install the required libraries
Namely, google-api-python-client . You can install using pip , for example:
pip install --upgrade google-api-python-client
This library will draw the necessary dependencies (such as oauth2client and others).
Step 3. Coding
3.1. Service object
We import the necessary:
import httplib2
import apiclient.discovery
from oauth2client.service_account import ServiceAccountCredentials
Create a Service object for working with Google tables:
CREDENTIALS_FILE = 'test-proj-for-habr-article-1ab131d98a6b.json'  # имя файла с закрытым ключом
credentials = ServiceAccountCredentials.from_json_keyfile_name(CREDENTIALS_FILE, ['https://www.googleapis.com/auth/spreadsheets',
                                                                                  'https://www.googleapis.com/auth/drive'])
httpAuth = credentials.authorize(httplib2.Http())
service = apiclient.discovery.build('sheets', 'v4', http = httpAuth)
3.2. Terms and id'shniki
Now pause for a second and discuss the terminology.
- spreadsheet is a google spreadsheet document. Below I will call the document (or the English name).
He has aspreadsheetIdhaving view1kygOW5wSSVqwf26M-OCT72i0FX0olZAz4duT2i6psp4. - sheet is the sheet inside the spreadsheet . In other words, a tab with one of the tables (there may be several within the same document).
At the sheet theresheetIdis a number. For the first sheet created in the document, id is 0 . There is always at least one sheet in the document (it cannot be deleted). All sheets have different id and different names.Historical background about worksheetIn the old API, the worksheet is called worksheet . He hasworksheetId(orwid) having a viewoowy6v0. To convert to a number, you need a special perversion :wid2sheetId = lambda wid: int(wid[1:] if len(wid) > 3 else wid, 36) ^ (474 if len(wid) > 3 else 31578)
A link to a specific sheet is formed as follows: If you discard , then the first sheet in the document opens by reference.
https://docs.google.com/spreadsheets/d/spreadsheetId/edit#gid=sheetId#gid=sheetId3.3. New spreadsheet
Let's go back to the code. The object
servicethat we created gives us only 9 functions . One of them is called spreadsheets.create , it creates a new spreadsheet . You need to pass a Spreadsheet object as an argument . It is not required to fill in all of its fields; most have default values.spreadsheet = service.spreadsheets().create(body = {
'properties': {'title': 'Сие есть название документа', 'locale': 'ru_RU'},
'sheets': [{'properties': {'sheetType': 'GRID',
'sheetId': 0,
'title': 'Сие есть название листа',
'gridProperties': {'rowCount': 8, 'columnCount': 5}}}]
}).execute()
In response, we get the Spreadsheet object again , there are more filled parameters:
See answer
{'properties': {'autoRecalc': 'ON_CHANGE',
                'defaultFormat': {'backgroundColor': {'blue': 1,
                                                      'green': 1,
                                                      'red': 1},
                                  'padding': {'bottom': 2,
                                              'left': 3,
                                              'right': 3,
                                              'top': 2},
                                  'textFormat': {'bold': False,
                                                 'fontFamily': 'arial,sans,sans-serif',
                                                 'fontSize': 10,
                                                 'foregroundColor': {},
                                                 'italic': False,
                                                 'strikethrough': False,
                                                 'underline': False},
                                  'verticalAlignment': 'BOTTOM',
                                  'wrapStrategy': 'OVERFLOW_CELL'},
                'locale': 'ru_RU',
                'timeZone': 'Etc/GMT',
                'title': 'Сие есть название документа'},
 'sheets': [{'properties': {'gridProperties': {'columnCount': 5,
                                               'rowCount': 8},
                            'index': 0,
                            'sheetId': 0,
                            'sheetType': 'GRID',
                            'title': 'Сие есть название листа'}}],
 'spreadsheetId': '1Sfl7EQ0Yuyo65INidt4LCrHMzFI9wrmc96qHq6EEqHM'}
It was possible to set many of them in the request, but to solve the current problem, we are satisfied with the default parameters.
The parameter
localewas set to a value ru_RUnot by chance, but more on that later. The answer contains
spreadsheetId. Hurrah! We go to look at the created document with our eyes ... and break off, because we do not have access to it. Even for reading. Everything is like a regular manually created Google spreadsheet by a user. And who has access? At the service account.
Click on the button “Request permission to access”?
Do not spam yourself. When you click this button, an email will be sent to an email like account@test-proj-for-habr-article.iam.gserviceaccount.com . This letter cannot be delivered (because the domain does not exist), and a message will be sent to your mail about the unsuccessful delivery of the letter. The contents of the letter will not help either, because the link for issuing access can only work if you are logged in under the owner’s account, that is, under the service account.
What to do? The answer is obvious: give access to the document using the API too.
Well, or another option
You can create the document manually on your Google drive and give access to the service account (that is, manually issue permissions to that e-mail like account@test-proj-for-habr-article.iam.gserviceaccount.com ). Then work with this document through the API.
This option did not suit me, because I needed to teach the program how to create many different documents.
This option did not suit me, because I needed to teach the program how to create many different documents.
3.4. Access to a new document
Our object
servicedoes not have a method for setting access to the document. It’s just not in the Google Sheets API. But it is in the Google Drive API v3 . We are writing a code.driveService = apiclient.discovery.build('drive', 'v3', http = httpAuth)
shareRes = driveService.permissions().create(
fileId = spreadsheet['spreadsheetId'],
body = {'type': 'anyone', 'role': 'reader'}, # доступ на чтение кому угодно
fields = 'id'
).execute()
Such code gives everyone access to read by reference . Suppose we want to give user@example.com edit access instead . For this instead
{'type': 'anyone', 'role': 'reader'}write
{'type': 'user', 'role': 'writer', 'emailAddress': 'user@example.com'}3.5. Some more theory
Let's start the table by setting the width of the columns. Oh, where is such a function? Everything is not so transparent and a little more intelligent than just any
setColumnWidth. There is a function spreadsheets.batchUpdate . She immediately applies a bunch of changes to the document. More precisely, first she checks the entire bundle for correctness. If everything is OK, then atomically applies everything and returns the corresponding packet of results. The list of changes that can be applied by this function is here .
3.6. Column Width
To set the width of the columns you need to do UpdateDimensionPropertiesRequest .
Read code
results = service.spreadsheets().batchUpdate(spreadsheetId = spreadsheet['spreadsheetId'], body = {
  "requests": [
    # Задать ширину столбца A: 317 пикселей
    {
      "updateDimensionProperties": {
        "range": {
          "sheetId": 0,
          "dimension": "COLUMNS",  # COLUMNS - потому что столбец
          "startIndex": 0,         # Столбцы нумеруются с нуля
          "endIndex": 1            # startIndex берётся включительно, endIndex - НЕ включительно,
                                   # т.е. размер будет применён к столбцам в диапазоне [0,1), т.е. только к столбцу A
        },
        "properties": {
          "pixelSize": 317     # размер в пикселях
        },
        "fields": "pixelSize"  # нужно задать только pixelSize и не трогать другие параметры столбца
      }
    },
    # Задать ширину столбца B: 200 пикселей
    {
      "updateDimensionProperties": {
        "range": {
          "sheetId": 0,
          "dimension": "COLUMNS",
          "startIndex": 1,
          "endIndex": 2
        },
        "properties": {
          "pixelSize": 200
        },
        "fields": "pixelSize"
      }
    },
    # Задать ширину столбцов C и D: 165 пикселей
    {
      "updateDimensionProperties": {
        "range": {
          "sheetId": 0,
          "dimension": "COLUMNS",
          "startIndex": 2,
          "endIndex": 4
        },
        "properties": {
          "pixelSize": 165
        },
        "fields": "pixelSize"
      }
    },
    # Задать ширину столбца E: 100 пикселей
    {
      "updateDimensionProperties": {
        "range": {
          "sheetId": 0,
          "dimension": "COLUMNS",
          "startIndex": 4,
          "endIndex": 5
        },
        "properties": {
          "pixelSize": 100
        },
        "fields": "pixelSize"
      }
    }
  ]
}).execute()
It turned out very cumbersome and a lot of copy-paste. At this stage, I decided to write a small wrapper class over the Sheets API, which will give me the necessary methods in a convenient way.
3.7. Wrapper class logic
Let the wrapper class (let's call it Spreadsheet ) store the list of requests and pass it to the spreadsheets.batchUpdate function in its runPrepared method , and then clear it. Methods of the form prepare_respectiveQuery will add elements to this list . Now the code for setting the width of the columns looks like this:
# ss - экземпляр нашего класса Spreadsheet
ss.prepare_setColumnWidth(0, 317)
ss.prepare_setColumnWidth(1, 200)
ss.prepare_setColumnsWidth(2, 3, 165)
ss.prepare_setColumnWidth(4, 100)
ss.runPrepared()
And here is the code for the prepare_setColumnWidth and prepare_setColumnsWidth methods :
class Spreadsheet:
    # ...
    def prepare_setDimensionPixelSize(self, dimension, startIndex, endIndex, pixelSize):
        self.requests.append({"updateDimensionProperties": {
            "range": {"sheetId": self.sheetId,
                      "dimension": dimension,
                      "startIndex": startIndex,
                      "endIndex": endIndex},
            "properties": {"pixelSize": pixelSize},
            "fields": "pixelSize"}})
    def prepare_setColumnsWidth(self, startCol, endCol, width):
        self.prepare_setDimensionPixelSize("COLUMNS", startCol, endCol + 1, width)
    def prepare_setColumnWidth(self, col, width):
        self.prepare_setColumnsWidth(col, col, width)
I will give the runPrepared method code a bit further, because it will be replenished with something else.
3.8. Filling cells with data
To fill the cells with information, the Google Sheets API v4 provides the function spreadsheets.values.batchUpdate , which works on the same principle as spreadsheets.batchUpdate . It takes a list of rectangles and the values that need to be written to each of them. In addition, it accepts the ValueInputOption parameter :
- if
USER_ENTERED, then the data is interpreted as entered by the user; - if
RAW, then they are not interpreted in any way and stored raw.
We need the first option because it requires the table to recognize dates and formulas.
This is how you can fill in a couple of rectangles on a sheet without using our wrapper class:
results = service.spreadsheets().values().batchUpdate(spreadsheetId = spreadsheet['spreadsheetId'], body = {
    "valueInputOption": "USER_ENTERED",
    "data": [
        {"range": "Сие есть название листа!B2:C3",
         "majorDimension": "ROWS",     # сначала заполнять ряды, затем столбцы (т.е. самые внутренние списки в values - это ряды)
         "values": [["This is B2", "This is C2"], ["This is B3", "This is C3"]]},
        {"range": "Сие есть название листа!D5:E6",
         "majorDimension": "COLUMNS",  # сначала заполнять столбцы, затем ряды (т.е. самые внутренние списки в values - это столбцы)
         "values": [["This is D5", "This is D6"], ["This is E5", "=5+5"]]}
    ]
}).execute()
We get such a document .
Now let's make our wrapper class provide convenient methods for achieving the same result.
Let the function spreadsheets.values.batchUpdate be called in the runPrepared method , and the prepare_setValues method add the rectangle and data to the valueRanges list , which, when runPrepared is called , will be passed to spreadsheets.values.batchUpdate .
The code of the prepare_setValues and runPrepared methods :
class Spreadsheet:
    # ...
    def prepare_setValues(self, cellsRange, values, majorDimension = "ROWS"):
        self.valueRanges.append({"range": self.sheetTitle + "!" + cellsRange, "majorDimension": majorDimension, "values": values})
    # spreadsheets.batchUpdate and spreadsheets.values.batchUpdate
    def runPrepared(self, valueInputOption = "USER_ENTERED"):
        upd1Res = {'replies': []}
        upd2Res = {'responses': []}
        try:
            if len(self.requests) > 0:
                upd1Res = self.service.spreadsheets().batchUpdate(spreadsheetId = self.spreadsheetId,
                                                                  body = {"requests": self.requests}).execute()
            if len(self.valueRanges) > 0:
                upd2Res = self.service.spreadsheets().values().batchUpdate(spreadsheetId = self.spreadsheetId,
                                                                           body = {"valueInputOption": valueInputOption,
                                                                                   "data": self.valueRanges}).execute()
        finally:
            self.requests = []
            self.valueRanges = []
        return (upd1Res['replies'], upd2Res['responses'])
Populate the same pair of rectangles, as in the example above, but with the use of our wrapper class:
# ss - экземпляр нашего класса Spreadsheet
ss.prepare_setValues("B2:C3", [["This is B2", "This is C2"], ["This is B3", "This is C3"]])
ss.prepare_setValues("D5:E6", [["This is D5", "This is D6"], ["This is E5", "=5+5"]], "COLUMNS")
ss.runPrepared()
3.9. Merging cells, adjusting boldness, display format, background color, and more
Who can’t wait, you can immediately read the full code of the Spreadsheet class and an example of its use , which is the solution to the problem posed at the beginning of the article.
For a more patient reader:
- MergeCellsRequest - merge cells.Example
# Объединить ячейки A1:E1 {'mergeCells': {'range': {'sheetId': 0, 'startRowIndex': 0, 'endRowIndex': 1, 'startColumnIndex': 0, 'endColumnIndex': 5}, 'mergeType': 'MERGE_ALL'}} # Подготовить такой запрос при помощи класса Spreadsheet ss.prepare_mergeCells('A1:E1') - RepeatCellRequest - apply the same changes to all cells in the specified range.Examples
# Сделать жирными и выровнять по центру ячейки A3:E3 {'repeatCell': {'range': {'sheetId': 0, 'startRowIndex': 2, 'endRowIndex': 3, 'startColumnIndex': 0, 'endColumnIndex': 5}, 'cell': {'userEnteredFormat': {'horizontalAlignment': 'CENTER', 'textFormat': {'bold': True}}}, 'fields': 'userEnteredFormat'}} # другие параметры форматирования ячейки будут сброшены # Формат отображения «продолжительность» для ячеек E4:E8 {'repeatCell': {'range': {'sheetId': 0, 'startRowIndex': 3, 'endRowIndex': 8, 'startColumnIndex': 4, 'endColumnIndex': 5}, 'cell': {'userEnteredFormat': {'numberFormat': {'pattern': '[h]:mm:ss', 'type': 'TIME'}}}, 'fields': 'userEnteredFormat.numberFormat'}} # для ячейки изменится только формат отображения # Подготовить такие запросы при помощи класса Spreadsheet ss.prepare_setCellsFormat('A3:E3', {'horizontalAlignment': 'CENTER', 'textFormat': {'bold': True}}) ss.prepare_setCellsFormat('E4:E8', {'numberFormat': {'pattern': '[h]:mm:ss', 'type': 'TIME'}}, fields = 'userEnteredFormat.numberFormat') - UpdateCellsRequest - apply the changes specified for each cell in the specified range.Example
# Задать цвет фона ячеек следующим образом: B4 - красный, C4 - зелёный, B5 - синий, C5 - жёлтый {'updateCells': {'range': {'sheetId': 0, 'startRowIndex': 3, 'endRowIndex': 5, 'startColumnIndex': 1, 'endColumnIndex': 3}, 'rows': [{'values': [{'userEnteredFormat': {'backgroundColor': {'red': 1, 'green': 0, 'blue': 0}}}, {'userEnteredFormat': {'backgroundColor': {'red': 0, 'green': 1, 'blue': 0}}}]}, {'values': [{'userEnteredFormat': {'backgroundColor': {'red': 0, 'green': 0, 'blue': 1}}}, {'userEnteredFormat': {'backgroundColor': {'red': 1, 'green': 1, 'blue': 0}}}]}], 'fields': 'userEnteredFormat'}} # Подготовить такой запрос при помощи класса Spreadsheet ss.prepare_setCellsFormats('B4:C5', [[{'backgroundColor': {'red': 1, 'green': 0, 'blue': 0}}, {'backgroundColor': {'red': 0, 'green': 1, 'blue': 0}}], [{'backgroundColor': {'red': 0, 'green': 0, 'blue': 1}}, {'backgroundColor': {'red': 1, 'green': 1, 'blue': 0}}]]) - UpdateBordersRequest - set the border of the cells.Example
# Чёрная сплошная граница толщиной 1 под A3:E3
{'updateBorders': {'range': {'sheetId': 0,
                             'startRowIndex': 2,
                             'endRowIndex': 3,
                             'startColumnIndex': 0,
                             'endColumnIndex': 5},
                   'bottom': {'style': 'SOLID',
                              'width': 1,
                              'color': {'red': 0, 'green': 0, 'blue': 0, 'alpha': 1}}}}
Some subtleties
Q1: Why, then, when creating the document (in 3.3),
localewas the parameter set to a value ru_RU? A1: The fact is that in this case a row having the form will be recognized by the table as date and time. Accordingly, such cells can be used in the formula to calculate the duration (as the difference of two dates, for example). Q2: Where did it get the “duration” format from ? A2: You can get to this by studying the documentation. But I just manually set the display format “duration” to a particular cell, and then I received the document using the spreadsheets.get function , setting the parameter to a value , and looked at the value of the parameter
2 июл 2016 17:57:52 {'numberFormat': {'pattern': '[h]:mm:ss', 'type': 'TIME'}}
includeGridDataTruenumberFormatat that cell. Q3: In requests passed to the spreadsheets.batchUpdate function , the parameter
rangehas the GridRange format :{
'sheetId': число,
'startRowIndex': число,
'endRowIndex': число,
'startColumnIndex': число,
'endColumnIndex': число
}
And in the data rectangles for the spreadsheets.values.batchUpdate function, the parameter
rangeis a string of the form Название_листа!A5:E7( A1 notation ). It’s strange. A3: Yes. Perhaps someone will explain why in the comments to the article.
In the wrapper class, I made the toGridRange method for convenience .
Q4: Pikachu, who is in the table at the beginning of the article , was put there programmatically?
A4: No, I placed Pikachu in the table manually. I'm not sure that the Google Sheets API v4 allows you to do this programmatically, I did not find the right function right away.
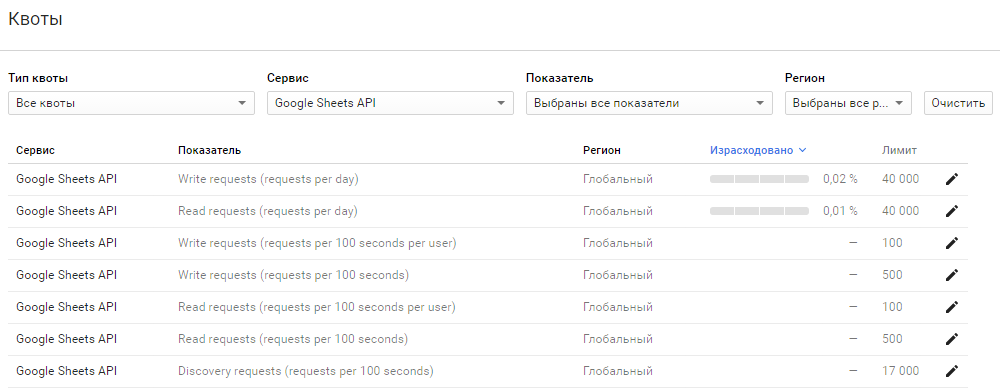
Q5: Are there any restrictions on using the Google Sheets API v4?
A5:Yes, they are called quotas. You can follow them in the Google Developers Console . There you can send a request to increase the quota, if it is not enough.
Conclusion
If you have read this far, you probably have mastered how to create spreadsheet programmatically, and now burn with the desire to use Google spreadsheets in all your projects :)
I’ll give you the most important links again: