Intel Virtual World. Part 2: SMP
In the previous article (link), I talked about the basic concept of a hypervisor based on Intel hardware virtualization technology. Now I propose to expand the capabilities of the hypervisor by adding support for multiprocessor architecture (SMP), and also to consider an example of how the hypervisor can make changes to the operation of the guest OS.
All further actions will be performed on a PC with the following configuration:
CPU: Intel Core i7 5820K
Motherboard: Asus X99-PRO
Ram: 16GB
Guest OS: Windows 7 x32 with PAE disabled
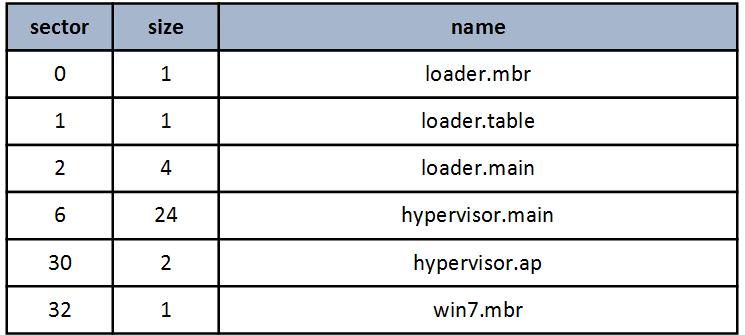
I will begin by describing the location of the components of the hypervisor on the hard disk (all values are given in sectors).
The process of loading the hypervisor differs from the previous version only by the presence of a new module hypervisor.ap , the purpose of which is the basic initialization of the processor's AP.
The process of loading modules into memory:

SMP support
I implemented a hypervisor on the principle of symmetric multiprocessing, which means that the same copy of VMX will run on all logical processors present. In addition, IDT and GDT tables, as well as paging memory tables, will be common to all logical processors. I did this because the hypervisor will immediately initialize the memory for the guest OS address space and there is no need to dynamically reassign the physical addresses of individual pages. Also, with this approach, it is possible not to follow the hypervisor's compliance with the TLB caches of the processors.
The initialization process for BSP and AP will be different. All the basic structures involved in the work of the hypervisor will be created during the initialization of the BSP. In addition, the Activity state for vmx non root AP mode processors will be set to HLT state. Thus, the guest OS environment will be emulated in accordance with what it would be without the use of virtualization.
BSP Initialization:
AP Initialization:
We can say that the implementation of SMP support in the hypervisor is quite simple, but there are a few points that I would like to draw attention to.
1.USB Legacy Support
The new motherboard models may not have PS / 2 connectors, so USB Legacy Support is used to ensure backward compatibility. This means that you can work with the usb keyboard or mouse using the same methods (input / output ports) as it was with the PS / 2 standard. The implementation of USB Legacy Support depends not only on the model of the motherboard, but it can also lure in various versions of the firmware. On my Asus X99-PRO motherboard, USB Legacy Support is implemented via SMI interrupts, in the handler of which PS / 2 emulation occurs. I am writing about it in such detail, because in my case (firmware version 3801), USB Legacy Support is not compatible with long mode and when I return from SMM, the processor goes into shutdown state.
The simplest solution in this situation is to turn off USB Legacy Support before switching to long mode. However, in Windows, when selecting boot options, the PS / 2 keyboard polling method is used, so USB Legacy Support must be activated again before the guest OS starts downloading.
2. Hardware Task Switch
In modern OS, switching between tasks is implemented, as a rule, by program methods. However, in Windows7, for interrupts 2 - NMI and 8 - Double Fault, selectors are assigned that point to TSS, which means that such interruptions will lead to a hardware context switch. Intel VMX does not support the hardware Task Switch, and attempting to run it results in VM Exit. For such cases, I wrote my Task Switch handler (the GuestTaskSwitch function). Double Fault interrupts only in the event of a serious system conflict caused by improper handling of other interrupts. In the process of debugging, I did not come across it. But NMI appears on AP processors at the time of restarting Windows. I still doubt this because it is not clear whether these NMIs are the result of a regular reboot process or is it the incorrect work of the hypervisor at some of the previous stages. If you have any information on this subject, please comment in the comments or write to me in a personal message.
Changes in the operation of the guest OS
Honestly, I haven’t been able to decide what changes in the operation of the guest OS the hypervisor should make. The fact is that, on the one hand, I wanted to show something interesting, such as the implementation of my handlers in the basic network protocols, but on the other hand, it would all rest on a large amount of code, and there is little hypervisor associated with the subject. In addition, I did not want to bind the hypervisor to any particular set of hardware.
As a result, the following compromise was found: in this version of the hypervisor, control over system calls from user mode is implemented, in other words, it will be possible to control the operation of application programs running in the guest OS. This type of control is quite simple to implement, and besides it allows to get a visual result of the work.
Control over the work of application programs will be executed at the level of system calls. And the main goal will be to change the result of the function NtQuerySystemInformation so that when calling with the argument SystemProcessInformation ( 0x05 ) you can intercept information about the processes.
In Windows 7, the application program calls the sysenter assembly command to call the system function, after which control is transferred to the kernel at the r0 level by the KiFastCallEntry handler . To return to the application level r3, use the sysexit command.
To access the results of executing the NtQuerySystemInformation function, you need to save the number of the function being called each time the sysenter command is executed. Then, when executing sysexit, compare the stored value with the number of the function being intercepted and, in case of coincidence, make changes to the data returned by the function.
Intel VMX does not provide direct means of monitoring sysenter / sysexit performance , however, if written inGuest MSR IA32_SYSENTER_CS value is 0, then in this case the sysenter / sysexit commands will trigger a GP exception that can be used to call the VM Exit handler. In order for GP exception to cause VM Exit, you need to set 13 bits in the Exception Bitmap field of VMCS.
The structure below is used when emulating a sysenter / sysexit pair.
The ServiceNumber field contains the number of the function being called and is updated each time sysenter is called.
The Guest_Sys_CS, Guest_Sys_EIP, Guest_Sys_ESP fields are updated when the guest OS tries to write to the corresponding MSR register. For this, write masks are set in MSR-Bitmap Address .
The guest OS should not see changes made by the hypervisor in the work of calls to system functions. By setting the mask for reading MSR IA32_SYSENTER_CS, you can return the guest OS to the original register value when reading.
Below is a sysenter / sysexit command emulation scheme .

At the sysexit emulation step , the stored number of the called function is compared with the NtQuerySystemInformation number (0x105). In the case of a match, it is checked that NtQuerySystemInformation is called with the System Process Information argument, and if so, the ChangeProcessNames function (DWORD SPI_GVA, DWORD SPI_size) makes changes to the structures containing information about the processes.
SPI_GVA is the guest virtual address of the SYSTEM_PROCESS_INFORMATION structure .
SPI_size is the total size of the structures in bytes.
The SYSTEM_PROCESS_INFORMATION structure itself looks like this:
There is nothing complicated in its parsing, the main thing to remember is to transfer the guest virtual address to the physical one; for this, the GuestLinAddrToPhysAddr () function is used .
For clarity of the result, I replaced the first two characters in the names of all processes with the ' :) ' sign . The result of this replacement is visible in the screenshot.

Results
In general, the tasks set at the beginning of the article were completed. The hypervisor ensures stable operation of the guest OS, and also monitors the calling of system functions from the application layer. I note that the main drawback of using sysenter / sysexit command emulationThis is a significant increase in VM Exit calls, which affects performance and this is especially noticeable when the guest OS is running in single-processor mode. This disadvantage can be eliminated by performing call control only in the context of selected processes.
And that's all for now. The source for the article can be taken here
Thank you for your attention.
All further actions will be performed on a PC with the following configuration:
CPU: Intel Core i7 5820K
Motherboard: Asus X99-PRO
Ram: 16GB
Guest OS: Windows 7 x32 with PAE disabled
I will begin by describing the location of the components of the hypervisor on the hard disk (all values are given in sectors).
The process of loading the hypervisor differs from the previous version only by the presence of a new module hypervisor.ap , the purpose of which is the basic initialization of the processor's AP.
The process of loading modules into memory:
SMP support
I implemented a hypervisor on the principle of symmetric multiprocessing, which means that the same copy of VMX will run on all logical processors present. In addition, IDT and GDT tables, as well as paging memory tables, will be common to all logical processors. I did this because the hypervisor will immediately initialize the memory for the guest OS address space and there is no need to dynamically reassign the physical addresses of individual pages. Also, with this approach, it is possible not to follow the hypervisor's compliance with the TLB caches of the processors.
The initialization process for BSP and AP will be different. All the basic structures involved in the work of the hypervisor will be created during the initialization of the BSP. In addition, the Activity state for vmx non root AP mode processors will be set to HLT state. Thus, the guest OS environment will be emulated in accordance with what it would be without the use of virtualization.
BSP Initialization:
- Spinlock initialization
- Initialization and loading of GDT and IDT tables
- Initialization of paging addressing tables
- Initializing VMCS structures and creating a common EPT table
- AP processor activation. To this end, the INIT - SIPI interrupt sequence is transmitted to each AP. The interrupt SIPI vector is 0x20, which corresponds to the transfer of control to the AP at address 0x20000 (hypervisor.ap module)
- Running the guest OS at 0x7C00 (module win7.mbr)
AP Initialization:
- After activating the AP, the processor is in real mode. The hypervisor.ap module initializes the memory and paging addressing tables for the transition to long mode
- Loading IDT, GDT, and also the catalog of tables of page addressing, created at the stage of initialization of BSP
- Initialization of VMCS structures, and loading of the EPT table created at the initialization stage of the BSP
- Switch to vmx non-root mode with active HLT state
We can say that the implementation of SMP support in the hypervisor is quite simple, but there are a few points that I would like to draw attention to.
1.USB Legacy Support
The new motherboard models may not have PS / 2 connectors, so USB Legacy Support is used to ensure backward compatibility. This means that you can work with the usb keyboard or mouse using the same methods (input / output ports) as it was with the PS / 2 standard. The implementation of USB Legacy Support depends not only on the model of the motherboard, but it can also lure in various versions of the firmware. On my Asus X99-PRO motherboard, USB Legacy Support is implemented via SMI interrupts, in the handler of which PS / 2 emulation occurs. I am writing about it in such detail, because in my case (firmware version 3801), USB Legacy Support is not compatible with long mode and when I return from SMM, the processor goes into shutdown state.
The simplest solution in this situation is to turn off USB Legacy Support before switching to long mode. However, in Windows, when selecting boot options, the PS / 2 keyboard polling method is used, so USB Legacy Support must be activated again before the guest OS starts downloading.
2. Hardware Task Switch
In modern OS, switching between tasks is implemented, as a rule, by program methods. However, in Windows7, for interrupts 2 - NMI and 8 - Double Fault, selectors are assigned that point to TSS, which means that such interruptions will lead to a hardware context switch. Intel VMX does not support the hardware Task Switch, and attempting to run it results in VM Exit. For such cases, I wrote my Task Switch handler (the GuestTaskSwitch function). Double Fault interrupts only in the event of a serious system conflict caused by improper handling of other interrupts. In the process of debugging, I did not come across it. But NMI appears on AP processors at the time of restarting Windows. I still doubt this because it is not clear whether these NMIs are the result of a regular reboot process or is it the incorrect work of the hypervisor at some of the previous stages. If you have any information on this subject, please comment in the comments or write to me in a personal message.
Changes in the operation of the guest OS
Honestly, I haven’t been able to decide what changes in the operation of the guest OS the hypervisor should make. The fact is that, on the one hand, I wanted to show something interesting, such as the implementation of my handlers in the basic network protocols, but on the other hand, it would all rest on a large amount of code, and there is little hypervisor associated with the subject. In addition, I did not want to bind the hypervisor to any particular set of hardware.
As a result, the following compromise was found: in this version of the hypervisor, control over system calls from user mode is implemented, in other words, it will be possible to control the operation of application programs running in the guest OS. This type of control is quite simple to implement, and besides it allows to get a visual result of the work.
Control over the work of application programs will be executed at the level of system calls. And the main goal will be to change the result of the function NtQuerySystemInformation so that when calling with the argument SystemProcessInformation ( 0x05 ) you can intercept information about the processes.
In Windows 7, the application program calls the sysenter assembly command to call the system function, after which control is transferred to the kernel at the r0 level by the KiFastCallEntry handler . To return to the application level r3, use the sysexit command.
To access the results of executing the NtQuerySystemInformation function, you need to save the number of the function being called each time the sysenter command is executed. Then, when executing sysexit, compare the stored value with the number of the function being intercepted and, in case of coincidence, make changes to the data returned by the function.
Intel VMX does not provide direct means of monitoring sysenter / sysexit performance , however, if written inGuest MSR IA32_SYSENTER_CS value is 0, then in this case the sysenter / sysexit commands will trigger a GP exception that can be used to call the VM Exit handler. In order for GP exception to cause VM Exit, you need to set 13 bits in the Exception Bitmap field of VMCS.
The structure below is used when emulating a sysenter / sysexit pair.
typedefstruct{
	QWORD ServiceNumber;
	QWORD Guest_Sys_CS;
	QWORD Guest_Sys_EIP;
	QWORD Guest_Sys_ESP;
} SysEnter_T;
The ServiceNumber field contains the number of the function being called and is updated each time sysenter is called.
The Guest_Sys_CS, Guest_Sys_EIP, Guest_Sys_ESP fields are updated when the guest OS tries to write to the corresponding MSR register. For this, write masks are set in MSR-Bitmap Address .
// 174H 372 IA32_SYSENTER_CS SYSENTER_CS write mask
ptrMSR_BMP[0x100 + (0x174 >> 6)] |= (1UL << (0x174 & 0x3F));
// 175H 373 IA32_SYSENTER_ESP SYSENTER_ESP write mask
ptrMSR_BMP[0x100 + (0x175 >> 6)] |= (1UL  << (0x175 & 0x3F));
// 176H 374 IA32_SYSENTER_EIP SYSENTER_EIP write mask
ptrMSR_BMP[0x100 + (0x176 >> 6)] |= (1UL  << (0x176 & 0x3F));
The guest OS should not see changes made by the hypervisor in the work of calls to system functions. By setting the mask for reading MSR IA32_SYSENTER_CS, you can return the guest OS to the original register value when reading.
// 174H 372 IA32_SYSENTER_CS SYSENTER_CS read mask
ptrMSR_BMP[0x174 >> 6] |= (1UL  << (0x174 & 0x3F));
Below is a sysenter / sysexit command emulation scheme .
At the sysexit emulation step , the stored number of the called function is compared with the NtQuerySystemInformation number (0x105). In the case of a match, it is checked that NtQuerySystemInformation is called with the System Process Information argument, and if so, the ChangeProcessNames function (DWORD SPI_GVA, DWORD SPI_size) makes changes to the structures containing information about the processes.
SPI_GVA is the guest virtual address of the SYSTEM_PROCESS_INFORMATION structure .
SPI_size is the total size of the structures in bytes.
The SYSTEM_PROCESS_INFORMATION structure itself looks like this:
typedefstruct _SYSTEM_PROCESS_INFORMATION {
    ULONG NextEntryOffset;
    ULONG NumberOfThreads;
    BYTE Reserved1[48];
    UNICODE_STRING ImageName;
    KPRIORITY BasePriority;
    HANDLE UniqueProcessId;
    PVOID Reserved2;
    ULONG HandleCount;
    ULONG SessionId;
    PVOID Reserved3;
    SIZE_T PeakVirtualSize;
    SIZE_T VirtualSize;
    ULONG Reserved4;
    SIZE_T PeakWorkingSetSize;
    SIZE_T WorkingSetSize;
    PVOID Reserved5;
    SIZE_T QuotaPagedPoolUsage;
    PVOID Reserved6;
    SIZE_T QuotaNonPagedPoolUsage;
    SIZE_T PagefileUsage;
    SIZE_T PeakPagefileUsage;
    SIZE_T PrivatePageCount;
    LARGE_INTEGER Reserved7[6];
} SYSTEM_PROCESS_INFORMATION;
There is nothing complicated in its parsing, the main thing to remember is to transfer the guest virtual address to the physical one; for this, the GuestLinAddrToPhysAddr () function is used .
For clarity of the result, I replaced the first two characters in the names of all processes with the ' :) ' sign . The result of this replacement is visible in the screenshot.
Results
In general, the tasks set at the beginning of the article were completed. The hypervisor ensures stable operation of the guest OS, and also monitors the calling of system functions from the application layer. I note that the main drawback of using sysenter / sysexit command emulationThis is a significant increase in VM Exit calls, which affects performance and this is especially noticeable when the guest OS is running in single-processor mode. This disadvantage can be eliminated by performing call control only in the context of selected processes.
And that's all for now. The source for the article can be taken here
Thank you for your attention.