Animations in iOS applications born on the server
Six months ago, we presented one of the most impressive features of Badoo - live broadcasts . Among other things, it allows users to express gratitude to their favorite streamers in the form of gifts. We wanted to make these gifts as bright and attractive as possible, so we decided to animate them - in other words, to animate. And to make it even more interesting, we planned to update the gifts and animations every few weeks.
iOS engineers have probably guessed how much work we are talking about: to remove old ones and add new animations, you need to perform a lot of actions from the client side. To do this, each release must have Android and iOS commands involved, and together with the time required to approve the update in the App Store, this means that each release with updated animations can take several days to launch. However, we managed to solve this problem, and now I will tell you how.
Solution Architecture
By that time, we were already able to export Adobe After Effects animations (hereinafter referred to as AAE) in a format that our iOS application can understand using the Lottie library. This time we went a little further: we decided to keep all the current animations on the server and download them as needed.

An example of a real animation in our application, obtained in this way:

However, in this post, as an example, I will take a simple animation that I created myself. It is not as creative as in Badoo, but it is quite suitable for demonstrating our approach.
Export animations
The AAE project that I use can be found along with other sources on GitHub . So, opening the project located at the address
_raw/animations/Fancy/Fancy.aepyou will see a window: 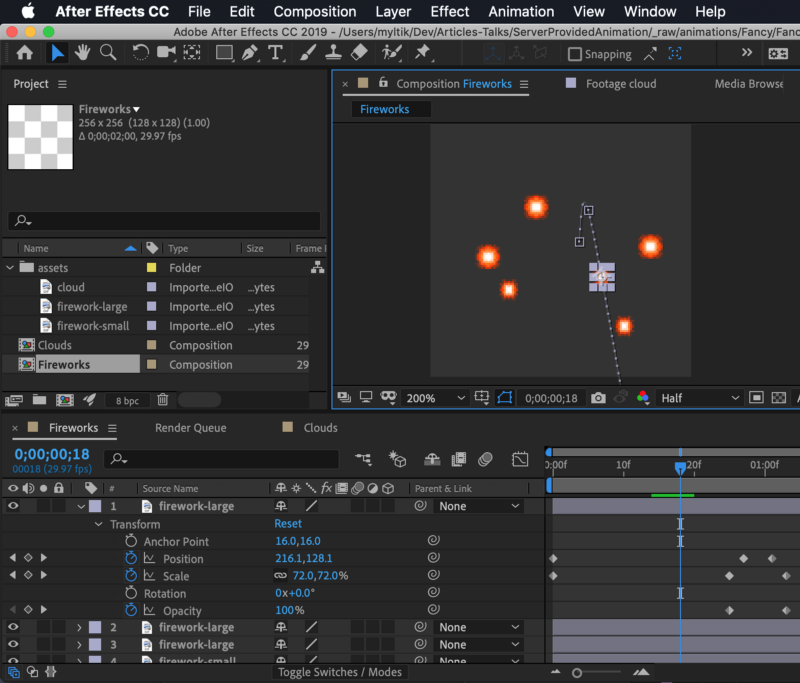
Now I’ll tell you not about the animation creation process in AAE, but about how to import existing animations from AAE into a suitable format for an iOS application using the Bodymovin plugin .
After installing the plugin, open it by selecting Window / Extensions / Bodymovin from the menu : The Bodymovin
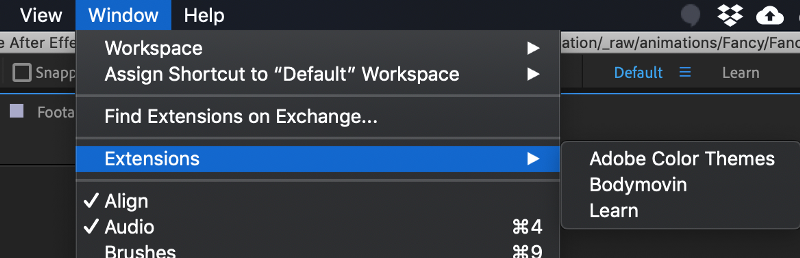
window appears in which you can select an animation for export, a folder to save the resulting file and open export settings:

In the animation settings we can ask Bodymovin to include resources in the JSON file by selecting Assets / Include in json :

Finally, by pressing the Render button, we export and save the selected animated composition to a file.
Storing animations on the server
Suppose we upload JSON-files of rendered animations to a web server. In our case, for simplicity, I put them in a project repository on GitHub. Animations are available here:
Basic link https://raw.githubusercontent.com/chupakabr/server-provided-animations/master/_raw/rendered-animations/
Animation IDs:
clouds.jsonfireworks.json
Note: Looking for a Swift-written web server for animations? The solution is available here , and a detailed explanation is in this article .
So, we have a working server with animations, and therefore it's time to go to the most exciting part: rendering animations on the screen.
Display animations
Now I advise you to open a demo project for our iOS application , as it contains all the necessary code and settings.
Loading animations
Considering that the REST API for getting data is already ready, it's time to enter the data provider protocol and add its implementation, which downloads data from the server:
import Lottie
protocol AnimationsProviderProtocol {
    typealias Completion = (_ animation: LOTComposition?) -> Void
    func loadAnimation(byId id: String, completion: @escaping Completion)
}
final class ServerAnimationProvider: AnimationsProviderProtocol {
    private let endpoint: URL
    init(endpoint: URL) {
        self.endpoint = endpoint
    }
    func loadAnimation(byId id: String, completion: @escaping Completion) {
        let path = "/\(id).json"
        guard let animationUrl = URL(string: path, relativeTo: self.endpoint) else {
            completion(nil)
            return
        }
        URLSession.shared.invalidateAndCancel()
        let task = URLSession.shared.dataTask(with: animationUrl) { (data, response, error) in
            guard error == nil, let data = data, let json = self.parseJson(from: data) else {
                completion(nil)
                return
            }
            let animation = LOTComposition(json: json)
            completion(animation)
        }
        task.resume()
    }
    private func parseJson(from data: Data?) -> [AnyHashable : Any]? {
        guard let data = data else { return nil }
        do {
            let json = try JSONSerialization.jsonObject(with: data, options: []) as? [AnyHashable : Any]
            return json
        } catch {
            return nil
        }
    }
}
This data provider class allows us to load animations from the server in JSON format on demand and store them in memory for drawing on the UI. Suppose we follow the MVVM pattern, then it is easy to use in essence
ViewModelas follows: // ...
private let animationProvider: AnimationsProviderProtocol
private(set) var animationModel: LOTComposition?
// …
func loadAnimation(byId animationId: String) {
self.animationProvider.loadAnimation(byId: animationId) { [weak self] (animationModel) in
self?.animationModel = animationModel
}
}
// ...ViewModelupdates the property of the selected animation when it receives a valid HTTP response from a server with a non-empty JSON object. This data is used by the presentation layer to render the animation.Presentation layer
Now we can use
ViewModelto get access to the animation data and display them on the UI using the on tap built-in handler attached to the button:class ViewController: UIViewController {
// ...
@IBOutlet weak var animationContainer: UIView!
override func viewDidLoad() {
super.viewDidLoad()
// ...
self.animationView = {
let view = LOTAnimationView(frame: self.animationContainer.bounds)
self.animationContainer.addSubview(view)
return view
}()
}
@IBAction func onPlayAnimationAction(_ sender: Any) {
self.animationView.stop()
self.animationView.sceneModel = self.viewModel.animationModel
self.animationView.play()
}
}When you click on a button, the LOTAnimationView instance is updated with the latest data from
ViewModel. Here's what it looks like:

That's all. The application now displays the animation downloaded from our REST API
(from the server).
Tips and limitations
Tricks:
- AAE supports most types of objects, including raster and vector images;
- Bodymovin allows you to embed all resources into the final JSON file using Base64, and thus you can avoid loading resources separately on the client side;
- You can either draw directly into AAE vector or simply import Adobe Illustrator vector images.
Unfortunately, I could not import SVG files into AAE (I tried!).
You can learn more about tricks and solving possible problems from this interesting article by my colleague Radoslaw Sesiva .
Conclusion
So, what gives us the download animations from the server? The most obvious advantage of this approach is the ability to separate all participants in the animation update process. In other words, in order to release a new cool animation, designers simply need to provide the server team with the appropriate JSON file. To remove the animation on the client, simply remove it from the server. Easy and fast.
It is also very cool that the same functions can be implemented on all supported platforms (iOS, Android, Web) without making changes to the client-server protocol, server code and animation files directly on the client.
That's all. Thanks for attention!
useful links
- "Behind the scenes with importing Adobe After Effects animation into Badoo iOS app" by Radoslaw Cieciwa;
- Bodymovin plugin for AAE by AirbnbEng;
- Проект целиком доступен здесь на GitHub;
- Installing bodymovin plugin for AAE by AirbnbEng;
- Lottie iOS library by AirbnbEng;
- "REST API with Swift on Vapor" Валерий Чевтаев
ZXP plugin installer for AAE.