RxSwift: working with a GUI

My first article on RxSwift covered almost all the basic operators, without the knowledge of which popping into the development did not make much sense. But this is just an alphabet of functional programming. In order to write full-fledged programs, you need to understand the basic principles when working with a GUI.
Mostly, standard examples from RxExample are used to study the material, but to clarify certain points, the UIExplanation sandbox and an additional example in RxExample were created.
All code can be found here github.com/sparklone/RxSwift
There are basic needs when working with UI elements in Rx:
1) understand what pitfalls await us in principle and why we need Driver
2)learn how to bind UI to Observable so that Observable elements change the state of the property / properties of the UI of the element. This is solved using UIBindingObserver
3) learn how to translate the target-action pattern on Rx rails. This is done using ControlEvent
4) make a two-way binding to the properties of the UI element. This is done using ControlProperty
5) because often UI delegate / dataSource elements are assumed in the singular, - introduced the class DelegateProxy, which allows you to use both a regular delegate and Rx sequences at the same time.
We will consider each need separately.
Driver
1) There are several problems when working with Observable. To understand them, consider a small example in the sandbox
import Cocoa
import RxSwift
import RxCocoa
import XCPlayground
XCPlaygroundPage.currentPage.needsIndefiniteExecution = true
example("without shareReplay duplicate call problem") {
    let source = NSTextField()
    let status = NSTextField()
    let URL = NSURL(string: "https://github.com/")!
    let request = NSURLRequest(URL: URL)
    let observable =  NSURLSession.sharedSession().rx_response(request).debug("http")
    let sourceObservable = observable.map { (maybeData, response) in
        return String(data: maybeData, encoding: NSUTF8StringEncoding)!
        }.observeOn(MainScheduler.instance)
    let statusObservable = observable.map { (maybeData, response) in
        return response.statusCode.description
        }.observeOn(MainScheduler.instance)
    sourceObservable.subscribe(source.rx_text)
    statusObservable.subscribe(status.rx_text)
}
a) If there is an Observable and to sign several Observers to it - a separate Observable will be created for each Observer. In our case, the Observable accesses the network and downloads the page, the page code and server response status are placed in different textViews.
If we look at the console we will see 2 subscribed, 2 disposed:
--- without shareReplay duplicate call problem example ---
2016-05-01 04:17:17.225: http -> subscribed
2016-05-01 04:17:17.229: http -> subscribed
curl -X GET
"https://github.com/" -i -v
Success (1098ms): Status 200
2016-05-01 04:17:18.326: http -> Event Next(( Event Completed
2016-05-01 04:17:18.339: http -> disposed
curl -X GET
"https://github.com/" -i -v
Success (1326ms): Status 200
2016-05-01 04:17:18.556: http -> Event Next(( Event Completed
2016-05-01 04:17:18.557: http -> disposed
To avoid this, add shareReplayLatestWhileConnected for the original observable
let observable = NSURLSession.sharedSession().rx_response(request).debug("http").shareReplayLatestWhileConnected()As a result, the console shows that now there is only one call to the server
--- with shareReplay no duplicate call problem example ---
2016-05-01 04:18:27.845: http -> subscribed
curl -X GET
"https://github.com/" -i -v
Success (960ms): Status 200
2016-05-01 04:18:28.807: http -> Event Next(( Event Completed
2016-05-01 04:18:28.821: http -> disposed
I also note that shareReplayLatestWhileConnected is used, and not shareReplay (1), because it clears the buffer when unsubscribing all Observers and upon completion of the sequence correctly or with an error. When I wrote the first article on RxSwift operators, I discovered this strange behavior of shareReplay (the lack of cleaning even after the sequence was completed) on my own in the sandbox and first decided that I was doing something wrong, it turned out - by design.
b) we are obliged to process everything connected with the GUI on MainScheduler. If you need to refresh your memory about different Schedulers. You can refer to the official documentation and follow the links where I described subscribeOn and observeOn in a previous article.
If we remove .observeOn (MainScheduler.instance) from the code, we get
fatalError "fatal error: Executing on backgound thread. Please use `MainScheduler.instance.schedule` to schedule work on main thread."By the way, I was somewhat puzzled by this error, because I knew that in what thread you create an Observable, the code inside it will be executed in that. But I mistakenly believed that in what thread the subscribe call is going on, in this the observer code will execute.
At the first moment, the Observable code actually runs in the same thread where it was created. But, in the case of rx_response, an Observable is created inside, inside which the dataTaskWithRequest method is called from NSURLSession, and the return of values comes from the closure of this method, and this closure is already performed in a completely different thread. Therefore, at the exit from NSURLSession.sharedSession (). Rx_response (request), another thread awaits us.
А по второму моменту — прочитав официальную документация я ошибочно посчитал, что из какого потока вызываешь subscribe — в этом потоке и будет выполняться тело Observer'а", оказалось что это не так. Поток сохраняется тот — в котором находится исполняемый код Observable.
Чтобы это проверить я написал еще два примера
example("from main thread") {
    print("init thread: \(NSThread.currentThread())")
    let source = NSTextField()
    let status = NSTextField()
    let URL = NSURL(string: "https://github.com/")!
    let request = NSURLRequest(URL: URL)
    let observable =  NSURLSession.sharedSession().rx_response(request).shareReplayLatestWhileConnected()
    let sourceObservable = observable.map { (maybeData, response) in
        return String(data: maybeData, encoding: NSUTF8StringEncoding)!
    }
    sourceObservable.subscribe() { e in
        print("observer thread: \(NSThread.currentThread())")
    }
}
example("from another queue") {
    print("init thread: \(NSThread.currentThread())")
    let source = NSTextField()
    let status = NSTextField()
    let URL = NSURL(string: "https://github.com/")!
    let request = NSURLRequest(URL: URL)
    let observable =  NSURLSession.sharedSession().rx_response(request).shareReplayLatestWhileConnected()
    let sourceObservable = observable.map { (maybeData, response) in
        return String(data: maybeData, encoding: NSUTF8StringEncoding)!
    }
    let queue1 = dispatch_get_global_queue(DISPATCH_QUEUE_PRIORITY_DEFAULT, 0)
    dispatch_async(queue1,{
        print("queue1 thread: \(NSThread.currentThread())")
        sourceObservable.subscribe() { e in
            print("observer thread: \(NSThread.currentThread())")
        }
    })
}
Вывод в консоли:
--- from main thread example ---
init thread: {number = 1, name = main}
curl -X GET
"https://github.com/" -i -v
Success (944ms): Status 200
observer thread: {number = 3, name = (null)}
observer thread: {number = 3, name = (null)}
--- from another queue example ---
init thread: {number = 1, name = main}
queue1 thread: {number = 3, name = (null)}
curl -X GET
"https://github.com/" -i -v
Success (956ms): Status 200
observer thread: {number = 4, name = (null)}
observer thread: {number = 4, name = (null)}
В обоих примерах я не использую observeOn. Как видно в обоих случаях код внутри observer'а выполняется не в потоке того кода который сделал subscribe, а в том, что вернулся из rx_response (в этом можно убедиться, проставив логирование потоков внутри файла NSURLSession+Rx из проекта Rx)
public func rx_response(request: NSURLRequest) -> Observable<(NSData, NSHTTPURLResponse)> {
	return Observable.create { observer in
		print("RXRESPONSE thread: \(NSThread.currentThread())")
......
            let task = self.dataTaskWithRequest(request) { (data, response, error) in
print("TASK thread: \(NSThread.currentThread())")
c) if an error occurs while processing Observable code, then in Debug mode we catch fatalError, and in Release - the error "Binding error to UI: Argument out of range." and there is an automatic untying of everything involved in the UI to this Observable.
To check how this happens - I slightly modified the original IntroductionExampleViewController. I commented out the binding to disposeButton.rx_tap, instead I made mine (on the github I commented out my version so that I could change the implementation on the fly)
disposeButton.rx_tap.debug("rx_tap")
    .flatMap{ value in
    return Observable.create{ observer in
        observer.on(.Next("1"))
        observer.onError(RxError.ArgumentOutOfRange)
        return NopDisposable.instance
    }
}
.bindTo(a.rx_text)
.addDisposableTo(disposeBag)
In Release mode, it appears in the console at startup
2016-04-30 02:02:41.486: rx_tap -> subscribedAnd when you first press the button
2016-04-30 02:02:48.248: rx_tap -> Event Next(())
Binding error to UI: Argument out of range.
2016-04-30 02:02:48.248: rx_tap -> disposed
Further pressing the button no longer leads to anything, because rx_tap became disposed
As a result, in order not to follow these points and Driver was created, it guarantees just three things
a) the data will be shared using shareReplayLatestWhileConnected
b) the stream is executed on the MainScheduler (roughly speaking the UI stream)
c) no errors will be generated ( we decide what value to return instead of an error)
Thus, the creation of the driver can be represented as it is done in the official documentation
let safeSequence = xs
  .observeOn(MainScheduler.instance) // observe events on main scheduler
  .catchErrorJustReturn(onErrorJustReturn) // can't error out
  .shareReplayLatestWhileConnected         // side effects sharing
return Driver(raw: safeSequence)           // wrap it up
If we see somewhere drive () instead of subscribe (), we understand that we can work safely with ui.
Now let's look at an example of GitHubSignup, where the code is compared directly with Driver and without it.
Without using Driver, the viewModel creation code will be as follows:
let viewModel = GithubSignupViewModel1(
    input: (
        username: usernameOutlet.rx_text.asObservable(),
        password: passwordOutlet.rx_text.asObservable(),
        repeatedPassword: repeatedPasswordOutlet.rx_text.asObservable(),
        loginTaps: signupOutlet.rx_tap.asObservable()
    )
    ...
because rx_text - ControlProperty, then asObservable returns an internal Observable without any transformations.
Now, as will be with Driver
let viewModel = GithubSignupViewModel2(
    input: (
        username: usernameOutlet.rx_text.asDriver(),
        password: passwordOutlet.rx_text.asDriver(),
        repeatedPassword: repeatedPasswordOutlet.rx_text.asDriver(),
        loginTaps: signupOutlet.rx_tap.asDriver()
    ),
    ...
The difference is small, instead of asObservable - asDriver, which leads to the fulfillment of the above 3 conditions.
If we take the application, the difference is also minimal, without Driver subscribe / bind and their modifications are used
viewModel.signupEnabled
    .subscribeNext { [weak self] valid  in
        self?.signupOutlet.enabled = valid
        self?.signupOutlet.alpha = valid ? 1.0 : 0.5
    }
    .addDisposableTo(disposeBag)
viewModel.validatedUsername
    .bindTo(usernameValidationOutlet.ex_validationResult)
    .addDisposableTo(disposeBag)
With Driver we use drive and its modifications
viewModel.signupEnabled
    .driveNext { [weak self] valid  in
        self?.signupOutlet.enabled = valid
        self?.signupOutlet.alpha = valid ? 1.0 : 0.5
    }
    .addDisposableTo(disposeBag)
viewModel.validatedUsername
    .drive(usernameValidationOutlet.ex_validationResult)
    .addDisposableTo(disposeBag)
It’s a little more interesting to take a look at GithubSignupViewModel1 / GithubSignupViewModel2 where Driver is created
Verbose code in GithubSignupViewModel1
validatedUsername = input.username
	.flatMapLatest { username in
	    return validationService.validateUsername(username)
	        .observeOn(MainScheduler.instance)
	        .catchErrorJustReturn(.Failed(message: "Error contacting server"))
	}
	.shareReplay(1)
simplified to
validatedUsername = input.username
	.flatMapLatest { username in
	    return validationService.validateUsername(username)
	        .asDriver(onErrorJustReturn: .Failed(message: "Error contacting server"))
	}
A sound application of this knowledge should already protect against basic mistakes when working with the UI. But still this is not enough, you need to understand how the standard UI elements for working with Rx are expanded, so that if necessary, write your own extensions.
UIBindingObserver
2) using the GeolocationViewController.swift as an example, you can see how to hang your own Observers on UI elements
private extension UILabel {
    var rx_driveCoordinates: AnyObserver {
        return UIBindingObserver(UIElement: self) { label, location in
            label.text = "Lat: \(location.latitude)\nLon: \(location.longitude)"
        }.asObserver()
    }
}
So, UIBindingObserver is a generic helper class that allows you to bind the parameter passed to the closure (in our case location) to changes in the property / properties of the passed object (in our case, the text property). UIBindingObserver is parameterized by the class of the object (in our case, UILabel, because extension UILabel), both the object (label) and the value with which we will change the state of the object (location) will be passed as parameters to the closure
Type for the location parameter in This example is determined automatically by parameterizing the return value of AnyObserver
This code for example will not work
var rx_driveCoordinates: AnyObserver {
    let observer = UIBindingObserver(UIElement: self) { label, location in
        label.text = "Lat: \(location.latitude)\nLon: \(location.longitude)"
    }
    return observer.asObserver()
}
Indeed, at the time of creation of the observer, - UIBindingObserver has no idea what type the location will be, because, unlike the original, it does not immediately return from the closure. The “magic” of auto-detecting types will not work.
But this will already work, because when creating the UIBindingObserver, we explicitly specified the type of all parameters
var rx_driveCoordinates: AnyObserver {
    let uiBindingObserver: UIBindingObserver = UIBindingObserver(UIElement: self) { label, location in
        label.text = "Lat: \(location.latitude)\nLon: \(location.longitude)"
    }
    return uiBindingObserver.asObserver()
}
To summarize. On the one hand, this remark is not directly related to RxSwift, it is rather a reference to how Swift works with the types of transferred values and their automatic recognition, which saves us from the routine explicit type specification. On the other hand, it is important to understand that there is no magic in RXSwift binders. With the knowledge of where it comes from and transmitted, we can come up with a task for fixing - for example, we want UILabel's text color to change color depending on the value of a parameter of type Bool passed to the closure. If it is true, let the text color turn red, and black if false.
All that is needed is to parameterize the Bool returned when the Observer is defined, well, use this knowledge correctly inside the closure
var rx_wasError: AnyObserver {
    return UIBindingObserver(UIElement: self) { label, error in
        label.textColor = error ? UIColor.redColor() : UIColor.blackColor()
        }.asObserver()
}
Well, the last point, why don't we return a UIBindingObserver, why cast to AnyObserver? Because otherwise we would have to parameterize the return type with the object type (UILabel), which is absolutely not important in the framework of the task.
var rx_driveCoordinatesUIB: UIBindingObserver {
    return UIBindingObserver(UIElement: self) { label, location in
        label.text = "Lat: \(location.latitude)\nLon: \(location.longitude)"
        }
}
Are we right? We look into the definition of AnyObserver
/ **
A type-erased `ObserverType`.
Forwards operations to an arbitrary underlying observer type with the same `Element` type, hiding the specifics of the underlying observer type.
* /
Indeed, AnyObserver is a wrapper hiding the type of the passed object, leaving only the type of the parameter passed to the closure.
The next extension, thanks to the knowledge gained, is easy to read. Depending on the parameter passed to the closure of type Bool, we hide the UIView, or vice versa, make it visible.
private extension UIView {
    var rx_driveAuthorization: AnyObserver {
        return UIBindingObserver(UIElement: self) { view, authorized in
            if authorized {
                view.hidden = true
                view.superview?.sendSubviewToBack(view)
            }
            else {
                view.hidden = false
                view.superview?.bringSubviewToFront(view)
            }
        }.asObserver()
    }
}
Controlvent
3) In order to process the target-event pattern in the Rx environment, a ControlEvent structure was introduced <>
It has the following properties:
- its code will never crash -
no initial value will be sent when subscribing
- when the memory is freed up, the control will generate .Completed
- it will never go outside no errors
- all events will be executed on MainScheduler
Let's consider the example of pressing a simple button. An extension has been created for UIButton where the rx_tap property is defined
extension UIButton {
    /**
    Reactive wrapper for `TouchUpInside` control event.
    */
    public var rx_tap: ControlEvent {
		return rx_controlEvent(.TouchUpInside)
    }
}
For UIControl, the extension defines a method
public func rx_controlEvent(controlEvents: UIControlEvents) -> ControlEvent {
    let source: Observable = Observable.create { [weak self] observer in
        MainScheduler.ensureExecutingOnScheduler() // убеждаемся что мы в Main потоке
        guard let control = self else { // если контрол уже не существует - генерируем .Competed
            observer.on(.Completed)
            return NopDisposable.instance
        }
        // самое важное, создаем ControlTarget на основании текущего контрола, переданных в качестве параметров событий на который мы должны реагировать и callback который будет вызываться при срабатывании события
        let controlTarget = ControlTarget(control: control, controlEvents: controlEvents) {
            control in
            observer.on(.Next())
        }
        return AnonymousDisposable {
            controlTarget.dispose()
        }
    }.takeUntil(rx_deallocated) // заканчиваем генерировать элементы при деаллокации контрола
    return ControlEvent(events: source)
}
Inside the ControlTarget class, the
control.addTarget events are already subscribed (self, action: selector, forControlEvents: controlEvents)
Using the same extensions is as simple as regular Observable
Consider the GeolocationExample, or rather the GeolocationViewController class
class GeolocationViewController: ViewController {
    @IBOutlet weak private var button: UIButton!
...
    override func viewDidLoad() {
...
        button.rx_tap
            .bindNext { [weak self] in
                self?.openAppPreferences()
            }
            .addDisposableTo(disposeBag)
...
    }
...
}
Here we simply make a bindNext for each click of a button, and in the closure code we open the settings panel.
bindNext, by the way, is just a wrapper over subscribe with a check that we are in the main thread
public func bindNext(onNext: E -> Void) -> Disposable {
    return subscribe(onNext: onNext, onError: { error in
        let error = "Binding error: \(error)"
        #if DEBUG
            rxFatalError(error)
        #else
            print(error)
        #endif
    })
}
Also, at any time, if necessary, we can get from the ControlEvent - Observable using .asObservable () or Driver using .asDriver ()
Controlproperty
4) To make a two-way binding to the properties of the UI element, the ControlProperty <> structure comes to the rescue with the following properties
- its code will never fall
- shareReplay (1)
is applied to the sequence of elements - when the memory is freed up by the control, .Completed will be generated
- no output will ever come out errors
- all events will be executed on MainScheduler
For an example, of course, take the text property from UITextField
extension UITextField {
    /**
    Reactive wrapper for `text` property.
    */
    public var rx_text: ControlProperty {
        return UIControl.rx_value(
            self,
            getter: { textField in
                textField.text ?? ""
            }, setter: { textField, value in
                textField.text = value
            }
        )
    }
}
let's see what the rx_value method is
static func rx_value(control: C, getter: (C) -> T, setter: (C, T) -> Void) -> ControlProperty {
        let source: Observable = Observable.create { [weak weakControl = control] observer in
                guard let control = weakControl else { // если контрол уже не существует - генерируем .Competed
                    observer.on(.Completed)
                    return NopDisposable.instance
                }
                observer.on(.Next(getter(control))) // сразу генерируем новый элемент последовательности на основе начального значения свойства контрола посредством переданного getter'а
				// сюрприз, и снова рассмотренный ранее ControlTarget
                let controlTarget = ControlTarget(control: control as! UIControl, controlEvents: [.AllEditingEvents, .ValueChanged]) { _ in
                    if let control = weakControl {
                        observer.on(.Next(getter(control)))
                    }
                }
                return AnonymousDisposable {
                    controlTarget.dispose()
                }
            }
            .distinctUntilChanged() // срабатывает только если значение действительно поменялось
            .takeUntil((control as! NSObject).rx_deallocated) // заканчиваем генерировать элементы при деаллокации контрола
        // и снова сюрприз, старый добрый UIBindingObserver позволяет сделать привязку элементов Observable к полю через переданный setter
        let bindingObserver = UIBindingObserver(UIElement: control, binding: setter)
        return ControlProperty(values: source, valueSink: bindingObserver)
    }
}
As we can see, two-way binding is a combination of the ControlTarget and UIBindingObserver already considered.
If you look at the definition of ControlProperty, you can see that it implements the ControlPropertyType protocol, which in turn inherits from both ObservableType and ObserverType.
Take another look at the IntroductionExampleViewController code
@IBOutlet var a: NSTextField!
@IBOutlet var b: NSTextField!
@IBOutlet var c: NSTextField!
...
override func viewDidLoad() {
...
	//Таким образом ControlProperty может выступать как в качестве Observable
    let sum = Observable.combineLatest(a.rx_text, b.rx_text) { (a: String, b: String) -> (Int, Int) in
        return (Int(a) ?? 0, Int(b) ?? 0)
    }
...
    sum
        .map { (a, b) in
            return "\(a + b)"
        }
        .bindTo(c.rx_text) //так и в качестве Observer'а
        .addDisposableTo(disposeBag)
}
If we need both behaviors at the same time, i.e. do two-way binding - you can see how to create your own operator in Rx code
infix operator <-> {
}
func <-> (property: ControlProperty, variable: Variable) -> Disposable {
    let bindToUIDisposable = variable.asObservable()
        .bindTo(property)
    let bindToVariable = property
        .subscribe(onNext: { n in
            variable.value = n
        }, onCompleted:  {
            bindToUIDisposable.dispose()
        })
    return StableCompositeDisposable.create(bindToUIDisposable, bindToVariable)
}
The operator allows you to create a binding simply and clearly.
let textViewValue = Variable("")
textView.rx_text <-> textViewValue
DelegateProxy
5) the cornerstone of Cocoa architecture - delegates. But it is usually assumed that there is one delegate per object, therefore, the DelegateProxy class has been added to Rx, which allows you to use both a regular delegate and Rx sequences at the same time.
From the point of view of the user, the existing API is not very complicated.
Take UISearchBar, for example, we want to respond somehow to clicking the Cancel button. For us, in the extension for the UISearchBar class, a variable is created
public var rx_cancelButtonClicked: ControlEvent {
        let source: Observable = rx_delegate.observe(#selector(UISearchBarDelegate.searchBarCancelButtonClicked(_:)))
            .map { _ in
                return ()
            }
        return ControlEvent(events: source)
    }
Working with her is easy and simple:
searchBar.rx_cancelButtonClicked.subscribeNext { _ in
            // выполняем нужные действия
        }
But working with tableView upset me a little.
If we take an example (SimpleTableViewExample), then everything is simple
class SimpleTableViewExampleViewController : ViewController {
    @IBOutlet weak var tableView: UITableView!
    override func viewDidLoad() {
        super.viewDidLoad()
        // создаем Observable  массивом элементов
        let items = Observable.just([
            "First Item",
            "Second Item",
            "Third Item"
        ])
		// связываем эти элементы с tableView (внутри автоматически создается прокси dataSource), так же указывая фабрику для создания ячеек
        items
            .bindTo(tableView.rx_itemsWithCellIdentifier("Cell", cellType: UITableViewCell.self)) { (row, element, cell) in
                cell.textLabel?.text = "\(element) @ row \(row)"
            }
            .addDisposableTo(disposeBag)
// добавляем реакцию на нажатие по строке, rx_modelSelected - обертка над tableView:didSelectRowAtIndexPath:
        tableView
            .rx_modelSelected(String)
            .subscribeNext { value in
                DefaultWireframe.presentAlert("Tapped `\(value)`")
            }
            .addDisposableTo(disposeBag)
// добавляем реакцию на нажатие по кнопки информации - обертка над tableView(_:accessoryButtonTappedForRowWithIndexPath:)
        tableView
            .rx_itemAccessoryButtonTapped
            .subscribeNext { indexPath in
                DefaultWireframe.presentAlert("Tapped Detail @ \(indexPath.section),\(indexPath.row)")
            }
            .addDisposableTo(disposeBag)
    }
}
Cool, rx_itemsWithCellIdentifier is defined in Rx itself, so it is accessible to everyone. OK. And what about the table with sections? Let's see an example of SimpleTableViewExampleSectioned
class SimpleTableViewExampleSectionedViewController
    : ViewController
    , UITableViewDelegate {
    @IBOutlet weak var tableView: UITableView!
    let dataSource = RxTableViewSectionedReloadDataSource>()
    override func viewDidLoad() {
        super.viewDidLoad()
        let dataSource = self.dataSource
        let items = Observable.just([
            SectionModel(model: "First section", items: [
                    1.0,
                    2.0,
                    3.0
                ]),
            SectionModel(model: "Second section", items: [
                    1.0,
                    2.0,
                    3.0
                ]),
            SectionModel(model: "Second section", items: [
                    1.0,
                    2.0,
                    3.0
                ])
            ])
        dataSource.configureCell = { (_, tv, indexPath, element) in
            let cell = tv.dequeueReusableCellWithIdentifier("Cell")!
            cell.textLabel?.text = "\(element) @ row \(indexPath.row)"
            return cell
        }
        items
            .bindTo(tableView.rx_itemsWithDataSource(dataSource))
            .addDisposableTo(disposeBag)
        tableView
            .rx_itemSelected
            .map { indexPath in
                return (indexPath, dataSource.itemAtIndexPath(indexPath))
            }
            .subscribeNext { indexPath, model in
                DefaultWireframe.presentAlert("Tapped `\(model)` @ \(indexPath)")
            }
            .addDisposableTo(disposeBag)
        tableView
            .rx_setDelegate(self)
            .addDisposableTo(disposeBag)
    }
    func tableView(tableView: UITableView, viewForHeaderInSection section: Int) -> UIView? {
        let label = UILabel(frame: CGRect.zero)
        label.text = dataSource.sectionAtIndex(section).model ?? ""
        return label
    }
}
Pay attention to the RxTableViewSectionedReloadDataSource, but where is it defined? In the RxExample project, i.e. as I understand it, this is not a run-in solution, which is recommended to everyone, but for example. If you look inside, you understand why, there for every sneeze they suggest reloading data for the entire table
public func tableView(tableView: UITableView, observedEvent: Event) {
    UIBindingObserver(UIElement: self) { dataSource, element in
        dataSource.setSections(element)
        tableView.reloadData()
    }.on(observedEvent)
}
To put it mildly, not the best solution. What are the alternatives? Again, the RxTableViewSectionedAnimatedDataSource class is defined in RxExample. For an example of working with this dataSource, an example of TableViewPartialUpdates is provided. In comparison, it demonstrates how to update data in tables with partitions both with a complete data reload (RxTableViewSectionedReloadDataSource) and partial (RxTableViewSectionedAnimatedDataSource). Here is an example of working with CollectionView. But all this without taking into account the possibility of editing.
Well, I’m in the hands of cards, I’ll create a simple example of working with a table with sections and the ability to edit. The example of TableViewEditPartialUpdate I put to the rest of the examples in RxExample.
Given that this was my first experience with a “combat” GUI code in RxSwift, I immediately received my portion of the rake.
class TablViewControllerEditPartialUpdate : ViewController {
    @IBOutlet weak var tableView: UITableView!
    var sections = Variable([NumberSection]())
    override func viewDidLoad() {
        super.viewDidLoad()
        // NumberSection - на самом деле typealias AnimatableSectionModel
        let items = [
            NumberSection(model: "Section 1", items: [1, 3, 5]),
            NumberSection(model: "Section 2", items: [2, 4, 6, 8]),
            NumberSection(model: "Section 3", items: [7, 11, 10])
        ]
        self.sections.value = items
        let editableDataSource = RxTableViewSectionedAnimatedDataSource()
        configDataSource(editableDataSource)
        // замечу что используется rx_itemsAnimatedWithDataSource, а не rx_itemsWithDataSource
        self.sections.asObservable()
            .bindTo(tableView.rx_itemsAnimatedWithDataSource(editableDataSource))
            .addDisposableTo(disposeBag)
        // удаляем элемент из модели
        tableView.rx_itemDeleted.subscribeNext{[weak self] item in
            if let controller = self {
                controller.sections.value[item.section].items.removeAtIndex(item.row)
            }
            }.addDisposableTo(disposeBag)
        // извлекаем объект при нажатии на строку таблицы
        tableView
            .rx_modelSelected(IdentifiableValue)
            .subscribeNext { i in
                DefaultWireframe.presentAlert("Tapped `\(i)`")
            }
            .addDisposableTo(disposeBag)
        // получаем NSIndexPath при нажатии на строку таблицы, что очень помогло при определении типа объекта
        tableView
            .rx_itemSelected
            .subscribeNext { [weak self]  i in
                if let controller = self {
                    print("Tapped `\(i)` - \(controller.sections.value[i.section].items[i.row].dynamicType)")
                }
            }
            .addDisposableTo(disposeBag)
    }
    func configDataSource(dataSource: RxTableViewSectionedDataSource) {
        dataSource.configureCell = { (_, tv, ip, i) in
            let cell = tv.dequeueReusableCellWithIdentifier("Cell")
                ?? UITableViewCell(style:.Default, reuseIdentifier: "Cell")
            cell.textLabel!.text = "\(i)"
            return cell
        }
        dataSource.titleForHeaderInSection = { (ds, section: Int) -> String in
            return dataSource.sectionAtIndex(section).model
        }
        dataSource.canEditRowAtIndexPath = { (ds, ip) in
            return true
        }
    }
}
1) I wrote this code, registered my class for the TableViewController created in the storyboard and tried to run it. Error.
fatal error: Failure converting from to UITableViewDataSource: file /Users/SparkLone/projects/repos/RxSwift/RxCocoa/Common/RxCocoa.swift, line 340 Wow. Not immediately, I realized what was happening. A lot of Rx code was poked around in a futile attempt to get through the wilds. And the thing was that by default when creating a ViewTableController in the designer, he indicates our controller as a dataSource. And when Rx creates a proxy, it tries to indicate the current dataSource as forwardToDelegate. And my controller does not implement the DataSource in canonical form. Of course there is no one to blame, but apparently starting to work with a library of this kind, you unconsciously expect some tricky bugs.
2) Okay, they wanted tricky bugs, please.
Initially instead of string
rx_modelSelected(IdentifiableValue) was
rx_modelSelected(Int)and when I clicked on the row of the table, I caught another wonderful mistake.
fatal error: Failure converting from 4 to Int: file /Users/SparkLone/projects/repos/RxSwift/RxCocoa/Common/RxCocoa.swift, line 340Well yes, how can 4 lead to int then. After another unsuccessful study of the insides of the library to find out what type should be instead of Int, I guessed to deduce it this way
tableView
    .rx_itemSelected
    .subscribeNext { [weak self]  i in
        if let controller = self {
            print("Tapped `\(i)` - \(controller.sections.value[i.section].items[i.row].dynamicType)")
        }
    }
    .addDisposableTo(disposeBag)
I can take this error into my account with a stretch, nowhere is there any mention of any IdentifiableValue in the examples.
3) initially, I indicated as the data for the first section not [1, 3, 5] but [1, 3, 3] The
application started normally, but when I tried to delete a line in a completely different section, I already got this error
precondition failed: Item 3 has already been indexed at (0, 1): file /Users/SparkLone/projects/repos/RxSwift/RxExample/RxDataSources/DataSources/Differentiator.swift, line 130As it turned out, the protection against duplicates in the rows of the table was built in, the values for the rows should be unique. As you might guess, I didn’t find out immediately either.
It is clear that all the errors seem to be sort of frivolous, and you can’t step on the same rake a second time. But expecting to spend half an hour to outline a simple example of working with a table, it is extremely unpleasant to dive into the inside of the library to understand why everything does not work again. And given the non-linearity of execution, even with the help of debugging, it is far from easy (fast) to understand what’s the matter. I really hope that over time, standardization of all extensions will be carried out, more detailed and intelligible documentation will be written. For me, the first pancake was lumpy.
Ok, let's look at how it all works.
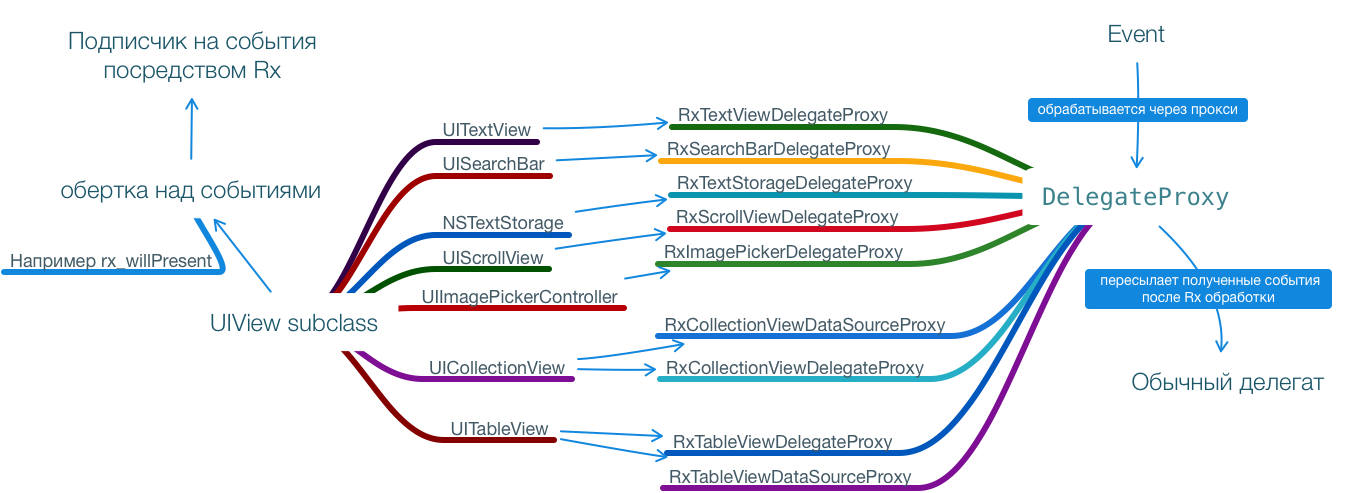
We create an extension over the UIView subclass, inside it we define the variable rx_delegate, which in turn creates a proxy for the delegate. Next, in the extension, we write wrappers over the events that we plan to handle. The client subscribes to these event wrappers, and when such an event occurs, the proxy first generates an Observable element, which is received by the client, then, if there is, it sends (makes forward so that the protocol API is clear) to its regular delegate, if it was assigned before creating the Rx delegate .
The protocol is based
protocol DelegateProxyType {
	// функция отвечающая за создание прокси
	static func createProxyForObject(object: AnyObject) -> AnyObject
 	// прикрепляем прокси к объекту посредством objc_setAssociatedObject
 	static func assignProxy(proxy: AnyObject, toObject object: AnyObject)
	// получаем прикрепленный прокси к объекту посредством objc_getAssociatedObject
    static func assignedProxyFor(object: AnyObject) -> AnyObject?
    // функции отвечающие за прикрепление / получении доступа к обычному(не Rx) делегату
    func setForwardToDelegate(forwardToDelegate: AnyObject?, retainDelegate: Bool)
    func forwardToDelegate() -> AnyObject?
    // функции отвечающие за присвоение / возврат делегату-прокси, с приведением типов
    static func currentDelegateFor(object: AnyObject) -> AnyObject?
    static func setCurrentDelegate(delegate: AnyObject?, toObject object: AnyObject)
}
There is also a base class DelegateProxy that implements the first 5 methods from this protocol. The remaining two usually override specific extensions, as they know what type the UI object should be and what name the property containing the delegate in a particular UIControl has
class DelegateProxy {
	public class func createProxyForObject(object: AnyObject) -> AnyObject {}
	public class func assignedProxyFor(object: AnyObject) -> AnyObject? {}
	public class func assignProxy(proxy: AnyObject, toObject object: AnyObject) {}
	public func setForwardToDelegate(delegate: AnyObject?, retainDelegate: Bool) {}
	public func forwardToDelegate() -> AnyObject? {}
}
To make it a little clearer, consider the UISearchController class as an example.
An extension was created for him
extension UISearchController {
	// создаем обертку над делегатом, создающую наш прокси RxSearchControllerDelegateProxy
    public var rx_delegate: DelegateProxy {
        return proxyForObject(RxSearchControllerDelegateProxy.self, self)
    }
    // Rx обертка над конкретным событием UISearchControllerDelegate.didDismissSearchController(_:)
    public var rx_didDismiss: Observable {
        return rx_delegate
            .observe(#selector(UISearchControllerDelegate.didDismissSearchController(_:)))
            .map {_ in}
    }
    ...
}
The proxy for UISearchController is RxSearchControllerDelegateProxy
public class RxSearchControllerDelegateProxy
    : DelegateProxy
    , DelegateProxyType
    , UISearchControllerDelegate {
    // для проставление делегата (нашего прокси) нам нужно знать тип класса (UISearchController) и имя свойства для делегата (delegate)
    public class func setCurrentDelegate(delegate: AnyObject?, toObject object: AnyObject) {
        let searchController: UISearchController = castOrFatalError(object)
        searchController.delegate = castOptionalOrFatalError(delegate)
    }
    // те же знания необходимы и для того, чтобы вернуть прокси по запросу
    public class func currentDelegateFor(object: AnyObject) -> AnyObject? {
        let searchController: UISearchController = castOrFatalError(object)
        return searchController.delegate
    }
}
Digging a little deeper.
The proxy in the example is created using
proxyForObject(RxSearchControllerDelegateProxy.self, self)proxyForObject is a global function, the core of working with proxies for delegates. The proxy type (RxSearchControllerDelegateProxy.self) and the object to which we will attach the proxy are passed to it as parameters.
In our case, type will be RxSearchControllerDelegateProxy, object - the current object of type UISearchController
public func proxyForObject(type: P.Type, _ object: AnyObject) -> P {
    MainScheduler.ensureExecutingOnScheduler() // проверяем что код выполняется в главном потоке
    let maybeProxy = P.assignedProxyFor(object) as? P // assignedProxyFor определена в DelegateProxy и больше нигде не переопределяется
    let proxy: P
    if maybeProxy == nil {
        proxy = P.createProxyForObject(object) as! P // создаем прокси (в нашем случае типа RxSearchControllerDelegateProxy). Метод createProxyForObject определен в DelegateProxy и при инициализации просто сохраняет объект для которого является прокси, но его могут переопределять классы с наследованием, для иерархии которых каждому нужен свой делегат
        P.assignProxy(proxy, toObject: object) // прикрепляем новый прокси к объекту. assignProxy так же определен в DelegateProxy, и его не переопределяют, как и assignedProxyFor
        assert(P.assignedProxyFor(object) === proxy)
    }
    else {
        proxy = maybeProxy! // если прокси уже был прикреплен ранее - берем его
    }
    let currentDelegate: AnyObject? = P.currentDelegateFor(object) // возвращает текущий делегат содержащийся в свойстве UI объекта (обычно delegate/dataSource). Все кто реализуют протокол DelegateProxy переопределяют этот метод, т.к. там есть приведение as! к типу объекта к которому мы прикрепляем прокси
    if currentDelegate !== proxy { // если текущий делегат не идентичен текущей прокси
        proxy.setForwardToDelegate(currentDelegate, retainDelegate: false) // проставляем старый делегат в качестве делегата к которому будут пересылаться сообщения. Таким образом у UI объекта будет одновременно и прокси делегат и обычный. Изначальная реализация лежит в Objective-C части Rx, а точнее в _RXDelegateProxy.
        P.setCurrentDelegate(proxy, toObject: object) // все кто соответствует протоколу DelegateProxy переопределяют этот метод, т.к. там есть приведение as! к типу объекта к которому мы прикрепляем прокси
        assert(P.currentDelegateFor(object) === proxy)
        assert(proxy.forwardToDelegate() === currentDelegate)
    }
    return proxy
}
Thus, this function creates a proxy if it has not been created before, puts it as the current delegate, and if it does, it saves the regular delegate.
I don’t really want to go deep into the implementation, I can only say that method substitution when calling delegate methods is done by standard swizzling from Objective-C code.
I created a UML sequence diagram, I hope it becomes a little clearer how the proxy is created (the picture is clickable). And now diving a little deeper, for the last time, I promise. What if our UI class has a delegate, but it is an inheritor from another UI class that also has a delegate? The factory method will help us.

Consider the UITableView as an example. It is the descendant of UIScrollView, and which also has a delegate. Therefore, rx_delegate is defined in the parent class (UIScrollView), and not in the UITableView.
The proxy for RxTableViewDelegateProxy is the successor to RxScrollViewDelegateProxy
extension UIScrollView {
    /**
    Factory method that enables subclasses to implement their own `rx_delegate`.
    - returns: Instance of delegate proxy that wraps `delegate`.
    */
    public func rx_createDelegateProxy() -> RxScrollViewDelegateProxy {
        return RxScrollViewDelegateProxy(parentObject: self)
    }
    /**
    Reactive wrapper for `delegate`.
    For more information take a look at `DelegateProxyType` protocol documentation.
    */
    public var rx_delegate: DelegateProxy {
        return proxyForObject(RxScrollViewDelegateProxy.self, self)
    }
...
}
In his proxy, the createProxyForObject class method is overridden, which delegates the creation of a proxy to the rx_createDelegateProxy method
public class RxScrollViewDelegateProxy
    : DelegateProxy
    , UIScrollViewDelegate
    , DelegateProxyType {
    public override class func createProxyForObject(object: AnyObject) -> AnyObject {
        let scrollView = (object as! UIScrollView)
        return castOrFatalError(scrollView.rx_createDelegateProxy())
    }
    ...
}
In UItableView, the rx_createDelegateProxy method is overridden
extension UITableView {
    /**
    Factory method that enables subclasses to implement their own `rx_delegate`.
    - returns: Instance of delegate proxy that wraps `delegate`.
    */
    public override func rx_createDelegateProxy() -> RxScrollViewDelegateProxy {
        return RxTableViewDelegateProxy(parentObject: self)
    }
   	...
}
The RxTableViewDelegateProxy constructor invokes the parent constructor when created (in our case, RxScrollViewDelegateProxy)
public class RxTableViewDelegateProxy
    : RxScrollViewDelegateProxy
    , UITableViewDelegate {
    public weak private(set) var tableView: UITableView?
    public required init(parentObject: AnyObject) {
        self.tableView = (parentObject as! UITableView)
        super.init(parentObject: parentObject)
    }
}
Thus, the entire proxy chain is initialized.
The next UML scheme, for fun, it shows how the creation and assignment of proxies is taking into account inheritance (the picture is clickable). Summarize. RxSwift is a very interesting topic, although the current state of the project is not without roughness. Having figured out how it works, you need to think about how to correctly apply it within the framework of architecture. Well. Writing such articles on the one hand makes it deeper to understand the material, on the other hand it takes a considerable amount of time. Does it make sense to continue writing on this topic? Unfortunately, I can’t position myself as a tough architect, rather as a person in search of a “silver bullet”, so my conclusions can be both obvious and incorrect, but the path will overpower the walking one.

About all the errors, as always - in PM.