Atmel ARM Cortex-M4 microcontrollers programming and debugging under Linux operating system. Part 2
Continuation of the electronic version of the article from issue No. 2 for 2016 of the journal Components and Technologies . The author Kurnits Andrey. Link to the first part
Now that the software for developing Atmel SAM4S microcontrollers is installed and configured on the workstation, you can verify the system’s performance by creating a simple program that will light and turn off the LED on the SAM4S-EK board.
In order to build a workable program for the microcontroller, in addition to the GCC tools, the following components are needed:
To create programs for its microcontrollers, Atmel freely distributes the Atmel Software Framework (abbreviated ASF) library for C / C + languages, which contains all 5 components from the list above that are necessary for building the program.
The ASF library provides a high-level interface that is common for microcontrollers of various families and architectures: megaAVR, AVR XMEGA, AVR UC3 and SAM. The ASF library contains examples of working with various peripheral units of microcontrollers, as well as with external devices located on various evaluation boards.
Such a variety of supported microcontrollers adversely affected the ease of development of the ASF library. The library turned out to be very complex, confusing and large in size (~ 400 MB archive containing more than 70,000 files).
Even though the ASF library can be downloaded separately [8] and it is designed to use the GCC compiler as well, the author was unable to manually select the necessary files from the library to create the simplest program for the Atmel SAM4S16C microcontroller.
The author suggests this way:
1. To get a minimal compiled project, use the Atmel Studio IDE integrated development environment designed for Windows operating systems and based on Microsoft Visual Studio 2013.
2. In the future, manually add the necessary components to the resulting project by copying them from a separately downloaded ASF library.
Atmel Studio IDE is free, you can download it from the official site [ 9 ]. During installation on a computer or virtual machine running Windows, select the ARM architecture and indicate the need to install the ASF library (Fig. 5).
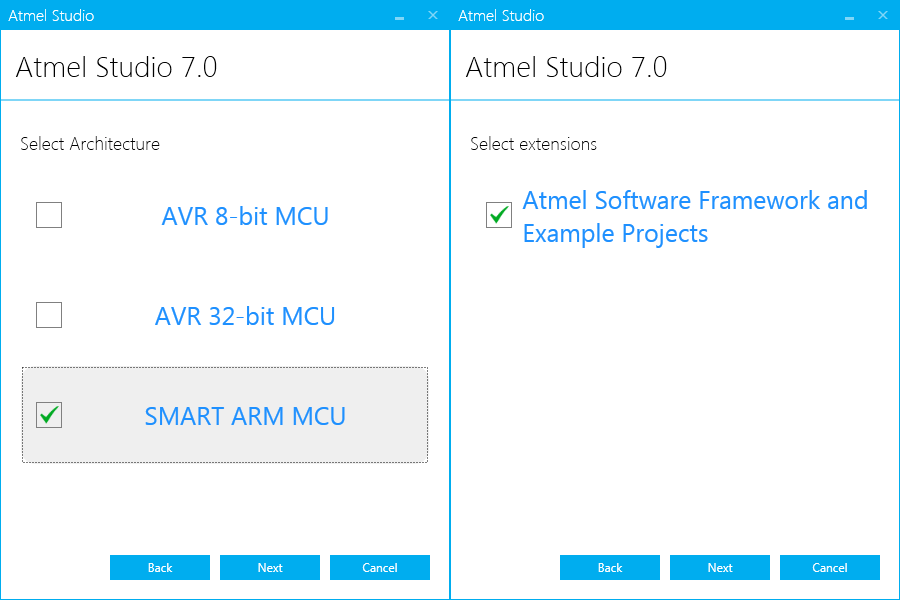
Fig. 5. Features of installing Atmel Studio IDE.
After installation, you should run the Atmel Studio IDE and create a new project by selecting the menu item "File -> New -> Project ...". Next, select the project type "GCC C ASF Board Project", as shown in Fig. 6.
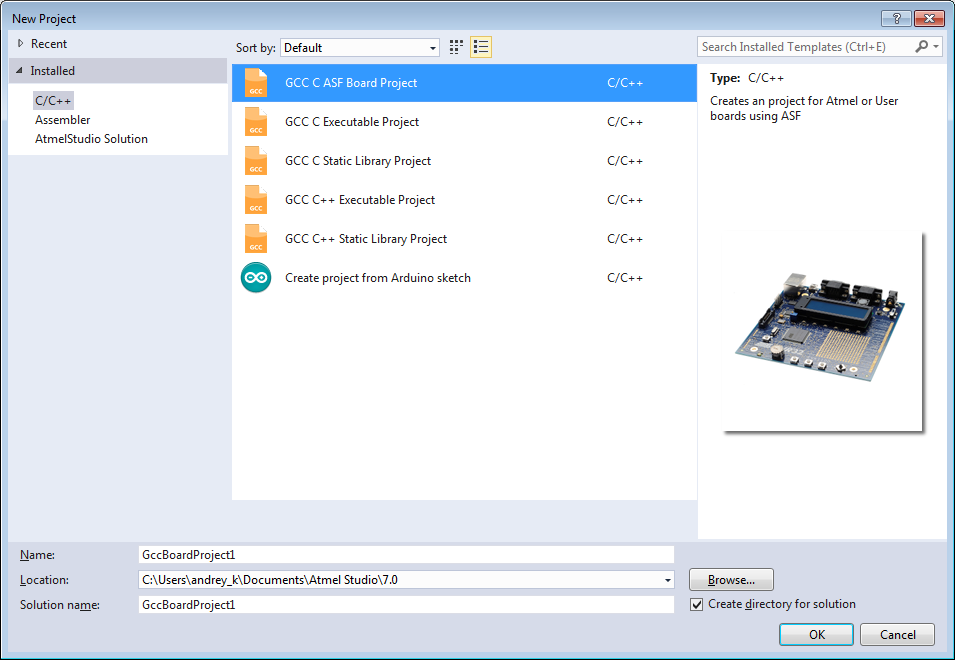
Fig. 6. Choosing a project type in Atmel Studio IDE.
Next, a window for selecting the hardware platform for which the project will be assembled opens (Fig. 7)

. 7. The choice of microcontroller
You can enter the name of the microcontroller, but in this case it is easier to set the name of the evaluation board. To do this, select “Select by Board” and select the name “SAM4S-EK” (Fig. 7). In the list below, select the item that appears with the name of the microcontroller "ATSAM4S16C" and click "Ok".
After the project is created, the source code files will be placed in the directory indicated earlier (Fig. 6) (in the case of the author c: \ Users \ andrey_k \ Documents \ Atmel Studio \ 7.0 \ GccBoardProject1 \ GccBoardProject1 \ src).
The src directory can now be transferred to the Linux operating system in the project directory, for example, in the ~ / sam / directory. Its structure is shown in Fig. 8.

Fig. 8. The structure of the simplest project
Attention should be paid to the location:
At the moment, the project does not have the delay.h component, which is necessary to obtain delays for a precisely specified time (this will be necessary for the LED to “blink”). The following shows how to add the necessary components from the ASF library as the project grows, using the example of the delay.h component. To add it, you need to copy the common / services / delay / delay.h file and the directory with all common / services / delay / sam / files to the project directory ~ / sam / src / ASF / common from the separately downloaded ASF library archive [ 8 ] / services / delay.
In addition, you must include the delay.h component in the assembly by adding the line at the end of the ~ / sam / src / asf.h file:
As you can see, adding individual components from the ASF library to the project does not present much difficulty.
The listing of the main.c file is shown below:
The board_init () function initializes the input / output ports (GPIO) of the microcontroller in accordance with the external electronic components connected to them, including configuring the input / output ports as outputs for switching on / off the LEDs located on the board. The board_init () function is located in the src / ASF / sam / borads / sam4s_ek / init.c file.
The opportunity is given to choose which ports will be initialized and which not using macro definitions in the src / config / conf_borad.h file.
The sysclk_init () function is responsible for initializing the clock block of the microcontroller. After the reset, the integrated 4 MHz RC oscillator is turned on [ 12]. The sysclk_init () function activates a generator operating from an external quartz crystal at 12 MHz, and also sets the phase-locked loop PLL, so that the clock frequency of the microcontroller core is 120 MHz.
You can change the timing settings by changing the macro definitions in the src / config / conf_clock.h file.
Then, in an infinite loop, the functions of turning on and off the LEDs of the evaluation board are successively called: LED_On () and LED_Off (). The macro definition LED1_GPIO is passed as an argument, which corresponds to the green LED connected to the PA20 port. Functions LED_On (), LED_Off () and macro definition LED1_GPIO are defined in the source files in the src / ASF / sam / borads / sam4s_ek / directory, which contains, among other things, a description of how LEDs are connected to the microcontroller pins.
Calling the delay_ms (500) function, which is part of the delay.h module added earlier, results in a delay of 0.5 seconds. The delay is implemented by empty microcontroller cycles, and there is no need to take into account the clock frequency of the microcontroller - the current frequency is taken into account inside the ASF library after calling the sysclk_init () function.
To get the executable firmware file, you need to compile a fairly large number of files. Atmel suggests using makefiles, which are instructions to the GCC compiler.
The author suggests using the QBS build automation environment built into Qt Creator [1]. To do this, you will have to create a QBS project file containing information about the source files to be compiled.
One of the advantages of QBS is that there is no need to manually enter the name of each file with the source code in the QBS file - just specify the file location directories, the rest is done by the system itself.
In the case of a successful release build (release - i.e. not for debugging, final) the QBS file contains instructions to perform the following actions:
As a result of the above actions, an ecosystem has been created for the development of Atmel SAM4S microcontrollers, which consists entirely of freely distributed programs. The ecosystem is easy to modify to use another Atmel microcontroller.
You can download the finished project at [ 11 ]. To use it, you will need the Ubuntu operating system or its derivative (Lubuntu, Kubuntu, Xubuntu) with the installed packages:
Creating, running, and debugging a primitive program on an Atmel SAM4S microcontroller
Now that the software for developing Atmel SAM4S microcontrollers is installed and configured on the workstation, you can verify the system’s performance by creating a simple program that will light and turn off the LED on the SAM4S-EK board.
In order to build a workable program for the microcontroller, in addition to the GCC tools, the following components are needed:
- CMSIS library (Cortex Microcontroller Software Interface Standard) - describes a single interface for interacting with the core of ARM Cortex-M microcontrollers - common for ARM Cortex-M microcontrollers of various manufacturers.
- A library for interacting with the peripherals of this family of microcontrollers is its own for each manufacturer, be it Atmel, STMicroelectronics, NXP, etc.
- Linker script (linker script) - a file with instructions about placing the program in the flash memory of the microcontroller, as well as about placing service areas (sections) in RAM: stack, heap, etc. For different microcontrollers with different memory sizes, different linker scripts are used.
- Syscalls.c file - contains the system functions necessary for the standard C library to work (newlib implementation). Typically, these functions are part of the operating system for which the program is intended. However, in the case of the microcontroller, which most often works without an operating system, the syscalls.c file should be included in the assembly, which for the most part contains empty system functions [10].
- In fairness, it should be noted that there are many operating systems designed specifically for microcontrollers.
- Initialization code (startup code) - responsible for filling the table of interrupt vectors with appropriate handlers, including the interrupt handler for resetting the microcontroller (reset handler).
- It also contains an implementation of the reset interrupt handler, which resets the necessary sections of memory, initializes the standard C library and transfers control to the program entry point - to the main () function.
Atmel Software Framework Library
To create programs for its microcontrollers, Atmel freely distributes the Atmel Software Framework (abbreviated ASF) library for C / C + languages, which contains all 5 components from the list above that are necessary for building the program.
The ASF library provides a high-level interface that is common for microcontrollers of various families and architectures: megaAVR, AVR XMEGA, AVR UC3 and SAM. The ASF library contains examples of working with various peripheral units of microcontrollers, as well as with external devices located on various evaluation boards.
Such a variety of supported microcontrollers adversely affected the ease of development of the ASF library. The library turned out to be very complex, confusing and large in size (~ 400 MB archive containing more than 70,000 files).
Even though the ASF library can be downloaded separately [8] and it is designed to use the GCC compiler as well, the author was unable to manually select the necessary files from the library to create the simplest program for the Atmel SAM4S16C microcontroller.
The author suggests this way:
1. To get a minimal compiled project, use the Atmel Studio IDE integrated development environment designed for Windows operating systems and based on Microsoft Visual Studio 2013.
2. In the future, manually add the necessary components to the resulting project by copying them from a separately downloaded ASF library.
Atmel Studio IDE
Atmel Studio IDE is free, you can download it from the official site [ 9 ]. During installation on a computer or virtual machine running Windows, select the ARM architecture and indicate the need to install the ASF library (Fig. 5).
Fig. 5. Features of installing Atmel Studio IDE.
After installation, you should run the Atmel Studio IDE and create a new project by selecting the menu item "File -> New -> Project ...". Next, select the project type "GCC C ASF Board Project", as shown in Fig. 6.
Fig. 6. Choosing a project type in Atmel Studio IDE.
Next, a window for selecting the hardware platform for which the project will be assembled opens (Fig. 7)
. 7. The choice of microcontroller
You can enter the name of the microcontroller, but in this case it is easier to set the name of the evaluation board. To do this, select “Select by Board” and select the name “SAM4S-EK” (Fig. 7). In the list below, select the item that appears with the name of the microcontroller "ATSAM4S16C" and click "Ok".
After the project is created, the source code files will be placed in the directory indicated earlier (Fig. 6) (in the case of the author c: \ Users \ andrey_k \ Documents \ Atmel Studio \ 7.0 \ GccBoardProject1 \ GccBoardProject1 \ src).
The src directory can now be transferred to the Linux operating system in the project directory, for example, in the ~ / sam / directory. Its structure is shown in Fig. 8.
Fig. 8. The structure of the simplest project
Attention should be paid to the location:
- The linker script is the file ~ / sam / src / ASF / sam / utils / linker_scripts / sam4s / sam4s16 / gcc / flash.ld
- The initialization code and the interrupt vector table are in the file ~ / sam / src / ASF / sam / utils / cmsis / sam4s / source / templates / gcc / startup_sam4s.c
- The syscalls.c file is located in the ~ / sam / src / ASF / sam / utils / syscalls / gcc directory.
Adding a module from the ASF library
At the moment, the project does not have the delay.h component, which is necessary to obtain delays for a precisely specified time (this will be necessary for the LED to “blink”). The following shows how to add the necessary components from the ASF library as the project grows, using the example of the delay.h component. To add it, you need to copy the common / services / delay / delay.h file and the directory with all common / services / delay / sam / files to the project directory ~ / sam / src / ASF / common from the separately downloaded ASF library archive [ 8 ] / services / delay.
In addition, you must include the delay.h component in the assembly by adding the line at the end of the ~ / sam / src / asf.h file:
#include As you can see, adding individual components from the ASF library to the project does not present much difficulty.
Simple program code
The listing of the main.c file is shown below:
#include
int main (void) {
    board_init();
    sysclk_init();
    while (1) {
        LED_On(LED1_GPIO);
        delay_ms(500);
        LED_Off(LED1_GPIO);
        delay_ms(500);
    }
    return 0;
}
The board_init () function initializes the input / output ports (GPIO) of the microcontroller in accordance with the external electronic components connected to them, including configuring the input / output ports as outputs for switching on / off the LEDs located on the board. The board_init () function is located in the src / ASF / sam / borads / sam4s_ek / init.c file.
The opportunity is given to choose which ports will be initialized and which not using macro definitions in the src / config / conf_borad.h file.
The sysclk_init () function is responsible for initializing the clock block of the microcontroller. After the reset, the integrated 4 MHz RC oscillator is turned on [ 12]. The sysclk_init () function activates a generator operating from an external quartz crystal at 12 MHz, and also sets the phase-locked loop PLL, so that the clock frequency of the microcontroller core is 120 MHz.
You can change the timing settings by changing the macro definitions in the src / config / conf_clock.h file.
Then, in an infinite loop, the functions of turning on and off the LEDs of the evaluation board are successively called: LED_On () and LED_Off (). The macro definition LED1_GPIO is passed as an argument, which corresponds to the green LED connected to the PA20 port. Functions LED_On (), LED_Off () and macro definition LED1_GPIO are defined in the source files in the src / ASF / sam / borads / sam4s_ek / directory, which contains, among other things, a description of how LEDs are connected to the microcontroller pins.
Calling the delay_ms (500) function, which is part of the delay.h module added earlier, results in a delay of 0.5 seconds. The delay is implemented by empty microcontroller cycles, and there is no need to take into account the clock frequency of the microcontroller - the current frequency is taken into account inside the ASF library after calling the sysclk_init () function.
Build with QBS Automation
To get the executable firmware file, you need to compile a fairly large number of files. Atmel suggests using makefiles, which are instructions to the GCC compiler.
The author suggests using the QBS build automation environment built into Qt Creator [1]. To do this, you will have to create a QBS project file containing information about the source files to be compiled.
One of the advantages of QBS is that there is no need to manually enter the name of each file with the source code in the QBS file - just specify the file location directories, the rest is done by the system itself.
QBS text file
import qbs
import qbs.FileInfo
import qbs.ModUtils
Project {
    CppApplication {
        type: ["application", "ucfw" ]
        Depends { name: "cpp" }
        consoleApplication: true
        cpp.positionIndependentCode: false
        cpp.executableSuffix: ".elf"
        cpp.includePaths: [
            "src",
            "src/ASF/common/boards",
            "src/ASF/common/services/clock",
            "src/ASF/common/services/clock/sam4s",
            "src/ASF/common/services/gpio",
            "src/ASF/common/services/gpio/sam_gpio",
            "src/ASF/common/services/ioport",
            "src/ASF/common/services/ioport/sam",
            "src/ASF/common/services/delay",
            "src/ASF/common/services/delay/sam",
            "src/ASF/common/utils",
            "src/ASF/common/utils/interrupt",
            "src/ASF/sam/boards",
            "src/ASF/sam/boards/sam4s_ek",
            "src/ASF/sam/drivers/pio",
            "src/ASF/sam/drivers/pmc",
            "src/ASF/sam/utils",
            "src/ASF/sam/utils/cmsis/sam4s/include",
            "src/ASF/sam/utils/cmsis/sam4s/include/component",
            "src/ASF/sam/utils/cmsis/sam4s/include/instance",
            "src/ASF/sam/utils/cmsis/sam4s/include/pio",
            "src/ASF/sam/utils/header_files",
            "src/ASF/sam/utils/preprocessor",
            "src/ASF/thirdparty/CMSIS/Include",
            "src/config"
        ]
        cpp.defines: [
            "__SAM4SA16C__",
            "BOARD = SAM4S_EK"
        ]
        cpp.commonCompilerFlags: [
            "-mcpu=cortex-m4",
            "-mthumb",
            "-mfloat-abi=soft"
        ]
        cpp.linkerFlags: [
            "-mcpu=cortex-m4",
            "-mthumb",
            "-mfloat-abi=soft",
            "-Xlinker",
            "--gc-sections"
        ]
        // Оптимизация - только не для отладки.
        Properties {
            condition: qbs.buildVariant === "debug"
            cpp.debugInformation: true
            cpp.optimization: "none"
        }
        Properties {
            condition: qbs.buildVariant === "release"
            cpp.debugInformation: false
            cpp.optimization: "small"
        }
        // Добавляет макроопределение DEBUG, если сборка "Отладка".
        Properties {
            condition: cpp.debugInformation
            cpp.defines: outer.concat("DEBUG")
        }
        // Использовать скрипт линковщика
        cpp.linkerScripts: [
            "src/ASF/sam/utils/linker_scripts/sam4s/sam4s16/gcc/flash.ld"
        ]
        // Группируем файлы с исходным кодом в группу "sources"
        Group {
            name: "sources"
            prefix: "./src/**/"
            files: [
                "*.c",
                "*.cpp",
                "*.h",
                "*.s"
            ]
            cpp.cxxFlags: [ "-std=c++11" ]
            cpp.cFlags: [ "-std=gnu99" ]
            cpp.warningLevel: "all"
        }
        // Группируем скрипты линковщика в группу "ldscripts"
        Group {
            name: "ldscripts"
            prefix: "./src/**/"
            files: "*.ld"
        }
        // В группу "others" попадет файл конфигурации OpenOCD
        Group {
            name: "others"
            prefix: "./**/"
            files: [
                "*.cfg"
            ]
        }
        // Автоматически после успешной сборки:
        // 1. Получение размера прошивки с помощью утилиты size из состава инструментария GCC
        // 2. Создание копии прошивки в популярном формате Intel HEX
        // 3. "Прошивка" в микроконтроллер с помощью программы OpenOCD
        Rule {
            id: flashing
            // Отключить правило для сборки "Отладка"
            condition: qbs.buildVariant === "release"
            inputs: ["application"]
            Artifact {
                fileTags: ["ucfw"]  // !!!Обязательно должен совпадать с полем type итема CppApplication!!!
                filePath: input.baseDir + "/" + input.baseName + ".hex"
            }
            prepare: {
                // Вывести размер
                var sizePath = "arm-none-eabi-size";
                var argsSize = [input.filePath];
                var cmdSize = new Command(sizePath, argsSize);
                cmdSize.description = "Size of sections:";
                cmdSize.highlight = "linker";
                // Создать копию в формате Intel HEX
                var objCopyPath = "arm-none-eabi-objcopy";
                var argsConv = ["-O", "ihex", input.filePath, output.filePath];
                var cmdConv = new Command(objCopyPath, argsConv);
                cmdConv.description = "converting to HEX: " + FileInfo.fileName(input.filePath);
                cmdConv.highlight = "linker";
                // Непосредственно прошивка
                var flashUtilityPath = "openocd";
                var cmd1 = 'flash write_image erase' + ' ' + input.filePath;
                var argsFlash = [
                            "-f", "interface/jlink.cfg",
                            "-f", "board/atmel_sam4s_ek.cfg",
                            "-c", "init",
                            "-c", "halt",
                            "-c", cmd1,
                            "-c", "reset",
                            "-c", "shutdown"];
                var cmdFlash = new Command(flashUtilityPath, argsFlash);
                cmdFlash.description = "flashig to uC: " + FileInfo.fileName(output.filePath);
                cmdFlash.highlight = "linker";
                // Выполнить последовательно все 3 действия
                return [cmdSize, cmdConv, cmdFlash];
            }
        }
    }
}
In the case of a successful release build (release - i.e. not for debugging, final) the QBS file contains instructions to perform the following actions:
- Display the firmware size in the assembly console,
- convert firmware file from ELF format to Intel HEX format
- Download the file to the target microcontroller via the SAM-ICE adapter using the OpenOCD program
Conclusion
As a result of the above actions, an ecosystem has been created for the development of Atmel SAM4S microcontrollers, which consists entirely of freely distributed programs. The ecosystem is easy to modify to use another Atmel microcontroller.
You can download the finished project at [ 11 ]. To use it, you will need the Ubuntu operating system or its derivative (Lubuntu, Kubuntu, Xubuntu) with the installed packages:
- GCC Toolkit for ARM Microcontrollers [1]
- Qt Creator development environment [1]
- OpenOCD program (installation described above)
Literature
- Kurnitz A. Development for STM32 microcontrollers in the Linux operating system environment // Components and Technologies. 2015. No. 10.
- www.sourceforge.net/projects/openocd
- www.we.easyelectronics.ru/CADSoft/ubuntueclipse-code-sourcery-openocd-j-link-arm-ilibystryy-start-dlya-somnevayuschihsya.html
- www.microsin.net/programming/arm/openocdmanual-part1.html
- www.microsin.net/programming/ARM/openocdmanual-part2.html
- www.microsin.net/programming/ARM/openocdmanual-part3.html
- www.openocd.org/doc/html/General-Commands.html
- www.asf.atmel.com/docs/latest/download.html
- www.atmel.com/tools/ATMELSTUDIO.aspx
- www.sourceware.org/newlib/libc.html#Syscalls
- www.e-kit.ru
- www.atmel.com/images/atmel-11100-32-bit%20cortex-m4-microcontroller-sam4s_datasheet.pdf