Access MySQL data from a UWP application without using services
In Windows Store applications and in UWP applications, you need to use web services to access databases stored on the network. If you use Azure databases, then you can use a service such as Azure Mobile Apps.
Let's, I will teach you the “bad” and talk about how you can use the UWP application to access data from the MySQL database directly using Connector / Net. The code will be identical for .Net WPF applications.

Using direct data access is not recommended for obvious reasons. The connection string is stored in the application, so anyone who downloads the application can potentially access the string. This is partly why UWP applications lack certain capabilities for working with data directly. In addition, updating the service logic will immediately affect all applications attached to it, while forcing all users to instantly update the application will fail.
Why use a non-recommended method? You can find some use cases. For example, I came up with the option of creating a MySQL database admin panel application for convenient editing of phone records. Of course, there is also the option to create a user with read-only rights. In some cases, it can be used, despite the fact that the server and database names are compromised in the connection string. Alternatively, you can force the user to enter the data necessary for authorization each time.
As a test database, I use the ClearDB MySQL cloud database, which can be created in Azure. Owners of a free student DreamSpark account can create such a database for free. However, the method that I describe is suitable for any MySQL database, and not just for databases deployed in the Azure cloud.
Creating a base is pretty simple. On the new Azure portal, click the plus sign in the menu, select "Data + Storage" - "MySQL Database", set the name of the database, configure the parameters and agree with the conditions.
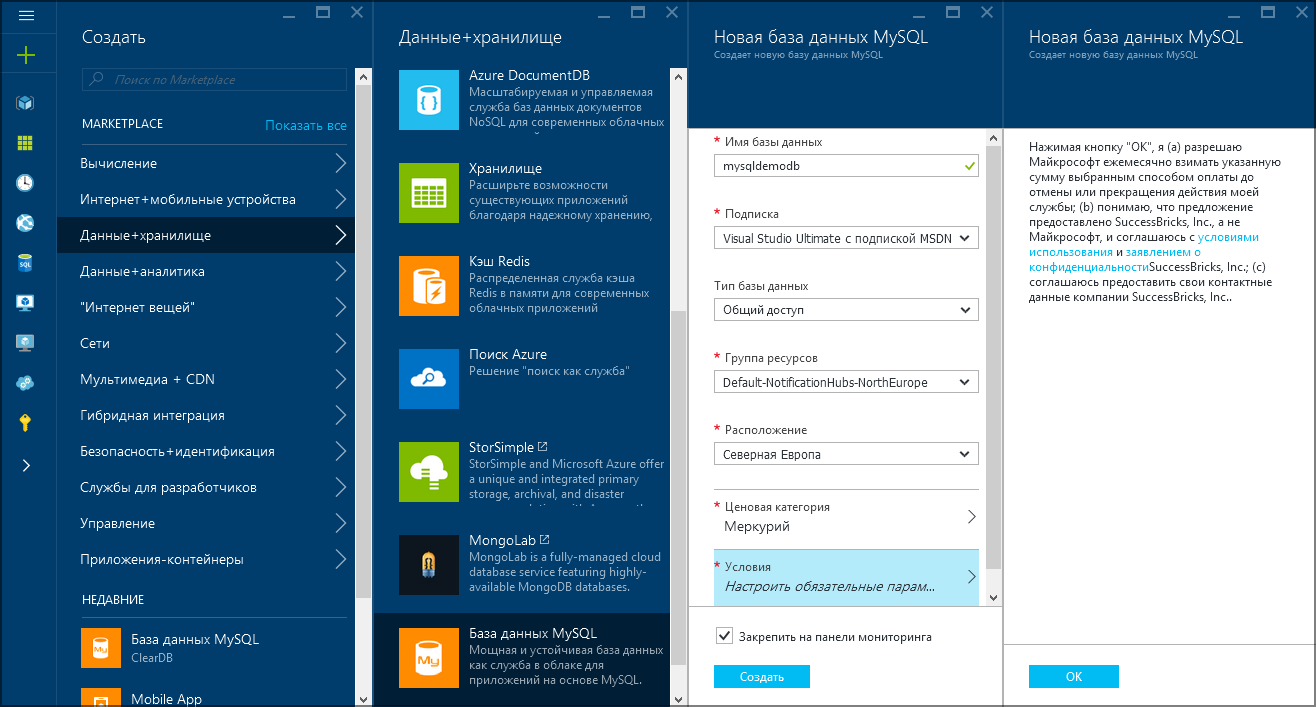
In a minute, the base will be deployed.

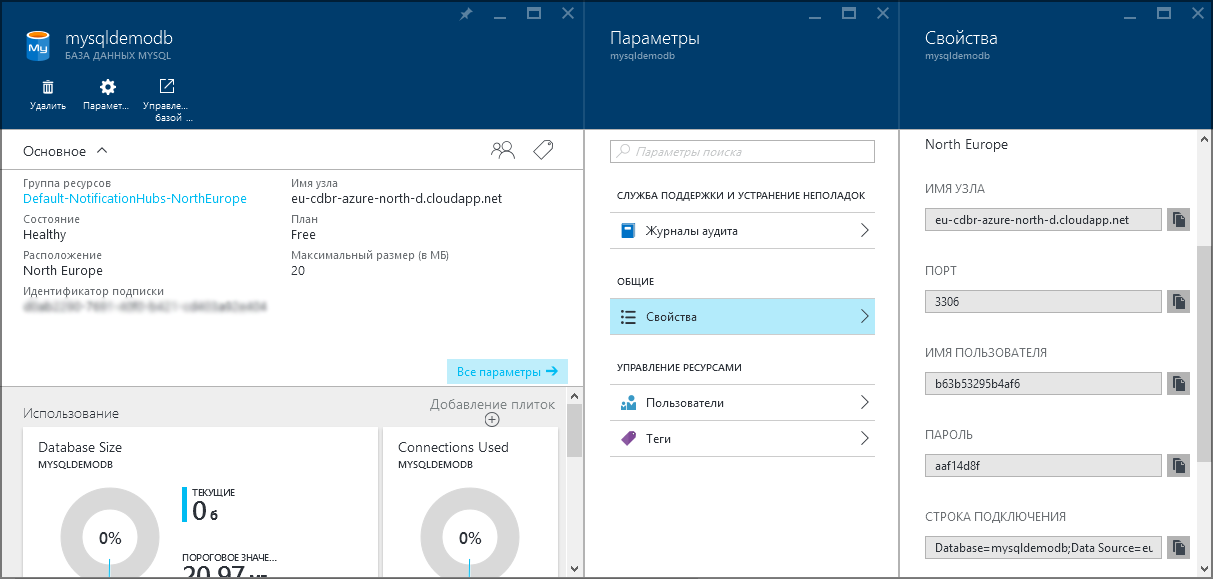
Now in the properties you can find the connection string.
As I already mentioned, to work with the MySQL database, we need Connector / Net.
At the time of writing this example, NuGet issued MySQL.6Net Connector / Net version 6.6.4 for search.
And the mysql Chapter 2 Connector / Net Versions website indicates that WinRT applications are supported starting from version 6.7.
So, you will have to download the installer from the official website: Download Connector / Net
When installing using the installer, you will be prompted to install examples on C # and VB. The examples were on .Net version 2.0, so they seemed to me not particularly relevant (I didn’t even have .Net installed).
Let's move on to creating the application. In Visual Studio, we create a universal Windows application project. Add a link to the library MySql.Data.RT.dll , which should be located at
C: \ Program Files (x86) \ MySQL \ MySQL Connector Net 6.9.8 \ Assemblies \ RT \
Officially, UWP is not yet supported, but the WinRT library is quite suitable for universal applications (after all, UWP is based on the WinRT API, although not all of WinRT available or used in UWP).
If you have a WPF application, then you need the library
C: \ Program Files \ MySQL \ MySQL Connector Net 6.9.8 \ Assemblies \ v4.5 \ MySql.Data.dll
In the manifest of the universal application you need to add the ability to use the Internet - Internet (Client) . Usually this feature is installed by default, so just go in and check that the checkmark is in the right place.
You can write code.
The namespace in which the MySQL classes are located is MySql.Data.MySqlClient. Add it so as not to mention in the code every time:
using MySql.Data.MySqlClient;
To begin with, an example of how you can create a table and enter data into it:
   using (MySqlConnection connection = new MySqlConnection("Database=as_bfb6f501597b777;Data Source=us-cdbr-azure-west-c.cloudapp.net;User Id=b74038821f5aea;Password=2564f4e5;SslMode=None;"))
 {
   connection.Open();
   MySqlCommand createCommand = new MySqlCommand("CREATE TABLE demotable(salary int,surname varchar(255))", connection);
   createCommand.ExecuteNonQuery();
   MySqlCommand addCommand = new MySqlCommand("INSERT INTO demotable (salary,surname) VALUES (1234,'Вейдер')", connection);
   addCommand.ExecuteNonQuery();
  }
Here I created a table called demotable with two fields - salary and surname, and inserted a row with the last and salary values in it. An employee with the surname Vader will receive 1234 for merit service.
Pay attention to the connection string. We took her from the portal. At the end, you need to add " SslMode = None; ", since Connector / Net does not yet support SSL.
Now a simple example of reading data.
We need to create a model class with the same fields as our database has. We do it like this:
    public class CloudTable
    {
        private string _surname;
        public string surname
        {
            get { return _surname; }
            set { _surname = value; }
        }
        private int _salary;
        public int salary
        {
            get { return _salary; }
            set { _salary = value; }
        }
    }
Next, you can declare a collection in the code of our page:
public ObservableCollection demodata = new ObservableCollection();
We will display the data in a ListView. XAML code let it be like this:
As you can see, I didn’t bother much and the display template for the list item was simply made in the form of a panel, inside of which there are 2 text blocks. The text values of the blocks are mapped to the surname and salary values from the data context. We will set the data context in C # code. If you want, you can make a better design, of course.
The code itself for reading data into a collection and binding it to a ListView is:
    using (MySqlConnection connection = new MySqlConnection("Database=as_bfb6f501597b777;Data Source=us-cdbr-azure-west-c.cloudapp.net;User Id=b74038821f5aea;Password=2564f4e5;SslMode=None;"))
  {
     connection.Open();
     MySqlCommand readCommand = new MySqlCommand("SELECT * FROM demotable", connection);
     using (MySqlDataReader reader = readCommand.ExecuteReader())
     {
        while (reader.Read())
         {
            demodata.Add(new CloudTable { surname = reader.GetString(1), salary = reader.GetInt32(0) });
         }
     }
 }
    myListView.DataContext = demodata;
Data is read in a loop, which looks at least old-fashioned. However, thanks to Connector / Net for the opportunities that exist.