Running context-sensitive tests in parallel using Visual Studio 2015 Update 1
- Transfer
Visual Studio 2015 Update 1 includes a number of enhancements and fixes. In this publication, we will focus on two improvements that can significantly increase the overall productivity of software development.
The test core of Visual Studio 2015 Update 1 is able to run test builds in parallel, which significantly improves the testing performance. By default, this mode is disabled, so you need to enable it.
The system simultaneously executes test builds on the number of cores you specify - up to all the cores of your computer. Of course, with a single test project, this does not give any advantages. This solution is intended for projects of significant scale. It does not depend on the type of test platform used and works with MSTest, NUnit 2 , NUnit 3 and XUnit . This mechanism is completely independent of concurrency support by the underlying platform.
In order to enable this feature, you need to use the runsettings file, which you need to enable in Visual Studio. An easy way to create the correct runsettings file is to use one of the templates . Please note that it is necessary to use templates of version no lower than 3.1. After installing this extension element, you will have three templates; if you need parallelism, then use the Parallel template.
Follow these steps:
select Solution, right-click and select Add / New item;
on the screen you will see a list similar to the one below;

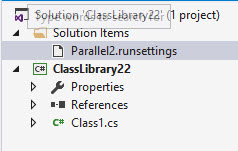
select Parallel; You will see a copy of it in the Solution Items tab of your solution.
That's all it takes to enable parallel test execution!
Remember to activate it in the Visual Studio Test menu, for which follow these steps:

(1) Go to the Select Test Settings file from the Test / Test settings main menu.
(2) Then select the desired Runsettings file, in this example I named it Parallel2.runsettings.
(3) Make sure it is selected and checked in the same menu.
Parameters: The
contents of the runsettings file are as follows:

Here we can change the value of only one element - MaxCpuCount, which determines the number of parallel processes. A value of 0 indicates that the maximum possible number of processes will be executed, it is limited only by the number of computer cores. A value of 1 indicates that the processes will be executed sequentially and only one process will be active (this value is set by default). Any other values determine the maximum number of processes running in parallel (or the number of cores of your computer used).
Why don't we include code coverage checking?
You may have noticed that the description of the Parallel file indicates that code coverage checking is not enabled. This means that upon activation of its settings, a check for code coverage will not be carried out. The other two templates are designed in the same way, since code coverage provides no benefits.
Activating code coverage check reduces performance, because code coverage verification is performed after each test and significantly increases the total testing time and does not provide any useful results.
Disabling code coverage activation does not mean that you cannot execute it from Team Explorer. On the contrary, you can do it! Oddly enough, the results of this check for code coverage are not used in Test Explorer. In the other two templates, only background testing of code coverage is activated, the results of which are saved in a file located in the Test Results folder.

This file does not give you any advantages in Visual Studio, however it is useful if you want to use the code coverage test data in another program, for example, NDepend .
One of the advantages of this section is that it not only enables background execution of code coverage check, but also sets up filtering of code coverage check data.which may be useful to you. These filters also work when analyzing code coverage from selected tests ("Analyze code coverage from selected tests") in Test Explorer.
The article referenced above contains a set of settings for checking for code coverage. Instead, use the CompleteRunSettings template, which includes both these and other settings. The XML provided in this article is irrelevant.

In the CompleteRunsettings template, the value of the MaxCpuCount parameter is 0; this means that the number of parallel processes will be the maximum possible.
The CoverageNoParallel template is almost identical to the previous one: it contains the same fields and values, with the exception of MaxCpuCount, whose value is 1. This means that the tests will be executed sequentially.
An article on more correct configuration of unit tests has been published on MSDN , however this publication does not contain as much detailed information as the above link. However, this article describes all the fields.
I created a simple project for running tests in parallel. It consists of four test projects, each of which contains one test, performed within 5 seconds. You can download the project source code from here and run these tests yourself.
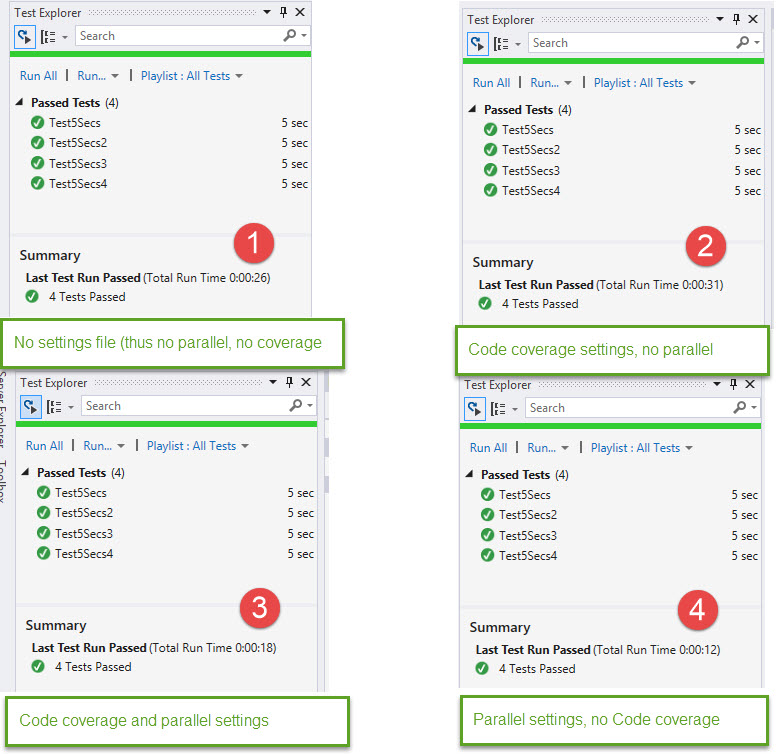
(1) Run tests without any configuration. In this case, the tests are executed sequentially and the execution time is 26 seconds. Each test runs for 5 seconds plus a delay of 6 seconds.
(2) Test execution using CodeCoverageNoParallel is the same as using the old runsettings file. In addition to tests, a check is performed for code coverage, but without concurrency. The total time increases to 31 seconds.
(3) When using a complete set of settings, including CodeCoverage and Parallel, the test execution time is reduced to 18 seconds.
(4) When using only Parallel without checking for code coverage, the test execution time is reduced to 12 seconds.
Thus, option (4) more than doubles productivity compared with option (1). This is a good result!
The computer on which these tests were carried out was equipped with 8 cores, but other programs did not make it possible to use all these cores for testing. The increase in testing performance is not a multiple of the number of computer cores, but a twofold increase is a good and very tangible achievement in everyday work.
Concurrent execution on the build server
Does the described circuit work on the build server? Yes: in the build definition, you can specify which runsettingfile will be used when executing the build server. But ask yourself another question: do you really need this? The answer depends on how many build servers you use, what their settings are and how many checks and commits you perform, i.e. from load on build servers. Usually, one build agent is executed on each core of the computer. If during the day you use a large number of assembly definitions and constantly perform commits and checks, the load on the assembly agents will be great and additional parallel execution of the tests will not cause a significant effect, since the tests will “deprive” other assemblies of access to the computer cores. In addition, additional costs may apply.
On the other hand, if the computer used for assembly is not heavily loaded and the number of fixes is small, then why not increase its performance by running tests in parallel?
There are other ways to run tests in parallel, one of which is described in this article .
Running context-sensitive tests is one of the new features of Update 1. The new Test Explorer only tests assemblies in the code of which it detects changes.
This means that if you are working with a piece of code in a specific module of your system, the code is used in several modules. When you make changes to one of the modules in the assembly, only the code that you modified is involved. This is a regular incremental assembly, which is used by default. The novelty is that when testing only tests that verify the modified code are executed. Obviously, this significantly improves the testing performance of large systems.
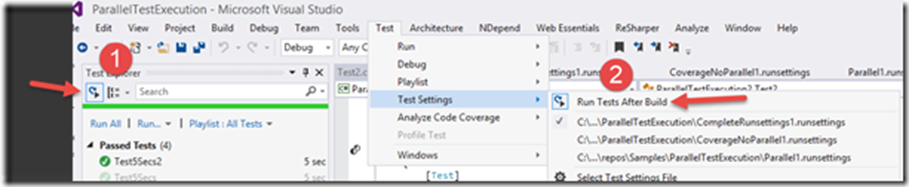
In order to use this function, you need to activate the “Run tests after build” item.
This can be done in Test Explorer (1) or in the main menu Test / Test Settings / Run Tests after Build (Test / Test settings / Perform tests after assembly) (2).
The results are shown in the following screenshot:

(1) Activate “Run tests after build”.
(2) Make changes to the code.
(3) Select Build or use the appropriate key combination.
(4) Only the necessary tests will be performed and the remaining tests will be displayed in muted green. The previous time they were executed and displayed in green, but this time they are not executed, since the code they are checking has not changed.
This process will help you significantly increase productivity when testing large projects and accelerate the transition to code editing after testing the next build. Agree that this is an important advantage for the developer!
Running tests in parallel
The test core of Visual Studio 2015 Update 1 is able to run test builds in parallel, which significantly improves the testing performance. By default, this mode is disabled, so you need to enable it.
The system simultaneously executes test builds on the number of cores you specify - up to all the cores of your computer. Of course, with a single test project, this does not give any advantages. This solution is intended for projects of significant scale. It does not depend on the type of test platform used and works with MSTest, NUnit 2 , NUnit 3 and XUnit . This mechanism is completely independent of concurrency support by the underlying platform.
In order to enable this feature, you need to use the runsettings file, which you need to enable in Visual Studio. An easy way to create the correct runsettings file is to use one of the templates . Please note that it is necessary to use templates of version no lower than 3.1. After installing this extension element, you will have three templates; if you need parallelism, then use the Parallel template.
Follow these steps:
select Solution, right-click and select Add / New item;
on the screen you will see a list similar to the one below;
select Parallel; You will see a copy of it in the Solution Items tab of your solution.
That's all it takes to enable parallel test execution!
Remember to activate it in the Visual Studio Test menu, for which follow these steps:
(1) Go to the Select Test Settings file from the Test / Test settings main menu.
(2) Then select the desired Runsettings file, in this example I named it Parallel2.runsettings.
(3) Make sure it is selected and checked in the same menu.
Parameters: The
contents of the runsettings file are as follows:
Here we can change the value of only one element - MaxCpuCount, which determines the number of parallel processes. A value of 0 indicates that the maximum possible number of processes will be executed, it is limited only by the number of computer cores. A value of 1 indicates that the processes will be executed sequentially and only one process will be active (this value is set by default). Any other values determine the maximum number of processes running in parallel (or the number of cores of your computer used).
Why don't we include code coverage checking?
You may have noticed that the description of the Parallel file indicates that code coverage checking is not enabled. This means that upon activation of its settings, a check for code coverage will not be carried out. The other two templates are designed in the same way, since code coverage provides no benefits.
Activating code coverage check reduces performance, because code coverage verification is performed after each test and significantly increases the total testing time and does not provide any useful results.
Disabling code coverage activation does not mean that you cannot execute it from Team Explorer. On the contrary, you can do it! Oddly enough, the results of this check for code coverage are not used in Test Explorer. In the other two templates, only background testing of code coverage is activated, the results of which are saved in a file located in the Test Results folder.
This file does not give you any advantages in Visual Studio, however it is useful if you want to use the code coverage test data in another program, for example, NDepend .
One of the advantages of this section is that it not only enables background execution of code coverage check, but also sets up filtering of code coverage check data.which may be useful to you. These filters also work when analyzing code coverage from selected tests ("Analyze code coverage from selected tests") in Test Explorer.
The article referenced above contains a set of settings for checking for code coverage. Instead, use the CompleteRunSettings template, which includes both these and other settings. The XML provided in this article is irrelevant.
In the CompleteRunsettings template, the value of the MaxCpuCount parameter is 0; this means that the number of parallel processes will be the maximum possible.
The CoverageNoParallel template is almost identical to the previous one: it contains the same fields and values, with the exception of MaxCpuCount, whose value is 1. This means that the tests will be executed sequentially.
An article on more correct configuration of unit tests has been published on MSDN , however this publication does not contain as much detailed information as the above link. However, this article describes all the fields.
Test project for parallel execution
I created a simple project for running tests in parallel. It consists of four test projects, each of which contains one test, performed within 5 seconds. You can download the project source code from here and run these tests yourself.
(1) Run tests without any configuration. In this case, the tests are executed sequentially and the execution time is 26 seconds. Each test runs for 5 seconds plus a delay of 6 seconds.
(2) Test execution using CodeCoverageNoParallel is the same as using the old runsettings file. In addition to tests, a check is performed for code coverage, but without concurrency. The total time increases to 31 seconds.
(3) When using a complete set of settings, including CodeCoverage and Parallel, the test execution time is reduced to 18 seconds.
(4) When using only Parallel without checking for code coverage, the test execution time is reduced to 12 seconds.
Thus, option (4) more than doubles productivity compared with option (1). This is a good result!
The computer on which these tests were carried out was equipped with 8 cores, but other programs did not make it possible to use all these cores for testing. The increase in testing performance is not a multiple of the number of computer cores, but a twofold increase is a good and very tangible achievement in everyday work.
Concurrent execution on the build server
Does the described circuit work on the build server? Yes: in the build definition, you can specify which runsettingfile will be used when executing the build server. But ask yourself another question: do you really need this? The answer depends on how many build servers you use, what their settings are and how many checks and commits you perform, i.e. from load on build servers. Usually, one build agent is executed on each core of the computer. If during the day you use a large number of assembly definitions and constantly perform commits and checks, the load on the assembly agents will be great and additional parallel execution of the tests will not cause a significant effect, since the tests will “deprive” other assemblies of access to the computer cores. In addition, additional costs may apply.
On the other hand, if the computer used for assembly is not heavily loaded and the number of fixes is small, then why not increase its performance by running tests in parallel?
There are other ways to run tests in parallel, one of which is described in this article .
Context-sensitive tests
Running context-sensitive tests is one of the new features of Update 1. The new Test Explorer only tests assemblies in the code of which it detects changes.
This means that if you are working with a piece of code in a specific module of your system, the code is used in several modules. When you make changes to one of the modules in the assembly, only the code that you modified is involved. This is a regular incremental assembly, which is used by default. The novelty is that when testing only tests that verify the modified code are executed. Obviously, this significantly improves the testing performance of large systems.
In order to use this function, you need to activate the “Run tests after build” item.
This can be done in Test Explorer (1) or in the main menu Test / Test Settings / Run Tests after Build (Test / Test settings / Perform tests after assembly) (2).
The results are shown in the following screenshot:
(1) Activate “Run tests after build”.
(2) Make changes to the code.
(3) Select Build or use the appropriate key combination.
(4) Only the necessary tests will be performed and the remaining tests will be displayed in muted green. The previous time they were executed and displayed in green, but this time they are not executed, since the code they are checking has not changed.
This process will help you significantly increase productivity when testing large projects and accelerate the transition to code editing after testing the next build. Agree that this is an important advantage for the developer!