Free hosting control panels. Goddess Vesta
- Tutorial
When you work in a hosting company, most of your friends and acquaintances solve all your hosting issues through you. This allows you to be in the trend of the latest innovations, as well as not only to increase your skills, but also to keep them in good shape. As soon as special. it became difficult for the guys to solve the tasks on the hosting server, as a rule due to the lack of the ability to install the necessary software for the operation of a particular script, I immediately thought about an inexpensive virtual server , especially since we had them. We also understood that it would be easier to work with the server through a convenient web interface, and a good control panel would be, anyhow, by the way. And if it is also free, then we will only be in the black. Without hesitation, he opened a browser and began to google free hosting control panels.

Understanding that it would take time to study each, I also decided to ask the advice of our experienced administrator, for which I received a short answer:
Since the Vesta panel was really unfamiliar to me, I began to collect information. I found several good publications, including on the Habrahabr resource, after which I even thought about what else can be said about this panel, since there is really enough material on it in RuNet. But how can everything change one conversation !? After reading a good article, I decided to write to the author and find out his opinion not only about the Vesta panel, but also about the niche of free hosting control panels in general. To my surprise, the answer was not long in coming, and the dialogue itself continues to continue now ... A lot of things have been discussed, but this was only a small part of what remains to be discussed. Yes, most likely this is material for a separate article, but we will not get ahead of ourselves and return to the Vesta panel itself.
I will not change my habits - I will install CentOS on a virtual server (also the panel has support for Debian, Ubuntu) and connect to it via SSH. To do this, if you are using a MacBook, launch the Terminal and enter the following command:
We confirm the connection, specify the superuser password, and after all these actions we get to the console. If you are a Windows user, use the PuTTY terminal emulator to work with the server .
Next, download the necessary installation files to the server using the command:
Before starting the installation process itself, I would like to inform you that the panel installer automatically classifies the servers into the following 4 groups:
Depending on the technical characteristics of your server, in this case the amount of RAM, the installer will automatically install a specific set of packages and configs of the Vesta panel. For example, the antivirus package will work correctly (according to the recommendations of the developers) starting with the medium version, and php cgi support, in turn, is available for the entire group of servers except micro. But nothing prevents you from installing the missing software manually.
We continue the panel installation process, for this we run the script using the command:
You should receive the following message on the screen:
Confirm your actions with the y (yes) key . Next, you will need to specify your email:
After which the installer may request to enter the host name:
The installation process itself can take about 15 minutes. Looking ahead a bit, I would like to say that if you install the Vesta panel on one server, then entering all the necessary data during the installation should not take much time. But if you need to prepare several dozens of servers with this panel, more recently, one of our clients has set such a task, then we recommend that you run the installation script with the key h (help):
And see the full list of available options:
Which, in turn, will allow you to install "for yourself", as well as help speed up the process of setting up a whole "fleet of cars." The easiest way to skip entering additional data during the installation of the panel is to deactivate the interactive mode, as a result, run the installation script with the key y (interactive) and the parameter no .
If you also want to set an access password to the panel yourself, add the p (password) key with your password option:
For those users who are not in a buzz to conduct a "debriefing" in the console, the developers have made a convenient web-based configurator of options , which greatly simplifies the process of custom installation. Just in the Advanced Install Settings section, set the necessary parameters, then click the Generate Install Command button and paste the ready-made command into the console. How do you like this installation option?
After the installation is completed, the following message will be displayed:
Well, are you ready to meet with the "goddess"? Then open the browser and log in to the panel. I draw your attention to the fact that the username is admin.
Immediately after logging in, we get to the USER page and see the information so far about the only admin user with system administrator rights. If someone is more pleased to work with the Russian interface, then open the admin user settings and select the desired language in the Language field. Do not forget to click the Save button to save the changes.
Also, shortcuts (SHORTCUTS) are very helpful in working with the panel, which simplify menu navigation and allow you to control using the keyboard. To open a list of all available SHORTCUTS, use the h key on the keyboard or one of the buttons in the lower right corner of the screen.
To increase security, developers do not recommend managing sites from the admin user, so let's create a new user. Go to the USER menu and press the green round button with a plus (ADD ACCOUNT). Do not forget that this can also be done using hotkeys, the previous screenshot should tell you that the key - a will help us in this .
Here you can specify the interface language for the user, as well as his mailbox to which the access will be sent. After filling in the required fields, click the "Add" button. As a result, we will already have two users in the USER menu, and using the LOGIN AS key, we can log in using the user we need. It is worth adding that the developers took care of the "great migration of peoples" and providedthe ability to transfer users from one server to another.
Now we can add your site. To do this, go to the WEB menu by pressing a call box that is filled with the necessary data.
Immediately recommend to open ADDITIONAL OPTIONS and activate an additional FTP account by filling in the appropriate fields. And for fans of statistics, there is also the possibility of connecting your resource to Webalizer or AWStats .
It is the turn to create a database (DB) for your project. Everything is quite simple - we go to the DB menu and again with the help of a burning key a call up a window where we fill in the necessary fields.
Do not forget to save all the entered data using the "Add" button. Then you can safely upload the necessary CMS or script on the hosting, on which your project will “spin”, and carry out additional configuration for the release of the site in production.
MySQL DBMS is administered using the phpMyAdmin web application , the launch button of which appears in the DB menu immediately after creating at least one database.
Also, the Vesta panel allows you to place the database on a remote server, as an option, you can build a solution from several web servers and service them using one more productive server.
Here you can dwell on the additional settings in more detail, and, perhaps, we will start with the mail, or rather with the mail domain settings. If we go to the MAIL menu, we will see that we already have a mail domain, which was created automatically with the addition of the domain itself to the panel.
When editing data for this domain, please note that in the “Mail Trap” field you can optionally specify a mail account (not necessarily local) where mail from non-existent accounts will be redirected. By default, the / dev / null file is specified there , which means only one thing - all incoming mail should be deleted.
We went further, it was the turn to create a mailbox. Select the required mail domain and click the ADD ACCOUNT button.
Here you can open the EXTRA OPTIONS tab and specify a quota for the size of the mailbox in MB, as well as an account for forwarding mail. As usual, save the specified data using the "Add" button.
To work with e-mail, the Roundcube client is used , the button of which (OPEN WEB MAIL) becomes available in the MAIL menu immediately after entering at least one email domain into the panel.
Probably one of the most difficult moments of working with the hosting control panel for novice users is setting up DNS. But here, the development team tried to simplify the task as much as possible by creating a template . After we make the necessary settings on the side of the domain name registrar, you need to click the EDIT button in the DNS menu for a specific domain.
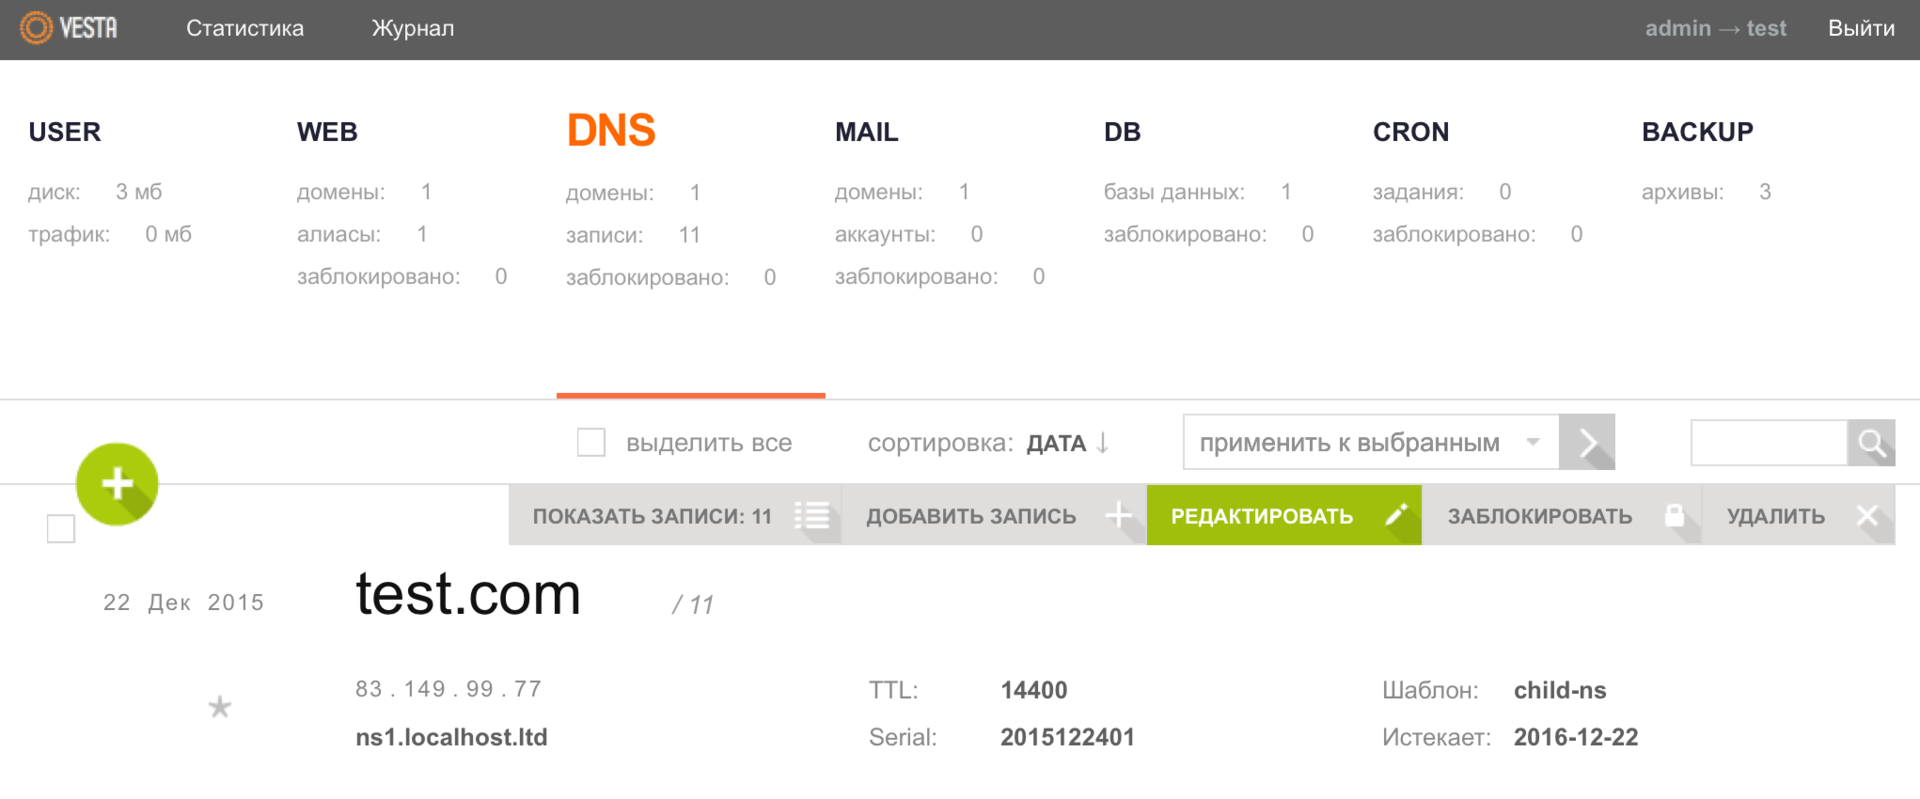
And in the Template field, select child-ns, and then save the changes.

Then from the user admin go to the Packages menu.

And edit the default package, while specifying the name servers of your domain.

Also, one of the panel's features is the creation of a DNS cluster , which allows zones to be automatically copied to other servers.
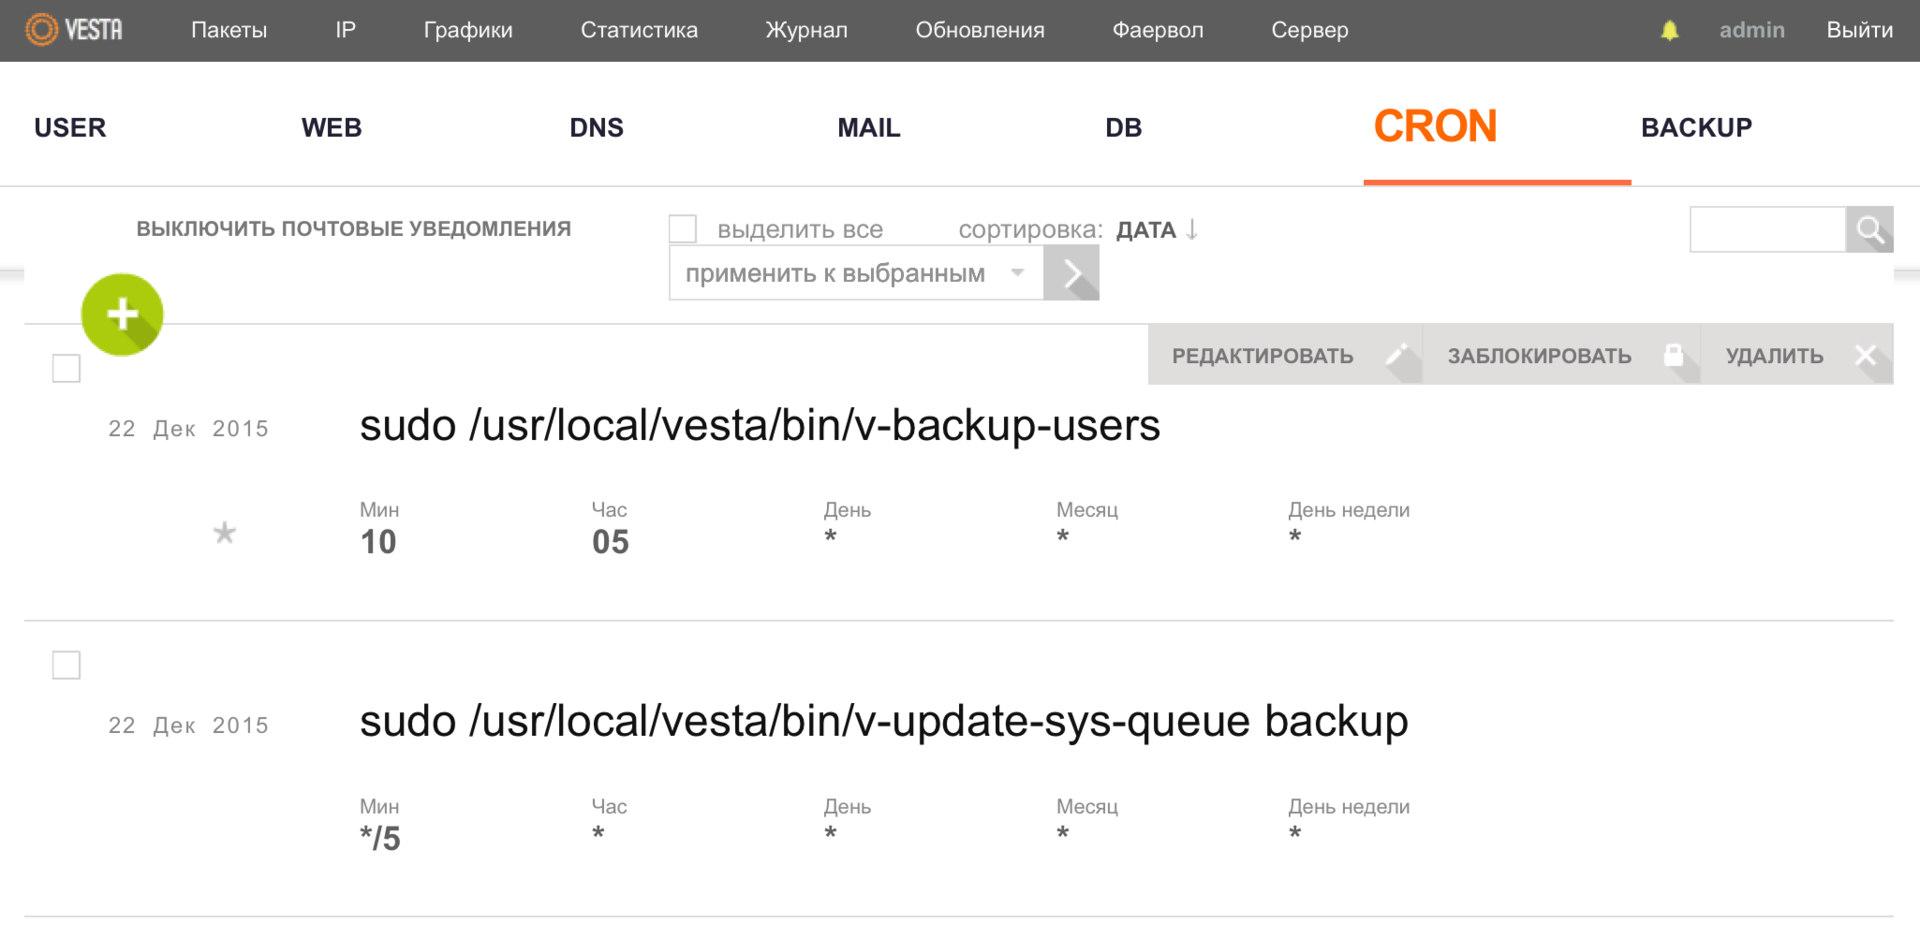
В разделе меню CRON можно ознакомиться со всем списком заданий и в случае необходимости внести в него изменения (добавить/удалить/заблокировать задание).
Панель управления Vesta имеет удобный веб-интерфейс для настройки резервного копирования на удаленный FTP/ SFTP сервер. Для этого переходим в меню BACKUP и с помощью клавиши a запускаем создание нового архива, на экране выведется следующее сообщение:
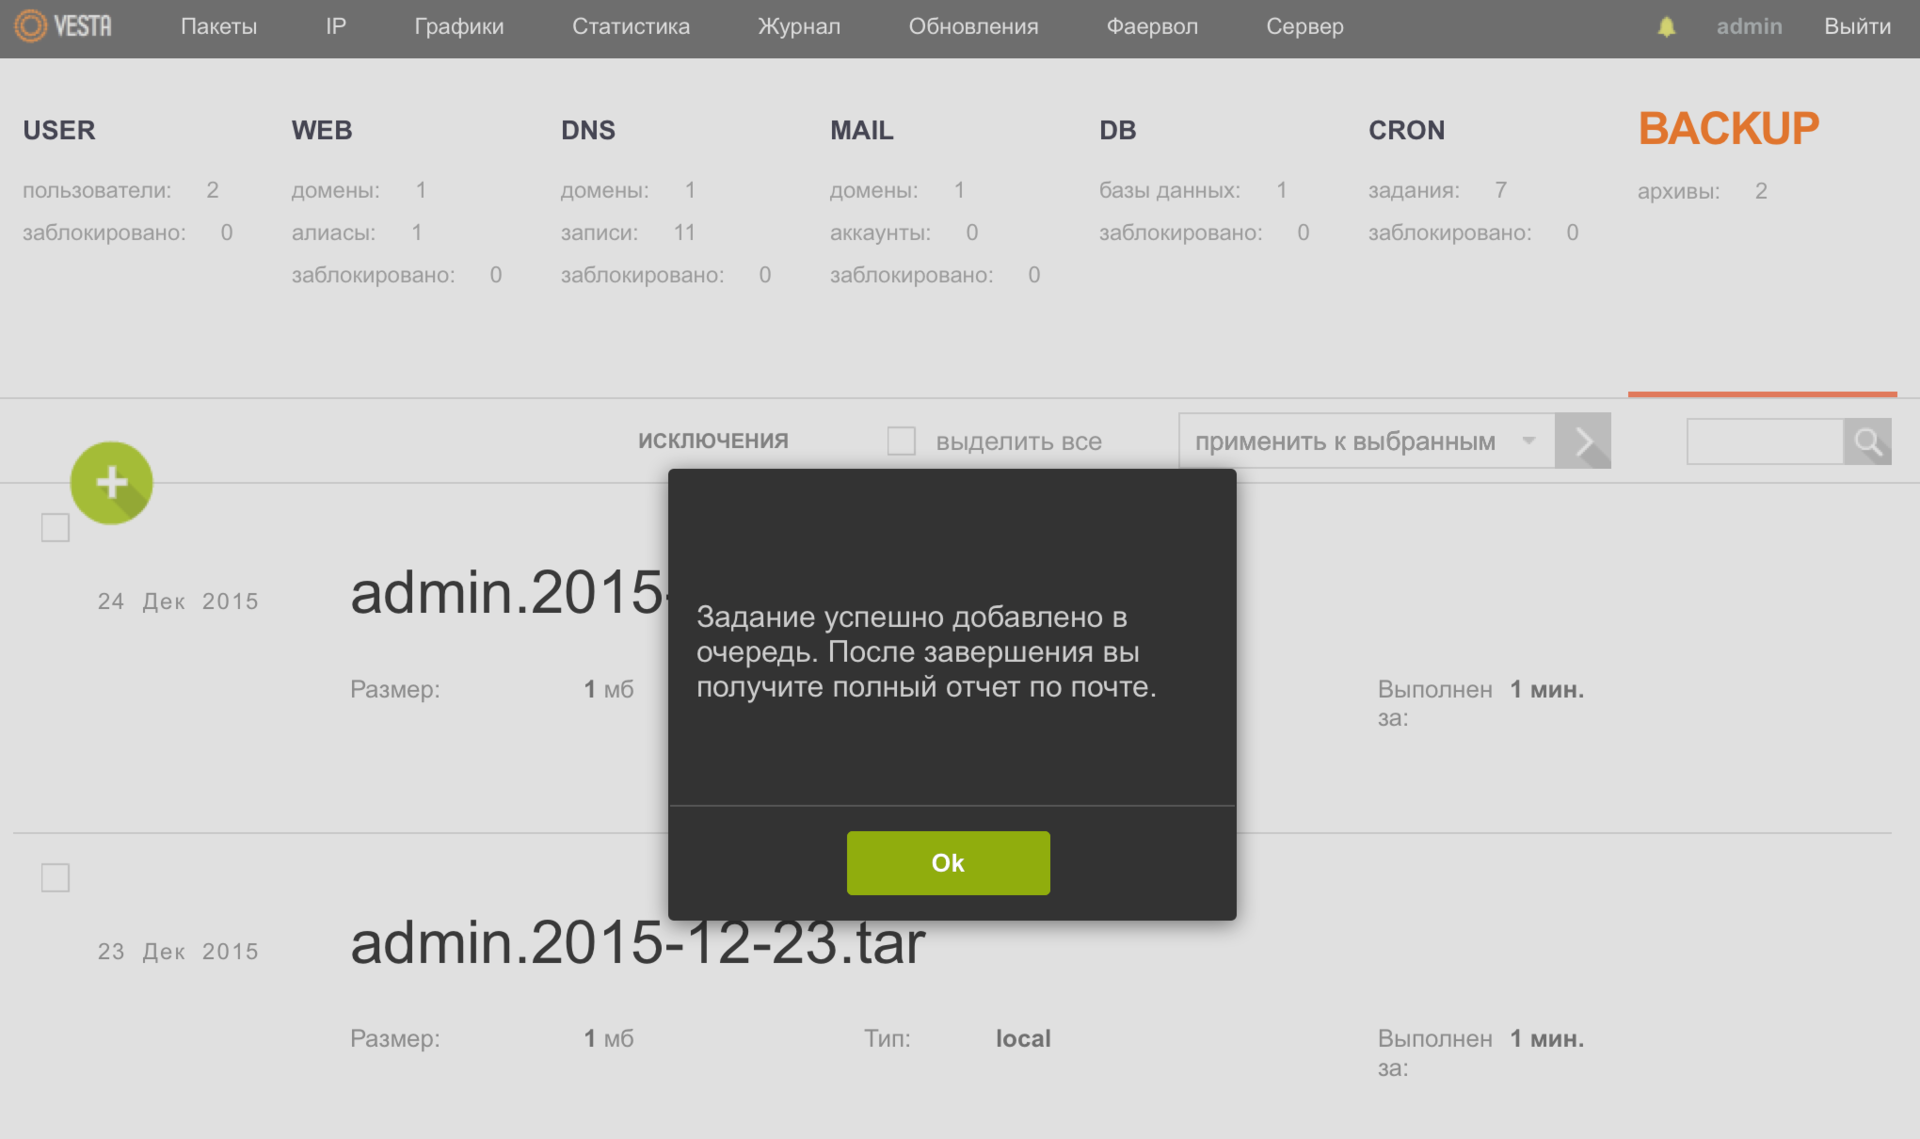
После того, как Вы получите уведомление на свой почтовый ящик, вернитесь в данное меню и с помощью кнопки СКАЧАТЬ сохраните бэкап на локальном компьютере. Также данный функционал доступен из консоли.

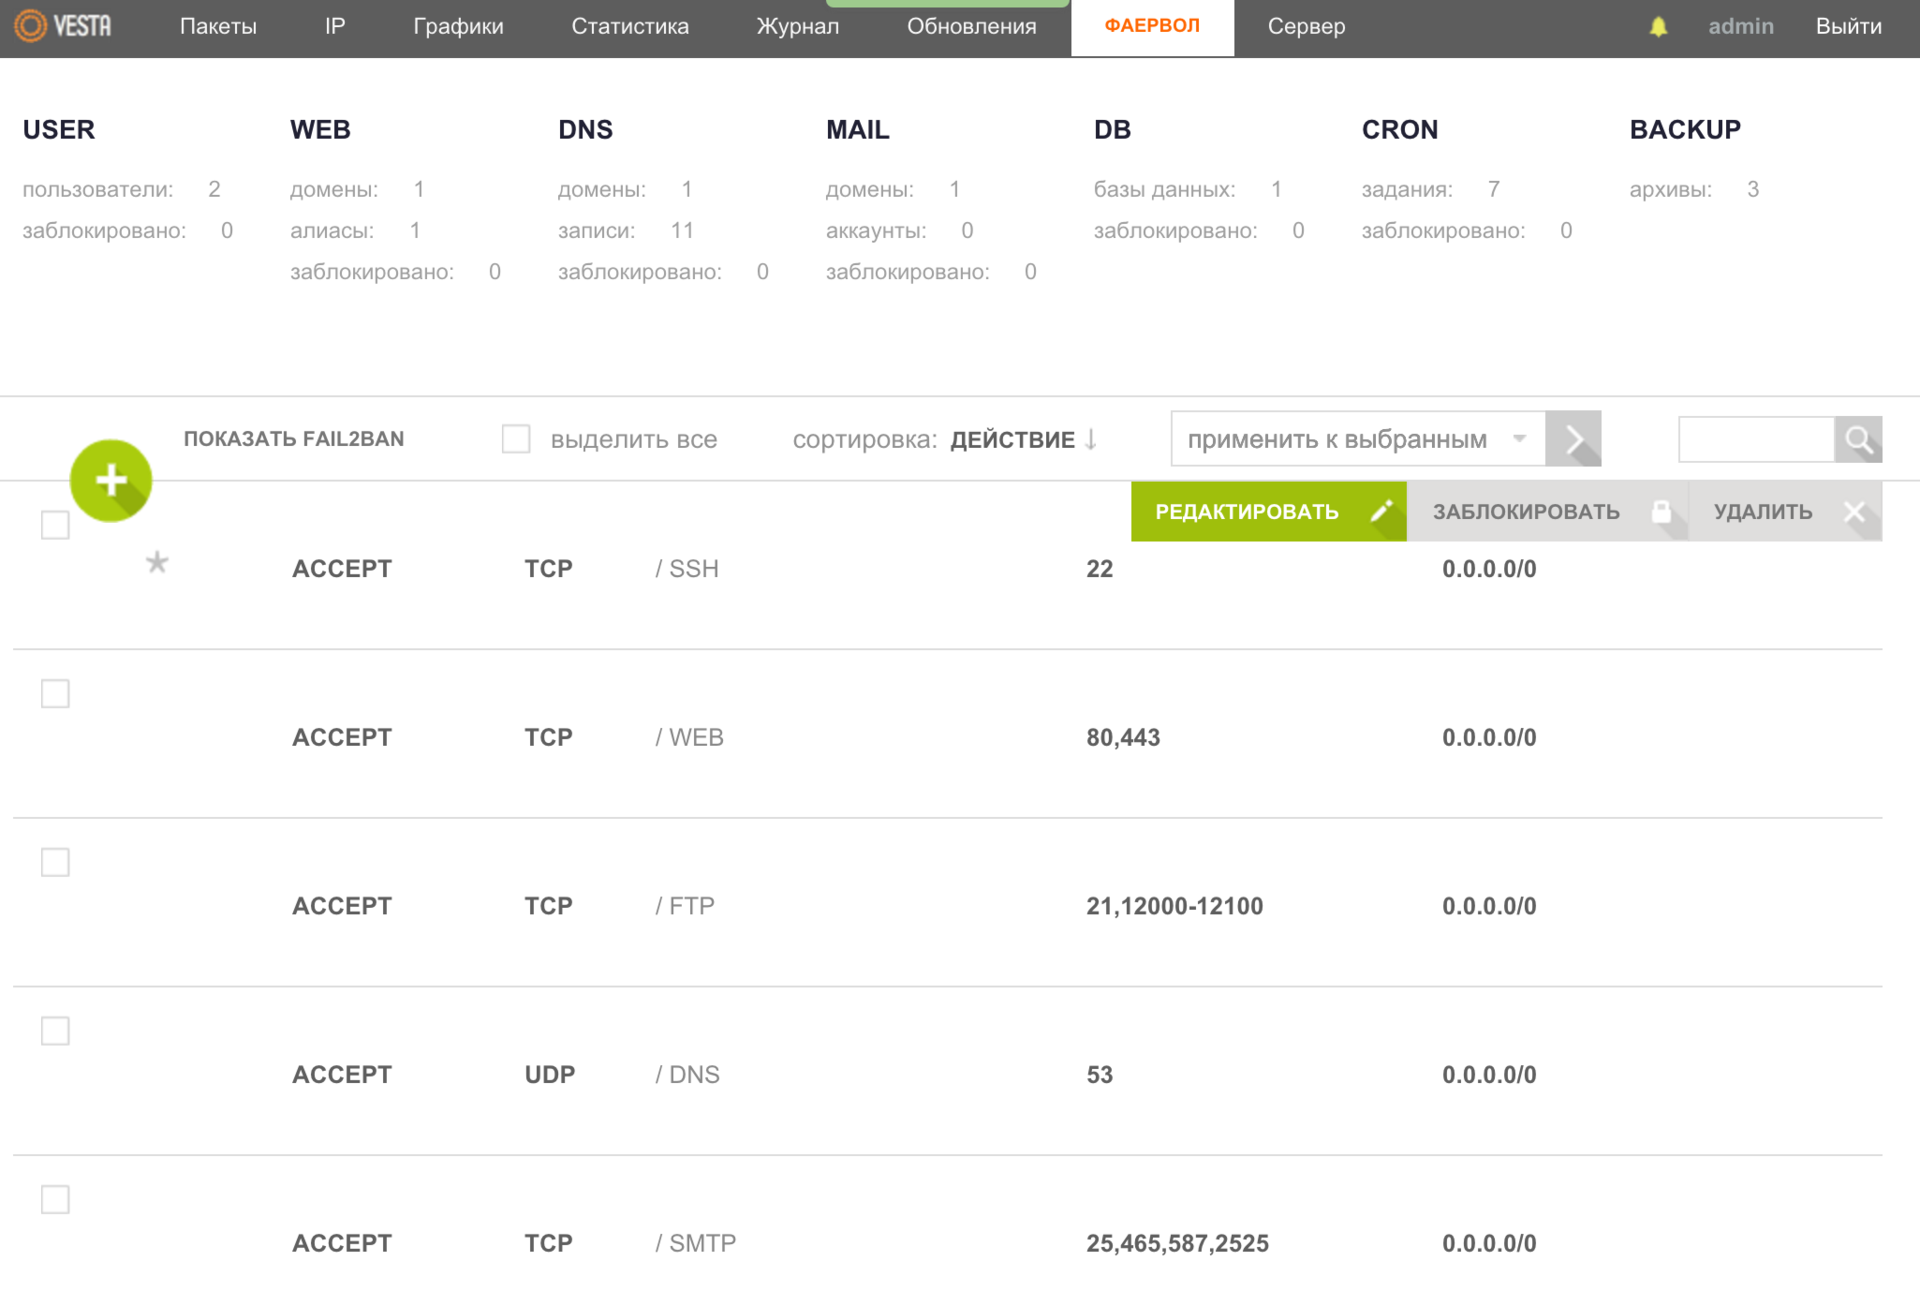
As you may have noticed, the panel has a firewall, as well as support for Fail2ban , which will automatically suppress the selection of passwords using various protocols (FTP, SSH), including the Vesta panel itself. To configure the firewall, you must select the appropriate menu item from the admin user.
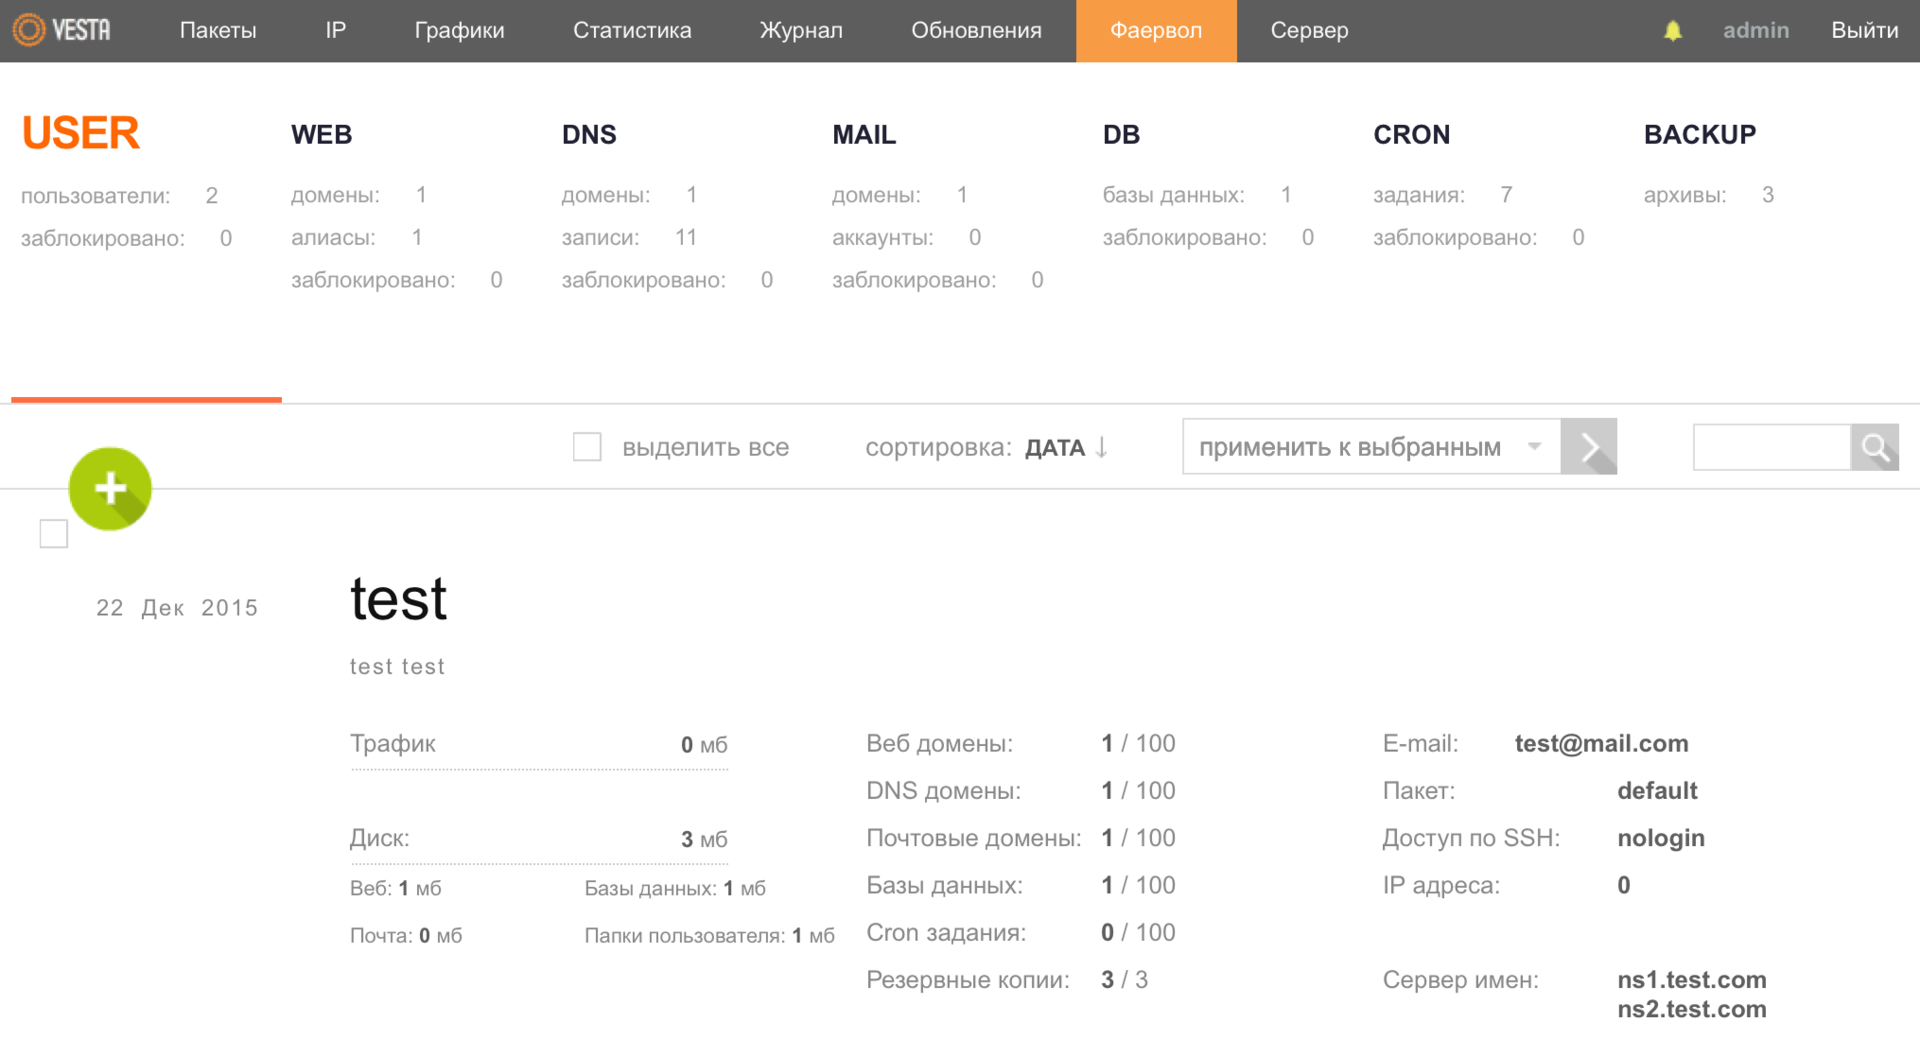
Where, with the help of the available functionality, it is possible to carry out the necessary settings, including for Fail2ban.
The Vesta control panel is very well implemented to collect statistics and various data that can help you analyze the operation of your server. For example, in the Server menu you can see how much RAM a particular process consumes.
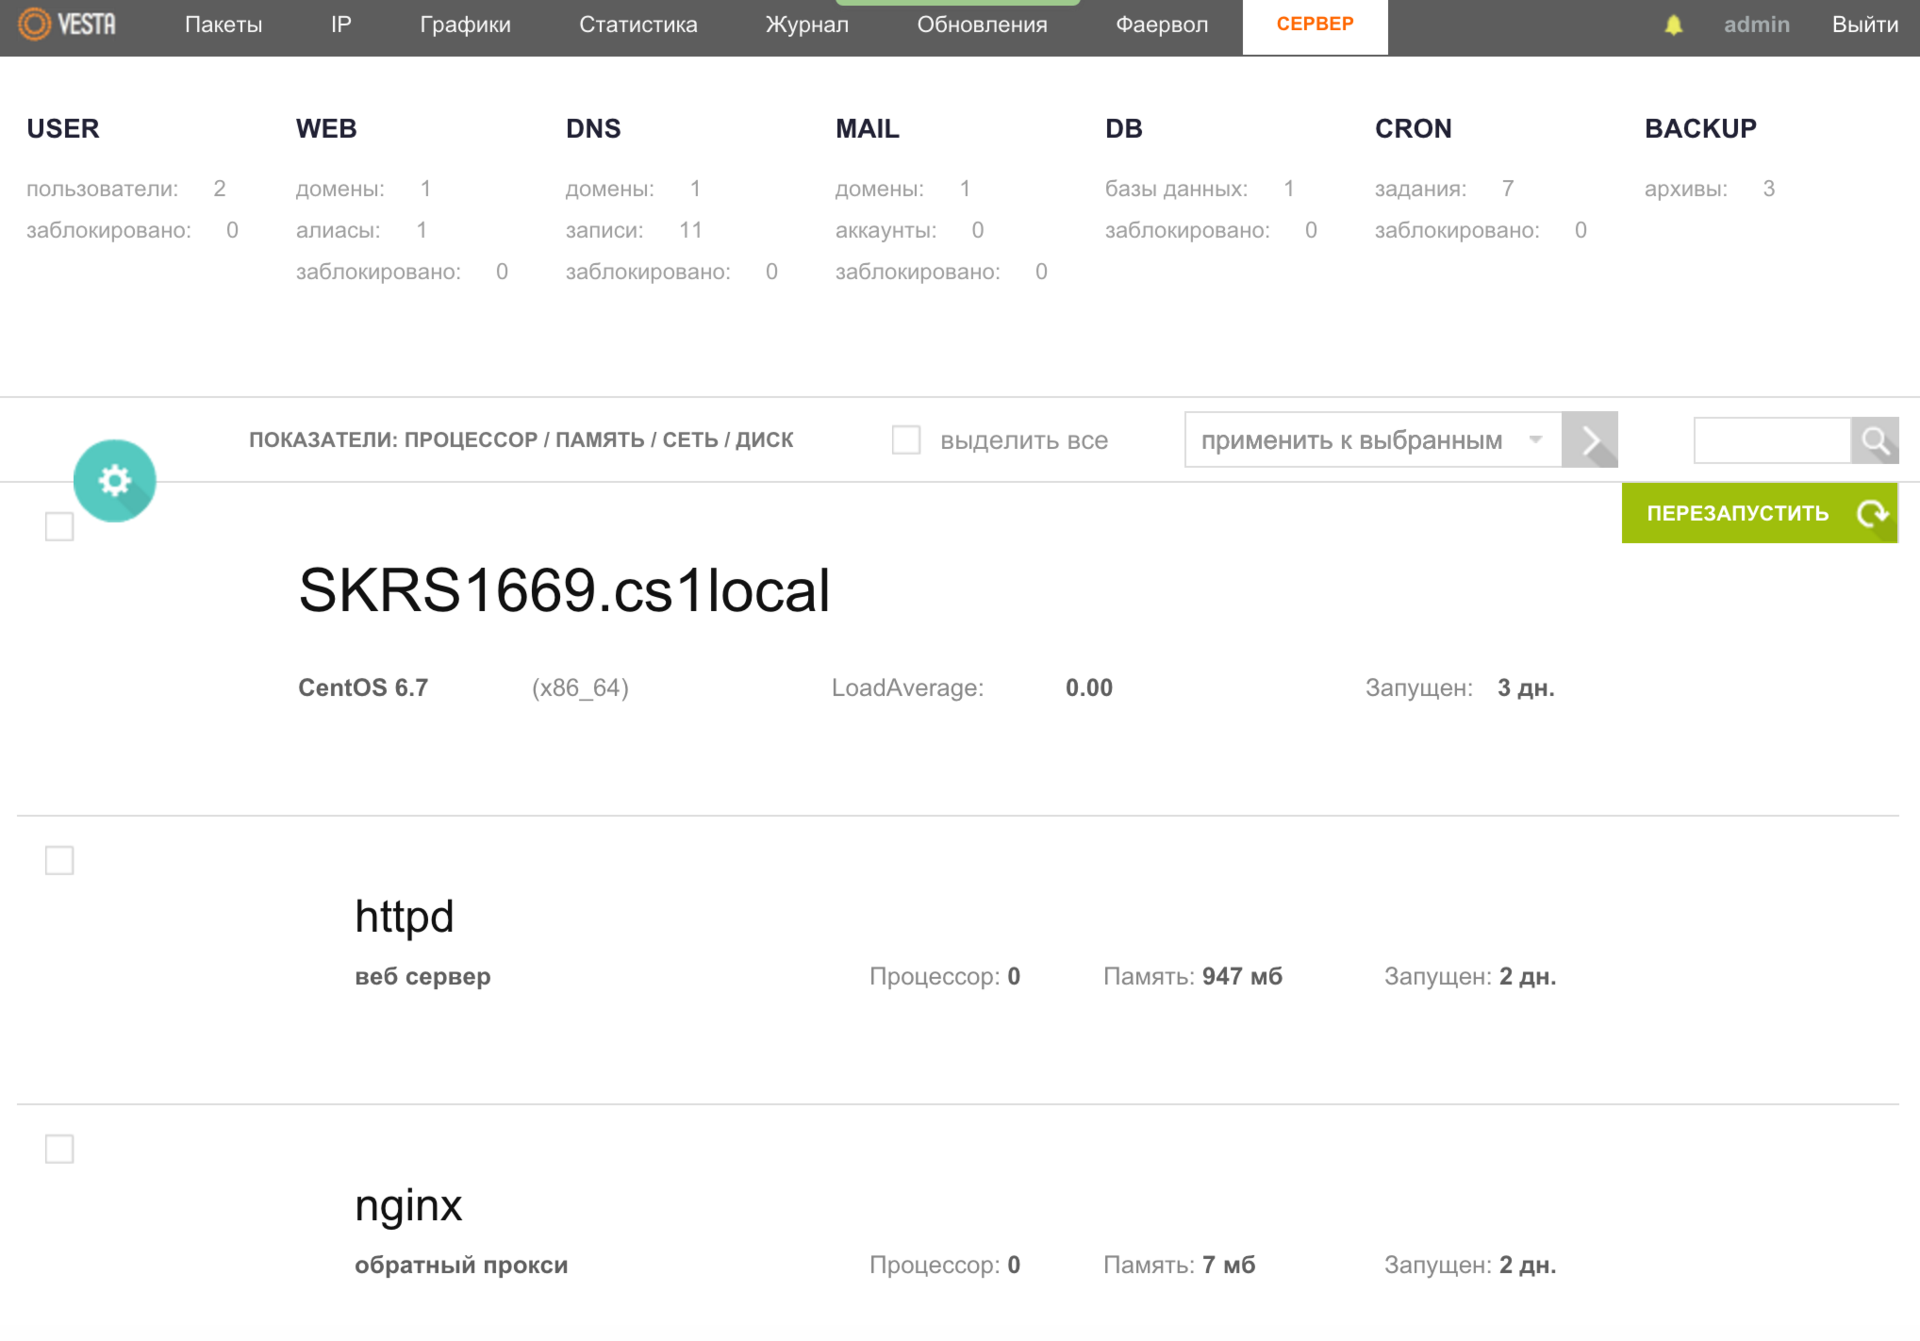
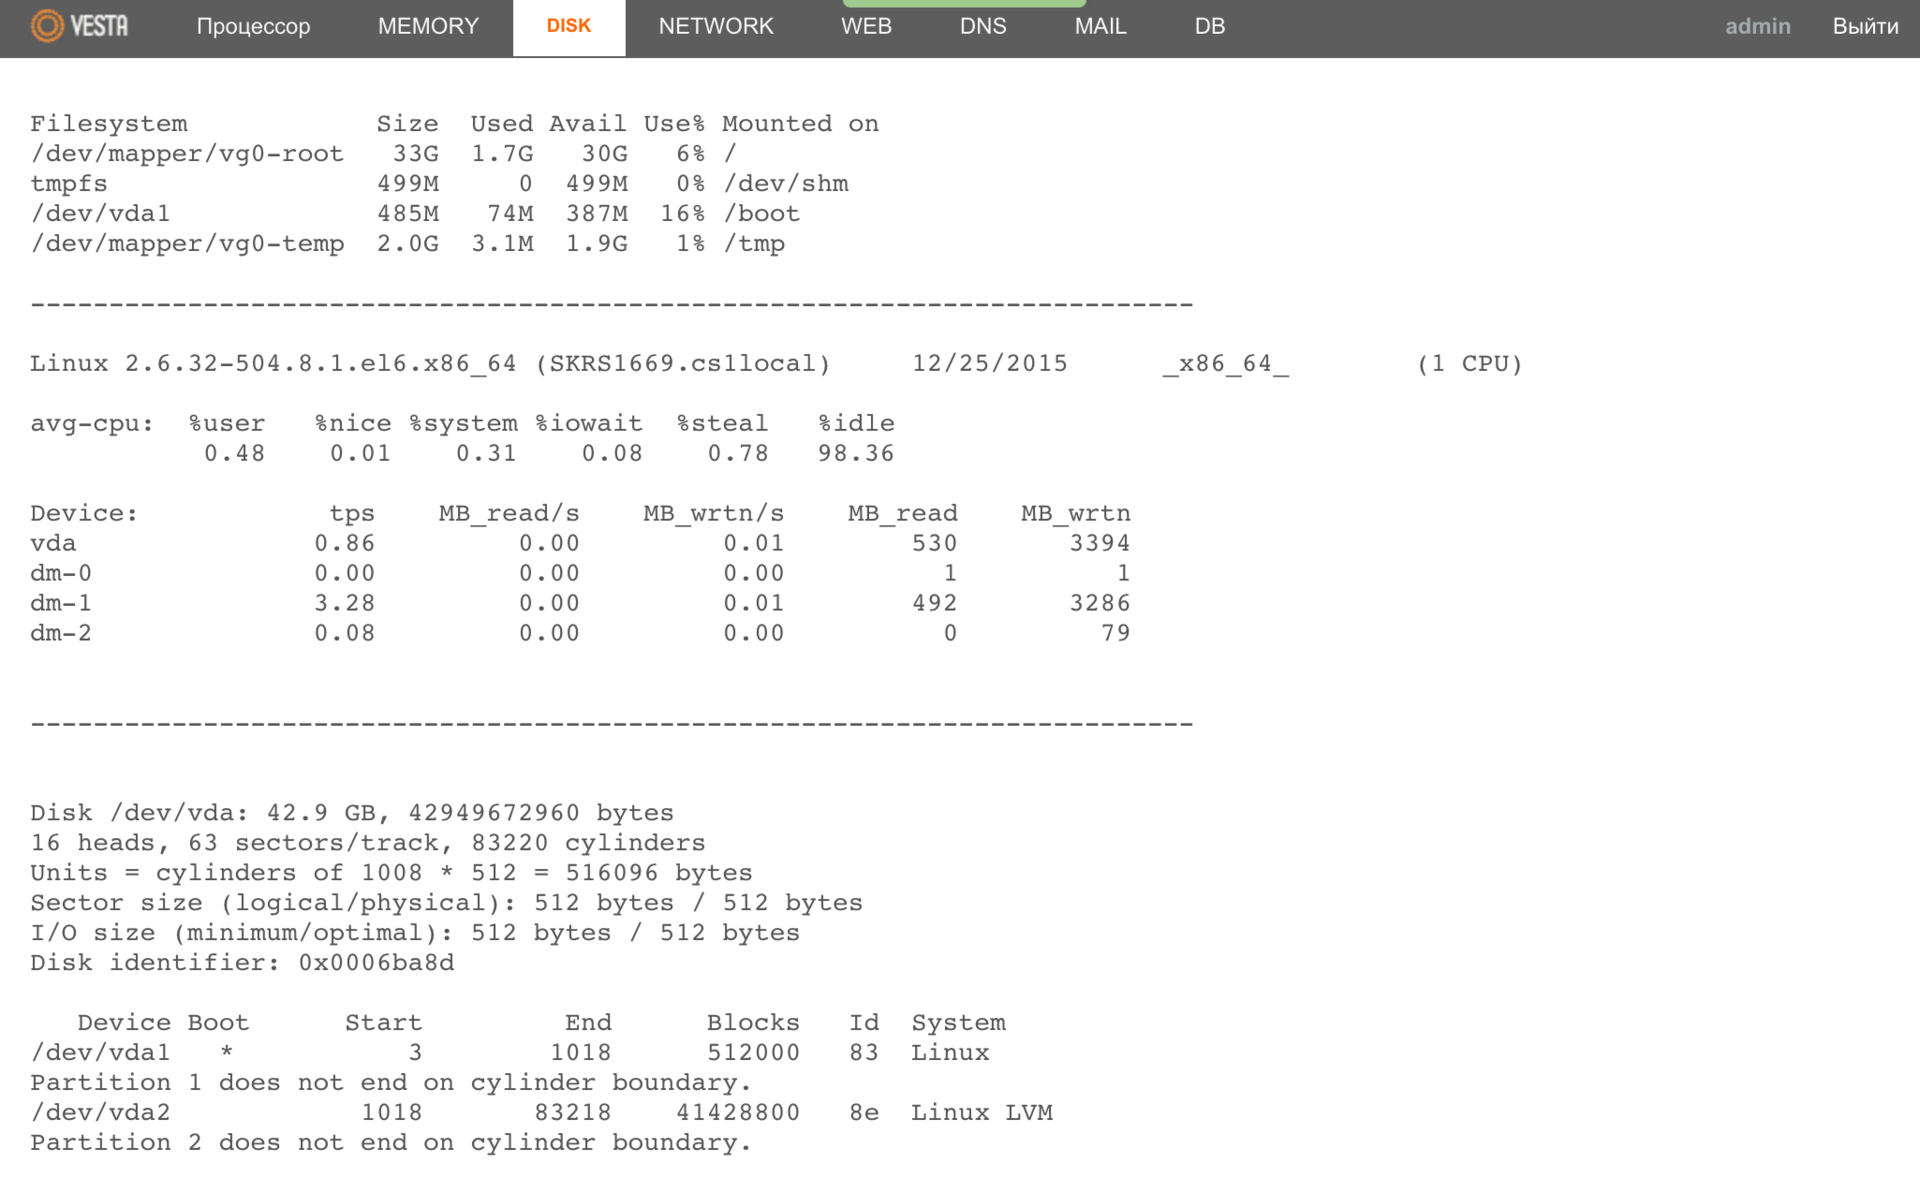
Also, if you want to study the performance of the processor (s), memory, network, disk (s), etc., you can get more detailed data on various parameters: server specifications, what requests are sent to the web server and to the database , it is possible to make a report on the sent letters and much more.
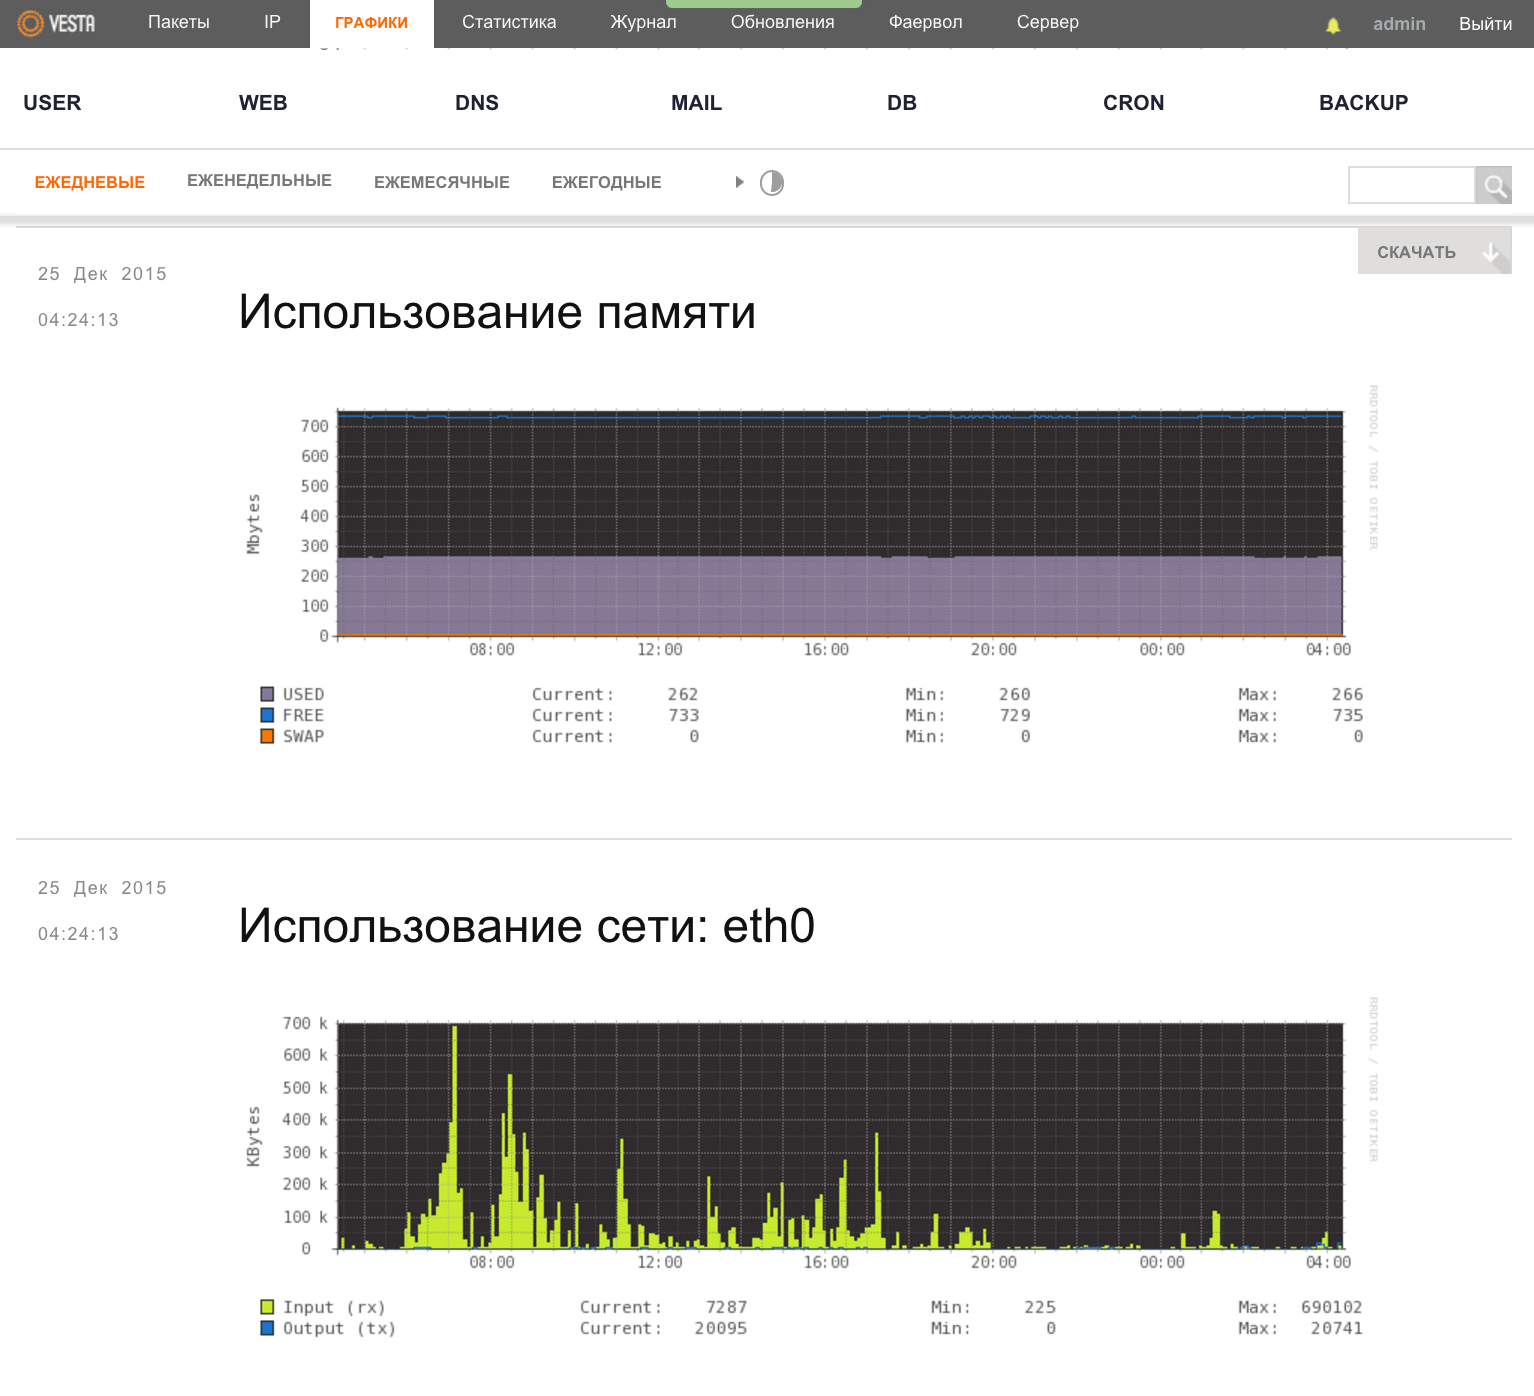
Do not forget about load graphs, which can also help you in analyzing the server.
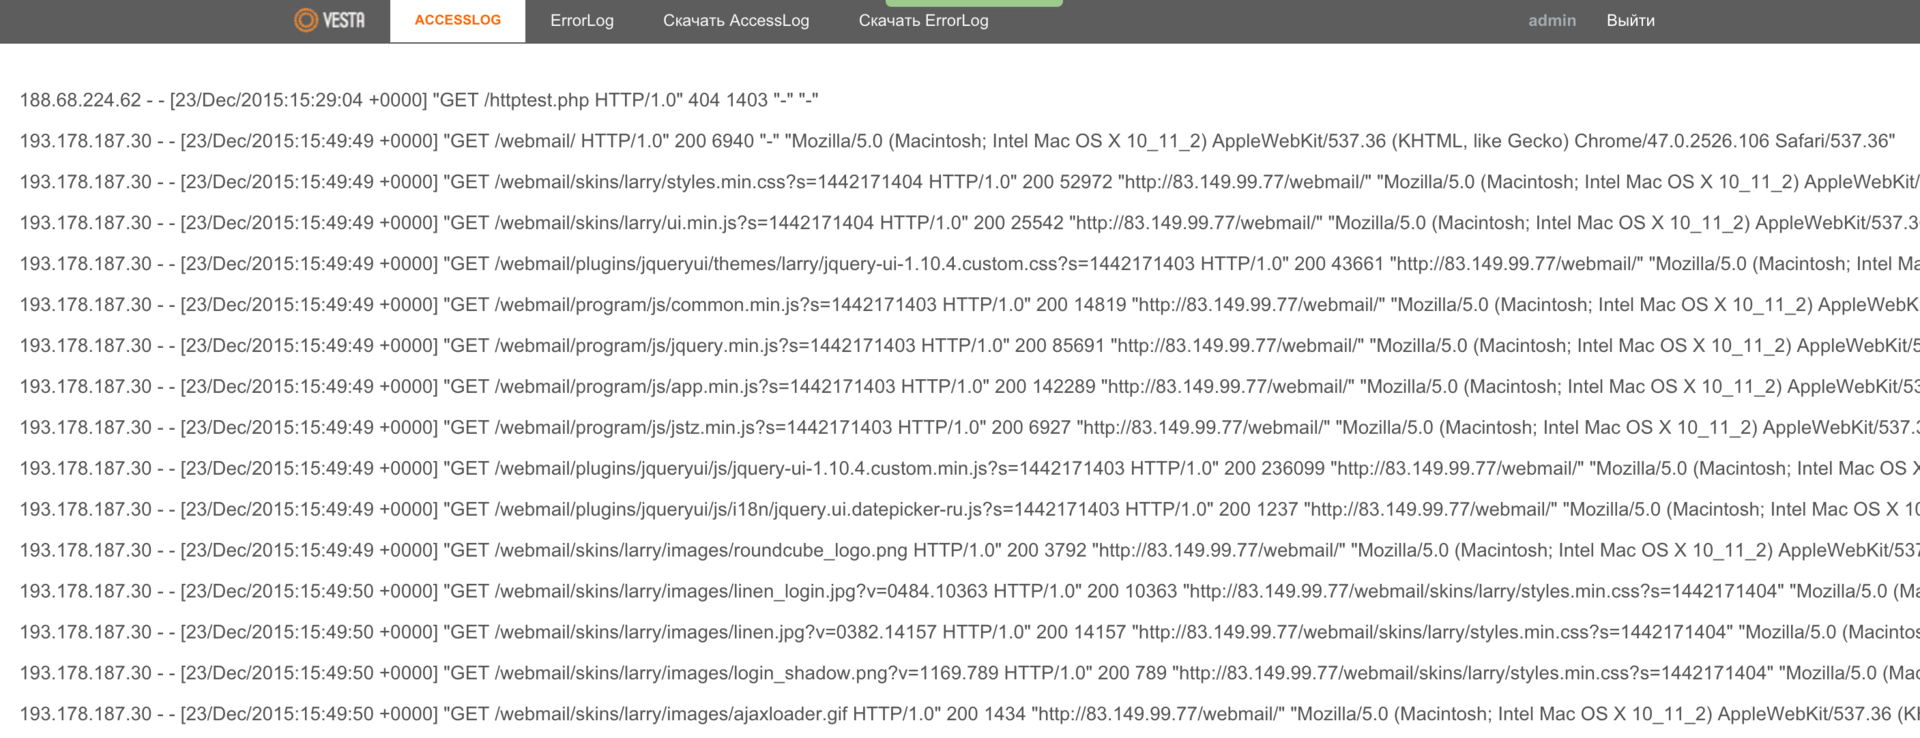
And for those for whom this is not enough, it is possible to view the domain logs live - the WEB menu, the BROWSE LOGS button.
The Vesta panel has an API that can be used as a framework for creating your own interfaces. For example, you can create a blog site or online stores . As the developers told me, several of their major customers use the panel in this way.
Vesta control panel updates may take place automatically, but this feature is disabled by default. All update management is carried out through the corresponding menu.
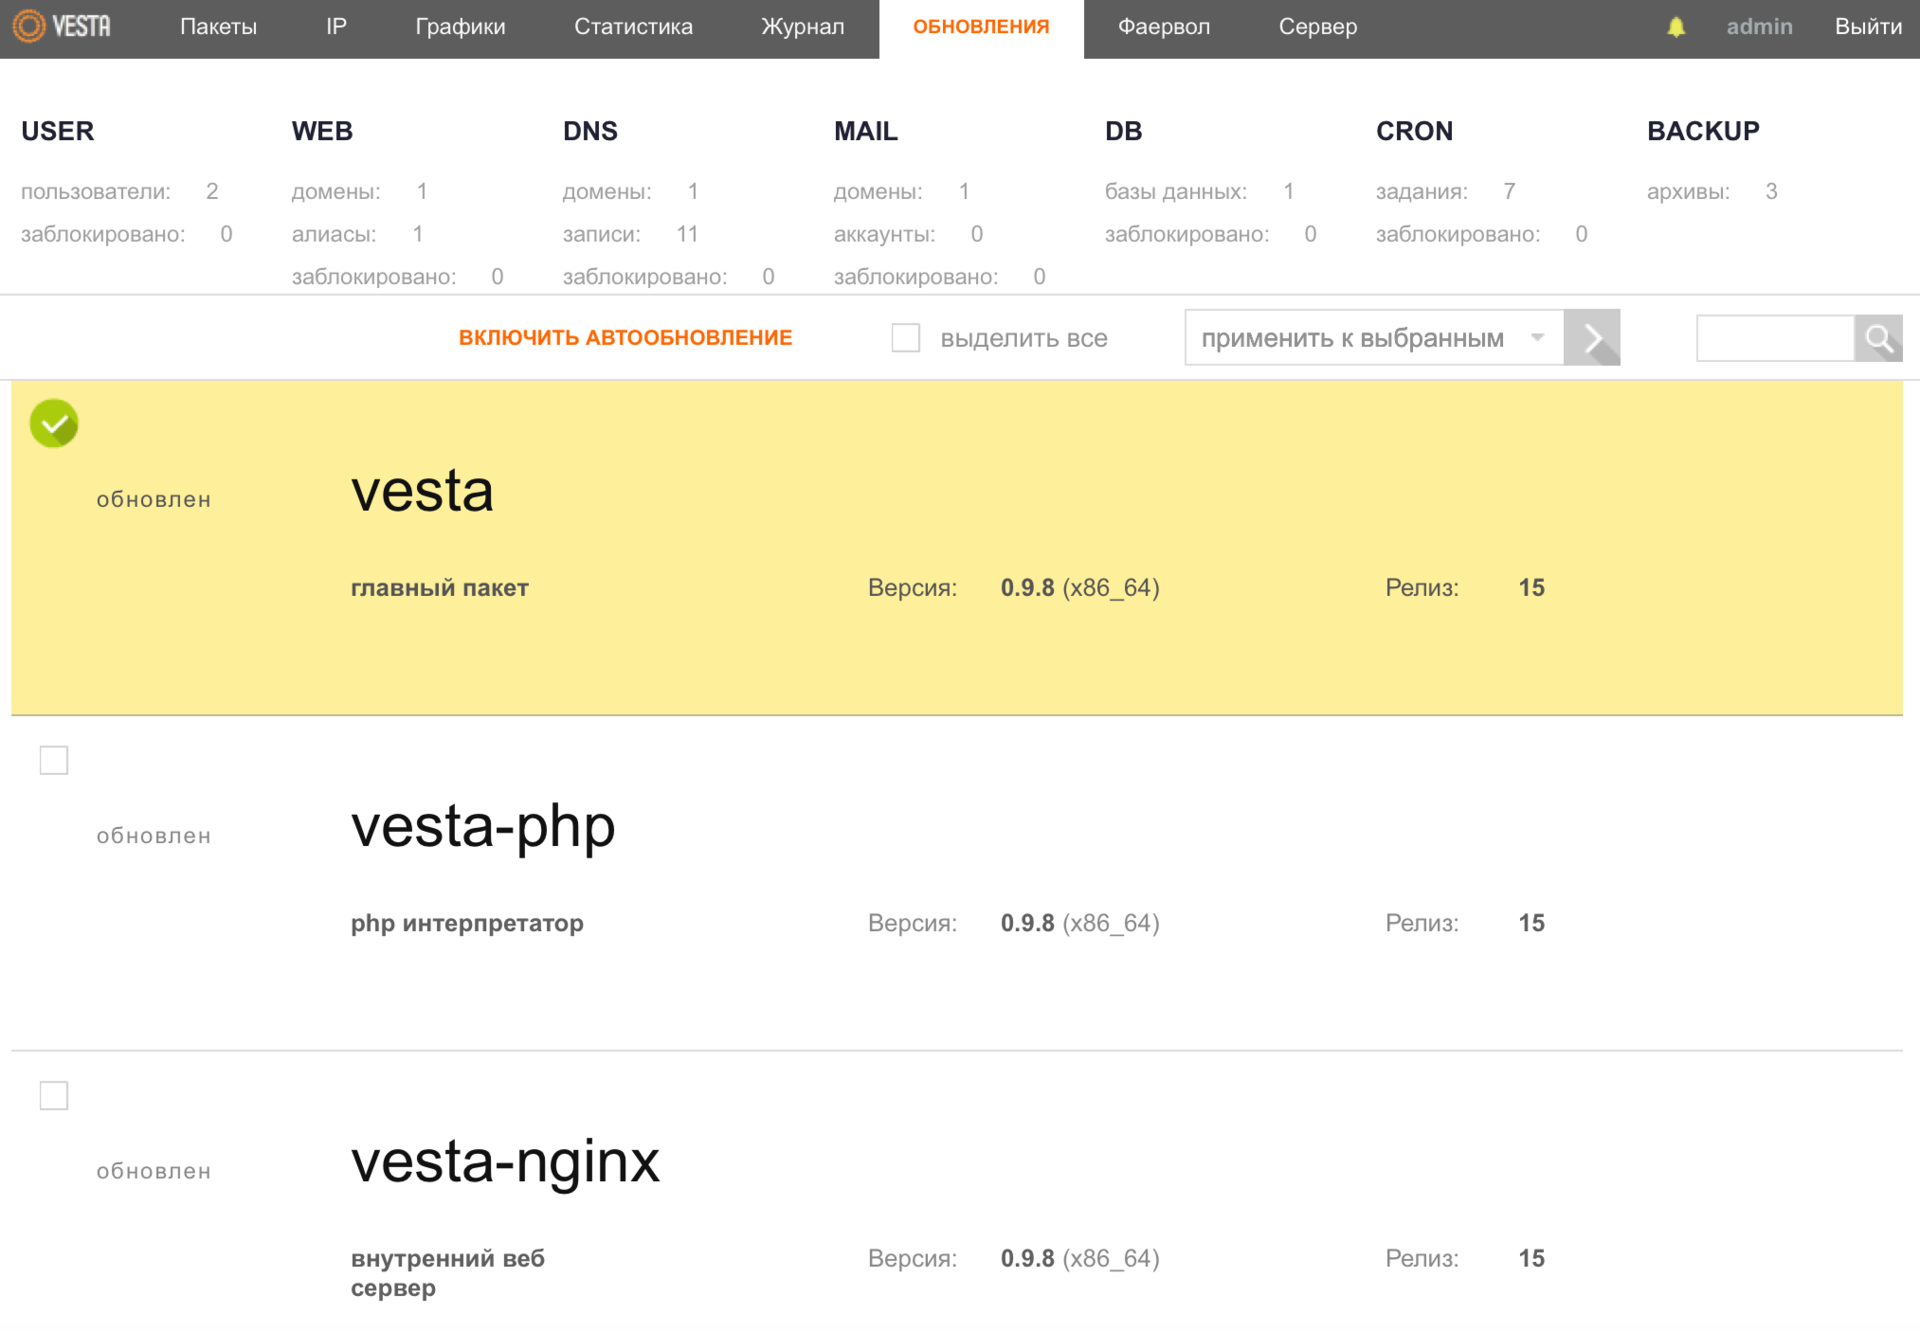
When an update comes out, the packages in this section of the menu begin to be highlighted in red, and the Update button appears. If necessary, you make one click and you're done.
With a little patience, and I will look with you into the near future of the "goddess." You really want to see what kind of “goodies” the developers are preparing for you in the next release of the Vesta panel?
I think almost every software product has its own characteristics. We have already mentioned some of them earlier, but there are those that I specially left for “dessert”.
At one time, the guys released several paid extensions, which would at least somehow cover the costs of supporting and developing this panel.
The first one is magic, in other words, I just can’t convey the convenience of its UI, file manager . As soon as you activate the plugin, the Files menu item appears, when you go to it, the following window opens:
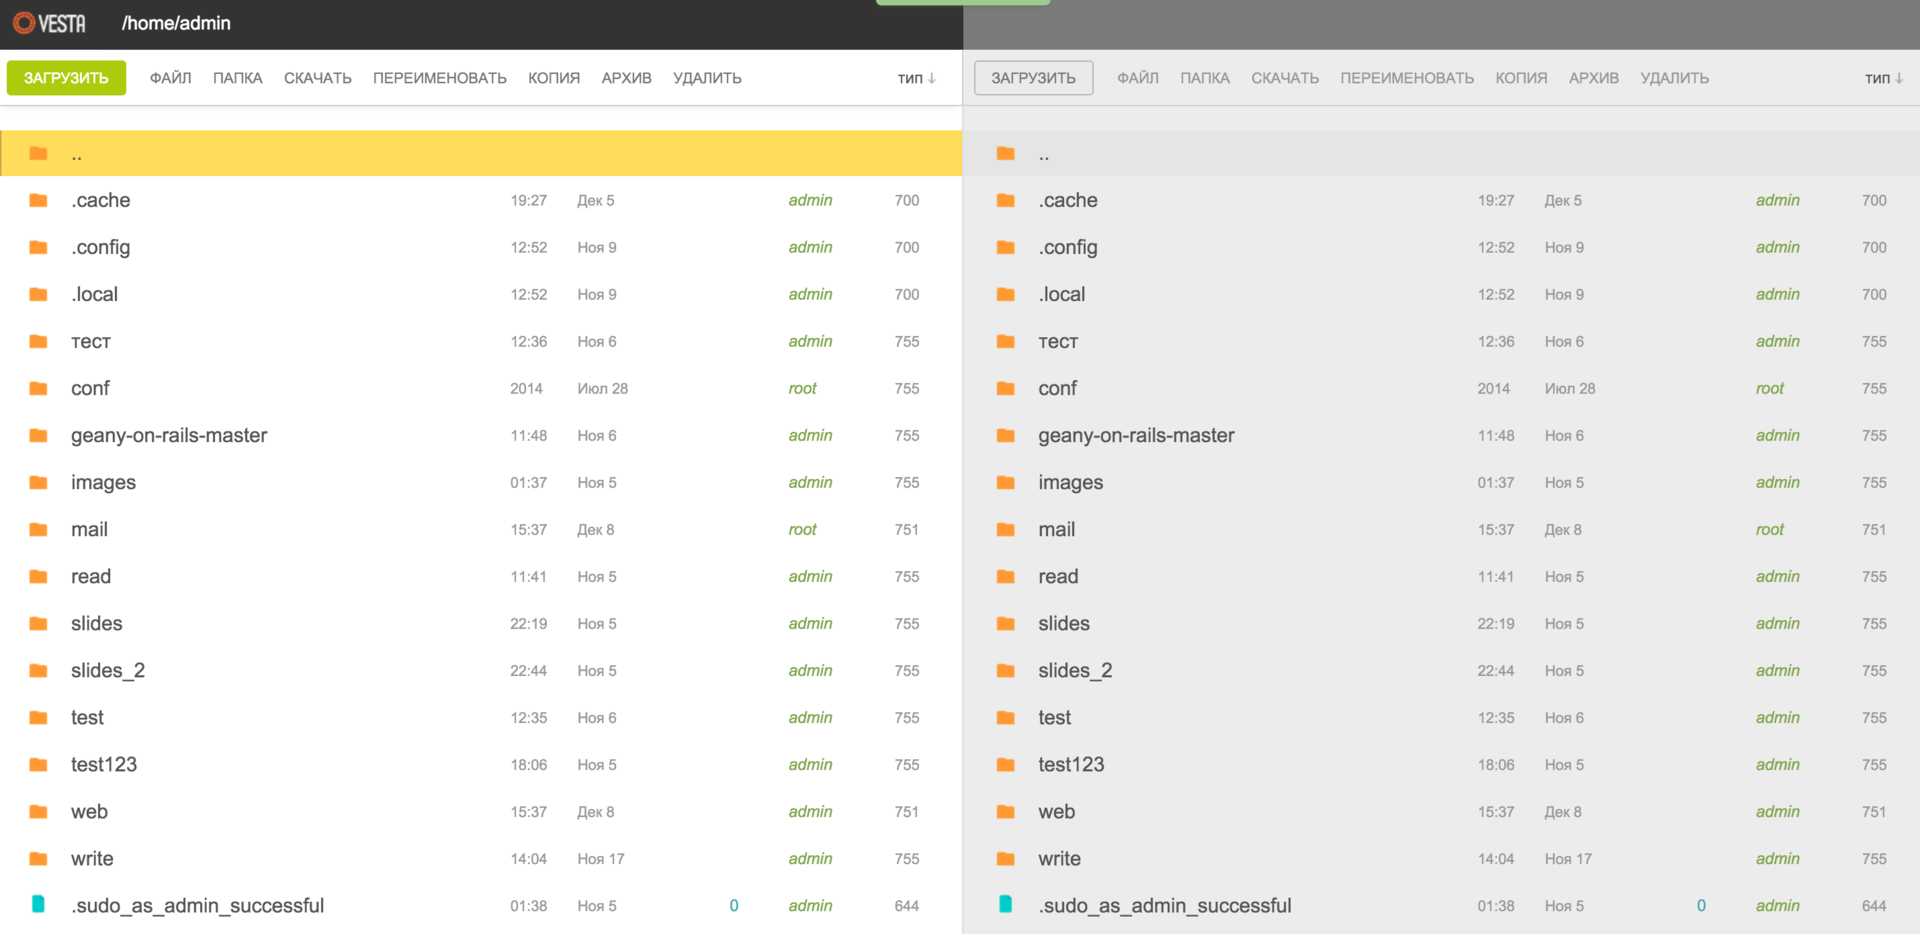
I agree that the first impression may be a little exaggerated, but you have not yet seen the set of available SHORTCUTS and have not even started working with the file manager itself, though ?

The development team does not hide the fact that the hot keys were borrowed from the magnificent GNU Midnight Commander file manager . Well, the truth is, why not accept what is really convenient? And believe me, you will have the opportunity to verify this yourself.
The second paid extension is SFTP Chroot . This plugin may be more interesting to those of you who provide hosting services, as well as share your server with other users. Further, I would like to quote the developer himself regarding this additional “feature” for increasing security:

Are you still thinking about which panel to choose? Then I continue, and move on to the most “delicious goodies” of the next release of the Vesta panel.
Additional hot keys will appear that allow you to fully control the panel using the keyboard - this is cool.

It will also be possible to get a free SSL certificate from the Let's Encrypt project in just one click. And as skid himself assured me, this functionality is already at the final stage of testing.
I will not disclose all the details of the upcoming release, but rather leave a little “food for thought” to you, our dear readers. All details at the end of the publication.
As a thank you, I want to list by the name of each of the development team this truly “goddess”:
And also to inform that people from different parts of the world participate in the development of this product, as evidenced by the number of language versions of the panel, as well as account statistics on the GitHub project. And the developers themselves admit that they are pleasantly surprised by the interest and desire of some users to support their project.
Keep it up guys!
PS In order to support the project on our part, we, together with the development team, decided to provide each of our clients who rent a cloud VPS service with the opportunity to activate both commercial extensions of the Vesta panel once for free for one service with superuser access. To do this, after placing the order, simply create a ticket to the sales department and we will activate the plugin (s) for you.
PPS The developers, for their part, also decided to hold an action and give you the opportunity to get an additional 30% discount when ordering eternal versions of licenses of paid Vesta extensions. When placing an order, simply use the HABR coupon, which will be valid until January 15th.
Understanding that it would take time to study each, I also decided to ask the advice of our experienced administrator, for which I received a short answer:
Look towards Vesta .For my part, there was an attempt to draw his attention to the fact that there are other free products:
Yes, I heard, but in general there are enough of them: Ajenti , CentOS Web Panel , etc.But the head of those. The department gave a rather expected answer:
These are not very popular in our circles.This is how my first acquaintance with one of the most popular free hosting control panels in runet - Vesta CP - happened. I would like to tell you how the solution of the tasks leads not only to writing tutorials, but also allows you to meet interesting people who put their soul into that business, which really brings them pleasure. And as a result, we get a wonderful software product. Well, isn't that wonderful? Have a nice and constructive reading for you ...
Foreword
Since the Vesta panel was really unfamiliar to me, I began to collect information. I found several good publications, including on the Habrahabr resource, after which I even thought about what else can be said about this panel, since there is really enough material on it in RuNet. But how can everything change one conversation !? After reading a good article, I decided to write to the author and find out his opinion not only about the Vesta panel, but also about the niche of free hosting control panels in general. To my surprise, the answer was not long in coming, and the dialogue itself continues to continue now ... A lot of things have been discussed, but this was only a small part of what remains to be discussed. Yes, most likely this is material for a separate article, but we will not get ahead of ourselves and return to the Vesta panel itself.
Installation
I will not change my habits - I will install CentOS on a virtual server (also the panel has support for Debian, Ubuntu) and connect to it via SSH. To do this, if you are using a MacBook, launch the Terminal and enter the following command:
ssh root@xxx.xxx.xxx.xxx
We confirm the connection, specify the superuser password, and after all these actions we get to the console. If you are a Windows user, use the PuTTY terminal emulator to work with the server .
Next, download the necessary installation files to the server using the command:
curl -O http://vestacp.com/pub/vst-install.sh
Before starting the installation process itself, I would like to inform you that the panel installer automatically classifies the servers into the following 4 groups:
- micro - less than 1 GB of RAM;
- small - less than 3 GB of RAM;
- medium - less than 7 GB of RAM;
- large - more than 7 GB of RAM.
Depending on the technical characteristics of your server, in this case the amount of RAM, the installer will automatically install a specific set of packages and configs of the Vesta panel. For example, the antivirus package will work correctly (according to the recommendations of the developers) starting with the medium version, and php cgi support, in turn, is available for the entire group of servers except micro. But nothing prevents you from installing the missing software manually.
We continue the panel installation process, for this we run the script using the command:
bash vst-install.sh
You should receive the following message on the screen:
_|      _|  _|_|_|_|    _|_|_|  _|_|_|_|_|    _|_|
 _|      _|  _|        _|            _|      _|    _|
 _|      _|  _|_|_|      _|_|        _|      _|_|_|_|
   _|  _|    _|              _|      _|      _|    _|
     _|      _|_|_|_|  _|_|_|        _|      _|    _|
                                  Vesta Control Panel
Following software will be installed on your system:
   - Nginx Web Server
   - Apache Web Server (as backend)
   - Bind DNS Server
   - Exim mail server
   - Dovecot POP3/IMAP Server
   - MySQL Database Server
   - Vsftpd FTP Server
   - Iptables Firewall + Fail2Ban
Would you like to continue [y/n]:
Confirm your actions with the y (yes) key . Next, you will need to specify your email:
Please enter admin email address: xxxxxxxxxx@domain.com
After which the installer may request to enter the host name:
Please enter FQDN hostname [XXXX1669]: xx1669.ua-hosting.company
The installation process itself can take about 15 minutes. Looking ahead a bit, I would like to say that if you install the Vesta panel on one server, then entering all the necessary data during the installation should not take much time. But if you need to prepare several dozens of servers with this panel, more recently, one of our clients has set such a task, then we recommend that you run the installation script with the key h (help):
bash vst-install.sh -h
And see the full list of available options:
Usage: vst-install-rhel.sh [OPTIONS]
  -a, --apache            Install Apache        [yes|no]  default: yes
  -n, --nginx             Install Nginx         [yes|no]  default: yes
  -w, --phpfpm            Install PHP-FPM       [yes|no]  default: no
  -v, --vsftpd            Install Vsftpd        [yes|no]  default: yes
  -j, --proftpd           Install ProFTPD       [yes|no]  default: no
  -k, --named             Install Bind          [yes|no]  default: yes
  -m, --mysql             Install MySQL         [yes|no]  default: yes
  -g, --postgresql        Install PostgreSQL    [yes|no]  default: no
  -d, --mongodb           Install MongoDB       [yes|no]  unsupported
  -x, --exim              Install Exim          [yes|no]  default: yes
  -z, --dovecot           Install Dovecot       [yes|no]  default: yes
  -c, --clamav            Install ClamAV        [yes|no]  default: yes
  -t, --spamassassin      Install SpamAssassin  [yes|no]  default: yes
  -i, --iptables          Install Iptables      [yes|no]  default: yes
  -b, --fail2ban          Install Fail2ban      [yes|no]  default: yes
  -r, --remi              Install Remi repo     [yes|no]  default: yes
  -q, --quota             Filesystem Quota      [yes|no]  default: no
  -l, --lang              Default language                default: en
  -y, --interactive       Interactive install   [yes|no]  default: yes
  -s, --hostname          Set hostname
  -e, --email             Set admin email
  -p, --password          Set admin password
  -f, --force             Force installation
  -h, --help              Print this help
Which, in turn, will allow you to install "for yourself", as well as help speed up the process of setting up a whole "fleet of cars." The easiest way to skip entering additional data during the installation of the panel is to deactivate the interactive mode, as a result, run the installation script with the key y (interactive) and the parameter no .
bash vst-install.sh -y no
If you also want to set an access password to the panel yourself, add the p (password) key with your password option:
bash vst-install.sh -y no -p xxxxxxxxx
For those users who are not in a buzz to conduct a "debriefing" in the console, the developers have made a convenient web-based configurator of options , which greatly simplifies the process of custom installation. Just in the Advanced Install Settings section, set the necessary parameters, then click the Generate Install Command button and paste the ready-made command into the console. How do you like this installation option?
After the installation is completed, the following message will be displayed:
 _|      _|  _|_|_|_|    _|_|_|  _|_|_|_|_|    _|_|
 _|      _|  _|        _|            _|      _|    _|
 _|      _|  _|_|_|      _|_|        _|      _|_|_|_|
   _|  _|    _|              _|      _|      _|    _|
     _|      _|_|_|_|  _|_|_|        _|      _|    _|
Congratulations, you have just successfully installed Vesta Control Panel
    https://xxx.xxx.xxx.xxx:8083
    username: admin
    password: xxxxxxxxxx
Web interface
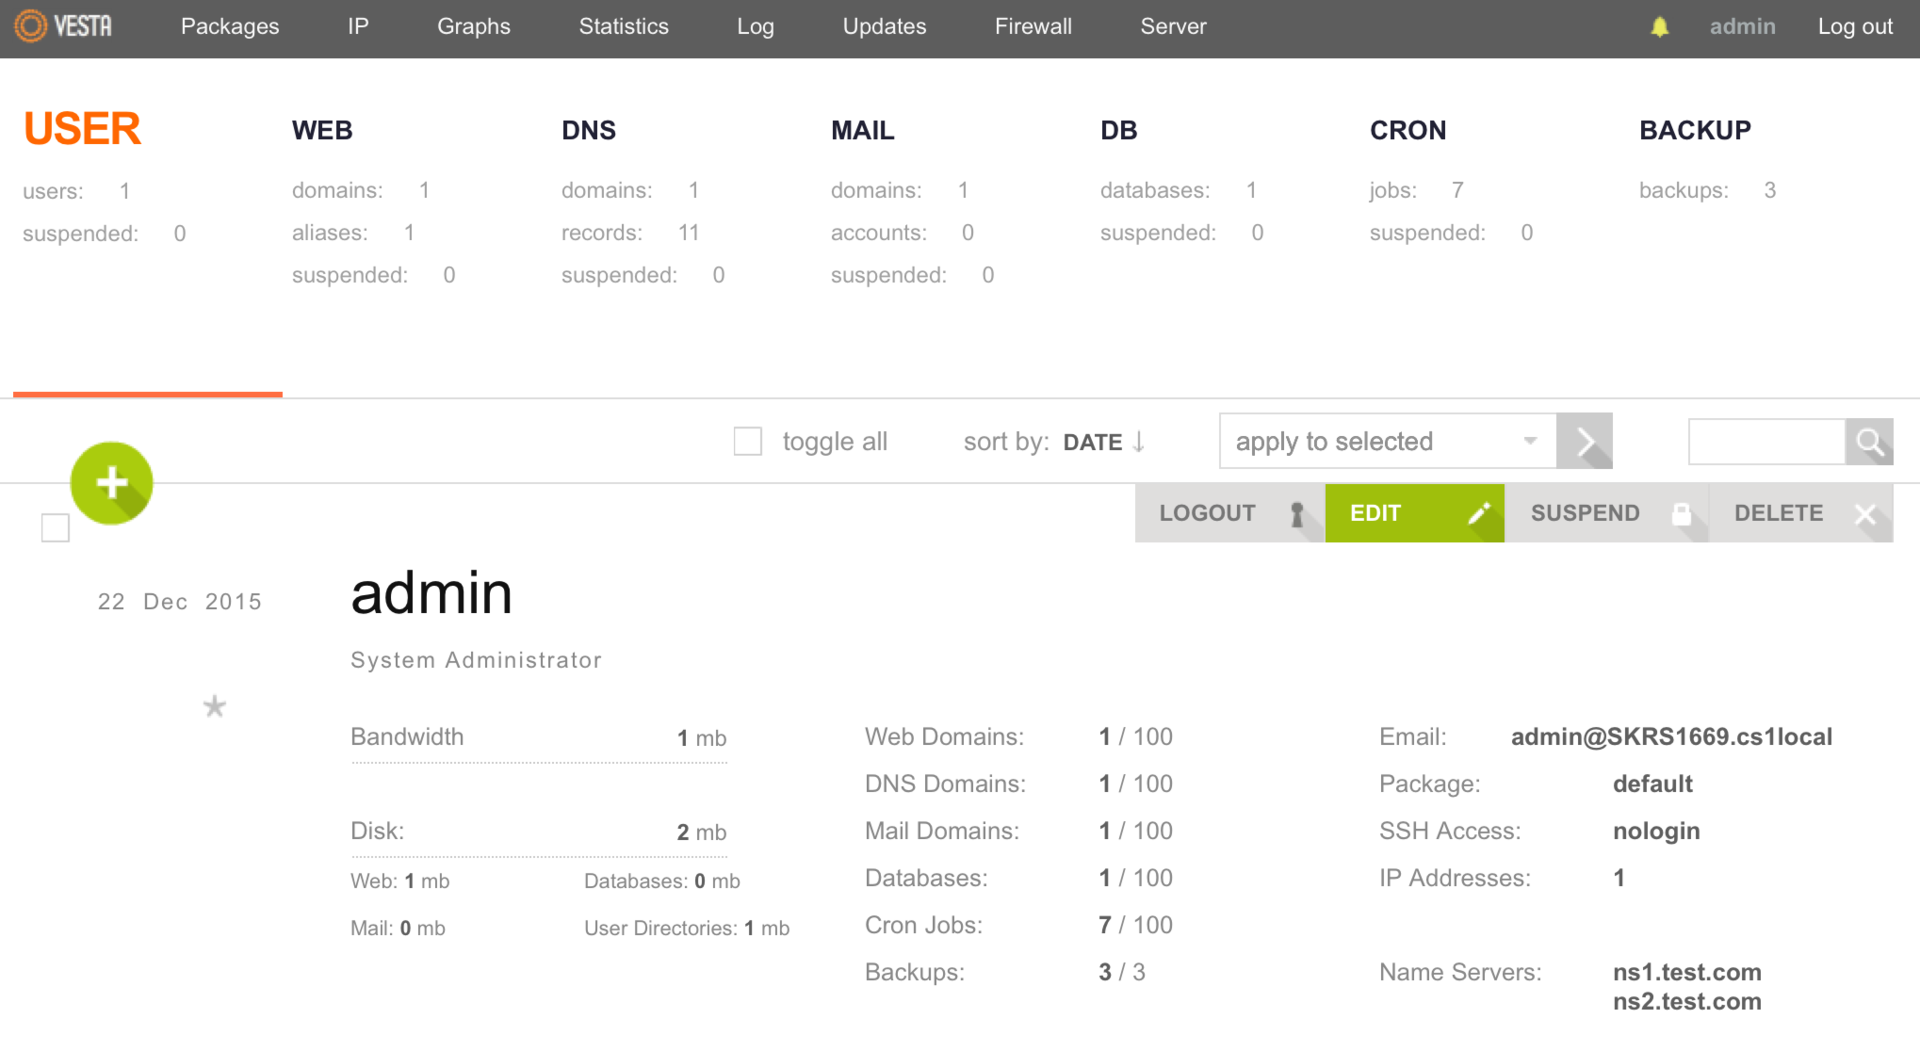
Well, are you ready to meet with the "goddess"? Then open the browser and log in to the panel. I draw your attention to the fact that the username is admin.
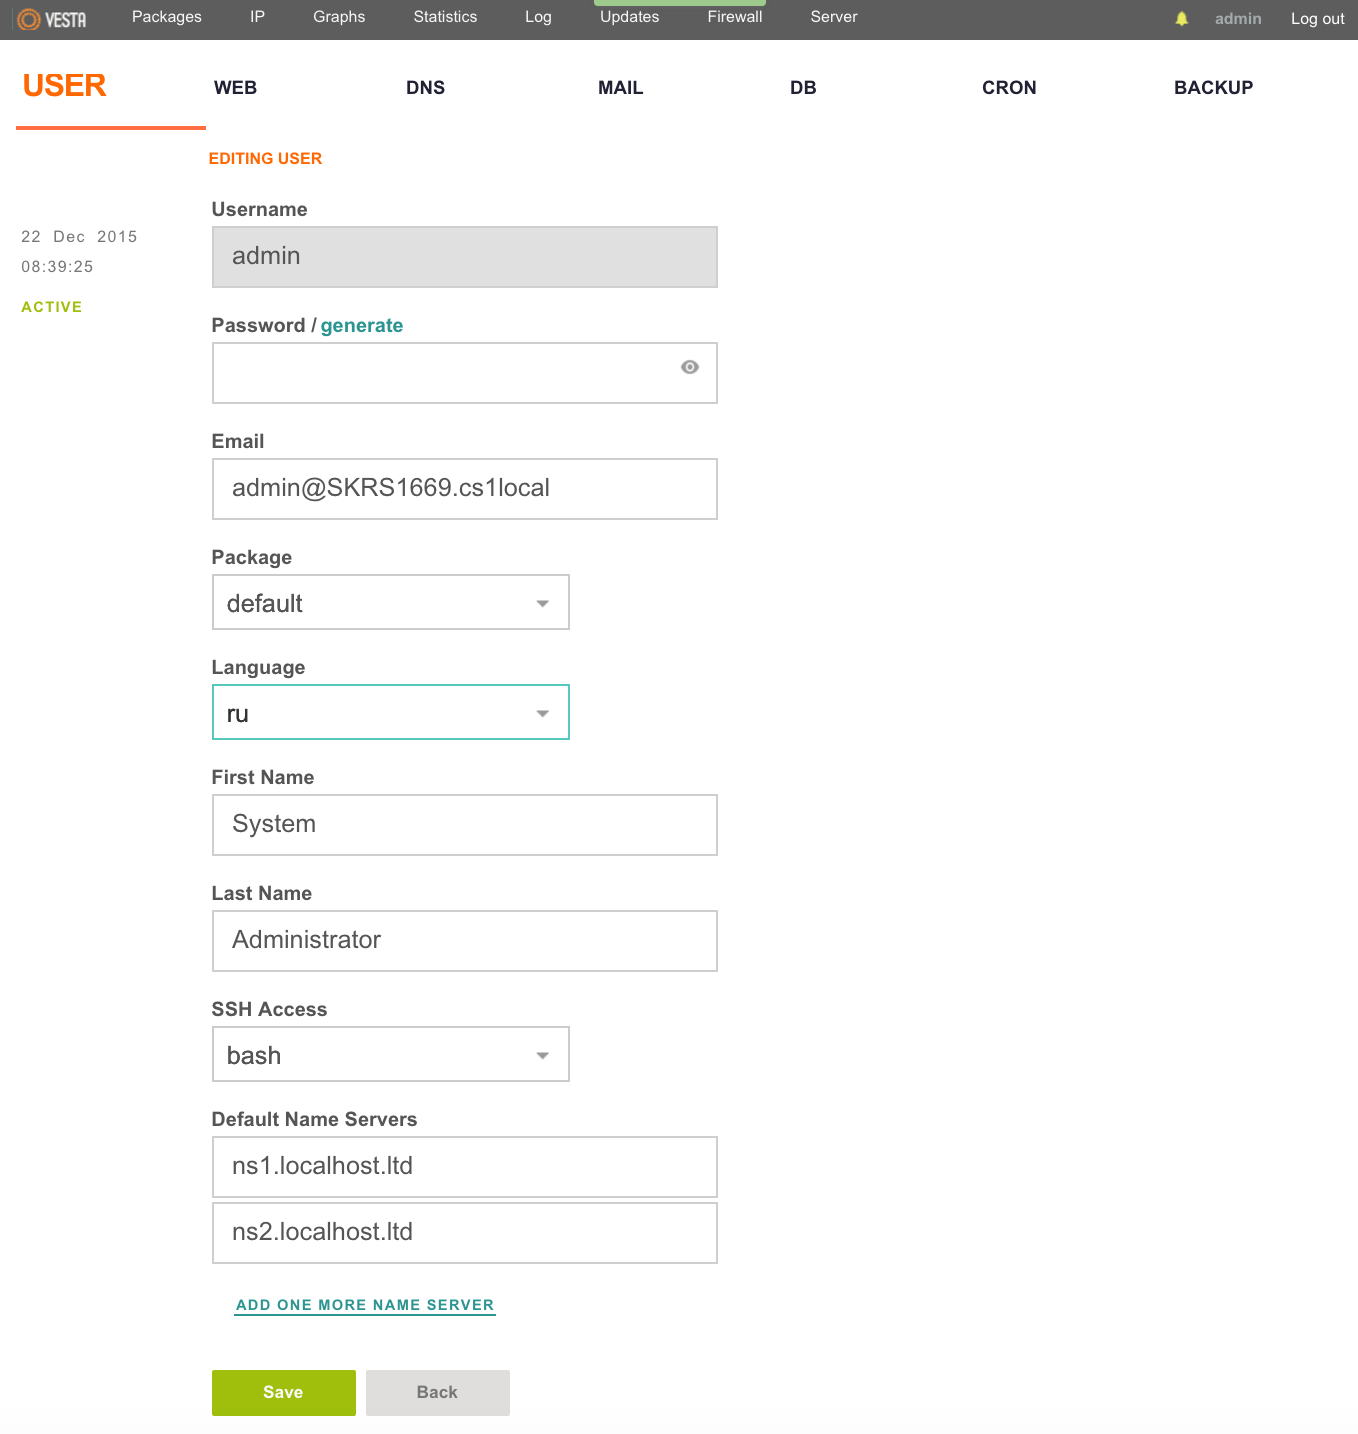
Immediately after logging in, we get to the USER page and see the information so far about the only admin user with system administrator rights. If someone is more pleased to work with the Russian interface, then open the admin user settings and select the desired language in the Language field. Do not forget to click the Save button to save the changes.
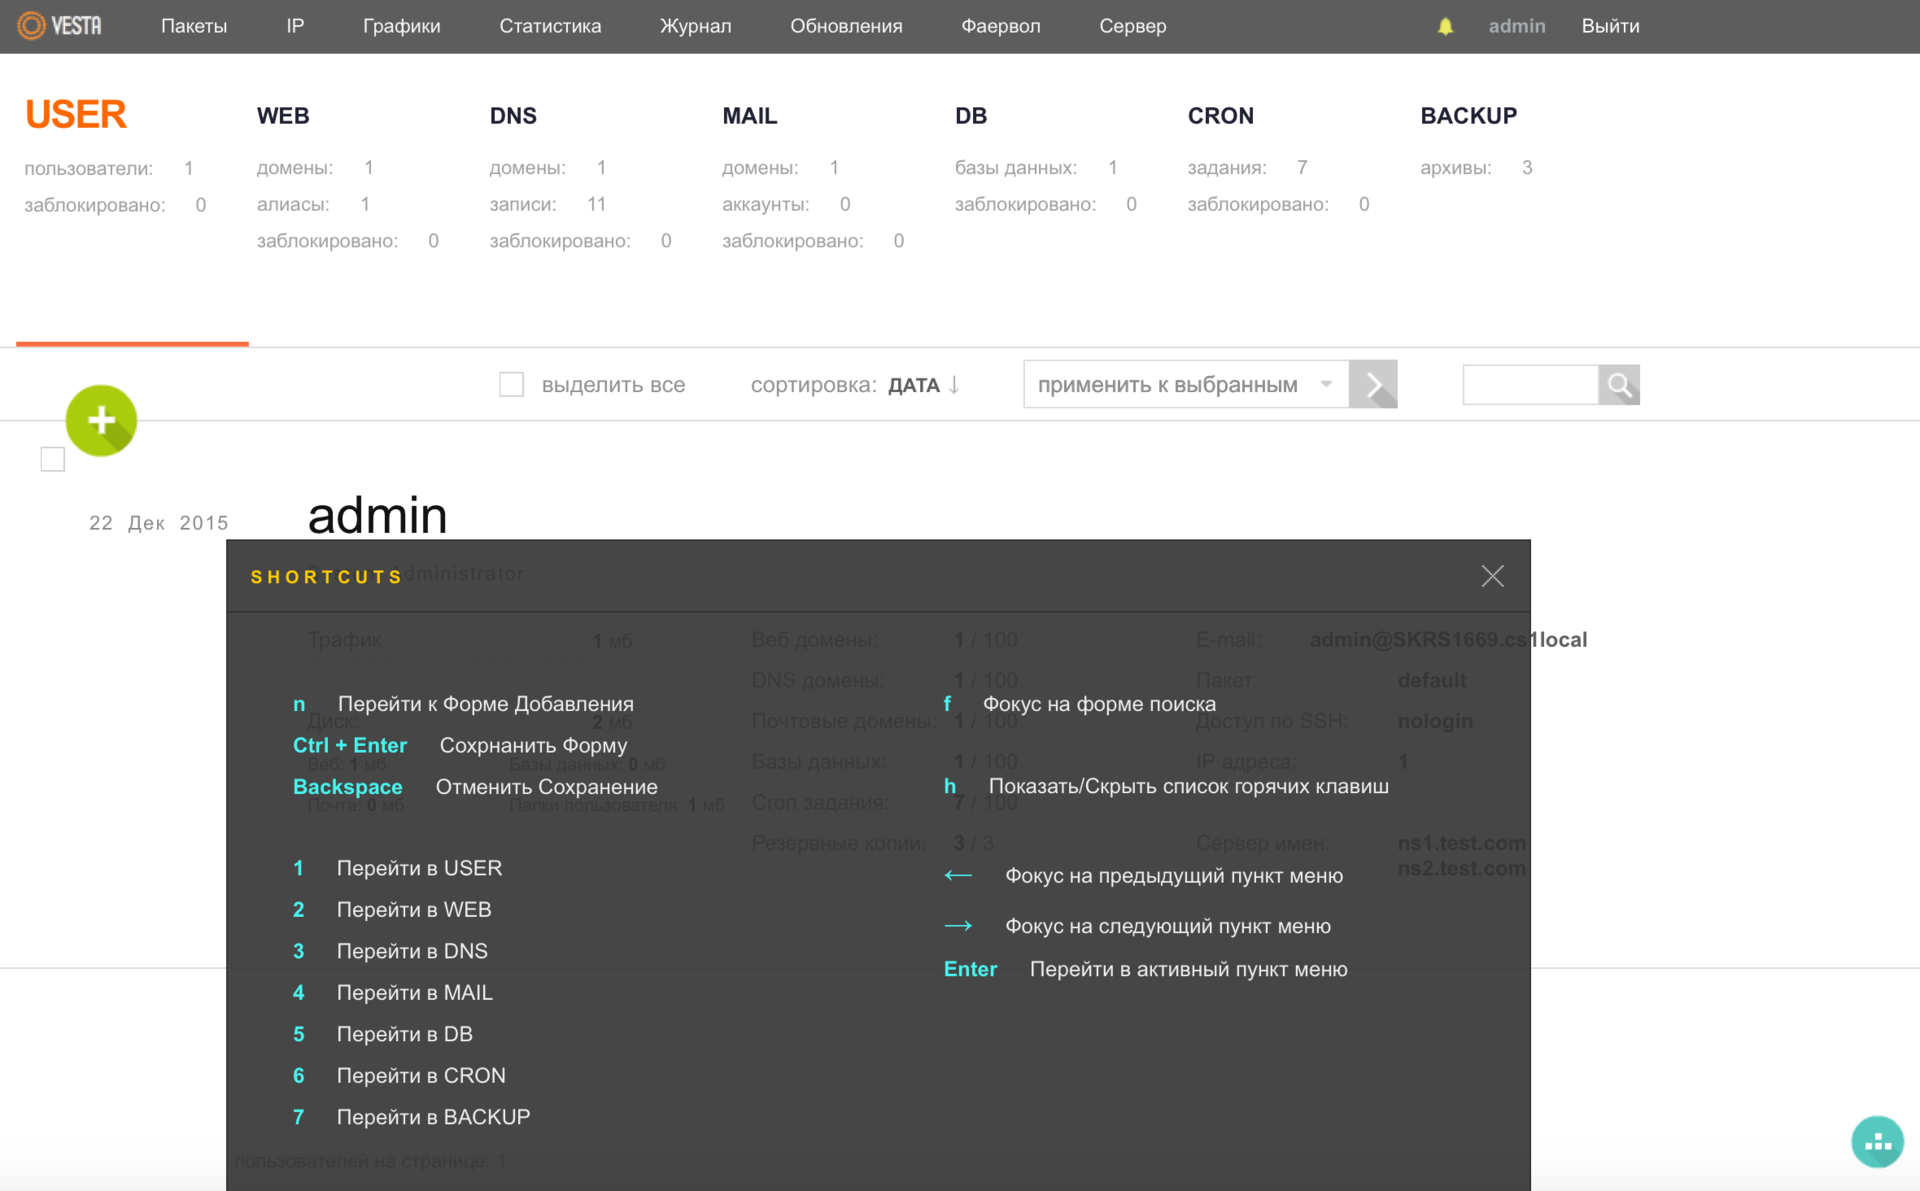
Also, shortcuts (SHORTCUTS) are very helpful in working with the panel, which simplify menu navigation and allow you to control using the keyboard. To open a list of all available SHORTCUTS, use the h key on the keyboard or one of the buttons in the lower right corner of the screen.
Users
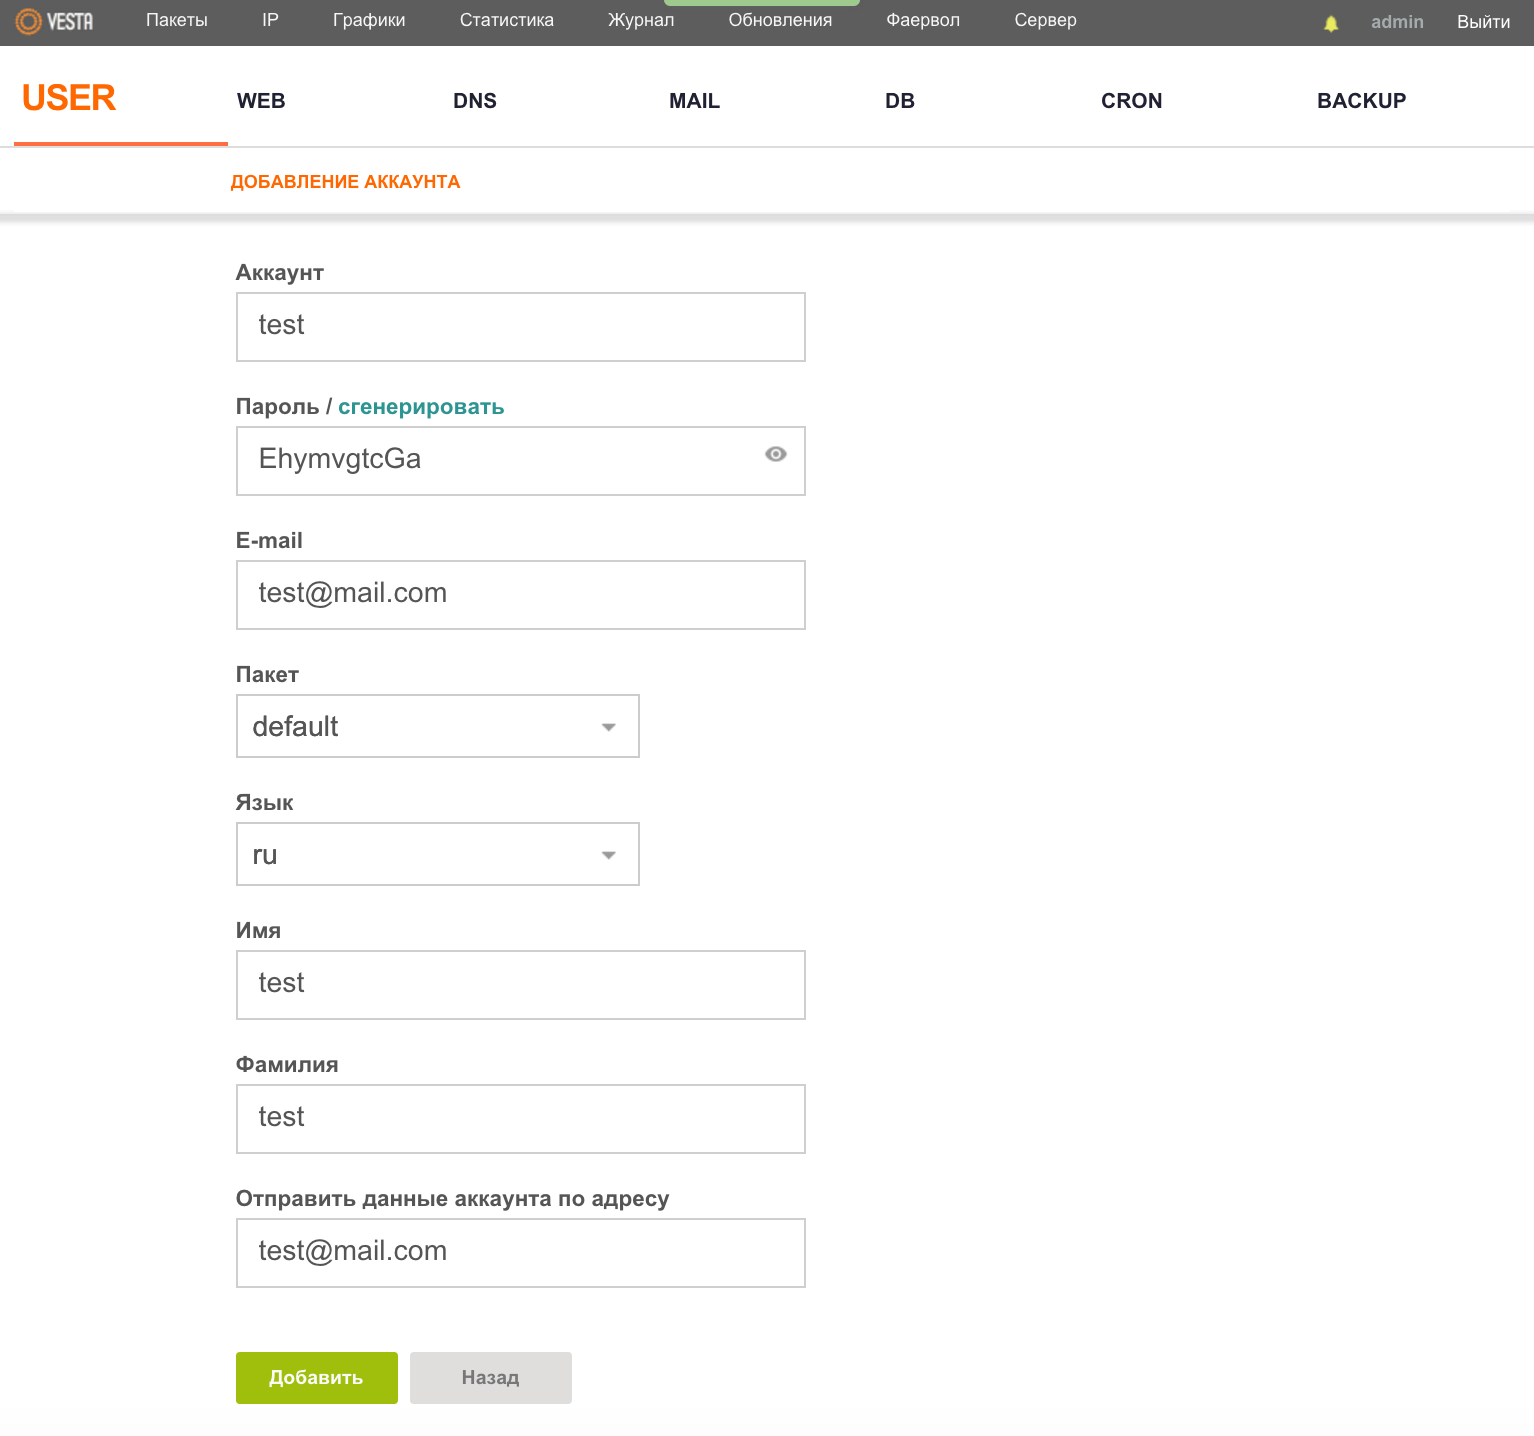
To increase security, developers do not recommend managing sites from the admin user, so let's create a new user. Go to the USER menu and press the green round button with a plus (ADD ACCOUNT). Do not forget that this can also be done using hotkeys, the previous screenshot should tell you that the key - a will help us in this .
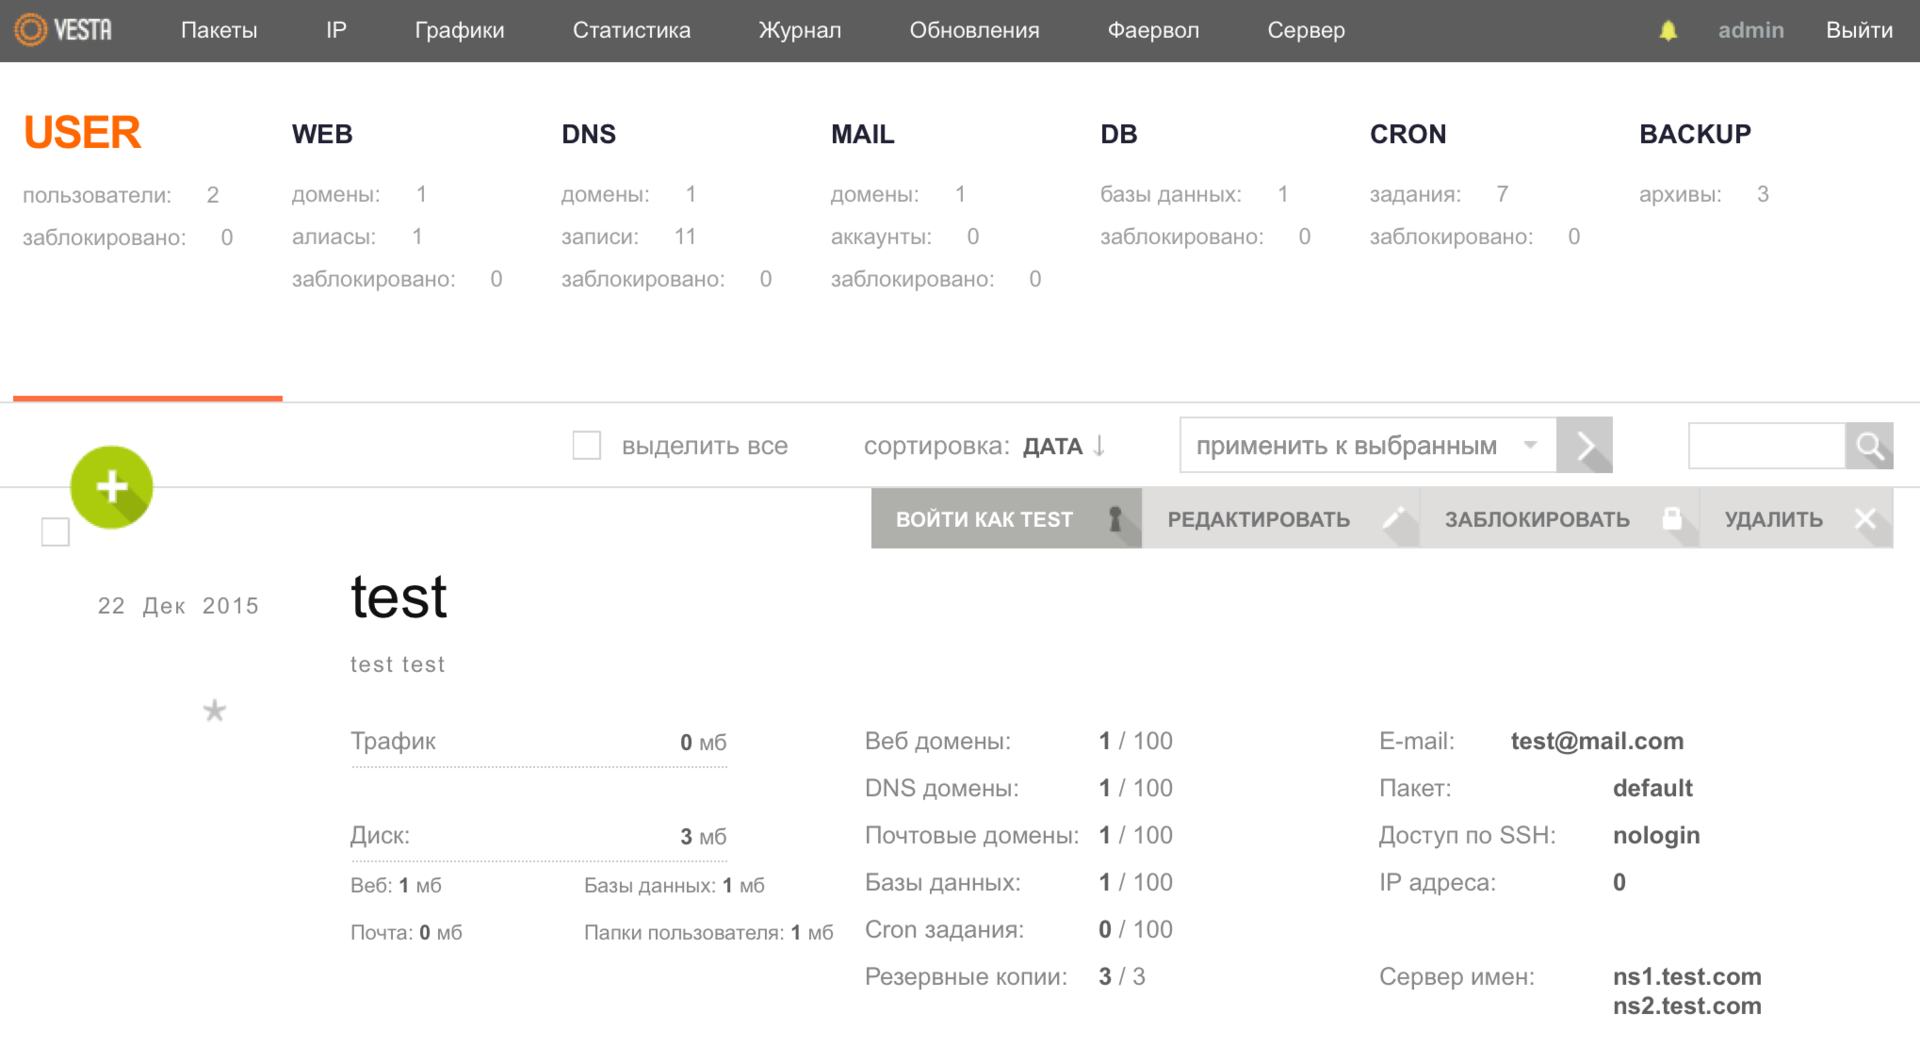
Here you can specify the interface language for the user, as well as his mailbox to which the access will be sent. After filling in the required fields, click the "Add" button. As a result, we will already have two users in the USER menu, and using the LOGIN AS key, we can log in using the user we need. It is worth adding that the developers took care of the "great migration of peoples" and providedthe ability to transfer users from one server to another.
Domains
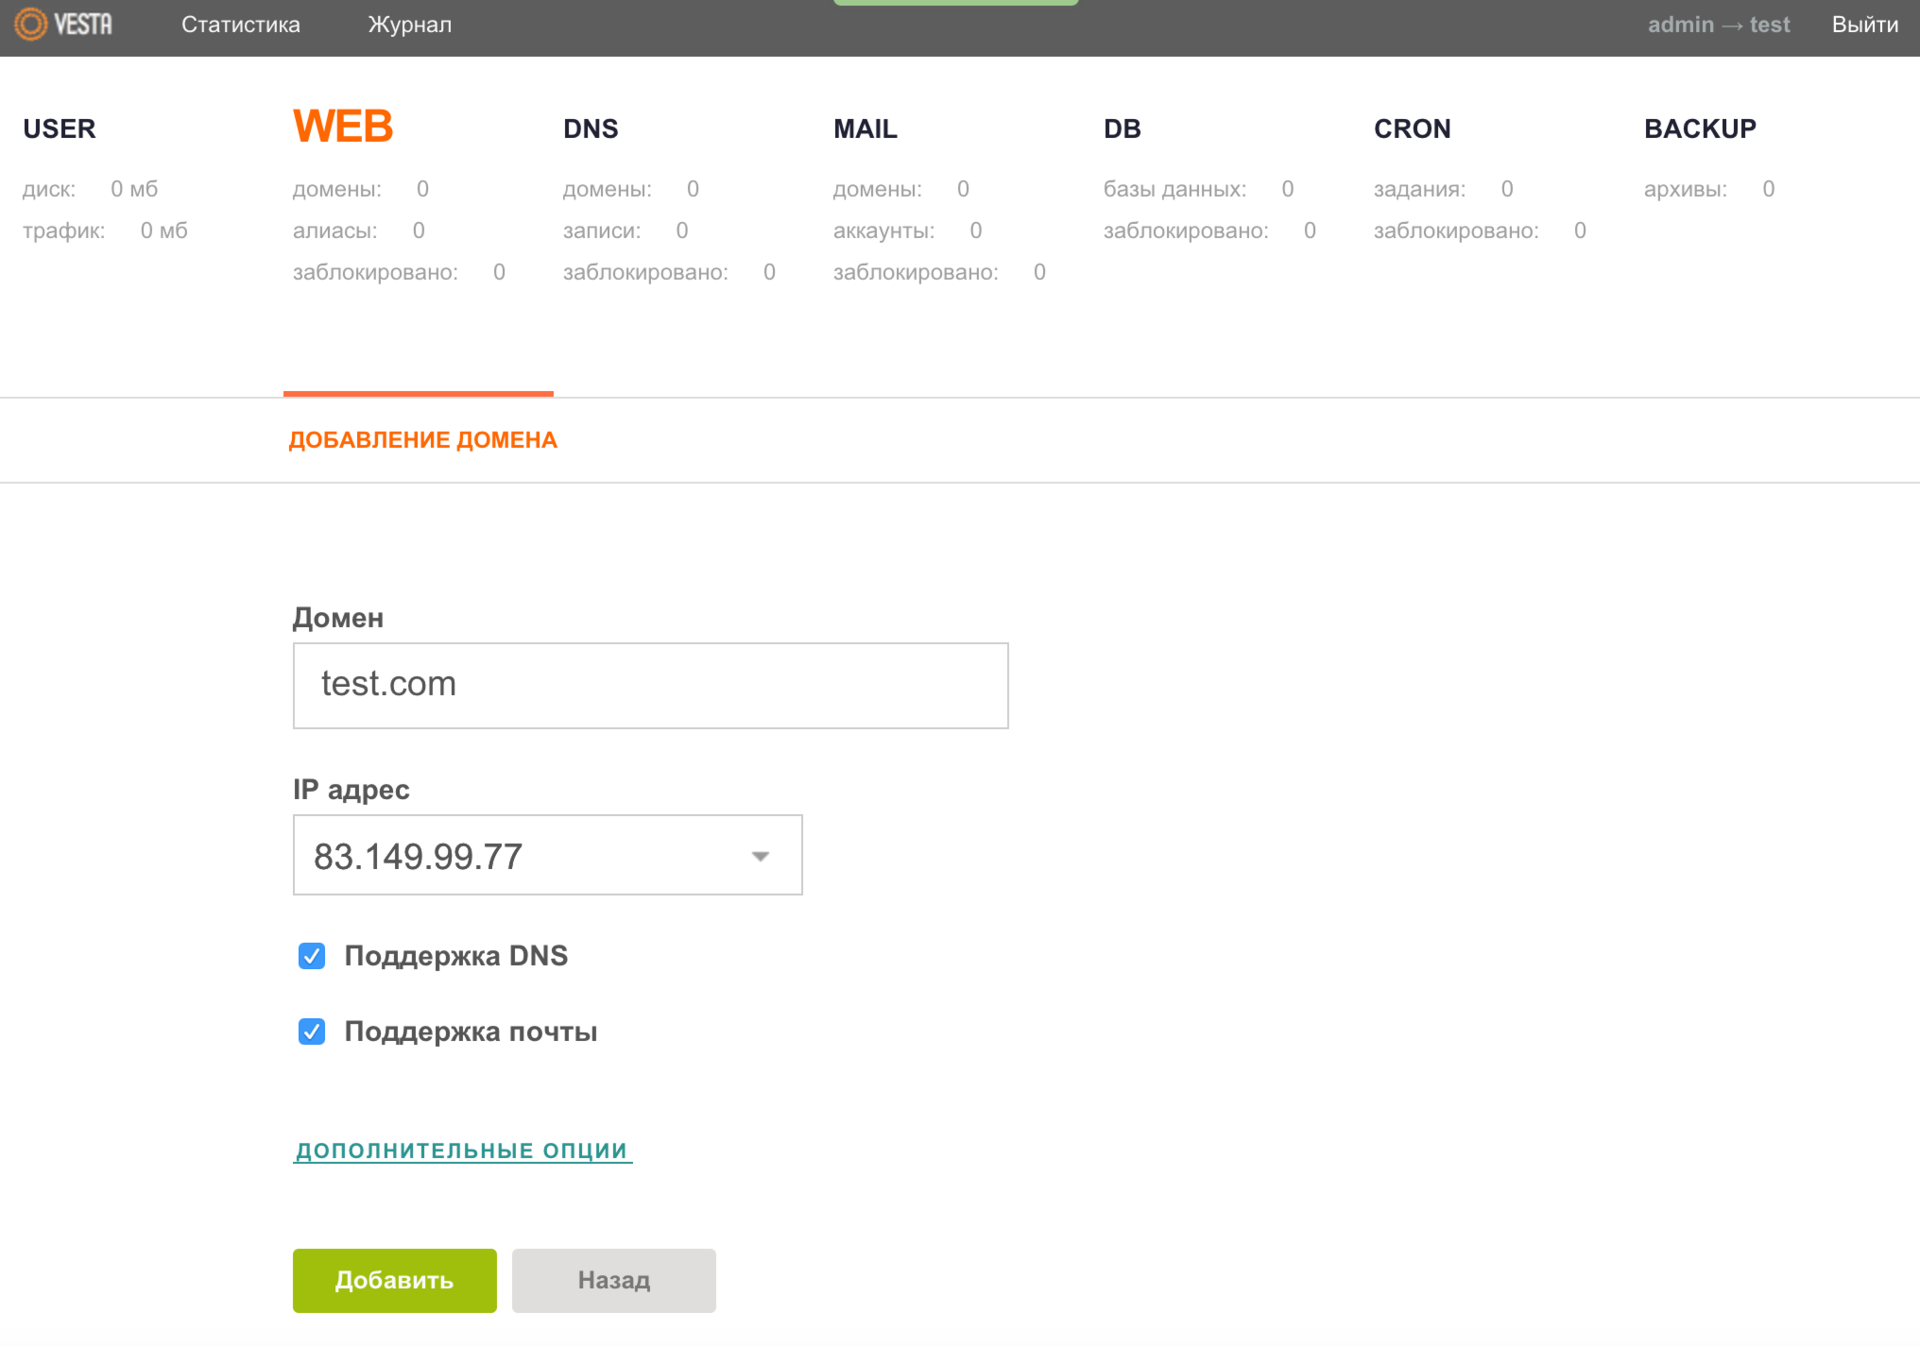
Now we can add your site. To do this, go to the WEB menu by pressing a call box that is filled with the necessary data.
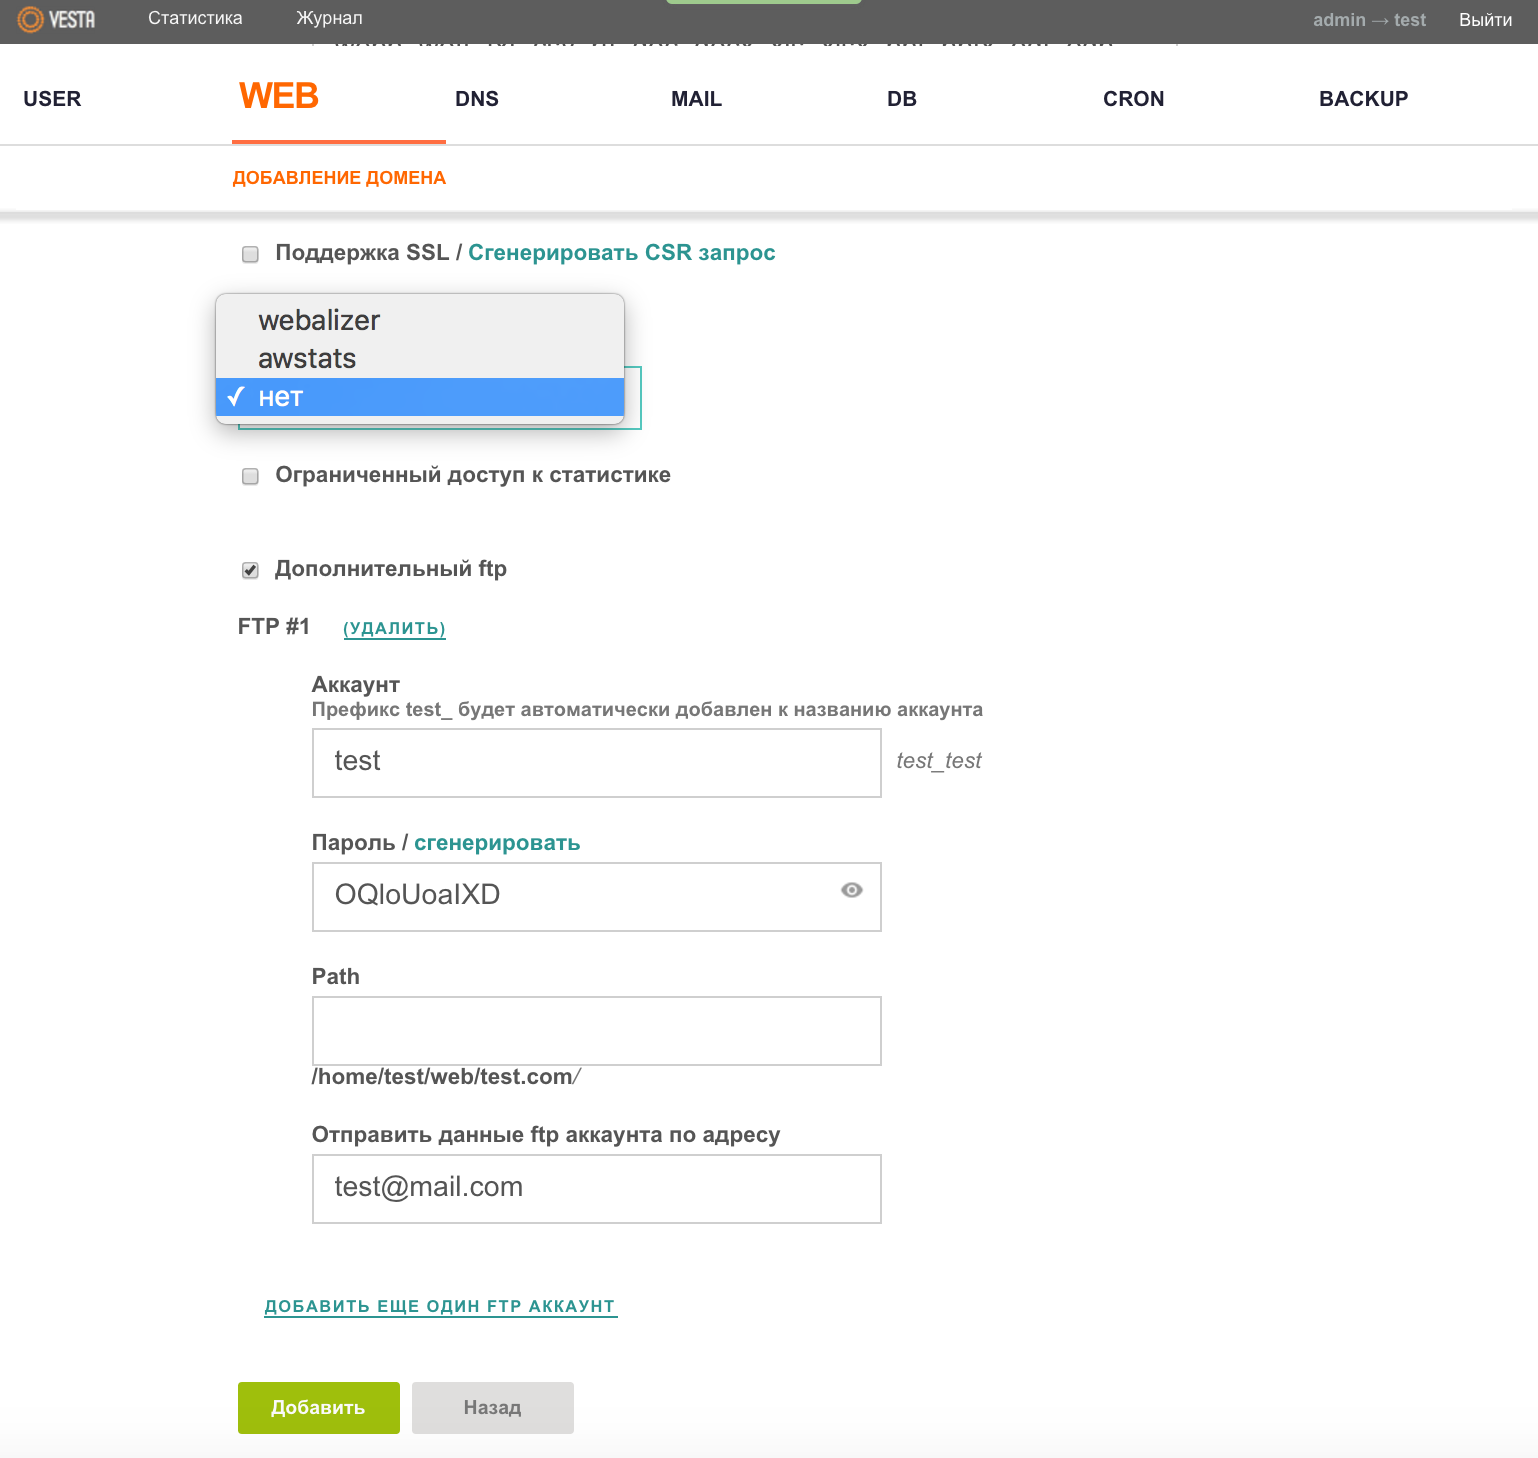
Immediately recommend to open ADDITIONAL OPTIONS and activate an additional FTP account by filling in the appropriate fields. And for fans of statistics, there is also the possibility of connecting your resource to Webalizer or AWStats .
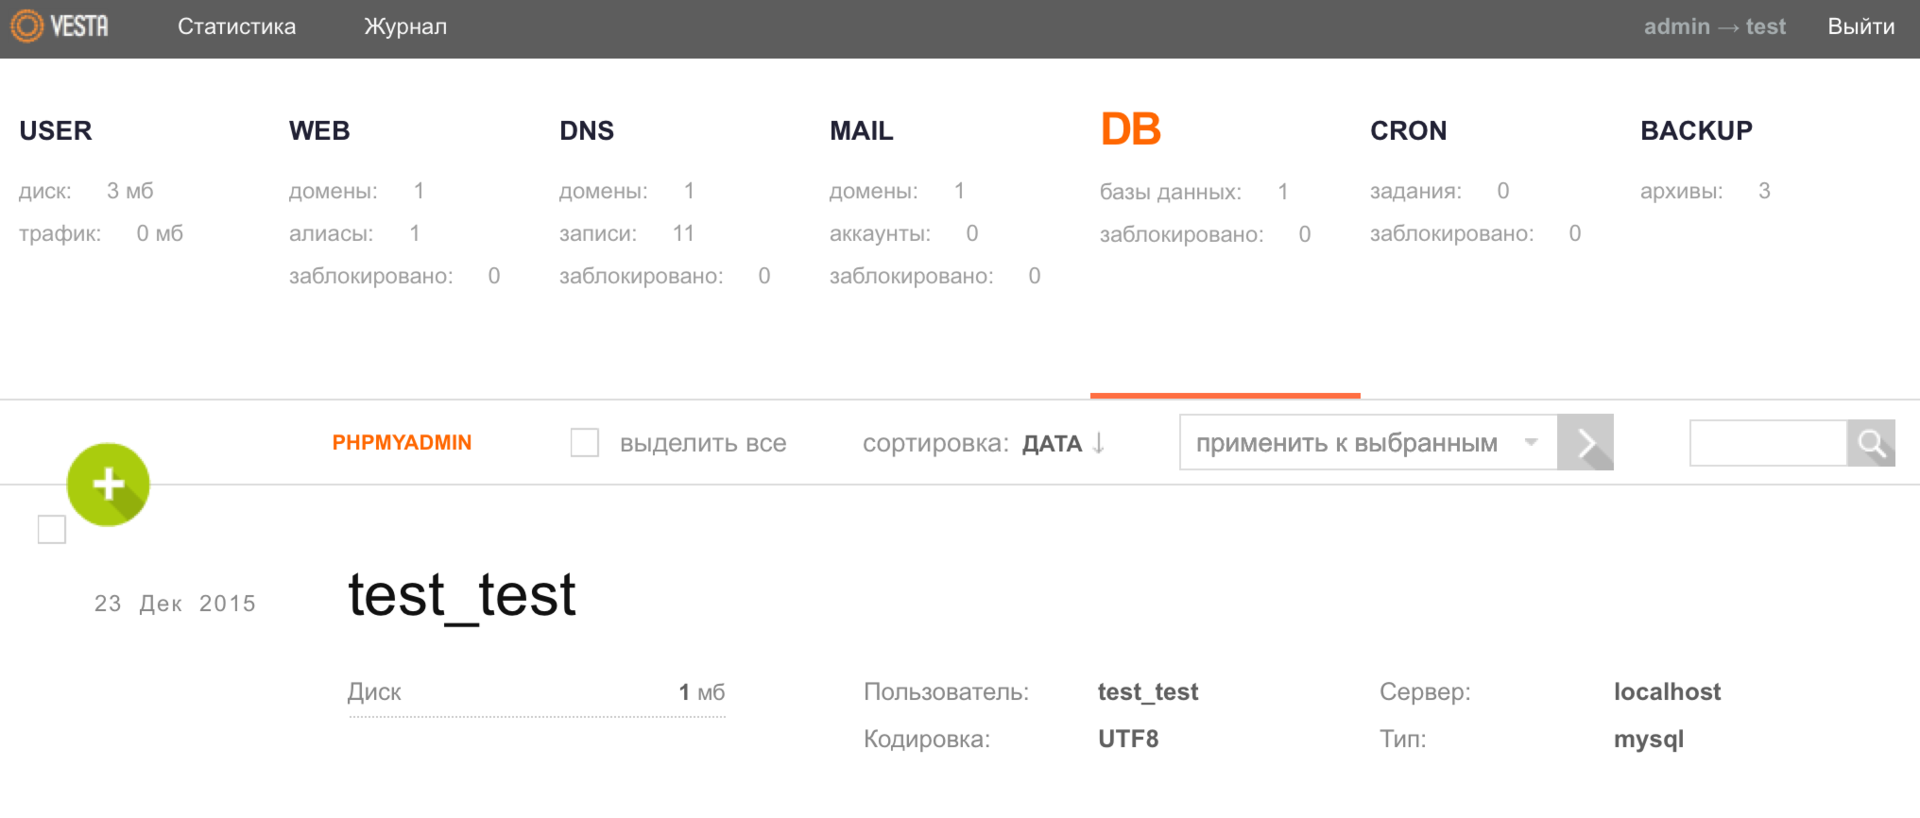
Database
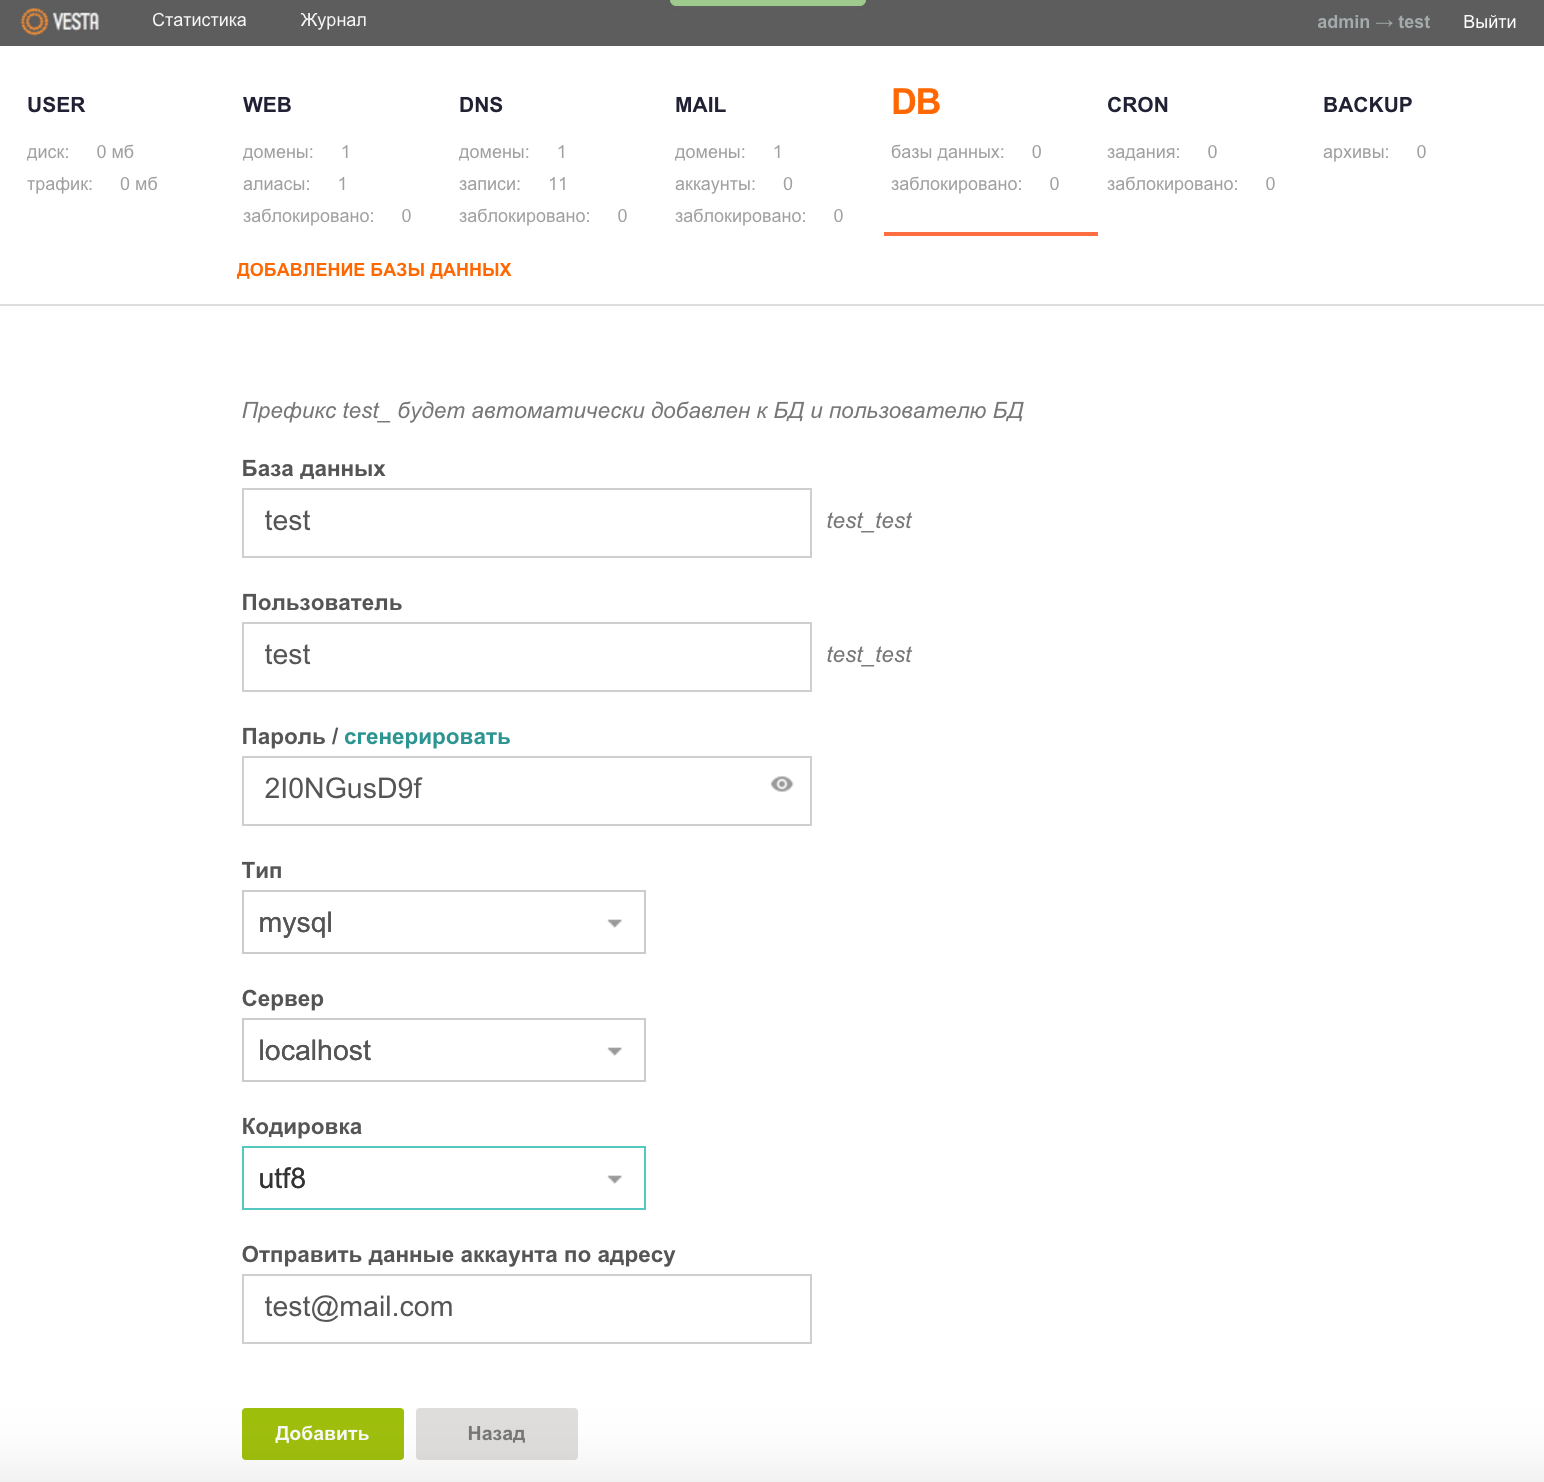
It is the turn to create a database (DB) for your project. Everything is quite simple - we go to the DB menu and again with the help of a burning key a call up a window where we fill in the necessary fields.
Do not forget to save all the entered data using the "Add" button. Then you can safely upload the necessary CMS or script on the hosting, on which your project will “spin”, and carry out additional configuration for the release of the site in production.
MySQL DBMS is administered using the phpMyAdmin web application , the launch button of which appears in the DB menu immediately after creating at least one database.
Also, the Vesta panel allows you to place the database on a remote server, as an option, you can build a solution from several web servers and service them using one more productive server.
post office
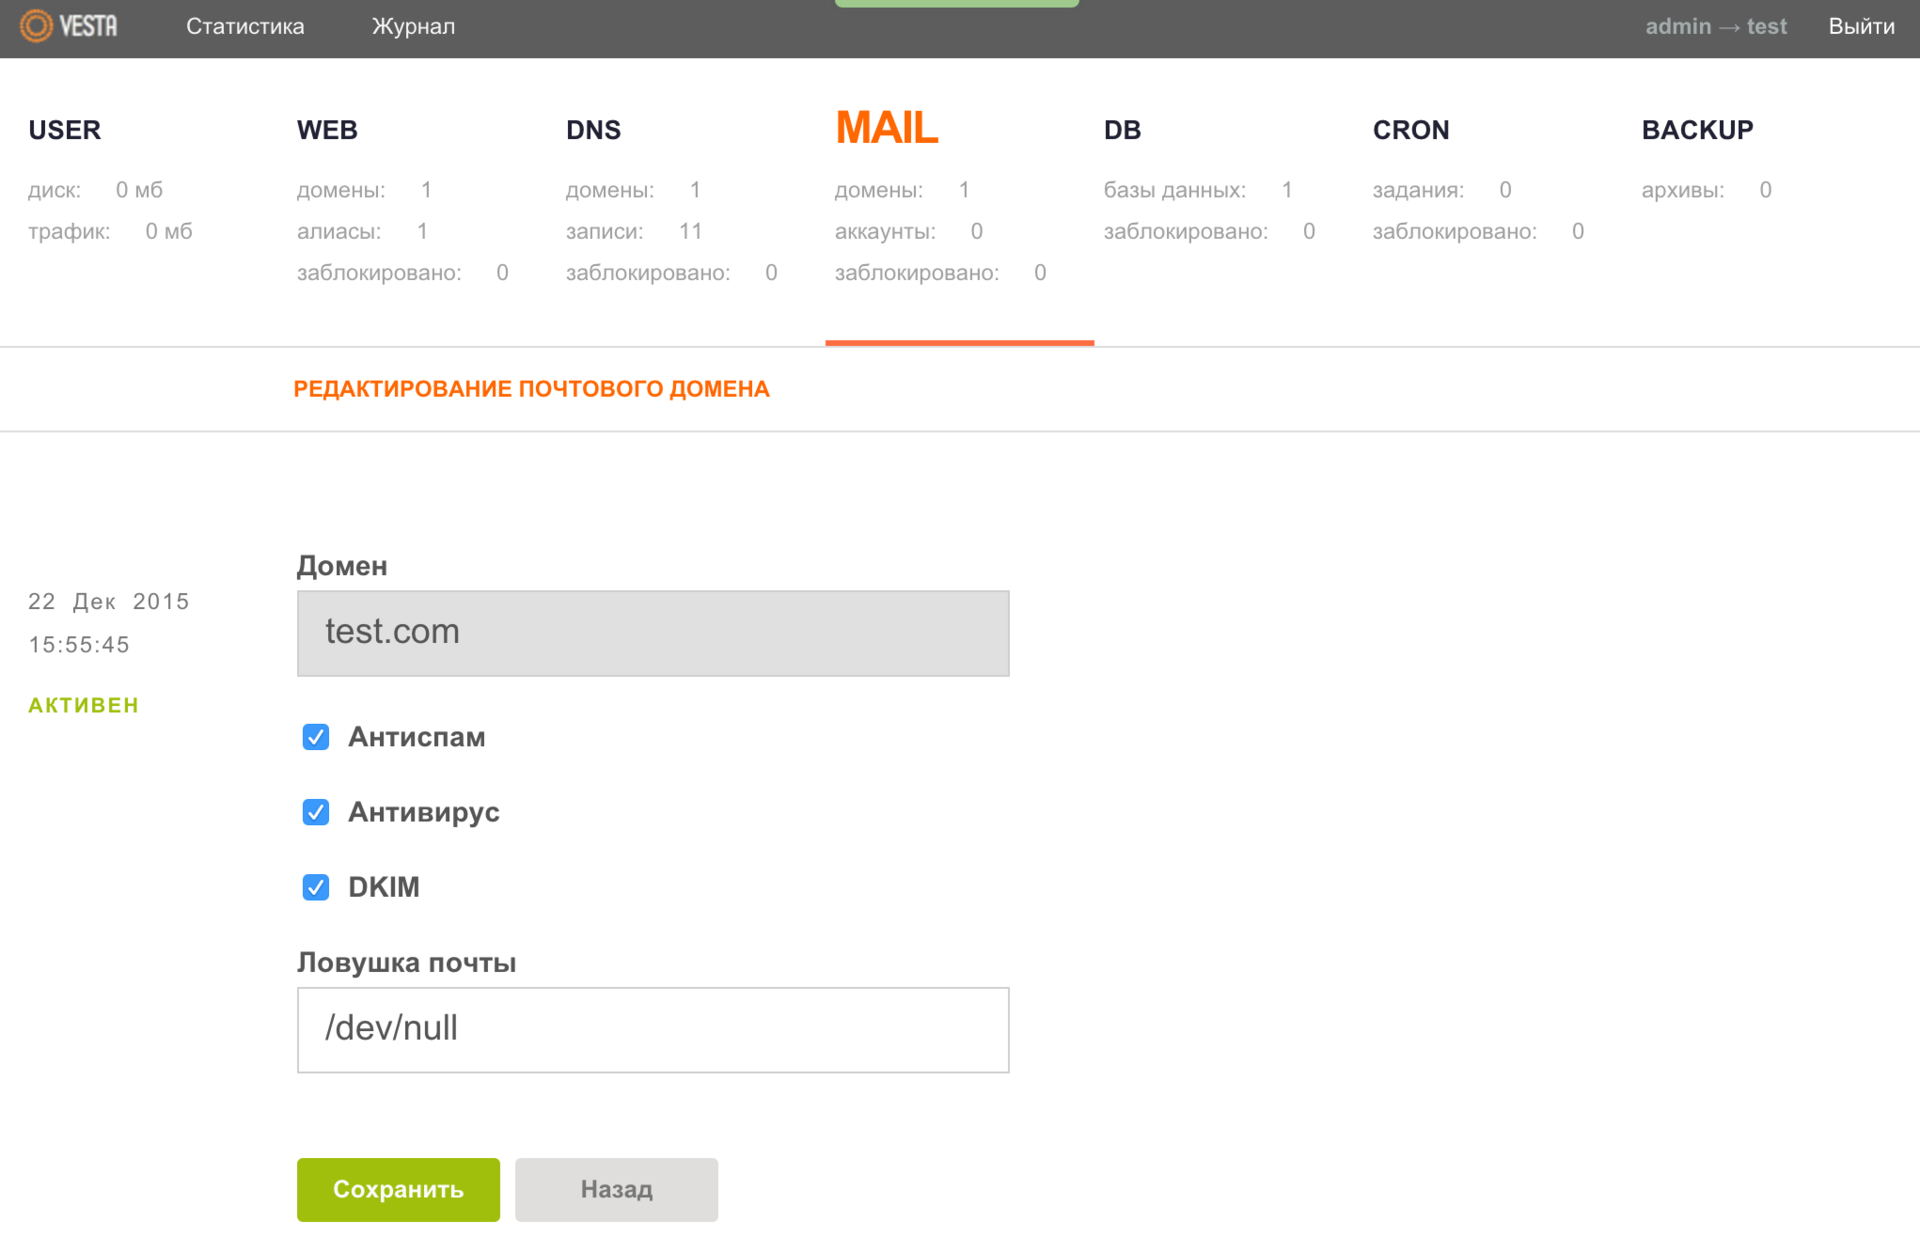
Here you can dwell on the additional settings in more detail, and, perhaps, we will start with the mail, or rather with the mail domain settings. If we go to the MAIL menu, we will see that we already have a mail domain, which was created automatically with the addition of the domain itself to the panel.
When editing data for this domain, please note that in the “Mail Trap” field you can optionally specify a mail account (not necessarily local) where mail from non-existent accounts will be redirected. By default, the / dev / null file is specified there , which means only one thing - all incoming mail should be deleted.
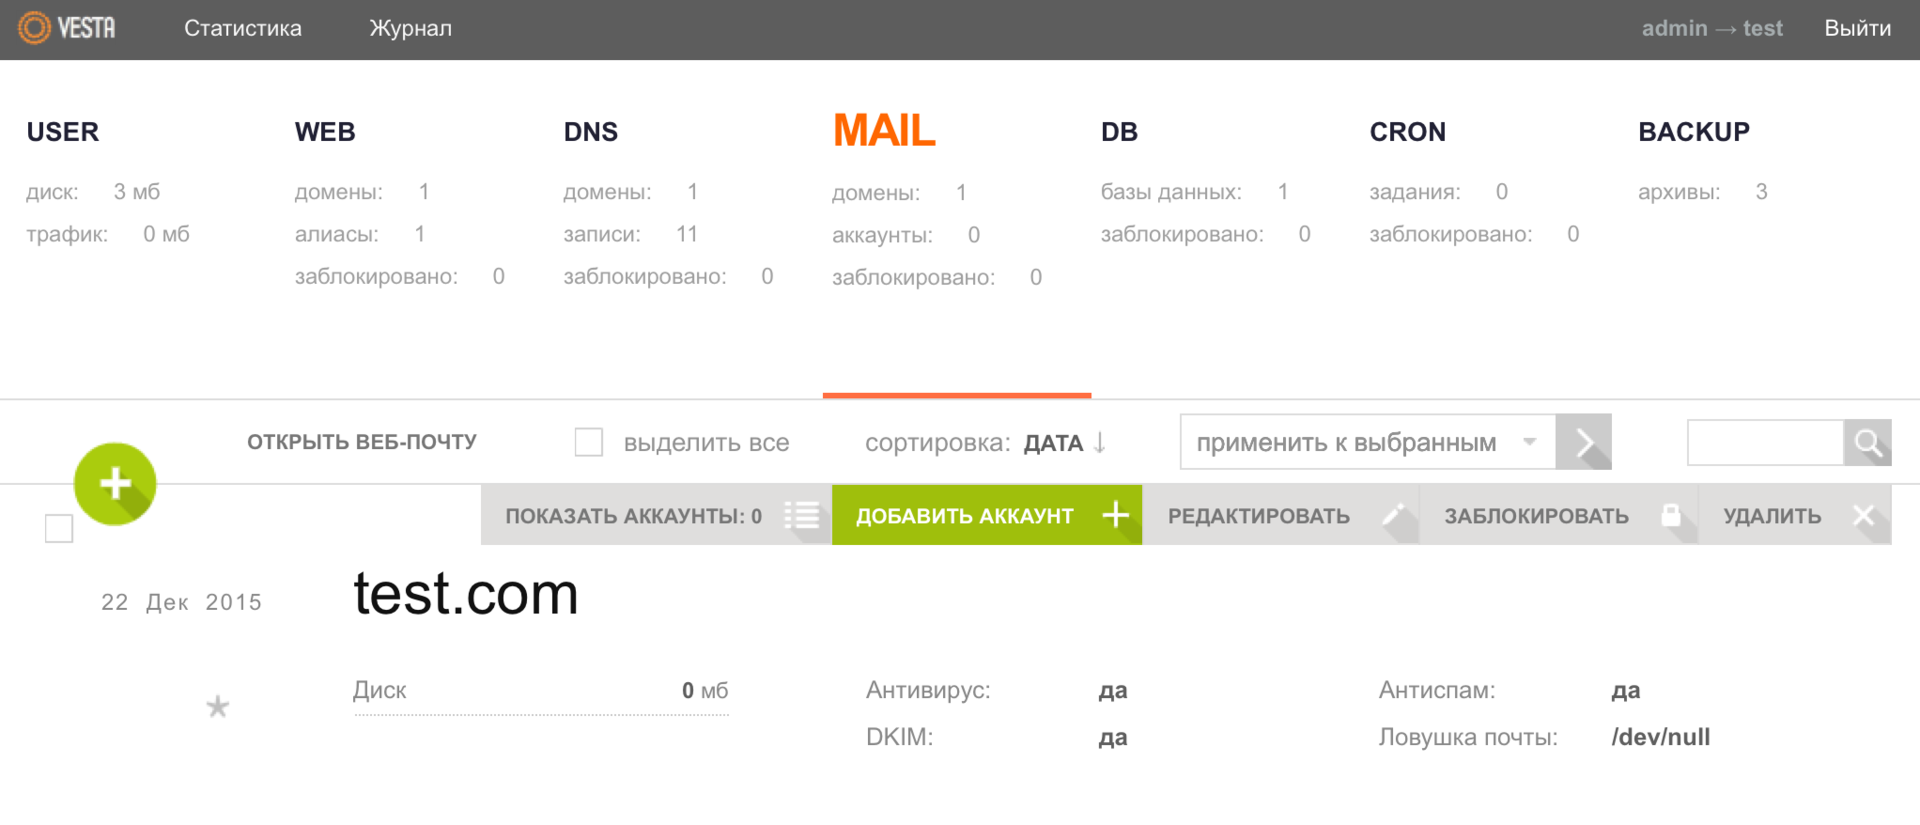
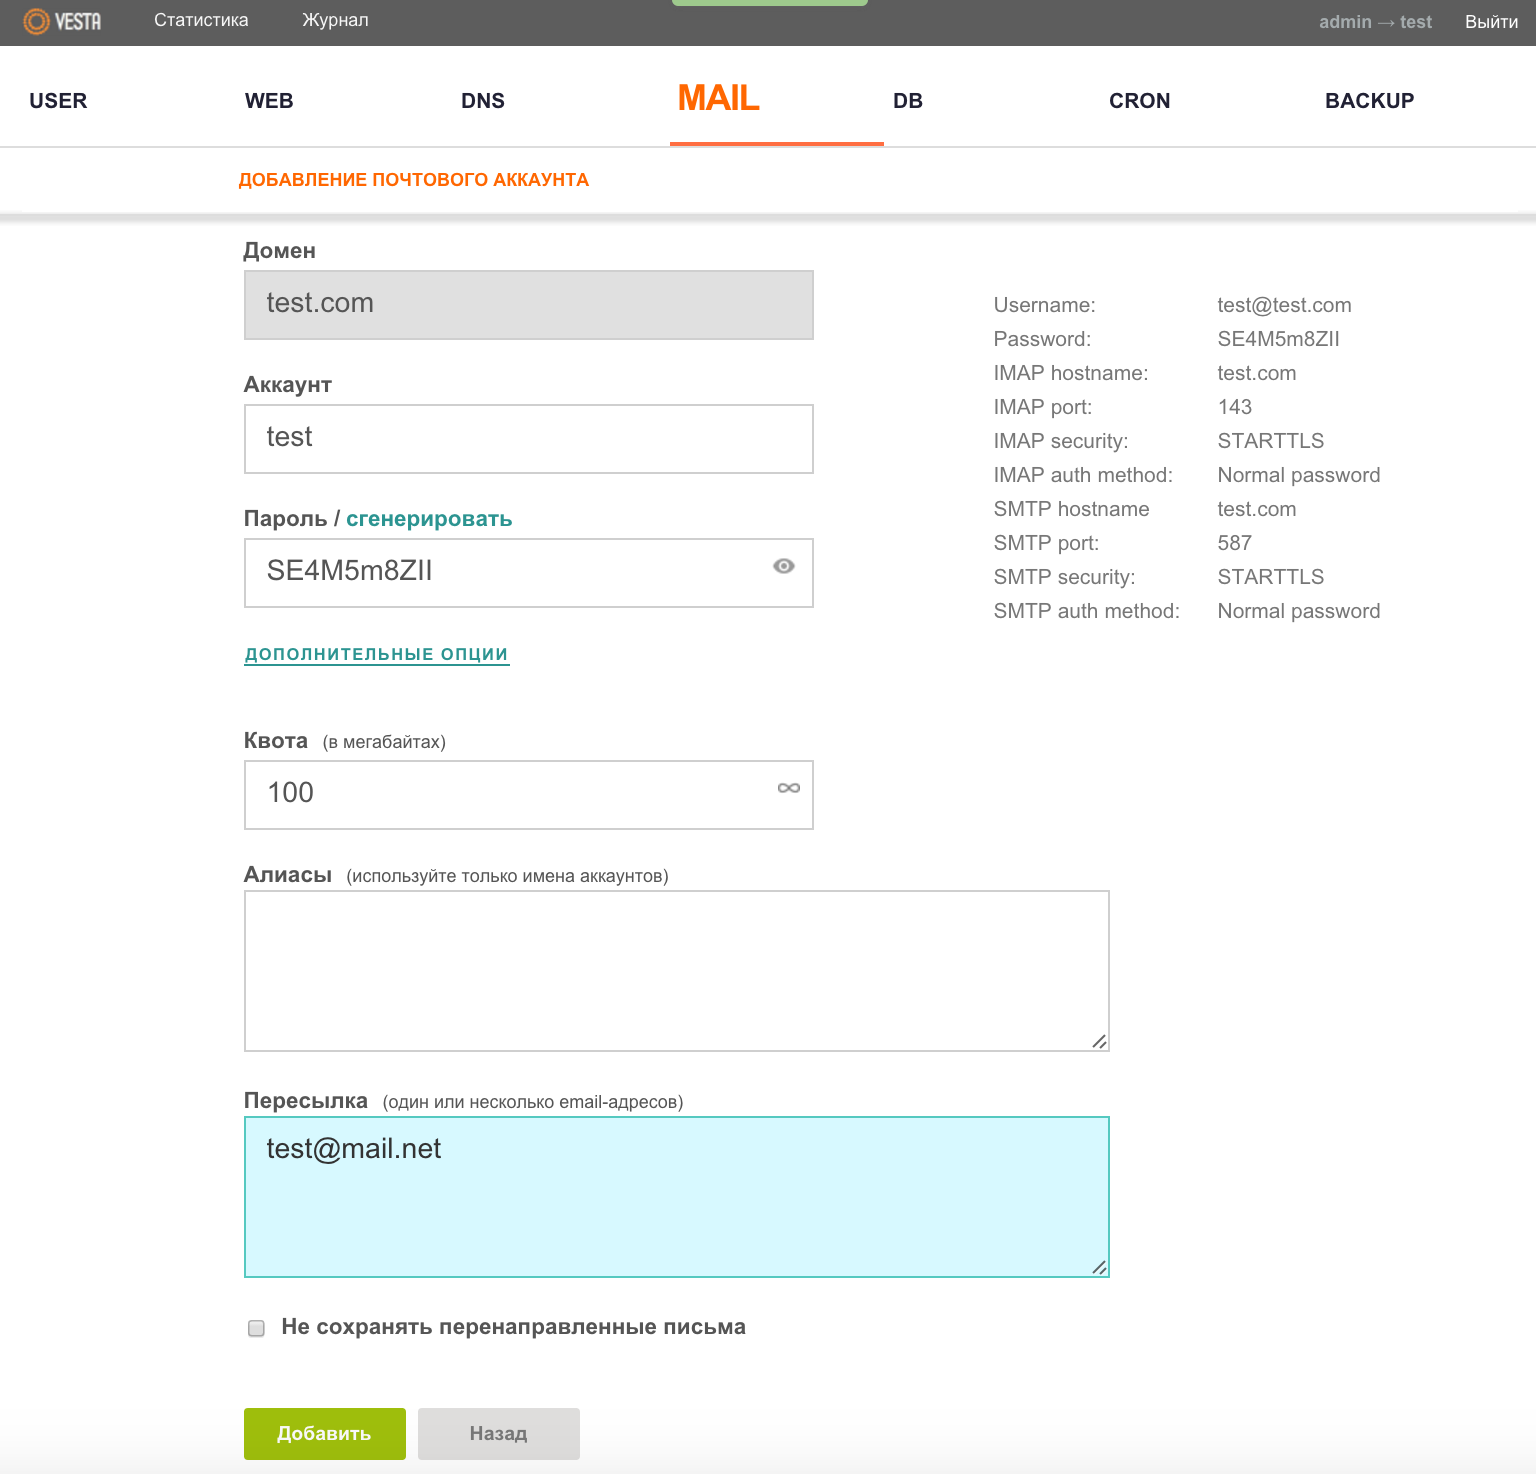
We went further, it was the turn to create a mailbox. Select the required mail domain and click the ADD ACCOUNT button.
Here you can open the EXTRA OPTIONS tab and specify a quota for the size of the mailbox in MB, as well as an account for forwarding mail. As usual, save the specified data using the "Add" button.
To work with e-mail, the Roundcube client is used , the button of which (OPEN WEB MAIL) becomes available in the MAIL menu immediately after entering at least one email domain into the panel.
DNS
Probably one of the most difficult moments of working with the hosting control panel for novice users is setting up DNS. But here, the development team tried to simplify the task as much as possible by creating a template . After we make the necessary settings on the side of the domain name registrar, you need to click the EDIT button in the DNS menu for a specific domain.
And in the Template field, select child-ns, and then save the changes.
Then from the user admin go to the Packages menu.
And edit the default package, while specifying the name servers of your domain.
Also, one of the panel's features is the creation of a DNS cluster , which allows zones to be automatically copied to other servers.
Cron
В разделе меню CRON можно ознакомиться со всем списком заданий и в случае необходимости внести в него изменения (добавить/удалить/заблокировать задание).
Резервное копирование
Панель управления Vesta имеет удобный веб-интерфейс для настройки резервного копирования на удаленный FTP/ SFTP сервер. Для этого переходим в меню BACKUP и с помощью клавиши a запускаем создание нового архива, на экране выведется следующее сообщение:
После того, как Вы получите уведомление на свой почтовый ящик, вернитесь в данное меню и с помощью кнопки СКАЧАТЬ сохраните бэкап на локальном компьютере. Также данный функционал доступен из консоли.
Безопасность
As you may have noticed, the panel has a firewall, as well as support for Fail2ban , which will automatically suppress the selection of passwords using various protocols (FTP, SSH), including the Vesta panel itself. To configure the firewall, you must select the appropriate menu item from the admin user.
Where, with the help of the available functionality, it is possible to carry out the necessary settings, including for Fail2ban.
Reports
The Vesta control panel is very well implemented to collect statistics and various data that can help you analyze the operation of your server. For example, in the Server menu you can see how much RAM a particular process consumes.
Also, if you want to study the performance of the processor (s), memory, network, disk (s), etc., you can get more detailed data on various parameters: server specifications, what requests are sent to the web server and to the database , it is possible to make a report on the sent letters and much more.
Do not forget about load graphs, which can also help you in analyzing the server.
And for those for whom this is not enough, it is possible to view the domain logs live - the WEB menu, the BROWSE LOGS button.
API
The Vesta panel has an API that can be used as a framework for creating your own interfaces. For example, you can create a blog site or online stores . As the developers told me, several of their major customers use the panel in this way.
Updates
Vesta control panel updates may take place automatically, but this feature is disabled by default. All update management is carried out through the corresponding menu.
When an update comes out, the packages in this section of the menu begin to be highlighted in red, and the Update button appears. If necessary, you make one click and you're done.
With a little patience, and I will look with you into the near future of the "goddess." You really want to see what kind of “goodies” the developers are preparing for you in the next release of the Vesta panel?
Buns
I think almost every software product has its own characteristics. We have already mentioned some of them earlier, but there are those that I specially left for “dessert”.
At one time, the guys released several paid extensions, which would at least somehow cover the costs of supporting and developing this panel.
The first one is magic, in other words, I just can’t convey the convenience of its UI, file manager . As soon as you activate the plugin, the Files menu item appears, when you go to it, the following window opens:
I agree that the first impression may be a little exaggerated, but you have not yet seen the set of available SHORTCUTS and have not even started working with the file manager itself, though ?
The development team does not hide the fact that the hot keys were borrowed from the magnificent GNU Midnight Commander file manager . Well, the truth is, why not accept what is really convenient? And believe me, you will have the opportunity to verify this yourself.
The second paid extension is SFTP Chroot . This plugin may be more interesting to those of you who provide hosting services, as well as share your server with other users. Further, I would like to quote the developer himself regarding this additional “feature” for increasing security:
FTP протокол небезопасен, поскольку все пароли передаются в чистом виде без шифрования. Сидя в кафе на публичном Wi-Fi, есть риск, что данные кто-то перехватит. Чтобы включить SFTP, нужно выдать пользователю системный шелл, однако, это позволит юзеру просматривать не только его собственные каталоги, но и системные, вроде /etc, /sbin или /bin. Это не проблема, если сервер используется 2-3 разработчиками. А вот когда уже идет речь о том, чтобы выдать доступ людям, к которым нет полного доверия, появляется дилемма. Модуль SFTP Сhroot помогает ее решить. Если модуль активирован, то на всех аккаунтах без реального шелла (/sbin/nologin), включается особый режим SFTP соединения. Такие аккаунты могут увидеть файлы только в своей домашней директории и все.After activating this extension, it is necessary for a particular user in the account settings to select the desired parameter from the drop-down list, as shown in the screenshot below:
Are you still thinking about which panel to choose? Then I continue, and move on to the most “delicious goodies” of the next release of the Vesta panel.
Additional hot keys will appear that allow you to fully control the panel using the keyboard - this is cool.
It will also be possible to get a free SSL certificate from the Let's Encrypt project in just one click. And as skid himself assured me, this functionality is already at the final stage of testing.
I will not disclose all the details of the upcoming release, but rather leave a little “food for thought” to you, our dear readers. All details at the end of the publication.
As a thank you, I want to list by the name of each of the development team this truly “goddess”:
- Dmitry Naumov - UI, the same interface that we all love: simplicity and convenience;
- Dmitry Malyshev - JS, without which interaction with the interface would not be interactive;
- Anton Reutov - user support, testing, analysis and sorting of bugs;
- Pavel Galkin - user support, testing;
- Sergey Rodin is the man who told me all the “secrets” of this wonderful software product.
And also to inform that people from different parts of the world participate in the development of this product, as evidenced by the number of language versions of the panel, as well as account statistics on the GitHub project. And the developers themselves admit that they are pleasantly surprised by the interest and desire of some users to support their project.
Keep it up guys!
PS In order to support the project on our part, we, together with the development team, decided to provide each of our clients who rent a cloud VPS service with the opportunity to activate both commercial extensions of the Vesta panel once for free for one service with superuser access. To do this, after placing the order, simply create a ticket to the sales department and we will activate the plugin (s) for you.
PPS The developers, for their part, also decided to hold an action and give you the opportunity to get an additional 30% discount when ordering eternal versions of licenses of paid Vesta extensions. When placing an order, simply use the HABR coupon, which will be valid until January 15th.