Creating applications for Firebird DBMS using various components and drivers: FireDac
- Tutorial
This article will describe the process of creating applications for Firebird DBMS using FireDac access components and Delphi XE5 environment. FireDac is the standard set of database access components since Delphi XE3.
Our application will work with the database model, which is presented in the figure below.
At the end of this article are links to other articles that describe the process of creating a database with this model and a link to the database creation script.
Create a new project File-> New-> VCL Forms Application - Delphi. In the new project, add a new date module File-> New-> Other, in the wizard that appears, select Delphi Projects-> Delphi Files-> Data Module. This date module will be central to our project. It will contain some instances of global access components that should be available to all forms that need to work with data. For example, such a component is TFDConnection.
The TFDConnection component provides connectivity to various types of databases. We will specify an instance of this component in the Connection properties of the remaining FireDac components. Which type of database will be connected to depends on the value of the DriverName property. To access Firebird, we need to set this property to FB. In order for the connection to know which access library it is necessary to work with, we will place the TFDPhysFBDriverLink component in the main date module. Its VendorLib property allows you to specify the path to the client library. If it is not specified, then connection to Firebird will be through libraries registered in the system, for example, system32, which in some cases may be undesirable.
We will place the necessary access library in the fbclient folder, which is located in the application folder. To do this, in the code for the OnCreate event the module date we will write the following code.
If you need your application to work without the installed Firebird server, i.e. in Embedded mode, then for Firebird 2.5 you need to replace fbclient.dll with fbembed.dll. If desired, the library name can be moved to the configuration file of your application. For Firebird 3.0, nothing needs to be changed (the mode of operation depends on the connection string and the value of the Providers parameter in the firebird.conf / databases.conf file).
The TFDConnection component contains the database connection parameters in the Params property (username, password, connection character set, etc.). If you use the TFDConnection property editor (double-click on the component), then the mentioned properties will be filled automatically. The set of these properties depends on the type of database.
Additional properties:
Connected - control the connection to the database, or check the status of the connection. This property must be set to True for the wizards of other FireDac components to work. If your application needs to request authorization data, it is important not to forget to reset this property to False before compiling your application.
LoginPrompt - whether to request a username and password when trying to connect.
Transaction - a component of TFDTransaction, which will be used as the default for performing various TFDConnection operations. If this property is not explicitly assigned, TFDConnection will create an instance of TFDTransaction on its own, its parameters can be specified in the TxOptions property.
UpdateTransaction- component TFDTransaction, which will be used as the default for the same properties of TFDQuery components. If this property is not explicitly assigned, the value from the Transaction property will be used.
Since the connection parameters, except for the username and password, usually do not change during the operation of the application, we will read them from the configuration file.
The config.ini file contains approximately the following lines:
The contents of the connection section can be obtained by copying the contents of the Params property of the TFDConnection component after the wizard.
To connect to the database, you must change the Connected property of the TFDConnection component to True or call the Open method. In the last method, you can pass the username and password as parameters. In our application, we will replace the standard database connection dialog. We will give the opportunity to make a mistake when entering registration information no more than three times, after which the application will be closed. To do this, we will write the following code in the OnCreate event handler of the main data module.
The TFDTransaction component is designed to work explicitly with transactions.
The client part of Firebird allows performing any action only in the context of a transaction. Therefore, if you were able to access the data without explicitly calling TFDTransaction.StartTransaction, then somewhere in the bowels of FireDac this call occurred automatically. This behavior is highly discouraged. For applications to work correctly with the database, it is desirable to manage transactions manually, that is, explicitly call the StartTransaction, Commit and Rollback methods of the TFDTransaction component.
Unlike other DBMSs, Firebird allows you to use as many TFDTransaction components tied to one connection. In our application, we will use one common reading transaction for all directories and online journals, and one writing transaction for each directory / journal.
In our application, we will not rely on automatic start and completion of transactions, and therefore in all transactions Options.AutoCommit = False, Options.AutoStart = False and Options.AutoStop = False.
Since the reading transaction is common to all directories and journals, it is convenient to place it in the main date module. For normal work (displaying data in a grid, etc.), the isolation mode READ COMMITED (Options.Isolation = xiReadCommited) is usually used, because it allows the transaction to see other people's committed database changes simply by re-executing the queries (re-reading the data). Since this transaction is read-only, set the Options.ReadOnly property to True. Thus, our transaction will have read read_commited rec_version parameters. A transaction with such parameters in Firebird can be open for an arbitrarily long time (days, weeks, months), without blocking other transactions or affecting the accumulation of garbage in the database (because, in fact,
We start the reading transaction immediately after successfully establishing a connection to the database by calling trRead.StartTransaction in the OnCreate event of the main data module, and we complete it before closing the connection by calling tRead.Commit in the OnDestroy event of the main data module. The value of the Options.DisconnectAction property is xdCommit by default, suitable for a read-only transaction.
The writing transaction will be separate for each directory / journal. We will place it on a form that relates directly to the desired magazine. The writing transaction should be as short as possible so as not to hold the Oldest Active Transaction, which does not allow garbage collection, which in turn leads to degradation of performance. Since the writing transaction is very short, we can use the SNAPSHOT isolation level. Thus, our writing transaction will have options.ReadOnly = False and Options.Isolation = xiSnapshot. For writing transactions, the value of the Options.DisconnectAction property is not suitable by default; it must be set to xdRollback.
You can work with data in FireDac using the FDQuery, FDTable, FDStoredProc, FDCommand components, but FDCommand is not a dataset.
TFDQuery, TFDTable, and TFDStoredProc are inherited from TFDRdbmsDataSet. In addition to data sets for working directly with the database, in FireDac there is also a TFDMemTable component, which is designed to work with a data set in memory, which is an analog of TClientDataSet.
The main component for working with datasets is TFDQuery. The capabilities of this component are enough for almost any purpose. The components TFDTable and TFDStoredProc are just modifications, either slightly extended or truncated. We will not consider and apply them in our application. You can read them in the FireDac documentation if you wish.
The purpose of the component is to buffer the records selected by the SELECT statement to represent this data in the Grid, as well as to ensure the "edibility" of the record (current in the buffer (grid)). Unlike the IBX.IBDataSet component, the FDQuery component does not contain the RefreshSQL, InsertSQL, UpdateSQL, and DeleteSQL properties. Instead, “editable” is provided by the FDUpdateSQL component, which is set to the UpdateObject property.
The TFDUpdateSQL component allows you to override the SQL commands generated to automatically update a dataset. It can be used to update TFDQuery, TFDTable, and TFDStoredProc components. Using TFDUpdateSQL is optional for the TFDQuery and TFDTable components, because these components are able to automatically generate commands for publishing updates from a dataset to a DBMS. Using TFDUpdateSQL is required to be able to update the TFDStoredProc dataset. We recommend that you always use it, even for the simplest cases, in order to get full control over what requests are performed in your application.
To specify SQL commands at the design stage, use the TFDUpdateSQL editor of the design time, which is called by double-clicking on the component.
On the Generate tab, you can simplify your task of writing Insert / Update / Delete / Refresh queries. To do this, select the table for updating, its key fields, fields for updating, and the fields that will be re-read after the update, and click on the “Generate SQL” button.
After that, the queries will be generated automatically, and you will go to the “SQL Commands” tab, where you can correct each of the queries.
The Options tab contains some properties that may affect the generation of queries. These properties do not apply to the TFDUpdateSQL component itself, but are links to the UpdateOptions properties of the data set that has the current TFDUpdateSQL in the UpdateObject property. This is done solely for convenience.
As you already noticed, the TFDUpdateSQL component does not have the Transaction property. This is because the component does not execute modifying queries directly, but only replaces the automatically generated queries in the dataset, which is the ancestor of TFDRdbmsDataSet.
The TFDCommand component is designed to execute SQL queries. It is not a successor to TDataSet, and therefore is convenient for executing SQL queries that do not return a dataset.
In our application we will create two reference books: a reference book of goods and a reference book of customers. Each of the directories is a form with a TDBGrid grid, a TDataSource data source, a TFDQuery dataset that writes TFDTransaction transactions.
Consider the creation of reference books on the example of a directory of customers.
Place the TFDQuery component on the form named qryCustomers. This dataset will be specified in the DataSet property of the DataSource. In the Transaction property, specify ReadOnly transaction trRead, which was created in the main project data module. In the UpdateTransaction property, we specify the trWrite transaction, in the Connection property - the connection located in the main data module. In the SQL property, write the following query:
The write transaction trWrite should be as short as possible and have SNAPSHOT isolation mode. We will not rely on automatic start and completion of the transaction, but we will start and end the transaction explicitly. Thus, our transaction should have the following properties:
Options.AutoStart = False
Options.AutoCommit = False
Options.AutoStop = False
Options.DisconnectAction = xdRollback
Options.Isolations = xiSnapshot
Options.ReadOnly = False
In fact, it is not necessary to set the isolation mode SNAPSHOT for simple INSERT / UPDATE / DELETE. However, if the table has complex triggers, or instead of simple INSERT / UPDATE / DELETE queries, a stored procedure is called, it is advisable to use the SNAPSHOT isolation level.
The fact is that the isolation level of READ COMMITED does not ensure the atomicity of the operator within a single transaction (statement read consistency). Thus, a SELECT statement can return data that has entered the database after the start of the query. In principle, SNAPSHOT isolation mode can be recommended almost always if the transaction is short.
To be able to edit the dataset, you must fill in the InsertSQL, ModifySQL, DeleteSQL, and FetchRowSQL properties. These properties can be generated by the wizard, but after that some editing may be required. For example, you can add a RETURNING clause, delete a modification of some columns, or even replace an automatically generated request to call a stored procedure.
InsertSQL:
ModifySQL:
DeleteSQL:
FetchRowSQL:
In this reference, we will get the value of the generator before inserting the record into the table. To do this, set the properties of the TFDQuery component to the following values: UpdateOptions.GeneratorName = GEN_CUSTOMER_ID and UpdateOptions.AutoIncFields = CUSTOMER_ID. There is another way when the value of the generator (auto-increment field) is returned after executing an INSERT request using the RETURNING clause. This method will be shown later.
To add a new record and edit an existing one, it is customary to use modal forms, upon closing of which, with the result of mrOK, changes are made to the database. Typically, DBAware components are used to create such forms, which allow you to display the values of a field in the current record and immediately make changes to the current record of the data set in Insert / Edit modes, i.e. to Post. But you can only switch the data set to Insert / Edit mode by starting a writing transaction. Thus, if someone opens the form for making a new entry and leaves for lunch without closing this form, we will have an active transaction hanging until the employee returns from lunch and closes the form. This in turn will cause the active transaction to hold garbage collection, which will later lead to reduced performance.
We show the application of both methods. For reference, it is much more convenient to use the first method. Consider the vendor record edit code
The code shows that before putting the data set into edit mode, we set it to CachedUpdates mode, and all the editing processing logic takes place in modal form.
The code shows that until the OK button is pressed, the writing transaction does not start at all. Thus, a writing transaction is active only for the period of data transfer from the data set buffer to the database. Since we save no more than one record in the buffer, the transaction will be active for a very short time, as required.
The directory of goods is made similar to the directory of customers. However, in it we will demonstrate another way to obtain auto-increment values.
The main request will look like this:
The component property TFDUpdateSQL.InsertSQL will contain the following query:
A RETURNING clause appeared in this query, which will return the value of the PRODUCT_ID field after changing it in the BEFORE INSERT trigger. In this case, it makes no sense to set the value of the UpdateOptions.GeneratorName property. In addition, the PRODUCT_ID field must be set to Required = False and ReadOnly = True, since the value of this property is not entered directly. Otherwise, everything is about the same as organized for the manufacturers directory.
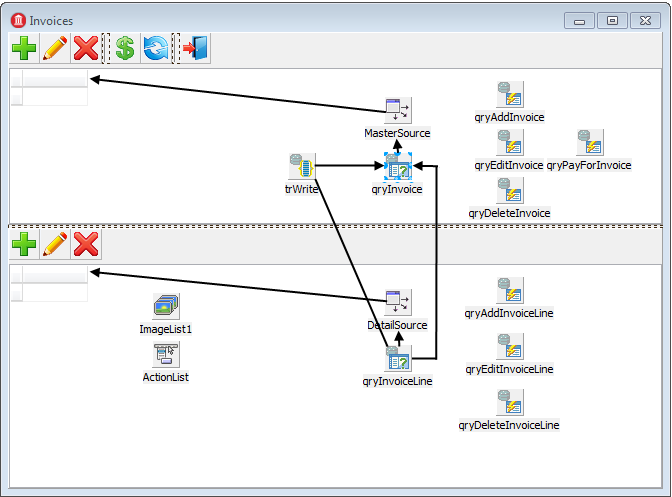
In our application there will be one journal “Invoices”. Unlike directories, journals contain a fairly large number of entries and are often updated.
Invoice - consists of a heading that describes common attributes (number, date, customer ...), and lines of the invoice with a list of goods, their quantity, cost, etc. For such documents, it is convenient to have two grids: in the main, data on the document header is displayed, and in the detail, the list of goods. Thus, on the form of the document we need to place two TDBGrid components, to each of which we will bind our TDataSource, which in turn will be bound to their TFDQuery. In our case, the data set with the document headers will be called qryInvoice, and with the document lines, qryInvoiceLine.
In the Transaction property of both datasets, we specify ReadOnly transaction trRead, which was created in the main project data module. In the UpdateTransaction property, we specify the trWrite transaction, in the Connection property - the connection located in the main data module.
Most logs contain a field with the date the document was created. To reduce the amount of data to be selected, it is usually customary to introduce such a thing as a working period in order to reduce the amount of data transmitted to the client. A work period is a date range within which work documents are required. Since the application may contain more than one log, it makes sense to place the variables containing the start and end dates of the working period in the global dmMain data module, which, in one way or another, is used by all modules working with the database. When the application starts, the working period is usually initialized by the start and end dates of the current quarter (there may be other options). During the application, you can change the working period at the request of the user.
Since the most recently entered documents are most often required, it makes sense to sort them by date in reverse order. Based on the foregoing, in the SQL property of the qryInvoice dataset, the query will look like this:
When you open this data set, you will need to initialize the query parameters:
All operations on the invoice will be performed using stored procedures, although in simpler cases this can also be done using ordinary INSERT / UPDATE / DELETE queries.
We will execute each stored procedure as a separate request in the TFDCommand components. This component is not an ancestor of TFDRdbmsDataSet, it does not buffer data and returns a maximum of one row of result, therefore its use carries less overhead for queries that do not return data. Since our stored procedures perform data modification, the Transaction property of the TFDCommand components needs to set the transaction trWrite.
Four operations are provided for working with the header of the invoice: adding, editing, deleting and setting the sign “paid”. As soon as the invoice is paid, we prohibit any modifications to it, both in the header and in the lines. This is done at the stored procedure level. Here are the query texts for calling stored procedures.
qryAddInvoice.CommandText:
qryEditInvoice.CommandText:
qryDeleteInvoice.CommandText:
qryPayForInvoice.CommandText:
Since our stored procedures are not called from the TFDUpdateSQL component, after executing them, you must call qryInvoice.Refresh to update the data in the grid.
Calling stored procedures for which data entry is not required is performed as follows:
To add a new record and edit an existing one, as in the case of directories, we will use modal forms. In this case, we will not use DBAware components. Another feature - we will use the TButtonedEdit component to select a customer. It will display the name of the current customer, and at the click of a button call up a modal form with a grid to select the customer. Of course, it would be possible to use something like TDBLookupCombobox, but, firstly, there can be a lot of customers and scrolling through such a drop-down list will be inconvenient, and secondly, a single name may not be enough to find the right customer.
As a modal window for choosing a customer, we use the same form that was created to enter customers. The button click handler code in the TButtonedEdit component will look like this:
Since we use non-DBAware components, when calling the edit form, we will need to initialize the customer code and its name for display.
We will carry out the processing of adding a new invoice and editing the existing one in the closing event of the modal form, just as it was done for directories. However, here we will no longer transfer the data set to CachedUpdates mode, since the modification is performed using stored procedures, and we do not use DBAware components.
Now let's move on to the invoice positions. To the qryInvoiceLine data set, set the MasterSource = MasterSource property, which is bound to qryInvoice, and the MasterFields = INVOICE_ID property. In the SQL property, write the following query:
All modifications, as in the case with the header of the invoice, will be carried out using stored procedures. Here are the query texts for calling stored procedures.
qryAddInvoiceLine:
qryEditInvoiceLine:
qryDeleteInvoiceLine:
The form for adding a new record and editing an existing one, as in the case with the header, will not use DBAware. To select the product, we will use the TButtonedEdit component. The button click handler code in the TButtonedEdit component will look like this:
Since we do not use DBAware components, when calling the editing form, we will need to initialize the product code, its name and cost for display.
The processing of adding a new position and editing an existing one will be performed in the closing event of the modal form.
That's it. I hope this article helped you understand the features of writing an application in Delphi using FireDac components when working with Firebird DBMS.
The finished application is as follows.
Questions, comments and suggestions write in the comments, or in PM.
Source codes and sample database
Our application will work with the database model, which is presented in the figure below.
At the end of this article are links to other articles that describe the process of creating a database with this model and a link to the database creation script.
| Attention! This model is just an example. Your subject area may be more complex, or completely different. The model used in this article is simplified as much as possible so as not to clutter up the description of working with components, the description of the creation and modification of the data model. |
Create a new project File-> New-> VCL Forms Application - Delphi. In the new project, add a new date module File-> New-> Other, in the wizard that appears, select Delphi Projects-> Delphi Files-> Data Module. This date module will be central to our project. It will contain some instances of global access components that should be available to all forms that need to work with data. For example, such a component is TFDConnection.
TFDConnection Component
The TFDConnection component provides connectivity to various types of databases. We will specify an instance of this component in the Connection properties of the remaining FireDac components. Which type of database will be connected to depends on the value of the DriverName property. To access Firebird, we need to set this property to FB. In order for the connection to know which access library it is necessary to work with, we will place the TFDPhysFBDriverLink component in the main date module. Its VendorLib property allows you to specify the path to the client library. If it is not specified, then connection to Firebird will be through libraries registered in the system, for example, system32, which in some cases may be undesirable.
Client Library Path
We will place the necessary access library in the fbclient folder, which is located in the application folder. To do this, in the code for the OnCreate event the module date we will write the following code.
  // указываем путь до клиентской библиотеки
  xAppPath := ExtractFileDir(Application.ExeName) + PathDelim;
  FDPhysFBDriverLink.VendorLib := xAppPath + 'fbclient' + PathDelim + 'fbclient.dll';
| Important! If you are compiling a 32-bit application, then you should use the 32-bit fbclient.dll library. For 64 bit - 64 bit. In addition to the fbclient.dll file, it is advisable to place the msvcp80.dll and msvcr80.dll libraries (for Firebird 2.5), and msvcp100.dll and msvcr100.dll (for Firebird 3.0) in the same folder. These libraries can be found either in the bin subfolder (Firebird 2.5) or in the root folder of the server (Firebird 3.0). In order for the application to correctly display its own firebird errors, you must also copy the firebird.msg file. For Firebird 2.5 and in earlier versions, it should be one level above the client library directory, i.e. in our case, in the application directory. For Firebird 3, it must be in the client library directory, i.e. in the fbclient directory. |
If you need your application to work without the installed Firebird server, i.e. in Embedded mode, then for Firebird 2.5 you need to replace fbclient.dll with fbembed.dll. If desired, the library name can be moved to the configuration file of your application. For Firebird 3.0, nothing needs to be changed (the mode of operation depends on the connection string and the value of the Providers parameter in the firebird.conf / databases.conf file).
| Tip Even if your application will work with Firebird in Embedded mode, it is more convenient to develop under a full server. The fact is that in Embedded Firebird mode it works in the same address space with your application, which can lead to undesirable consequences when errors occur in your application. In addition, at the time of development, the Delphi environment and your application are separate applications using Embedded. Prior to version 2.5, they cannot work with one database at the same time. |
Connection options
The TFDConnection component contains the database connection parameters in the Params property (username, password, connection character set, etc.). If you use the TFDConnection property editor (double-click on the component), then the mentioned properties will be filled automatically. The set of these properties depends on the type of database.
| Parameter | Appointment |
|---|---|
| Pooled | Is the connection pool used. |
| Database | The path to the database or its alias defined in the aliases.conf (or databases.conf) configuration file of the Firebird server. |
| User_Name | Username. |
| Password | Password. |
| OSAuthent | Is authentication used by the operating system? |
| Protocol | Connection protocol. The following values are allowed:
|
| Server | Server name or its IP address. If the server runs on a non-standard port, then you must also specify the port through a slash, for example localhost / 3051. |
| SQLDialect | Dialect. Must match the dialect of the database. |
| Rolename | The name of the role. |
| Characterset | The name of the connection character set. |
Additional properties:
Connected - control the connection to the database, or check the status of the connection. This property must be set to True for the wizards of other FireDac components to work. If your application needs to request authorization data, it is important not to forget to reset this property to False before compiling your application.
LoginPrompt - whether to request a username and password when trying to connect.
Transaction - a component of TFDTransaction, which will be used as the default for performing various TFDConnection operations. If this property is not explicitly assigned, TFDConnection will create an instance of TFDTransaction on its own, its parameters can be specified in the TxOptions property.
UpdateTransaction- component TFDTransaction, which will be used as the default for the same properties of TFDQuery components. If this property is not explicitly assigned, the value from the Transaction property will be used.
Since the connection parameters, except for the username and password, usually do not change during the operation of the application, we will read them from the configuration file.
  // считываем параметры подключения
  xIniFile := TIniFile.Create(xAppPath + 'config.ini');
  try
    xIniFile.ReadSectionValues('connection', FDConnection.Params);
  finally
    xIniFile.Free;
  end;
The config.ini file contains approximately the following lines:
[connection]
DriverID=FB
Protocol=TCPIP
Server=localhost/3051
Database=examples
OSAuthent=No
RoleName=
CharacterSet=UTF8
The contents of the connection section can be obtained by copying the contents of the Params property of the TFDConnection component after the wizard.
| Note In fact, the general settings are usually found in% AppData% \ Manufacture \ AppName and saved there by the application installer. However, during development it is convenient that the settings file lay somewhere closer, for example, in the application folder. Please note that if your application is installed in the Program Files folder and the configuration file is in the same place, either this file will be virtualized in Program Data, or there will be problems with its modification and subsequent reading of new settings. |
Database Connection
To connect to the database, you must change the Connected property of the TFDConnection component to True or call the Open method. In the last method, you can pass the username and password as parameters. In our application, we will replace the standard database connection dialog. We will give the opportunity to make a mistake when entering registration information no more than three times, after which the application will be closed. To do this, we will write the following code in the OnCreate event handler of the main data module.
  // делаем максимум 3 попытки входа в систему, потом закрываем приложение
  xLoginCount := 0;
  xLoginPromptDlg := TLoginPromptForm.Create(Self);
  while (xLoginCount < MAX_LOGIN_COUNT) and
        (not FDConnection.Connected) do
  begin
    try
      if xLoginPromptDlg.ShowModal = mrOK then
        FDConnection.Open(
          xLoginPromptDlg.UserName, xLoginPromptDlg.Password)
      else
        xLoginCount := MAX_LOGIN_COUNT;
    except
      on E: Exception do
      begin
        Inc(xLoginCount);
        Application.ShowException(E);
      end
    end;
  end;
  xLoginPromptDlg.Free;
  if not FDConnection.Connected then
    Halt;
TFDTransaction Component
The TFDTransaction component is designed to work explicitly with transactions.
The client part of Firebird allows performing any action only in the context of a transaction. Therefore, if you were able to access the data without explicitly calling TFDTransaction.StartTransaction, then somewhere in the bowels of FireDac this call occurred automatically. This behavior is highly discouraged. For applications to work correctly with the database, it is desirable to manage transactions manually, that is, explicitly call the StartTransaction, Commit and Rollback methods of the TFDTransaction component.
| Parameter | Appointment |
|---|---|
| Connection | Communication with the FDConnection component. |
| Options.AutoCommit | Controls the automatic start and end of a transaction. The default value is True. If the value of this property is set to True, then FireDAC does the following:
In Firebird, automatic transaction management is emulated by the FireDAC components themselves. |
| Options.AutoStart | Controls the automatic start of a transaction. Default is True. |
| Options.AutoStop | Controls the automatic completion of a transaction. Default is True. |
| Options.DisconnectAction | The action that will be performed when the connection is closed, if the transaction is active. The default value is xdCommit. The following options are possible:
In other access components, the default value for the similar xdRollback property is. Therefore, you must set this property manually to the value that is really required. |
| Options.EnableNested | Manages nested transactions. The default value is True. When a transaction is active, the next StartTransaction call will create a nested transaction. FireDAC emulates nested transactions using savepoints if the DBMS does not explicitly support nested transactions. To disable nested transactions, set EnableNested to False and the next call to StartTransaction will throw an exception. Firebird does not support nested transactions explicitly. |
| Options.Isolation | Defines the level of transaction isolation. This is the most important property of a transaction. The default value is xiReadCommited. The following options are possible:
|
| Options.Params | DBMS-specific transaction parameters. Currently used only for Firebird and Interbase. Possible values:
|
| Options.ReadOnly | Indicates whether the transaction is read-only. Default is False. If set to True, then any changes within the current transaction are not possible, in Firebird in this case there is no read value in the transaction parameters. Setting this property to True allows the DBMS to optimize the use of resources. |
Unlike other DBMSs, Firebird allows you to use as many TFDTransaction components tied to one connection. In our application, we will use one common reading transaction for all directories and online journals, and one writing transaction for each directory / journal.
In our application, we will not rely on automatic start and completion of transactions, and therefore in all transactions Options.AutoCommit = False, Options.AutoStart = False and Options.AutoStop = False.
Since the reading transaction is common to all directories and journals, it is convenient to place it in the main date module. For normal work (displaying data in a grid, etc.), the isolation mode READ COMMITED (Options.Isolation = xiReadCommited) is usually used, because it allows the transaction to see other people's committed database changes simply by re-executing the queries (re-reading the data). Since this transaction is read-only, set the Options.ReadOnly property to True. Thus, our transaction will have read read_commited rec_version parameters. A transaction with such parameters in Firebird can be open for an arbitrarily long time (days, weeks, months), without blocking other transactions or affecting the accumulation of garbage in the database (because, in fact,
| Note Such a transaction cannot be used for reports (especially if they use several consecutive queries), because a transaction with the READ COMMITED isolation mode during re-reading of data will see all new committed changes. For reports, it is recommended that you use a short read-only transaction with SNAPSHOT isolation mode (Options.Isolation = xiSnapshot and Options.ReadOnly = True). In this example, working with reports is not considered. |
We start the reading transaction immediately after successfully establishing a connection to the database by calling trRead.StartTransaction in the OnCreate event of the main data module, and we complete it before closing the connection by calling tRead.Commit in the OnDestroy event of the main data module. The value of the Options.DisconnectAction property is xdCommit by default, suitable for a read-only transaction.
The writing transaction will be separate for each directory / journal. We will place it on a form that relates directly to the desired magazine. The writing transaction should be as short as possible so as not to hold the Oldest Active Transaction, which does not allow garbage collection, which in turn leads to degradation of performance. Since the writing transaction is very short, we can use the SNAPSHOT isolation level. Thus, our writing transaction will have options.ReadOnly = False and Options.Isolation = xiSnapshot. For writing transactions, the value of the Options.DisconnectAction property is not suitable by default; it must be set to xdRollback.
Datasets
You can work with data in FireDac using the FDQuery, FDTable, FDStoredProc, FDCommand components, but FDCommand is not a dataset.
TFDQuery, TFDTable, and TFDStoredProc are inherited from TFDRdbmsDataSet. In addition to data sets for working directly with the database, in FireDac there is also a TFDMemTable component, which is designed to work with a data set in memory, which is an analog of TClientDataSet.
The main component for working with datasets is TFDQuery. The capabilities of this component are enough for almost any purpose. The components TFDTable and TFDStoredProc are just modifications, either slightly extended or truncated. We will not consider and apply them in our application. You can read them in the FireDac documentation if you wish.
The purpose of the component is to buffer the records selected by the SELECT statement to represent this data in the Grid, as well as to ensure the "edibility" of the record (current in the buffer (grid)). Unlike the IBX.IBDataSet component, the FDQuery component does not contain the RefreshSQL, InsertSQL, UpdateSQL, and DeleteSQL properties. Instead, “editable” is provided by the FDUpdateSQL component, which is set to the UpdateObject property.
| Information In some cases, you can make the FDQuery component editable without setting the UpdateObject property and writing Insert / Update / Delete queries, simply setting the UpdateOptions.RequestLive = True property, and modifying queries will be generated automatically. However, this approach has many limitations on the main SELECT query, so you should not rely on it. |
| Parameter | Appointment |
|---|---|
| Connection | Communication with the FDConnection component. |
| Masterource | Link to the Master Data Source (TDataSource) for FDQuery used as Detail. |
| Transaction | The transaction within which the query specified in the SQL property will be executed. If the property is not specified, the default transaction will be used to connect. |
| Updateobject | Communication with the FDUpdateSQL component, which provides “editable” data sets when a SELECT query does not meet the requirements for automatically generating modifying queries when setting UpdateOptions.RequestLive = True. |
| UpdateTransaction | A transaction within which modifying queries will be executed. If the property is not specified, the transaction from the Transaction property will be used. |
| UpdateOptions.CheckRequired | If the CheckRequired property is set to True, then FireDac controls the Required property of the corresponding fields, i.e. fields with a NOT NULL constraint. The default is set to True. If CheckRequired = True and the field with the Required = True property is not assigned a value, an exception will be thrown when the Post method is called. This may be undesirable if the value of this field can be assigned later in BEFORE triggers. |
| UpdateOptions.EnableDelete | Determines whether deleting a record from a dataset is allowed. If EnableDelete = False, an exception will be thrown when the Delete method is called. |
| UpdateOptions.EnableInsert | Determines whether inserting a record into a dataset is allowed. If EnableInsert = False, an exception will be thrown when calling the Insert / Append method. |
| UpdateOptions.EnableUpdate | Determines whether changing a record in a dataset is allowed. If EnableUpdate = False, an exception will be thrown when calling the Edit method. |
| UpdateOptions.FetchGeneratorsPoint | Controls when the next generator value specified in the UpdateOptions.GeneratorName property or the GeneratorName property of the auto-increment field AutoGenerateValue = arAutoInc is obtained. It has the following options:
The default value is gpDeffered. |
| UpdateOptions.GeneratorName | The name of the generator to retrieve the next auto-increment field value. |
| UpdateOptions.ReadOnly | Indicates whether the dataset is read-only. Default is False. If the value of this property is set to True, then the values of the EnableDelete, EnableInsert and EnableUpdate properties will be automatically set to False. |
| UpdateOptions.RequestLive | Setting RequestLive to True makes the request “live”, i.e. editable if possible. In this case, Insert / Update / Delete queries will be generated automatically. This option imposes many restrictions on a SELECT query, introduced for backward compatibility with BDE, and is not recommended. |
| UpdateOptions.UpdateMode | Responsible for checking record modification. This property made it possible to control the possible “overlap” of updates for cases when the user is editing the record “for a long time” and another user can manage to edit the same record and save it earlier. That is, the first user at the editing stage will not even know that the record has already changed, perhaps more than once, and will be able to “wipe” these updates with his own:
The last check corresponds to the query generated automatically for UpdateSQL. Therefore, in case of possible update conflicts in a multi-user environment, it is necessary to append the conditions to where independently. And, of course, it is also necessary, when implementing the upWhereChanged analogue, to remove unnecessary column changes in the update table set ... - that is, leave only really changed columns in the set list, otherwise the request will overwrite other people's updates of this record. As you understand, this means the need to dynamically construct the UpdateSQL query. If you want to configure update conflict detection detection individually for each field, then you can use the ProviderFlags property for each field. |
| Cachedupdates | Determines whether the data set will cache the changes without immediately making them to the database. If this property is set to True, then any changes (Insert / Post, Update / Post, Delete) are not immediately made to the database, but are saved in a special log. An application must explicitly apply the changes by calling the ApplyUpdates method. In this case, all changes will be made within a short period of time and in one short transaction. The default value of this property is False. |
| SQL | Contains an SQL query. If this property contains a SELECT query, then it must be performed using the Open method. Otherwise, you must use the Execute or ExecSQL methods. |
TFDUpdateSQL Component
The TFDUpdateSQL component allows you to override the SQL commands generated to automatically update a dataset. It can be used to update TFDQuery, TFDTable, and TFDStoredProc components. Using TFDUpdateSQL is optional for the TFDQuery and TFDTable components, because these components are able to automatically generate commands for publishing updates from a dataset to a DBMS. Using TFDUpdateSQL is required to be able to update the TFDStoredProc dataset. We recommend that you always use it, even for the simplest cases, in order to get full control over what requests are performed in your application.
To specify SQL commands at the design stage, use the TFDUpdateSQL editor of the design time, which is called by double-clicking on the component.
| Note For many FireDac design-time editors to work, they must have an active database connection (TFDConnection.Connected = True) and the transaction in auto-start mode (TFDTransaction.Options.AutoStart = True). But such settings may interfere with the application. For example, the user must enter the program under his username, and TFDConnection connects to the database under SYSDBA. Therefore, after each use of the design-time editors, we recommend that you check the TFDConnection.Connected property and reset it. In addition, you will have to enable and disable auto-read-only read-only transactions. |
On the Generate tab, you can simplify your task of writing Insert / Update / Delete / Refresh queries. To do this, select the table for updating, its key fields, fields for updating, and the fields that will be re-read after the update, and click on the “Generate SQL” button.
After that, the queries will be generated automatically, and you will go to the “SQL Commands” tab, where you can correct each of the queries.
| Note Since product_id is not included in Updating Fields, it is not in the generated insert request. It is assumed that this column is automatically populated with a trigger (with a generator), or this is an IDENTITY column (starting with Firebird 3.0). When retrieving the generator value for this column from the server, it is recommended that you manually add the PRODUCT_ID column to the RETURNING clause of the INSERT statement. |
The Options tab contains some properties that may affect the generation of queries. These properties do not apply to the TFDUpdateSQL component itself, but are links to the UpdateOptions properties of the data set that has the current TFDUpdateSQL in the UpdateObject property. This is done solely for convenience.
| Parameter | Appointment |
|---|---|
| Connection | Communication with the FDConnection component. |
| DeleteSQL | SQL query to delete a record. |
| Fetchrowow | SQL query to return one current (updated, inserted) record. |
| InsertSQL | SQL query to insert records. |
| LockSQL | SQL query to lock one current record. (FOR UPDATE WITH LOCK). |
| ModifySQL | SQL query to modify the record. |
| Unlocklock | SQL query to unlock the current record. Firebird does not apply. |
As you already noticed, the TFDUpdateSQL component does not have the Transaction property. This is because the component does not execute modifying queries directly, but only replaces the automatically generated queries in the dataset, which is the ancestor of TFDRdbmsDataSet.
TFDCommand Component
The TFDCommand component is designed to execute SQL queries. It is not a successor to TDataSet, and therefore is convenient for executing SQL queries that do not return a dataset.
| Parameter | Appointment |
|---|---|
| Connection | Communication with the FDConnection component. |
| Transaction | Транзакция, в рамках которой будет выполняться SQL команда. |
| CommandKind | Тип команды.
Typically, the type of command is automatically determined by the text of the SQL query. |
| CommandText | The text of the SQL query. |
Creating Directories
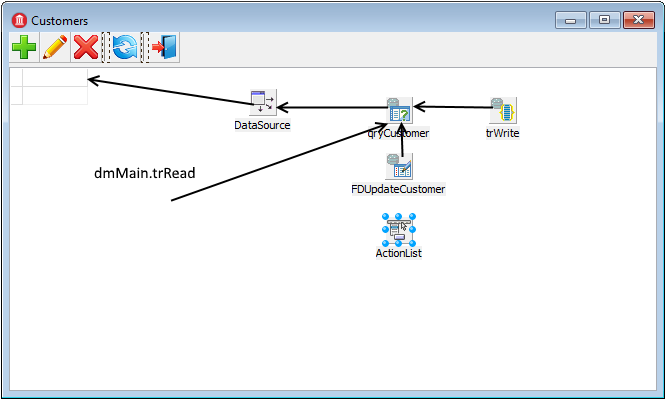
In our application we will create two reference books: a reference book of goods and a reference book of customers. Each of the directories is a form with a TDBGrid grid, a TDataSource data source, a TFDQuery dataset that writes TFDTransaction transactions.
| Note The trRead component is not visible because it is not on the form, but in the dmMain module. |
Consider the creation of reference books on the example of a directory of customers.
Place the TFDQuery component on the form named qryCustomers. This dataset will be specified in the DataSet property of the DataSource. In the Transaction property, specify ReadOnly transaction trRead, which was created in the main project data module. In the UpdateTransaction property, we specify the trWrite transaction, in the Connection property - the connection located in the main data module. In the SQL property, write the following query:
SELECT
    customer_id,
    name,
    address,
    zipcode,
    phone
FROM
    customer
ORDER BY name
The write transaction trWrite should be as short as possible and have SNAPSHOT isolation mode. We will not rely on automatic start and completion of the transaction, but we will start and end the transaction explicitly. Thus, our transaction should have the following properties:
Options.AutoStart = False
Options.AutoCommit = False
Options.AutoStop = False
Options.DisconnectAction = xdRollback
Options.Isolations = xiSnapshot
Options.ReadOnly = False
In fact, it is not necessary to set the isolation mode SNAPSHOT for simple INSERT / UPDATE / DELETE. However, if the table has complex triggers, or instead of simple INSERT / UPDATE / DELETE queries, a stored procedure is called, it is advisable to use the SNAPSHOT isolation level.
The fact is that the isolation level of READ COMMITED does not ensure the atomicity of the operator within a single transaction (statement read consistency). Thus, a SELECT statement can return data that has entered the database after the start of the query. In principle, SNAPSHOT isolation mode can be recommended almost always if the transaction is short.
To be able to edit the dataset, you must fill in the InsertSQL, ModifySQL, DeleteSQL, and FetchRowSQL properties. These properties can be generated by the wizard, but after that some editing may be required. For example, you can add a RETURNING clause, delete a modification of some columns, or even replace an automatically generated request to call a stored procedure.
InsertSQL:
INSERT INTO customer (customer_id,
                      name,
                      address,
                      zipcode,
                      phone)
VALUES (:new_customer_id,
        :new_name,
        :new_address,
        :new_zipcode,
        :new_phone)
ModifySQL:
UPDATE customer
SET name = :new_name,
    address = :new_address,
    zipcode = :new_zipcode,
    phone = :new_phone
WHERE (customer_id = :old_customer_id)
DeleteSQL:
DELETE FROM customer
WHERE (customer_id = :old_customer_id)
FetchRowSQL:
SELECT
    customer_id,
    name,
    address,
    zipcode,
    phone
FROM
    customer
WHERE customer_id = :old_customer_id
In this reference, we will get the value of the generator before inserting the record into the table. To do this, set the properties of the TFDQuery component to the following values: UpdateOptions.GeneratorName = GEN_CUSTOMER_ID and UpdateOptions.AutoIncFields = CUSTOMER_ID. There is another way when the value of the generator (auto-increment field) is returned after executing an INSERT request using the RETURNING clause. This method will be shown later.
To add a new record and edit an existing one, it is customary to use modal forms, upon closing of which, with the result of mrOK, changes are made to the database. Typically, DBAware components are used to create such forms, which allow you to display the values of a field in the current record and immediately make changes to the current record of the data set in Insert / Edit modes, i.e. to Post. But you can only switch the data set to Insert / Edit mode by starting a writing transaction. Thus, if someone opens the form for making a new entry and leaves for lunch without closing this form, we will have an active transaction hanging until the employee returns from lunch and closes the form. This in turn will cause the active transaction to hold garbage collection, which will later lead to reduced performance.
- Use the CachedUpdates mode, which allows you to keep a transaction active only for a very short period of time, namely, while making changes.
- Refuse DBAware components. However, this path will require additional efforts from you.
We show the application of both methods. For reference, it is much more convenient to use the first method. Consider the vendor record edit code
procedure TCustomerForm.actEditRecordExecute(Sender: TObject);
var
  xEditor: TEditCustomerForm;
begin
  xEditor := TEditCustomerForm.Create(Self);
  try
    xEditor.OnClose := CustomerEditorClose;
    xEditorForm.DataSource := DataSource;
    xEditor.Caption := 'Edit customer';
    qryCustomer.CachedUpdates := True;
    qryCustomer.Edit;
    xEditor.ShowModal;
  finally
    xEditor.Free;
  end;
end;
The code shows that before putting the data set into edit mode, we set it to CachedUpdates mode, and all the editing processing logic takes place in modal form.
procedure TCustomerForm.CustomerEditorClose (Sender: TObject;
  var Action: TCloseAction);
begin
  if TForm(Sender).ModalResult <> mrOK then
  begin
    // отменяем все изменения
    qryCustomer.Cancel;
    qryCustomer.CancelUpdates;
    // возвращаем набор данных в обычный режим обновления
    qryCustomer.CachedUpdates := False;
    // и позволяем закрыть форму
    Action := caFree;
    Exit;
  end;
  try
    // подтверждаем изменения на уровне набора данных
    qryCustomer.Post;
    // стартуем транзакцию
    trWrite.StartTransaction;
    // если в наборе данных есть изменения
    if (qryCustomer.ApplyUpdates = 0) then
    begin
      // записываем их в БД
      qryCustomer.CommitUpdates;
      // и подтверждаем транзакцию
      trWrite.Commit;
    end
    else begin
      raise Exception.Create(qryCustomer.RowError.Message);
    end;
    qryCustomer.CachedUpdates := False;
    Action := caFree;
  except
    on E: Exception do
    begin
      // откатываем транзакцию
      if trWrite.Active then
        trWrite.Rollback;
      Application.ShowException(E);
      // Не закрываем окно, даём возможность исправить ошибку
      Action := caNone;
    end;
  end;
end;
The code shows that until the OK button is pressed, the writing transaction does not start at all. Thus, a writing transaction is active only for the period of data transfer from the data set buffer to the database. Since we save no more than one record in the buffer, the transaction will be active for a very short time, as required.
The directory of goods is made similar to the directory of customers. However, in it we will demonstrate another way to obtain auto-increment values.
The main request will look like this:
SELECT
    product_id,
    name,
    price,
    description
FROM product
ORDER BY name
The component property TFDUpdateSQL.InsertSQL will contain the following query:
INSERT INTO PRODUCT
(NAME, PRICE, DESCRIPTION)
VALUES (:NEW_NAME, :NEW_PRICE, :NEW_DESCRIPTION)
RETURNING PRODUCT_ID
A RETURNING clause appeared in this query, which will return the value of the PRODUCT_ID field after changing it in the BEFORE INSERT trigger. In this case, it makes no sense to set the value of the UpdateOptions.GeneratorName property. In addition, the PRODUCT_ID field must be set to Required = False and ReadOnly = True, since the value of this property is not entered directly. Otherwise, everything is about the same as organized for the manufacturers directory.
Create Magazines
In our application there will be one journal “Invoices”. Unlike directories, journals contain a fairly large number of entries and are often updated.
Invoice - consists of a heading that describes common attributes (number, date, customer ...), and lines of the invoice with a list of goods, their quantity, cost, etc. For such documents, it is convenient to have two grids: in the main, data on the document header is displayed, and in the detail, the list of goods. Thus, on the form of the document we need to place two TDBGrid components, to each of which we will bind our TDataSource, which in turn will be bound to their TFDQuery. In our case, the data set with the document headers will be called qryInvoice, and with the document lines, qryInvoiceLine.
In the Transaction property of both datasets, we specify ReadOnly transaction trRead, which was created in the main project data module. In the UpdateTransaction property, we specify the trWrite transaction, in the Connection property - the connection located in the main data module.
Most logs contain a field with the date the document was created. To reduce the amount of data to be selected, it is usually customary to introduce such a thing as a working period in order to reduce the amount of data transmitted to the client. A work period is a date range within which work documents are required. Since the application may contain more than one log, it makes sense to place the variables containing the start and end dates of the working period in the global dmMain data module, which, in one way or another, is used by all modules working with the database. When the application starts, the working period is usually initialized by the start and end dates of the current quarter (there may be other options). During the application, you can change the working period at the request of the user.
Since the most recently entered documents are most often required, it makes sense to sort them by date in reverse order. Based on the foregoing, in the SQL property of the qryInvoice dataset, the query will look like this:
SELECT
  invoice.invoice_id AS invoice_id,
  invoice.customer_id AS customer_id,
  customer.NAME AS customer_name,
  invoice.invoice_date AS invoice_date,
  invoice.total_sale AS total_sale,
  IIF(invoice.payed=1, 'Yes', 'No') AS payed
FROM
  invoice
  JOIN customer ON customer.customer_id = invoice.customer_id
WHERE invoice.invoice_date BETWEEN :date_begin AND :date_end
ORDER BY invoice.invoice_date DESC
When you open this data set, you will need to initialize the query parameters:
  qryInvoice.ParamByName('date_begin').AsSqlTimeStamp := dmMain.BeginDateSt;
  qryInvoice.ParamByName('date_end').AsSqlTimeStamp := dmMain.EndDateSt;
  qryInvoice.Open;
All operations on the invoice will be performed using stored procedures, although in simpler cases this can also be done using ordinary INSERT / UPDATE / DELETE queries.
We will execute each stored procedure as a separate request in the TFDCommand components. This component is not an ancestor of TFDRdbmsDataSet, it does not buffer data and returns a maximum of one row of result, therefore its use carries less overhead for queries that do not return data. Since our stored procedures perform data modification, the Transaction property of the TFDCommand components needs to set the transaction trWrite.
| Note Stored procedures for inserting, editing, and adding records can also be placed in the corresponding properties of the TFDUpdateSQL component. |
Four operations are provided for working with the header of the invoice: adding, editing, deleting and setting the sign “paid”. As soon as the invoice is paid, we prohibit any modifications to it, both in the header and in the lines. This is done at the stored procedure level. Here are the query texts for calling stored procedures.
qryAddInvoice.CommandText:
EXECUTE PROCEDURE sp_add_invoice(
  NEXT VALUE FOR gen_invoice_id,
  :CUSTOMER_ID,
  :INVOICE_DATE
)
qryEditInvoice.CommandText:
EXECUTE PROCEDURE sp_edit_invoice(
  :INVOICE_ID,
  :CUSTOMER_ID,
  :INVOICE_DATE
)
qryDeleteInvoice.CommandText:
EXECUTE PROCEDURE sp_delete_invoice(:INVOICE_ID)
qryPayForInvoice.CommandText:
EXECUTE PROCEDURE sp_pay_for_inovice(:invoice_id)
Since our stored procedures are not called from the TFDUpdateSQL component, after executing them, you must call qryInvoice.Refresh to update the data in the grid.
Calling stored procedures for which data entry is not required is performed as follows:
  if MessageDlg('Вы действительно хотите удалить счёт фактуру?', mtConfirmation,
    [mbYes, mbNo], 0) = mrYes then
  begin
    // Стартуем транзакцию
    trWrite.StartTransaction;
    try
      qryDeleteInvoice.ParamByName('INVOICE_ID').AsInteger :=
        qryInvoice.FieldByName('INVOICE_ID').AsInteger;
      // выполнение хранимой процедуры
      qryDeleteInvoice.Execute;
      // подтверждение транзакции
      trWrite.Commit;
      // обновление данных в гриде
      qryInvoice.Refresh;
    except
      on E: Exception do
      begin
        if trWrite.Active then
          trWrite.Rollback;
        Application.ShowException(E);
      end;
    end;
  end;
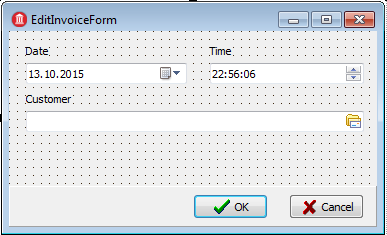
To add a new record and edit an existing one, as in the case of directories, we will use modal forms. In this case, we will not use DBAware components. Another feature - we will use the TButtonedEdit component to select a customer. It will display the name of the current customer, and at the click of a button call up a modal form with a grid to select the customer. Of course, it would be possible to use something like TDBLookupCombobox, but, firstly, there can be a lot of customers and scrolling through such a drop-down list will be inconvenient, and secondly, a single name may not be enough to find the right customer.
As a modal window for choosing a customer, we use the same form that was created to enter customers. The button click handler code in the TButtonedEdit component will look like this:
procedure TEditInvoiceForm.edtCustomerRightButtonClick(Sender: TObject);
var
  xSelectForm: TCustomerForm;
begin
  xSelectForm := TCustomerForm.Create(Self);
  try
    xSelectForm.Visible := False;
    if xSelectForm.ShowModal = mrOK then
    begin
      FCustomerId := xSelectForm.qryCustomer.FieldByName('CUSTOMER_ID')
        .AsInteger;
      edtCustomer.Text := xSelectForm.qryCustomer.FieldByName('NAME').AsString;
    end;
  finally
    xSelectForm.Free;
  end;
end;
Since we use non-DBAware components, when calling the edit form, we will need to initialize the customer code and its name for display.
procedure TInvoiceForm.actEditInvoiceExecute(Sender: TObject);
var
  xEditorForm: TEditInvoiceForm;
begin
  xEditorForm:= TEditInvoiceForm.Create(Self);
  try
    xEditorForm.OnClose := EditInvoiceEditorClose;
    xEditor.Caption := 'Редактирование счёт-фактуры';
    xEditorForm.InvoiceId := qryInvoice.FieldByName('INVOICE_ID').AsInteger;
    xEditorForm.SetCustomer(qryInvoice.FieldByName('CUSTOMER_ID').AsInteger,
                        qryInvoice.FieldByName('CUSTOMER_NAME').AsString);
    xEditorForm.InvoiceDate := qryInvoice.FieldByName('INVOICE_DATE').AsDateTime;
    xEditorForm.ShowModal;
  finally
    xEditorForm.Free;
  end;
end;
procedure TEditInvoiceForm.SetCustomer(ACustomerId: Integer;
  const ACustomerName: string);
begin
  FCustomerId := ACustomerId;
  edtCustomer.Text := ACustomerName;
end;
We will carry out the processing of adding a new invoice and editing the existing one in the closing event of the modal form, just as it was done for directories. However, here we will no longer transfer the data set to CachedUpdates mode, since the modification is performed using stored procedures, and we do not use DBAware components.
procedure TInvoiceForm.EditInvoiceEditorClose(Sender: TObject; var Action: TCloseAction);
var
  xEditorForm: TEditInvoiceForm;
begin
  xEditorForm := TEditInvoiceForm(Sender);
  // если форма закрыта не по нажатию кнопки OK,
  // то вообще ничего не делаем. Транзакция не стартует.
  if xEditorForm.ModalResult <> mrOK then
  begin
    Action := caFree;
    Exit;
  end;
  // Выполняем всё в короткой транзакции
  trWrite.StartTransaction;
  try
    qryEditInvoice.ParamByName('INVOICE_ID').AsInteger := xEditorForm.InvoiceId;
    qryEditInvoice.ParamByName('CUSTOMER_ID').AsInteger :=
      xEditorForm.CustomerId;
    qryEditInvoice.ParamByName('INVOICE_DATE').AsSqlTimeStamp :=
      DateTimeToSQLTimeStamp(xEditorForm.InvoiceDate);
    qryEditInvoice.Execute();
    trWrite.Commit;
    qryInvoice.Refresh;
    Action := caFree;
  except
    on E: Exception do
    begin
      if trWrite.Active then
        trWrite.Rollback;
      Application.ShowException(E);
      // Не закрываем окно, даём возможность исправить ошибку
      Action := caNone;
    end;
  end;
end;
Now let's move on to the invoice positions. To the qryInvoiceLine data set, set the MasterSource = MasterSource property, which is bound to qryInvoice, and the MasterFields = INVOICE_ID property. In the SQL property, write the following query:
SELECT
    invoice_line.invoice_line_id AS invoice_line_id,
    invoice_line.invoice_id AS invoice_id,
    invoice_line.product_id AS product_id,
    product.name AS productname,
    invoice_line.quantity AS quantity,
    invoice_line.sale_price AS sale_price,
    invoice_line.quantity * invoice_line.sale_price AS total
FROM
    invoice_line
JOIN product ON product.product_id = invoice_line.product_id
WHERE invoice_line.invoice_id = :invoice_id
All modifications, as in the case with the header of the invoice, will be carried out using stored procedures. Here are the query texts for calling stored procedures.
qryAddInvoiceLine:
EXECUTE PROCEDURE sp_add_invoice_line(
  :invoice_id,
  :product_id,
  :quantity
)
qryEditInvoiceLine:
EXECUTE PROCEDURE sp_edit_invoice_line(
  :invoice_line_id,
  :quantity
)
qryDeleteInvoiceLine:
EXECUTE PROCEDURE sp_delete_invoice_line(
  :invoice_line_id
)
The form for adding a new record and editing an existing one, as in the case with the header, will not use DBAware. To select the product, we will use the TButtonedEdit component. The button click handler code in the TButtonedEdit component will look like this:
procedure TEditInvoiceLineForm.edtProductRightButtonClick(Sender: TObject);
var
  xSelectForm: TGoodsForm;
begin
  // не позволяем изменять товар в режиме редактирования
  // это можно сделать только при добавлении новой позиции
  if FEditMode = emInvoiceLineEdit then
    Exit;
  xSelectForm := TGoodsForm.Create(Self);
  try
    xSelectForm.Visible := False;
    if xSelectForm.ShowModal = mrOK then
    begin
      FProductId := xSelectForm.qryGoods.FieldByName('PRODUCT_ID')
        .AsInteger;
      edtProduct.Text := xSelectForm.qryGoods.FieldByName('NAME').AsString;
      // в данном случае мы копируем также цену по прайсу
      edtPrice.Text := xSelectForm.qryGoods.FieldByName('PRICE').AsString;
    end;
  finally
    xSelectForm.Free;
  end;
end;
Since we do not use DBAware components, when calling the editing form, we will need to initialize the product code, its name and cost for display.
procedure TInvoiceForm.actEditInvoiceLineExecute(Sender: TObject);
var
  xEditorForm: TEditInvoiceLineForm;
begin
  xEditorForm:= TEditInvoiceLineForm.Create(Self);
  try
    xEditorForm.OnClose := EditInvoiceLineEditorClose;
    xEditorForm.EditMode := emInvoiceLineEdit;
    xEditorForm.Caption := 'Редактирование позиции';
    xEditorForm.InvoiceLineId := qryInvoiceLine.FieldByName('INVOICE_LINE_ID').AsInteger;
    xEditorForm.SetProduct(qryInvoiceLine.FieldByName('PRODUCT_ID').AsInteger,
                       qryInvoiceLine.FieldByName('PRODUCTNAME').AsString,
                       qryInvoiceLine.FieldByName('SALE_PRICE').AsCurrency);
    xEditorForm.Quantity := qryInvoiceLine.FieldByName('QUANTITY').AsInteger;
    xEditorForm.ShowModal;
  finally
    xEditorForm.Free;
  end;
end;
procedure TEditInvoiceLineForm.SetProduct(AProductId: Integer;
  AProductName: string; APrice: Currency);
begin
  FProductId := AProductId;
  edtProduct.Text := AProductName;
  edtPrice.Text := CurrToStr(APrice);
end;
The processing of adding a new position and editing an existing one will be performed in the closing event of the modal form.
procedure TInvoiceForm.EditInvoiceLineEditorClose(Sender: TObject;
  var Action: TCloseAction);
var
  xCustomerId: Integer;
  xEditorForm: TEditInvoiceLineForm;
begin
  xEditorForm := TEditInvoiceLineForm(Sender);
  // если форма закрыта не по нажатию кнопки OK,
  // то вообще ничего не делаем. Транзакция не стартует.
  if xEditorForm.ModalResult <> mrOK then
  begin
    Action := caFree;
    Exit;
  end;
  // Всё делаем в короткой транзакции
  trWrite.StartTransaction;
  try
    qryEditInvoiceLine.ParamByName('INVOICE_LINE_ID').AsInteger :=
      xEditorForm.InvoiceLineId;
    qryEditInvoiceLine.ParamByName('QUANTITY').AsInteger :=
      xEditorForm.Quantity;
    qryEditInvoiceLine.Execute();
    trWrite.Commit;
    qryInvoice.Refresh;
    qryInvoiceLine.Refresh;
    Action := caFree;
  except
    on E: Exception do
    begin
      if trWrite.Active then
        trWrite.Rollback;
      Application.ShowException(E);
      // Не закрываем окно редактирования. Позволяем пользователю исправить ошибку
      Action := caNone;
    end;
  end;
end;
That's it. I hope this article helped you understand the features of writing an application in Delphi using FireDac components when working with Firebird DBMS.
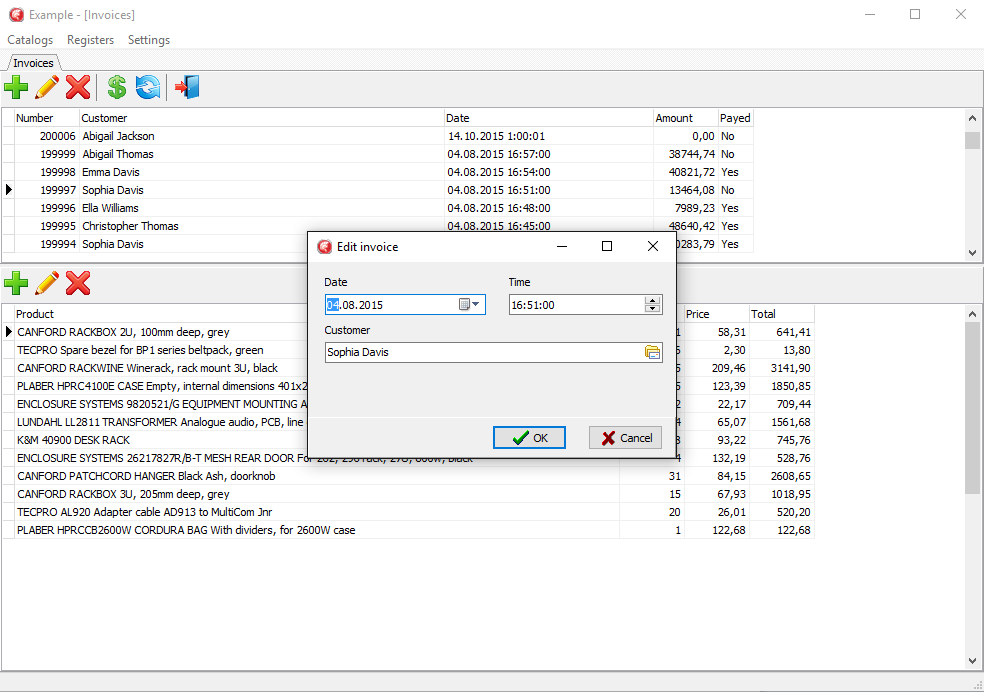
The finished application is as follows.
Questions, comments and suggestions write in the comments, or in PM.
References
Source codes and sample database