Google Cloud Endpoints in Java: A Guide. part 3
- Tutorial
previous parts:
Google Cloud Endpoints in Java: A Guide. Part 1
Google Cloud Endpoints in Java: A Guide. part 2 (Frontend)
The Google App Engine provides the ability to download up to 10 different versions of the application.
One of them (by default - the first one loaded) is the main one (default) and is available at the main address of the application, and accordingly at the address of its own domain (s).
The rest are available at the address of the form {version} -dot- {project ID} .appspot.com
Versions can be called as you like, it does not have to be 1-dot- {project ID} .appspot.com, you can use more complex notation that in particular, it makes the address of the raw version inaccessible to a wide audience.
But, of course, since the version name becomes part of the web address, there should not be periods or characters inadmissible in the web addresses.
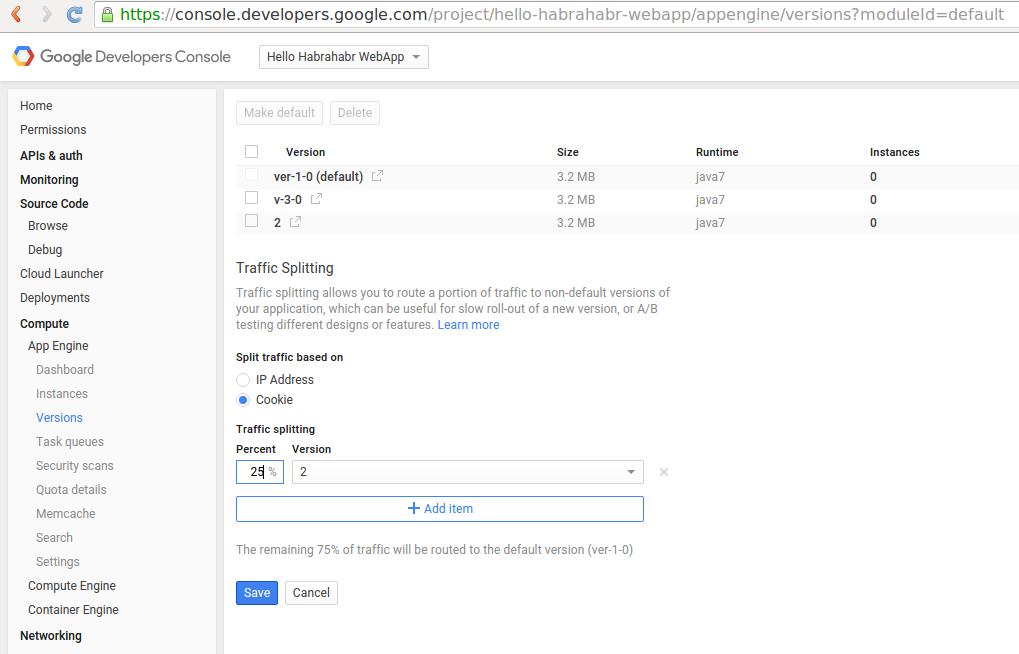
For A / B testing, you can enable traffic splitting and redirect a certain percentage of visitors to a version other than the default version.
Versioning is available in the developer menu: Compute -> App Engine -> Versions:
In the application, we specify the versions in two places in /src/main/webapp/WEB-INF/appengine-web.xml:
- This is the actual version of the application in GAE,
and in pom.xml:
- this will be part of the name of the .war file: target / {project ID} - {version} .war
Actually, the version designations in appengine-web.xml and pom.xml are not technically related and can be completely different, but from the point of view of maintaining order it is logical that they coincide.
The mvn appengine: update command posts updates to the version with the name '1' regardless of the version of the .war file and the version value specified in /src/main/webapp/WEB-INF/appengine-web.xml
Therefore, to work with different versions of the application, we need Google App Engine SDK. At the time of this writing, the latest version is 1.9.28. Download to: cloud.google.com/appengine/downloads#Google_App_Engine_SDK_for_Java and unzip to the directory of your choice, and, for convenience, write in PATH, for example:
The appcfg.sh utility is used for deployment , in the project directory, run the commands:
The utility authenticates the user through a browser, and saves tokens in ~ / .appcfg_oauth2_tokens_java.
As parameters, specify the path to the directory created by the mvn install command (./target/{project ID} {version number}) and in which WEB-INF is located, where, in turn, is appengine-web.xml, and the project will be uploaded to the server in the version whose name is specified in appengine-web.xml
Well, when changing versions, do not forget to indicate the version change in the comments of git commits.
( UPD : Google App Engine SDK 1.9.30 with Maven 3.3.3 - already works correctly with versions)
Using the utility, you can also download project files from the server. This is done by a command of the form:
appcfg.sh -A {project ID} -V {version name} download_app {download directory}
for example:
The downloaded project will look something like this:
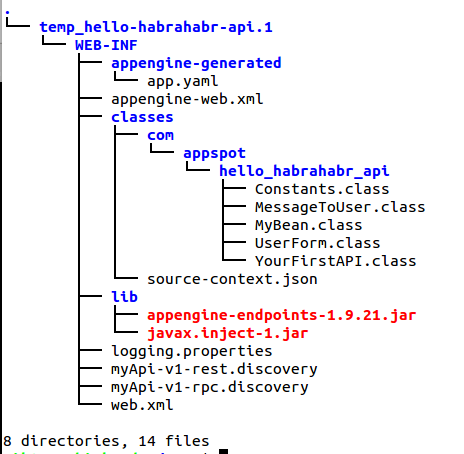
or like this:

i.e. this is the result of deploying .war on the server but not the .war itself and not the source code.
Logs can be downloaded from the server to the local machine using the same utility in a simple text file format with a command of the form:
appcfg.sh -A {project ID, you can skip it - used from appengine-web.xml} -V {version name} - num_days = {number of days, default: 1, available up to 90} --severity = {level 0 (DEBUG) to 4 (CRITICAL), if this parameter is omitted, only request logs are downloaded} request_logs src / main / webapp / {file to save information)
You can also specify options:
--append (add to an existing file)
--include_all (include all contents of log messages)
--noisy (display more information about work utilities)
For example:
Another interesting feature of the developer console is the Google Cloud Shell .
By clicking on the icon depicting the terminal in the upper panel at the bottom of the page, the console is launched, and we get access to the Debian-based Linux virtual machine with the pre-installed tools necessary for working with Google cloud services, in particular: standard Debian-based Linux utilities, in t .h. apt-get, wget, etc .; Java 7 Maven 3.2; Git Python 2.7 and pip; Node.js and npm; Google Cloud SDK Google App Engine SDK; Vim, Nano, Emacs.
The user is allocated 5GB of permanent disk space, but only the user's home directory is saved between restarts. That is, programs, files, and settings in the home directory will be available with every new entry. You can install programs using but apt-get - but only for one session.
The Web preview function is also available: you can start a web server (for example python -m SimpleHTTPServer) with a port in the range from 8080 to 8084, and open it in a separate browser window / tab with the "web preview" button (available only to this user)
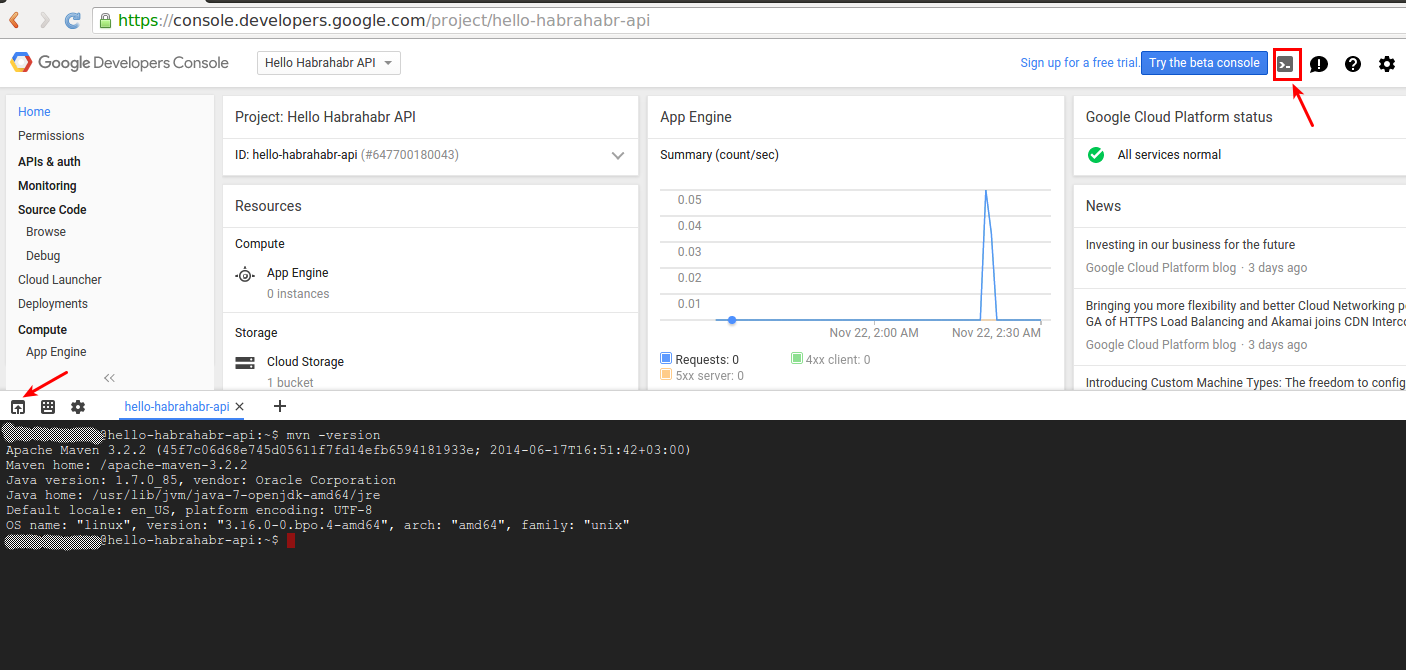
This is how Cloud Shell looks . The arrows indicate the console launch buttons and Web preview.
UPD:
Continued:
Working with a database in the Google App Engine / Google Cloud Endpoints in Java: Objectify framework
Google Cloud Storage with Java: Images and Other Files in the Cloud
Google Cloud Endpoints in Java: A Guide. Part 1
Google Cloud Endpoints in Java: A Guide. part 2 (Frontend)
Work with versions
The Google App Engine provides the ability to download up to 10 different versions of the application.
One of them (by default - the first one loaded) is the main one (default) and is available at the main address of the application, and accordingly at the address of its own domain (s).
The rest are available at the address of the form {version} -dot- {project ID} .appspot.com
Versions can be called as you like, it does not have to be 1-dot- {project ID} .appspot.com, you can use more complex notation that in particular, it makes the address of the raw version inaccessible to a wide audience.
But, of course, since the version name becomes part of the web address, there should not be periods or characters inadmissible in the web addresses.
For A / B testing, you can enable traffic splitting and redirect a certain percentage of visitors to a version other than the default version.
Versioning is available in the developer menu: Compute -> App Engine -> Versions:
In the application, we specify the versions in two places in /src/main/webapp/WEB-INF/appengine-web.xml:
{проект ID} {наименование версии} - This is the actual version of the application in GAE,
and in pom.xml:
4.0.0 war {версия} - this will be part of the name of the .war file: target / {project ID} - {version} .war
Actually, the version designations in appengine-web.xml and pom.xml are not technically related and can be completely different, but from the point of view of maintaining order it is logical that they coincide.
The mvn appengine: update command posts updates to the version with the name '1' regardless of the version of the .war file and the version value specified in /src/main/webapp/WEB-INF/appengine-web.xml
Therefore, to work with different versions of the application, we need Google App Engine SDK. At the time of this writing, the latest version is 1.9.28. Download to: cloud.google.com/appengine/downloads#Google_App_Engine_SDK_for_Java and unzip to the directory of your choice, and, for convenience, write in PATH, for example:
mkdir ~/GAE-SDK # any path you like
cd $_
wget https://storage.googleapis.com/appengine-sdks/featured/appengine-java-sdk-1.9.28.zip
unzip appengine-java-sdk-1.9.28.zip
cd appengine-java-sdk-1.9.28/bin
echo 'export PATH=$PATH:'$(pwd) >> ~/.bashrc # adds current dir to PATH
source ~/.bashrc
cd
The appcfg.sh utility is used for deployment , in the project directory, run the commands:
mvn clean install
appcfg.sh update ./target/{проект ID}{номер версии} --noisy
The utility authenticates the user through a browser, and saves tokens in ~ / .appcfg_oauth2_tokens_java.
As parameters, specify the path to the directory created by the mvn install command (./target/{project ID} {version number}) and in which WEB-INF is located, where, in turn, is appengine-web.xml, and the project will be uploaded to the server in the version whose name is specified in appengine-web.xml
Well, when changing versions, do not forget to indicate the version change in the comments of git commits.
( UPD : Google App Engine SDK 1.9.30 with Maven 3.3.3 - already works correctly with versions)
Downloading project files from the server
Using the utility, you can also download project files from the server. This is done by a command of the form:
appcfg.sh -A {project ID} -V {version name} download_app {download directory}
for example:
appcfg.sh -A hello-habrahabr-api -V '1' download_app temp_hello-habrahabr-api.1
The downloaded project will look something like this:
or like this:
i.e. this is the result of deploying .war on the server but not the .war itself and not the source code.
Downloading logs from the server
Logs can be downloaded from the server to the local machine using the same utility in a simple text file format with a command of the form:
appcfg.sh -A {project ID, you can skip it - used from appengine-web.xml} -V {version name} - num_days = {number of days, default: 1, available up to 90} --severity = {level 0 (DEBUG) to 4 (CRITICAL), if this parameter is omitted, only request logs are downloaded} request_logs src / main / webapp / {file to save information)
You can also specify options:
--append (add to an existing file)
--include_all (include all contents of log messages)
--noisy (display more information about work utilities)
For example:
appcfg.sh -A 'hello-habrahabr-api' -V '1' --num_days=90 --noisy request_logs src/main/webapp/ ../$(date '+%Y-%m-%d').LOGS.txt
Google cloud shell
Another interesting feature of the developer console is the Google Cloud Shell .
By clicking on the icon depicting the terminal in the upper panel at the bottom of the page, the console is launched, and we get access to the Debian-based Linux virtual machine with the pre-installed tools necessary for working with Google cloud services, in particular: standard Debian-based Linux utilities, in t .h. apt-get, wget, etc .; Java 7 Maven 3.2; Git Python 2.7 and pip; Node.js and npm; Google Cloud SDK Google App Engine SDK; Vim, Nano, Emacs.
The user is allocated 5GB of permanent disk space, but only the user's home directory is saved between restarts. That is, programs, files, and settings in the home directory will be available with every new entry. You can install programs using but apt-get - but only for one session.
The Web preview function is also available: you can start a web server (for example python -m SimpleHTTPServer) with a port in the range from 8080 to 8084, and open it in a separate browser window / tab with the "web preview" button (available only to this user)
This is how Cloud Shell looks . The arrows indicate the console launch buttons and Web preview.
UPD:
Continued:
Working with a database in the Google App Engine / Google Cloud Endpoints in Java: Objectify framework
Google Cloud Storage with Java: Images and Other Files in the Cloud