Two-factor authentication of AnyConnect clients. Active Directory and Azure Multi-Factor Authentication Server
Already practically no one questions why one needs two-factor authentication, especially when accessing the resources of remote users. A priori, the user is quite irresponsible in storing passwords protecting work information, which is not surprising, given how many personal passwords you have to remember and the priorities of an ordinary person in terms of protecting personal or work information.
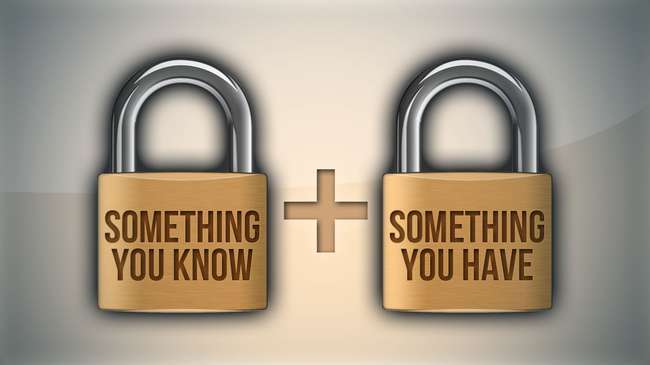
The introduction of authentication of remote users on the principle of “something I know + something I have” allows you to make an attack aimed at intercepting or selecting passwords meaningless and significantly reduce IS threats from an attacker receiving a user password.
I present to you the guide on setting up Microsoft Azure Multi-Factor Authentication Server (MFAS) as the second authentication factor when connecting domain users to company resources through Cisco AnyConnect.
Why exactly MS Azure?
- Better integration with AD, which is very convenient when the VPN account uses the same account as for the rest of the resources.
- Different types of authentication, call, SMS application and offline OTP code.
- Easy setup.
- High reliability and trust.
Of the minuses, it is probably worth noting only that this is a paid solution, but security is never cheap.
Configure Microsoft Azure
The steps below assume that you have a subscription or the trial version of Microsoft Azure is installed .
We proceed directly to the configuration:
- We go to the Azure management portal .

- Go to the Active Directory tab -> Multivariate Authentication Providers -> Quick Creation. We indicate the necessary parameters and then “create”.

After creation, the "Management" button will be available, go to:
- Go to the downloads. Download MULTI-FACTOR AUTHENTICATION SERVER.
You also need to create an account to activate the server.
To install this server, you will need the .NET Framework 2.0.Important: It is recommended to install on a separate VM. When installing, skip the setup wizard.
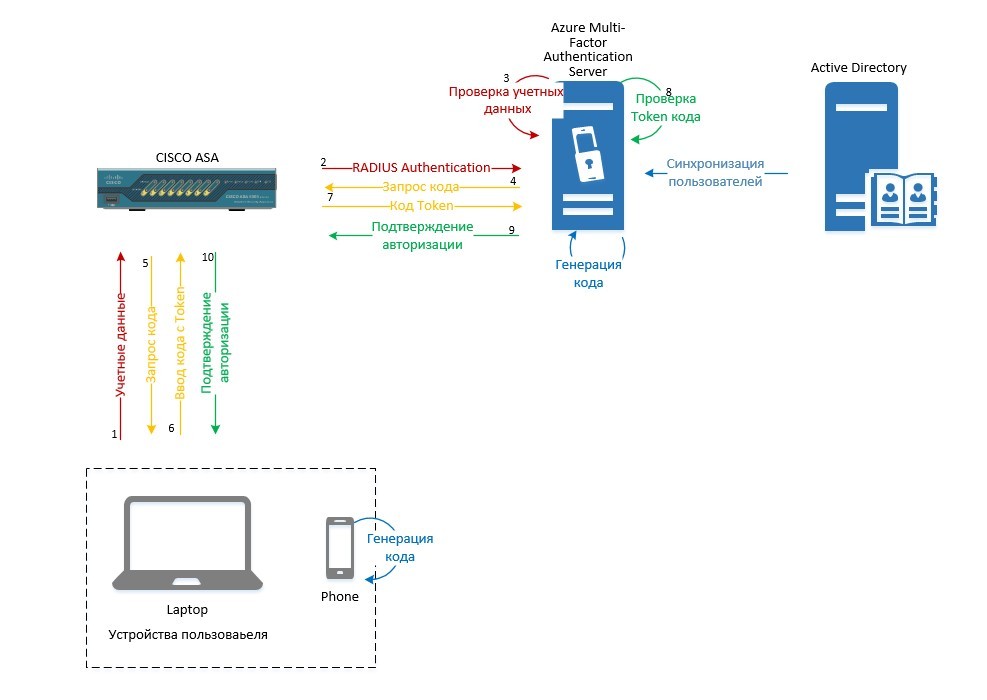
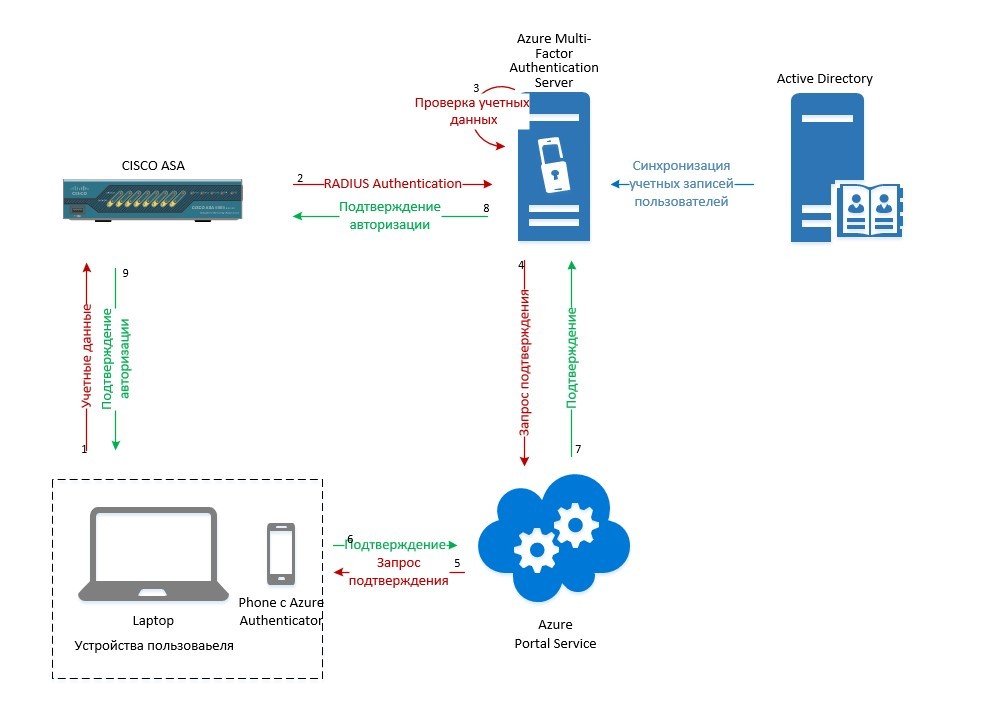
Server functions: user synchronization with AD, RADIUS server for Cisco ASA, sending requests for authorization by the second factor, receiving and processing responses from clients, user authorization. It can be installed on both server versions and client versions. - At the first start, we activate using the previously generated account (we refuse replication at this stage).
- We configure user integration between AD and our server. In the Directory Integration tab, add the directory that will be synchronized with AD and configure the synchronization settings:


- In AD we create a user and synchronize the User Base with MFAS:
a) create a test user and indicate the phone number:
b) Save, click the "Test .." button in the Users tab. Enter the user credentials: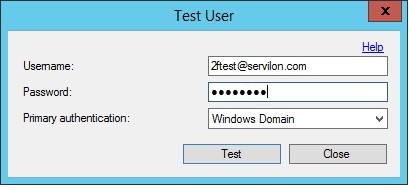
c) We receive a call to the specified phone, press "#". The successful completion of the test is indicated by the message:
You can also check authorization via SMS. To do this, in the client settings, you must specify the authorization method Text message - One-Way - OTP. In this case, MFAS will request OTP, which will be sent to you on the phone as an SMS.
In order to associate a user with a mobile device on which Azure Authenticator is installed, you will need to deploy and configure the User Portal (User Portal installation and configuration instructions)
It is also necessary to additionally install and configure the Mobile Portal:
a) Go to the C: \ Program Files \ Multi-Factor Authentication Server directory
b) Select the required version and install.
c) After installation, edit the file:
C: \ Inetpub \ wwwroot \ MultiFactorAuthMobileAppWebService \ Web.conf
Find the parameters:
WEB_SERVICE_SDK_AUTHENTICATION_USERNAME
WEB_SERVICE_SDK_AUTHENTICATION_PASSWORD
and change the values similarly to the User Portal parameters.
Also in the pfup section, the <value> parameter http: // localhost: 4898 / PfWsSdk.asmx </ value> is changed by analogy with the User Portal - <value> https: //EXTERNALFQDN/MultiFactorAuthWebServiceSDK/PfWsSdk.asmx</ value>. In our case, “EXTERNALFQDN” is mfa.servilon.comIt is worth noting that for the User Portal to work, it is necessary:
- A record in the external DNS zone that will point to the User Portal.
- Trust relationship with the server. Ideally, this is a “white” certificate issued for “EXTERNALFQDN”. - After installation and configuration, for the User Portal to work correctly, enter the URL to the portal in the “User Portal” tab and, if authorization is for domain users, specify Primary authentication - Windows Domain.
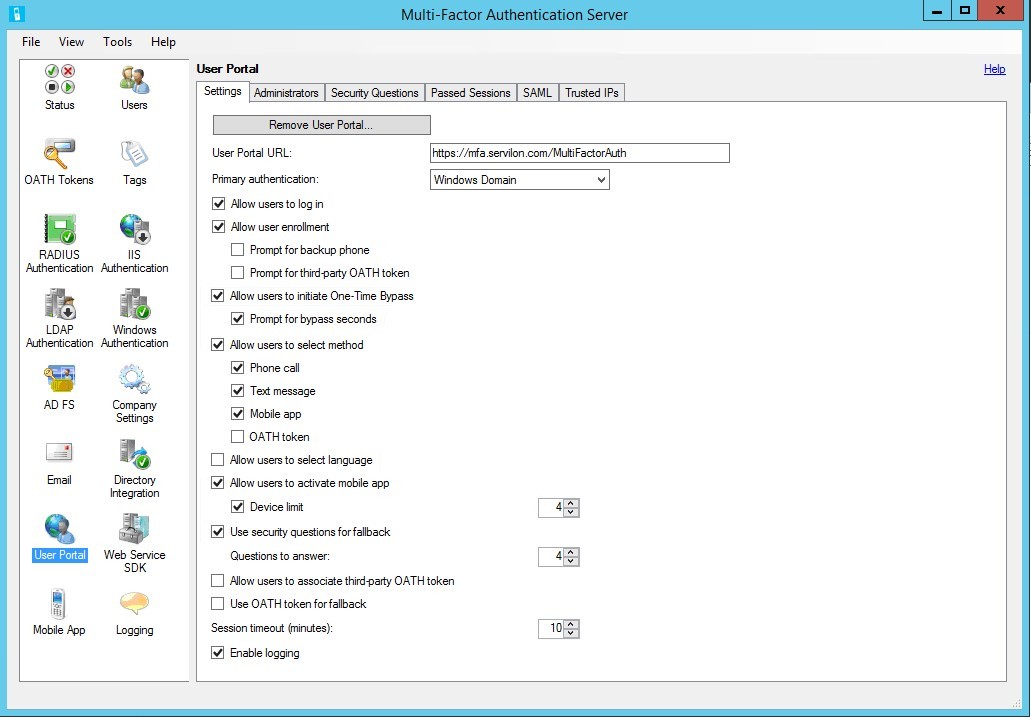
- In the Mobile App tab, enter the URL of the Mobile App Web Service and check the Enable OATH tokens checkbox if we want to use the mobile device as Software token.
The principle of the APP:- In token mode
- In standard mode without PIN
- In token mode
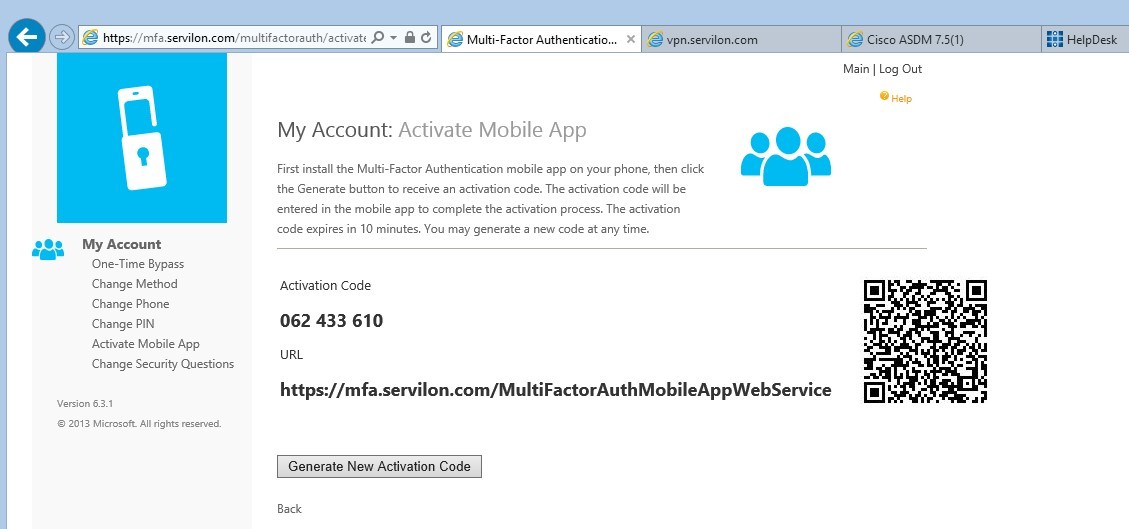
- After the portal is configured, to bind the mobile device, click on the User Portal link, in this case https://mfa.servilon.com/multifactorauth

During the first login, you need to fill out the secret questions form, after which the user will receive full access to the portal.
- In the Activate Mobile App menu, go to the Generate Activation Code. We generate a new activation code and as a result we get:
Azure Authenticator application must be installed on the mobile device (links for iOS , Android and Windows Mobile ).
Launch the application - press + and read the QR code. As a result, the account is tied to the mobile device:
Verification on the server:
Now you can experiment with different authentication modes and see what is the difference between the Standard mode and the “OATH token”.
Radius Setup
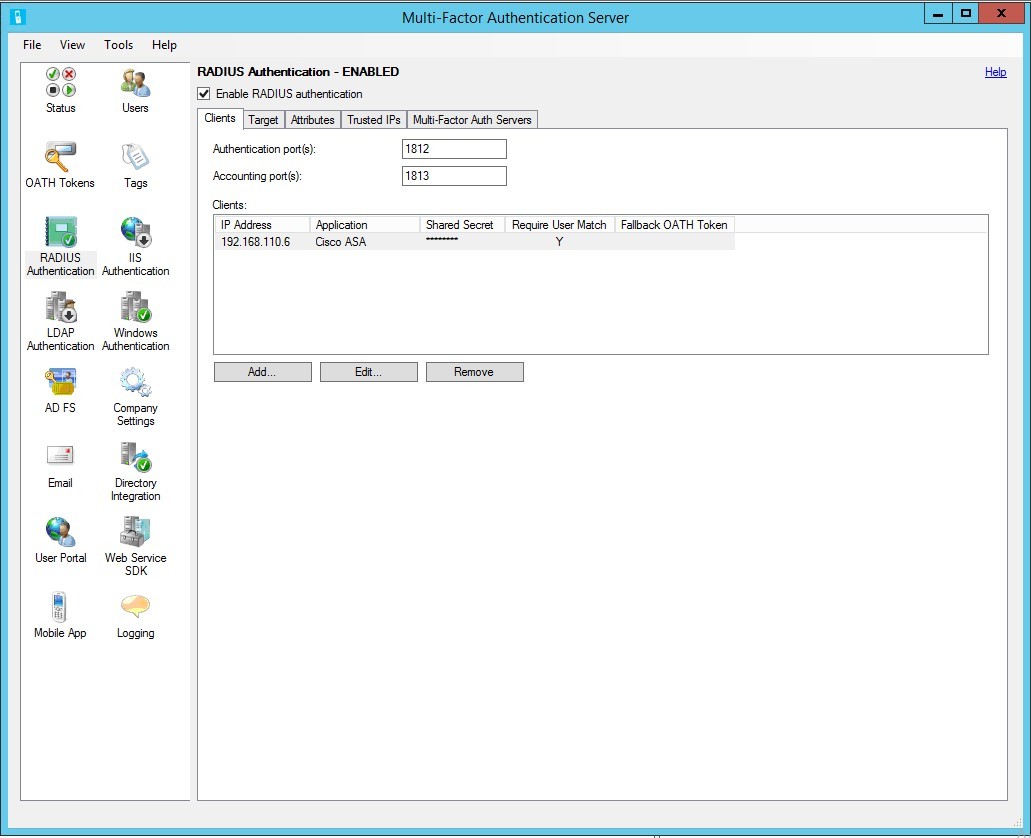
The Cisco ASA can use a third-party Radius server to authenticate AnyConnect users. To do this, you must configure AAA Server on the ASA, and configure the Radius client on MFAS:

Configure CISCO ASA
Since domain authentication is used, the ASA must have a trust relationship with the domain. It is also recommended that you use a “white” certificate for the VPN gateway. In our case - vpn.servilon.co
On ASA, we recommend that you configure AnyConnect VPN gateway with local authentication. Make sure that the connection is working, and then proceed to configure authentication via Radius.
Then configure RADIUS. Go to Configuration / Remote Access VPN / AAA / Local Users / AAA Server Groups and create a group:

Add a server to the group. The timeout must be increased, since the default values may not be enough to enter the code.

Testing the connection with the RADIUS server:

If the test is successful, on the previously configured “AnyConnect Connection Profiles” we change the authentication from local to a new group:

Profile settings:
- Change timeout:
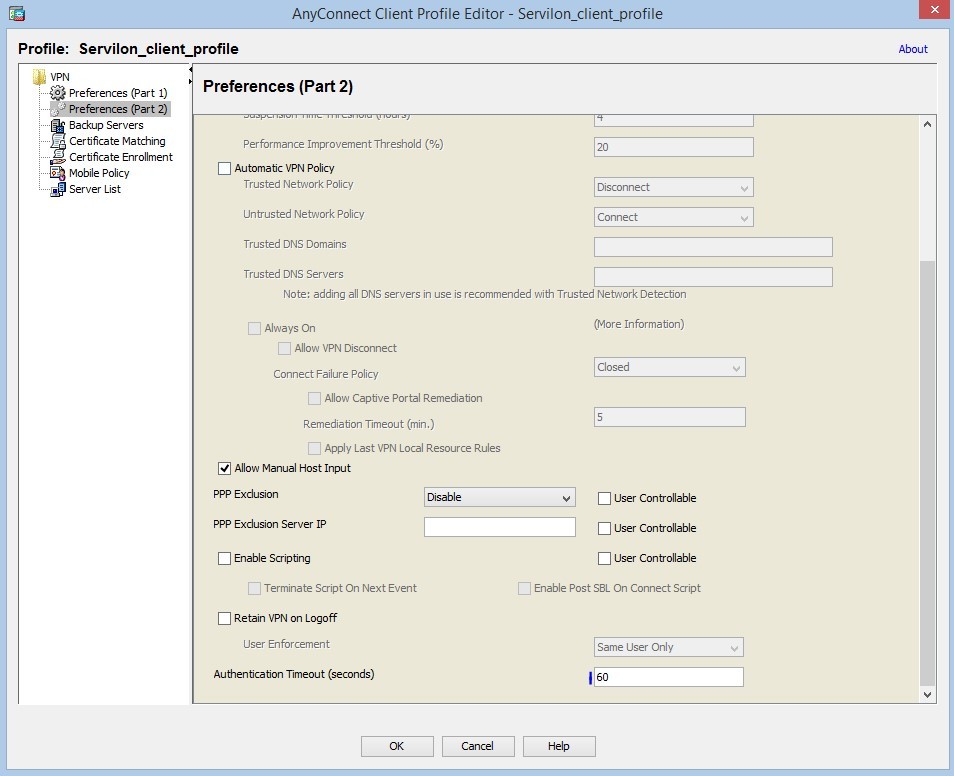
- Specify the FQDN for Anyconnect gateway.

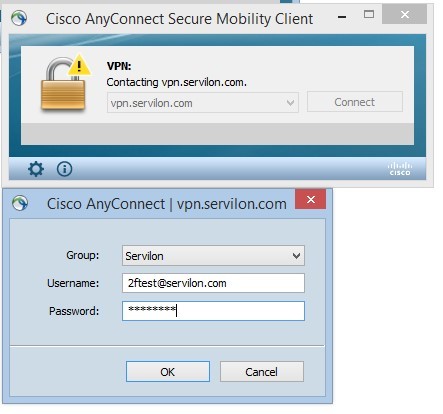
In order to test the connection with authentication in the standard mode and OATH token mode, we connect to the FQDN and enter the domain credentials:
We receive a request to enter the code from a mobile application:

If standard mode without PIN is used, then the application will receive a confirmation confirmation message :
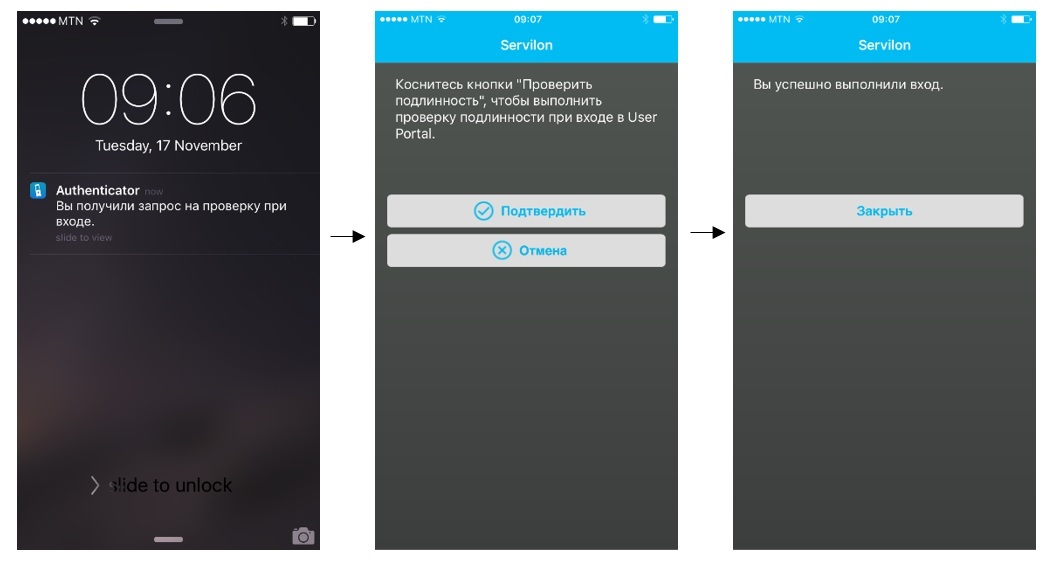
After checking the second factor, user authentication occurs. Authentication Successful:

This article describes an example of setting up two-factor user authentication for the Cisco AnyConnect application, but this scheme can be implemented for any services that support authentication using the Radius protocol.
Regards, Servilon Team