SWAPY with a new code generator
 SWAPY is a graphical UI automation utility for pywinauto (Python).
 In version 0.4.7, the code generator is completely redesigned. The main features, as well as examples of how to quickly and easily create scripts for automatic testing of UI, see under the cat.
Description
SWAPY is a graphical utility for viewing the hierarchy of windows and generating UI automation code for the pywinauto library.
The name itself is an acronym that reflects the main idea of the application - Simple Windows Automation on PYthon. The utility is a complete exe file compiled using PyInstaller. SWAPY does not require any additional settings for automation and code generation. Of course, for further use of the code you will need to install at least Python and pywinauto. But to test the capabilities and, most importantly, whether such a bundle is suitable for automating your application, SWAPY is quite self-sufficient.
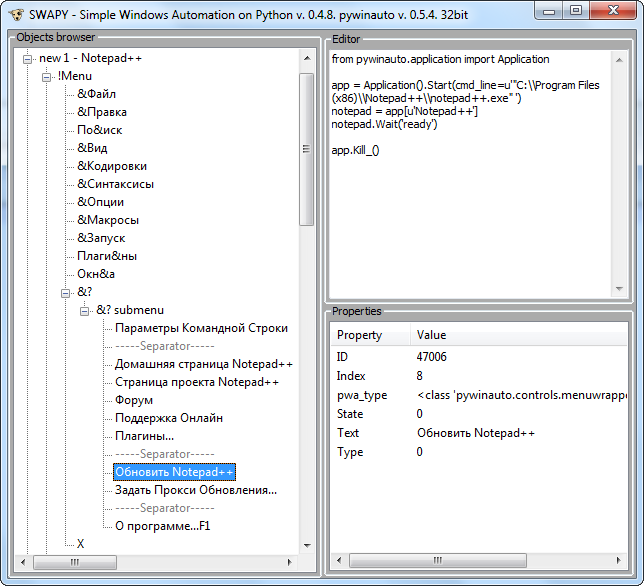
The utility contains three main components, these are:
- tree of objects
- property table of the selected object
- code field
To create a script, you need to find an element in the tree of all controls and then call an action, for example, Click. In this case, the action itself will be performed on the object, and the field with the code will be updated.
Previously, little attention was paid to the code generator. More often, the functions of searching for an element and viewing its parameters were used. All fixes and features for the code generator were added according to the residual principle. As a result, in order to get a working code, certain efforts on the part of the user were needed - it was necessary to sequentially initialize all the ancestors.
The new code generator is basically devoid of previous flaws.
History of development
In early 2011, while in the position of Automation QA Engineer, he discovered a library for UI automation - pywinauto. You can learn something about the history of the library itself in the article “Old new pywinauto” . At that time, it was practically not supported. However, Pywinauto defeated all of its competitors and was selected to test a number of products with medium GUI complexity.
I note the main advantages due to which the choice fell on this option:
- Tool price. Pywinauto is free, licensed under GNU LGPL v.2.1
- This is a Python library. With all its features, libraries, etc.
- Simple preparation of the environment. Preparing a virtual machine for testing by installing Python + pywinauto is much easier than installing, for example, a monster like TestComplete. This is very relevant in the context of using Continuous Integration.
Soon, one drawback was discovered - a lot of time was wasted searching for the necessary element and analyzing its properties. There was a lack of a graphical utility for viewing the tree of elements and their parameters. A library for automating graphical interfaces would be nice to have a graphical interface.
It was decided to correct this injustice.
 In April 2011, I started work on the utility, by the end of the year the version rapidly grew to 0.3.0, and the utility already had all the key components and ... a lot of problems ...
 Over the next year, bugs were slowly fixed and something minor was added. And then I changed my work and interest in supporting a utility that I myself do not use, and even alone, it disappeared.
SWAPY received a second wind in September 2015, when the guys from pywinauto called for themselves.
Since then, he began to actively develop the utility again. A key improvement is the new code generator.
I reconsidered my attitude to the code generation function as one of the main functions. It is through the code generator that you can introduce the developer to the additional features of the library, as well as save even an experienced developer from the routine.
New opportunities
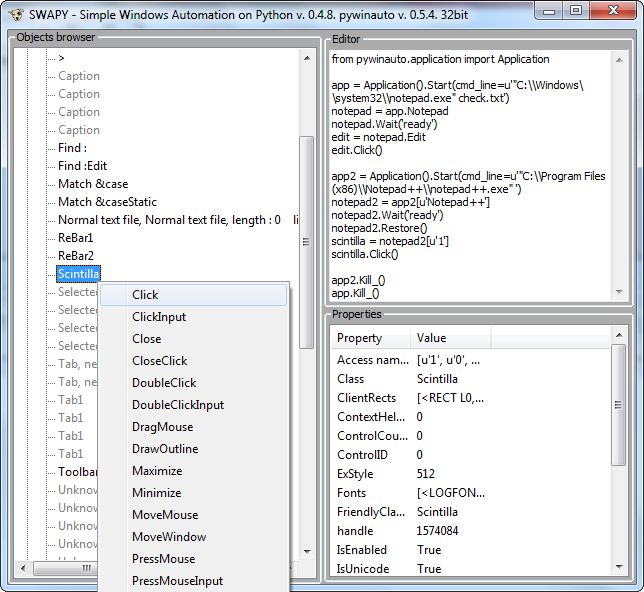
- The code generator now works fine. It means that you do not need to click on all the ancestors in the object tree to get a working code. Now it’s enough to find the necessary element and perform an action on it, the code will be automatically built up to import. One click in the new version:
from pywinauto.application import Application
app = Application().Start(cmd_line=u'"C:\\Program Files (x86)\\Notepad++\\notepad++.exe" ')
notepad = app[u'Notepad++']
notepad.Wait('ready')
systabcontrol = notepad.Tab
systabcontrol.Select(u'new 1')
app.Kill_()
In the old version, a similar action leads to the following result:import pywinauto pwa_app = pywinauto.application.Application() ctrl.Select(0)
Obviously, such code will not work. - Friendly variable names. Agree, it’s
systabcontrolmuch clearer than somectrl. Names are formed on the basis of the class name, or from the shortest name for access (from pywinauto). Only if both of these cases were unsuccessful will the faceless be usedcontrol. - Control over the same variable names. If you need to work with different controls that have the same name, SWAPY makes sure that they remain unique.
button = calcframe.Button19
button.Click()
button2 = calcframe.Button20
button2.Click()
This is relevant for the next paragraph. - Reuse. As a rule, an action consists of two lines. In the first, access to the control is initialized, in the second, the action itself. So, if it was necessary at some point to repeat an action on a control that has already been initialized, then just an action code is added.
button = calcframe.Button19
button.Click()
button2 = calcframe.Button20
button2.Click()
button.Click()  # Повторный Click по Button19
Cancel the last command. Often there is a need to delete the last command, for example, after unsuccessful experiments. Now it is possible to do this through the context menu of the editor. In this case, the name of the disappeared variable will be freed and will be used the next time. You can cancel any number of steps. You need to understand that canceling the last command will only clear the code, the action in the application will not be canceled.
It is also possible to clear all the code at once, and you can also save all the code to a file.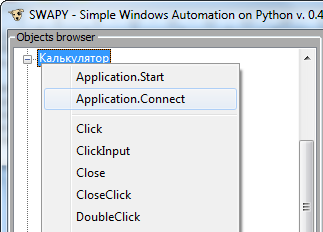 Change the code on the fly. So far, this functionality is used in top-level windows to switch between
 app = Application().Start(cmd_line=...andapp = Application().Connect(title=.... In most cases, it will be enoughStart, but if you do not need to run the application, you should select theApplication.Connectobject tree in the context menu by clicking on the window name. The code in the editor will be updated, theApplication().Startcommands bound to the method will disappear -calcframe.Wait('ready')at the beginning andapp.Kill_()at the end.
Sample code to start the application.from pywinauto.application import Application app = Application().Start(cmd_line=u'"C:\\Program Files (x86)\\Notepad++\\notepad++.exe" ') notepad = app[u'Notepad++'] notepad.Wait('ready') app.Kill_()
Connects to an already running application.from pywinauto.application import Application app = Application().Connect(title=u'new 1 - Notepad++', class_name='Notepad++') notepad = app[u'Notepad++']
Usage example
Now let's create some scripts to automate testing. I tried to choose enough life examples and at the same time demonstrate new features of the code generator.
License Text
In this test, we verify that the license text is displayed on the About dialog. At the same time, make sure that SWAPY understands that the new window belongs to the old application and will not create unnecessary calls
app = Application().Start(...).Checking the license text
The final test code may look like this:
As you can see, a minimum of native code.
- We start manually Notepad ++.
- We find the necessary menu item in the tree of SWAPY elements and click on it.
- To update the element tree to display the newly opened window, you need to put a selection on the
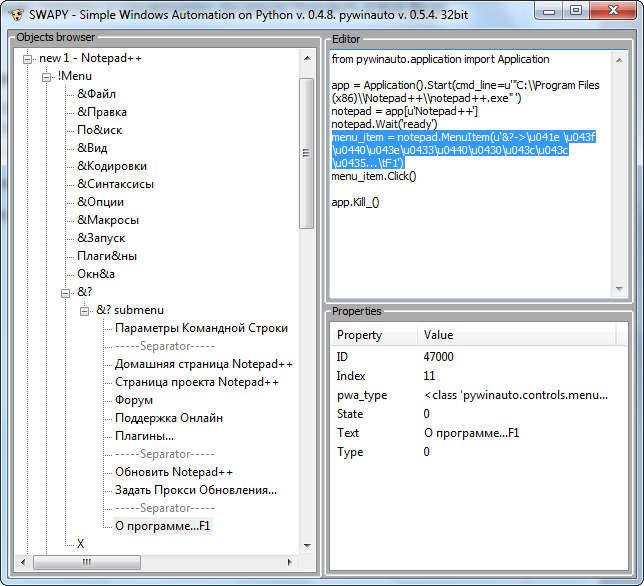
rootelement in the tree. In this case, all child elements will be updated. - We find About dialogue, it’s called for me
Window#657198, it SWAPY itself formed the name from the handle of the window, since thewindow.Texts()name was not determined in the usual way ( ). - In the About hierarchy of the dialog we find the license text and click on it.
Only the following lines were added:window = app.Dialog edit = window.Edit2 edit.Click() # Изменим на получение текста
Those. SWAPY used an existing variableapp. With auto-generated code for this test, we are done. Please note that Notepad ++ will be launched and closed after the test, the last line is responsible for thisapp.Kill_().
The final test code may look like this:
from pywinauto.application import Application
expected_text = “...”
app = Application().Start(cmd_line=u'"C:\\Program Files (x86)\\Notepad++\\notepad++.exe" ')
notepad = app[u'Notepad++']
notepad.Wait('ready')
menu_item = notepad.MenuItem(u'&?->\u041e \u043f\u0440\u043e\u0433\u0440\u0430\u043c\u043c\u0435...\tF1')
menu_item.Click()
window = app.Dialog
edit = window.Edit2
actual_text = edit.Texts()
app.Kill_()
assertEqual(expected_text, actual_text)
As you can see, a minimum of native code.
Tab Order
Let's check the movement of the tabs. We will deliberately make a mistake when generating the code and see how SWAPY will allow it to be removed.
Checking tab order changes
The test might look like this:
Here I had to read a little documentation and work a bit with the generated code.
- We start manually Notepad ++.
- Open two additional tabs. We find the necessary in the tree of elements
ToolBarand perform the actionClickon the button with index 0. As a result, the code appears and one new tab opens.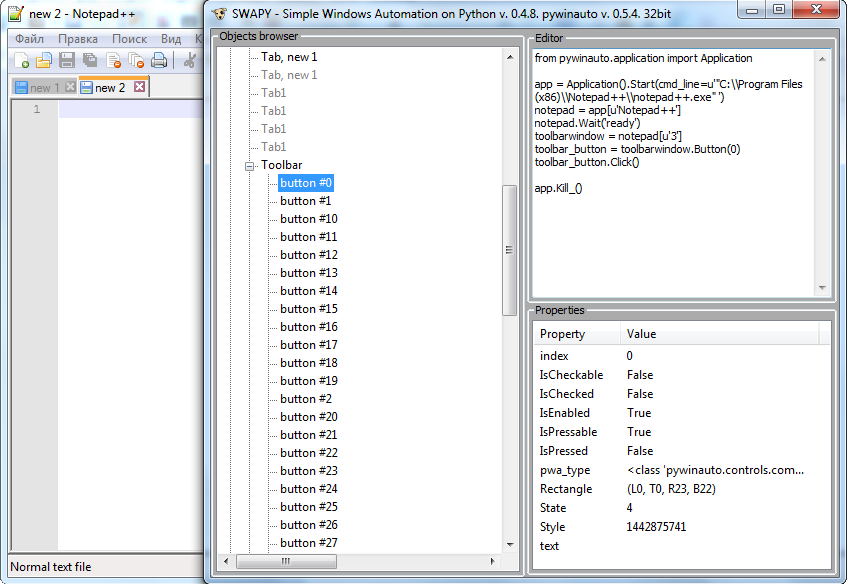
We need another tab, repeat the action again. Since the button text is not available, addressing by index is used. We did not notice and accidentally clicked on the button with index 1.
The code was added: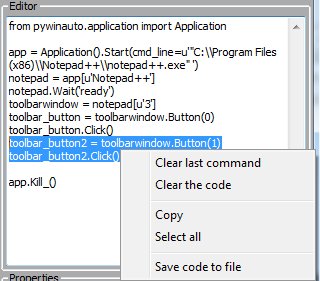
toolbar_button2 = toolbarwindow.Button(1)
toolbar_button2.Click()
Need to be fixed. In order not to repeat everything from the beginning, SWAPY allows you to undo the last command (you can consecutively undo at least all the code).Clear last commandcancel the last command (highlighted fragment) - just what we need. To completely clear the code, there is a commandClear the code. A full cleaning is hidden behind a confirmation dialog, in order to avoid accidents at work.
Now we will do everything right and click on the button with index 0.
The code will be added:toolbar_button.Click()
SWAPY remembers what is already theretoolbar_button = toolbarwindow.Button(0)and for a second click to initialize it is no longer necessary. - For drug-n-drop, we use the method
toolbarwindow.DragMouseInput. Details of use can be found in the documentation .
Tab coordinates can be determined usingsystabcontrol.GetTabRect(0).mid_point()
The test might look like this:
# automatically generated by SWAPY
from pywinauto.application import Application
app = Application().Start(cmd_line=u'"C:\\Program Files (x86)\\'
                                   u'Notepad++\\notepad++.exe" ')
notepad = app[u'Notepad++']
notepad.Wait('ready')
systabcontrol = notepad.Tab
assertEqual([u'Tab', u'new 1'], systabcontrol.Texts())
toolbarwindow = notepad[u'3']
toolbar_button = toolbarwindow.Button(0)
toolbar_button.Click()
toolbar_button.Click()
assertEqual([u'Tab', u'new 1', u'new 2', u'new 3'], systabcontrol.Texts())
systabcontrol.DragMouseInput(
    press_coords=systabcontrol.GetTabRect(0).mid_point(),
    release_coords=systabcontrol.GetTabRect(2).mid_point())
assertEqual([u'Tab', u'new 2', u'new 3', u'new 1'], systabcontrol.Texts())
app.Kill_()
Here I had to read a little documentation and work a bit with the generated code.
Insert and save text
The test requires checking the copy and paste of the text and then save it. Let's complicate the task - Notepad ++ is already running and minimized (Minimize), and the standard notepad (from which copying will be performed) has yet to be launched.
Work with multiple windows
There are all the main actions, now it remains to add the sending of the CTRL + C, CTRL + V commands and checks to get a real test.
To send commands, we use the built-in TypeKeys method .
The full text is given below:
- We will prepare test applications. Run and collapse Notepad ++, run the usual notepad with the test file = "notepad check.txt".
- In the tree of objects we find the notebook and click on the contents of the editor.
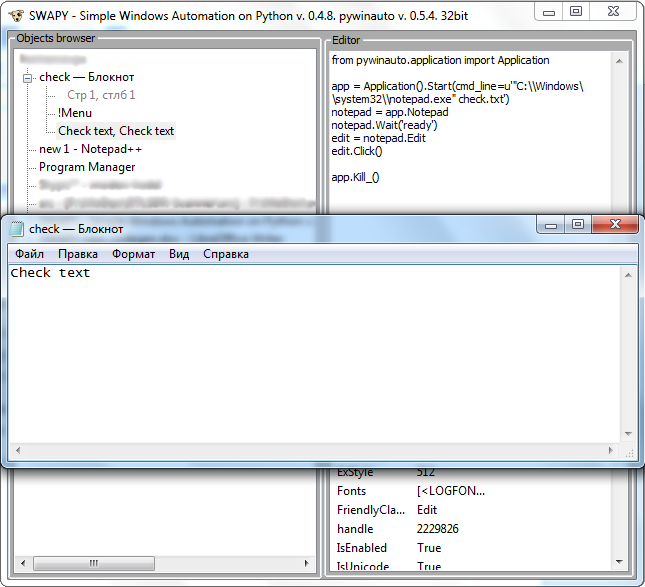
Please note that notepad will be launched with the original arguments. - Now we find Notepad ++ and its text box. You must not forget to deploy it first (Restore).
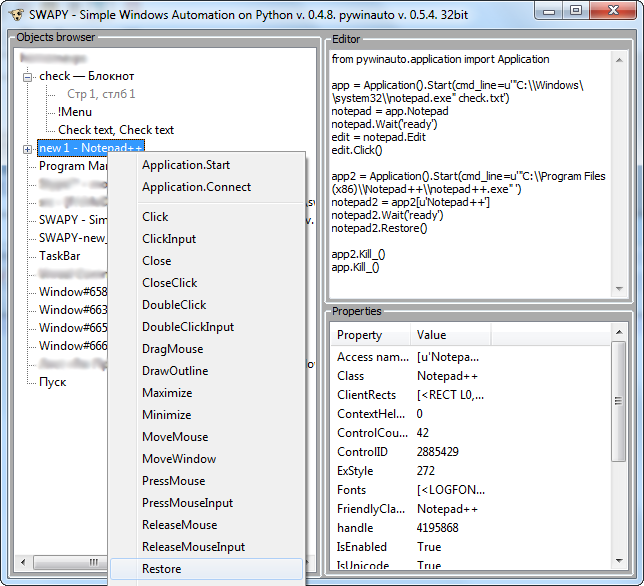
Everything goes according to plan, but then suddenly we remembered that, according to the conditions of the task, Notepad ++ was already running, and our code would try to run it.
SWAPY by default generates a bunchapp = Application().Start ... app.Kill_(). But in our case, we do not need to run Notepad ++ again.
The new code generator allows you to change the "approach" for generating code, and this can even be done ex post. - To change
Application().Startto,Application().Connectyou need to call the context menu for the Notepad ++ application window and selectApplication().Connect.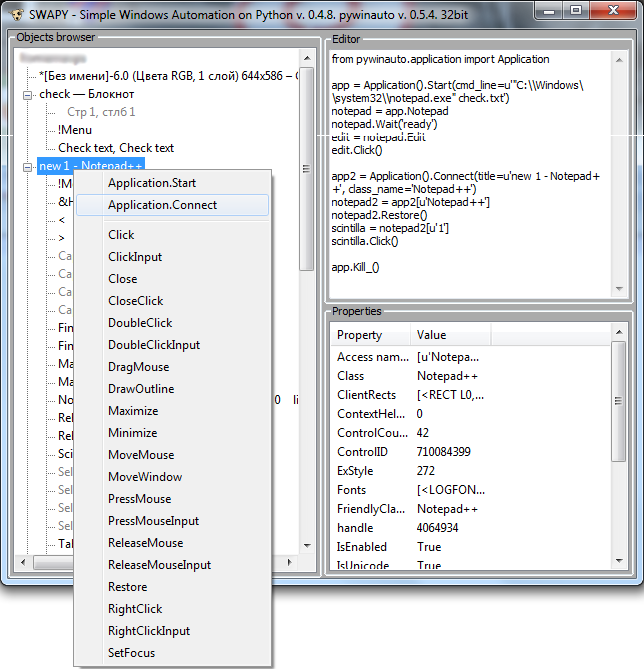
- Copying and pasting the text, we will issue later, but now suppose that the text is and needs to be saved.
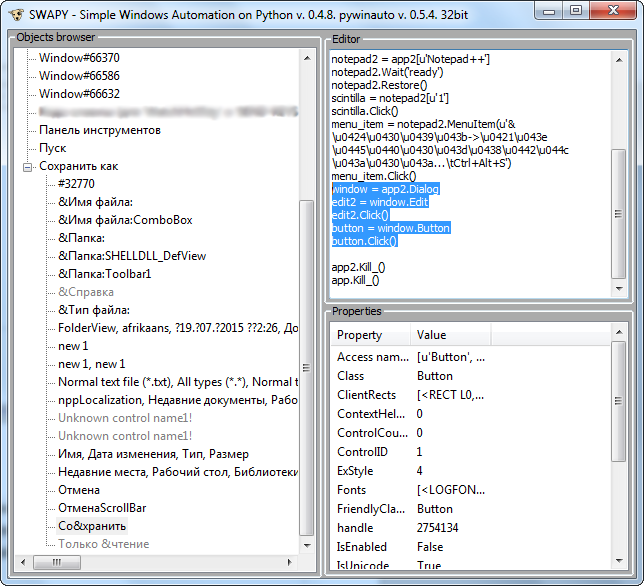
- The “Save as” window has opened, you need to update the element tree to see it. To do this, select the root element of the tree. After updating the tree, click on the field with the name of the file to be saved (in order to change it later) and on the button for saving.
There are all the main actions, now it remains to add the sending of the CTRL + C, CTRL + V commands and checks to get a real test.
To send commands, we use the built-in TypeKeys method .
The full text is given below:
# automatically generated by SWAPY
from pywinauto.application import Application
import time
import os
SAVE_PATH = r"Notepad_default_path"
app = Application().Start(cmd_line=u'"C:\\Windows\\system32\\notepad.exe" check.txt')
notepad = app.Notepad
notepad.Wait('ready')
edit = notepad.Edit
edit.TypeKeys("^a^c")  # Copy all the text
app2 = Application().Connect(title=u'new 1 - Notepad++', class_name='Notepad++')
notepad2 = app2[u'Notepad++']
notepad2.Restore()
scintilla = notepad2[u'1']
scintilla.TypeKeys("^a^v")  # Paste the text
#Save a file
menu_item = notepad2.MenuItem(u'&\u0424\u0430\u0439\u043b->\u0421\u043e\u0445\u0440\u0430\u043d\u0438\u0442\u044c \u043a\u0430\u043a...\tCtrl+Alt+S')
menu_item.Click()
window = app2.Dialog
edit2 = window.Edit
filename = "checked_at_%s" % time.time()  # Compose a filename
edit2.TypeKeys(filename)
button = window.Button
button.Click()
with open(os.path.join(SAVE_PATH, filename)) as f:
    assertEqual(“expected_text”, f.read())
app.Kill_()
Is it even better?
Of course - Yes!
Even in the examples described, we were forced to do
Click()and then manually change to receive the text - Texts(). Or manually added TypeKeys. In future releases, such popular actions have yet to be simplified by adding additional items to the context menu. It is not yet possible to control the format for accessing items. Pywinauto allows you to access elements through the - attributes
window.Edit, and if this is not possible (invalid name for a Python variable), then through __getitem__- window[u'0']. SWAPY finds the shortest name for access and tries to use it as an attribute. If it doesn’t work, then through
__getitem__. The idea so far is the simplest - get a short code. But, for example, in the test “Tab Order” there is such a line
toolbarwindow = notepad[u'3']. Everything works, everything is OK. But, imagine, you opened this test after a while, and there is such a magic number. Instead of a triple, it could be Toolbar- the most understandable, and not the shortest name. The plans are to give the user the opportunity to choose a name (“Name! Name, sister!”). Also, while you need to update the tree of objects manually. Automatic refresh will obviously add convenience.
useful links
PS
I would like to thank vasily -v-ryabov and airelil comrades for their active participation in the discussion of features for the new code generator.