Google Play Services Research: Place Picker & Autocomplete
- Transfer
The Place Picker widget and Autocomplete are powerful Google Play services features. In this article we will consider them in detail, as well as how to implement them in applications.

With the release of Play Services 7.0, Google has made some very useful features available for implementation in our applications - two of which include the Place Picker UI and the Autocomplete component. Both of them can help significantly improve existing solutions in your application, or even help you implement similar features in your future applications. In any case, providing native and clean solutions in such frequently used functions will greatly help to improve the quality of experience that your application offers.
Taking into account the fact that I have not had the opportunity to implement any of these functions since their release, I decided that it was time to take a close look at them.
Together with this article, I created an application that allowed me to experiment with these functions - you can find the code on github at the link .
Since you are still reading this here, I suggest that you want to try these components in person. So, before you put on your java hat and write code, you need to start by adding the play-services-location dependency to your build.gradle file.
Note: In case you are not familiar with the format used, you just need to declare the dependency of the play service that you will use. For more information, I recommend that you read this guide .
In addition, you will also need to register an API key when using location services, which can be done in the next guide.. Once you are done with the registration, you will need to add the API key and the version of play services in your manifest file, as shown below:
A place picker widget is a user interface component that provides the ability to interact with an interactive map based on the current geographic location of the device. This map can be used to select nearby places in one of two ways:
The obvious question is, “Why should we use this?”
So, now we know what we are dealing with, everything looks as if we are ready to start. There are several important operations that are always present in the Place Picker life cycle, which we will now familiarize ourselves with.
To get started, we need to create a new instance of builder using the IntentBuilder from the Place Picker class.
Using this builder, we can set the initial boundaries of the latitude-dogota that will be used by the instance of the place picker. As mentioned earlier, if the initial value is not set then by default our place picker will use the current position of the device as
Once this is done, we start picker using the method
When the method is called
As shown above, we retrieve our selected Place when the activity returns it to us. We do it as follows:
At this point, if the user uses the back button to exit the picker widget without selecting a location, then the result will not be returned.
Note : You will need to grant your application the following rights - ACCESS_FINE_LOCATION in order to use the Place Picker widget.
To stay in one design theme with your application, by default the Place Picker widget will use the colors of your application:
Be careful and recheck the set color attributes of the theme.
With the play services 7.8, widget place picker can also be used (signals from a nearby beacon beacons ) for determining the current location of the device. This works thanks to a
Place Autocomplete - a new component that can be used to return a list of recommended places nearby based on a search query, where the result is offset from the current location of the device. Previously, in order to achieve this result, it was necessary to directly call the Place API, but now the same thing can be done automatically by wrapping GoogleApiClient.
First, we must create a new instance of the GoogleApiClient class. To do this, we will use the GoogleApiClient builder, where we also need to indicate that we want to use the Places API:
As a result of the search query, the current position will make a request to the Auto Complete API using this instance.
Since RxJava is currently part of my workflow, I decided to implement this with observables. I suggest you look at the completed class to understand the code:
Note : Providing an instance
The method is
As soon as we wait for the result, we can check the status of our DataBuffer to verify the success of the request:
If the request completes successfully, we return a set of AutocompletePrediction objects , which in theory are the minimum Place object. Since this will not be enough to display useful information to the user, we use
Note : Remember to call the
These Place results will then be returned by activity and displayed as a result of a recyclerview search. Then it works like the Place Picker example , when autocomplete predictions are selected from the list, it returns to MainActivity and displays the saved Places in the list.
I hope that from this article you can conclude how easy the demonstrated services are in implementing and configuring, and I hope you will use them in your applications.
Although the standard one
With the release of Play Services 7.0, Google has made some very useful features available for implementation in our applications - two of which include the Place Picker UI and the Autocomplete component. Both of them can help significantly improve existing solutions in your application, or even help you implement similar features in your future applications. In any case, providing native and clean solutions in such frequently used functions will greatly help to improve the quality of experience that your application offers.
Taking into account the fact that I have not had the opportunity to implement any of these functions since their release, I decided that it was time to take a close look at them.
Together with this article, I created an application that allowed me to experiment with these functions - you can find the code on github at the link .
Customization
Since you are still reading this here, I suggest that you want to try these components in person. So, before you put on your java hat and write code, you need to start by adding the play-services-location dependency to your build.gradle file.
compile 'com.google.android.gms:play-services-location:8.1.0'Note: In case you are not familiar with the format used, you just need to declare the dependency of the play service that you will use. For more information, I recommend that you read this guide .
In addition, you will also need to register an API key when using location services, which can be done in the next guide.. Once you are done with the registration, you will need to add the API key and the version of play services in your manifest file, as shown below:
Place picker
A place picker widget is a user interface component that provides the ability to interact with an interactive map based on the current geographic location of the device. This map can be used to select nearby places in one of two ways:
- Selecting the current location - The user can move the map displayed on the screen to select a place if the automatically selected one does not suit him.
- Selecting a place nearby - The user can select a place from the list of places nearby his current location, this list can be opened by dragging from the bottom of the map.
Map selection
List selection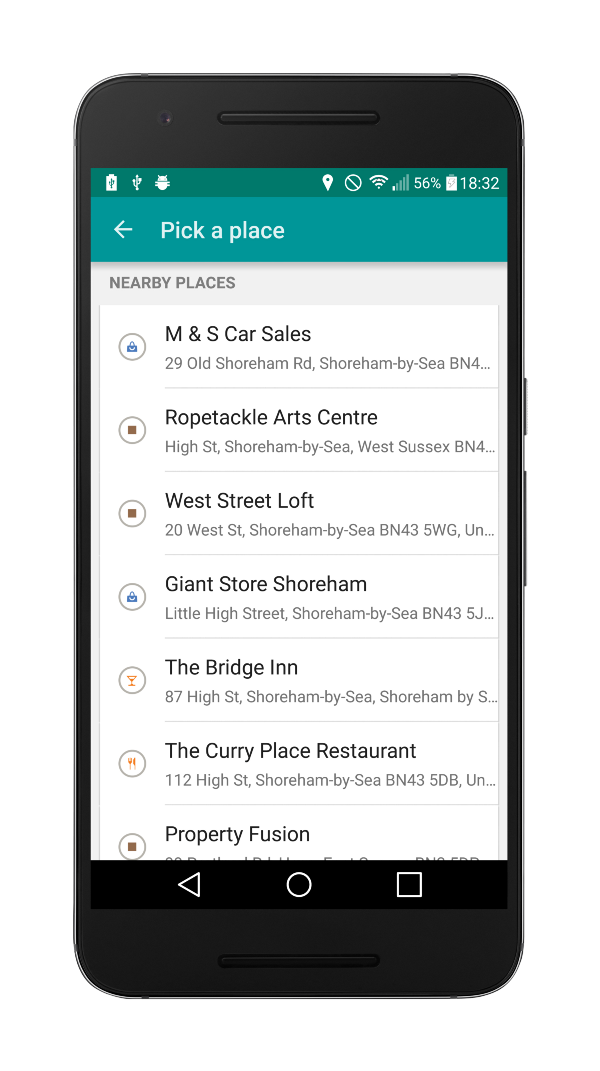
The obvious question is, “Why should we use this?”
- Development time is significantly reduced - Components come ready-to-go out of the box, which means that all functions (map, places, life cycle, network requests, etc.) are completely controlled by the widget. Compared to how this can be done manually, time is reduced tremendously.
- Consistent use experience - Using this component not only by Google, but also by third-party developers (like you) makes user experience much easier, since this component is already familiar to them, which eliminates unnecessary time to study working with it.
Operational process
So, now we know what we are dealing with, everything looks as if we are ready to start. There are several important operations that are always present in the Place Picker life cycle, which we will now familiarize ourselves with.
- Opening Place Picker using the startActivityForResult () method, the moment when we catch the selected place returned by our activity.
- The next step is to decide on the initial location on the map. If the place is provided in advance, we use it, otherwise the current position of the device will be selected.
- Whether the user selects a place on the map or from a list of places nearby, or closes the place picker without making a choice.
- Once the choice is made, the place picker is completed and the result (the selected place) is returned to our activity.
Place Picker Operational Process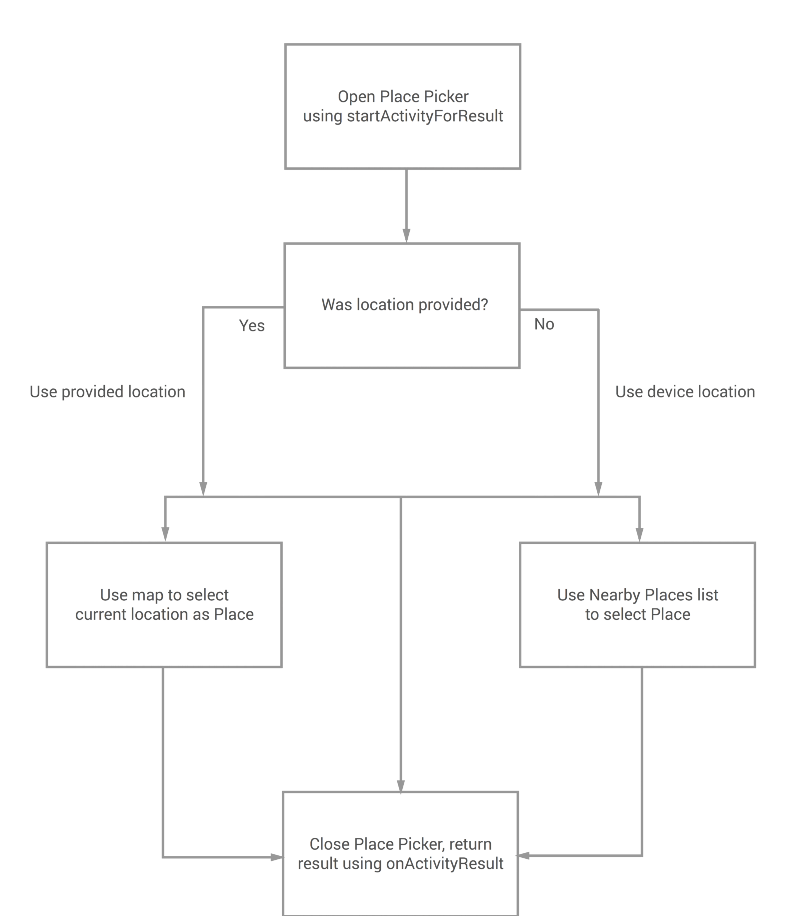
Implementation
To get started, we need to create a new instance of builder using the IntentBuilder from the Place Picker class.
PlacePicker.IntentBuilder builder = new PlacePicker.IntentBuilder();
Using this builder, we can set the initial boundaries of the latitude-dogota that will be used by the instance of the place picker. As mentioned earlier, if the initial value is not set then by default our place picker will use the current position of the device as
LatLngBounds.builder.setLatLngBounds(new LatLngBounds(...));
Once this is done, we start picker using the method
startActivityForResult(), passing our builder an instance of the place picker and the request code as parameters. As mentioned earlier, the selected Place from Place Picker returns to our activity in onActivityResult, where we use the PLACE_PICKER_REQUEST request code to filter the results.startActivityForResult(builder.build(this), PLACE_PICKER_REQUEST);
When the method is called
startActivityForResult, the place picker widget will open in the new activity. Here the user will make a choice using the current position or the choice of location based on recommendations. As soon as the place picker is closed, ours onActivityResultwill be called:protected void onActivityResult(int requestCode, int resultCode, Intent data) {
if (requestCode == PLACE_PICKER_REQUEST) {
if (resultCode == RESULT_OK) {
Place selectedPlace = PlacePicker.getPlace(data, this);
// Do something with the place
}
}
}
As shown above, we retrieve our selected Place when the activity returns it to us. We do it as follows:
Place selectedPlace = PlacePicker.getPlace(data, this);
At this point, if the user uses the back button to exit the picker widget without selecting a location, then the result will not be returned.
Note : You will need to grant your application the following rights - ACCESS_FINE_LOCATION in order to use the Place Picker widget.
Themes
To stay in one design theme with your application, by default the Place Picker widget will use the colors of your application:
- colorPrimary - Will be used as the color of text and back arrows in the action bar of the application
- colorPrimaryDark - Will be used as the background color for the action bar
Be careful and recheck the set color attributes of the theme.
Beacon Signals
With the play services 7.8, widget place picker can also be used (signals from a nearby beacon beacons ) for determining the current location of the device. This works thanks to a
PlaceIddetected beacon ( beacon ) along with other detected signals that are available to the device (network, wifi, etc.). Based on the collected geodata, a list of recommendations will be built to display to the user as 'Nearby Places' in the Place Picker component.Place autocomplete
Place Autocomplete - a new component that can be used to return a list of recommended places nearby based on a search query, where the result is offset from the current location of the device. Previously, in order to achieve this result, it was necessary to directly call the Place API, but now the same thing can be done automatically by wrapping GoogleApiClient.
First, we must create a new instance of the GoogleApiClient class. To do this, we will use the GoogleApiClient builder, where we also need to indicate that we want to use the Places API:
mGoogleApiClient = new GoogleApiClient.Builder(this)
        .enableAutoManage(this, 0, this)
        .addApi(Places.GEO_DATA_API)
        .build();
As a result of the search query, the current position will make a request to the Auto Complete API using this instance.
Since RxJava is currently part of my workflow, I decided to implement this with observables. I suggest you look at the completed class to understand the code:
- We are starting to use the Places API to retrieve predictions autocomplete list based on search queries provided and latitude-longitude boundaries.
PendingResult results =
        Places.GeoDataApi.getAutocompletePredictions(
                             mGoogleApiClient, query, bounds, null);
Note : Providing an instance
LatLngBoundsdoes not limit the results to these limits. Results will be biased within the limits provided, which means that nearby places will be given higher priority. The method is
PendingResultused to receive data from Google Play Services by accessing the API. We do this using a method await()to give PendingResultsome time to return data to us.AutocompletePredictionBuffer autocompletePredictions =
results.await(60, TimeUnit.SECONDS);
As soon as we wait for the result, we can check the status of our DataBuffer to verify the success of the request:
final Status status = autocompletePredictions.getStatus();
if (!status.isSuccess()) {
    autocompletePredictions.release();
    subscriber.onError(null);
} else {
    for (AutocompletePrediction place : autocompletePredictions) {
        subscriber.onNext(
                new AutocompletePlace(
                        place.getPlaceId(),
                        place.getDescription()
                ));
    }
    autocompletePredictions.release();
    subscriber.onCompleted();
}
If the request completes successfully, we return a set of AutocompletePrediction objects , which in theory are the minimum Place object. Since this will not be enough to display useful information to the user, we use
placeIdto get the full Place object with the API. This is done by linking requests to our observable stream, where we get place this way:final PendingResult placeResult =
Places.GeoDataApi.getPlaceById(mGoogleApiClient, id);
placeResult.setResultCallback(new ResultCallback() {
@Override
public void onResult(PlaceBuffer places) {
if (!places.getStatus().isSuccess()) {
places.release();
subscriber.onError(new Throwable(...));
} else {
subscriber.onNext(
PointOfInterest.fromPlace(places.get(0)));
places.close();
subscriber.onCompleted();
}
}
});
Note : Remember to call the
releaseinstance of PlaceBuffer . These Place results will then be returned by activity and displayed as a result of a recyclerview search. Then it works like the Place Picker example , when autocomplete predictions are selected from the list, it returns to MainActivity and displays the saved Places in the list.
conclusions
I hope that from this article you can conclude how easy the demonstrated services are in implementing and configuring, and I hope you will use them in your applications.
Although the standard one
MapViewis still used in many different situations (mainly for finer tuning and enhanced functionality, Place Picker will be useful in cases when you do not need any advanced features. The same applies to the Autocomplete component). again, you can manually implement the API call for recommendations on the basis of geo-data, but using GoogleApiClientit is much easier to do. Having said that, I believe that the components provided in the Play Services will be enough for most dressing ednevnyh tasks.