Simple graphical editor using OpenCV
In this article I will tell you how to quickly and easily write an image editor in C ++ using the opencv computer vision library. Implemented effects such as saturation, exposure, sharpness, contrast and others. No magic!
Attention! Under the cat there are a lot of graphics and code.
So, let's begin…
Ingredients:
- HSV color system,
- “split”
function , - “merge” layer merge function.
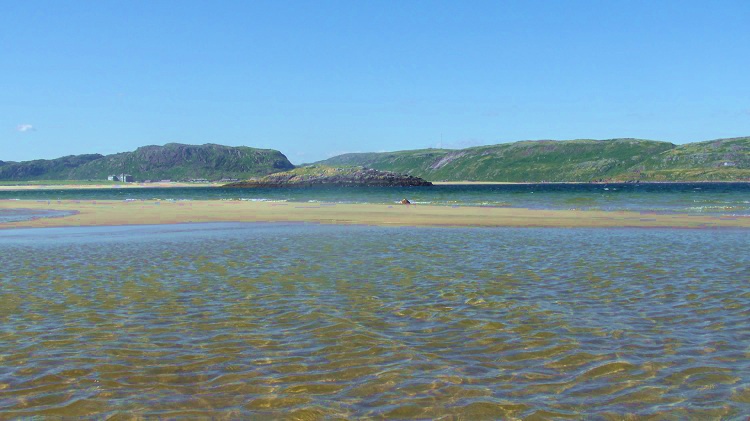
To change the saturation, the image is converted to the HSV color system and divided into layers. A step is added to the values of the Sature layer. Layers are merged. Everything is simple:

Ingredients:
- HSV color system,
- split, merge function, as well as LUT
histogram conversion function , - histogram transformed by x + sin (x * 0.01255) * step * 10 function,
- protection against overflow of histogram byte values .
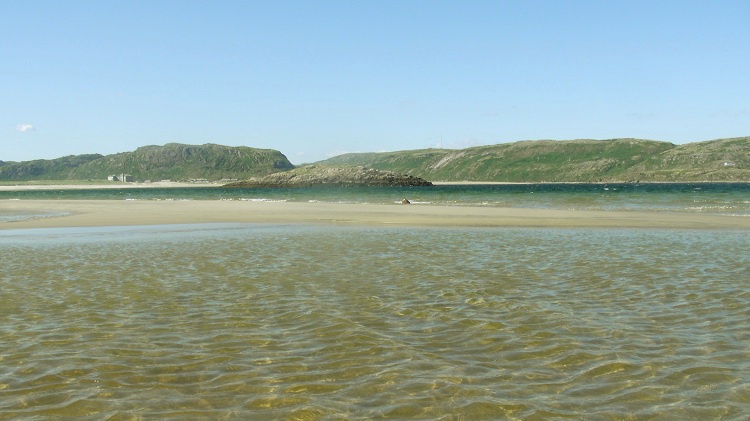
As in the case of saturation, the image is converted to HSV and divided into layers. For the “Value” layer, we perform the conversion using the histogram defined by the function i + sin (i * 0.01255) * step * 10. At the same time, do not forget to protect ourselves from overflowing the byte number.

Graph of the function x + sin (x * 0.01255) * step * 10
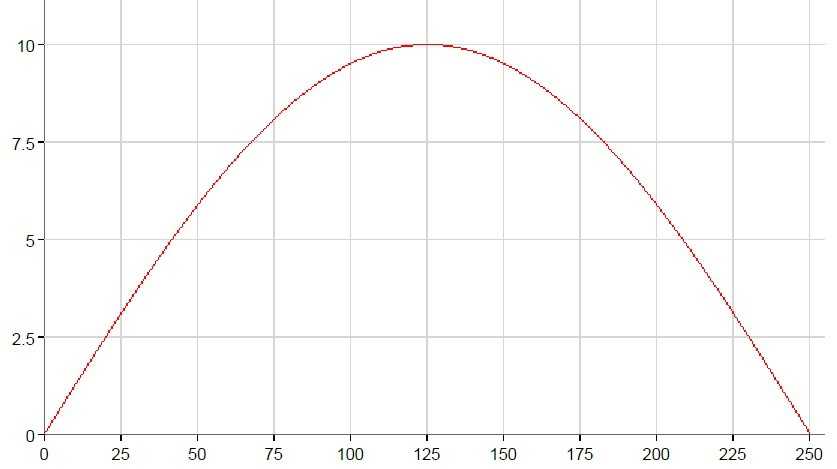
The function mainly affects the middle of the range.
Ingredients:
- RGB color system,
- split, merge and LUT
function , - histograms converted by the exposure function for red, blue and green channels,
- protection against overflow of histogram values.
The hue parameter characterizes the presence in the image of green and purple. In the RGB color system, you can control the green layer, but you must remember to compensate for the drop in brightness of the other two layers. To convert the red and blue layers, the positive exposure gamma function is used, for the green, negative.

Ingredients: the same as in the shade, but the histograms for red and green are positive, and for the blue layer double negative.
Color temperature characterizes the presence of yellow and blue colors in the image. So we will "twist" the blue.
Ingredients:
- HSV color system,
- split, merge, LUT
function , - shadow histogram converted by function (0.36811145 * e) ^ (- (x ^ 1.7)) * 0.2x * step,
- light histogram , transformed by the function (0.36811145 * e) ^ (- (256 - x) ^ 1.7) * 0.2 (256-x) * step,
- protection against overflow of the histogram values.
The “light” parameter characterizes the brightness of the bright areas of the image, and the “shadow” parameter characterizes the brightness of the dark areas. We will transform the channel of brightness.
 "alt =" image "/>
On the chart, the shadow conversion function is indicated by the red line, the light function by the green line.
Ingredients:
- RGB color system,
- "split", "merge", "LUT" function,
- contrast level "(100 + step) / 100",
- contrast histogram obtained from the formula ((x / 255 - 0.5) * constrastLevel + 0.5) * 255.
Contrast is determined by the difference in brightness. Those. to increase the contrast, we need to expand the range of brightness from the center to the edges. Conversion is performed for all layers.

The red line is high contrast, the green line is low.

Ingredients:
- blur function "blur",
- convolution matrix, with calculated coefficients,
- conversion function of convolution matrix "filter2D",
- copy of the image.
Sharpness (sharpness) is determined by the selection of individual elements, their contours. The inverse of sharpness is the blur.
In opencv, we use the blur function to blur the image, which takes as its parameters the source image, output image, and the size of the blur matrix. The blur strength depends on the size of the blur matrix. This size must be even so as not to manually indicate the center of the matrix.
The clarity in opencv is easiest to increase using a convolution matrix, using a special matrix for this. The filter2D function, which receives the original image, the resulting image, the number of bits per convolution matrix value, convolution matrix, performs the conversion directly. So, what the up / down method will look like.

Almost no magic. Well, magic numbers were found empirically, so instead of them you can use your own, the most suitable.
Link to the demo application.
Attention! Under the cat there are a lot of graphics and code.
So, let's begin…
Saturation
Ingredients:
- HSV color system,
- “split”
function , - “merge” layer merge function.
To change the saturation, the image is converted to the HSV color system and divided into layers. A step is added to the values of the Sature layer. Layers are merged. Everything is simple:
Saturation
void CImageEditor::Sature(int step)
{
	try
	{
		std::vector hsv;
		cv::cvtColor(*m_imgEdit, *m_imgEdit, cv::ColorConversionCodes::COLOR_RGB2HSV_FULL);
		cv::split(*m_imgEdit, hsv);
		hsv[1] += step * 5;
		cv::merge(hsv, *m_imgEdit);
		cv::cvtColor(*m_imgEdit, *m_imgEdit, cv::ColorConversionCodes::COLOR_HSV2RGB_FULL);
	}
	catch (Exception ex)
	{
	}
}
Exposition
Ingredients:
- HSV color system,
- split, merge function, as well as LUT
histogram conversion function , - histogram transformed by x + sin (x * 0.01255) * step * 10 function,
- protection against overflow of histogram byte values .
As in the case of saturation, the image is converted to HSV and divided into layers. For the “Value” layer, we perform the conversion using the histogram defined by the function i + sin (i * 0.01255) * step * 10. At the same time, do not forget to protect ourselves from overflowing the byte number.
Exposition
void CImageEditor::Expo(int step)
{
	try
	{
		std::vector hsv;
		cv::cvtColor(*m_imgEdit, *m_imgEdit, cv::ColorConversionCodes::COLOR_RGB2HSV_FULL);
		Mat lut = GetGammaExpo(step);
		cv::split(*m_imgEdit, hsv);
		cv::LUT(hsv[2], lut, hsv[2]);
		cv::merge(hsv, *m_imgEdit);
		cv::cvtColor(*m_imgEdit, *m_imgEdit, cv::ColorConversionCodes::COLOR_HSV2RGB_FULL);
	}
	catch (Exception ex)
	{
	}
}
cv::Mat CImageEditor::GetGammaExpo(int step)
{
	Mat result(1, 256, CV_8UC1);
	uchar* p = result.data;
	for (int i = 0; i < 256; i++)
	{
		p[i] = AddDoubleToByte(i, std::sin(i * 0.01255) * step * 10);
	}
	return result;
}
byte CImageEditor::AddDoubleToByte(byte bt, double d)
{
	byte result = bt;
	if (double(result) + d > 255)
		result = 255;
	else if (double(result) + d < 0)
		result = 0;
	else
	{
		result += d;
	}
	return result;
}
Graph of the function x + sin (x * 0.01255) * step * 10
The function mainly affects the middle of the range.
Hue
Ingredients:
- RGB color system,
- split, merge and LUT
function , - histograms converted by the exposure function for red, blue and green channels,
- protection against overflow of histogram values.
The hue parameter characterizes the presence in the image of green and purple. In the RGB color system, you can control the green layer, but you must remember to compensate for the drop in brightness of the other two layers. To convert the red and blue layers, the positive exposure gamma function is used, for the green, negative.
Hue
void CImageEditor::Hue(int step)
{
	try
	{
		std::vector rgb;
		Mat lut0 = GetGammaExpo(step), lut1 = GetGammaExpo(-step), lut2 = GetGammaExpo(step);
		cv::split(*m_imgEdit, rgb);
		LUT(rgb[0], lut0, rgb[0]);
		LUT(rgb[1], lut1, rgb[1]);
		LUT(rgb[2], lut2, rgb[2]);
		cv::merge(rgb, *m_imgEdit);
	}
	catch (Exception ex)
	{
	}
}
Colour temperature
Ingredients: the same as in the shade, but the histograms for red and green are positive, and for the blue layer double negative.
Color temperature characterizes the presence of yellow and blue colors in the image. So we will "twist" the blue.
Colour temperature
void CImageEditor::Temperature(int step)
{
	try
	{
		std::vector rgb;
		Mat lut0 = GetGammaExpo(-step*2), lut1 = GetGammaExpo(step), lut2 = GetGammaExpo(step);
		cv::split(*m_imgEdit, rgb);
		LUT(rgb[0], lut0, rgb[0]);
		LUT(rgb[1], lut1, rgb[1]);
		LUT(rgb[2], lut2, rgb[2]);
		cv::merge(rgb, *m_imgEdit);
	}
	catch (Exception ex)
	{
	}
}
Light and shade
Ingredients:
- HSV color system,
- split, merge, LUT
function , - shadow histogram converted by function (0.36811145 * e) ^ (- (x ^ 1.7)) * 0.2x * step,
- light histogram , transformed by the function (0.36811145 * e) ^ (- (256 - x) ^ 1.7) * 0.2 (256-x) * step,
- protection against overflow of the histogram values.
The “light” parameter characterizes the brightness of the bright areas of the image, and the “shadow” parameter characterizes the brightness of the dark areas. We will transform the channel of brightness.
On the chart, the shadow conversion function is indicated by the red line, the light function by the green line.
Light and shade
void CImageEditor::White(int step)
{
	try
	{
		std::vector hsv;
		cv::cvtColor(*m_imgEdit, *m_imgEdit, cv::ColorConversionCodes::COLOR_RGB2HSV_FULL);
		cv::split(*m_imgEdit, hsv);
		Mat lut = GetGammaLightShadow(step, true);
		LUT(hsv[2], lut, hsv[2]);
		cv::merge(hsv, *m_imgEdit);
		cv::cvtColor(*m_imgEdit, *m_imgEdit, cv::ColorConversionCodes::COLOR_HSV2RGB_FULL);
	}
	catch (Exception ex)
	{
		AfxMessageBox(CString(CStringA(ex.msg.begin())));
		throw;
	}
}
void CImageEditor::Shadow(int step)
{
	try
	{
		std::vector hsv;
		cv::cvtColor(*m_imgEdit, *m_imgEdit, cv::ColorConversionCodes::COLOR_RGB2HSV_FULL);
		cv::split(*m_imgEdit, hsv);
		Mat lut = GetGammaLightShadow(step, false);
		LUT(hsv[2], lut, hsv[2]);
		cv::merge(hsv, *m_imgEdit);
		cv::cvtColor(*m_imgEdit, *m_imgEdit, cv::ColorConversionCodes::COLOR_HSV2RGB_FULL);
	}
	catch (Exception ex)
	{
		AfxMessageBox(CString(CStringA(ex.msg.begin())));
		throw;
	}
}
Mat CImageEditor::GetGammaLightShadow(int step, bool reverse)
{
	Mat result(1, 256, CV_8UC1);
	for (int i = 0; i < 256; i++)
	{
		*(result.data + i) = AddDoubleToByte(i, std::pow(0.36811145*M_E,
			-std::pow(abs((reverse ? 256 : 0) - i), 1.7))*0.2*step*abs((reverse ? 256 : 0) - i));
	}
	return result;
}
Contrast
Ingredients:
- RGB color system,
- "split", "merge", "LUT" function,
- contrast level "(100 + step) / 100",
- contrast histogram obtained from the formula ((x / 255 - 0.5) * constrastLevel + 0.5) * 255.
Contrast is determined by the difference in brightness. Those. to increase the contrast, we need to expand the range of brightness from the center to the edges. Conversion is performed for all layers.
Contrast
void CImageEditor::Contrast(int step)
{
	try
	{
		std::vector rgb;
		cv::split(*m_imgEdit, rgb);
		Mat lut(1, 256, CV_8UC1);
		double contrastLevel = double(100 + step) / 100;
		uchar* p = lut.data;
		double d;
		for (int i = 0; i < 256; i++)
		{
			d = ((double(i) / 255 - 0.5)*contrastLevel + 0.5) * 255;
			if (d > 255)
				d = 255;
			if (d < 0)
				d = 0;
			p[i] = d;
		}
		LUT(rgb[0], lut, rgb[0]);
		LUT(rgb[1], lut, rgb[1]);
		LUT(rgb[2], lut, rgb[2]);
		cv::merge(rgb, *m_imgEdit);
	}
	catch (Exception ex)
	{
		AfxMessageBox(CString(CStringA(ex.msg.begin())));
		throw;
	}
}
The red line is high contrast, the green line is low.
Sharpness
Ingredients:
- blur function "blur",
- convolution matrix, with calculated coefficients,
- conversion function of convolution matrix "filter2D",
- copy of the image.
Sharpness (sharpness) is determined by the selection of individual elements, their contours. The inverse of sharpness is the blur.
In opencv, we use the blur function to blur the image, which takes as its parameters the source image, output image, and the size of the blur matrix. The blur strength depends on the size of the blur matrix. This size must be even so as not to manually indicate the center of the matrix.
The clarity in opencv is easiest to increase using a convolution matrix, using a special matrix for this. The filter2D function, which receives the original image, the resulting image, the number of bits per convolution matrix value, convolution matrix, performs the conversion directly. So, what the up / down method will look like.
Sharpness
void CImageEditor::Clarity(int step)
{
	try
	{
		if (step < 0)
		{
			cv::blur(*m_imgEdit, *m_imgEdit, cv::Size(-step * 2 + 1, -step * 2 + 1));
		}
		else
		{
			Mat dst = m_imgEdit->clone();
			float matr[9] {
				-0.0375 - 0.05*step, -0.0375 - 0.05*step, -0.0375 - 0.05*step,
				-0.0375 - 0.05*step, 1.3 + 0.4*step, -0.0375 - 0.05*step,
				-0.0375 - 0.05*step, -0.0375 - 0.05*step, -0.0375 - 0.05*step
			};
			Mat kernel_matrix = Mat(3, 3, CV_32FC1, &matr);
			cv::filter2D(*m_imgEdit, dst, 32, kernel_matrix);
			m_imgEdit = make_shared(dst);
		}
	}
	catch (Exception ex)
	{
		AfxMessageBox(CString(CStringA(ex.msg.begin())));
		throw;
	}
}
Total
Almost no magic. Well, magic numbers were found empirically, so instead of them you can use your own, the most suitable.
Link to the demo application.