Google Faces API Example
Not so long ago, Google released version 7.8 of the Google Play Services library. Among the major innovations is the new Mobile Vision API, which consists of two large components: the Barcode API, for scanning and recognizing various barcodes and QR codes, and the updated Faces API, for searching and tracking faces in pictures. Under the cat, we will get acquainted with the Faces API, consider its main features and write a small application.
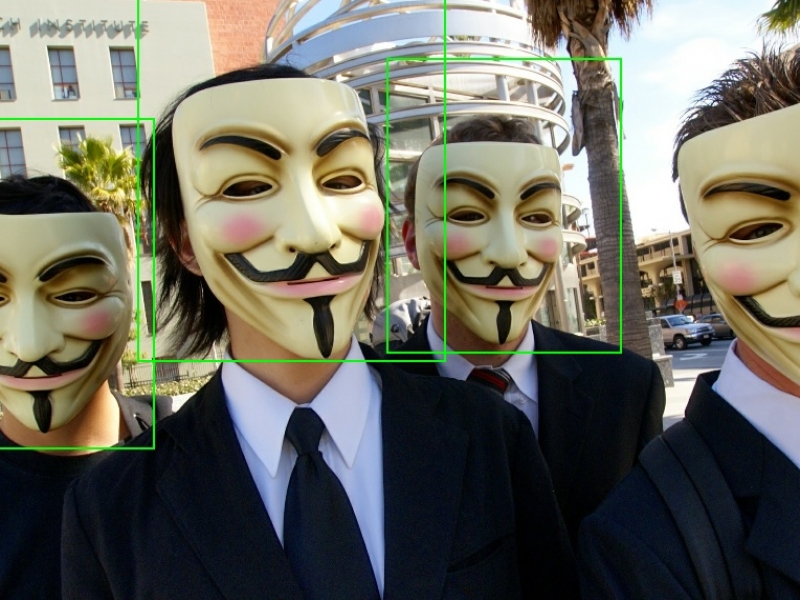
The Faces API provides the ability to detect and track human faces in ready-made images and streams coming from the device’s camera. It copes with this task quite tolerably: Although in complex cases, algorithm failures are possible:

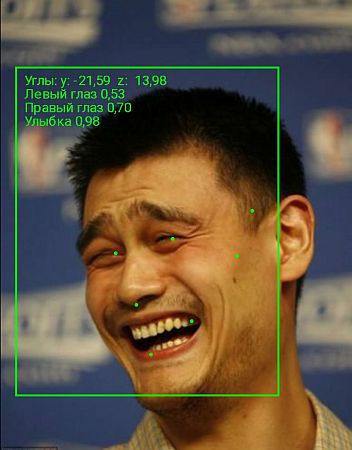
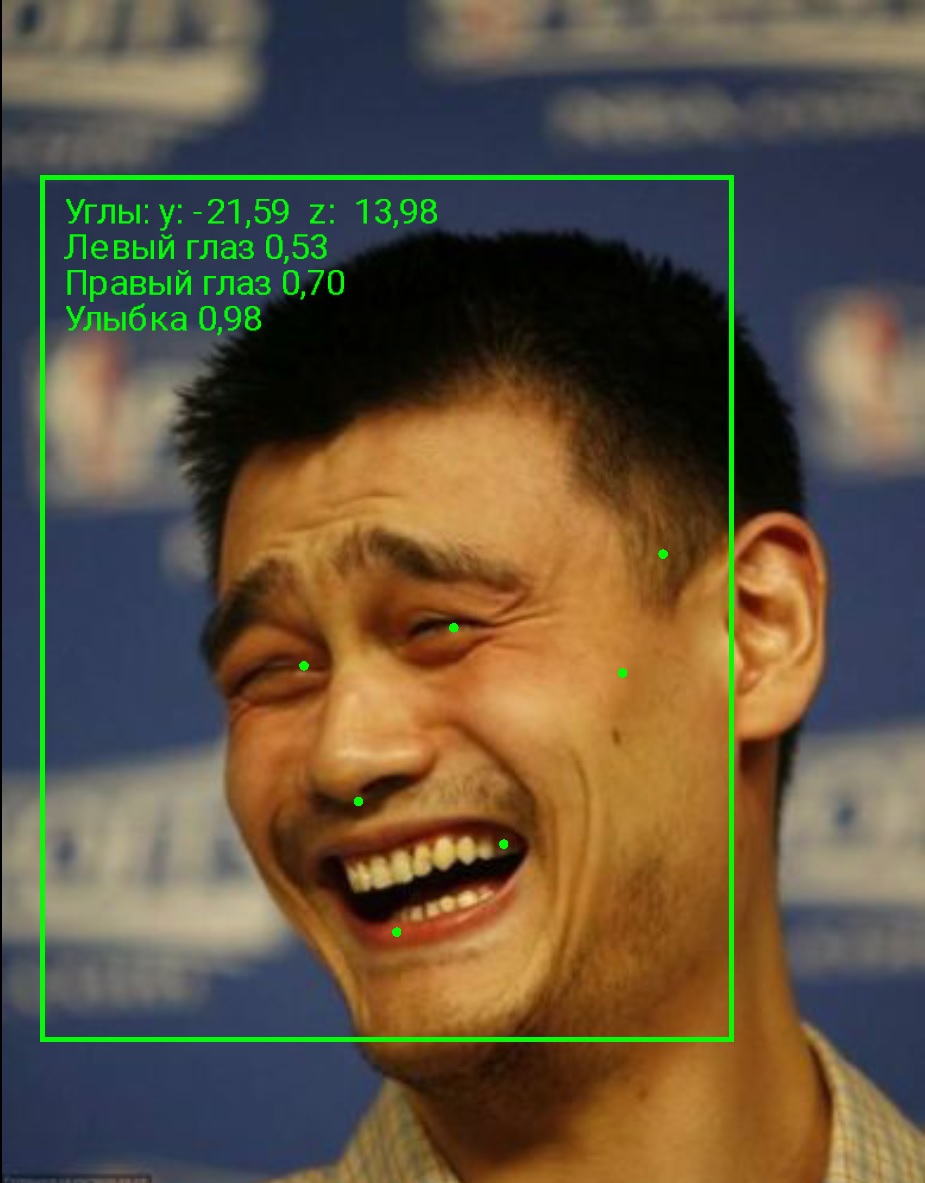
In addition to simple tracking, the library can determine the orientation of the face in space, calculate the position of the main points of the face (nose, eyes, corners of the mouth) and make simple recognition: determine the likelihood that the person’s eyes are open and the likelihood of a smile: But enough of an introduction, let's move on to practice . Every minute, Instagram users upload 216 thousand photos
. By pointing a finger at the sky, suppose that 40% of them are selfies. This is 1440 pieces per second! Let's try to join the trend and make a small application for automating selfies. Few people like sour mines, so we will only shoot smiling faces. An attentive reader will ask, but what is automation? It's simple: in order not to force users to search for the shutter button by touch, we will automatically take a picture after a person just winks at the camera.
As a basis we will use official examples of Vision API from Google. For simplicity, questions of rendering frames from the camera are omitted. Those interested can look at the source on the github .
To connect the Faces API to your project, just specify the dependency in the gradle script:
First, make an instance of the detector. Selfies are most often purely individual matters, so we will only track the face of one person:
We create the brains of our detector - the processing algorithm. The detector needs a factory that will create an instance of the handler for each face found.Using a bunch of tweaks in front of the phone’s front camera, it was empirically determined: a more or less adequate smile in the photo has a value of 0.4 or higher, and a wink can be formalized as follows: “the probabilities that the eyes are open for the right and left eyes differ by more than 0.6” . Well, we implement this algorithm in our handler:
We pass a factory instance to our detector:
Now all that remains is to simply create and start to start the stream from the camera. Important! Do not forget to stop the camera correctly when we no longer need it. Otherwise, the camera will remain locked, and not a single application will get access to it until the phone restarts.
So. We compile. We start. We try on colleagues.Everything works. Fix bugs. We try on colleagues. Everything works.

In general, the Faces API leaves a pleasant impression for both the developer and the user. Developers will like the simplicity and ease of development, and users will like the speed and quality of work. We look forward to more applications with face recognition in the Play Store.
Useful links:
Documentation from Google
Application sources
The Faces API provides the ability to detect and track human faces in ready-made images and streams coming from the device’s camera. It copes with this task quite tolerably: Although in complex cases, algorithm failures are possible:

 First kind error |  Error of the second kind |
In addition to simple tracking, the library can determine the orientation of the face in space, calculate the position of the main points of the face (nose, eyes, corners of the mouth) and make simple recognition: determine the likelihood that the person’s eyes are open and the likelihood of a smile: But enough of an introduction, let's move on to practice . Every minute, Instagram users upload 216 thousand photos
. By pointing a finger at the sky, suppose that 40% of them are selfies. This is 1440 pieces per second! Let's try to join the trend and make a small application for automating selfies. Few people like sour mines, so we will only shoot smiling faces. An attentive reader will ask, but what is automation? It's simple: in order not to force users to search for the shutter button by touch, we will automatically take a picture after a person just winks at the camera.
As a basis we will use official examples of Vision API from Google. For simplicity, questions of rendering frames from the camera are omitted. Those interested can look at the source on the github .
To connect the Faces API to your project, just specify the dependency in the gradle script:
compile 'com.google.android.gms:play-services-vision:7.8.0'
First, make an instance of the detector. Selfies are most often purely individual matters, so we will only track the face of one person:
FaceDetector detector = new FaceDetector.Builder(context)
                 // Включаем расчет для глаз и улыбки
                .setClassificationType(FaceDetector.ALL_CLASSIFICATIONS)
                // Только "главное" лицо в кадре
                .setProminentFaceOnly(true)
                .setTrackingEnabled(true)
                .build();
We create the brains of our detector - the processing algorithm. The detector needs a factory that will create an instance of the handler for each face found.
private class GraphicFaceTracker extends Tracker {
    @Override
    public void onUpdate(FaceDetector.Detections detectionResults, Face face) {
        boolean isSmiling = face.getIsSmilingProbability() > 0.4;
        if (isSmiling) {
            float leftEye = face.getIsLeftEyeOpenProbability();
            float rightEye = face.getIsRightEyeOpenProbability();
            if (Math.abs(leftEye - rightEye) >= 0.6) {
                takeShot();  // Делаем снимок
            }
        }
    }
}
private class GraphicFaceTrackerFactory implements MultiProcessor.Factory {
        @Override
        public Tracker create(Face face) {
            return new GraphicFaceTracker();
        }
    }
We pass a factory instance to our detector:
        GraphicFaceTrackerFactory trackerFactory = new GraphicFaceTrackerFactory();
        MultiProcessor processor = new MultiProcessor.Builder<>(trackerFactory).build();
        detector.setProcessor(processor);
Now all that remains is to simply create and start to start the stream from the camera. Important! Do not forget to stop the camera correctly when we no longer need it. Otherwise, the camera will remain locked, and not a single application will get access to it until the phone restarts.
CameraSource cameraSource = new CameraSource.Builder(context, detector)
                .setFacing(CameraSource.CAMERA_FACING_FRONT)
                .build().start();
So. We compile. We start. We try on colleagues.
In general, the Faces API leaves a pleasant impression for both the developer and the user. Developers will like the simplicity and ease of development, and users will like the speed and quality of work. We look forward to more applications with face recognition in the Play Store.
Useful links:
Documentation from Google
Application sources