Work with lighting in Unity - theory and practice
In video games, beautiful real-time lighting has a huge impact on performance, which is especially noticeable on mobile devices. Thus, developers are forced to look for workarounds for this problem. Lightmapping is a technology that stores information about lighting in a texture, which allows you to free up computing resources for other needs.
In this article, I will introduce the reader to the theory of lighting in games, describe the process of creating a lightmap in Unity 5, and share some tips.
Over the past couple of years I had to work a lot with “lightmapping” both at work and on my own indie project. When your team has few production resources and you can’t allocate a lot of time to create unique graphics for game locations, lighting becomes one of the key factors that help to revive and diversify the picture.
Let's define the terminology. Lighting in computer graphics is divided, relatively speaking, into two categories:
There are many methods for calculating reflected light, the two most famous being Global Illumination (GI) and Final Gather (FG). They can be used individually, but together they give an especially good result. However, you have to pay for everything: the render, that is, the process of calculating complex lighting and its subsequent visualization, will take a lot of time.
Global illumination(GI) is the most “honest” way to simulate reflected light. Photons fly out from the light source - particles carrying information about the color and brightness of the light. Hitting a surface, they illuminate it, but lose some of the energy, as a result of which their color and brightness change. Then the photons bounce off and hit the next surface, repeatedly losing some of the energy. This happens several times depending on the settings of the renderer.
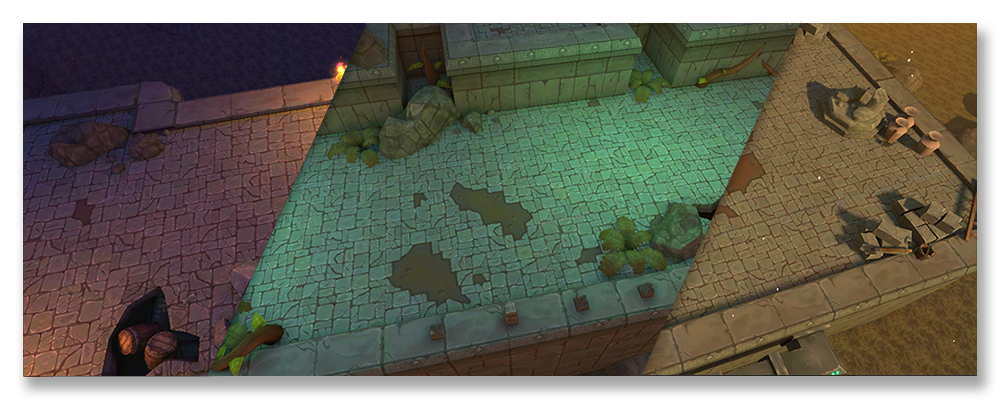
Final gather(FG) scatter points on the stage, - final gather points, - from which rays fly out in different directions. After a collision with any surface, the rays return information on the color and its brightness to the parent point. Imagine this picture: in the evening, the sun has almost gone beyond the horizon; it gets dark, but a small part of the room is still bathed in orange sunset light. The final gather point located on the floor sends several rays in different directions, some of them reach the illuminated part of the room and with this information return to the starting point, thereby slightly illuminating the floor with "reflected" orange light. This is not such an “honest” way as GI, but it produces a good result, and it is often used to fill scenes with beautiful soft lighting.
For the next picture, I twisted the parameters of the reflected light to insane values, so you can clearly see how the particles of light bounce off objects.

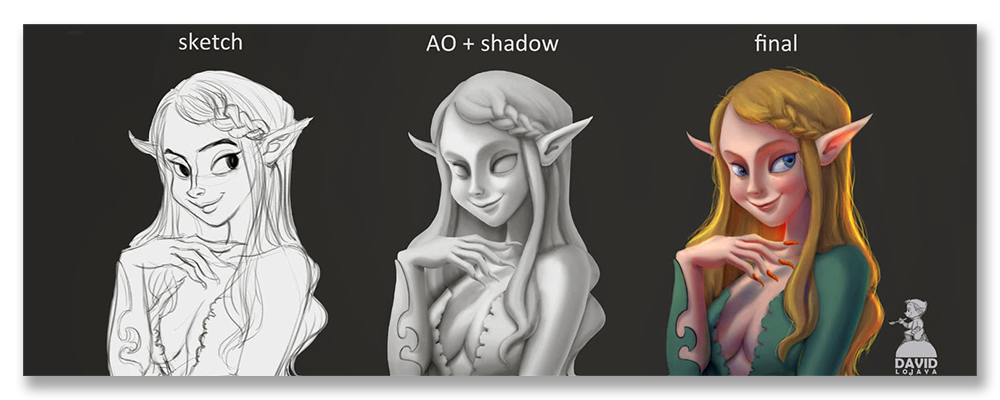
In addition to reflected light, we are also interested in the so-called Ambient Occlusion (AO). This is the effect of shading in corners, cracks, narrow openings. Imagine that a ray of light flies into a corner of a room, it is reflected several times from both walls, gradually fading. The farther into the corner, the less light gets there.
As a rule, Ambient Occlusion is used to artistically emphasize the effect of shading - in reality, the rays of light do not lose energy so quickly that in the corners of the room the darkness is as thick as shown in games. If you render physically correct lighting, your engine itself calculates the rate of energy loss by a ray of light, and you do not need to render the Ambient Occlusion map (texture) separately. But you can do this if necessary to implement an artistic design.

By the way, I had to: some digital 2d artists like to imitate this effect while painting, and in general, the process of their work is very similar to how they create 3d graphics.
The next term you should know is texture satin . Roughly speaking, this is one large texture that contains several small textures. Most often, texture atlases are created to save computing resources. Let me give you an extremely simplified example - specialists, hide torches and pitchforks! Suppose you have a tavern in the game, in which 20 wooden objects (tables, chairs, spoons ...), each has its own texture. As a result, the CPU will access the GPU 20 times, requiring each object to be rendered individually. If we assign all the wooden objects one material, referring to one texture atlas, in which all 20 textures are sewn, then the GPU will be able to render 20 objects in one call (it is draw call, at the end of the article I will provide interesting links on this topic).
In the case of “light mapping”, an additional small texture is created for each object, in which information about lighting is “baked”. Then many, many small textures of different objects are placed in large texture atlases. As with wooden furniture, we also get a performance boost.
But back to the lightmapping in Unity itself. First of all, be patient and, if possible, a powerful computer. The rendering process tends to completely occupy the processor and RAM, so I turn it on before I go to work or go to sleep. Thus, I return to the computer just at the moment when the render is already completed.
Looking ahead, I warn you that Unity caches intermediate results of lighting calculations. If you see that you have lost 10 gigabytes of space on the system drive, this is it. To configure the cache, go to: Edit - Preferences - GI Cache. Here you can indicate where it is stored and its maximum size. You can remove the compression, “weigh” will be more, but work faster. You can immediately clear the cache, but keep in mind that if you have a scene open with a ready lightmap, it will also be deleted, be careful.
There are 5 types of light sources available in Unity:
In Unity, all objects are divided into dynamic ( static ) and static (static). Static objects are those that always stand still and do not move anywhere. It is for them that the “baking" of lighting occurs. Dynamic objects are those that, on the contrary, are in motion. This includes such elements of the scene as a hero, a monster, a waving flag, a stone falling from a cliff. Lightmapping is not suitable for these objects; they are illuminated either by real-time light sources or by means of light probes, which I will discuss in addition at the end of the article.
I want to draw attention to how key the settings of the light sources are (the available settings vary depending on the type of light source):

The window for lighting the scene is called through Window - Lighting , and consists of three tabs: Object , Scene , Lightmaps . To start the lighting rendering, use the Build button at the very bottom of the window. There is also a checkmark Auto, which automatically launches a render every time you make changes to the scene; use it if you have a powerful computer. Below is information about the number and size of “lightmaps” that will appear at the end of the “lightmapping” process.
In ObjectThe settings for a specific object are displayed. If you select an environment element in your scene, then you will see a number of settings and parameters. Provided that the object is static, a checkmark will be checked on the Lightmap Static checkbox. Most often you will use the Scale in Lightmap field here. As I said earlier, for each object, the lighting is “baked” into a separate small texture, which is then placed in a large “lightmap” atlas. With the Scale in Lightmap parameter, you can adjust how much space this texture will occupy. Of course, the less space allocated to it, the worse the quality of the “baked” lighting in it will be. The default value is “1”, but if you know that the object will rarely fall into the field of view or it is located far from the background, you can safely reduce this parameter down to 0.1 or even less.
The Scene located render settings key lighting. I tell the basics of working with light, and also share the experience of “lightmapping” specifically for mobile platforms, so I deliberately miss things like realtime GI or using an HDR texture as a light source.
In Ambient Source, you set up the Ambient Light fill source, which I already mentioned. You are invited to choose between a sky texture, a sky from a single color, as well as a sky created on the basis of a color gradient. I prefer to choose Gradient. It allows you to adjust three colors - the dome of the sky, the equator and the earth, which will create a fairly complex and interesting fill light for your scene. Ambient Intensity indicates the brightness of this light. Depending on the artistic intent, you can even have a very bright scene illuminated with one Ambient Light.
The Baked GI tab contains the basic settings for the quality of lighting, both direct and reflected, including both GI and FG.
Before delving into these settings, I want to give one piece of advice. Always keep in mind that when placing light sources on the stage, adjusting shadows and Ambient Light, after rendering the lightmap you will get a completely different picture, only remotely resembling what you did. Therefore, I recommend working with iterations: you set the minimum quality of lighting so that the rendering happens quickly, look at the result of the render, then make changes and start re-rendering. When you are more or less satisfied with the result, you can improve the quality of the render and enable Final Gather. This will take a long time, so it makes sense to include such a render before you leave the computer for a relatively long period of time.
The settings in the Baked GI tab operate with a unit such as texel. In simple terms, a texel is a pixel, but not on the screen, but in the texture space of the three-dimensional model. But don’t bother, it’s hard to say how Unity operates with texels and how they depend on the scale of objects, so simply follow the experimental path. For example, for my mobile RPG I am making a final renderer with a Baked Resolution set to 25.
Below I will talk about each parameter separately, but before that you need to know something else. If you run a lighting render in Unity, then it will be written to the bottom right what exactly the engine is currently busy with. At the very end of the rendering process, Compositing will be written there.
The fact is that the lightmap is generated in layers. During rendering, several separate textures are created. I don’t know which cards Unity makes, but among them there is either all or part of the list: Diffuse (direct light), GI (Global Illumination), FG (Final Gather), AO (Ambient Occlusion) and others. After that, the engine takes these cards and merges with each other. For example, a Diffuse layer can be at the base, an FG layer is placed above it in the Lighten blending mode (just like in Photoshop), and an AO layer is placed higher in the Multiply mode ... As a result, these layers merge into one picture and the final result is “ lightmap. ”
Let's go through the settings that interest us in the General GI tab:
And finally, the fog! Fog, I mean. It has nothing to do with the lighting renderer; it can turn on and off at any time. Everything is extremely simple here, so take and experiment. I can only say that fog is an extremely powerful artistic tool. You can radically change the atmosphere of the scene through the fog, thanks to him the sunny scene will become brighter, darker - darker.
In addition, fog can be used as a tool to increase productivity. For example, you want to turn off the texture of all objects in the distance and hide them behind the fog. In older versions of World of Warcraft, if you played, you couldn't help but notice how dense the fog was.
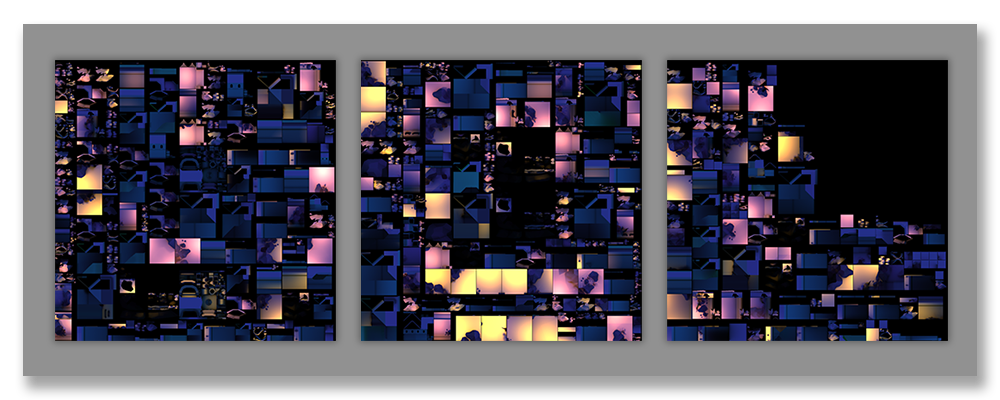
The third section is Lightmaps , where rendered lightmaps will be located. Moreover, if there are a lot of atlases, at the top of the tab you won’t be able to see all the atlases, the scroll in that window is inactive. Therefore, we look at the bottom and scroll the mouse wheel.
Here it is important for us to see how full the last, lowest “lightmap” atlas is. If it is almost empty, then either increase the quality of the lightmap to fill the entire atlas, or decrease so that the atlas is empty and is deleted. The picture below shows two well-filled atlases, and one so far as.
Lightmaps are stored in EXR files with a depth of 32 bits.
I also promised to talk about Light Probes . They are small spheres that absorb information about the lighting of the surrounding space. When there are many such areas, they create a unique map of the illumination of your level or location. They are then used to illuminate dynamic objects into which light is not “baked”.
To better understand their meaning, give an example. There is one Point Light on your stage with Baked settings, that is, it is used to “bake" the light. You do not do it Real-time, because it is expensive in terms of performance, and many mobile devices do not support such a light source at all. Then you “lightmap” the scene and see that your Point Light illuminates the surroundings. But if you take the monster and put it next to the light source, it will remain dark, because it belongs to the class of dynamic objects, and your Point Light affects only static ones.
Now you place a grid of Light Probes around the light source, bake the lighting again. And now your monster can walk around Point Light and be illuminated by it! This is an extremely effective and inexpensive way to simulate lighting. To add “samples” to the scene, go to the Game Object - Light - Light Probe Group . A cube of four spheres appears on the scene. To select individual spheres, use ctrl + click. Several buttons will appear in the Inspector, allowing you to add or remove spheres. You can also use the combination ctrl + D to duplicate spheres.
Arrange Light Probes carefully, place them where you want them to absorb information about lighting, and then transmit it to dynamic objects. To avoid graphic artifacts and flickering light, make sure that Light Probes form an even, beautiful grid.
Below is a screenshot of the correctly set grid. If you look closely, you will notice that Light Probes are not randomly displayed, but surround light sources, trying to effectively catch the transition from light to shadow and back.

Finally, I want to give advice on creating environment models for light mapping. When creating content for the game, I knew which side the game camera would look from, so for the sake of dubious optimization I deleted the back walls of some objects. At that time, I had experience rendering lightmaps, but only in Maya, not Unity. It turned out that when rendering lighting in Unity near objects that have holes, that is, remote polygons, hard, clearly visible artifacts appear. Keep in mind.
In this article, I will introduce the reader to the theory of lighting in games, describe the process of creating a lightmap in Unity 5, and share some tips.
Over the past couple of years I had to work a lot with “lightmapping” both at work and on my own indie project. When your team has few production resources and you can’t allocate a lot of time to create unique graphics for game locations, lighting becomes one of the key factors that help to revive and diversify the picture.
Lighting theory
Reflected light
Let's define the terminology. Lighting in computer graphics is divided, relatively speaking, into two categories:
- Direct Illumination. Direct hit of light rays on the surface.
- Indirect Illumination. Rays are reflected from the surface, scattered and form a soft fill light.
There are many methods for calculating reflected light, the two most famous being Global Illumination (GI) and Final Gather (FG). They can be used individually, but together they give an especially good result. However, you have to pay for everything: the render, that is, the process of calculating complex lighting and its subsequent visualization, will take a lot of time.
Global illumination(GI) is the most “honest” way to simulate reflected light. Photons fly out from the light source - particles carrying information about the color and brightness of the light. Hitting a surface, they illuminate it, but lose some of the energy, as a result of which their color and brightness change. Then the photons bounce off and hit the next surface, repeatedly losing some of the energy. This happens several times depending on the settings of the renderer.
Final gather(FG) scatter points on the stage, - final gather points, - from which rays fly out in different directions. After a collision with any surface, the rays return information on the color and its brightness to the parent point. Imagine this picture: in the evening, the sun has almost gone beyond the horizon; it gets dark, but a small part of the room is still bathed in orange sunset light. The final gather point located on the floor sends several rays in different directions, some of them reach the illuminated part of the room and with this information return to the starting point, thereby slightly illuminating the floor with "reflected" orange light. This is not such an “honest” way as GI, but it produces a good result, and it is often used to fill scenes with beautiful soft lighting.
For the next picture, I twisted the parameters of the reflected light to insane values, so you can clearly see how the particles of light bounce off objects.
Ambient occlusion
In addition to reflected light, we are also interested in the so-called Ambient Occlusion (AO). This is the effect of shading in corners, cracks, narrow openings. Imagine that a ray of light flies into a corner of a room, it is reflected several times from both walls, gradually fading. The farther into the corner, the less light gets there.
As a rule, Ambient Occlusion is used to artistically emphasize the effect of shading - in reality, the rays of light do not lose energy so quickly that in the corners of the room the darkness is as thick as shown in games. If you render physically correct lighting, your engine itself calculates the rate of energy loss by a ray of light, and you do not need to render the Ambient Occlusion map (texture) separately. But you can do this if necessary to implement an artistic design.
By the way, I had to: some digital 2d artists like to imitate this effect while painting, and in general, the process of their work is very similar to how they create 3d graphics.
Texture atlases
The next term you should know is texture satin . Roughly speaking, this is one large texture that contains several small textures. Most often, texture atlases are created to save computing resources. Let me give you an extremely simplified example - specialists, hide torches and pitchforks! Suppose you have a tavern in the game, in which 20 wooden objects (tables, chairs, spoons ...), each has its own texture. As a result, the CPU will access the GPU 20 times, requiring each object to be rendered individually. If we assign all the wooden objects one material, referring to one texture atlas, in which all 20 textures are sewn, then the GPU will be able to render 20 objects in one call (it is draw call, at the end of the article I will provide interesting links on this topic).
In the case of “light mapping”, an additional small texture is created for each object, in which information about lighting is “baked”. Then many, many small textures of different objects are placed in large texture atlases. As with wooden furniture, we also get a performance boost.
Work with Unity
general information
But back to the lightmapping in Unity itself. First of all, be patient and, if possible, a powerful computer. The rendering process tends to completely occupy the processor and RAM, so I turn it on before I go to work or go to sleep. Thus, I return to the computer just at the moment when the render is already completed.
Looking ahead, I warn you that Unity caches intermediate results of lighting calculations. If you see that you have lost 10 gigabytes of space on the system drive, this is it. To configure the cache, go to: Edit - Preferences - GI Cache. Here you can indicate where it is stored and its maximum size. You can remove the compression, “weigh” will be more, but work faster. You can immediately clear the cache, but keep in mind that if you have a scene open with a ready lightmap, it will also be deleted, be careful.
There are 5 types of light sources available in Unity:
- Directional Light . The simplest, simulates sunlight. It is an infinite number of rays parallel to each other.
- Point Light . A point source of light, that is, rays diverge in all directions from one point. A good example of such a light source would be an ordinary light bulb.
- Area Light . A light source having an area. Imagine a rectangular panel from which light comes, this will be area light. Such light sources are most often used in offices, shopping centers and other non-residential premises where large areas need to be illuminated.
- Ambient Light . Fill light with no source. Examples of use: light shadows that are too dark; add atmospheric dungeon, filling it with barely noticeable light of bioluminescent plants.
- Light Probes . A special light source that affects exclusively dynamic objects. Technically, this is not a light source, but for simplicity we will call it that.
In Unity, all objects are divided into dynamic ( static ) and static (static). Static objects are those that always stand still and do not move anywhere. It is for them that the “baking" of lighting occurs. Dynamic objects are those that, on the contrary, are in motion. This includes such elements of the scene as a hero, a monster, a waving flag, a stone falling from a cliff. Lightmapping is not suitable for these objects; they are illuminated either by real-time light sources or by means of light probes, which I will discuss in addition at the end of the article.
Light source parameters
I want to draw attention to how key the settings of the light sources are (the available settings vary depending on the type of light source):
- Baking . Allows you to select the method of processing the light source. For “lightmapping” we put in the position of Baked.
- The Color . Actually, the color of the light source.
- The Radius . Parameter Point Light'a, responsible for how far rays of light fly.
- The Intensity . Just the brightness of the light source.
- The Intensity Bounce . Determines the brightness of reflected rays emitted from the current light source.
- Shadow Type . Defines the display of shadows. I advise you to use Soft Shadows, it gives beautiful shadows at the cost of increased render time.
- Baked Shadow Angle . Available only for Soft Shadows. Imagine a long shadow. The farther she moves away from the object casting her away, the more blurry she becomes. If the parameter is set to “0”, then the shadow will practically not blur. If set to more than “0”, a blur appears.
Scene Lighting Setting
The window for lighting the scene is called through Window - Lighting , and consists of three tabs: Object , Scene , Lightmaps . To start the lighting rendering, use the Build button at the very bottom of the window. There is also a checkmark Auto, which automatically launches a render every time you make changes to the scene; use it if you have a powerful computer. Below is information about the number and size of “lightmaps” that will appear at the end of the “lightmapping” process.
Section - Object
In ObjectThe settings for a specific object are displayed. If you select an environment element in your scene, then you will see a number of settings and parameters. Provided that the object is static, a checkmark will be checked on the Lightmap Static checkbox. Most often you will use the Scale in Lightmap field here. As I said earlier, for each object, the lighting is “baked” into a separate small texture, which is then placed in a large “lightmap” atlas. With the Scale in Lightmap parameter, you can adjust how much space this texture will occupy. Of course, the less space allocated to it, the worse the quality of the “baked” lighting in it will be. The default value is “1”, but if you know that the object will rarely fall into the field of view or it is located far from the background, you can safely reduce this parameter down to 0.1 or even less.
Section - Scene
The Scene located render settings key lighting. I tell the basics of working with light, and also share the experience of “lightmapping” specifically for mobile platforms, so I deliberately miss things like realtime GI or using an HDR texture as a light source.
In Ambient Source, you set up the Ambient Light fill source, which I already mentioned. You are invited to choose between a sky texture, a sky from a single color, as well as a sky created on the basis of a color gradient. I prefer to choose Gradient. It allows you to adjust three colors - the dome of the sky, the equator and the earth, which will create a fairly complex and interesting fill light for your scene. Ambient Intensity indicates the brightness of this light. Depending on the artistic intent, you can even have a very bright scene illuminated with one Ambient Light.
The Baked GI tab contains the basic settings for the quality of lighting, both direct and reflected, including both GI and FG.
Before delving into these settings, I want to give one piece of advice. Always keep in mind that when placing light sources on the stage, adjusting shadows and Ambient Light, after rendering the lightmap you will get a completely different picture, only remotely resembling what you did. Therefore, I recommend working with iterations: you set the minimum quality of lighting so that the rendering happens quickly, look at the result of the render, then make changes and start re-rendering. When you are more or less satisfied with the result, you can improve the quality of the render and enable Final Gather. This will take a long time, so it makes sense to include such a render before you leave the computer for a relatively long period of time.
The settings in the Baked GI tab operate with a unit such as texel. In simple terms, a texel is a pixel, but not on the screen, but in the texture space of the three-dimensional model. But don’t bother, it’s hard to say how Unity operates with texels and how they depend on the scale of objects, so simply follow the experimental path. For example, for my mobile RPG I am making a final renderer with a Baked Resolution set to 25.
Texel on Wikipedia
Texel (short for English. Tex ture el ement) - the minimum unit of texture of a three-dimensional object. Pixel texture.
The easiest way to explain the meaning of the term "texel" on the example of three-dimensional games. If you come close to the wall in some old 3D-game (Wolfenstein or Duke Nukem), you can observe how the wall texture breaks up into monophonic squares that increase as you get closer and gather back into a meaningful picture when you move away. These squares are called texels, and the larger the original texture pattern, the smaller texels become. For a perfect texture display, the number of texels should match the number of pixels on the monitor, but almost all the engines allow the viewer to get closer to the wall than the detail allows.
A source.
Below I will talk about each parameter separately, but before that you need to know something else. If you run a lighting render in Unity, then it will be written to the bottom right what exactly the engine is currently busy with. At the very end of the rendering process, Compositing will be written there.
The fact is that the lightmap is generated in layers. During rendering, several separate textures are created. I don’t know which cards Unity makes, but among them there is either all or part of the list: Diffuse (direct light), GI (Global Illumination), FG (Final Gather), AO (Ambient Occlusion) and others. After that, the engine takes these cards and merges with each other. For example, a Diffuse layer can be at the base, an FG layer is placed above it in the Lighten blending mode (just like in Photoshop), and an AO layer is placed higher in the Multiply mode ... As a result, these layers merge into one picture and the final result is “ lightmap. ”
Tab - Baked GI
- Baked Resolution . This parameter can be considered the overall quality of the lightmap, it is also Diffuse, which I talked about in the last paragraph. The higher you put it, the clearer the picture will be. But do not get carried away too much, there is a certain limit, after which you will not notice any difference. In general, it is important to look for a balance between the quality of the “bake” and the render time.
- Baked Padding . The distance between the individual textures in the general atlas. It is necessary so that during compression, when the atlas starts to “float”, the color of one separate texture does not slap another texture. For my game, I usually bet within 1-3.
- The Compressed . Almost always you will have a tick here, while Unity will compress the lightmap atlases. In an uncompressed state, they “weigh” indecently.
- Indirect Resolution . This parameter can be considered the quality, or detail, of the GI, FG, and possibly AO layers. It makes no sense here to put a large number, you will not see the difference. For example, if you put 40 in Baked Resolution, then in Indirect you can safely put in the region of 3-8.
- Occlusion the Ambient . As I wrote at the very beginning of the article, AO is shading in various angles and cracks due to the loss of energy by a light beam. This parameter adjusts how quickly energy is lost. The higher the setting, the darker the AO will be. Let me remind you that AO is an artistic device that actually has nothing to do with physically correct lighting.
- The Distance max . By and large, this is just a dimming distance for Ambient Occlusion. If you take the corner of the room as an example, then at high Max Distance the dimming will start very early, and at low Max Distance the dimming will only be at the very very depth of the corner.
- Final Gather . Includes the reflected light method described at the beginning of the article. By default, only GI is rendered, here you turn on FG as well. Nowhere are there any settings for the number of points that FG scatters around the scene. I guess this one way or another depends on the Indirect Resolution.
- Ray Count . The number of rays that each FG point emits. Most likely, 32 or 64 rays will be enough for your eyes.
Tab - General GI
Let's go through the settings that interest us in the General GI tab:
- Directional Mode . A very specific parameter, “baking” for each “lightmap” is the second atlas. The usual “lightmap” is a simple texture, which is then superimposed on top of your objects, simulating their illumination. The second atlas, called Directional, contains information about the direction of movement of the rays of light. This mode only makes sense if you use normal maps and are not working on a mobile game. Otherwise, it is recommended to take Non Directional.
- The Intensity Indirect . We can say that this is the brightness of the layers with indirect light, in particular FG. Earlier, I already said that in fact the “lightmap” is assembled from layers superimposed on top of each other.
- The Boost Bounce . Adjusts the brightness of the reflected photons, information about which is contained in the GI layer.
- Atlas Size . It indicates the size of texture atlases with “baked” lighting. If you are making a game for mobile devices straight from the 19th century, it makes sense to set 1024 here, since textures of size 2048 are not supported by very old devices. Otherwise, I recommend installing 2048, it is supported by almost all devices of recent years. As you know, the smaller the size of one atlas, the more they will have to be made. If you are familiar with the term Draw Call, then you can easily predict that an increase in the number of atlases will hit productivity. Therefore, if you do not have specific requirements, try to render in 2048.
Tab - Fog
And finally, the fog! Fog, I mean. It has nothing to do with the lighting renderer; it can turn on and off at any time. Everything is extremely simple here, so take and experiment. I can only say that fog is an extremely powerful artistic tool. You can radically change the atmosphere of the scene through the fog, thanks to him the sunny scene will become brighter, darker - darker.
In addition, fog can be used as a tool to increase productivity. For example, you want to turn off the texture of all objects in the distance and hide them behind the fog. In older versions of World of Warcraft, if you played, you couldn't help but notice how dense the fog was.
Section - Lightmaps
The third section is Lightmaps , where rendered lightmaps will be located. Moreover, if there are a lot of atlases, at the top of the tab you won’t be able to see all the atlases, the scroll in that window is inactive. Therefore, we look at the bottom and scroll the mouse wheel.
Here it is important for us to see how full the last, lowest “lightmap” atlas is. If it is almost empty, then either increase the quality of the lightmap to fill the entire atlas, or decrease so that the atlas is empty and is deleted. The picture below shows two well-filled atlases, and one so far as.
Lightmaps are stored in EXR files with a depth of 32 bits.
Light probes
I also promised to talk about Light Probes . They are small spheres that absorb information about the lighting of the surrounding space. When there are many such areas, they create a unique map of the illumination of your level or location. They are then used to illuminate dynamic objects into which light is not “baked”.
To better understand their meaning, give an example. There is one Point Light on your stage with Baked settings, that is, it is used to “bake" the light. You do not do it Real-time, because it is expensive in terms of performance, and many mobile devices do not support such a light source at all. Then you “lightmap” the scene and see that your Point Light illuminates the surroundings. But if you take the monster and put it next to the light source, it will remain dark, because it belongs to the class of dynamic objects, and your Point Light affects only static ones.
Now you place a grid of Light Probes around the light source, bake the lighting again. And now your monster can walk around Point Light and be illuminated by it! This is an extremely effective and inexpensive way to simulate lighting. To add “samples” to the scene, go to the Game Object - Light - Light Probe Group . A cube of four spheres appears on the scene. To select individual spheres, use ctrl + click. Several buttons will appear in the Inspector, allowing you to add or remove spheres. You can also use the combination ctrl + D to duplicate spheres.
Arrange Light Probes carefully, place them where you want them to absorb information about lighting, and then transmit it to dynamic objects. To avoid graphic artifacts and flickering light, make sure that Light Probes form an even, beautiful grid.
Below is a screenshot of the correctly set grid. If you look closely, you will notice that Light Probes are not randomly displayed, but surround light sources, trying to effectively catch the transition from light to shadow and back.
Conclusion
Finally, I want to give advice on creating environment models for light mapping. When creating content for the game, I knew which side the game camera would look from, so for the sake of dubious optimization I deleted the back walls of some objects. At that time, I had experience rendering lightmaps, but only in Maya, not Unity. It turned out that when rendering lighting in Unity near objects that have holes, that is, remote polygons, hard, clearly visible artifacts appear. Keep in mind.
Useful and interesting links
- An explanation of a physically correct lighting and rendering system written for 3d artists.
- If you want to know more about draw calls and graphics optimization, then there is great material focused on non-programmers - render hell 2.0 .
- The Unity website has a good description of their lighting system, which in some places echoes my material.
- In this short article, using the example of Diablo III, we demonstrate how the developer of AAA games uses the same trick - significantly changes the atmosphere of the levels with one lighting, without changing the graphics of the environment.