A small guide to ZPL
Good afternoon, Habrahabr.
Thanks to the warmly received past publication, I can publish this article here. Thanks to everyone who put the pros.
On duty, I often have to generate reports for Zebra family of label printers.

They are such
zebras. The mechanism of labeling is as follows: first, a specially formatted line is sent to the printer from the user's computer (computer, data collection terminal), then the internal processor of the printer processes this line and prints it. But the language in which the line is formed for a printer (called ZPL) at first glance it causes uninitiated nervous hiccups and jitters.
I ask for a cut, everyone who wants to understand this issue.
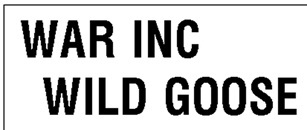
Example:
^XA
^FO 0,10
^GB632,0,2^FS
^FO0,25
^FB632,1,0,C,0
^ASN,70,70
^FDWAR INC.^FS
^FO0,100
^GB632,0,2^FS
^FO0,120
^FB632,1,0,C,0
^ASN,60,60
^FDGoose^FS
^FO0,180
^FB632,1,0,C,0
^ASN,60,60
^FDWild^FS
^FO0,240
^GB632,0,2^FS
^FO120,260
^BY2
^BCN,70,N,N,N
^FDSECRECTCODE^FS -
^XZ
And such a neat badge is printed:
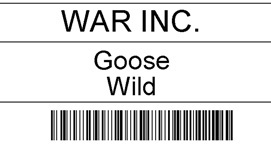
Let's look at what is written in this code and consider the main elements.
The first part of my speech I will devote to the analysis of the syntax of this language, in an amount sufficient to create labels of satisfactory quality. Secondly, I will give examples of code in Java and VisualBasic, in order to send the label to print on its own. Based on these examples, you can independently build your program for printing.
Part 1. ZPL Syntax
Firstly, all measurements in ZPL are indicated in points. Therefore, for a clearer view, you should look in the printer documentation for the density of dots per unit of length.
First, briefly go over the main commands, then consider them in more detail in a bunch.
1. The beginning and end of the ZPL-code:
^ XA - the beginning of the code, ^ XZ - the end of the code;
2. Indents for the subsequent contents:
^ FO x, y where: x - indent from the left edge, y - indent from the top;
3. Field separator:
^ FS - indicates the end of the field definition. Literally, you can consider it a signal to the end of the line;
4. Scalable text. Consists of two parts, font selection and text input:
4.1. Font selection:
^ A <font name> <text orientation>, <font height in dots>, <width in dots>:
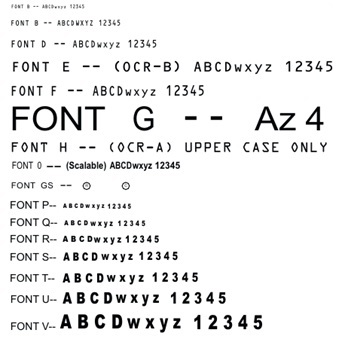
<font name> - defaults to A. More precisely, you don’t even need to enter it, you can take other fonts from official documentation:
<text orientation>:
N - normal orientation; R - rotated 90 degrees clockwise;
I - inverted 180 degrees; B - rotated 270 degrees;
4.2. Text output with parameters specified in the previous paragraph:
^ FD <text>
Examples:
^XA
^FO20,20  - отступ по 20 точек от верхнего и левого края этикетки
^ASN,70,70 - нормальная ориентация, шрифт S, высота и ширина 70 точек
^FDWAR INC.^FS – содержание текста WAR INC.
^XZ

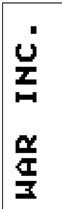
Turn and change the font:
^XA
^FO20,20  - отступ по 20 точек от верхнего и левого края этикетки
^ABB,30,30 - повернуто на 270 градусов, шрифт B, высота и ширина 30 точек
^FDWAR INC.^FS – содержание текста WAR INC.
^XZ
Change the font to S:
^XA
^FO20,20  - отступ по 20 точек от верхнего и левого края этикетки
^ASB,30,30 - повернуто на 270 градусов, шрифт S, высота и ширина 30 точек
^FDWAR INC.^FS – содержание текста WAR INC.
^XZ
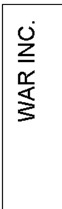
Be sure to remember that different fonts may look different in terms of size, as can be seen above. I most often use font S.
5. Text block:
^ FB <width>, <number of lines>, <spaces between lines>, <text alignment>, <indent for the second or subsequent line>
<text position> - can take the values: L (left), R (right edge), C (in the center), J (stretch the text to the width of the field);
Usually I used this command to center the text, or if it is necessary to place the text in several lines. If the text does not fit in a line, it begins to overlap on itself. And it turns out like this:
^XA
^FO 20,20
^FB400,1,0,C,0
^AVN,70,70
^FDWAR INC WILD GOOSE^FS
^XZ

Change the code so that there are two lines, and make the distance between the lines at 10 points:
^XA
^FO 20,20
^FB400,2,10,C,0
^AVN,70,70
^FDWAR INC WILD GOOSE^FS
^XZ

Now indent the second line 30 points to the left:
^XA
^FO 20,20
^FB400,2,10,L,30
^AVN,70,70
^FDWAR INC WILD GOOSE^FS
^XZ
6. Drawing rectangles:
^ GB <width>, <height>, <line thickness>, (<line color>, <corner rounding>)
Optional parameters are indicated in brackets.
Line color: B (black) or W (white) The
rounding of the corners is indicated by a number from 0 to 8 (strong rounding)
Examples:
With a strong rounding:
^XA
^FO20,20
^GB300,100,2,B,8^FS
^XZ
Without rounding:
^XA
^FO20,20
^GB300,100,2^FS
^XZ
If we want to draw just a line, then draw a rectangle with a height equal to 0:
^XA
^FO20,20
^GB300,0,2^FS
^XZ
7. The barcode consists of three commands - the first sets its dimensions, the second settings and the third - contents:
7.1 Barcode dimensions:
^ BY <width>, (
7.2. Barcode settings:
^ BC <orientation>, <barcode height in points>, <whether to print the code decryption>, <code decryption above the barcode>, <mode>
<orientation> - N - normal orientation; R - rotated 90 degrees clockwise; I - inverted 180 degrees; B - rotated 270 degrees;
<whether to print the decryption of the code>, <decryption of the code above the barcode> - take the values Y (yes) or N (no);
<mode> - I did not understand this field, by default N;
^ BC - barcode in standard 128 (more details Code_128 ); There are also several more formats, but since I did not have to use them, they will not be considered in this article, and I recommend that you look at the information on them in the official documentation supplied with Zebra printers;
7.3. Print barcode:
^ FD <encoded information>
Unfortunately, the barcode cannot be placed in the “box” as text to center the labels across the width, and therefore you have to shamanize with margins and indents.
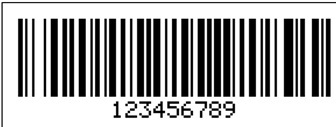
Examples:
^XA
^FO 20,20
^BY3
^BCN,100,Y,N,N
^FD123456789^FS
^XZ
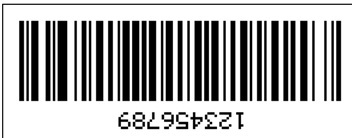
We turn it over and indicate that the decryption should be printed from above (now it turned out from below):
^XA
^FO 20,20
^BY3
^BCI,100,Y,Y,N
^FD123456789^FS
^XZ
We dwell on this consideration of the main elements of the ZPL, and move on to the second part, in which we briefly consider the mechanism for sending information to the printer.
Part 2. Printing
The transmission mechanism is nowhere easier. For this, we need to know the IP, where the printer is located, and the port. Next, we form the stream, which we send to the specified address, and we get a label at the output.
Visual Basic Example:
Dim i As Double
        Dim SSCC As String
        Dim ipAddress As String = "127.0.0.1"
        Dim port As Integer = 1234
        Dim ZPLString As String
        Try
         'Открываем соединение
        Dim client As New System.Net.Sockets.TcpClient
        client.Connect(ipAddress, port)
        Dim writer As New System.IO.StreamWriter(client.GetStream())
       'Формируем ZPL-строку
        ZPLString=
        "^XA" &
	"^BY2" &
	"^FO0,200" &
	"^FB632,2,0,C,0" &
	"^ASN,60,60" &
	"^FDHELLO HABRAHABR!!!^FS" &
	"^XZ"
      writer.Write(ZPLString)
      writer.Flush()
      'закрываем соединение
      writer.Close()
      client.Close()
Catch ex As Exception
End Try
Java example:
import java.io.IOException;
import java.io.OutputStream;
import java.io.PrintWriter;
import java.net.Socket;
public class PrintToZebra {
	public static void main(String[] args) throws IOException {
		System.out.println("Готовлю к печати");
		try(Socket s = new Socket("127.0.0.1", 1234)){
		OutputStream out = s.getOutputStream();
		PrintWriter writer = new PrintWriter(out, true);
	      String ZPLString=
	                "^XA" +
	                "^BY2" +
	                "^FO0,200" +
	                "^FB632,2,0,C,0" +
	                "^ASN,60,60" +
	                "^FDHELLO HABRAHABR!!!^FS" +
	                "^XZ";
	        writer.println(ZPLString);
	        writer.flush();
	        System.out.println("Отправил на печать");
		}
	}
}
As you can see, nothing complicated. I hope that my article will facilitate the way for the brave zebra tamers.
Then let me take my leave. I look forward to advice, criticism and support.