Publish DITA to PDF using the DITA Open Toolkit. Page Layout - Layout-master Overview
In a previous article, I did a short review giving a general idea of publishing DITA in PDF. Now I decided to tell how the layout of the pages of the future document is carried out in XSL-FO and how it is implemented in the basic configuration of DITA-OT.
The materials of the book "Dave Pawson, XSL-FO - Making XML Look Good in Print, 2002" were used.
It is customary to subdivide any document in XSL-FO into three logical parts:
It is worth noting that this is the structure of the final document from the point of view of XSL-FO. A DITA source document usually contains only text (tables and illustrations). DITA elements contain attributes whose values also play a role in publishing (language used, alignment, binding to neighboring elements, etc.). Table of contents, lists and indexes, cover page - these parts of the document are generated automatically based on the original content.
The front document may be missing the front and / or back, or they can be combined with the main part. The main part always exists.
For each component of the document, its own page layout can be used. All layouts (page types) are described in the layout-masters.xsl file located in the .. \ org.dita.pdf2 \ cfg \ fo folder .
Sets of parameters for each layout are set in the layout-masters-attr.xsl file , which is located in the .. \ org.dita.pdf2 \ cfg \ fo \ attrs folder .
Parameter values in sets are either specified explicitly, or as a reference to another parameter. The parameter referenced must be specified explicitly in one of the parameter files.
The root element of an XSL-FO document is fo: root . The conversion for it is located in the file .. \ org.dita.pdf2 \ xsl \ fo \ root-processing.xsl . Its child, which contains markup for all types of pages, is fo: layout-master-set (see figure).
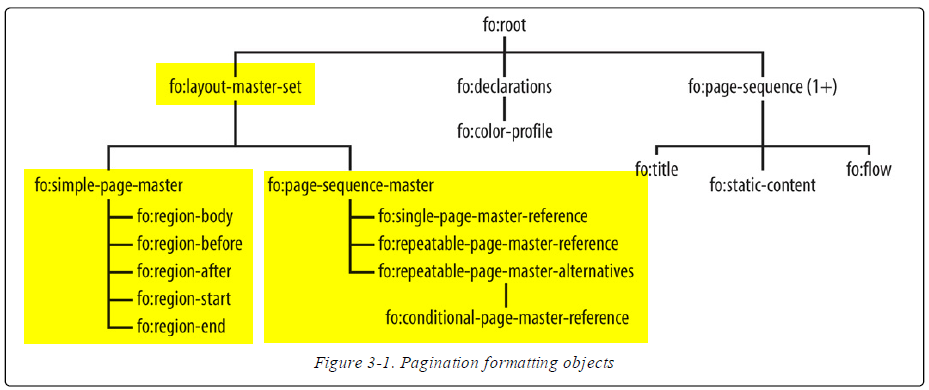
The fo: layout-master-set element, in turn, contains two children:
Both elements have a unique name, which is specified in the master-name parameter . According to it, when forming the document, the required page layout is called up. The call is made from fo: page-sequence elements , which are designed to distribute the contents of DITA among pages with the required markup. fo: page-sequence refers to fo: simple-page-master or fo: page-sequence-master through the master-reference parameter .
The question arises - why use fo: page-sequence-master , if you can refer to fo: simple-page-masterdirectly. The fact is that for the same type of markup you can use subtypes: for the first page of the section, for the last page, for even pages, for odd pages. For each subtype, as well as for the main type, its own set of parameters is set. And fo: page-sequence-master allows you to dynamically determine by input parameters what type of markup should be used. If we call fo: simple-page-master directly, then we must know in advance which markup to choose, which is not always feasible.
In DITA-OT, subtype names are defined as follows:
As I said above, the fo: simple-page-master element is designed to describe the layout of the pages of a specific part of the document.
In XSL-FO, any page contains five work areas (see the figure):
Each area has a name. By default, it matches the name of the item. The name can be specified in the region-name parameter . The name of the area is used to indicate when creating a document which area to display what data. For example, static fo: static-content data is most often displayed in headers or footers.

Each area in XSL-FO corresponds to an element of the same name (in the fo namespace ). All of these elements are children of fo: simple-page-master .
The fo: simple-page-master element has the following parameters:
The figure below shows the location of the areas on the page depending on the reference-orientation and writing-mode parameters .

Each of the regions (except for the region-body ) has an extent parameter that determines the size of the region in the direction perpendicular to the corresponding side of the page. For headers and footers, this is height; for fields, it is width. It is set in units of length, or as a percentage of the corresponding page size ( page-height and page-width parameters ).
The sizes of the region-body region are defined differently. Firstly, they are limited by the size of the page margins. Secondly, it has 4 parameters: margin-top , margin-bottom , margin-left and margin-right , which determine the margins of the region-body region from the content rectangle of the page reference area , indicated by a dash in the second figure. These indents can be specified in units of length or as a percentage of the size of the content rectangle of the page reference area .
Here we should make a sufficiently significant conclusion that the boundaries of the region-bodyindependent of the sizes and parameters of neighboring regions.
The margins of the region-body region are aligned with the orientation of the page. For example, if the page orientation is set to 90, then the top indent is counted from this direction. If a region-body has its own orientation ( reference-orientation parameter ), this does not affect the location of the indents. They are still counted according to the orientation of the page. The orientation of the region-body region only affects how the child blocks will be located in it.
For the region-body region, the number of columns in which the contents of the document will be placed can be specified. Two parameters are responsible for this:column-count - sets the number of columns (must be greater than or equal to 1); column-gap - the distance between adjacent columns.
For alignment in areas, the display-align parameter is intended , which can take the values: auto , before , center , after . It determines the alignment of child blocks in the area in the direction they follow, which is specified in the writing-mode parameter .
The two top corners of the page can be occupied by either the header or the left and right margins. Similarly, the bottom corners are the footer or the left and right margins. The precedence parameter specified for the footers is responsible for this . If the parameter is true , then the footer will occupy the corners (the one for which the parameter is specified). If the parameter is false , then the corners occupy the fields. By default, the parameter is false .
The fo: page-sequence-master element , as I mentioned, is intended to create a sequence of pages into which the original DITA content will be distributed during the formation of the document.
This item has three children:
Layout selection conditions in the fo: repeatable-page-master-alternatives element are set using the fo: conditional-page-master-reference children . Each condition can contain from one to three parameters, which together determine whether the condition is fulfilled or not.
These are the following options:
So, the markups are described, the selection conditions are set, how now to call them from XSLT transformations?
To do this, use the fo: page-sequence element . It has the required parameter master-reference , which indicates the name of the called markup.
Also, the element may contain parameters that are responsible for pagination.
The initial-page-number parameter captures the first page number of the generated page sequence:
The force-page-count parameter imposes a condition on the number of pages of the generated sequence:
A lot of theory, but how is all this implemented in the DITA Open Toolkit.
If in general terms, all types of simple-page-master layouts are described first (for cover, table of contents, etc.). Further, in theory, page-sequence-master page sequences for each markup should be described .
DITA-OT uses the XSL template generate-page-sequence-master , which generates a sequence of pages according to the specified parameters.
The template runs several times from the call-template . Each call generates a sequence for one type of markup in accordance with the specified parameters.
All this we can see in the file layout-masters.xsllocated in the folder .. \ org.dita.pdf2 \ cfg \ fo .
On line 43, we see the beginning of the fo: layout-master-set element , in which the fo: simple-page-master elements are located , each of which contains a description of a separate markup.
For example, the first four pieces are for the cover:
Then, after all markups are declared, sequences of page-sequence-master pages are generated (line 169), into which, when the document is formed, the data stream from the DITA topics will be distributed.
For example, the following code generates a sequence of pages for a table of contents (toc - table of content):
To create each sequence, the XSL template generate-page-sequence-master is called with the appropriate parameters in the xsl: with-param elements . In the parameters: name - parameter name, select - parameter value.
The XSL template generate-page-sequence-master is described at the end of the file , which generates a page sequence of page-sequence-master according to the input parameters (see the last listing). In the basic DITA-OT configuration, only universal fo: repeatable-page-master-alternatives is used , and depending on the input parameters, one or another markup is selected.
The template has four parameters:
Next, a page-sequence-master is created in the template with the name specified in the master-name parameter of the template. The parameter value is passed as the variable $ master-name . The page-sequence-master element contains one child fo: repeatable-page-master-alternatives , which contains three conditions:
If the page is the first, then conditional-page-master-reference causes markup by the name specified in the $ master-reference variable for the first page ( -first is added to the name ), with the parameters: odd-or-even = “odd” (odd page ) and page-position = “first” (first page).
If the page is the last, then conditional-page-master-reference causes the markup by the name specified in the $ master-reference variable for the last page ( -last is added to the name ), with the parameters: odd-or-even = “even” (even page ), page-position = “last” (last page) andblank-or-not-blank = "blank" (blank page).
If page parity is taken into account, then two conditional-page-master-reference are used : for even and for odd pages. Otherwise ( xsl: otherwise ), markup for odd pages is used.
The materials of the book "Dave Pawson, XSL-FO - Making XML Look Good in Print, 2002" were used.
Document structure
It is customary to subdivide any document in XSL-FO into three logical parts:
- front matter - the front part, which includes the title page, annotation, table of contents, list of illustrations, etc.
- main matter (or body ) - the main part that directly contains the text of the document, table, illustration, etc.
- back matter - the back part, which contains indexes, glossaries, bibliography, etc.
It is worth noting that this is the structure of the final document from the point of view of XSL-FO. A DITA source document usually contains only text (tables and illustrations). DITA elements contain attributes whose values also play a role in publishing (language used, alignment, binding to neighboring elements, etc.). Table of contents, lists and indexes, cover page - these parts of the document are generated automatically based on the original content.
The front document may be missing the front and / or back, or they can be combined with the main part. The main part always exists.
Markup files
For each component of the document, its own page layout can be used. All layouts (page types) are described in the layout-masters.xsl file located in the .. \ org.dita.pdf2 \ cfg \ fo folder .
Sets of parameters for each layout are set in the layout-masters-attr.xsl file , which is located in the .. \ org.dita.pdf2 \ cfg \ fo \ attrs folder .
Parameter values in sets are either specified explicitly, or as a reference to another parameter. The parameter referenced must be specified explicitly in one of the parameter files.
Layout Elements
The root element of an XSL-FO document is fo: root . The conversion for it is located in the file .. \ org.dita.pdf2 \ xsl \ fo \ root-processing.xsl . Its child, which contains markup for all types of pages, is fo: layout-master-set (see figure).
The fo: layout-master-set element, in turn, contains two children:
- fo: simple-page-master - contains a description of the layout of the pages of a certain part of the document (for example, the table of contents)
- fo: page-sequence-master - Generates a sequence of pages with specific markup. When a document is formed, the original DITA content is distributed in these sequences.
Both elements have a unique name, which is specified in the master-name parameter . According to it, when forming the document, the required page layout is called up. The call is made from fo: page-sequence elements , which are designed to distribute the contents of DITA among pages with the required markup. fo: page-sequence refers to fo: simple-page-master or fo: page-sequence-master through the master-reference parameter .
The question arises - why use fo: page-sequence-master , if you can refer to fo: simple-page-masterdirectly. The fact is that for the same type of markup you can use subtypes: for the first page of the section, for the last page, for even pages, for odd pages. For each subtype, as well as for the main type, its own set of parameters is set. And fo: page-sequence-master allows you to dynamically determine by input parameters what type of markup should be used. If we call fo: simple-page-master directly, then we must know in advance which markup to choose, which is not always feasible.
In DITA-OT, subtype names are defined as follows:
- for the first page, add -first to the name of the main type ;
- for the last - -last ;
- for odd ones - -odd ;
- for even - -even ;
- for blank pages - -blank .
Simple page master
As I said above, the fo: simple-page-master element is designed to describe the layout of the pages of a specific part of the document.
In XSL-FO, any page contains five work areas (see the figure):
- region-body - the main area of the page in which the contents of the document are placed;
- region-before - header;
- region-after - footer;
- region-start - left field (for directing text from left to right);
- region-end - the right field (for the direction of the text from left to right).
Each area has a name. By default, it matches the name of the item. The name can be specified in the region-name parameter . The name of the area is used to indicate when creating a document which area to display what data. For example, static fo: static-content data is most often displayed in headers or footers.
Each area in XSL-FO corresponds to an element of the same name (in the fo namespace ). All of these elements are children of fo: simple-page-master .
Simple Page Master Options
The fo: simple-page-master element has the following parameters:
- master-name - unique markup identifier.
- page-height - page height.
- page-width - page width.
- margin-top , margin-bottom , margin-left and margin-right are the sizes of the page margins. They should be distinguished from headers and footers, which are workspaces.
- reference-orientation - orientation of the top of the page (angle in degrees counterclockwise) relative to the default value. It can take values: -270, -180, -90, 0, 90, 180, 270. The default is 0.
- writing-mode - a mode that determines the location of areas and blocks (paragraphs, tables, illustrations, etc.) on the page. There are three modes: lr-tb (left to right, top to bottom), rl-tb (right to left, top to bottom), tb-rl (top to bottom, right to left). The first part of the mode name indicates the direction of the text in the lines, the second - the direction of the blocks within the area.
The figure below shows the location of the areas on the page depending on the reference-orientation and writing-mode parameters .
Area Sizes
Each of the regions (except for the region-body ) has an extent parameter that determines the size of the region in the direction perpendicular to the corresponding side of the page. For headers and footers, this is height; for fields, it is width. It is set in units of length, or as a percentage of the corresponding page size ( page-height and page-width parameters ).
Region-body region
The sizes of the region-body region are defined differently. Firstly, they are limited by the size of the page margins. Secondly, it has 4 parameters: margin-top , margin-bottom , margin-left and margin-right , which determine the margins of the region-body region from the content rectangle of the page reference area , indicated by a dash in the second figure. These indents can be specified in units of length or as a percentage of the size of the content rectangle of the page reference area .
Here we should make a sufficiently significant conclusion that the boundaries of the region-bodyindependent of the sizes and parameters of neighboring regions.
The margins of the region-body region are aligned with the orientation of the page. For example, if the page orientation is set to 90, then the top indent is counted from this direction. If a region-body has its own orientation ( reference-orientation parameter ), this does not affect the location of the indents. They are still counted according to the orientation of the page. The orientation of the region-body region only affects how the child blocks will be located in it.
For the region-body region, the number of columns in which the contents of the document will be placed can be specified. Two parameters are responsible for this:column-count - sets the number of columns (must be greater than or equal to 1); column-gap - the distance between adjacent columns.
Alignment in areas
For alignment in areas, the display-align parameter is intended , which can take the values: auto , before , center , after . It determines the alignment of child blocks in the area in the direction they follow, which is specified in the writing-mode parameter .
What about the corners?
The two top corners of the page can be occupied by either the header or the left and right margins. Similarly, the bottom corners are the footer or the left and right margins. The precedence parameter specified for the footers is responsible for this . If the parameter is true , then the footer will occupy the corners (the one for which the parameter is specified). If the parameter is false , then the corners occupy the fields. By default, the parameter is false .
Page Sequence Master
The fo: page-sequence-master element , as I mentioned, is intended to create a sequence of pages into which the original DITA content will be distributed during the formation of the document.
This item has three children:
- fo: single-page-master-reference - used when you want to form a sequence of one page. For example, the title page of a document. When working with the fo: single-page-master-reference element , remember that if one page is not enough to host the original content, this will cause an error when publishing.
- fo: repeatable-page-master-reference - used to form limited or unlimited sequences of pages with the same markup. When using the fo: repeatable-page-master-reference element , the limit on the number of pages that can be generated can be specified. To do this, use the maximum-repeats parameter . By default, the number of pages is unlimited.
- fo: repeatable-page-master-alternatives - used to form several sequences with different markup depending on the specified parameters. It is the most flexible tool.
Layout selection conditions in the fo: repeatable-page-master-alternatives element are set using the fo: conditional-page-master-reference children . Each condition can contain from one to three parameters, which together determine whether the condition is fulfilled or not.
These are the following options:
- page-position - the location of the page in the section - first (first), last (last), rest (not the first and not the last), any (any).
- odd-or-even - evenness of the page number - odd (odd), even (even), any (any).
- blank-or-not-blank - whether the page has data transmitted from the fo block : flow - blank (empty), not-blank (not empty), any (any).
- for fo: repeatable-page-master- alternatives can also be set to limit the number of pages in the parameter maximum-repeats .
A bit about fo: page-sequence
So, the markups are described, the selection conditions are set, how now to call them from XSLT transformations?
To do this, use the fo: page-sequence element . It has the required parameter master-reference , which indicates the name of the called markup.
Also, the element may contain parameters that are responsible for pagination.
The initial-page-number parameter captures the first page number of the generated page sequence:
- auto - continues the numbering of the previous section;
- auto-odd - continues numbering from the first odd number;
- auto-even - continues numbering from the first even number;
- The specific number to start numbering.
The force-page-count parameter imposes a condition on the number of pages of the generated sequence:
- auto - sets the number of pages in accordance with the first page number of the next sequence;
- even - rigidly sets an even number of pages;
- odd - rigidly sets an odd number of pages;
- end-on-even - the last page number is even;
- end-on-odd - the last page number is odd;
- no-force - not regulated.
How is it in DITA-OT?
A lot of theory, but how is all this implemented in the DITA Open Toolkit.
If in general terms, all types of simple-page-master layouts are described first (for cover, table of contents, etc.). Further, in theory, page-sequence-master page sequences for each markup should be described .
DITA-OT uses the XSL template generate-page-sequence-master , which generates a sequence of pages according to the specified parameters.
The template runs several times from the call-template . Each call generates a sequence for one type of markup in accordance with the specified parameters.
All this we can see in the file layout-masters.xsllocated in the folder .. \ org.dita.pdf2 \ cfg \ fo .
On line 43, we see the beginning of the fo: layout-master-set element , in which the fo: simple-page-master elements are located , each of which contains a description of a separate markup.
For example, the first four pieces are for the cover:
- The first layout, based on the name, is for the first page of the cover. It has only the main region-body region , for which the region-body__frontmatter.odd attribute set is applied . Although this set is intended for odd pages (judging by the name), nothing prevents us from using it here. The set of attributes is described in the layout-masters-attr.xsl file .
- The second layout is for the last page of the cover. It has a main area, a header and a footer. At the same time, headers and footers have their own names last-frontmatter-header and last-frontmatter-footer , the main area has a default name - region-body .
- The third markup - for even cover pages - is used only if the condition specified in the xsl: if element is met . If the boolean variable $ mirror-page-margins is true , then for odd and even pages different markup is used (usually a mirror).
- The fourth markup - for odd cover pages - is not limited to the condition that the page is even. However, if $ mirror-page-margins is true , then it is called only for odd pages. This can be seen in fo: page-sequence-master below.
Then, after all markups are declared, sequences of page-sequence-master pages are generated (line 169), into which, when the document is formed, the data stream from the DITA topics will be distributed.
For example, the following code generates a sequence of pages for a table of contents (toc - table of content):
To create each sequence, the XSL template generate-page-sequence-master is called with the appropriate parameters in the xsl: with-param elements . In the parameters: name - parameter name, select - parameter value.
The XSL template generate-page-sequence-master is described at the end of the file , which generates a page sequence of page-sequence-master according to the input parameters (see the last listing). In the basic DITA-OT configuration, only universal fo: repeatable-page-master-alternatives is used , and depending on the input parameters, one or another markup is selected.
The template has four parameters:
- master-name - sets the name for the generated sequence. By this name, the sequence will be selected when distributing the original DITA content.
- master-reference is the name of the markup that will be called to generate the sequence.
- first - a sign that this is the first page. The default is true .
- last - a sign that this is the last page. The default is true .
Next, a page-sequence-master is created in the template with the name specified in the master-name parameter of the template. The parameter value is passed as the variable $ master-name . The page-sequence-master element contains one child fo: repeatable-page-master-alternatives , which contains three conditions:
- xsl: if test = "$ first" - whether the page is the first in the sequence;
- xsl: if test = "$ last" - whether the page is the last in the sequence;
- xsl: when test = "$ mirror-page-margins" - whether different markup is used for even and odd pages.
If the page is the first, then conditional-page-master-reference causes markup by the name specified in the $ master-reference variable for the first page ( -first is added to the name ), with the parameters: odd-or-even = “odd” (odd page ) and page-position = “first” (first page).
If the page is the last, then conditional-page-master-reference causes the markup by the name specified in the $ master-reference variable for the last page ( -last is added to the name ), with the parameters: odd-or-even = “even” (even page ), page-position = “last” (last page) andblank-or-not-blank = "blank" (blank page).
If page parity is taken into account, then two conditional-page-master-reference are used : for even and for odd pages. Otherwise ( xsl: otherwise ), markup for odd pages is used.