Urho3D Editor (Part 1)
- Tutorial
We continue to deal with the Urho3D engine. This time I want to stop at the editor. It is quite simple to use, but some points definitely require clarification, and the official documentation does not disclose them. Well, at the same time we will write a small toy. Let's get started.

The editor is a script in the AngelScript language, launched by the launcher that we used the last time . So, its code can be studied along with other examples and, if desired, can be easily modified. You can start the editor using the batch file Build / bin / Editor.bat.
Navigation is like controlling a shooter. W and S - move forward and backward, A and D - left and right, Q and E - down and up. Clamped shift moves faster. You can use the arrows. Holding down the right mouse button allows you to rotate the camera in different directions. When the middle button is clamped, it rotates around the selected object. If you turn the wheel, then the viewing angle (fov) changes. A complete list of keys can be found here .
View-> Editor Settings - display and control settings. For fans of Blender, there is the opportunity to choose an alternative keyboard layout. An option to pay attention to is New node mode. Use distance mode is enabled by default. In this mode, new nodes are created in the center of the screen at the distance specified in the New node distance column. As for me, this is not very convenient. I like the second mode much more - In center. In this mode, new nodes are created in the center of coordinates and they can be moved from there to the desired position. The third mode (Raycast) is similar to the first, only not a fixed distance is used, but the intersection with the scene is searched.
View-> Editor Preferences - interface settings. Of the interesting things here is the ability to select a language (including Russian) and set the transparency of the interface. Minimum opacity - transparency when moving the view, Maximum opacity - the rest of the time. I usually set both values to 1, because it is distracting. Note: to apply the new values, after entering, press Enter.
All settings are stored in the file c: \ Users \ USERNAME \ AppData \ Roaming \ urho3d \ Editor \ Config.xml (on Windows). To reset the settings, this file can be deleted.
Pressing F1 opens the console. It can work in two modes, switching between which is done using the button to the left of the input field.
In FileSystem mode, the console works like a regular Windows command line (if you have Windows of course). For example, if you enter “notepad.exe,” then notepad opens.
In Script mode, all entered commands are executed by the AngelScript interpreter. For example, the command “log.Write (1 + 2)” will output 3. Here we come to the conclusion that the console output is a log. The log itself is written in text form to the file c: \ Users \ USERNAME \ AppData \ Roaming \ urho3d \ logs \ Editor.as.log. It will help you a lot when debugging scripts.
Take the Urho3DHabrahabr02Start.zip archive from the github.com/1vanK/Urho3DHabrahabr02 repository and unpack it into an empty folder (I have this path “d: \ MyGames \ Urho3DHabrahabr02 \ Urho3DHabrahabr02 \”, so I will use it for clarity). This archive contains the resources that we will need when creating the game: several models, materials for them and one sound file.
In the editor, click File-> Set resource path ... and specify the path "d: \ MyGames \ Urho3DHabrahabr02 \ Urho3DHabrahabr02 \ GameData \". Now the editor has access to three folders with resources: the own Data and CoreData folders that are next to it, and the GameData folder that we specified.
In the Resource Browser, select the Models folder and drag Ground.mdl onto the Scene root node in the Hierarchy window.

In this case, a new node with the StaticModel component (a simple model without a skeleton) will be automatically created. In the Attribute inspector window, set the node name to Ground, click the Pick button next to the Material column and select Materials / Ground.xml.

Now we have the floor, but the scene is poorly lit, so let's add a light source.
First, create a new node. Select the Scene root node and select the menu item Create-> Local node. You can also create a Replicated node. In our case, there is no difference, since the replicated nodes are synchronized during network interaction, and we do not plan to work with the network. Nodes can also be created not through the menu, but using the vertical panel on the left side of the editor.
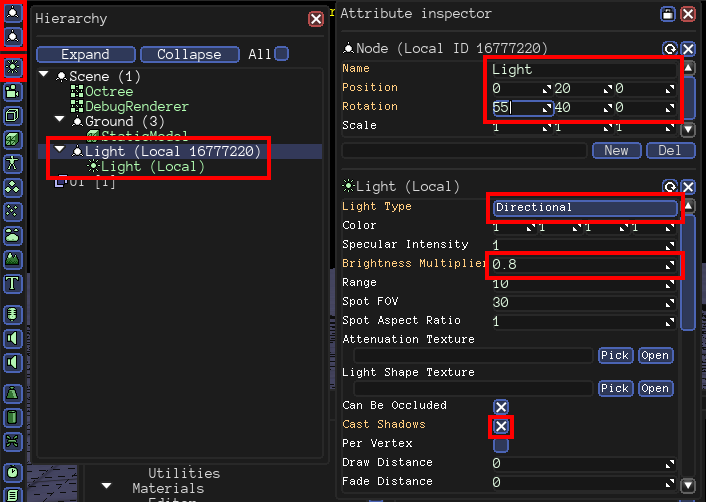
Make sure that the newly created node is selected, and select the menu item Create-> Component-> Scene-> Light (many components are duplicated in the left vertical panel). In the Attribute inspector window, specify a name for the node, select the type of source Directional (sunlight), specify the brightness, rotation, position (for this type of light source, the position does not matter, but we will raise the node above so as not to interfere with the scene). Also turn on the Cast Shadows option so that the light source can create shadows.
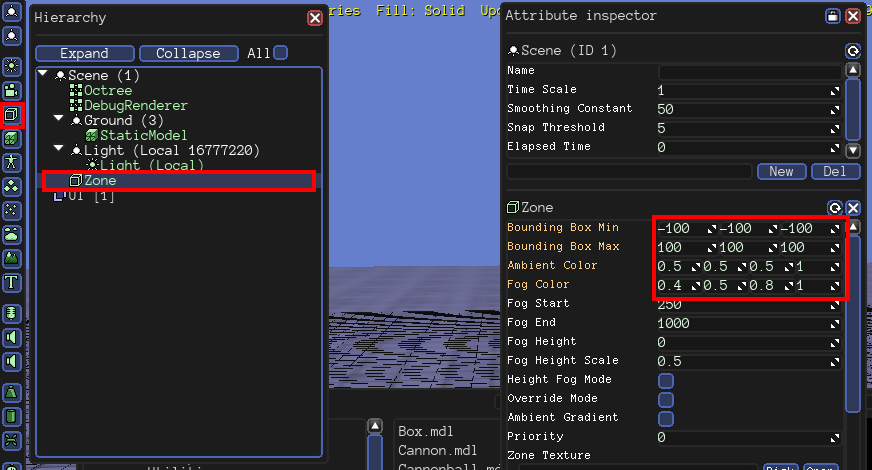
Now change the background lighting. Select the Scene root node and create the Zone component (Create-> Component-> Scene-> Zone). Set the background color (Fog Color) and background color (Ambient Color). These values will only be used if the camera is within the zone, so expand the boundaries (Bounding Box Min / Max).
Create a new node, add the AnimatedModel component (model with skeleton) to it and specify the Models / Cannon.mdl model and the Materials / Cannon.xml material. Move the gun up a bit, and also turn on the Cast Shadows option so that the gun casts a shadow.
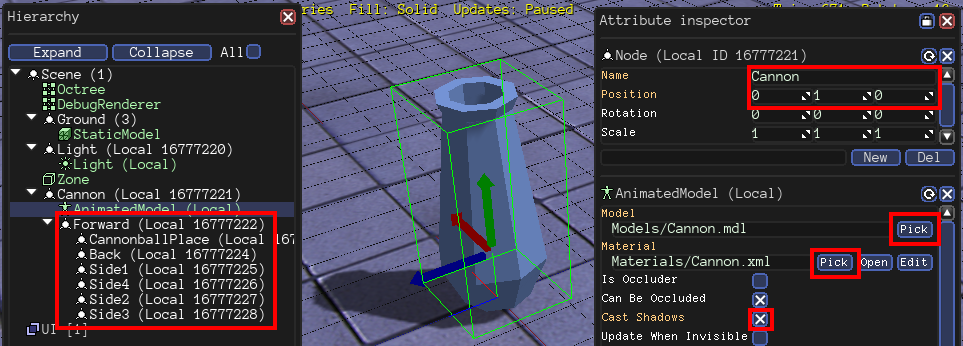
The child nodes that you see in the gun are the bones embedded in the model. For now, ignore them.
In the GameData \ Scripts folder, create a Cannon.as file with the following contents:
Scripts are best stored in UTF-8 encoding, then there will be no problems with the Cyrillic alphabet.
Add a ScriptInstance component to the Cannon node (Create-> Component-> Logic-> ScriptInstance). Click on the Pick button and select the newly created file, and enter Cannon in the Class Name column (the file may contain several classes). After entering, do not forget to press Enter. If everything is done correctly, the direction variable, which we declared in the script, should appear below the class name.
Make sure the RevertOnPause switch (third button on the top panel) is activated and click the RunUpdatePlay button (first button on the top panel). The gun will begin to spin back and forth. To stop, click RunUpdatePause (middle button).

What does the RevertOnPause switch do? If it is active, then before starting the scene, the state of the scene is remembered, and when you click on the pause, the state is restored to the original. This button is still useful to us in the second part of the lesson.
In the meantime, save the scene (File-> Save scene as ...) to the file GameData / Scenes / Level01.xml.
To be continued...
The editor is also a game.
The editor is a script in the AngelScript language, launched by the launcher that we used the last time . So, its code can be studied along with other examples and, if desired, can be easily modified. You can start the editor using the batch file Build / bin / Editor.bat.
Navigation is like controlling a shooter. W and S - move forward and backward, A and D - left and right, Q and E - down and up. Clamped shift moves faster. You can use the arrows. Holding down the right mouse button allows you to rotate the camera in different directions. When the middle button is clamped, it rotates around the selected object. If you turn the wheel, then the viewing angle (fov) changes. A complete list of keys can be found here .
Settings
View-> Editor Settings - display and control settings. For fans of Blender, there is the opportunity to choose an alternative keyboard layout. An option to pay attention to is New node mode. Use distance mode is enabled by default. In this mode, new nodes are created in the center of the screen at the distance specified in the New node distance column. As for me, this is not very convenient. I like the second mode much more - In center. In this mode, new nodes are created in the center of coordinates and they can be moved from there to the desired position. The third mode (Raycast) is similar to the first, only not a fixed distance is used, but the intersection with the scene is searched.
View-> Editor Preferences - interface settings. Of the interesting things here is the ability to select a language (including Russian) and set the transparency of the interface. Minimum opacity - transparency when moving the view, Maximum opacity - the rest of the time. I usually set both values to 1, because it is distracting. Note: to apply the new values, after entering, press Enter.
All settings are stored in the file c: \ Users \ USERNAME \ AppData \ Roaming \ urho3d \ Editor \ Config.xml (on Windows). To reset the settings, this file can be deleted.
Console
Pressing F1 opens the console. It can work in two modes, switching between which is done using the button to the left of the input field.
In FileSystem mode, the console works like a regular Windows command line (if you have Windows of course). For example, if you enter “notepad.exe,” then notepad opens.
In Script mode, all entered commands are executed by the AngelScript interpreter. For example, the command “log.Write (1 + 2)” will output 3. Here we come to the conclusion that the console output is a log. The log itself is written in text form to the file c: \ Users \ USERNAME \ AppData \ Roaming \ urho3d \ logs \ Editor.as.log. It will help you a lot when debugging scripts.
The first steps
Take the Urho3DHabrahabr02Start.zip archive from the github.com/1vanK/Urho3DHabrahabr02 repository and unpack it into an empty folder (I have this path “d: \ MyGames \ Urho3DHabrahabr02 \ Urho3DHabrahabr02 \”, so I will use it for clarity). This archive contains the resources that we will need when creating the game: several models, materials for them and one sound file.
In the editor, click File-> Set resource path ... and specify the path "d: \ MyGames \ Urho3DHabrahabr02 \ Urho3DHabrahabr02 \ GameData \". Now the editor has access to three folders with resources: the own Data and CoreData folders that are next to it, and the GameData folder that we specified.
Create a scene
In the Resource Browser, select the Models folder and drag Ground.mdl onto the Scene root node in the Hierarchy window.
In this case, a new node with the StaticModel component (a simple model without a skeleton) will be automatically created. In the Attribute inspector window, set the node name to Ground, click the Pick button next to the Material column and select Materials / Ground.xml.
Now we have the floor, but the scene is poorly lit, so let's add a light source.
First, create a new node. Select the Scene root node and select the menu item Create-> Local node. You can also create a Replicated node. In our case, there is no difference, since the replicated nodes are synchronized during network interaction, and we do not plan to work with the network. Nodes can also be created not through the menu, but using the vertical panel on the left side of the editor.
Make sure that the newly created node is selected, and select the menu item Create-> Component-> Scene-> Light (many components are duplicated in the left vertical panel). In the Attribute inspector window, specify a name for the node, select the type of source Directional (sunlight), specify the brightness, rotation, position (for this type of light source, the position does not matter, but we will raise the node above so as not to interfere with the scene). Also turn on the Cast Shadows option so that the light source can create shadows.
Now change the background lighting. Select the Scene root node and create the Zone component (Create-> Component-> Scene-> Zone). Set the background color (Fog Color) and background color (Ambient Color). These values will only be used if the camera is within the zone, so expand the boundaries (Bounding Box Min / Max).
Scripts
Create a new node, add the AnimatedModel component (model with skeleton) to it and specify the Models / Cannon.mdl model and the Materials / Cannon.xml material. Move the gun up a bit, and also turn on the Cast Shadows option so that the gun casts a shadow.
The child nodes that you see in the gun are the bones embedded in the model. For now, ignore them.
In the GameData \ Scripts folder, create a Cannon.as file with the following contents:
class Cannon : ScriptObject
{
    // Положительное или отрицательное направление вращения пушки.
    int direction = 1;
    // Функция вызывается каждый кадр.
    void Update(float timeStep)
    {
        // Угол поворота вокруг оси x (node указывает на ноду, к которой прикреплен скрипт).
        float pitch = node.rotation.pitch;
        // Меняем направление вращения, если значение угла выходит за заданные пределы.
        if (pitch >= 70.0f)
            direction = -1;
        else if (pitch <= -10.0f)
            direction = 1;
        pitch += 30.0f * direction * timeStep;
        node.rotation = Quaternion(pitch, 0.0f, 0.0f);
    }
}
Scripts are best stored in UTF-8 encoding, then there will be no problems with the Cyrillic alphabet.
Add a ScriptInstance component to the Cannon node (Create-> Component-> Logic-> ScriptInstance). Click on the Pick button and select the newly created file, and enter Cannon in the Class Name column (the file may contain several classes). After entering, do not forget to press Enter. If everything is done correctly, the direction variable, which we declared in the script, should appear below the class name.
Make sure the RevertOnPause switch (third button on the top panel) is activated and click the RunUpdatePlay button (first button on the top panel). The gun will begin to spin back and forth. To stop, click RunUpdatePause (middle button).
What does the RevertOnPause switch do? If it is active, then before starting the scene, the state of the scene is remembered, and when you click on the pause, the state is restored to the original. This button is still useful to us in the second part of the lesson.
In the meantime, save the scene (File-> Save scene as ...) to the file GameData / Scenes / Level01.xml.
To be continued...









