Creation of The Blacksmith: concept and decoration
- Transfer
In the framework of official cooperation with Unity, we will publish translations of articles on creating projects on Unity 5.
This time we will talk about sources of inspiration for creating the Blacksmith video (Kuznets), we will show examples of concept art and share interesting observations and tips.

The main character
In a previous article, we already wrote that in the process of creating content, our Unity Demo Team adheres to specific development goals.
When creating the protagonist of The Blacksmith, we were guided not only by the set technical goals, but also by the specific characteristics that, in our opinion, this character should have had.
For example, as part of this project, we decided to abandon skin shaders in favor of the built-in physically accurate shader (PBS) in Unity, which was under development at that time. In other words, we did not strive to ensure that the character's skin looked realistic. The same thing applied to hair - writing a separate shader for this purpose was not part of the project’s tasks.
In addition, we had to make sure that the environment corresponded to the image of the protagonist. We already had the environment ready for us, which we showed in the demo video of Viking Village (Viking Village), therefore, in order to save working time, we decided to reuse some resources. Thus, a ready-made setting was chosen for the character. And this led us to the idea of turning to Scandinavian mythology in search of interesting characters and plots.
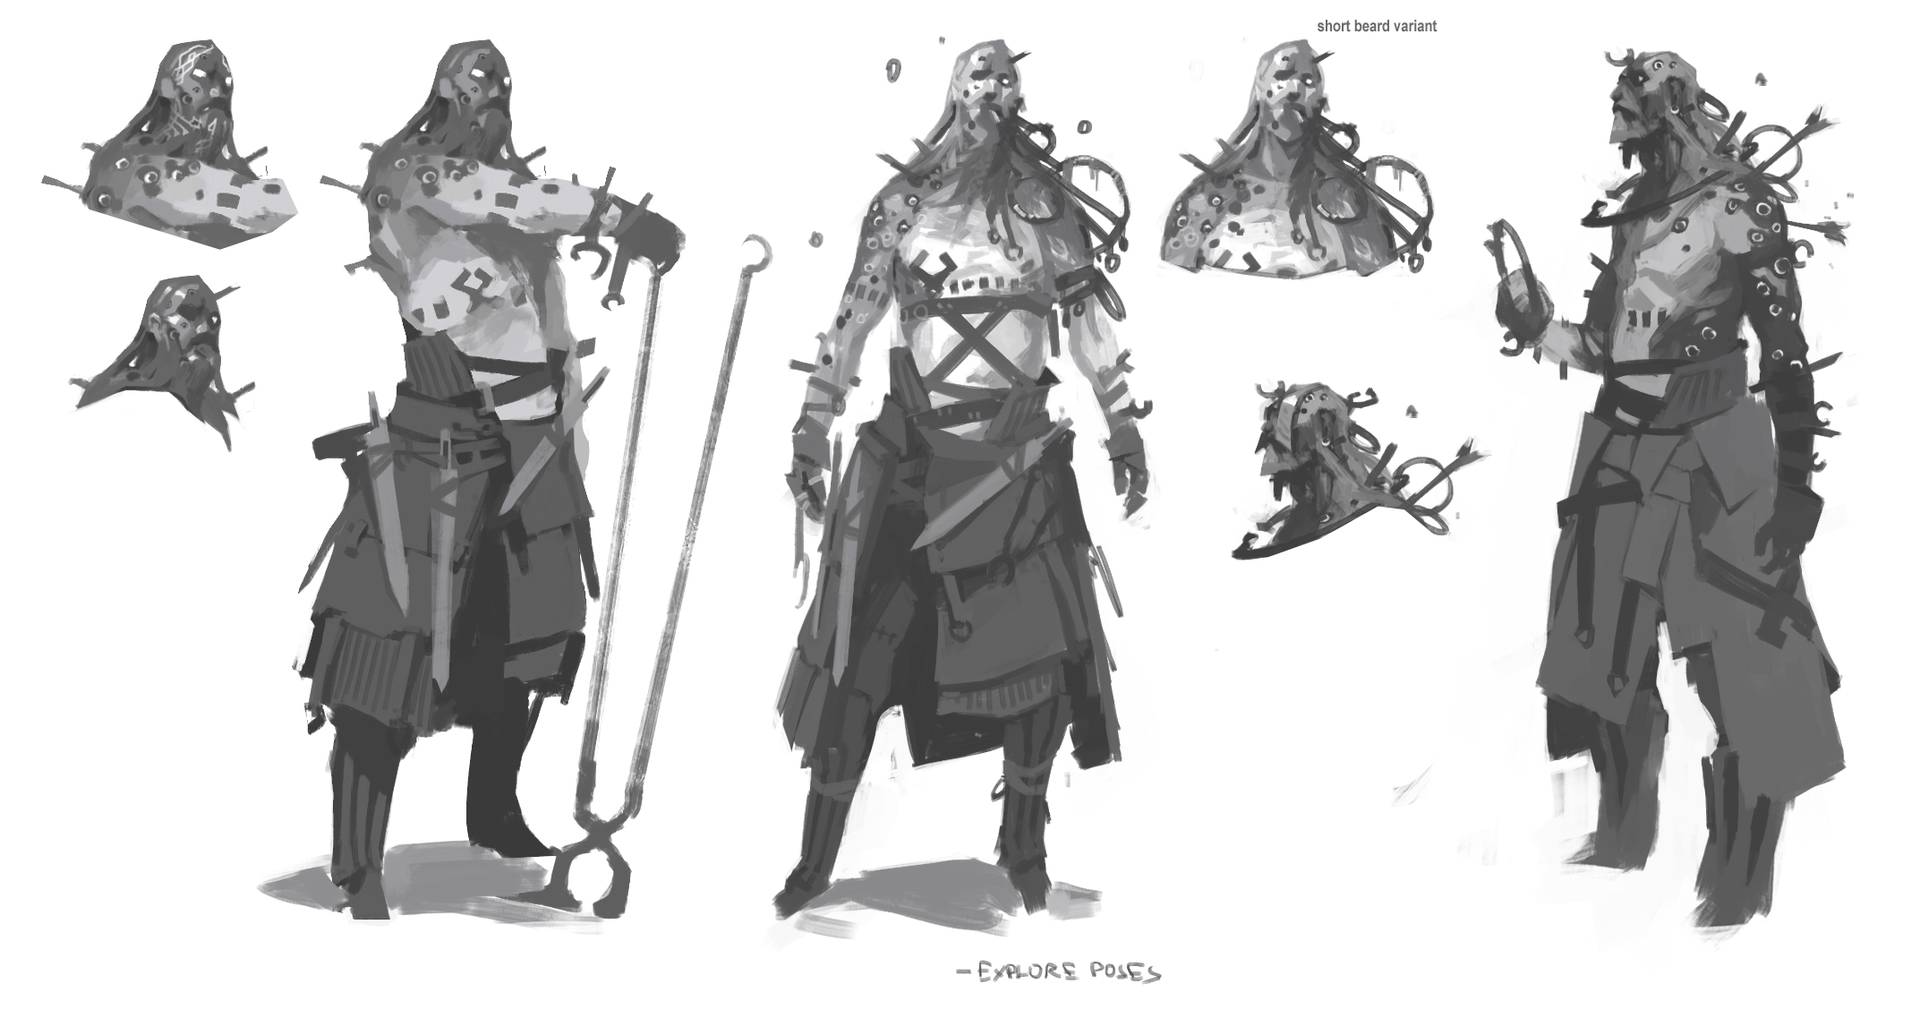
Concept art. Early drafts.
You may have already guessed which literary source formed the basis for the image of the blacksmith - “Song of Velound” - a work from the collection of Old Icelandic songs “Elder Edda”. Colorful images of blacksmiths and overlapping plots can also be found in the Finnish poetic epic."Kalevala . " Exploring the historical and mystical significance of the blacksmith in the mythology and folklore of the Indo-European peoples, we were fascinated by how this ambiguous image combines different elements that make it attractive, but at the same time emphasize its dark side. We decided that this is exactly what we need - an image reminiscent of many modern villains in cinema and literature who cannot leave anyone indifferent.

Concept art. Thumbnails.
As part of the visual development of the character, we worked closely with concept artist Georgy Simeonov . George proposed many interesting ideas and showed several ways to depict hair as part of a human silhouette using elements such as strips of skin or a hood.

Concept art. Thumbnails.
When creating the main character, we explored and rethought many mythological images. The collected material influenced not only the decoration, but also the plot of the video. In addition, we focused on other multifaceted and unusual literary characters, such as Morpheus from the Sandman comic book series by Neil Gaiman and judge Holden from the novel Cormac McCarthy's Blood Meridian (Blood Meridian).
This is how the last approved concept art of the protagonist of The Blacksmith:

Concept Art looks like . Approved Version.
We commissioned the development of models and textures for the character to Jonas Tornqvist(Jonas Thornquist). Jonas did an excellent job, created a model and visualized using VRay - and this is what he did: the

Blacksmith. The original render of a high-poly model made in VRay.
Antagonist
We examined the potential for creating a short film and decided to expand the project a bit. As a result, we not only abandoned the initial technical restrictions regarding the protagonist, but also added another character.
According to the idea, the antagonist is a battle-hardened warrior, in whose image the Old Norse and anachronistic elements are deliberately combined. In working on the concept and design of this character, we collaborated with Sergey Samuilov .

Antagonist. The original render made in the Marmoset Toolbag 2.
Environment The
environment from the Viking Village video was still under development and, of course, we wanted to use ready-made resources. However, from the very beginning it was obvious that they would have to be organized differently. In The Blacksmith, we wanted to create a more dramatic atmosphere. The environment was supposed to complement the plot of our video and go well with the individual characteristics and background of the characters.
To convey this idea to our team and other employees, we made several illustrations.

Illustrations for the video.
The development of the concept of the environment took very little time. We limited ourselves to a few quick sketches, and then switched to iterations in Unity, until we settled on a suitable version.

When creating the landscape, we collaborated with Terragen expert Martin Huisman, entrusting him with the procedural generation of highly detailed stone textures.

All stones in this image are rotated, scaled samples of the same source.
Create Movie
At the first stage of the project, we made a storyboard. As a result, we had many new ideas that we shared with the production team. Thanks to working with Unity, we did not have to block access to the storyboard at an early stage - the engine provides the ability to load resources in real time, which allows you to edit individual frames even in the last stages. Without much effort, we explored a number of modifications and adaptations of our original idea, made technical changes and even changed the plot a bit until the deadline for the completion of the project.

Storyboard. Early version.
The subsequent stages of work looked something like this:
First, we made pilot samples of some key personnel. To feel the length and rhythmic development of the video, we used a ready-made animated 2D storyboard. In addition, we identified additional tools and shaders that could be useful to us.
Then we went on to develop a prototype environment in Unity using preliminary versions of resources, including character models. We also used them when working with visuals, and pre-visualization in 3D served as a good reference for actors in motion-capture studio.
After the shootings, we did the post-processing of the animation, exported it to Unity and performed chronological synchronization along with additional frame iterations. Meanwhile, the artist began to replace preliminary resources in the engine with newer ones, while working on lighting and post-effects.

Frame structure. Sketch; 2D animatic; motion capture with real-time preview; 3D rendering; final version in Unity (Scene view); final version in Unity (Game view).
At this point, the Unity graphics system and our additional shaders were subjected to increased loads. As the Unity 5.0 engine went through beta testing, we sent our comments and suggestions to the Unity development team regarding bugs, inconsistencies, integration issues, and stability issues, and also asked for better workflows and performance.
At the last stage, we were engaged in iterating and final polishing graphics and animations, fixing remaining bugs in our tools and shaders, and, finally, preparing for the delivery of the project.
In the next article in this series, we will consider creating the Blacksmith video from a more technical point of view and touch upon aspects of scene preparation, shading, and lighting. Stay tuned on the special page of our short film.
This time we will talk about sources of inspiration for creating the Blacksmith video (Kuznets), we will show examples of concept art and share interesting observations and tips.
The main character
In a previous article, we already wrote that in the process of creating content, our Unity Demo Team adheres to specific development goals.
When creating the protagonist of The Blacksmith, we were guided not only by the set technical goals, but also by the specific characteristics that, in our opinion, this character should have had.
For example, as part of this project, we decided to abandon skin shaders in favor of the built-in physically accurate shader (PBS) in Unity, which was under development at that time. In other words, we did not strive to ensure that the character's skin looked realistic. The same thing applied to hair - writing a separate shader for this purpose was not part of the project’s tasks.
In addition, we had to make sure that the environment corresponded to the image of the protagonist. We already had the environment ready for us, which we showed in the demo video of Viking Village (Viking Village), therefore, in order to save working time, we decided to reuse some resources. Thus, a ready-made setting was chosen for the character. And this led us to the idea of turning to Scandinavian mythology in search of interesting characters and plots.
Concept art. Early drafts.
You may have already guessed which literary source formed the basis for the image of the blacksmith - “Song of Velound” - a work from the collection of Old Icelandic songs “Elder Edda”. Colorful images of blacksmiths and overlapping plots can also be found in the Finnish poetic epic."Kalevala . " Exploring the historical and mystical significance of the blacksmith in the mythology and folklore of the Indo-European peoples, we were fascinated by how this ambiguous image combines different elements that make it attractive, but at the same time emphasize its dark side. We decided that this is exactly what we need - an image reminiscent of many modern villains in cinema and literature who cannot leave anyone indifferent.
Concept art. Thumbnails.
As part of the visual development of the character, we worked closely with concept artist Georgy Simeonov . George proposed many interesting ideas and showed several ways to depict hair as part of a human silhouette using elements such as strips of skin or a hood.
Concept art. Thumbnails.
When creating the main character, we explored and rethought many mythological images. The collected material influenced not only the decoration, but also the plot of the video. In addition, we focused on other multifaceted and unusual literary characters, such as Morpheus from the Sandman comic book series by Neil Gaiman and judge Holden from the novel Cormac McCarthy's Blood Meridian (Blood Meridian).
This is how the last approved concept art of the protagonist of The Blacksmith:
Concept Art looks like . Approved Version.
We commissioned the development of models and textures for the character to Jonas Tornqvist(Jonas Thornquist). Jonas did an excellent job, created a model and visualized using VRay - and this is what he did: the
Blacksmith. The original render of a high-poly model made in VRay.
Antagonist
We examined the potential for creating a short film and decided to expand the project a bit. As a result, we not only abandoned the initial technical restrictions regarding the protagonist, but also added another character.
According to the idea, the antagonist is a battle-hardened warrior, in whose image the Old Norse and anachronistic elements are deliberately combined. In working on the concept and design of this character, we collaborated with Sergey Samuilov .
Antagonist. The original render made in the Marmoset Toolbag 2.
Environment The
environment from the Viking Village video was still under development and, of course, we wanted to use ready-made resources. However, from the very beginning it was obvious that they would have to be organized differently. In The Blacksmith, we wanted to create a more dramatic atmosphere. The environment was supposed to complement the plot of our video and go well with the individual characteristics and background of the characters.
To convey this idea to our team and other employees, we made several illustrations.
Illustrations for the video.
The development of the concept of the environment took very little time. We limited ourselves to a few quick sketches, and then switched to iterations in Unity, until we settled on a suitable version.
When creating the landscape, we collaborated with Terragen expert Martin Huisman, entrusting him with the procedural generation of highly detailed stone textures.
All stones in this image are rotated, scaled samples of the same source.
Create Movie
At the first stage of the project, we made a storyboard. As a result, we had many new ideas that we shared with the production team. Thanks to working with Unity, we did not have to block access to the storyboard at an early stage - the engine provides the ability to load resources in real time, which allows you to edit individual frames even in the last stages. Without much effort, we explored a number of modifications and adaptations of our original idea, made technical changes and even changed the plot a bit until the deadline for the completion of the project.
Storyboard. Early version.
The subsequent stages of work looked something like this:
First, we made pilot samples of some key personnel. To feel the length and rhythmic development of the video, we used a ready-made animated 2D storyboard. In addition, we identified additional tools and shaders that could be useful to us.
Then we went on to develop a prototype environment in Unity using preliminary versions of resources, including character models. We also used them when working with visuals, and pre-visualization in 3D served as a good reference for actors in motion-capture studio.
After the shootings, we did the post-processing of the animation, exported it to Unity and performed chronological synchronization along with additional frame iterations. Meanwhile, the artist began to replace preliminary resources in the engine with newer ones, while working on lighting and post-effects.
Frame structure. Sketch; 2D animatic; motion capture with real-time preview; 3D rendering; final version in Unity (Scene view); final version in Unity (Game view).
At this point, the Unity graphics system and our additional shaders were subjected to increased loads. As the Unity 5.0 engine went through beta testing, we sent our comments and suggestions to the Unity development team regarding bugs, inconsistencies, integration issues, and stability issues, and also asked for better workflows and performance.
At the last stage, we were engaged in iterating and final polishing graphics and animations, fixing remaining bugs in our tools and shaders, and, finally, preparing for the delivery of the project.
In the next article in this series, we will consider creating the Blacksmith video from a more technical point of view and touch upon aspects of scene preparation, shading, and lighting. Stay tuned on the special page of our short film.