Effective image resizing with ImageMagick
- Transfer
Nowadays, more and more sites are faced with the need to introduce responsive design and responsive images - and in this regard, there is a need to effectively resize all images. The system should work so that each user is sent, upon request, a picture of the right size - small for users with small screens, large - for large screens.
The web thus works fine, but to deliver pictures of different sizes to different users, you must first create all these pictures.
Many tools resize, but all too often they produce large files that invalidate the performance gains that come with responsive images. Let's look at how withImageMagick , a command-line tool, can quickly resize images, while maintaining excellent quality and obtaining files of small volumes.
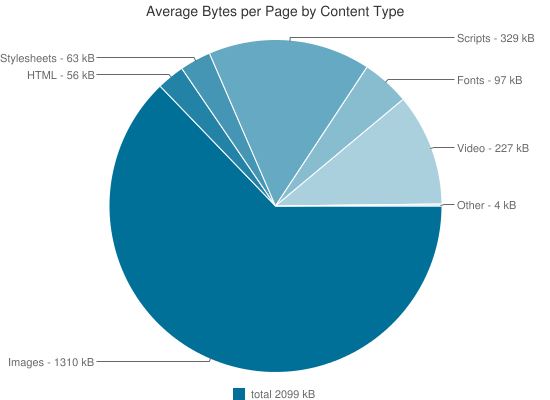
The average web page weighs 2 MB , of which 2/3 are pictures. Millions of people go online via 3G, or worse. 2MB sites in these cases work terribly. Even on fast connections, such sites can use up traffic limits. The work of web designers and developers is to simplify and improve the life of the user.
Very small sites can simply save several variations of all images. But what if you have their dofig? For example, in a store there may be hundreds of thousands of pictures - do not make their variants manually.
A 25-year-old command-line utility is at the same time a full-featured image editor. It has a huge bunch of functions, and among them - fast and automatic resizing of pictures. But with the default settings, files often turn out to be excessively large - sometimes the volume is larger than the original, although they have fewer pixels. Now I will explain what the problem is and show what settings are needed to solve it.
By definition, when you resize a picture, the number of pixels in it changes. If it is increased, the output will have more pixels than the input; with a decrease - on the contrary. The challenge is how best to save the contents of the original image using a different number of pixels.
Enlarging images is easier to depict, so let's start with it. Consider a picture with a 4x4 pixel square, which we want to double to 8x4. In fact, we take this picture and pull it onto a new grid - this is called resampling. To sample a 4x4 image by 8x8, you need to insert 48 extra pixels somewhere. They must have some color - the process of its selection is called interpolation. When sampling, an algorithm that selects how interpolation works is called a sampling filter.
There are many such filters. It’s easiest to add four rows and four columns of any color. Well, say red. This will be background interpolation when the background color (red) appears on empty places. In Photoshop, this is done through “Image” → “Canvas Size” instead of “Image” → “Image Size”.
This, of course, will not suit us. The picture will not be similar to the original. Background interpolation is used only to add new pixels, and even then it is useless when resizing.
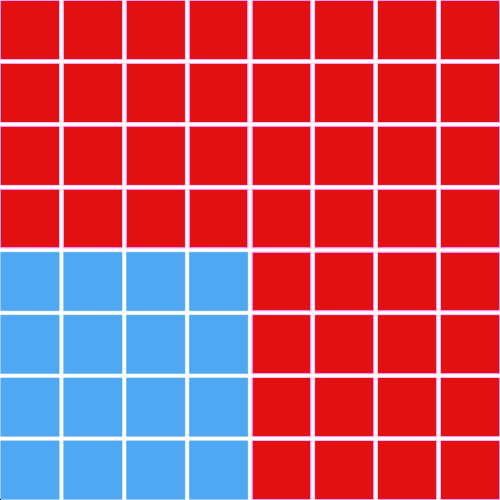
Another simple interpolation — making the color of the new pixels the same as their neighbors — is interpolation over the nearest neighbors. For pictures, especially for our square, the result will be much better.

With downsampling, that is, reducing the picture, it is not so easy to interpolate the nearest neighbors. It must be accepted that for mathematical purposes it is possible to operate with fractional pixels. For starters, the new grid is applied to the original image. As the pixels are smaller and larger, some of them contain several colors.
But real pixels have only one color. The resulting color of each pixel in the new grid is determined by the color at its center. Therefore, sometimes interpolation over the nearest neighbors when decreasing is called point discretization.

But if it is something more complicated than lines and squares, such a method produces jagged and square pictures. It works fast, produces small files, but it looks bad.
Most filters use interpolation variations for the closest neighbors - they do spot sampling at several points and somehow calculate a certain average color for them. In bilinear interpolation, a weighted average of colors is considered.

But such a filter affects the file size because it adds new colors along with rounded edges. The original picture had only two colors, but now we have more of them. And other things being equal, the more colors, the heavier the file.
And what does this mean for us
? We need to somehow reduce the number of colors without losing quality. This is most affected by the choice of filter, but other settings can also.
ImageMagick has a lot of settings and functions , and finding the right one is pretty hard. We are interested in two functions, convert and mogrify. They perform similar actions, but mogrify works with several files at once, and convert - one at a time.
Simple operation:
In doing so, IM takes input.jpg and resizes it to pixels wide, storing the result in output.jpg. The -resize 300 function is an example of one of many functions. They all have one format: -functionName option.
You can also use mogrify, with a little addition:
Here IM takes all JPEG files from the current directory (* .jpg), resizes them to 300 pixels wide and saves them in the output directory.
Functions can be combined:
This also resizes input.jpg to 300 pixels, but sets the JPEG quality to 75 before saving to output.jpg.
While testing various IM settings, I tried to reduce the size of the files without compromising their quality - so that they would not be distinguished from the Photoshop option “Save for Web”. For testing, I used both subjective opinion and objective - I measured structural differences (structural dissimilarity, DSSIM). DSSIM compares two pictures and gives a rating. The lower the score, the more they are similar. 0 means identity. I achieved a DSSIM score of no more than 0.0075. And in one study last year, it was found that usually people can’t distinguish by eye pictures with DSSIM of less than 0.015.
Having tested various images of different sizes in JPEG and PNG formats, I came to the conclusion that the following IM settings create the smallest results, which are almost indistinguishable from Photoshop output:
Let's analyze them in more detail.
IM uses convert to process images one at a time, and mogrify is usually needed for batch processing. In an ideal world, the results of their work should match. Unfortunately, there is an error in convert , due to which it ignores some of the settings (-define jpeg: fancy-upsampling = off), so I had to use mogrify.
The choice of a sampling filter in IM is for some reason confused. There are three ways to do this:
Examples of twelve different resizing
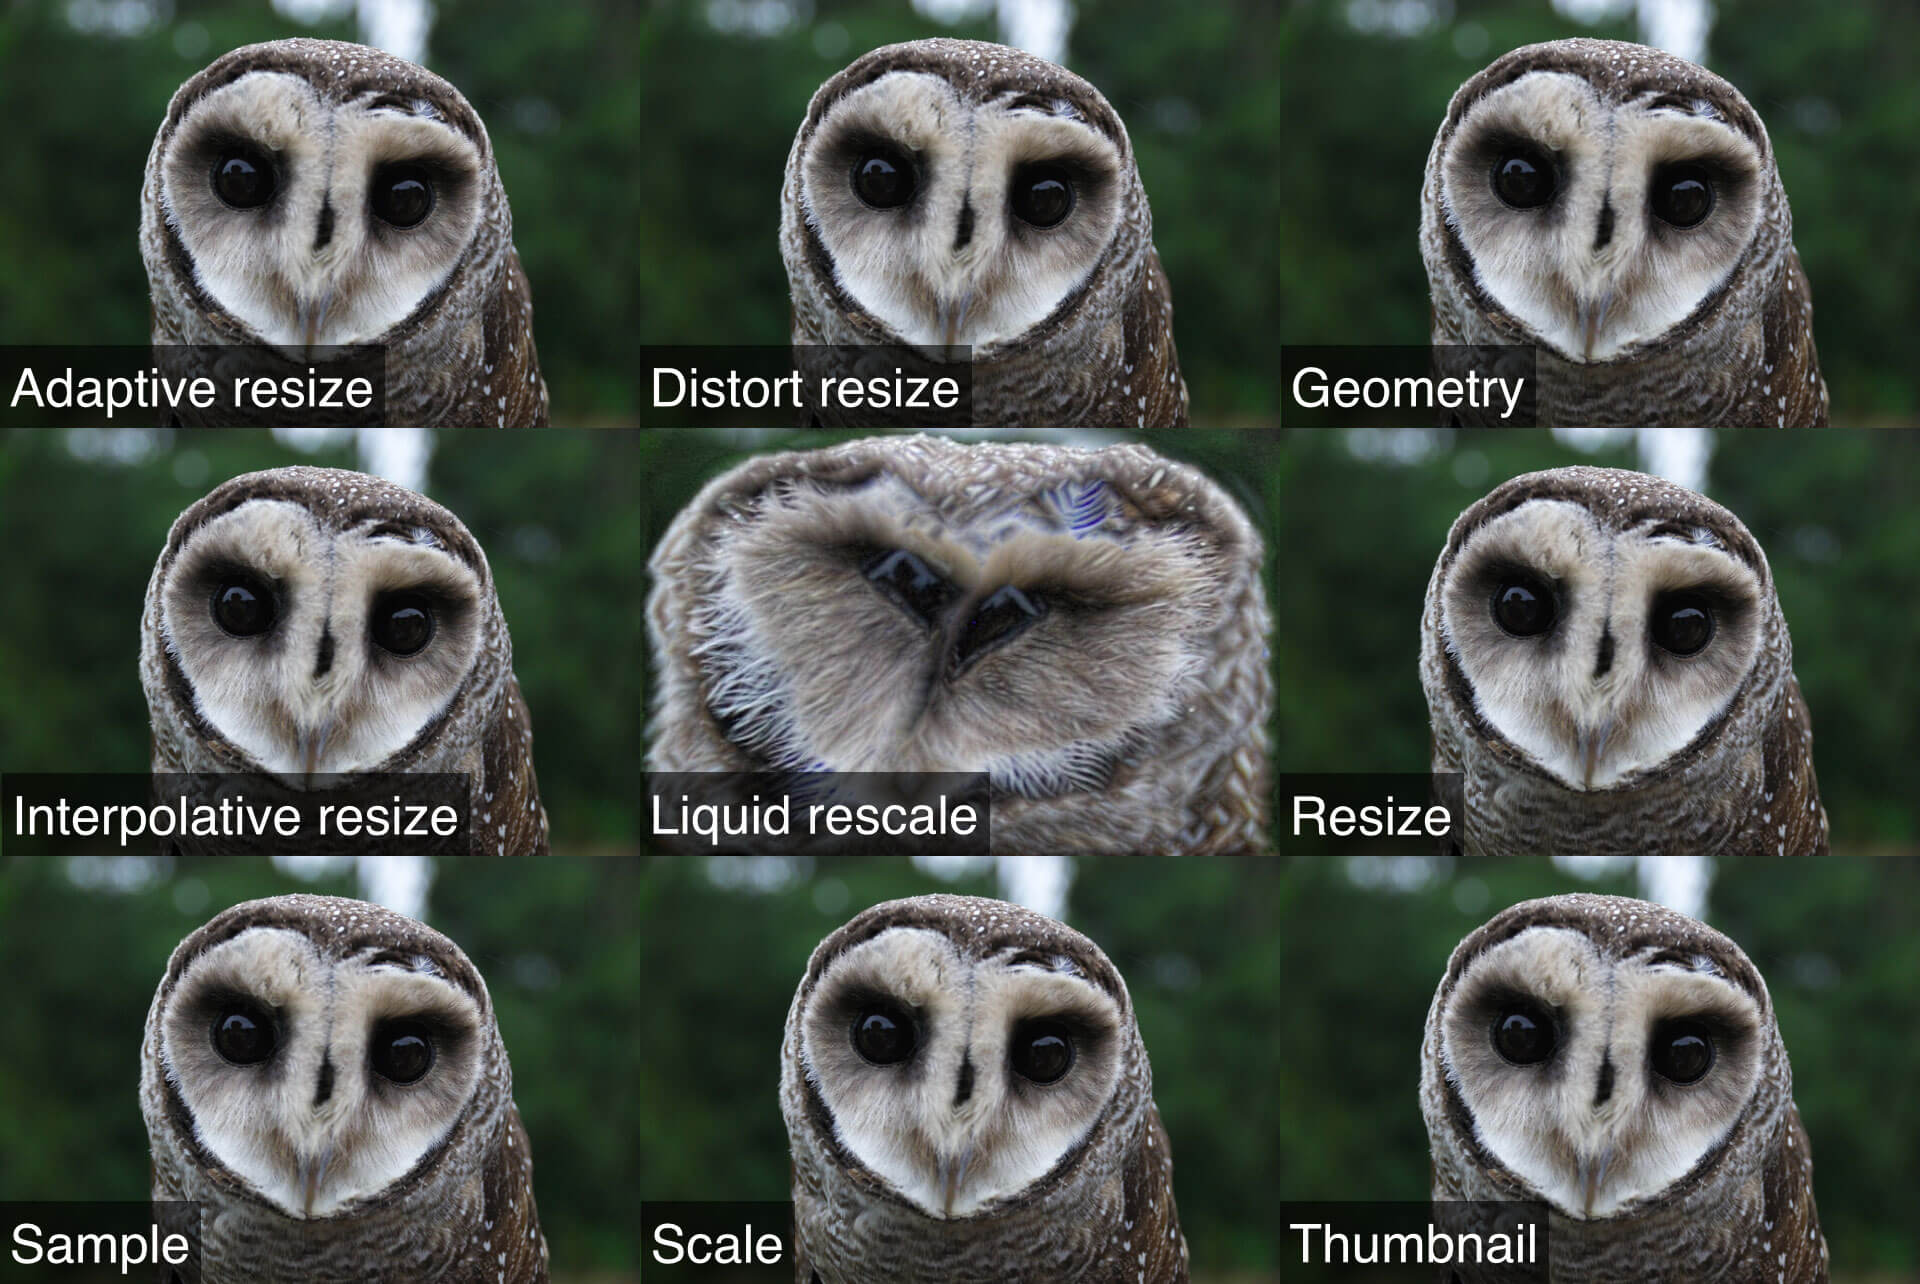
functions Most obviously, –resize is used, but the results are too large. I checked 11 different functions and found that thumbnail works best with reduction, both in size and in quality. This function works in three stages:
That is, if we reduce the image to 500 pixels wide, -thumbnail will first resize it to 2500 using –sample. Then IM will resize from 2500 to 500 via –resize. And at the end it will delete the meta data.
The second way to select a sampling filter is through –filter. Some functions have built-in filters, while others have default filters that you can change. In the second step of –thumbnail, –filter is used, because the –resize function is used there.
I checked 31 settings for –filter and got the best results using Triangle. This filter is also known as bilinear interpolation. It calculates a weighted average color from neighboring pixels. I found that it is best to set the area of neighboring pixels as -define filter: support = 2 setting.
The third way to select a filter is –interpolate, but it is ignored when using -thumbnail.
Among other things, IM by default uses some function called JPEG fancy upsampling, which tries to produce better quality JPEG. I decided that it only increases the size of the pictures, and the difference in quality is negligible, so I recommend turning it off via -define jpeg: fancy-upsampling = off.
When resizing, the pictures are slightly blurred, so the same photoshop uses different techniques to increase the clarity. I recommend the unsharp filter, which, despite the name, increases the clarity of the picture: -unsharp 0.25x0.25 + 8 + 0.065.
The filter works so that Gaussian blur is applied first . The first two numbers are the radius and sigma (in our case, 0.25 pixels each). After blurring, the filter compares the blurry version with the original, and where the brightness differs more than the specified threshold (0.065), an increase in the sharpness of the specified force is applied (8).
As I said earlier, the main reason for the increase in file size when resizing images is the addition of new colors. Therefore, you need to try to reduce their number, but without loss of quality.
One way is posterization, when gradients are replaced with sets of clear colors. Posterization reduces the number of color levels - this is how many options remain in the red, green and blue channels. The total number of colors in the picture will be a combination of the colors of these channels.
Posterization can reduce file size, but also degrade quality. I propose the number 136, in which you get a small file without losing much in quality.
Original
Reduced Color
Dithering is a process that mitigates the effects of reducing colors by adding noise to color sets to create the illusion of more colors. In theory, this is a good idea.
After dithering
Unfortunately, IM has an error that spoils images with transparency during dithering. Therefore, it is better to disable it through -dither None. Fortunately, even without it, the results of posterization look pretty good.
Dithering error in IM
Color space indirectly refers to the number of colors in a picture. This space determines which colors are available. The picture below shows that the ProPhoto RGB color space contains more colors than Adobe RGB, which in turn contains more colors than sRGB. And they all contain fewer flowers than the eye sees.
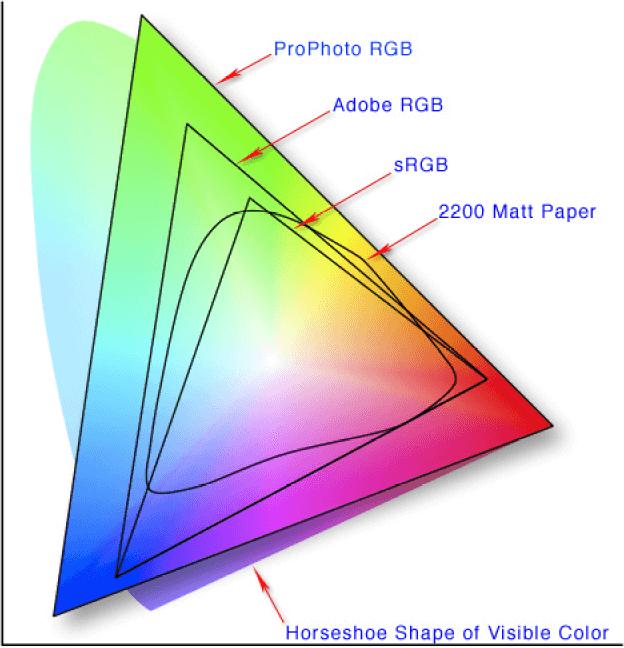
sRGB made the king of Internet color spaces. It was approved by W3C and other organizations. It is required support in the CSS Color Module Level 3 and in the SVG and WebP specifications. It is referenced in the PNG specification. In Photoshop, this is also the default color space. In short, sRGB is the best choice for the web, and if you want your pictures to display correctly, it's best to use it.
In formats with loss of quality like JPEG, quality and compression are directly related - the more compression, the lower the quality and less file size. Therefore, you need to find a balance.
In my tests, the control pictures and photoshop were set to high, or 60. And in IM settings, I recommend using 82. Why?
It turns out that quantitatively the quality setting is not defined in JPEG format, and therefore it is not a standard. Quality 60 in Photoshop may turn out to be the same as quality 40 in one program, quality B + in another, or “awesome” quality in a third. In my tests, I found out that Photoshop 60 corresponds to -quality 82 in ImageMagick.
And in formats without loss of quality like PNG, quality and compression are not related. High compression does not change the appearance of the picture, but depends only on the processor load level during its processing. If you do not spare computers, then there is no reason not to set the maximum PNG compression.
PNG compression in IM can be set in three settings: -define png: compression-filter, -define png: compression-level and -define png: compression-strategy. Compression filter- This is an additional step before compression, which sorts the data so that compression becomes more efficient. I achieved better results using adaptive filtering (-define png: compression-filter = 5). I recommend setting the compression level to a maximum of 9 (-define png: compression-level = 9). A strategy determines the algorithm itself. I liked the default strategy more (-define png: compression-strategy = 1).
In addition to the picture itself, files can contain meta data - information about the picture when it was created, about the device that created it. This information takes place, but does not improve the perception of the picture, and it is better to delete it. And although I pointed out that –thumbnail deletes meta data, still it doesn’t delete all of them. It is possible to delete everything using -strip and -define png: exclude-chunk = all. This does not affect the quality.
JPEGs and PNGs can be saved using progressive or sequential rendering. By default, the second one is executed, when pixels are loaded in rows, from top to bottom. Progressive means that the picture is transmitted and displayed gradually.
With JPEG, progressive rendering can occur in any number of steps - this is determined when the file is saved. The first step is the low resolution version of the full picture; on each subsequent version of a higher resolution appears until the entire picture is displayed in higher resolution.

PNG has a kind of progressive render called Adam7 interlacing , when pixels are displayed in seven steps based on an 8x8 grid.
Both types of rendering can be configured in IM via –interlace. But is it necessary?
Such a render increases the volume of files. For a long time, it was believed that it should be included, as it improves user experience. Even if the perfect picture does not load right away, it will recognize something, and it will be better than nothing.
Last year, according to the results of the study, it became clear that users prefer consistent rendering. This is just one study, but still interesting. So I decided to recommend using a sequential render through "-interlace none".
I mentioned optimization. I recommend all the settings described before this if you do not optimize your images. If they can be optimized, then I will change them: small changes in the -unsharp settings work better (-unsharp 0.25x0.08 + 8.3 + 0.045 versus -unsharp 0.25x0.25 + 8 + 0.065 without optimization) and you do not need to use -strip.
There are many optimizers. I tested image_optim , picopt and ImageOptim , and they all run the pictures through a series of different steps. I checked them in turn and came to the conclusion that it is better to run the files through all three in the order in which they are listed. True, after using image_optim, the benefits of picopt and ImageOptim become minimal. If you do not have extra time and processor power, then using more than one optimization will be excessive.
Of course, my settings are complicated, but they are needed to improve user experience. I am pleased to report that having spent time on tests, I was able to drastically reduce the volume of files without losing quality.
The average file size decreased by 35% compared to the Photoshop option “Save for Web”.
Comparison with Photoshop Creative Cloud
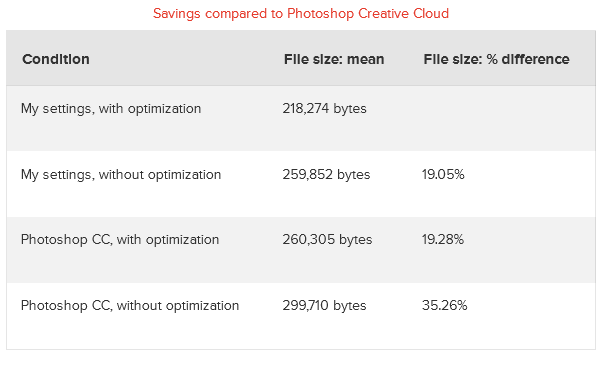
My settings without optimization turned out to be even better than photoshop with optimization!
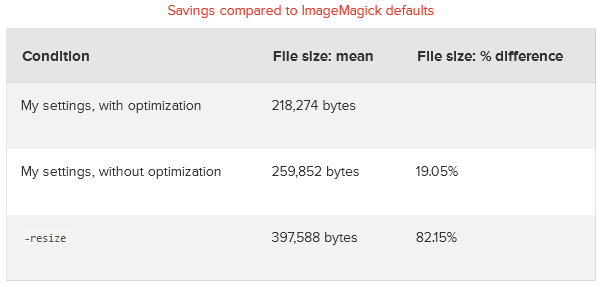
Compared to the default settings when resizing IM images, my recommendations won on average 82%.
Compared to the default settings in WordPress, which uses ImageMagick “under the hood,” my settings won an average of 77%.
Compared to other CMS and tools that use ImageMagick, my settings won up to 144%.
I remind you that all the pictures turned out to be indistinguishable from the output of Photoshop.
Here you can add the macro function to the .bash_aliases (or .bashrc) file, which will replace my recommended command:
And you need to call it like this:
The npm package called imagemagick allows you to use ImageMagick. When using it, you can add a resize function as follows:
If you use Grunt to run tasks, then I specially made for you a task called grunt-respimg ( npm ), which does everything that I described. It can be included in your projects like this:
And then it can be done in the Grunt file:
In PHP, ImageMagick is integrated under the name Imagick . Unfortunately, there it is limited and does not know how to do everything that I recommended - in particular, configure the sampling filter to use the thumbnail function.
But you're in luck - I created the php-respimg ( packagist ) module , which does everything you need. It can be included in the project using Composer :
And then resize the images like this:
If your CMS runs on PHP, take the “PHP” section and make a plugin out of it. If you use WordPress, then you can use the RICG Responsive Images plugin . After installing it, you will need to add the following to the functions.php file for activation:
Other CMS provide access to image manipulation functions in one way or another - refer to their documentation.
In my tests, I found that compared to –resize by default, IM took 2.25 times more time to process images.
Designers and developers are very influential in how the web works. We can make websites more responsive, improve their perception by users, and even bring our content to new markets . Cutting the volume of images is done quite simply and greatly affects the increase in website performance - I hope that all this information will be useful to you and will allow you to improve your site for your users.
grunt-respimg
php-respimg
RICG Responsive Images plugin
The web thus works fine, but to deliver pictures of different sizes to different users, you must first create all these pictures.
Many tools resize, but all too often they produce large files that invalidate the performance gains that come with responsive images. Let's look at how withImageMagick , a command-line tool, can quickly resize images, while maintaining excellent quality and obtaining files of small volumes.
Large pictures == big problems
The average web page weighs 2 MB , of which 2/3 are pictures. Millions of people go online via 3G, or worse. 2MB sites in these cases work terribly. Even on fast connections, such sites can use up traffic limits. The work of web designers and developers is to simplify and improve the life of the user.
Very small sites can simply save several variations of all images. But what if you have their dofig? For example, in a store there may be hundreds of thousands of pictures - do not make their variants manually.
Imagemagick
A 25-year-old command-line utility is at the same time a full-featured image editor. It has a huge bunch of functions, and among them - fast and automatic resizing of pictures. But with the default settings, files often turn out to be excessively large - sometimes the volume is larger than the original, although they have fewer pixels. Now I will explain what the problem is and show what settings are needed to solve it.
How image resizing works
By definition, when you resize a picture, the number of pixels in it changes. If it is increased, the output will have more pixels than the input; with a decrease - on the contrary. The challenge is how best to save the contents of the original image using a different number of pixels.
Enlarging images is easier to depict, so let's start with it. Consider a picture with a 4x4 pixel square, which we want to double to 8x4. In fact, we take this picture and pull it onto a new grid - this is called resampling. To sample a 4x4 image by 8x8, you need to insert 48 extra pixels somewhere. They must have some color - the process of its selection is called interpolation. When sampling, an algorithm that selects how interpolation works is called a sampling filter.
There are many such filters. It’s easiest to add four rows and four columns of any color. Well, say red. This will be background interpolation when the background color (red) appears on empty places. In Photoshop, this is done through “Image” → “Canvas Size” instead of “Image” → “Image Size”.
This, of course, will not suit us. The picture will not be similar to the original. Background interpolation is used only to add new pixels, and even then it is useless when resizing.
Another simple interpolation — making the color of the new pixels the same as their neighbors — is interpolation over the nearest neighbors. For pictures, especially for our square, the result will be much better.
With downsampling, that is, reducing the picture, it is not so easy to interpolate the nearest neighbors. It must be accepted that for mathematical purposes it is possible to operate with fractional pixels. For starters, the new grid is applied to the original image. As the pixels are smaller and larger, some of them contain several colors.
But real pixels have only one color. The resulting color of each pixel in the new grid is determined by the color at its center. Therefore, sometimes interpolation over the nearest neighbors when decreasing is called point discretization.
But if it is something more complicated than lines and squares, such a method produces jagged and square pictures. It works fast, produces small files, but it looks bad.
Most filters use interpolation variations for the closest neighbors - they do spot sampling at several points and somehow calculate a certain average color for them. In bilinear interpolation, a weighted average of colors is considered.
But such a filter affects the file size because it adds new colors along with rounded edges. The original picture had only two colors, but now we have more of them. And other things being equal, the more colors, the heavier the file.
And what does this mean for us
? We need to somehow reduce the number of colors without losing quality. This is most affected by the choice of filter, but other settings can also.
Optimal settings for ImageMagick
ImageMagick Basics
ImageMagick has a lot of settings and functions , and finding the right one is pretty hard. We are interested in two functions, convert and mogrify. They perform similar actions, but mogrify works with several files at once, and convert - one at a time.
Simple operation:
convert input.jpg -resize 300 output.jpg
In doing so, IM takes input.jpg and resizes it to pixels wide, storing the result in output.jpg. The -resize 300 function is an example of one of many functions. They all have one format: -functionName option.
You can also use mogrify, with a little addition:
mogrify -path output/ -resize 300 *.jpg
Here IM takes all JPEG files from the current directory (* .jpg), resizes them to 300 pixels wide and saves them in the output directory.
Functions can be combined:
convert input.jpg -resize 300 -quality 75 output.jpg
This also resizes input.jpg to 300 pixels, but sets the JPEG quality to 75 before saving to output.jpg.
Testing and Results
While testing various IM settings, I tried to reduce the size of the files without compromising their quality - so that they would not be distinguished from the Photoshop option “Save for Web”. For testing, I used both subjective opinion and objective - I measured structural differences (structural dissimilarity, DSSIM). DSSIM compares two pictures and gives a rating. The lower the score, the more they are similar. 0 means identity. I achieved a DSSIM score of no more than 0.0075. And in one study last year, it was found that usually people can’t distinguish by eye pictures with DSSIM of less than 0.015.
Having tested various images of different sizes in JPEG and PNG formats, I came to the conclusion that the following IM settings create the smallest results, which are almost indistinguishable from Photoshop output:
mogrify -path OUTPUT_PATH -filter Triangle -define filter:support=2 -thumbnail OUTPUT_WIDTH -unsharp 0.25x0.25+8+0.065 -dither None -posterize 136 -quality 82 -define jpeg:fancy-upsampling=off -define png:compression-filter=5 -define png:compression-level=9 -define png:compression-strategy=1 -define png:exclude-chunk=all -interlace none -colorspace sRGB -strip INPUT_PATH
Let's analyze them in more detail.
Mogrify or Convert
IM uses convert to process images one at a time, and mogrify is usually needed for batch processing. In an ideal world, the results of their work should match. Unfortunately, there is an error in convert , due to which it ignores some of the settings (-define jpeg: fancy-upsampling = off), so I had to use mogrify.
Resampling
The choice of a sampling filter in IM is for some reason confused. There are three ways to do this:
- by selecting the resize function
- using the -filter option
- or the -interpolate option
Examples of twelve different resizing
functions Most obviously, –resize is used, but the results are too large. I checked 11 different functions and found that thumbnail works best with reduction, both in size and in quality. This function works in three stages:
- resizes the image to a size five times larger than necessary using the –sample function, which has its own built-in filter
- then resizes to desired via –resize
- removes meta data from a picture
That is, if we reduce the image to 500 pixels wide, -thumbnail will first resize it to 2500 using –sample. Then IM will resize from 2500 to 500 via –resize. And at the end it will delete the meta data.
The second way to select a sampling filter is through –filter. Some functions have built-in filters, while others have default filters that you can change. In the second step of –thumbnail, –filter is used, because the –resize function is used there.
I checked 31 settings for –filter and got the best results using Triangle. This filter is also known as bilinear interpolation. It calculates a weighted average color from neighboring pixels. I found that it is best to set the area of neighboring pixels as -define filter: support = 2 setting.
The third way to select a filter is –interpolate, but it is ignored when using -thumbnail.
Among other things, IM by default uses some function called JPEG fancy upsampling, which tries to produce better quality JPEG. I decided that it only increases the size of the pictures, and the difference in quality is negligible, so I recommend turning it off via -define jpeg: fancy-upsampling = off.
Sharpening
When resizing, the pictures are slightly blurred, so the same photoshop uses different techniques to increase the clarity. I recommend the unsharp filter, which, despite the name, increases the clarity of the picture: -unsharp 0.25x0.25 + 8 + 0.065.
The filter works so that Gaussian blur is applied first . The first two numbers are the radius and sigma (in our case, 0.25 pixels each). After blurring, the filter compares the blurry version with the original, and where the brightness differs more than the specified threshold (0.065), an increase in the sharpness of the specified force is applied (8).
Color reduction
As I said earlier, the main reason for the increase in file size when resizing images is the addition of new colors. Therefore, you need to try to reduce their number, but without loss of quality.
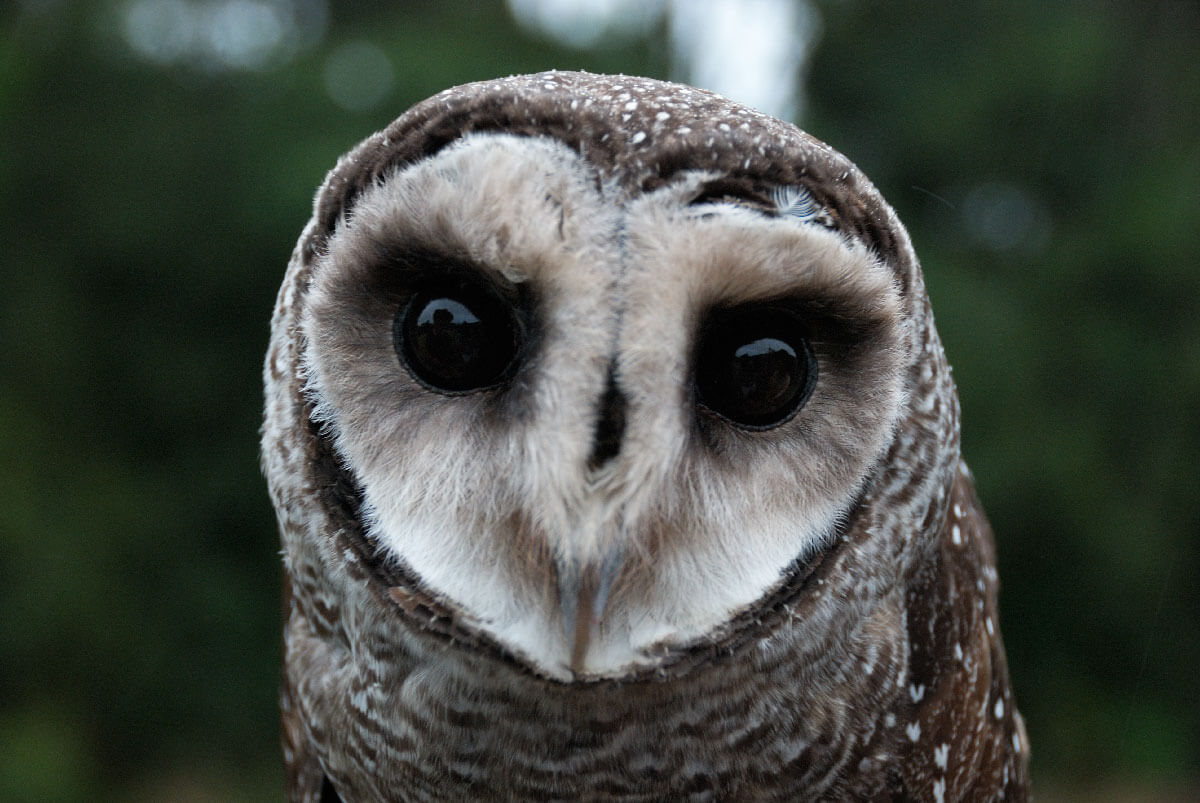
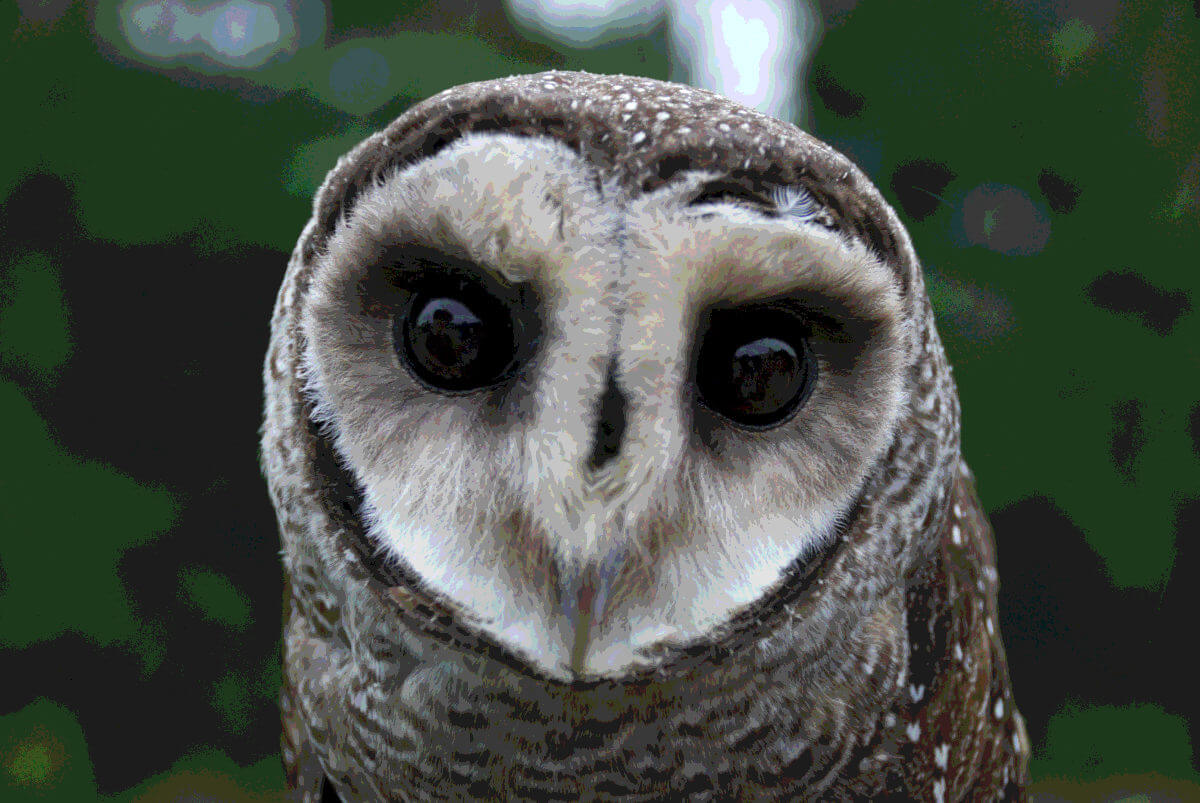
One way is posterization, when gradients are replaced with sets of clear colors. Posterization reduces the number of color levels - this is how many options remain in the red, green and blue channels. The total number of colors in the picture will be a combination of the colors of these channels.
Posterization can reduce file size, but also degrade quality. I propose the number 136, in which you get a small file without losing much in quality.
Original
Reduced Color
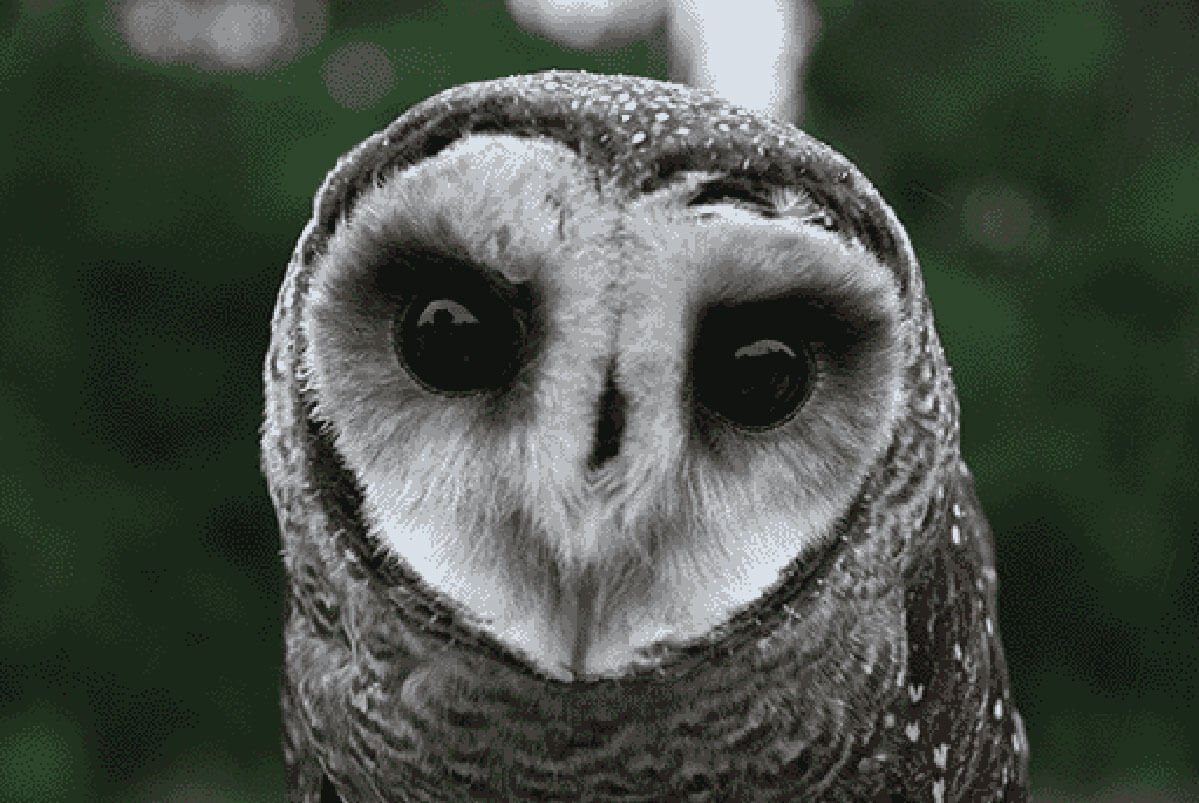
Dithering is a process that mitigates the effects of reducing colors by adding noise to color sets to create the illusion of more colors. In theory, this is a good idea.
After dithering
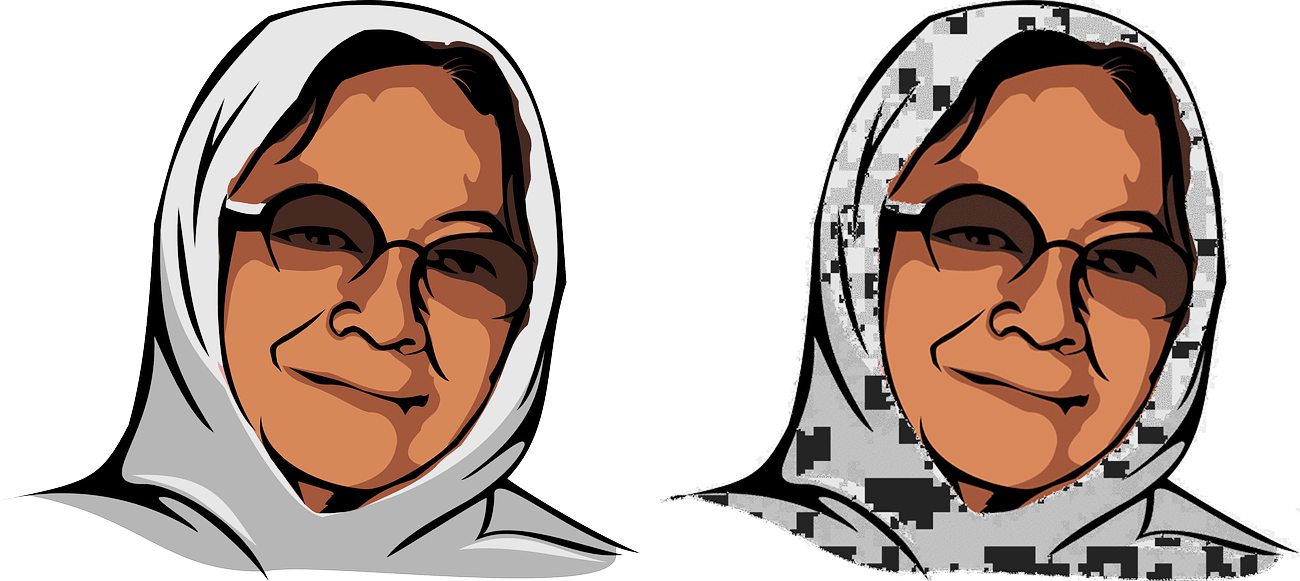
Unfortunately, IM has an error that spoils images with transparency during dithering. Therefore, it is better to disable it through -dither None. Fortunately, even without it, the results of posterization look pretty good.
Dithering error in IM
Color space
Color space indirectly refers to the number of colors in a picture. This space determines which colors are available. The picture below shows that the ProPhoto RGB color space contains more colors than Adobe RGB, which in turn contains more colors than sRGB. And they all contain fewer flowers than the eye sees.
sRGB made the king of Internet color spaces. It was approved by W3C and other organizations. It is required support in the CSS Color Module Level 3 and in the SVG and WebP specifications. It is referenced in the PNG specification. In Photoshop, this is also the default color space. In short, sRGB is the best choice for the web, and if you want your pictures to display correctly, it's best to use it.
Quality and Compression
In formats with loss of quality like JPEG, quality and compression are directly related - the more compression, the lower the quality and less file size. Therefore, you need to find a balance.
In my tests, the control pictures and photoshop were set to high, or 60. And in IM settings, I recommend using 82. Why?
It turns out that quantitatively the quality setting is not defined in JPEG format, and therefore it is not a standard. Quality 60 in Photoshop may turn out to be the same as quality 40 in one program, quality B + in another, or “awesome” quality in a third. In my tests, I found out that Photoshop 60 corresponds to -quality 82 in ImageMagick.
And in formats without loss of quality like PNG, quality and compression are not related. High compression does not change the appearance of the picture, but depends only on the processor load level during its processing. If you do not spare computers, then there is no reason not to set the maximum PNG compression.
PNG compression in IM can be set in three settings: -define png: compression-filter, -define png: compression-level and -define png: compression-strategy. Compression filter- This is an additional step before compression, which sorts the data so that compression becomes more efficient. I achieved better results using adaptive filtering (-define png: compression-filter = 5). I recommend setting the compression level to a maximum of 9 (-define png: compression-level = 9). A strategy determines the algorithm itself. I liked the default strategy more (-define png: compression-strategy = 1).
Meta data
In addition to the picture itself, files can contain meta data - information about the picture when it was created, about the device that created it. This information takes place, but does not improve the perception of the picture, and it is better to delete it. And although I pointed out that –thumbnail deletes meta data, still it doesn’t delete all of them. It is possible to delete everything using -strip and -define png: exclude-chunk = all. This does not affect the quality.
Progressive render
JPEGs and PNGs can be saved using progressive or sequential rendering. By default, the second one is executed, when pixels are loaded in rows, from top to bottom. Progressive means that the picture is transmitted and displayed gradually.
With JPEG, progressive rendering can occur in any number of steps - this is determined when the file is saved. The first step is the low resolution version of the full picture; on each subsequent version of a higher resolution appears until the entire picture is displayed in higher resolution.
PNG has a kind of progressive render called Adam7 interlacing , when pixels are displayed in seven steps based on an 8x8 grid.
Both types of rendering can be configured in IM via –interlace. But is it necessary?
Such a render increases the volume of files. For a long time, it was believed that it should be included, as it improves user experience. Even if the perfect picture does not load right away, it will recognize something, and it will be better than nothing.
Last year, according to the results of the study, it became clear that users prefer consistent rendering. This is just one study, but still interesting. So I decided to recommend using a sequential render through "-interlace none".
Image Optimization
I mentioned optimization. I recommend all the settings described before this if you do not optimize your images. If they can be optimized, then I will change them: small changes in the -unsharp settings work better (-unsharp 0.25x0.08 + 8.3 + 0.045 versus -unsharp 0.25x0.25 + 8 + 0.065 without optimization) and you do not need to use -strip.
mogrify -path OUTPUT_PATH -filter Triangle -define filter:support=2 -thumbnail OUTPUT_WIDTH -unsharp 0.25x0.08+8.3+0.045 -dither None -posterize 136 -quality 82 -define jpeg:fancy-upsampling=off -define png:compression-filter=5 -define png:compression-level=9 -define png:compression-strategy=1 -define png:exclude-chunk=all -interlace none -colorspace sRGB INPUT_PATH
There are many optimizers. I tested image_optim , picopt and ImageOptim , and they all run the pictures through a series of different steps. I checked them in turn and came to the conclusion that it is better to run the files through all three in the order in which they are listed. True, after using image_optim, the benefits of picopt and ImageOptim become minimal. If you do not have extra time and processor power, then using more than one optimization will be excessive.
Results (and so, was it worth it to suffer so much?)
Of course, my settings are complicated, but they are needed to improve user experience. I am pleased to report that having spent time on tests, I was able to drastically reduce the volume of files without losing quality.
The average file size decreased by 35% compared to the Photoshop option “Save for Web”.
Comparison with Photoshop Creative Cloud
My settings without optimization turned out to be even better than photoshop with optimization!
Compared to the default settings when resizing IM images, my recommendations won on average 82%.
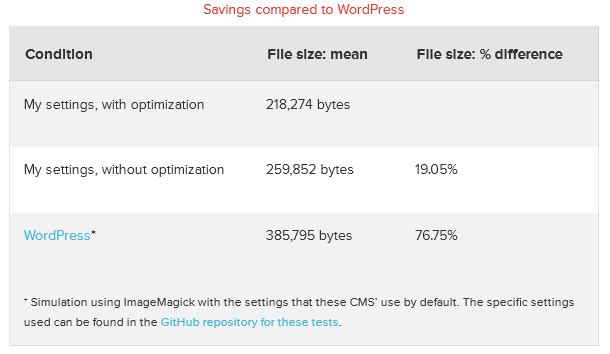
Compared to the default settings in WordPress, which uses ImageMagick “under the hood,” my settings won an average of 77%.
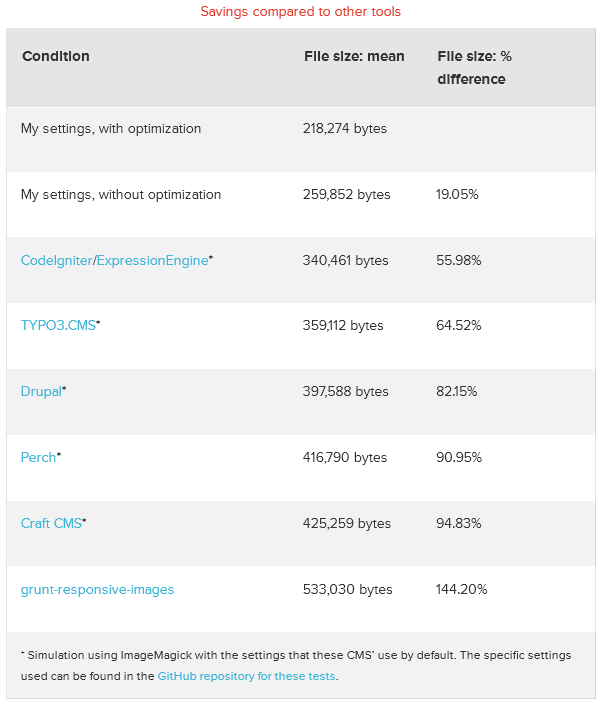
Compared to other CMS and tools that use ImageMagick, my settings won up to 144%.
I remind you that all the pictures turned out to be indistinguishable from the output of Photoshop.
How to implement this in your projects
bash shell
Here you can add the macro function to the .bash_aliases (or .bashrc) file, which will replace my recommended command:
smartresize() {
   mogrify -path $3 -filter Triangle -define filter:support=2 -thumbnail $2 -unsharp 0.25x0.08+8.3+0.045 -dither None -posterize 136 -quality 82 -define jpeg:fancy-upsampling=off -define png:compression-filter=5 -define png:compression-level=9 -define png:compression-strategy=1 -define png:exclude-chunk=all -interlace none -colorspace sRGB $1
}
And you need to call it like this:
smartresize inputfile.png 300 outputdir/
Node.js
The npm package called imagemagick allows you to use ImageMagick. When using it, you can add a resize function as follows:
var im = require('imagemagick');
var inputPath = 'path/to/input';
var outputPath = 'path/to/output';
var width = 300; // output width in pixels
var args = [
   inputPath,
   '-filter',
   'Triangle',
   '-define',
   'filter:support=2',
   '-thumbnail',
   width,
   '-unsharp 0.25x0.25+8+0.065',
   '-dither None',
   '-posterize 136',
   '-quality 82',
   '-define jpeg:fancy-upsampling=off',
   '-define png:compression-filter=5',
   '-define png:compression-level=9',
   '-define png:compression-strategy=1',
   '-define png:exclude-chunk=all',
   '-interlace none',
   '-colorspace sRGB',
   '-strip',
   outputPath
];
im.convert(args, function(err, stdout, stderr) {
   // do stuff
});
Grunt
If you use Grunt to run tasks, then I specially made for you a task called grunt-respimg ( npm ), which does everything that I described. It can be included in your projects like this:
npm install grunt-respimg --save-dev
And then it can be done in the Grunt file:
grunt.initConfig({

 respimg: {

 default: {

 options: {

 widths: [200, 400]

 },

 files: [{

 expand: true,

 cwd: 'src/img/',

 src: ['**.{gif,jpg,png,svg}'],

 dest: 'build/img/'

 }]

 }

 },

});

grunt.loadNpmTasks('grunt-respimg');
Php
In PHP, ImageMagick is integrated under the name Imagick . Unfortunately, there it is limited and does not know how to do everything that I recommended - in particular, configure the sampling filter to use the thumbnail function.
But you're in luck - I created the php-respimg ( packagist ) module , which does everything you need. It can be included in the project using Composer :
composer require nwtn/php-respimg
And then resize the images like this:
require_once('vendor/autoload.php');
use nwtn\Respimg as Respimg;
$image = new Respimg($input_filename);
$image->smartResize($output_width, 0, false);
$image->writeImage($output_filename);
Content management systems
If your CMS runs on PHP, take the “PHP” section and make a plugin out of it. If you use WordPress, then you can use the RICG Responsive Images plugin . After installing it, you will need to add the following to the functions.php file for activation:
function custom_theme_setup() {
   add_theme_support( 'advanced-image-compression' );
}
add_action( 'after_setup_theme', 'custom_theme_setup' );
Other CMS provide access to image manipulation functions in one way or another - refer to their documentation.
Performance
In my tests, I found that compared to –resize by default, IM took 2.25 times more time to process images.
Conclusion
Designers and developers are very influential in how the web works. We can make websites more responsive, improve their perception by users, and even bring our content to new markets . Cutting the volume of images is done quite simply and greatly affects the increase in website performance - I hope that all this information will be useful to you and will allow you to improve your site for your users.
References
grunt-respimg
php-respimg
RICG Responsive Images plugin