TEETH powered by Intel Edison will find a way to motivate you to brush your teeth and send a report to the cloud
- Transfer
It would be great if someone or something helped us to do daily, well, maybe not particularly entertaining, but important activities. Such as brushing your teeth. For example, a device that encouraged us, helped to monitor our progress and was very easy to use.
Tell me, do you always brush your teeth for 2 minutes? In this DIY project, we will transform the usual toothbrush holder purchased in the store into modern Internet of Things appliances. Intel Edison has a small footprint and the necessary processing power to accustom to healthy habits - the proper use of a toothbrush and toothpaste.

I am sure you already have the knowledge necessary for developing for Intel Edison. Since this board contains built-in Wi-Fi and uses node.js to work with its hardware, you can program in JavaScript. This means that most web developers can use the Intel Edison board to quickly start programming for the Internet of Things.
The steps below show how to add switches, a screen, and sensors to remake any toothbrush holder in TEETH (Timer Encouraging Everyone To Health - A timer that encourages everyone to have a healthy lifestyle). You can see in the source how a fairly simple node.js project manages these components and connects to the Internet to use cloud analytics and send mail.
To get started, remove your brush from the holder. This will prepare a timer that will wait when you start brushing your teeth. Then a two-minute countdown will begin, and the LCD screen will show you words of approval. Two minutes is the time recommended by the American Dental Association for brushing your teeth. The screen will change colors and labels until you finish. Do not worry, if you brush your teeth with your eyes closed, a sound signal will sound at the beginning and at the end of the procedure. The timer will stop when you put the brush back or when you turn off the light when leaving the bathroom. After that, the stand will save your timer data in the cloud. If you reach the goal, she will send an email with congratulations. Then you can go into the cloud and see the progress for each brush in the stand. You can track this IoT data to encourage healthy household habits.
Estimated time to complete the project: 2-3 hours.
Price: 75-100 dollars.
Materials:
Instruments:
I chose a bamboo toothbrush holder, so I just had to cut out the holes needed to install the components and place the wires so that they were not visible in front. The tools you need depend on the material of the stand. Well, or you can make a stand yourself.
Cut a piece on top large enough to fit the entire LCD screen. Then cut a smaller hole in this piece for the screen itself. Paste the resulting part back into the stand.

In addition, you can simply screw all the components on the outside. It depends on your sense of beauty. But no matter how you do it, the main thing to remember is that the wires from your screen can reach the Intel Edison board, which will be attached to the back.
Any sensor that can detect the presence of a brush will do. I chose a button with a lever, instead of some IR sensor, to minimize consumption. However, a toothbrush weighs only 15 grams, so you need a fairly sensitive sensor.
Since the switch is small enough, I added a plate so that the toothbrush could be left anywhere in the stand. I cut a plate from a plastic partition from the tool box (it seems to me that I always have more than necessary, so I just took one of them). Solder the wires to the switch. One wire to the common pin (earth) and one to the normally closed.
Due to the fact that pressing the back of the button does not work, I set the button so that its back is actually inside the wall of the stand. As with the LCD screen, make sure the wires reach the main board. I drilled holes in the back of the stand, so the wires are mostly not visible.
Prepare the light sensor and tweeter by soldering the connecting wires of sufficient length to reach the back wall where the main board will be located. I drilled a hole in the front, sufficient for the light sensor. Its front location allows you to accurately respond to the lighting in the room. At the back, I cut a bigger hole for the tweeter. This placement will minimize the appearance of the stand and make a loud sound in the morning.
Since the device will undoubtedly get into a humid environment, precautions must be taken for the connections. Use silicone or some other sealant to cover exposed electronics and wires. I used enough sealant for the back of the LCD screen. But make sure you don’t cover the switch itself so that it can work well.
The first time I created this project, I used a breadboard to test my board and connections. You can do this before you take the final steps.
Use the following diagram to connect the components to the pins on the circuit board.
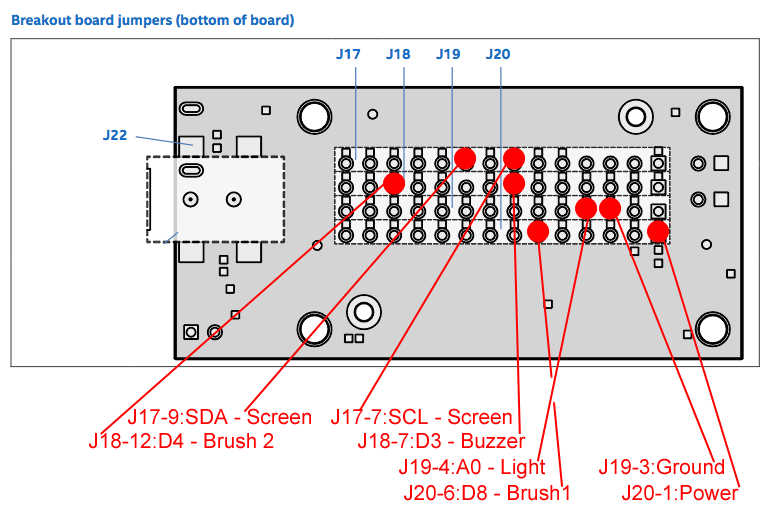
Most of the elements are connected directly, but I had to add a pull-up resistor of 10 k to reduce the noise of the buttons and get rid of a false positive.
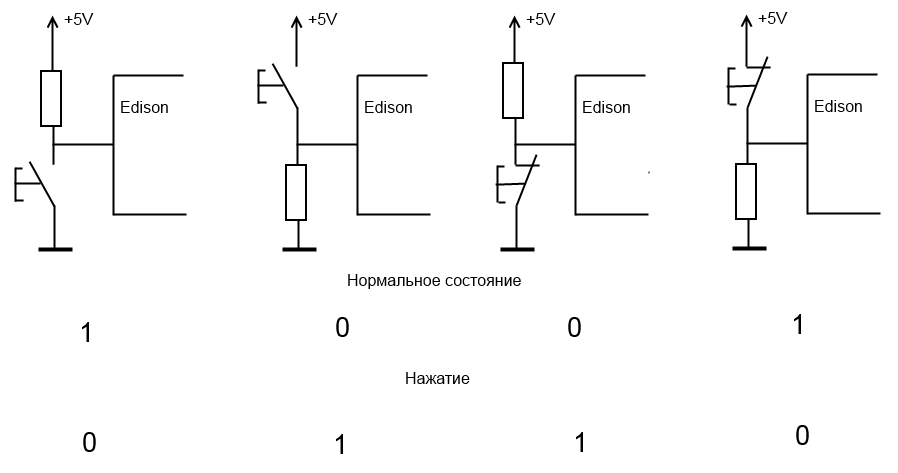
Note trans. - You have four ways to connect buttons. But depending on their connection, it may be necessary to change the source code, as it is configured to display “0” when the button is pressed: The
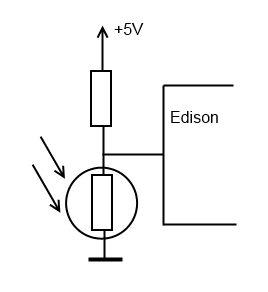
photoresistor is connected in the following way:
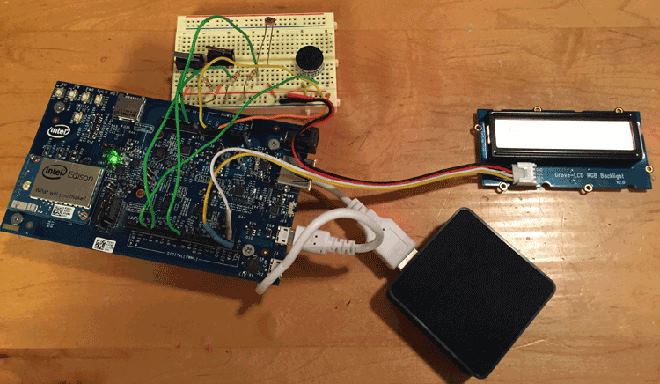
Add the Intel Edison processor module to the main circuit board. The iron part of your project is almost complete. Soon we will add a battery. At the moment, your project should look something like this.
The launch of the Intel Edison board is described on the Intel IoT website. To connect a computer to the board, follow the instructions at http://intel.com/Edison/getstarted
Since our project uses Wi-Fi to connect to the cloud and send mail, it will be necessary to connect the board with a Wi-Fi router. This is quite simple to do using the configure_edison utility, which is already on the Intel Edison board. More information can be obtained from intel.com/Edison/getstarted
This project uses the Intel IoT Developer Kit Cloud-based Analytics to store data in the cloud. You can set up an account at https://dashboard.us.enableiot.com/v1/ui/auth#/login
After you register your Intel Edison board with IoT Analytics, you must prepare the cloud for your data by creating custom components. Create one component for each toothbrush. The names you give the components will be the names that appear in the report. Follow the instructions for creating the components https://software.intel.com/en-us/intel-iot-developer-kit-cloud-based-analytics-user-guide
When the components are created in the IoT Analytics dashboard, you need to register them on the board. The names that you use in this step will be used in the source code that sends the data to the cloud. Here is a link to similar instructions for registering components on the board https://software.intel.com/en-us/intel-iot-developer-kit-cloud-based-analytics-user-guide
Intel Edison uses an integrated service for interacting with the cloud. This service must be started for the program to connect and send data. After you follow the instructions on the link above, you can test that the board can connect to the cloud and send data to your components.
Well, since the hardware and services are ready, it’s time to download the TEETH source code onto the board
The Intel XDK IoT Edition development environment allows you to build Node.js projects on the board. It comes with a bunch of sample projects. The documentation is available here https://software.intel.com/en-us/html5/documentation/getting-started-with-intel-xdk-iot-edition
Download or clone sources from GitHub. Files have the structure of a small node.js project https://github.com/ncarver/TEETH
At the beginning of the main.js file, several constants are defined. You can change them to fit your home environment and your preferences. At a minimum, you need to change the values for MAIL.user, MAIL.pass, and MAIL.brushTo. These properties determine how the SMTP mail server connects to the Internet and where TEETH should send messages.
Use the names that you registered in the IoT Analytics dashboard in the constant section, METRICS.brushComponent. This is an array of all the components used in your project. I have it consists of two elements.
If you have built a stand for more than two brushes, you will need to change the constant section so that the code matches this. The code uses an array of structures with values specific to brushes. Add additional array elements for each brush, such constants as: METRICS.brushComponent, MAIL. brushTo.PINS.brushSwitch, SCREEN_MSG.brushName, TIME.brushPreptime, and TIME.brushGoaltime.
Although it was possible to split the project into several files by modules, it seems to me that it will be easier if everything is in one main.js. This project does not require a lot of code, so additional files can only complicate the understanding.
Since we have a node.js project, additional modules are used to interact with hardware, the analytics daemon, and mail.
This is the only section in which you need to edit something. Change these constant values to change the color of the messages on the screen, the text of the letters, and the time intervals.
For simplicity, all timers are stored as global objects. This allows you to always have access to timers when calling methods from setTimeout and setInterval.
The Logger class outputs messages to the console, using the traditional approach to reduce the output of errors, warnings, and information.
Using the Sensors class, you will see how easy it is to work with I / O pins. The state of the switches under the toothbrushes and the value of the photoresistor are read in this class.
Most of the code in the Buzzer class is needed to play a chirping sound and is used to start and stop the timer.
The Screen class is responsible for all commands to the LCD screen. He has two responsibilities - to show text messages and change the background color.
The Mailer class uses nodemailer to send mail using SMTP. It contains error checking if it is not possible to send an email.
The Metrics class uses a local socket on the board to send analytic data to the iotkit-agent daemon. If a connection error occurs, an error message is sent to the console.
This is the main class containing all the project logic. Teeth calls the Sensors class to monitor buttons and lights, the Buzzer class to play sound, the Screen class to display messages, the Mailer class to send mail, the Metrics class to update the IoT Dashboard. If you want to change the capabilities of your device, you must update this code.
Take some time to test the circuit board and brush stand while they are connected to the computer. This is the easiest way, as you can see the console output.
Use the Install / Build button in the Intel XDK IoT Edition to download the source code to the board and run NPM to build the node project. Press the Run button to start TEETH
Test the stand using the toothbrush for each button on the stand. You should see that the LCD screen turns on, and you can follow the console output. Also, the squeaker should beep and the timer should turn off if you close the light sensor.
Allow the timer to count to the end to send the letter. Depending on your services, you should receive a letter in your inbox in a few minutes.
Use all the toothbrushes on your stand to test each button. Log in to the control panel to make sure that you see all the configured components.
Finally, you are ready to disconnect the Intel Edison board from your computer and place the brush stand on the sink in the bathroom as a standalone IoT device.
Use a battery with a USB port to power the board. They gave me this at the conference. It is designed to charge a cell phone, but works great in this project. I left its USB port available for charging.
Remember that our project works in a humid environment. Take all precautions to protect the battery and circuit board as well as other sensitive electronics. This is a picture of my final device.
In this project, we have just begun to take advantage of the use of wireless Internet and cloud data on the Intel Edison platform. The source code can be easily modified to use other technologies. Maybe you want to send a tweet instead of a letter. Or you might want to use another cloud service instead of IoT Analytics, for example, Xively. Even the sound of starting and stopping the timer can be replaced with your favorite mp3 file, which will be sent to the speaker. You can quickly make these changes simply by replacing some modules with the others you want to use.
But this smart brush holder can be made even smarter. For example, like Nest home systems. Now the data is only transmitted outward to the cloud, but taking this data as input for the timer, it will become a learning tool. For example, if you never clean a full two minutes, the timer will set a shorter goal, and will increase it little by little with each success. And instead of using fixed time intervals, a sensor that responds to the external sound of brushing your teeth can adapt to your habits. But even without any additions, this is a big project to bring IoT to a fairly important room in your home. Think it might be the first part of the Bathroom 2.0 movement.
Nathan Carver came to the IoT area on a winding road. Starting as a clown at Ringling Brothers, he is now vice president of engineering at Crisp Media, a mobile advertising company where he works with web and big data technologies. Previous work included the launch of a professional service department, the founding of a software company, playing music on a saw ( “Singer and Saw” ) and sailing along the Hudson River. He lives in New York. His other projects are available on Github .
Tell me, do you always brush your teeth for 2 minutes? In this DIY project, we will transform the usual toothbrush holder purchased in the store into modern Internet of Things appliances. Intel Edison has a small footprint and the necessary processing power to accustom to healthy habits - the proper use of a toothbrush and toothpaste.
I am sure you already have the knowledge necessary for developing for Intel Edison. Since this board contains built-in Wi-Fi and uses node.js to work with its hardware, you can program in JavaScript. This means that most web developers can use the Intel Edison board to quickly start programming for the Internet of Things.
The steps below show how to add switches, a screen, and sensors to remake any toothbrush holder in TEETH (Timer Encouraging Everyone To Health - A timer that encourages everyone to have a healthy lifestyle). You can see in the source how a fairly simple node.js project manages these components and connects to the Internet to use cloud analytics and send mail.
Using TEETH - a smart timer for toothbrush
To get started, remove your brush from the holder. This will prepare a timer that will wait when you start brushing your teeth. Then a two-minute countdown will begin, and the LCD screen will show you words of approval. Two minutes is the time recommended by the American Dental Association for brushing your teeth. The screen will change colors and labels until you finish. Do not worry, if you brush your teeth with your eyes closed, a sound signal will sound at the beginning and at the end of the procedure. The timer will stop when you put the brush back or when you turn off the light when leaving the bathroom. After that, the stand will save your timer data in the cloud. If you reach the goal, she will send an email with congratulations. Then you can go into the cloud and see the progress for each brush in the stand. You can track this IoT data to encourage healthy household habits.
Shopping and Planning
Estimated time to complete the project: 2-3 hours.
Price: 75-100 dollars.
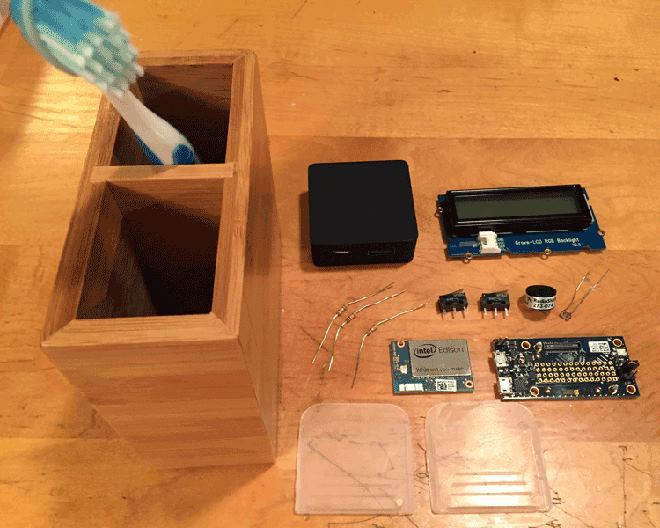
Parts used in the project
Materials:
- Toothbrush holder.
- Intel Edison processor module.
- Connection board for Intel Edison.
- Switch buttons, one for each brush.
- Plastic platform (one for each brush).
- 10k resistors (one for each brush, and one more for the photoresistor).
- LCD screen with RGB backlight. ( http://www.seeedstudio.com/depot/Grove-LCD-RGB-Backlight-p-1643.html?cPath=34_36 ).
- Light sensor (photoresistor).
- Piezoelectric speaker.
- Battery with USB port.
- Silicone glue or sealant.
- The source code of the project.
- Mounting wires.
Instruments:
- Computer with Intel XDK IoT Edition and USB cables installed.
- Soldering iron and solder.
- Cutting tools depending on the material of your stand.
Steps
1. Stand preparation
I chose a bamboo toothbrush holder, so I just had to cut out the holes needed to install the components and place the wires so that they were not visible in front. The tools you need depend on the material of the stand. Well, or you can make a stand yourself.
Installing the LCD screen on the front wall
Cut a piece on top large enough to fit the entire LCD screen. Then cut a smaller hole in this piece for the screen itself. Paste the resulting part back into the stand.
In addition, you can simply screw all the components on the outside. It depends on your sense of beauty. But no matter how you do it, the main thing to remember is that the wires from your screen can reach the Intel Edison board, which will be attached to the back.
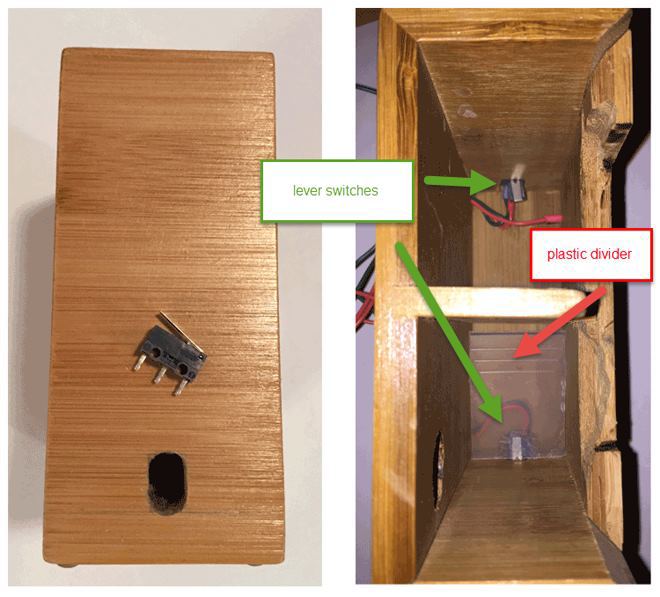
Add a button to the bottom of the stand
Any sensor that can detect the presence of a brush will do. I chose a button with a lever, instead of some IR sensor, to minimize consumption. However, a toothbrush weighs only 15 grams, so you need a fairly sensitive sensor.
Since the switch is small enough, I added a plate so that the toothbrush could be left anywhere in the stand. I cut a plate from a plastic partition from the tool box (it seems to me that I always have more than necessary, so I just took one of them). Solder the wires to the switch. One wire to the common pin (earth) and one to the normally closed.
Due to the fact that pressing the back of the button does not work, I set the button so that its back is actually inside the wall of the stand. As with the LCD screen, make sure the wires reach the main board. I drilled holes in the back of the stand, so the wires are mostly not visible.
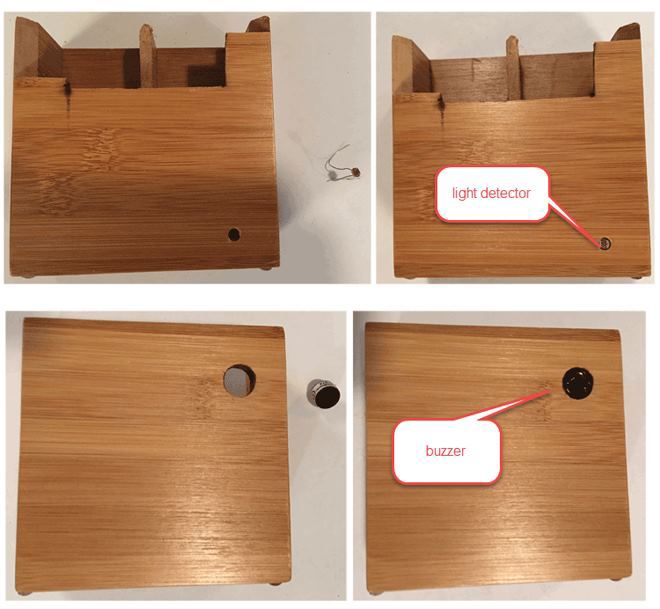
Adding a front light sensor and a rear tweeter
Prepare the light sensor and tweeter by soldering the connecting wires of sufficient length to reach the back wall where the main board will be located. I drilled a hole in the front, sufficient for the light sensor. Its front location allows you to accurately respond to the lighting in the room. At the back, I cut a bigger hole for the tweeter. This placement will minimize the appearance of the stand and make a loud sound in the morning.
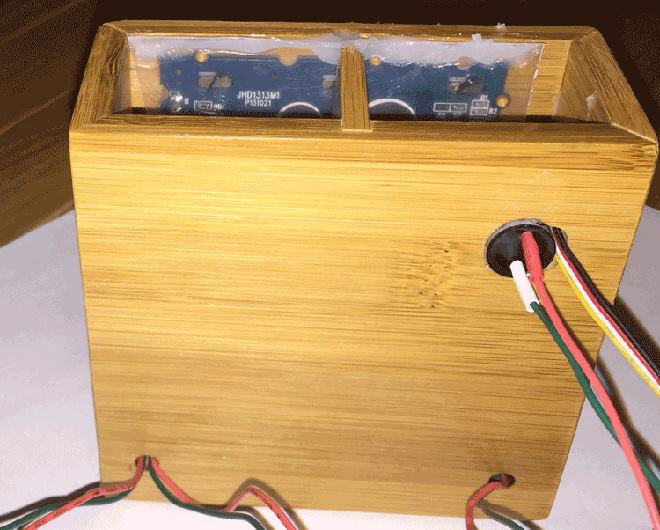
Sensitive electronics protected against water
Since the device will undoubtedly get into a humid environment, precautions must be taken for the connections. Use silicone or some other sealant to cover exposed electronics and wires. I used enough sealant for the back of the LCD screen. But make sure you don’t cover the switch itself so that it can work well.
Connecting components to the main board
The first time I created this project, I used a breadboard to test my board and connections. You can do this before you take the final steps.
Use the following diagram to connect the components to the pins on the circuit board.
Most of the elements are connected directly, but I had to add a pull-up resistor of 10 k to reduce the noise of the buttons and get rid of a false positive.
Note trans. - You have four ways to connect buttons. But depending on their connection, it may be necessary to change the source code, as it is configured to display “0” when the button is pressed: The
photoresistor is connected in the following way:
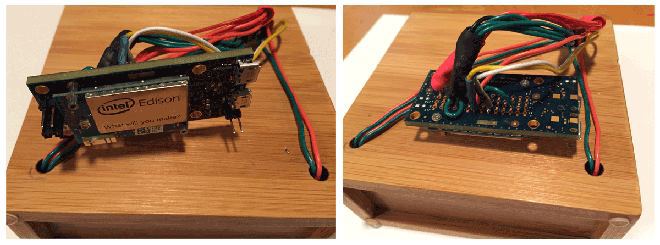
Add the Intel Edison processor module to the main circuit board. The iron part of your project is almost complete. Soon we will add a battery. At the moment, your project should look something like this.
2. Preparing the Intel Edison Board and Cloud Service
The launch of the Intel Edison board is described on the Intel IoT website. To connect a computer to the board, follow the instructions at http://intel.com/Edison/getstarted
Wi-Fi setup
Since our project uses Wi-Fi to connect to the cloud and send mail, it will be necessary to connect the board with a Wi-Fi router. This is quite simple to do using the configure_edison utility, which is already on the Intel Edison board. More information can be obtained from intel.com/Edison/getstarted
Setting up an IoT Analytics account
This project uses the Intel IoT Developer Kit Cloud-based Analytics to store data in the cloud. You can set up an account at https://dashboard.us.enableiot.com/v1/ui/auth#/login
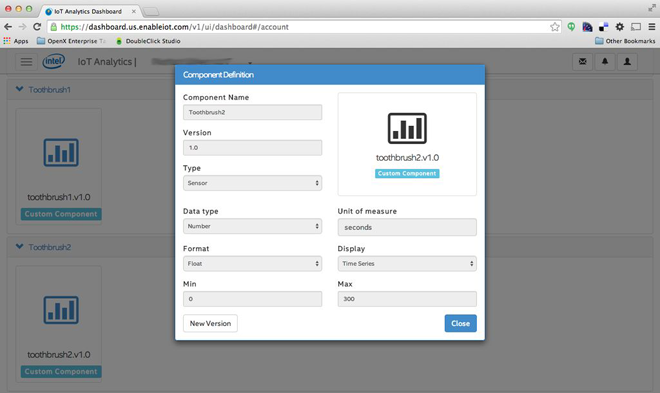
Adding components to the cloud
After you register your Intel Edison board with IoT Analytics, you must prepare the cloud for your data by creating custom components. Create one component for each toothbrush. The names you give the components will be the names that appear in the report. Follow the instructions for creating the components https://software.intel.com/en-us/intel-iot-developer-kit-cloud-based-analytics-user-guide
Registering Components on an Intel Edison Board
When the components are created in the IoT Analytics dashboard, you need to register them on the board. The names that you use in this step will be used in the source code that sends the data to the cloud. Here is a link to similar instructions for registering components on the board https://software.intel.com/en-us/intel-iot-developer-kit-cloud-based-analytics-user-guide
Intel Agent Launch on Intel Edison Board
Intel Edison uses an integrated service for interacting with the cloud. This service must be started for the program to connect and send data. After you follow the instructions on the link above, you can test that the board can connect to the cloud and send data to your components.
3. Programming the Intel Edison Board
Well, since the hardware and services are ready, it’s time to download the TEETH source code onto the board
Connecting to a board from Intel XDK IoT Edition
The Intel XDK IoT Edition development environment allows you to build Node.js projects on the board. It comes with a bunch of sample projects. The documentation is available here https://software.intel.com/en-us/html5/documentation/getting-started-with-intel-xdk-iot-edition
Program download
Download or clone sources from GitHub. Files have the structure of a small node.js project https://github.com/ncarver/TEETH
- readme.md - documentation and license;
- package.json - a descriptor of the project and dependent libraries;
- main.js - the main code needed to run TEETH;
- node_modules is a directory with dependent libraries created when you first build a project.
Configure SMTP Service
At the beginning of the main.js file, several constants are defined. You can change them to fit your home environment and your preferences. At a minimum, you need to change the values for MAIL.user, MAIL.pass, and MAIL.brushTo. These properties determine how the SMTP mail server connects to the Internet and where TEETH should send messages.
Using the names of registered analytic components
Use the names that you registered in the IoT Analytics dashboard in the constant section, METRICS.brushComponent. This is an array of all the components used in your project. I have it consists of two elements.
More, more toothbrushes
If you have built a stand for more than two brushes, you will need to change the constant section so that the code matches this. The code uses an array of structures with values specific to brushes. Add additional array elements for each brush, such constants as: METRICS.brushComponent, MAIL. brushTo.PINS.brushSwitch, SCREEN_MSG.brushName, TIME.brushPreptime, and TIME.brushGoaltime.
4. Source code parsing
Although it was possible to split the project into several files by modules, it seems to me that it will be easier if everything is in one main.js. This project does not require a lot of code, so additional files can only complicate the understanding.
Required Libraries
Since we have a node.js project, additional modules are used to interact with hardware, the analytics daemon, and mail.
constants
This is the only section in which you need to edit something. Change these constant values to change the color of the messages on the screen, the text of the letters, and the time intervals.
timers
For simplicity, all timers are stored as global objects. This allows you to always have access to timers when calling methods from setTimeout and setInterval.
Logger
The Logger class outputs messages to the console, using the traditional approach to reduce the output of errors, warnings, and information.
Sensors
Using the Sensors class, you will see how easy it is to work with I / O pins. The state of the switches under the toothbrushes and the value of the photoresistor are read in this class.
Buzzer
Most of the code in the Buzzer class is needed to play a chirping sound and is used to start and stop the timer.
Screen
The Screen class is responsible for all commands to the LCD screen. He has two responsibilities - to show text messages and change the background color.
Mailer
The Mailer class uses nodemailer to send mail using SMTP. It contains error checking if it is not possible to send an email.
Metrics
The Metrics class uses a local socket on the board to send analytic data to the iotkit-agent daemon. If a connection error occurs, an error message is sent to the console.
Teeth
This is the main class containing all the project logic. Teeth calls the Sensors class to monitor buttons and lights, the Buzzer class to play sound, the Screen class to display messages, the Mailer class to send mail, the Metrics class to update the IoT Dashboard. If you want to change the capabilities of your device, you must update this code.
5. Testing
Take some time to test the circuit board and brush stand while they are connected to the computer. This is the easiest way, as you can see the console output.
Checking sensors and display
Use the Install / Build button in the Intel XDK IoT Edition to download the source code to the board and run NPM to build the node project. Press the Run button to start TEETH
Test the stand using the toothbrush for each button on the stand. You should see that the LCD screen turns on, and you can follow the console output. Also, the squeaker should beep and the timer should turn off if you close the light sensor.
Mail check
Allow the timer to count to the end to send the letter. Depending on your services, you should receive a letter in your inbox in a few minutes.
View analytics
Use all the toothbrushes on your stand to test each button. Log in to the control panel to make sure that you see all the configured components.
6. Add power
Finally, you are ready to disconnect the Intel Edison board from your computer and place the brush stand on the sink in the bathroom as a standalone IoT device.
Battery connection
Use a battery with a USB port to power the board. They gave me this at the conference. It is designed to charge a cell phone, but works great in this project. I left its USB port available for charging.
Final step
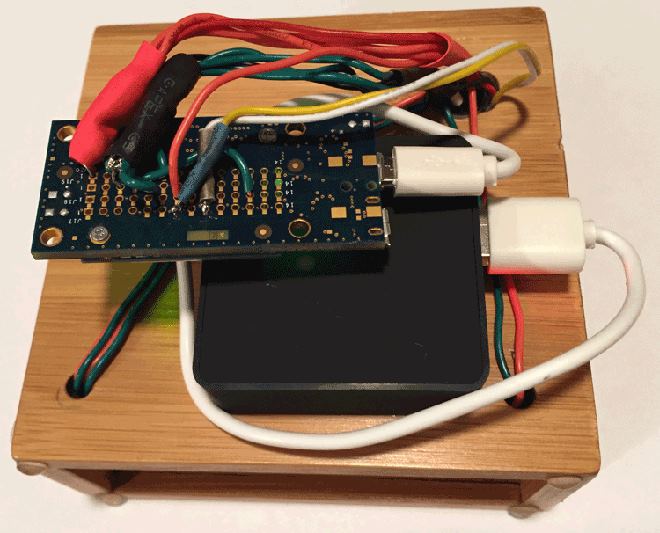
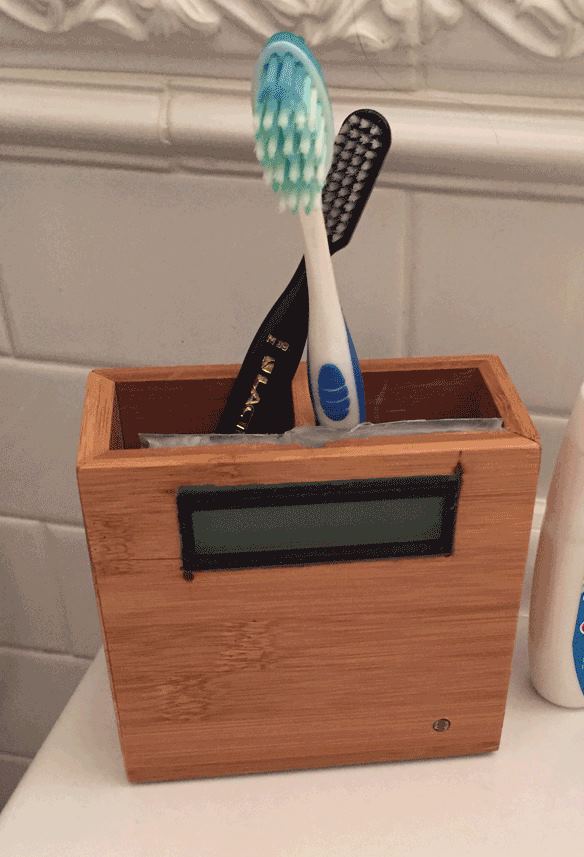
Remember that our project works in a humid environment. Take all precautions to protect the battery and circuit board as well as other sensitive electronics. This is a picture of my final device.
Moving on
In this project, we have just begun to take advantage of the use of wireless Internet and cloud data on the Intel Edison platform. The source code can be easily modified to use other technologies. Maybe you want to send a tweet instead of a letter. Or you might want to use another cloud service instead of IoT Analytics, for example, Xively. Even the sound of starting and stopping the timer can be replaced with your favorite mp3 file, which will be sent to the speaker. You can quickly make these changes simply by replacing some modules with the others you want to use.
But this smart brush holder can be made even smarter. For example, like Nest home systems. Now the data is only transmitted outward to the cloud, but taking this data as input for the timer, it will become a learning tool. For example, if you never clean a full two minutes, the timer will set a shorter goal, and will increase it little by little with each success. And instead of using fixed time intervals, a sensor that responds to the external sound of brushing your teeth can adapt to your habits. But even without any additions, this is a big project to bring IoT to a fairly important room in your home. Think it might be the first part of the Bathroom 2.0 movement.
about the author
Nathan Carver came to the IoT area on a winding road. Starting as a clown at Ringling Brothers, he is now vice president of engineering at Crisp Media, a mobile advertising company where he works with web and big data technologies. Previous work included the launch of a professional service department, the founding of a software company, playing music on a saw ( “Singer and Saw” ) and sailing along the Hudson River. He lives in New York. His other projects are available on Github .