Investigation of the format of the level map of the NES-game "Jackal"
- Tutorial
The article will describe a non-standard way of searching for data on levels in NES games - by sequentially changing all the data in the image and studying the consequences (“corruption” in terms of romhackers). As an example, I will show how to find level data in the Jackal game for NES and add one of its levels to the CadEditor editor . This method allows you to explore any game with a block level structure (almost any game on NES), without knowledge of the X8502 assembler, you only need initial skills in working with scripting languages ( Lua and Python ).
The idea of the method is to change all the bytes in the game one at a time and see if any of them changed the level externally. Hands to do it for very long, so you need to use auxiliary tools, namely a built-in emulator FCEUX scripting language the Lua , its possibilities and limitations will be discussed below.
In addition, the process of checking the result is of some difficulty - a modified ROM image must be loaded into the emulator, and then bring the game to the point of launching the first level. Moreover, it is impossible to simply load the ready-made emulator saving made on the original image at the moment after the start of the level - the data from the image will already go into the video memory and RAM, and the first level screen will remain unchanged, it will be impossible to visually distinguish it from the original. Therefore, you must either record the repetition of all keystrokes in the FCEUX emulator, which leads the game from the moment of the start screen to the start of the level (this is done using the File-> Movie-> Record Movie ... menu ), or it’s easier to do it - make saving directly to moment loading level. After pressing the “Start” buttonin the main menu of the game, before the start of the level, the image on the screen is darkened for several moments, at which time the first game screen of the level is created.
To get the save at the right time, you can slow down the time several times (menu NES-> Emulation Speed-> Speed Down , I recommend setting hot keys in the Config-> Map Hotkeys menu to conveniently speed up / slow down the game from the keyboard). It is necessary to wait for the screen to darken and at this moment (until the game screen appears), save the game (for example, in slot 1, using the Shift + F1 key combination) For further work, it is necessary to detect on which frame the save was made and on which frame the game screen appeared (you can enable the display of the current frame-frame on the screen using the menu item Config-> Display-> Frame Counter ). This will be needed in order to take a screenshot of the level screen at the moment when it will already be created, so as not to remove the black screen before.
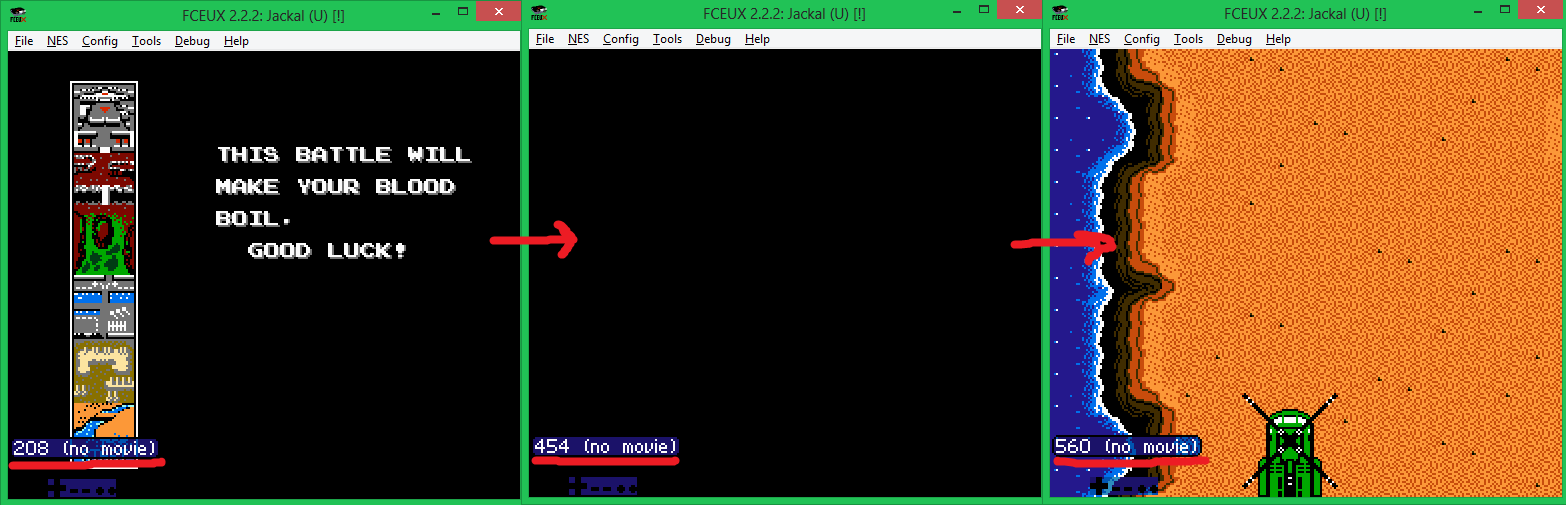
In the screenshot, the level data is loaded from the image into memory at the moment between frames 454 and 560.
Thus, the algorithm for searching for level data will look like this:
In most cases, the image on the screen will not change, sometimes it will not be at all, since in some versions of ROM images we will inevitably break the game code, sometimes there will be a strange mess of tiles on the screen, the ultimate goal is to find the version in which the screen will be changed only one macroblock (I remind you again, level screens in NES are composed of macroblocks ). When such a screenshot is found, it will become clear at what address the array of block numbers describing the screens is stored.
The Lua language built into the emulator allowsoperate with the processor’s memory and registers, however, it is designed to work with the already loaded ROM cartridge image, therefore, it doesn’t have operations either to load changed versions of ROM images or to change the image itself after loading, however, using it you can implement steps 2,3, 4 algorithms.
The rest in the first version of the automatic corrupter I decided using the Python language. However, in that version there were several serious drawbacks - several thousand generated ROM images took up a lot of space, the emulator was constantly launched from the command line as a separate application and closed, due to which focus was switched to it, so working on a machine with a running script was inconvenient, how to close it in the course of work. Therefore, for the article, I decided to add the necessary functionality to Lua modules in order to change the byte inside the ROM image directly from the emulator.
Fortunately, the source code for the FCEUX emulator is available , so you can download the sources and add your modifications.
We find the function for reading the byte from the ROM image (file fceu.cpp , the function FCEU_ReadRomByte ) and add the same version for writing:
Next, we “forward” the ability to call this function from Lua (file lua_engine.cpp ):
Thus, we got the opportunity to change bytes of data from scripts and got rid of the need to create and load thousands of different versions of ROM images.
The next step is to teach Lua to analyze screenshots before saving them. To do this, instead of the standard save the screenshot to a file function gui.savescreenshot () to leave it in the memory using the gui.gdscreenshot () , and then check whether already made was not the same screenshot (it will have to store hashes of all have to take a screenshot ), and save to disk only unique. This will allow you not to store thousands of identical screenshots in which changing one byte did not affect the first screen of the game.
To save screenshots, I used the gd library(you can take the compiled version here or compile it from the source yourself), the unpacked files must be put in the folder with the emulator built. To calculate the hashes, I used a little trick - I threw the calculation function from the emulator itself (there it was used to calculate the checksums of ROM images):
Now the preparatory work is finally over and you can write a Lua script for image corruption (if the comments at the end of the lines do not appear completely, you can see the commented scripts on the github, link at the end of the article):
To run the emulator with a script, you can use a batch file of the following content:
fceux -turbo 1 -lua corrupt.lua “Jackal (U) [!]. Nes”
(The turbo key allows you to start the emulator in the most accelerated mode).
The script on my machine processes all the data in 8 minutes. If it works for too long, you can increase the STEP step to a larger one, up to 64 per screen, and also make the game more accurate, in which the time between the launch frame and the frame on which you want to take a screenshot will be minimal.
A few recommendations for setting up a script for different games: data on screens often starts from the beginning of banks (at addresses that are multiples of 0x2000 or 0x4000), these zones can be investigated in more detail; if there are video banks ( CHR-ROMs ) in the ROM image , you can not investigate them, since they only store video memory. Video banks are always at the end of the ROM image, their number can also be seen in the header (first 16 bytes of the ROM image).
For the game "Jackal" the script finds 235 unique screenshots, which show a wide range of various graphic glitches. However, screenshots taken from images with modified bytes at the addresses 0x105C8, 0x105D8, 0x105E8 are of interest :

Of them it is clear that:
What can be done with the received data? For example, prepare pictures of all macroblocks of a level, and use them in the CadEditor block editor to create a level map editor.
To do this, slightly rewrite the script so that it records all the possible byte values at the address, which leads to a change in the block on the screen (for example, 0x105C8 ) and takes screenshots of all the blocks. I will not provide the full text of the script, it is in the example archive at the end of the article ( corrupt_byte.lu a ). Sorry, gd libraryIt is not intended for convenient processing of parts of pictures, therefore, to “bite” the macroblock picture from the screenshot and combine them for convenience into one long “tape”, I had to write another Python script (with the PIL library for processing pictures installed ):
The last part remains - you need to create a configuration file for the CadEditor editor , which would use the resulting image. It uses C # as a scripting language (using the CSScript library ).
According to the screenshots, we calculate the beginning of the line in the macroblock map - if the address 0x105C8 changes the 4th macroblock in the line, then the address 0x105C5 is responsible for the first . Next, create a template config:
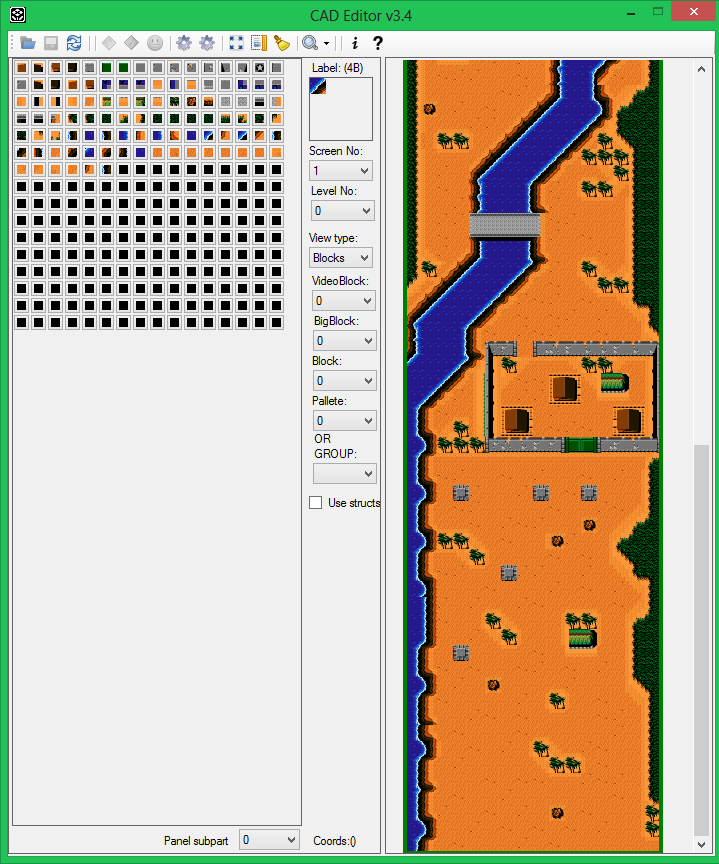
The level map loaded in the editor with such a config looks strange, although it resembles the real one:

After examining the result, it turns out that the lines of the 16x8 macroblock screen are stored in the order from bottom to top, but the screens themselves are from top to bottom, which means that every 8 lines screen rearranged. Fortunately, the editor has a large number of methods that allow you to specify how the ROM level will be loaded from the image. In this case, you need to set two special functions that will control how the macroblock number is read from the card and, accordingly, how it will be written back by the editor.
That's it, now the map is displayed correctly and you can redraw the level geometry:
The search method is applicable to almost all NES games, you can use scripts from the archive with an example to study your favorite games!
In addition, with some modifications, the method is also applicable to the Sega Mega Drive and SNES platforms (the difference is that it is not the ROM image itself that needs to be modified, but the console’s RAM, often the unpacked level card is stored in it).
In the next article, I will show, as an example of a game, a device of game logic and methods of searching for game objects in order to display and place them on a map.
Links:
Archive with example
Commented Scripts
Theory
The idea of the method is to change all the bytes in the game one at a time and see if any of them changed the level externally. Hands to do it for very long, so you need to use auxiliary tools, namely a built-in emulator FCEUX scripting language the Lua , its possibilities and limitations will be discussed below.
In addition, the process of checking the result is of some difficulty - a modified ROM image must be loaded into the emulator, and then bring the game to the point of launching the first level. Moreover, it is impossible to simply load the ready-made emulator saving made on the original image at the moment after the start of the level - the data from the image will already go into the video memory and RAM, and the first level screen will remain unchanged, it will be impossible to visually distinguish it from the original. Therefore, you must either record the repetition of all keystrokes in the FCEUX emulator, which leads the game from the moment of the start screen to the start of the level (this is done using the File-> Movie-> Record Movie ... menu ), or it’s easier to do it - make saving directly to moment loading level. After pressing the “Start” buttonin the main menu of the game, before the start of the level, the image on the screen is darkened for several moments, at which time the first game screen of the level is created.
To get the save at the right time, you can slow down the time several times (menu NES-> Emulation Speed-> Speed Down , I recommend setting hot keys in the Config-> Map Hotkeys menu to conveniently speed up / slow down the game from the keyboard). It is necessary to wait for the screen to darken and at this moment (until the game screen appears), save the game (for example, in slot 1, using the Shift + F1 key combination) For further work, it is necessary to detect on which frame the save was made and on which frame the game screen appeared (you can enable the display of the current frame-frame on the screen using the menu item Config-> Display-> Frame Counter ). This will be needed in order to take a screenshot of the level screen at the moment when it will already be created, so as not to remove the black screen before.
In the screenshot, the level data is loaded from the image into memory at the moment between frames 454 and 560.
Thus, the algorithm for searching for level data will look like this:
- Run the modified ROM in the emulator
- We load the storage prepared in advance on the original ROM image (at the time of loading data from the image into video memory to get a changed level on the screen).
- We are waiting for the measured number of frames (for this we spotted the value of Frame Counter at the moment when the image appears on the screen).
- Take a screenshot of the screen.
- Repeat the process for the next version of the modified ROM image.
- We analyze the screenshots taken (in the name of the screenshot taken, it is necessary to indicate the address of the byte that was changed, so that it is clear which change led to the fact that the data on the screen changed).
In most cases, the image on the screen will not change, sometimes it will not be at all, since in some versions of ROM images we will inevitably break the game code, sometimes there will be a strange mess of tiles on the screen, the ultimate goal is to find the version in which the screen will be changed only one macroblock (I remind you again, level screens in NES are composed of macroblocks ). When such a screenshot is found, it will become clear at what address the array of block numbers describing the screens is stored.
The Lua language built into the emulator allowsoperate with the processor’s memory and registers, however, it is designed to work with the already loaded ROM cartridge image, therefore, it doesn’t have operations either to load changed versions of ROM images or to change the image itself after loading, however, using it you can implement steps 2,3, 4 algorithms.
The rest in the first version of the automatic corrupter I decided using the Python language. However, in that version there were several serious drawbacks - several thousand generated ROM images took up a lot of space, the emulator was constantly launched from the command line as a separate application and closed, due to which focus was switched to it, so working on a machine with a running script was inconvenient, how to close it in the course of work. Therefore, for the article, I decided to add the necessary functionality to Lua modules in order to change the byte inside the ROM image directly from the emulator.
Tool making
Fortunately, the source code for the FCEUX emulator is available , so you can download the sources and add your modifications.
We find the function for reading the byte from the ROM image (file fceu.cpp , the function FCEU_ReadRomByte ) and add the same version for writing:
// new
void FCEU_WriteRomByte (uint32 i, uint8 value)
{
if (i <16 + PRGsize [0]) PRGptr [0] [i - 16] = value;
else if (i <16 + PRGsize [0] + CHRsize [0]) CHRptr [0] [i - 16 - PRGsize [0]] = value;
}
Next, we “forward” the ability to call this function from Lua (file lua_engine.cpp ):
static int rom_writebyte (lua_State * L)
{
FCEU_WriteRomByte (luaL_checkinteger (L, 1), luaL_checkinteger (L, 2))
return 1;
}
static const struct luaL_reg romlib [] = {
{"readbyte", rom_readbyte},
{"readbytesigned", rom_readbytesigned},
// alternate naming scheme for unsigned
{"readbyteunsigned", rom_readbyte},
{"writebyte", rom_writebyte}, / / new function
{"gethash", rom_gethash},
{NULL, NULL}
};
Thus, we got the opportunity to change bytes of data from scripts and got rid of the need to create and load thousands of different versions of ROM images.
The next step is to teach Lua to analyze screenshots before saving them. To do this, instead of the standard save the screenshot to a file function gui.savescreenshot () to leave it in the memory using the gui.gdscreenshot () , and then check whether already made was not the same screenshot (it will have to store hashes of all have to take a screenshot ), and save to disk only unique. This will allow you not to store thousands of identical screenshots in which changing one byte did not affect the first screen of the game.
To save screenshots, I used the gd library(you can take the compiled version here or compile it from the source yourself), the unpacked files must be put in the folder with the emulator built. To calculate the hashes, I used a little trick - I threw the calculation function from the emulator itself (there it was used to calculate the checksums of ROM images):
// file lua_engine.cpp
static int calchash (lua_State * L) {
const char * buffer = luaL_checkstring (L, 1);
int size = luaL_checkinteger (L, 2);
int hash = CalcCRC32 (0, (uint8 *) buffer, size);
lua_pushinteger (L, hash);
return 1;
}
static const struct luaL_reg emulib [] = {
// part of the code is skipped
// ...
{"readonly", movie_getreadonly},
{"setreadonly", movie_setreadonly},
{"print", print}, // sure, why not
{"calchash", calchash},
{NULL, NULL}
};
Corrupt script and its use
Now the preparatory work is finally over and you can write a Lua script for image corruption (if the comments at the end of the lines do not appear completely, you can see the commented scripts on the github, link at the end of the article):
- download the gd library
require "gd" - the
initial address for the corruption (immediately from the title of the ROM image)
START_ADDR = 0x10 - the
final address for the corruption (depends on the mapper on which the cartridge is made, you can simply set the file size)
END_ADDR = 0x20010
CUR_ADDR = START_ADDR - the
final frame number, after which you need to take a screenshot (when the game screen is already displayed for the player, the number is measured for the created save)
FRAME_FOR_SCREEN = 7035
- the test value that will be written instead of the game byte
WRITE_VALUE = 0x33 - the
step with which the corruption will be performed to save search time
- (you do not need to change each byte on the screen, a large number of macroblocks can be displayed on the screen, it’s enough to detect though would be one of them).
STEP = 8 -
table for saving hashes of all unique screenshots
shas = {} -
remember the value that will be corrupted by the corrupt, to restore it
laterValue = rom.readbyte (START_ADDR)
- load pre-prepared storage from the FIRST slot (the numbering of slots in the emulator starts from 0, and in Lua - from 1).
s = savestate.create (2)
savestate.load (s)
while (true) do -
if the screen has loaded and is already displayed
if (emu.framecount ()> FRAME_FOR_SCREEN) then -
save the screenshot in memory
local gdStr = gui.gdscreenshot ();
- count its hash
local hash = emu.calchash (gdStr, string.len (gdStr));
--if there was no such screenshot
if (not shas [hash]) then
print ("Found new screen" ..tostring (hash));
local fname = string.format ("% 05X", CUR_ADDR) .. ". png";
local gdImg = gd.createFromGdStr (gdStr);
- save a screenshot to the disk with the address name of the changed byte
gdImg: png (fname)
shas [hash] = true;
end;
- restore the value of the previous byte
rom.writebyte (CUR_ADDR, lastValue);
CUR_ADDR = CUR_ADDR + STEP;
- Correction of the next byte
lastValue = rom.readbyte (CUR_ADDR);
rom.writebyte (CUR_ADDR, WRITE_VALUE);
- again save loading to enable the game to load data from a new image into memory
s = savestate.create (2)
- progress
display savestate.load (s)
gui.text (20,20, string.format ("% 05X ", CUR_ADDR));
--when all addresses are processed, stop the emulator
if (CUR_ADDR> END_ADDR) then
emu.pause ();
end
end;
--Wrap emulation until the next frame
emu.frameadvance ();
end;
To run the emulator with a script, you can use a batch file of the following content:
fceux -turbo 1 -lua corrupt.lua “Jackal (U) [!]. Nes”
(The turbo key allows you to start the emulator in the most accelerated mode).
The script on my machine processes all the data in 8 minutes. If it works for too long, you can increase the STEP step to a larger one, up to 64 per screen, and also make the game more accurate, in which the time between the launch frame and the frame on which you want to take a screenshot will be minimal.
A few recommendations for setting up a script for different games: data on screens often starts from the beginning of banks (at addresses that are multiples of 0x2000 or 0x4000), these zones can be investigated in more detail; if there are video banks ( CHR-ROMs ) in the ROM image , you can not investigate them, since they only store video memory. Video banks are always at the end of the ROM image, their number can also be seen in the header (first 16 bytes of the ROM image).
For the game "Jackal" the script finds 235 unique screenshots, which show a wide range of various graphic glitches. However, screenshots taken from images with modified bytes at the addresses 0x105C8, 0x105D8, 0x105E8 are of interest :
Of them it is clear that:
- The game uses a system of macroblocks with a size of 2x2 blocks (4x4 tiles).
- Screens are described by lines of 16 macroblocks wide (the difference between two adjacent addresses).
- The lines are stored in the ROM image in the order from bottom to top.
What can be done with the received data? For example, prepare pictures of all macroblocks of a level, and use them in the CadEditor block editor to create a level map editor.
To do this, slightly rewrite the script so that it records all the possible byte values at the address, which leads to a change in the block on the screen (for example, 0x105C8 ) and takes screenshots of all the blocks. I will not provide the full text of the script, it is in the example archive at the end of the article ( corrupt_byte.lu a ). Sorry, gd libraryIt is not intended for convenient processing of parts of pictures, therefore, to “bite” the macroblock picture from the screenshot and combine them for convenience into one long “tape”, I had to write another Python script (with the PIL library for processing pictures installed ):
# - * - coding: utf-8 - * -
import Image
def cutBlock (pp):
im = Image.open (pp)
# load a screenshot into any image editor to see the coordinates of the beginning of the block
X = 96
Y = 96
# cut from screenshot of the block at the given coordinates
imCut = im.crop ((X, Y, X + 32, Y + 32))
imCut.save ("_" + pp)
for x in xrange (256):
cutBlock (r "% 03d. png "% x)
BLOCK_COUNT = 102
MAX_BLOCK_COUNT = 256
imBig = Image.new (" RGB ", (32 * MAX_BLOCK_COUNT, 32))
for x in xrange (BLOCK_COUNT):
im = Image.open (" _% 03d.png " % x)
imBig.paste (im, (32 * x, 0.32 * x + 32.32))
# increase in macroblock size to 64x64, requirement for use with the CadEditor editor imBig64
= imBig.resize ((MAX_BLOCK_COUNT * 64.64))
imBig64.save ("outStrip.png")
Adding a game to the level editor
The last part remains - you need to create a configuration file for the CadEditor editor , which would use the resulting image. It uses C # as a scripting language (using the CSScript library ).
According to the screenshots, we calculate the beginning of the line in the macroblock map - if the address 0x105C8 changes the 4th macroblock in the line, then the address 0x105C5 is responsible for the first . Next, create a template config:
using CadEditor;
using System;
using System.Collections.Generic;
using System.Drawing;
public class Data
{
/ * calculate the correct address by alternately shifting the boundaries of the lines up and down until the
correct level map appears in the "window".
From the starting address 0x10625 we retreat 96 lines up.
1 - the number of game screens per level,
16 * 96 - the size in bytes of one game screen
* /
public OffsetRec getScreensOffset () {return new OffsetRec (0x10625 - 16 * 96, 1, 16 * 96); }
public int getScreenWidth () {return 16; } // set the screen width
public int getScreenHeight () {return 96; } // set the screen height
public int getBigBlocksCount () {return 256; }
// connect the strip with macroblock pictures
public string getBlocksFilename () {return "jackal_1.png"; }
// turn off macroblock and enemy sub-
editors that are not implemented for this game public bool isBigBlockEditorEnabled () {return false; }
public bool isBlockEditorEnabled () {return false; }
public bool isEnemyEditorEnabled () {return false; }
}
The level map loaded in the editor with such a config looks strange, although it resembles the real one:
After examining the result, it turns out that the lines of the 16x8 macroblock screen are stored in the order from bottom to top, but the screens themselves are from top to bottom, which means that every 8 lines screen rearranged. Fortunately, the editor has a large number of methods that allow you to specify how the ROM level will be loaded from the image. In this case, you need to set two special functions that will control how the macroblock number is read from the card and, accordingly, how it will be written back by the editor.
// Direct the editor to use a special function to get the macroblock number from the
// card and write back
public GetBigTileNoFromScreenFunc getBigTileNoFromScreenFunc () {return getBigTileNoFromScreen; }
public SetBigTileToScreenFunc setBigTileToScreenFunc () {return setBigTileToScreen; }
public int getBigTileNoFromScreen (int [] screenData, int index)
{
int w = getScreenWidth ();
int noY = index / w;
noY = (noY / 8) * 8 + 7 - (noY% 8); // transformation of the Y-coordinate of the macroblock
int noX = index% w;
return screenData [noY * w + noX];
}
public void setBigTileToScreen (int [] screenData, int index, int value)
{
int w = getScreenWidth ();
int noY = index / w;
noY = (noY / 8) * 8 + 7 - (noY% 8); // transformation of the Y-coordinate of the macroblock
int noX = index% w;
screenData [noY * w + noX] = value;
}
That's it, now the map is displayed correctly and you can redraw the level geometry:
The search method is applicable to almost all NES games, you can use scripts from the archive with an example to study your favorite games!
In addition, with some modifications, the method is also applicable to the Sega Mega Drive and SNES platforms (the difference is that it is not the ROM image itself that needs to be modified, but the console’s RAM, often the unpacked level card is stored in it).
In the next article, I will show, as an example of a game, a device of game logic and methods of searching for game objects in order to display and place them on a map.
Links:
Archive with example
Commented Scripts