New 2GIS for Windows Phone: architecture and technology stack
It was 2013. For a dollar they gave 30 rubles, and I got a job at 2GIS to develop under Windows Phone. I managed to participate in the launch of the 2GIS application, which was almost ready by that time, which soon became available to our users in the Marketplace.
This application had one annoying feature: it worked on our WebAPI, and, accordingly, required an Internet connection. Therefore, almost immediately there was a need to teach 2GIS under WP to work offline. And at the same time solve other pressing problems.
Reasons to rewrite everything
The old application, despite the fact that it was published recently, did not do very well with the requirements of users and business. The requirements looked something like this.
Fast data delivery
Suppose 2GIS found out some new information about your city. In order to share this information with users, we performed such actions here.
- They taught the application to display new data.
- All tested.
- Published a new version of the application in the store.
- They released data updates for the city.
Only after that you downloaded the new version of the application, and finally found out how much it costs to comb a beard in the nearest barbershop. I'm not talking about the problems of data and application versioning, compatibility, and all that. Fast data delivery means that we would like to completely exclude points 1-3 from this process, and thereby make beard owners a little happier.
The rapid emergence of new features
Let's say we come up with a new search algorithm that searches better and faster. I wanted this algorithm to appear in the product without significant labor costs from the Windows Phone team.
Offline
As I said, the previous version of the application needed the Internet.
This was a little frustrating for some of our users, and therefore the new 2GIS for WP must have worked offline.
The architecture of the new 2GIS under Windows Phone
Well, our small but friendly team clarified the basic requirements, charged early in the morning with positive feedback from the latest reviews in the store and began to develop. The first thing, of course, is architecture.
It is worth saying that in 2GIS mobile applications have been doing for quite some time, and several versions have already changed for other platforms. When we developed the architecture, we took into account the experience gained by the company and the requirements voiced above. Here's what happened.
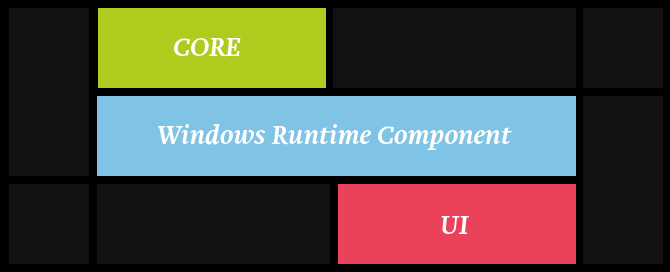
Cross-platform core
The upper block in the picture is a cross-platform core, the basis of everything, the entry point to all our algorithms and services. Our offline backend, to which we ask questions and get answers. This thing provides us with work without a network connection. We call it cross-platform, because we can collect it not only under WP, but also under Windows, OS X, Linux, iOS and Android.
In accordance with the requirement to quickly add new features, everything new that appears in 2GIS appears in the kernel and automatically gets into the new 2GIS for WP (as with all products that use this kernel). The cross-platform kernel is developed in C ++ by very smart guys from a special team for the development of the cross-platform kernel. They are great, but I won’t write anything more about them, because the article is not about them, but about Windows Phone.
UI
The lowest block in the diagram is the UI, the frontend, the part that the user is working with. It is developed using native tools for the platform (C # and XAML) in order to provide the user with the most familiar and easy experience of interacting with his favorite platform. At the time of this writing, developers had several types of applications available for WP: Silverlight Application, Windows Phone (not Silverlight!) Application, Universal Application. But when we just started working on the new 2GIS, there was only Silverlight, so it is not surprising that we chose it.
Intermediate layer
In order to make friends with C ++ and C #, to teach the kernel to communicate with the application, and the application with the kernel, some intermediate layer in the form of Windows Runtime Component, written in C ++ / CX, is required.
3D map on OpenGL
Continuing the conversation about offline, you can not say about our card, which also works without an Internet connection. A map in 2GIS is a fairly recognizable element. It is three-dimensional, cross-platform (also assembled under different operating systems) and is written in OpenGL.
Unfortunately, OpenGL is not supported on WP, so we have to use Angle to translate OpenGL calls to DirectX. I want to note that with the integration of the card we suffered a lot of different things, but in the end we managed to launch it on WP. Of course, the use of Angle leaves its mark on performance, but we try to minimize this impact.
Instruments
As in any other application written in C # / XAML, the entire internal device of the 2GIS frontend for WP obeys the MVVM pattern.
Any programmer using MVVM, sooner or later has a need
- Open your favorite browser. For example, Internet Exporer.
- We go to the website caliburnmicro.com .
- Download Caliburn.Micro, install and enjoy.
Seriously, in 2013 there were not very many popular MVVM frameworks running on WP8. In fact, the choice was between Prism, MVVM Light and Caliburn.Micro. Prism is too monstrous, more suitable for large enterprise applications, MVVM Light, on the contrary, is too light, and I wanted something more. But Caliburn.Micro we liked for the following reasons.
Navigation support
Usually navigation between pages in a silverlight application looks something like this:
NavigationService.Navigate(new Uri("/GroupPage.xaml?name=Administrators", UriKind.Relative));
This is not very beautiful, it is easy to make mistakes when entering lines, because typing is missing. The name parameter itself must be retrieved inside the onNavigated page event in this form.
var name = NavigationContext.QueryString["name"];
Caliburn.Micro allows you to solve the same problem as follows.
NavigationService.UriFor()
         .WithParam(x => x.Name, "Administrators")
         .Navigate();
The code looks beautiful, type control is present, and the Name parameter is immediately written to the corresponding ViewModel property during navigation.
Saving State Support
Caliburm.Micro offers an interesting infrastructure for maintaining application state. For example, in order to define a state-preservation strategy for GroupPageViewModel, just define such a class.
public class GroupPageViewModelStorage : StorageHandler
{
    public override void Configure()
    {
        Property(x => x.Name)
            .InPhoneState()
            .RestoreAfterActivation();
    }
}
The code above means that if the system suddenly unloads your application while it is inactive, then the GroupPageViewModel's Name property will survive this trouble and will be saved and then restored when the application is reactivated.
Native IoC container support
The heart of Caliburn.Micro is its built-in IoC container , which implements the dependency injection pattern. When navigating between pages, ViewModels get all the necessary services using constructor / property injection, and this is extremely convenient. I highly recommend it.
For WP - Pivot Support
Caliburn.Micro provides an infrastructure in which each Pivot control page can be a separate View with its own separate ViewModel. This is very convenient, allows you to decompose the logic and relatively easy to set up lazy data loading for Pivot tabs.
Special methods in view models that are tied to the page life cycle
The Screen class - the base class for most of your ViewModels, has very convenient methods OnInitialize, OnActivate, OnDeactivate, etc., which are called by the framework when creating a ViewModel instance and when navigating to the corresponding page or when leaving it. You can override these methods in your ViewModels and execute some useful code there.
Open source
Caliburn.Micro is open source. If you are missing something in the framework, you can always add it yourself.
Low entry threshold
Getting started with Caliburn.Micro is easy. In addition, it is quite lightweight, the entire Caliburn.Micro code is quite realistic to learn in a day or two.
Saving application state
It is worth saying that we have somewhat modified the mechanism for maintaining the state of the application used in Caliburn.Micro. By default, Caliburn uses the standard XML serialization mechanisms used in WP. We have added support for binary serialization using SharpSerializer . It turned out conveniently, quickly, and you can serialize almost anything.
Fast data delivery
So, the cross-platform core provides us with the rapid emergence of new features and work offline, but what about fast data delivery? How can new city data appear in the application if the application does not know anything about this data?
The answer is that together with the new data, we must put in a new UI to display them. In our case, these are XAML templates. Usually XAML templates live inside the application and are delivered with it, but we want to distribute XAML resources separately and completely independently of the application itself.
I'm not sure anyone else is doing this, but by and large, there is nothing fantastic here. For some time we experimented with various options and settled on a very simple, in my opinion, scheme, which I will try to tell you in a very simplified way now.
Suppose that, separately from the application, we distribute such data that we want to display.
{
  "data": "Windows Phone"
}
Nothing special here - it's just json.
We also distribute (also separately from the application) the XAML template needed to display this data.
It is worth noting a few points.
- We will load this template on the application side as a string and parse using XamlReader.Load (). It naturally follows from this that not every XAML can be used like that. The correct XAML should not contain any code behind, any references to x: Class, event subscriptions, etc.
- DataTemplates are great for the previous requirement, so we will use them.
- We use ResourceDictionary as a container for several templates.
- Notice how we distribute the TestIcon icon, also in the form of a DataTemplate. And display it using ContentPresenter.
- The Text property of a text block is bound to some data property by binding to some ViewModel's indexer (about which later). Please note that in our json there is an element with exactly the same name, and this is no accident.
Suppose, already in the application itself, we have just such a View.
In this View, the ContentControl is an entry point for displaying dynamic data. There is an important convention here: ContentControl knows what it needs to display the template with the EntryPoint key, and this is the template in our XAML that we distribute separately. Actually, the key name is the only thing the application knows about the template that will show.
Accordingly, ViewModel is defined for View, which implements some test magic for loading dynamic content.
public class MainPageViewModel
{
    public MainPageViewModel()
    {
        // Загружаем с секретных серверов 2ГИС данные о городе.
        string json = LoadDynamicData();
        DynamicData = (JObject)JsonConvert.DeserializeObject(json);
        // Загружаем шаблон для отображения данных.
        string xaml = LoadDynamicXaml();
        // Парсим xaml.
        var resources = (ResourceDictionary)XamlReader.Load(xaml);
        // Добавляем шаблоны в ресурсы приложения.
        foreach (DictionaryEntry entry in resources)
        {
            Application.Current.Resources.Add(entry.Key, entry.Value);
        }
    }
    public JObject DynamicData { get; private set; }
}
I will explain a few points.
- In the example, I used Json.Net to parse json and get some object from it suitable for data binding. Actually, we use DynamicDataContext for these purposes , but in this example we use JObject for simplicity.
- JObject has an indexer that takes a string - the name of the json element, and returns the value of this element.
- That is why in the template the text of the text block is attached to the [data] indexer, which returns the value of the data element from json. So ordinary json becomes a view model for our template.
If you collect this example and run it on your favorite Windows Phone phone, you can see this picture.
So easily and naturally, we just displayed data in the application about which the application knows nothing at all. And the application does not know how to display this data either - all the information is downloaded from 2GIS servers.
Summary
We made a real 2GIS for WP: we have a three-dimensional map, a detailed directory of organizations, a cross-platform core, and we distribute xaml templates regardless of the application. And it all works without an internet connection. If for some reason you still have not installed the new 2GIS on your Windows Phone smartphones, it 's time to do it .