Architecture creation: working with iOS Coordinator pattern
- Tutorial

( Illustration )
Each team, sooner or later, begins to think about introducing its own architectural approaches, and many copies of it were broken. Here we are at Umbrella ITalways wanted to work with flexible tools, so that the formation of the architecture was not something painful, and the problems of navigation, mock-files, isolation and testing ceased to be something scary, something that sooner or later hangs over an overgrown project. Fortunately, we are not talking about a new "exclusive" architecture with an elaborate name-abbreviation. It must be admitted that the currently existing popular architectures (MVP, MVVM, VIPER, Clean-swift) cope with their tasks, and complexity can be caused only by the wrong choice and the wrong use of one or another approach. However, within the framework of the adopted architecture, it is possible to use various patterns, which will make it possible to achieve the very, almost mythical indicators: flexibility, isolation, testability, reuse.
Of course, applications are different. If the project contains only a few screens that are connected in series, then there is no particular need for complex interactions between modules. It is quite possible to get along with the usual segue links, spicing it all up with the good old MVC / MVP. And although architectural snobbery sooner or later overcomes every developer, the implementation must be commensurate with the goals and complexity of the project. And so, if the project assumes a complex structure of screens and various states (authorization, Guest mode, offline, roles for users, etc.), then a simplified approach to architecture will certainly play a cruel joke: a lot of dependencies, unclear and expensive data transfer between screens and states, problems with navigation and, most importantly, all this will not have any flexibility and reusability, the solutions will be tightly fused into the project and the screen A will always open the screen B. Attempts to change will lead to painful refactoring, during which it is so easy to make mistakes and break things that used to work. In the example below, we describe a flexible way of organizing the operation of an application that has two states: the user is not authorized and should be sent to the authorization screen, the user is authorized and a certain Main-screen should be opened.
1. Implementation of the main protocols
First we need to implement the base. It all starts with the Coordinatable, Presentable, Routable protocols:
protocolCoordinatable: class{
    funcstart()
}
protocolPresentable{
    var toPresent: UIViewController? { get }
}
extensionUIViewController: Presentable{
    var toPresent: UIViewController? {
        returnself
    }
    funcshowAlert(title: String, message: String? = nil) {
        UIAlertController.showAlert(title: title,
                                    message: message,
                                    inViewController: self,
                                    actionBlock: nil)
    }
}
In this example, showAlert is simply a convenient method for invoking a notification, which is in the UIViewController extension.
protocolRoutable: Presentable{
    funcpresent(_ module: Presentable?)funcpresent(_ module: Presentable?, animated: Bool)funcpush(_ module: Presentable?)funcpush(_ module: Presentable?, animated: Bool)funcpush(_ module: Presentable?, animated: Bool, completion: CompletionBlock?)funcpopModule()funcpopModule(animated: Bool)funcdismissModule()funcdismissModule(animated: Bool, completion: CompletionBlock?)funcsetRootModule(_ module: Presentable?)funcsetRootModule(_ module: Presentable?, hideBar: Bool)funcpopToRootModule(animated: Bool)
}
2. Creating a coordinator
From time to time there is a need to change the application screens, which means it will be necessary to implement the test layer without downcast, and also without violating the SOLID principles.
Let's
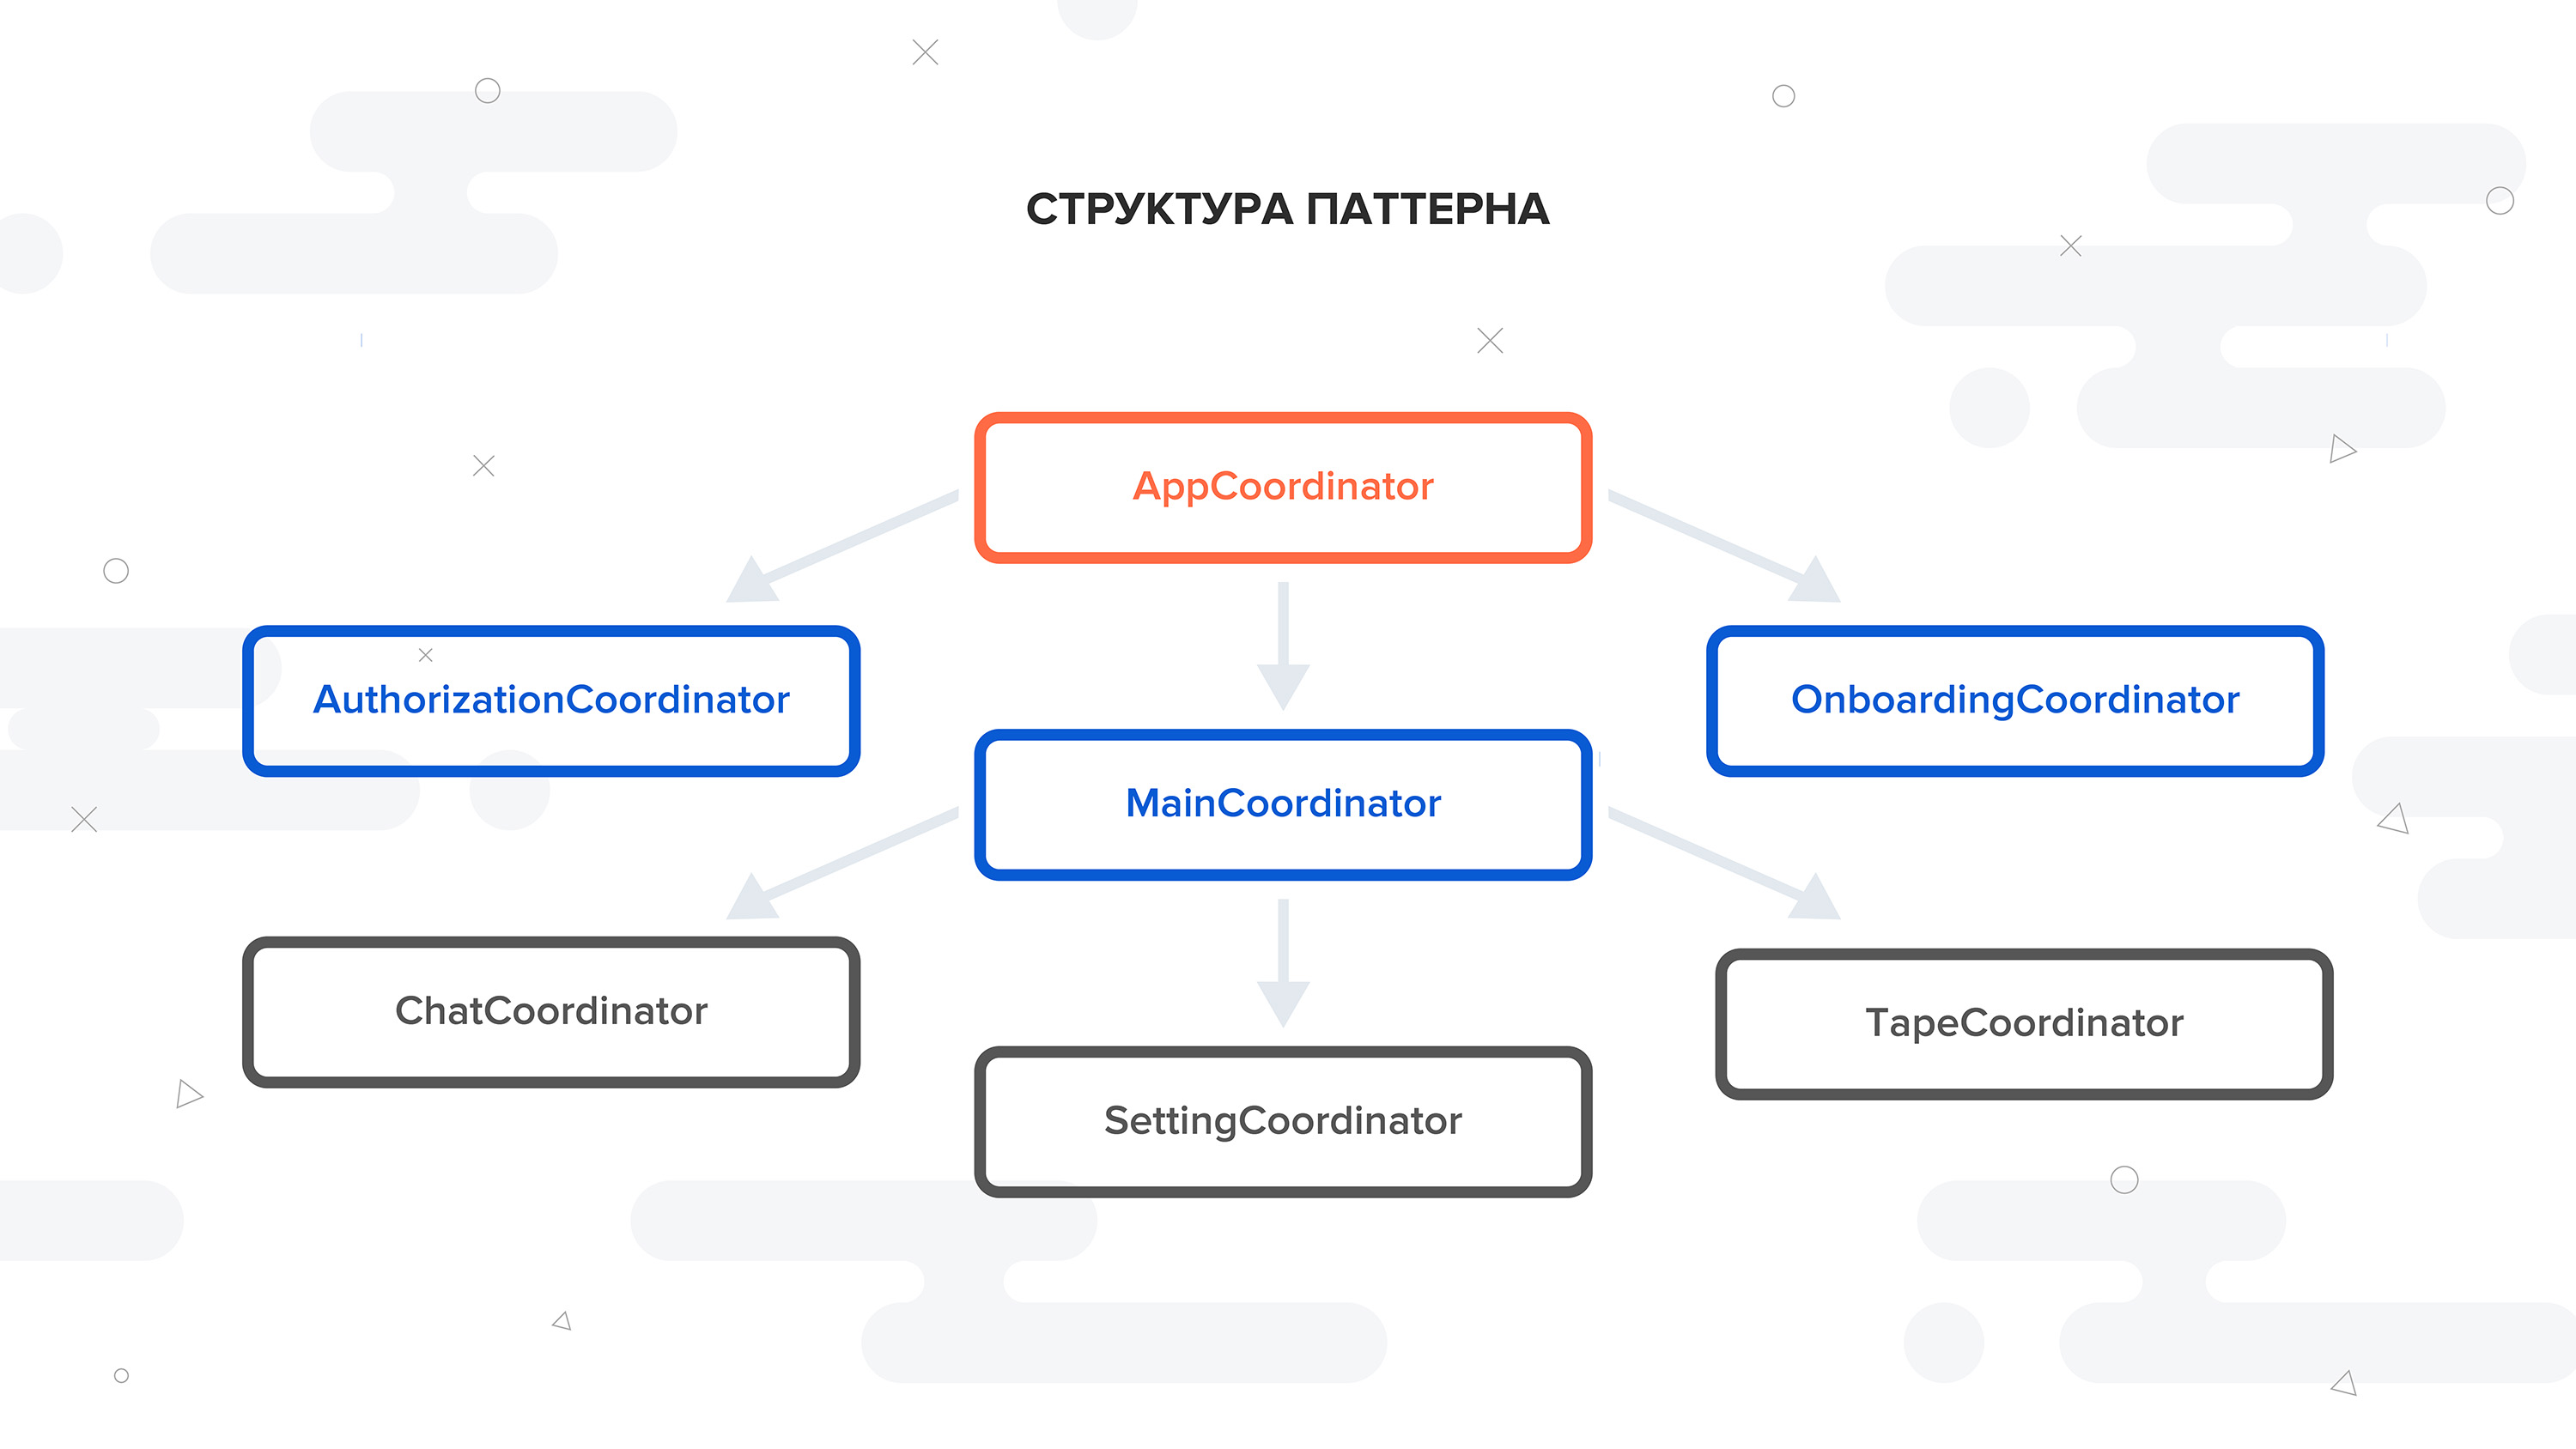
start the implementation of the coordinate layer: After starting the application, the AppCoordinator method should be called, which determines which flow should be started. For example, if a user is registered, then the application's flow should be started, and if not, then the authorization flow. In this case, MainCoordinator and AuthorizationCoordinator are required. We will describe the coordinator for authorization, all other screens can be created in the same way.
First you need to add an output to the coordinator so that he can have a connection with the higher level coordinator (AppCoordinator):
protocolAuthorizationCoordinatorOutput: class{
    var finishFlow: CompletionBlock? { getset }
}
finalclassAuthorizationCoordinator: BaseCoordinator, AuthorizationCoordinatorOutput{
    var finishFlow: CompletionBlock?fileprivatelet factory: AuthorizationFactoryProtocolfileprivatelet router : Routableinit(router: Routable, factory: AuthorizationFactoryProtocol) {
        self.router  = router
        self.factory = factory
    }
}
// MARK:- CoordinatableextensionAuthorizationCoordinator: Coordinatable{
    funcstart() {
        performFlow()
    }
}
// MARK:- Private methodsprivateextensionAuthorizationCoordinator{
    funcperformFlow() {
       //:- Will implement later
    }
}
As shown above, we have an Authorization coordinator with a router and a module factory. But who calls the start () method and when?
Here we need to implement AppCoordinator.
finalclassAppCoordinator: BaseCoordinator{
fileprivatelet factory: CoordinatorFactoryProtocolfileprivatelet router : Routablefileprivatelet gateway = Gateway()
init(router: Routable, factory: CoordinatorFactory) {
self.router = router
self.factory = factory
}
}
// MARK:- CoordinatableextensionAppCoordinator: Coordinatable{
funcstart() {
self.gateway.getState { [unownedself] (state) inswitch state {
case .authorization:
self.performAuthorizationFlow()
case .main:
self.performMainFlow()
}
}
}
}
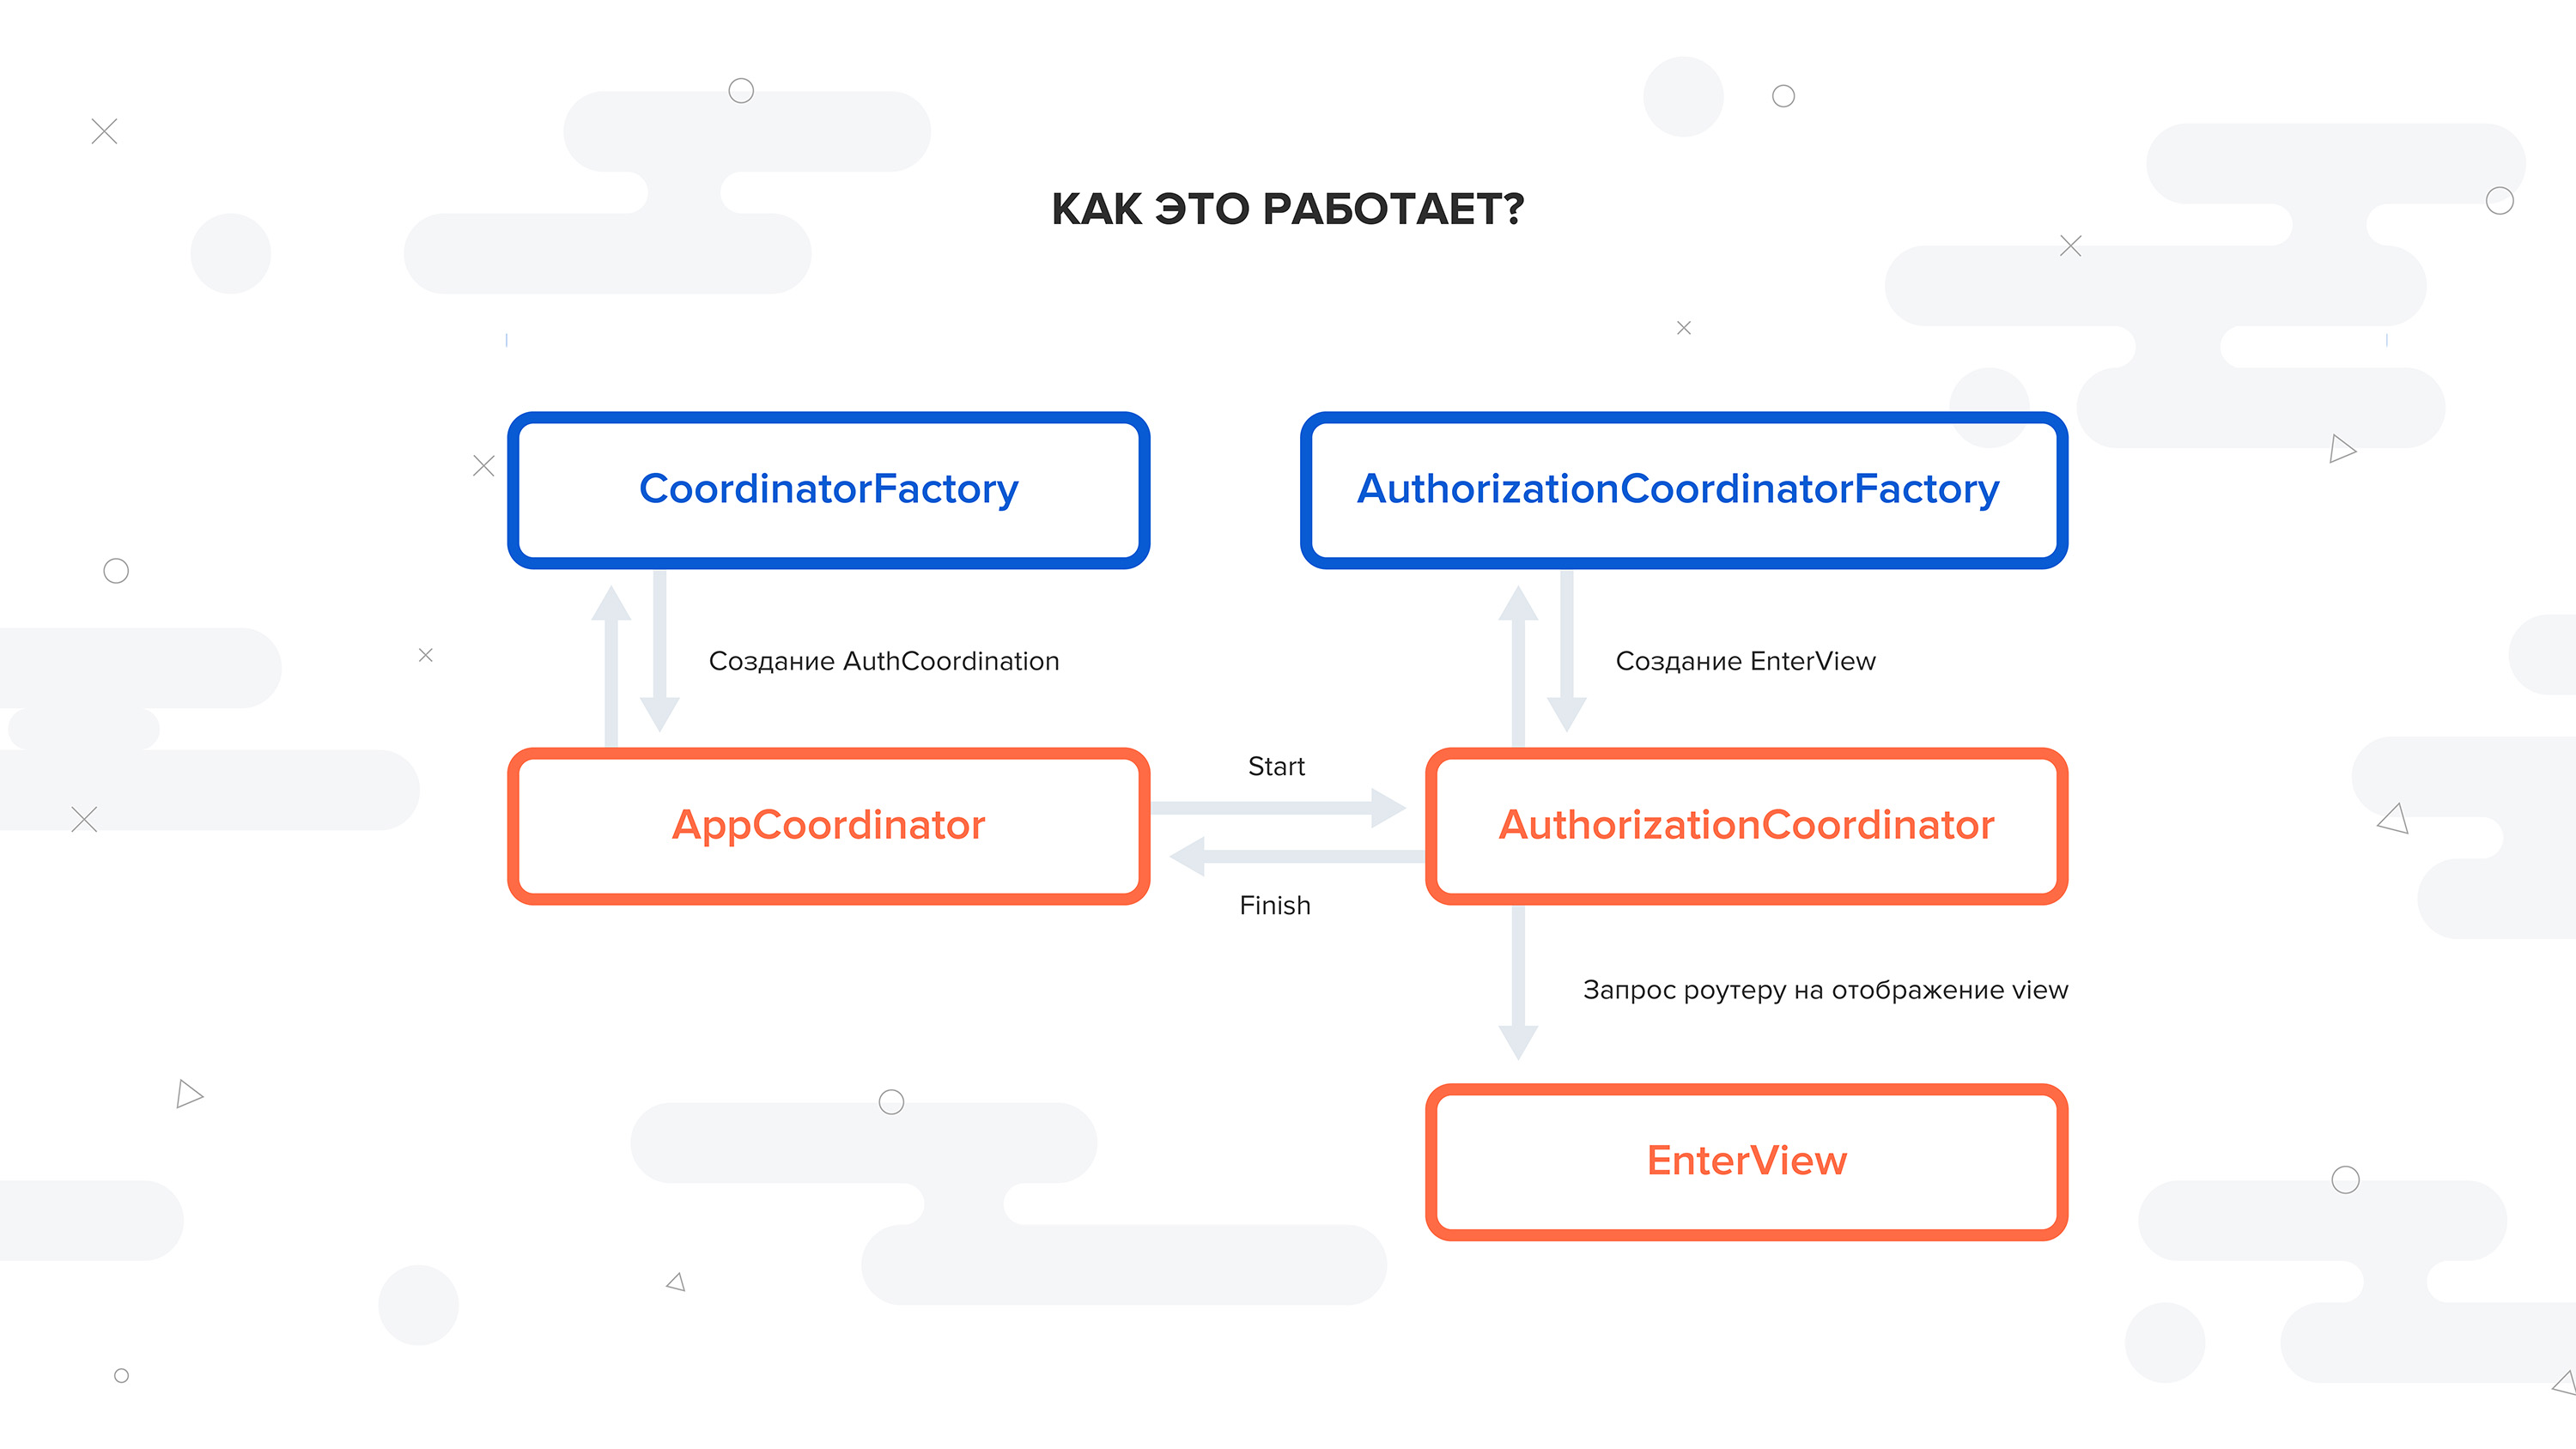
// MARK:- Private methodsfuncperformAuthorizationFlow() {
let coordinator = factory.makeAuthorizationCoordinator(with: router)
coordinator.finishFlow = { [weakself, weak coordinator] inguardlet `self` = self,
let `coordinator` = coordinator
else { return }
self.removeDependency(coordinator)
self.start()
}
addDependency(coordinator)
coordinator.start()
}
funcperformMainFlow() {
// MARK:- main flow logic
}
From the example, you can see that AppCoordinator has a router, a coordinator factory and the state of the entry point for AppCoordinator, whose role is to determine the start of the flow of the application.
finalclassCoordinatorFactory{
    fileprivatelet modulesFactory = ModulesFactory()
}
extensionCoordinatorFactory: CoordinatorFactoryProtocol{
    funcmakeAuthorizationCoordinator(with router: Routable) -> Coordinatable & AuthorizationCoordinatorOutput {
        returnAuthorizationCoordinator(router: router, factory: modulesFactory)
    }
}
3. Implementation of the factory coordinators
Each coordinator is initialized with a router and a module factory. Moreover, each coordinator must inherit from the base coordinator:
classBaseCoordinator{
    var childCoordinators: [Coordinatable] = []
    // Add only unique objectfuncaddDependency(_ coordinator: Coordinatable) {
        for element in childCoordinators {
            if element === coordinator { return }
        }
        childCoordinators.append(coordinator)
    }
    funcremoveDependency(_ coordinator: Coordinatable?) {
        guard
            childCoordinators.isEmpty == false,
            let coordinator = coordinator
            else { return }
        for (index, element) in childCoordinators.enumerated() {
            if element === coordinator {
                childCoordinators.remove(at: index)
                break
            }
        }
    }
}
BaseCoordinator is a class containing an array of child coordinators and two methods: Delete and Add coordinator dependency.
4. Configure AppDelegate
Now let's see what UIApplicationMain looks like:
@UIApplicationMainclassAppDelegate: UIResponder, UIApplicationDelegate{
    var window: UIWindow?var rootController: UINavigationController {
        window?.rootViewController = UINavigationController()
        window?.rootViewController?.view.backgroundColor = .white
        return window?.rootViewController as! UINavigationController
    }
    fileprivatelazyvar coordinator: Coordinatable = self.makeCoordinator()
funcapplication(_ application: UIApplication, didFinishLaunchingWithOptions launchOptions: [UIApplicationLaunchOptionsKey: Any]?) -> Bool {
        coordinator.start()
        returntrue
    }
}
// MARK:- Private methodsprivateextensionAppDelegate{
    funcmakeCoordinator() -> Coordinatable {
        returnAppCoordinator(router: Router(rootController: rootController),
                              factory: CoordinatorFactory())
    }
}
As soon as the delegate's didFinishLaunchingWithOptions method is called, the Start () method of the AppCoordinator is called, which determines the further logic of the application.
5. Creating a screen module
To demonstrate what happens next, let's go back to the AuthorizationCoordinator and implement the performFlow () method.
First we need to implement the AuthorizationFactoryProtocol interface in the ModulesFactory class:
finalclassModulesFactory{}
// MARK:- AuthorizationFactoryProtocolextensionModulesFactory: AuthorizationFactoryProtocol{
     funcmakeEnterView() -> EnterViewProtocol {
        let view: EnterViewController =
 EnterViewController.controllerFromStoryboard(.authorization)
        EnterAssembly.assembly(with: view)
         return view
Calling any method for a module factory usually means initializing a ViewController from a storyboard and then linking all the necessary components of this module within a specific architecture (MVP, MVVM, CleanSwift).
After the necessary preparations, we can implement the performFlow () method of the AuthorizationCoordinator.
The start screen within this coordinator is EnterView.
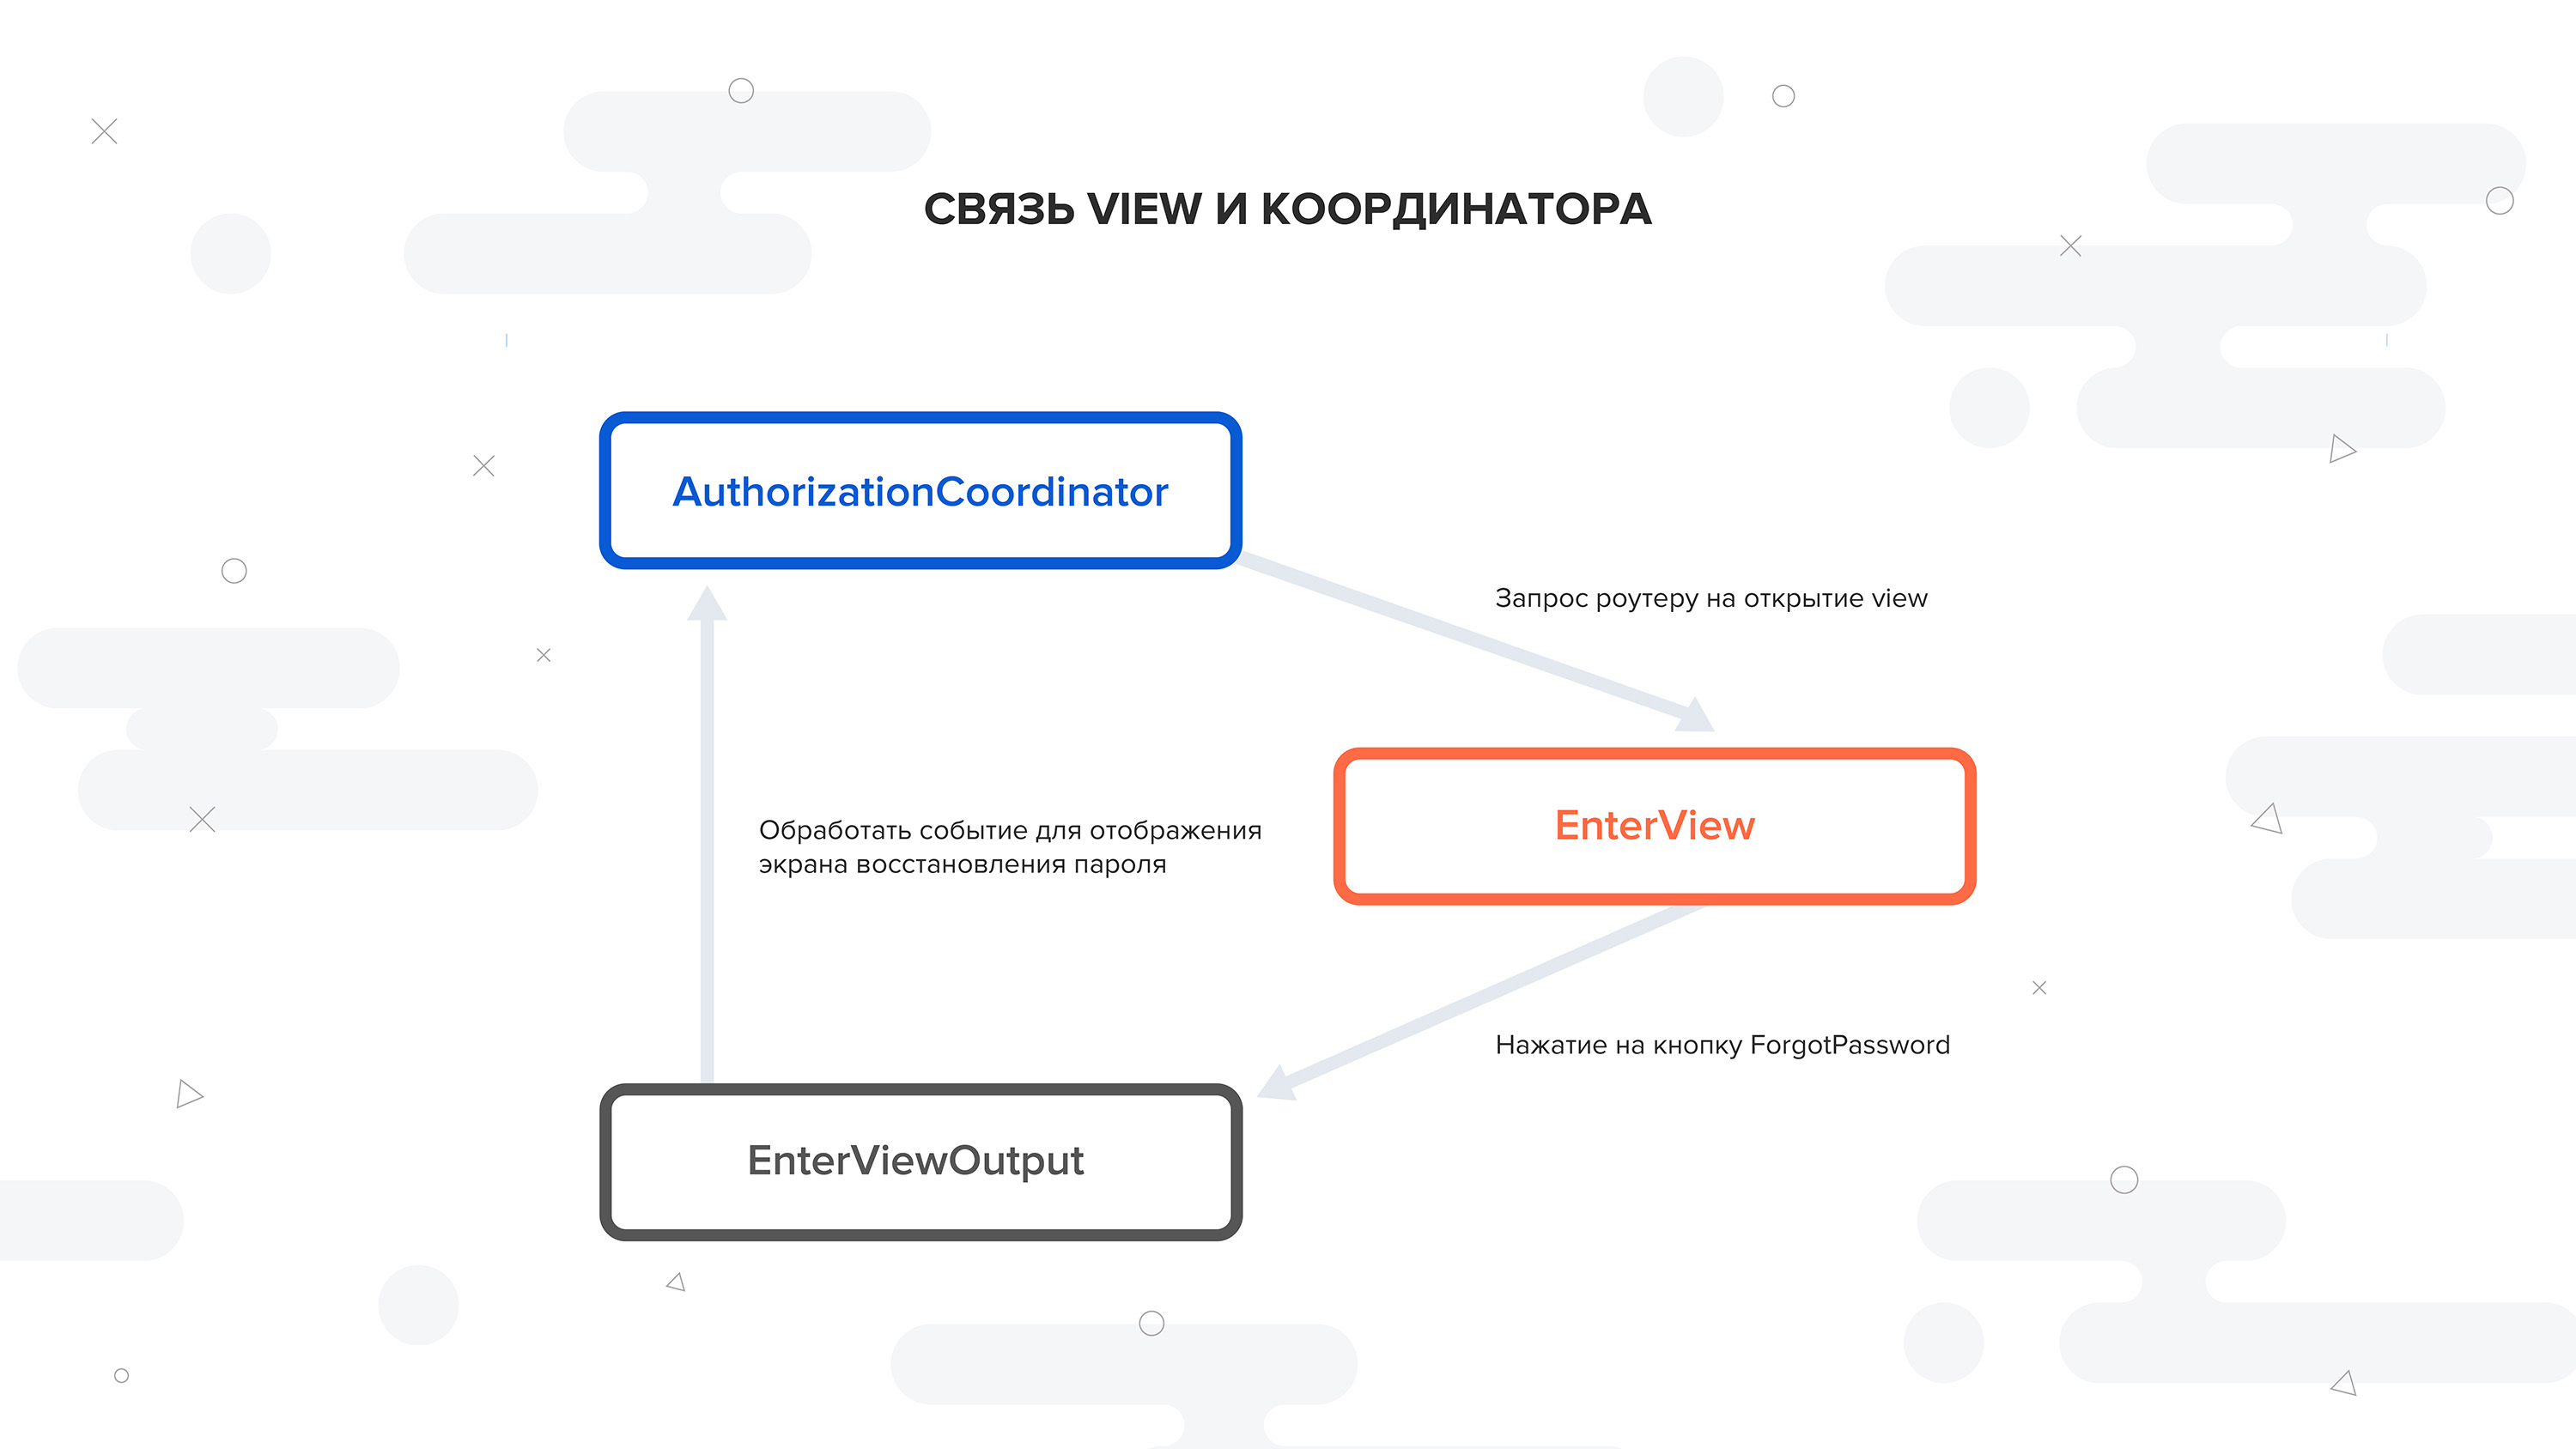
In the performFlow () method, using the module factory, the creation of a ready-made module for a given coordinator is called, then the logic of processing closures that our view controller causes at one time or another is implemented, then this module is exposed to the router by the root in the navigation screen stack:
privateextensionAuthorizationCoordinator{
     funcperformFlow() {
        let enterView = factory.makeEnterView()
        finishFlow =  enterView.onCompleteAuthorization
        enterView.output?.onAlert = { [unownedself] (message: String) inself.router.toPresent?.showAlert(message: message)
        }
        router.setRootModule(enterView)
} }
Despite the seeming complexity in some places, this pattern is ideal for working with mock files, allows you to completely isolate the modules from each other, and also abstracts us from UIKit, which is well suited for full coverage of tests. At the same time, the Coordinator does not impose strict requirements on the application architecture and is only a handy addition, structuring navigation, dependencies and data flows between modules.
Link to github , which contains a demo based on Clean architecture and a convenient Xcode Template to create the necessary architectural layers.