Inno Setup: creating an installer using an example of a C # application deployment
- Tutorial
Introduction
I am not a professional programmer. In the sense that I do not make money with this craft, but use my skills as a tool for my main, scientific, activity. Therefore, all my "crafts" live only the time allotted to them for solving a specific problem and do not go beyond the project catalogs. In addition, quite a long time ago I moved away from development under the Windows OS, because Linux is more convenient for solving my problems.
However, scientists also want to eat, dress decently and refuel the car. Therefore (the truth is rather rare) there is a need to be a little freelanced.
Recently, they gave me a not-too-complicated project - one company wants to write an analogue of the program that another has. A bit of reverse, a bit of coding, in general, the project is quite ordinary. However, the question immediately arose about creating an installer - the client, after all, wants the product “turnkey” in order to click on the “setup”, click “Next” and get the program ready for work.
I have never been involved in creating installers. Therefore, this issue was thoroughly “googled,” among other things, I also came across such an article from Habr. The choice of tools for this task is quite wide, and includes both proprietary and open-source products. Here is a list of what I “felt”
- InstallShield - a classic of the genre, a fairly solid proprietary product
- Adnvanced Installer is a proprietary tool with extensive customization capabilities through the GUI. The site says that if you are a blogger and will write a lot of good words about this product, then you have the opportunity to get a Free License
- WiX is an open, free XML script based product. Powerful, well-documented thing. I have not yet begun to deal with it, because time is expensive (and the soul lies not so much with XML). Perhaps someday I will return to him. Yes, there are plugins for it for Visual Studio, which is a definite plus.
- Inno Setup is an open source project whose code is available on the github . Due to the gratuitous nature and low entry threshold, my choice was based on it, as a tool that allowed me to perform work quickly and efficiently.
So in this article we will consider an example of using Inno Setup, for which there is a useful Inno Script Studio frontend that allows you to create simple installers using the wizard and change settings through the GUI. I needed a GUI for the first acquaintance with the product, but we won’t pay much attention to it - my “Linux of the brain” has recently led me more and more away from the desire to use all kinds of “masters” (this is subjective, please do not kick) . We will look at the hardcore way to write a script from scratch.
1. Installation, configuration and a simple (but pretty solid) script
I think that downloading the program from the official site and installing it will not be difficult. We start Inno Setup Compiler and we see such a window. It is
frighteningly sad that Inno Setup meets us ...
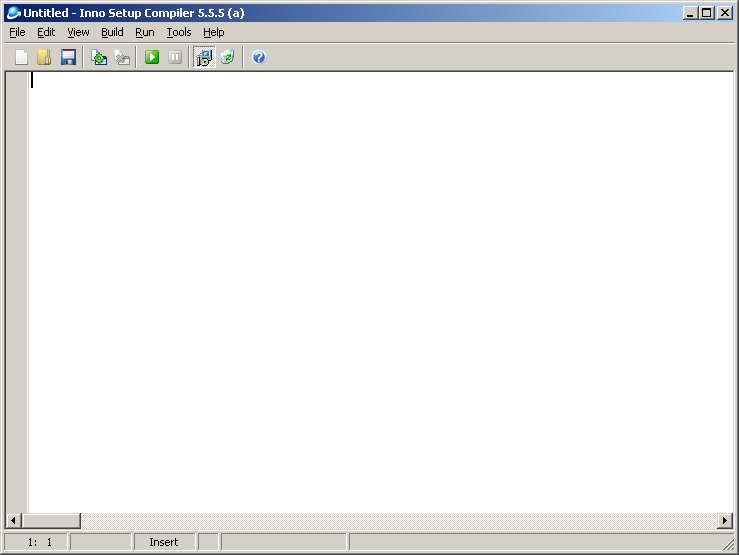
What is this? In fact, this is simply a script editor, equipped with syntax highlighting and compilation and launch buttons. They expect us to start typing script text in this window that defines the logic of the future installer. Well, we will not waste time.
First of all, we define the necessary constants
;------------------------------------------------------------------------------
;
;       Пример установочного скрипта для Inno Setup 5.5.5
;       (c) maisvendoo, 15.04.2015
;
;------------------------------------------------------------------------------
;------------------------------------------------------------------------------
;   Определяем некоторые константы
;------------------------------------------------------------------------------
; Имя приложения
#define   Name       "Miramishi Painter"
; Версия приложения
#define   Version    "0.0.1"
; Фирма-разработчик
#define   Publisher  "Miramishi"
; Сафт фирмы разработчика
#define   URL        "http://www.miramishi.com"
; Имя исполняемого модуля
#define   ExeName    "Miramishi.exe"
These lines will often occur in script code, so we define them, as in C, using the directive #define
The body of the script is divided into sections, each of which carries its own purpose. The required [Setup] section sets the global parameters of the installer and uninstaller.
;------------------------------------------------------------------------------
;   Параметры установки
;------------------------------------------------------------------------------
[Setup]
; Уникальный идентификатор приложения,
;сгенерированный через Tools -> Generate GUID
AppId={{F3E2EDB6-78E8-4539-9C8B-A78F059D8647}
; Прочая информация, отображаемая при установке
AppName={#Name}
AppVersion={#Version}
AppPublisher={#Publisher}
AppPublisherURL={#URL}
AppSupportURL={#URL}
AppUpdatesURL={#URL}
; Путь установки по-умолчанию
DefaultDirName={pf}\{#Name}
; Имя группы в меню "Пуск"
DefaultGroupName={#Name}
; Каталог, куда будет записан собранный setup и имя исполняемого файла
OutputDir=E:\work\test-setup
OutputBaseFileName=test-setup
; Файл иконки
SetupIconFile=E:\work\Mirami\Mirami\icon.ico
; Параметры сжатия
Compression=lzma
SolidCompression=yes
Attention udelali options ADDID - a unique application identifier (GUID), used for the registration application in the Windows registry. We do not write it “from the flashlight”, but generate it by opening the curly brace and selecting Tools -> Generate GUID from the menu (or using the Shift + Ctrl + G hotkey). Next, indicate the name of the application under which it will be installed in the system, its version, data of the developer company, the addresses of the developer’s sites, technical support and updates.
The default path proposed by the installer for installation is determined by the DefaultDirName option . In this case, the variable {pf} is the path to the Program Files directory of the corresponding bit depth. Option DefaultGroupNamedefines the name of the program group in the Start menu. Please note that to indicate the name of the application, we use the name macro given by us above, framing it with curly braces and a grid.
A couple of options OutputDir and OutputBaseFileName specify the directory where the compiled “setup” and its name (without extension) will be written. In addition, we indicate where to get the icon for test-setup.exe with the SetupIconFile option .
The last options in this section define the compression algorithm (LZMA) and indicate that all files are compressed at the same time, and not separately ( SolidCompression ), which speeds up the decompression process with a large number of files of the same type.
A good installer should have support for multiple languages. We include it in our “setup” using the optional [Languages] section . In the absence of this section, English will be used.
;------------------------------------------------------------------------------
;   Устанавливаем языки для процесса установки
;------------------------------------------------------------------------------
[Languages]
Name: "english"; MessagesFile: "compiler:Default.isl"; LicenseFile: "License_ENG.txt"
Name: "russian"; MessagesFile: "compiler:Languages\Russian.isl"; LicenseFile: "License_RUS.txt"
Each line in this section defines one of the languages used during installation. The syntax of the string is this
<имя параметра>: <значение параметра>
semicolon is used as a parameter separator. The Name parameter speaks for itself - the "name" of the language, generally accepted two-letter abbreviations are allowed ("en", "ru", "de" and so on). The MessagesFile parameter tells the compiler where to get the template of messages displayed during installation. We take these templates in the Inno Setup compiler directory, which we report with the compiler directive . For English, the Default.isl template is suitable, for Russian - Languages \ Russian.isl
The LicenseFile parameter sets the path to the file with the license text in the corresponding language.
Typically, the installer offers us, for example, to decide whether we want or do not want to create a shortcut on the desktop. Such installation options are determined by an optional section.[Tasks]
;------------------------------------------------------------------------------
;   Опционально - некоторые задачи, которые надо выполнить при установке
;------------------------------------------------------------------------------
[Tasks]
; Создание иконки на рабочем столе
Name: "desktopicon"; Description: "{cm:CreateDesktopIcon}"; GroupDescription: "{cm:AdditionalIcons}"; Flags: unchecked
Here Name sets the name of the operation - “desktopicom” - creating an icon on the desktop; Description - a description of the checkbox with an option that the user will see. Design
{cm:<имя сообщения>}
sets the standard message text corresponding to the language selected at the beginning of the installation. The GroupDescription parameter is the heading of the group of checkboxes with options. The Flags parameter sets certain actions and states of controls, in this case indicating that the “create a shortcut on the desktop” checkbox should be unchecked.
To make it clear - this is how the result looks
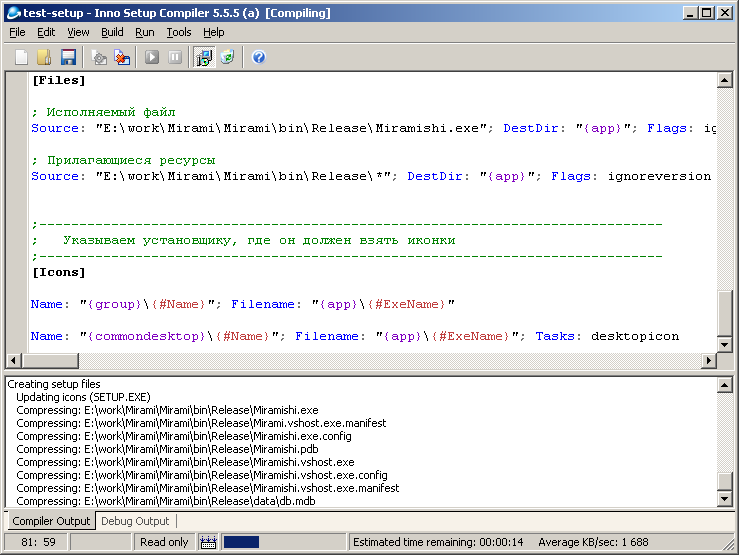
Now we indicate which files should be included in the distribution kit and where they should be placed during installation. The required section [Files] is used for this .
;------------------------------------------------------------------------------
;   Файлы, которые надо включить в пакет установщика
;------------------------------------------------------------------------------
[Files]
; Исполняемый файл
Source: "E:\work\Mirami\Mirami\bin\Release\Miramishi.exe"; DestDir: "{app}"; Flags: ignoreversion
; Прилагающиеся ресурсы
Source: "E:\work\Mirami\Mirami\bin\Release\*"; DestDir: "{app}"; Flags: ignoreversion recursesubdirs createallsubdirs
Here
- Source - path to the source file. I have everything the program needs to work in the Release directory of the MS VS project
- DestDir - installation directory, the {app} variable contains the path chosen by the user in the installer window
- Flags - a variety of flags. In our example, for the executable file: ignoring the version of the program when overwriting the executable module, if it already exists in the system (ignorevarsion); for other files and directories, we also ignore the version, recursively include all subdirectories and source files (recursesubdirs) and create subdirectories if they are not (createallsubdirs)
Finally, to make everything beautiful, we will optionally indicate to the compiler where to get icons for placement in the program menu and on the desktop
;------------------------------------------------------------------------------
;   Указываем установщику, где он должен взять иконки
;------------------------------------------------------------------------------
[Icons]
Name: "{group}\{#Name}"; Filename: "{app}\{#ExeName}"
Name: "{commondesktop}\{#Name}"; Filename: "{app}\{#ExeName}"; Tasks: desktopicon
Here I indicate that for the group in the Start menu and for the desktop, the icon must be taken from the executable module. Naturally, the icon must be “compiled” into it, otherwise in the required places we will see the standard icon from the Windows collection.
So, everything seems ready. Hit Ctrl + F9 and try to build the installer. If no syntax errors are made, the build process begins.
Inno Setup collects the installer.
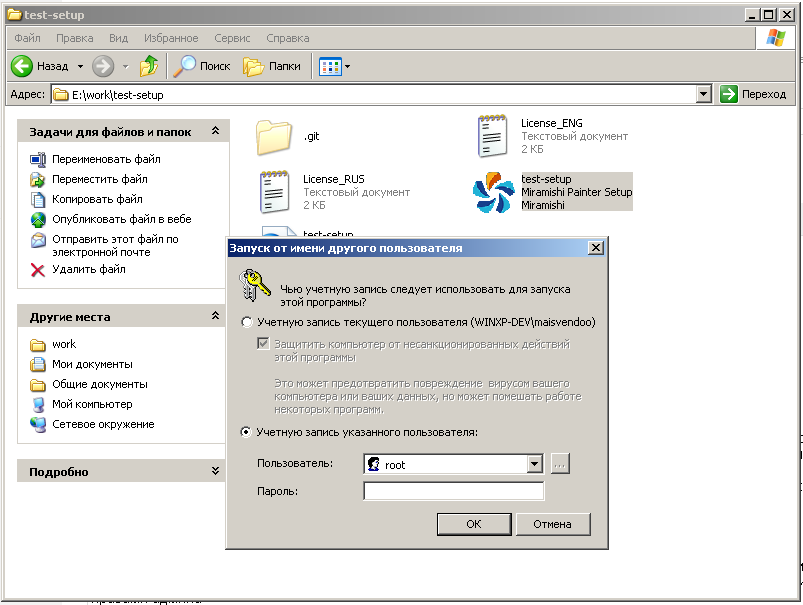
After successful assembly, the installer can be started by pressing F9. If you work under an account with limited rights (and I work in Windows this way), then you will have to crawl into the directory with the compilation results, which we specified in the script, and run the installer with administrator privileges.
Run the installer under the limited account
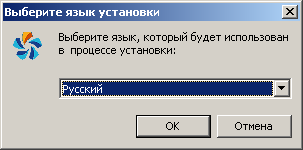
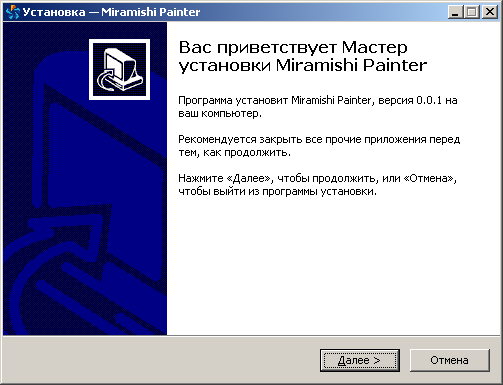
As a result, we will see painfully familiar to each Windows user window language selection
welcome wizard
license agreement
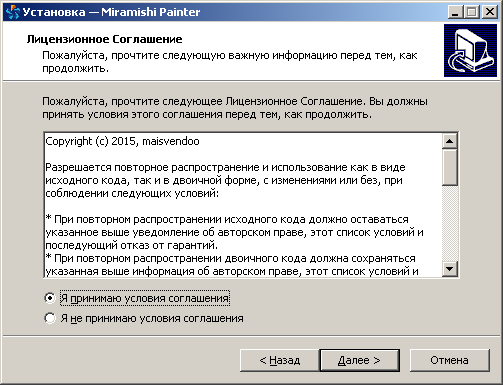
and so on. It's nice that the default is a laconic wizard design, without ruffles (which you can add if you want)
Well, what can I say? Hurrah! We wrote our first “setup” and could be happy, but
2. Deployment of the .NET Framework
You didn’t notice that we forgot about something? An application created in C # will not work without the framework with which it was built, if one is missing from the system. The appropriate framework must be installed, but for this it is necessary
- Decide how we will receive the distribution kit of the framework. There are two options - to deliver it together with the distribution package of the program, or, if necessary, download it online to the target machine. We will focus on the option of including the framework in the distribution. The framework itself, say version 4.0, can be taken for free from Microsoft.
- Detect the presence / absence of this framework in the target system. To do this, you need to write logic that analyzes the status of the system registry.
The values in the registry that need to be checked are given in the official documentation of Microsoft , in the article I will give a brief squeeze from it
Table 1 . Registry keys to verify the installed version of the .NET Framework
| .NET version | Registry key | Value |
|---|---|---|
| 3.0 | HKLM \ Software \ Microsoft \ NET Framework Setup \ NDP \ v3.0 \ Setup \ InstallSuccess | 1 |
| 3.5 | HKLM \ Software \ Microsoft \ NET Framework Setup \ NDP \ v3.0 \ Setup \ Install | 1 |
| 4.0 Client Profile | HKLM \ Software \ Microsoft \ NET Framework Setup \ NDP \ v4.0 \ Client \ Install | 1 |
| 4.0 Full Profile | HKLM \ Software \ Microsoft \ NET Framework Setup \ NDP \ v4.0 \ Full \ Install | 1 |
| 4.5 | HKLM \ Software \ Microsoft \ NET Framework Setup \ NDP \ v4.0 \ Full \ Release | release number |
To implement the arbitrary logic of the installer, Inno Setup has a [Code] section . Within this section, code is implemented that implements logic functions in the Pascal language. We will put the contents of this section into a separate dotnet.pas file and include the #include directive in the main script
;------------------------------------------------------------------------------
;   Секция кода включенная из отдельного файла
;------------------------------------------------------------------------------
[Code]
#include "dotnet.pas"
although you can fill in the code directly in the [Code] section . Remember that the Pascal syntax is used inside this section, and comments are preceded by the “//” sequence instead of the semicolon used in the main part of the script.
We will write a function that determines whether the system has the correct version of .NET
//-----------------------------------------------------------------------------
//  Проверка наличия нужного фреймворка
//-----------------------------------------------------------------------------
function IsDotNetDetected(version: string; release: cardinal): boolean;
var
    reg_key: string; // Просматриваемый подраздел системного реестра
    success: boolean; // Флаг наличия запрашиваемой версии .NET
    release45: cardinal; // Номер релиза для версии 4.5.x
    key_value: cardinal; // Прочитанное из реестра значение ключа
    sub_key: string;
begin
    success := false;
    reg_key := 'SOFTWARE\Microsoft\NET Framework Setup\NDP\';
    // Вресия 3.0
    if Pos('v3.0', version) = 1 then
      begin
          sub_key := 'v3.0';
          reg_key := reg_key + sub_key;
          success := RegQueryDWordValue(HKLM, reg_key, 'InstallSuccess', key_value);
          success := success and (key_value = 1);
      end;
    // Вресия 3.5
    if Pos('v3.5', version) = 1 then
      begin
          sub_key := 'v3.5';
          reg_key := reg_key + sub_key;
          success := RegQueryDWordValue(HKLM, reg_key, 'Install', key_value);
          success := success and (key_value = 1);
      end;
     // Вресия 4.0 клиентский профиль
     if Pos('v4.0 Client Profile', version) = 1 then
      begin
          sub_key := 'v4\Client';
          reg_key := reg_key + sub_key;
          success := RegQueryDWordValue(HKLM, reg_key, 'Install', key_value);
          success := success and (key_value = 1);
      end;
     // Вресия 4.0 расширенный профиль
     if Pos('v4.0 Full Profile', version) = 1 then
      begin
          sub_key := 'v4\Full';
          reg_key := reg_key + sub_key;
          success := RegQueryDWordValue(HKLM, reg_key, 'Install', key_value);
          success := success and (key_value = 1);
      end;
     // Вресия 4.5
     if Pos('v4.5', version) = 1 then
      begin
          sub_key := 'v4\Full';
          reg_key := reg_key + sub_key;
          success := RegQueryDWordValue(HKLM, reg_key, 'Release', release45);
          success := success and (release45 >= release);
      end;
    result := success;
end;
Despite the abundance of code, the logic of its operation is quite simple - depending on the value of the version parameter, using the RegQueryDWordValue (...) function, the value of the corresponding registry key is read and compared with the required value (see table 1). For version 4.5, we additionally pass the release number in the release parameter.
For the application that we are going to deploy, we need a very specific version of .NET, so we will write a wrapper function to define it in the target system
//-----------------------------------------------------------------------------
//  Функция-обертка для детектирования конкретной нужной нам версии
//-----------------------------------------------------------------------------
function IsRequiredDotNetDetected(): boolean;
begin
    result := IsDotNetDetected('v4.0 Full Profile', 0);
end;
In order to check the availability of the framework and inform the user about the actions taken before starting the installation, use the Callback function InitializeSetup ()
//-----------------------------------------------------------------------------
// Callback-функция, вызываемая при инициализации установки
//-----------------------------------------------------------------------------
function InitializeSetup(): boolean;
begin
// Если нет тербуемой версии .NET выводим сообщение о том, что инсталлятор
// попытается установить её на данный компьютер
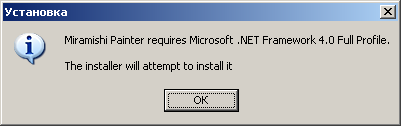
if not IsDotNetDetected('v4.0 Full Profile', 0) then
begin
MsgBox('{#Name} requires Microsoft .NET Framework 4.0 Full Profile.'#13#13
'The installer will attempt to install it', mbInformation, MB_OK);
end;
result := true;
end;
Now in the [Files] section we add an entry about where the compiler should take the .NET distribution, where it should unpack the installer, and under what conditions it should be unpacked
; .NET Framework 4.0
Source: "E:\install\dotNetFx40_Full_x86_x64.exe"; DestDir: "{tmp}"; Flags: deleteafterinstall; Check: not IsRequiredDotNetDetected
In the flags, we say that you need to remove the .NET distribution after installation (deleteafterinstall). The condition under which unpacking is required is set by the Check option , where we call the IsRequiredDotNetDetected () function, unpacking if it returns false.
Starting the installation of the framework itself can be performed after installing the main program, so we include the [Run] section in the script , which indicates what needs to be run after the installation is completed
;------------------------------------------------------------------------------
;   Секция кода включенная из отдельного файла
;------------------------------------------------------------------------------
[Code]
#include "dotnet.pas"
[Run]
;------------------------------------------------------------------------------
;   Секция запуска после инсталляции
;------------------------------------------------------------------------------
Filename: {tmp}\dotNetFx40_Full_x86_x64.exe; Parameters: "/q:a /c:""install /l /q"""; Check: not IsRequiredDotNetDetected; StatusMsg: Microsoft Framework 4.0 is installed. Please wait...
Please note that we first specify the name of the [Run] section to close the [Code] section, and then write a comment starting with a semicolon. This is necessary due to the difference in the syntax of the main script and the [Code] section, otherwise we will get a syntax error during compilation.
The section sets the path to the installer of the framework - previously it was unpacked by us into a temporary directory (the {tmp} variable contains the path to the temporary directory); command line options are set. The Check option defines the condition for starting the installation - this is the absence of the required framework in the target system. The StatusMsg option defines the message that the user will see in the installer window.
We are compiling our project again. Now, when starting on a “clean” Windows, the installer will display a message
We are told that the .NET Framework 4.0 is required and will be installed for us.
When unpacking, we will notice that the .NET distribution is also unpacked into a temporary folder

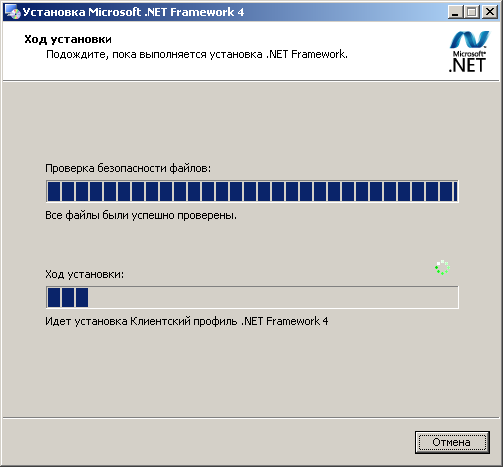
and then the process switches to the .NET installation.
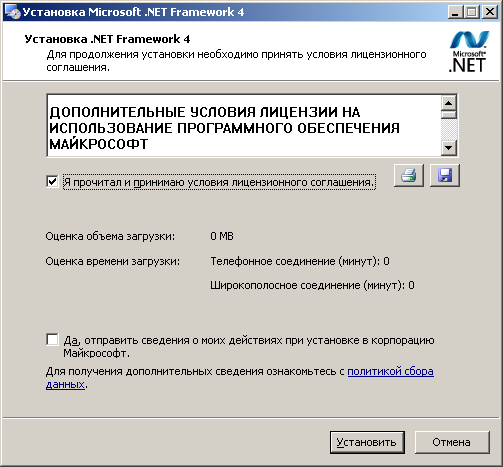
Microsoft asks us accept the license ...
Installing .NET
After that, we get a working C # application installed "in an adult way"
Conclusion
I am not a professional and in many things I can be wrong. Please take this with understanding. The article was written by noob for noobs, its main purpose is to set the search vector when solving the problem of writing the installer. For other questions, refer to the documentation that came with Inno Setup.
The code for this example is available on my Github repository. “Crack-picks” in the comments are caused by the mismatch of the Cyrillic encodings. I always write English comments for myself, but for a better understanding of the code I made this mistake. When downloading in Windows, everything is viewed fine, so please forgive me this absurdity.
For the rest, I think the “hautushka” came out worthy and thank you for your attention.