Under the hood Graveyard Keeper: How graphic effects are implemented
Hello! For 4 years I did not write on Habr. My last series of posts was about various tools and tricks that we used on our last game (developing it on Unity). Since then, the game that we have safely released, and also released a new one. So now you can breathe a little and write a few new articles that may be useful to someone.

Today I want to talk about graphic techniques and tricks that we used to create the image that you see in the gif above.
We are very sensitive to the visuals of our games and for this we have invested quite a lot of time and energy into various effects and other goodies that would make our pixel art as attractive as possible. Perhaps someone will find something useful for themselves.
To begin with, briefly list what is going to picture in our game:
Now - more.
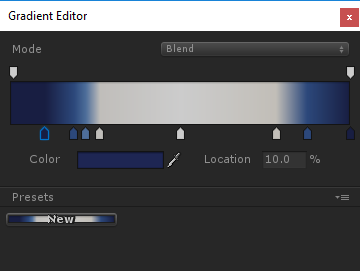
Here, in principle, nothing special. At night - darker, day - lighter. The color of light is given by the gradient of the time of day. By nightfall, the light source not only becomes darker, but acquires a blue tint.
It looks like this:
LUT (Look-up table) - color replacement tables. Roughly speaking, this is a three-dimensional RGB array, where in each node there is a color value, with which the corresponding one should be replaced. That is, if there is a red dot on the coordinates (1, 1, 1), this means that all the white color in the picture will be replaced with red. If the coordinates (1, 1, 1) are white (R = 1, G = 1, B = 1), then there is no change. Accordingly, the LUT without changes has a color for each coordinate corresponding to these same coordinates. Those. at the point (0.4, 0.5, 0.8) there is a color (R = 0.4, G = 0.5, B = 0.8).
Well, it is worth noting that, for convenience, they represent a 3D texture as a two-dimensional one. For example, this is what the “default” LUT looks like (it doesn’t change the color rendition):

It is implemented elementary, it works quickly and conveniently.
It is also very simple to set up - you give the artist any picture from the game and say “set the colors so that it is as if the evening”. After that, you apply all layers of color correction to the default LUT and you get the LUT of the evening.
In our case, the artist stumbled a bit and created as many as 10 different LUTs for different times of the day (night, dusk, evening, etc.). This is what their setup looks like:

As a result, depending on the time of day, the same location looks different:

Here the transparency of the sprites of the light from the windows also changes depending on the time of day.
Light sources are used absolutely ordinary, from Unity. In addition, each sprite is drawn normal maps, which allows you to get a sense of volume.
Drawing such normals is pretty simple. The artist roughly draws light from 4 sides with a brush:
And then this script is already going to the normal map:
If you are looking for a shader (and software) that does this, you can look in the direction of the Sprite Lamp.
It's a little more complicated here. You can not just take and light up the sprites. We need to consider whether the sprite is “behind” the light source or “before.”
Pay attention to this picture:
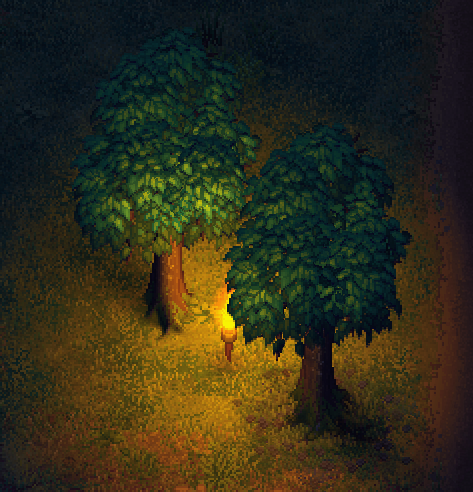
Both trees are at the same distance from the light source, but the far tree is lit, but the nearest one is not (because its unlighted part is turned toward the camera).
I solved this problem quite simply. The shader calculates the distance on the vertical axis y between the light source and the sprite. And if it is positive (the light source before the sprite), then we illuminate the sprite as usual, but if it is negative (the sprite blocks the light source), but the illumination intensity is very attenuated from a distance with a very large factor. The coefficient is made, and not just “not illuminate”, so that when the light source moves and it turns out suddenly behind the sprite, the sprite does not instantly turn black, but gradually. But still pretty quickly.
Shadows are made by sprites rotating around a point. I tried to add more compression (skew), but it turned out to be unnecessary.
In total, each object can have a maximum of 4 shadows. One - from the sun, and three - from dynamic sources of light. The picture below shows the principle:

The task “to find the nearest 3 light sources and calculate the distance / angle of shadows to them” is solved by a script that runs in Update. Yes, it turns out not very fast, because have to do a lot of math. If I wrote now, I would use the newfangled systems of parallel jobs in Unity. But then it was not yet, so I just optimized normal scripts as much as possible.
The only thing that matters is that I did not make the rotation of the sprites transform, but inside the vertex shader. Those. rotation does not move. It's just that a parameter is set in the sprite (I used the color for this, since all the shadows are all black), and the shader is responsible for the rotation of the sprite. So it turns out faster, because no need to tug geometry in unity.
Another disadvantage of this approach is that the shadows have to be customized (and sometimes painted) individually for each object. True, we managed, probably, a dozen different more or less universal sprites (thin, thick, oval, etc.).
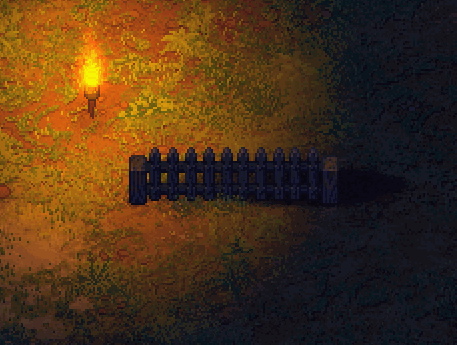
The second drawback is that it is sometimes difficult to make a shadow for an object whose ground contact spot is very long. For example, look at the shadow of the fence:
Not ideal. It looks like this if you make the sprite of the fence itself translucent:
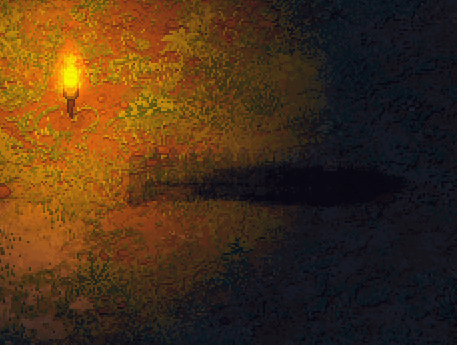
Here, however, it is worth noting that the sprite is still very strongly deformed vertically (the original shadow sprite looks almost like a circle). That is why its rotation looks not so much as a rotation, but as a distortion.
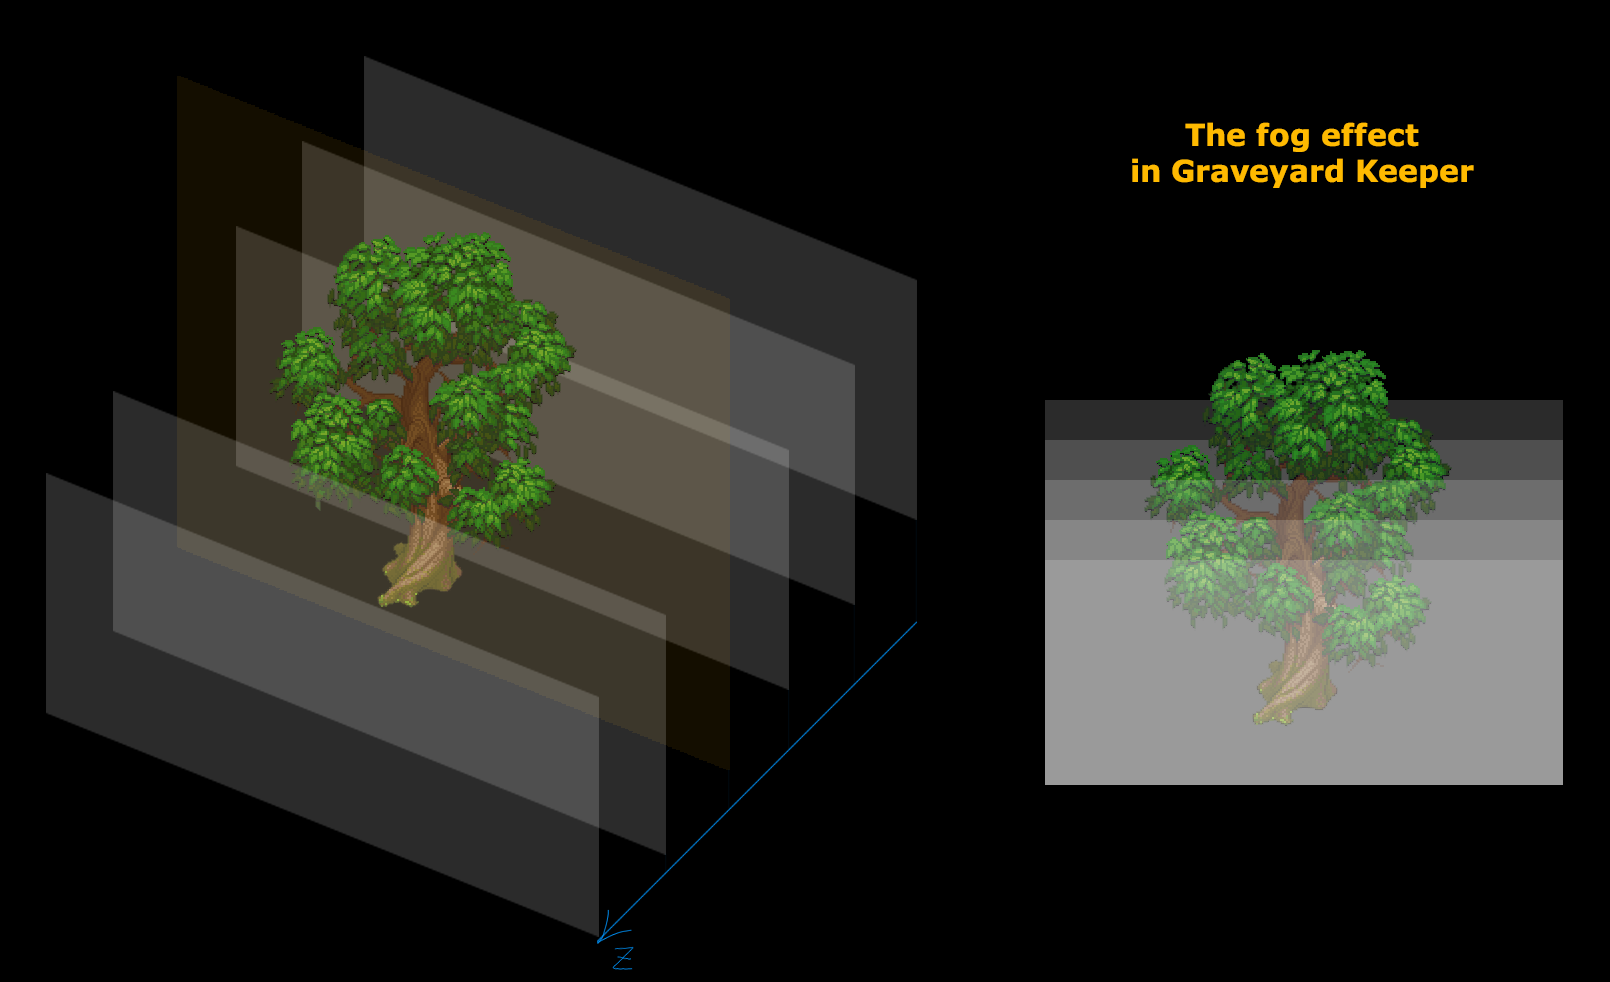
There is fog in the game. It looks like this (above - the normal version, below - an extreme 100% fog, to demonstrate the effect).
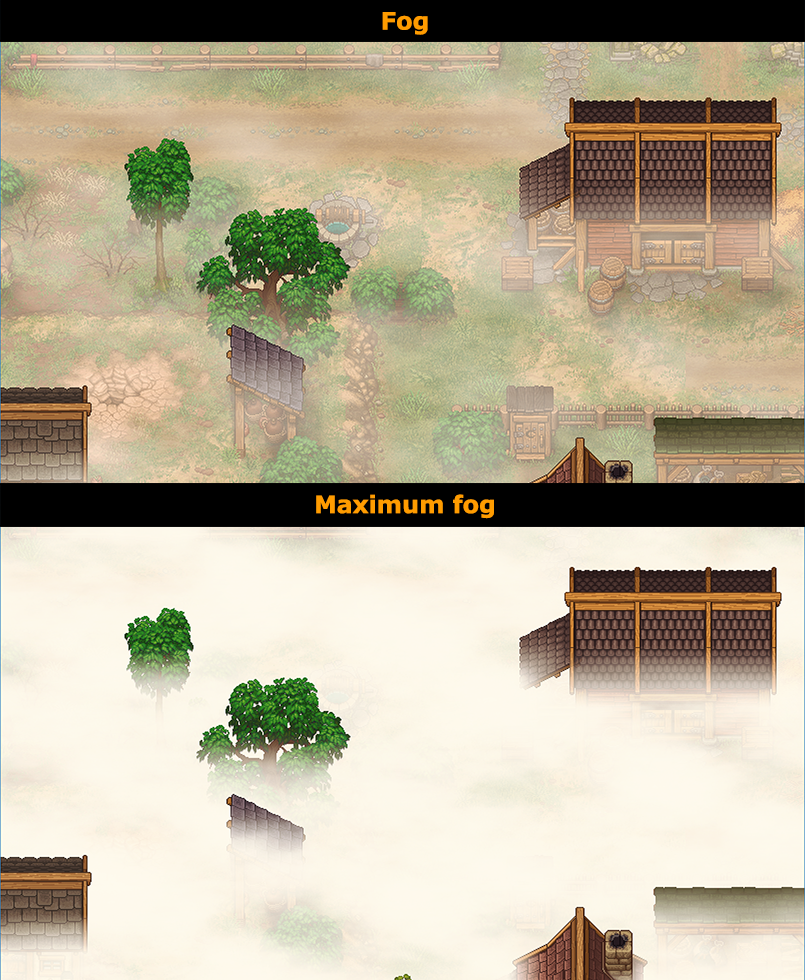
As you can see, the tops of houses and trees protrude from the fog. In fact, to achieve this effect was quite simple. The fog consists of many horizontal clouds, which are distributed throughout the depth of the scene. As a result, the upper part of all sprites is covered with a smaller number of fog sprites:
The wind in pixel art is another story. There are not many options here. Either animate with your hands (which is almost impossible with our quantity of art), or write a deforming shader, but then you will have to endure some ugly distortion. You can, of course, do not animate at all, but then the picture looks inanimate.
We chose the distortion option using a shader. It looks like this:
If you apply this shader to the checkered texture, it becomes clear what is happening:
It is also worth noting that we are not animating the entire crown, but only individual leaves:

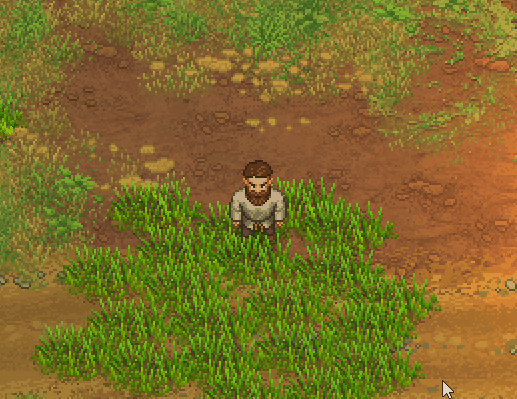
We also shake wheat in the wind, but everything is simple - the vertex shader deforms the x-coordinates, and it takes the y-component into account. The higher the dot, the harder it is. This is done so that only the tip staggers, but the root does not. Plus - the reeling phase changes from x / y coordinates, so that different sprites on the screen sway apart.
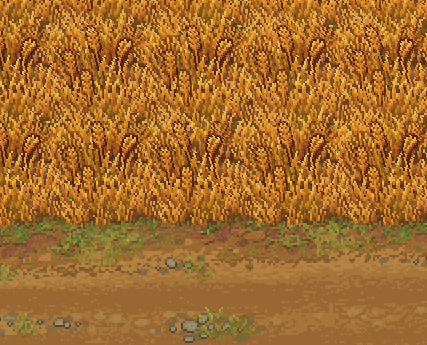
The same shader is also used to create the effect of swinging wheat and grass when a player passes through them.
Probably, this is all for now. I intentionally did not touch upon the question of constructing the scene and its geometry, since This material is for a separate article. In the rest - he told about the main decisions that were used in the development.
PS: If anyone is interested in any technical aspects, write in the comments. Perhaps I will tell in a separate article. Unless, of course, need.
PPS: Taking this opportunity, I will say that now we want to find a few competent people in the team (programmer, PM, CM, artist). Details - on the website of the studio. I hope this phrase did not break the rules.
Today I want to talk about graphic techniques and tricks that we used to create the image that you see in the gif above.
We are very sensitive to the visuals of our games and for this we have invested quite a lot of time and energy into various effects and other goodies that would make our pixel art as attractive as possible. Perhaps someone will find something useful for themselves.
To begin with, briefly list what is going to picture in our game:
- Variable ambient light - a banal change in light depending on the time of day.
- LUT-color correction - is responsible for changing the tone of the image depending on the time of day (or zone type).
- Dynamic light sources - torches, stoves, lamps.
- Normal maps are responsible for giving objects volume, especially when moving light sources.
- Mathematics of 3D-distribution of light - is responsible for ensuring that the light source in the center of the screen correctly illuminates an object that is above, but does not illuminate an object that is below (that is, turned toward the camera with the unlighted side).
- Shadows - made by sprites, rotate and react to the position of light sources.
- Object height simulation - for correct fog display.
- Other decorators: rain, wind, animations (including shader animation of foliage and grass), etc.
Now - more.
Variable ambient light
Here, in principle, nothing special. At night - darker, day - lighter. The color of light is given by the gradient of the time of day. By nightfall, the light source not only becomes darker, but acquires a blue tint.
It looks like this:
LUT-color correction
LUT (Look-up table) - color replacement tables. Roughly speaking, this is a three-dimensional RGB array, where in each node there is a color value, with which the corresponding one should be replaced. That is, if there is a red dot on the coordinates (1, 1, 1), this means that all the white color in the picture will be replaced with red. If the coordinates (1, 1, 1) are white (R = 1, G = 1, B = 1), then there is no change. Accordingly, the LUT without changes has a color for each coordinate corresponding to these same coordinates. Those. at the point (0.4, 0.5, 0.8) there is a color (R = 0.4, G = 0.5, B = 0.8).
Well, it is worth noting that, for convenience, they represent a 3D texture as a two-dimensional one. For example, this is what the “default” LUT looks like (it doesn’t change the color rendition):
It is implemented elementary, it works quickly and conveniently.
It is also very simple to set up - you give the artist any picture from the game and say “set the colors so that it is as if the evening”. After that, you apply all layers of color correction to the default LUT and you get the LUT of the evening.
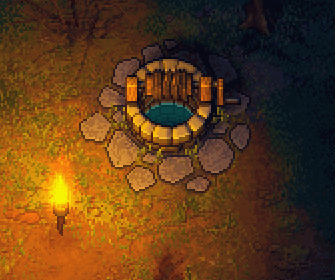
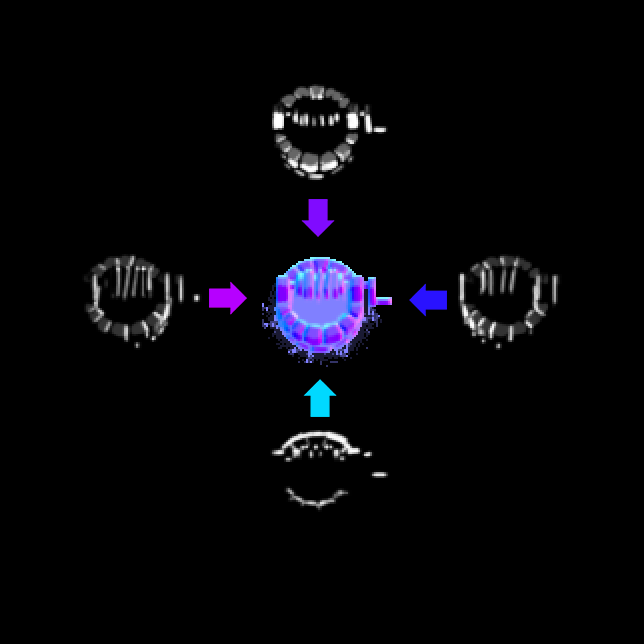
In our case, the artist stumbled a bit and created as many as 10 different LUTs for different times of the day (night, dusk, evening, etc.). This is what their setup looks like:
As a result, depending on the time of day, the same location looks different:
Here the transparency of the sprites of the light from the windows also changes depending on the time of day.
Dynamic lights and normal maps
Light sources are used absolutely ordinary, from Unity. In addition, each sprite is drawn normal maps, which allows you to get a sense of volume.
Drawing such normals is pretty simple. The artist roughly draws light from 4 sides with a brush:
And then this script is already going to the normal map:
If you are looking for a shader (and software) that does this, you can look in the direction of the Sprite Lamp.
3D imitation of light
It's a little more complicated here. You can not just take and light up the sprites. We need to consider whether the sprite is “behind” the light source or “before.”
Pay attention to this picture:
Both trees are at the same distance from the light source, but the far tree is lit, but the nearest one is not (because its unlighted part is turned toward the camera).
I solved this problem quite simply. The shader calculates the distance on the vertical axis y between the light source and the sprite. And if it is positive (the light source before the sprite), then we illuminate the sprite as usual, but if it is negative (the sprite blocks the light source), but the illumination intensity is very attenuated from a distance with a very large factor. The coefficient is made, and not just “not illuminate”, so that when the light source moves and it turns out suddenly behind the sprite, the sprite does not instantly turn black, but gradually. But still pretty quickly.
Shadows
Shadows are made by sprites rotating around a point. I tried to add more compression (skew), but it turned out to be unnecessary.
In total, each object can have a maximum of 4 shadows. One - from the sun, and three - from dynamic sources of light. The picture below shows the principle:
The task “to find the nearest 3 light sources and calculate the distance / angle of shadows to them” is solved by a script that runs in Update. Yes, it turns out not very fast, because have to do a lot of math. If I wrote now, I would use the newfangled systems of parallel jobs in Unity. But then it was not yet, so I just optimized normal scripts as much as possible.
The only thing that matters is that I did not make the rotation of the sprites transform, but inside the vertex shader. Those. rotation does not move. It's just that a parameter is set in the sprite (I used the color for this, since all the shadows are all black), and the shader is responsible for the rotation of the sprite. So it turns out faster, because no need to tug geometry in unity.
Another disadvantage of this approach is that the shadows have to be customized (and sometimes painted) individually for each object. True, we managed, probably, a dozen different more or less universal sprites (thin, thick, oval, etc.).
The second drawback is that it is sometimes difficult to make a shadow for an object whose ground contact spot is very long. For example, look at the shadow of the fence:
Not ideal. It looks like this if you make the sprite of the fence itself translucent:
Here, however, it is worth noting that the sprite is still very strongly deformed vertically (the original shadow sprite looks almost like a circle). That is why its rotation looks not so much as a rotation, but as a distortion.
Fog and height imitation
There is fog in the game. It looks like this (above - the normal version, below - an extreme 100% fog, to demonstrate the effect).
As you can see, the tops of houses and trees protrude from the fog. In fact, to achieve this effect was quite simple. The fog consists of many horizontal clouds, which are distributed throughout the depth of the scene. As a result, the upper part of all sprites is covered with a smaller number of fog sprites:
Wind
The wind in pixel art is another story. There are not many options here. Either animate with your hands (which is almost impossible with our quantity of art), or write a deforming shader, but then you will have to endure some ugly distortion. You can, of course, do not animate at all, but then the picture looks inanimate.
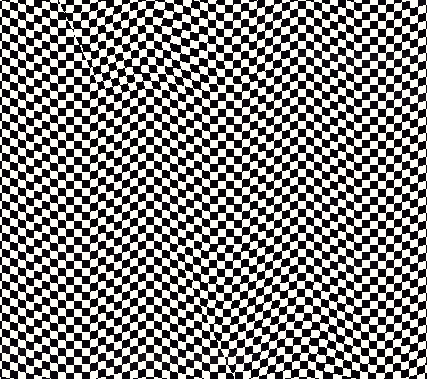
We chose the distortion option using a shader. It looks like this:
If you apply this shader to the checkered texture, it becomes clear what is happening:
It is also worth noting that we are not animating the entire crown, but only individual leaves:
We also shake wheat in the wind, but everything is simple - the vertex shader deforms the x-coordinates, and it takes the y-component into account. The higher the dot, the harder it is. This is done so that only the tip staggers, but the root does not. Plus - the reeling phase changes from x / y coordinates, so that different sprites on the screen sway apart.
The same shader is also used to create the effect of swinging wheat and grass when a player passes through them.
Probably, this is all for now. I intentionally did not touch upon the question of constructing the scene and its geometry, since This material is for a separate article. In the rest - he told about the main decisions that were used in the development.
PS: If anyone is interested in any technical aspects, write in the comments. Perhaps I will tell in a separate article. Unless, of course, need.
PPS: Taking this opportunity, I will say that now we want to find a few competent people in the team (programmer, PM, CM, artist). Details - on the website of the studio. I hope this phrase did not break the rules.