Secure Cisco
- Tutorial
Hello!
Many of you have seen and read excellent materials under the general title of “Networks for the Youngest”. Actually, I do not pretend to laurels, but decided to write something similar in the field of network security based on Cisco equipment.
The first material will be devoted to BaseLine / L2 Security, i.e. those mechanisms that can be used in the initial configuration of devices as well as on L2 switches running IOS.
Everyone who is interested, let's go!
Suppose we have brand-new [switch / router], for the first chapter it does not matter. We connect to it using the console wire ( Part.1 Networks for the smallest are described in more detail).) Because we don’t want the piece of iron lying on our table or (if it is already in the rack) standing and freezing in the server room, we will immediately configure remote control on it.
Remote control & credentials
In order to connect remotely you need to have your own credentials. When connecting through the console, we can get into privileged mode without restrictions. This, as you know, is not particularly safe, although if an attacker was already able to physically gain access to the piece of hardware, what kind of security can be talked about in principle ... But taking into account the defense-in-depth approach, it’s still worth setting a password for privileged mode.
In IOS, there are 4 options for password storage levels: 0, 4, 5, 7:
Consider them using the enable command with parameters as an example.To emulate the switch, we use IOU on GNS3v1.0, as described here .
Let's see the configuration, as it was not possible to set the same passwords (because I have Version 15.1 on IOU Switch - level 4 is used):
And level 7: service password-encryption, after entering this command, only 0 storage level is converted to 7 by Cisco encryption protocol:

It can be assumed that level 7 is more reliable than security 4 and 5, but this is not the case, which can be read, for example, in this article .
In order to further increase the level of secure connection to the device, we introduce the following commands (here the commands are entered on the router with IOS ver. 15.4, because the necessary commands were not on the switch due to the release peculiarities):
What they did: set the minimum password length in 10 characters created the user with the maximum privilege level and named him “NotAdmin”.
Use usernames like cisco, admin, root, etc. Not recommended. As you can see, the Qwerty! 23 password didn’t work out due to the control of its length (if you have difficulty with passwords, try something from this practice (I can never remember my password =! CNrmp, Quarter pounder with cheese = .25 # erwchz, How many times do I need to change my password? = hmtd! n2cmp?). Next, we generated keys for a secure connection and set connection parameters using only ssh. Also with this config we control the number of failed login attempts in a period of time, thereby protecting against brute-force.
For all this, a local database with user names will be used. Similarly (local), configure the console port. If we use a different account, the privilege level of which is not specified or lower than 15 (by default there are three privilege levels: 0, 1, 15), you will need to enter the password when entering the account and when activating the privileged mode for enable.
When configuring password access, it is strongly discouraged to use the password command .
It remains to hang the IP address on the device (it may also be dg, depending on whether you have an OOB management network or not), while it is desirable that the management network be allocated separately.
Everything, the device is ready for remote use.
Yes, if you suddenly forgot your passwords, then help is here . Of course, if you have not used no service password-recovery .
There are, let’s say, two approaches to the use of secure mechanisms for remote control of Cisco devices. Without AAA, we reviewed above. Now using AAA.
What is AAA ?- authentication, authorization, accounting or control over allocated resources. As you can see, AAA is very granular in terms of access, which just increases the level of security. How relevant is its use depends on the specific architecture. Everything is activated simply:

So, the commands on the screen: created 2 users, activated AAA and applied 2 methods (Method-List) with parameters - default local, which means that authentication and authorization will be checked by the local database on the entire iron, except for authorization on the console port, for this you need to enter aaa authorization console .
Actually, in a similar way, you can create custom Method-Lists and apply it to vty:

As you understand, you also need to configure the radius / tacacs server: radius-server host 192.168.1.100 .
Check order in Method-List: radius (yes / no), if not available, check in enable. The logic of the Method-List is such that the name sheets are checked first, and only then the default sheet.
Another interesting security command: aaa local authentication attempts max-fail 3 . If the user runs out of 3 attempts, his account will be blocked.
What else, to be honest, a lot of things ...
Remote control via vty can be limited using ACLs (what ACLs are and what they eat with can be found in the very first link, regarding NAT and ACLs), it does something like this:
And in principle, it is better to separate the control network from the rest of the data network.
Unused management ports must be disabled for entering commands:
Another good practice is to install various informational messages - banners. For what? Well, for example, in order to notify an “accidentally” administrator who got to the control interface of a piece of iron about this:
Cisco has such a good protocol as CDP , and from the point of view of information security, we need to put it out either globally no cdp run or separately on the interface, no cdp enable . Be careful about disconnecting if you have Cisco VoIP, as CDP transfers configuration to telephones.
For management (if possible) we do not use HTTP, only HTTPS:
Disable Gratuitous ARP - this is from the category of "did not wait, but he pinned up", such packages can be used with APR Poisoning, it is disabled by the no ip gratuitous-arps command .
IOS also has an auto security configuration: auto secure - Wizard to configure basic security settings.
It is also necessary to inspect such parameters that it would be desirable to disable (in recent versions of IOS they are disabled by default and in most cases relate to L3): TCP / UDP Small-Servers, Finger, Identification (auth) Protocol, PAD, Autoloading Device Configuration, IP Source Routing, IP Directed Broadcast
And one more thing: disable all unnecessary services and protocols, administratively quench unused interfaces, do not forget about NTP (ntp server), logging and baseline config:
It seems to be all, if I forgot something, please unsubscribe in a comment, at least JDima , always made worthwhile comments.
L2 Security
After we figured out safe access, let's proceed to L2 information security risk mitigation. There is such a document: CISCO LAYER 2 ATTACKS & MITIGATION TECHNIQUES, which reflects the following:
So, what is a switch, how does it work, a broadcast domain, VLAN and other basic theoretical part is abruptly described in ... yes yes yes “Networks for the smallest . Part 2. Switching. "
VLAN Hopping - a type of attack when an attacker gains access to a VLAN, for example, when a port mode is forced to negotiate. You can do this with this utility., she is in Kali. In general, on new switches this does not go very well, but the essence of the problem lies in the operation of DTP in auto default mode. But if you enter the switchport mode access command on user ports (it should work on trunk DTP, no negotiate ), then the attacker will not be able to negotiate the mode.
Also transfer all unused ports to some VLAN 2451, do not use or disable the VLAN1 interface ( interface vlan 1, shutdown ) anywhere and set the trunk port, for example, native vlan 20 , because by default native vlan has id = 1.
The vlan dot1q tag native command does the same thingfrom global configuration mode, but I didn’t have it ...
In addition to the usual VLANs, there are such ( Keith Barker copyright):
What can be seen from this illustration:
I will not repeat much, everything is described in detail here or here . A small example:
It is up to you to decide whether or not to apply.
Everything seems to be clear, but if we route the Promiscuous port, then there is the possibility of getting from ISOLATED to other VLANs by sending a crafted packet to the L3 device. This option is closed using the ACL on the router.
A similar functionality with Isolated VLAN is available when configuring PVLAN Edge or Protected port. This is configured on each interface separately with the command: switchport protected .
Well and in the end with VLAN we will consider ACLs for VLANs: VLAN ACL (VACL) or VLAN map and also MacSec.
If you need to control the traffic inside the VLAN, you need to determine the traffic and hang it on the desired VLAN, something like this:
Create a regular access list that will be used in VACL. Define a VLAN access map. We define the action when traffic matches the list. Applicable to VLAN. Class 1 traffic will stop, all other traffic will be forwarded.
An interesting feature on iOS is MacSec .
Here is a set of commands (for example, on 2 devices):
Having configured on L2 devices, on the ports through which two switches are interconnected, we get a symmetrically encrypted channel (pmk on the devices should be the same).
CAM protection
If you take the macof utility (available in Kali) and run it to generate MAC addresses from a client connected to the switch, then depending on the model of the switch, after a while it will become a hub. Why? Due to the fact that the place in the CAM table will end. In order to prevent this, there is port security mode on the interface of interest to us:
 and
and 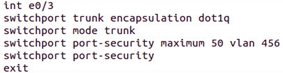
This mode only works on trunk or access port, but not on dynamic port.
The mode has parameters: Protect (no packets if violation, no log), Restrict (no packets if violation, log: snmp, sylog), Shut down port (default, max = 1, log: snmp, sylog), Shut down Vlan . There are modes Dynamic (memorize 5 first mac), Static (manually write into running config static mac) and sticky (brand new network -> auto write in running config).
And at the end of the setting you need to remember to activate the mode itself.
Snooping table
In order to protect yourself from attacks on dhcp, you can use dhcp snooping table . The bottom line is that the switch remembers for which port it has a legal dhcp server, thereby performing a dhcp starvation attack(well, or someone just brought dlink from home) from the access ports will not work.
The mode is turned on separately for all the hardware and vlans: You can
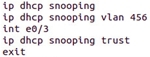
limit the number of dhcp requests with the ip dhcp snooping limit rate 20 command . And if necessary, look at the existing connections:

Initially, in this mode, by default, all ports are not trusted.
DAI
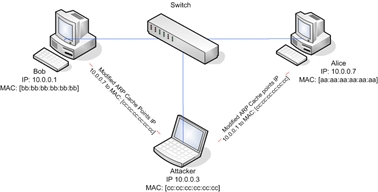
Based on the snooping table, DAI - dynamic arp inspection, i.e. dynamically compares MAC-IP and thereby prevents ARP poisoning: ip arp inspection vlan 456 .
This is a type of attack in which ARP packets with changed MAC addresses are sent; after updating the ARP table, MITM is performed.
If the infrastructure does not have DHCP, then a similar functionality can be achieved using arp access-list:
There is also functionality for comparing ARP Validation Checks .
IP Spoofing / Source Guard
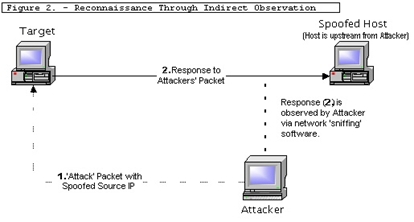
Again, based on the snooping table, IP Spoofing / Source Guard functions.
A vivid example of an IP spoofing attack is when an attacker generates different packets with different IP DESTINATION and the same IP SOURCE. In the end, all Destinations try to respond to Source and run their DDoS.
This set of commands will help protect against attacks like IP Spoofing.

STP
As you know, the main goal of STP is to eliminate loops in a topology that has redundant connections. But it is possible to implement such a scheme when the attacker becomes the root bridge and again implements MITM:
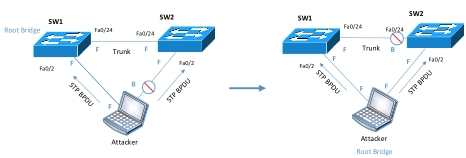
In order to activate protection globally on all ports, you must use the spanning-tree portfast bpduguard default command .
Next, put the port in portfast mode and get ... Instead of a thousand words:

Separately on the interface, this is done with the command: spanning-tree bpduguard enable .
Storm Control

This is another mechanism for controlling forwarded packets when STP is enabled, having the following parameters:
In addition to the above, there are such technologies as: Root Guard, EtherChannel Guard, Loop Guard, Port Blocking .
For sim everything, thank you for reading to the end. I hope the information is helpful.
PS It would be interesting to know what security mechanisms in the context of this material do you use in the infrastructure? Write in the comments.
Many of you have seen and read excellent materials under the general title of “Networks for the Youngest”. Actually, I do not pretend to laurels, but decided to write something similar in the field of network security based on Cisco equipment.
The first material will be devoted to BaseLine / L2 Security, i.e. those mechanisms that can be used in the initial configuration of devices as well as on L2 switches running IOS.
Everyone who is interested, let's go!
Suppose we have brand-new [switch / router], for the first chapter it does not matter. We connect to it using the console wire ( Part.1 Networks for the smallest are described in more detail).) Because we don’t want the piece of iron lying on our table or (if it is already in the rack) standing and freezing in the server room, we will immediately configure remote control on it.
Remote control & credentials
In order to connect remotely you need to have your own credentials. When connecting through the console, we can get into privileged mode without restrictions. This, as you know, is not particularly safe, although if an attacker was already able to physically gain access to the piece of hardware, what kind of security can be talked about in principle ... But taking into account the defense-in-depth approach, it’s still worth setting a password for privileged mode.
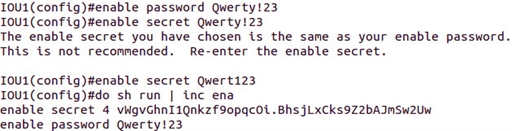
In IOS, there are 4 options for password storage levels: 0, 4, 5, 7:
- Level 0: enable password Qwerty! 23 - data storage in clear text.
- Level 4: enable secret Qwerty! 23 - data conversion to SHA256 Encryption in IOS 15, because "Change to new encryption, md5 can be deprecated soon."
- Level 5: enable secret Qwerty! 23 - data conversion to MD5 Hash.
Consider them using the enable command with parameters as an example.
Let's see the configuration, as it was not possible to set the same passwords (because I have Version 15.1 on IOU Switch - level 4 is used):
And level 7: service password-encryption, after entering this command, only 0 storage level is converted to 7 by Cisco encryption protocol:
It can be assumed that level 7 is more reliable than security 4 and 5, but this is not the case, which can be read, for example, in this article .
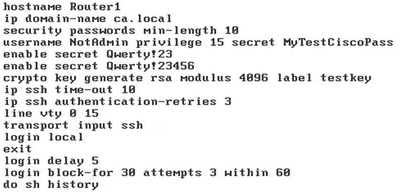
In order to further increase the level of secure connection to the device, we introduce the following commands (here the commands are entered on the router with IOS ver. 15.4, because the necessary commands were not on the switch due to the release peculiarities):
What they did: set the minimum password length in 10 characters created the user with the maximum privilege level and named him “NotAdmin”.
Use usernames like cisco, admin, root, etc. Not recommended. As you can see, the Qwerty! 23 password didn’t work out due to the control of its length (if you have difficulty with passwords, try something from this practice (I can never remember my password =! CNrmp, Quarter pounder with cheese = .25 # erwchz, How many times do I need to change my password? = hmtd! n2cmp?). Next, we generated keys for a secure connection and set connection parameters using only ssh. Also with this config we control the number of failed login attempts in a period of time, thereby protecting against brute-force.
For all this, a local database with user names will be used. Similarly (local), configure the console port. If we use a different account, the privilege level of which is not specified or lower than 15 (by default there are three privilege levels: 0, 1, 15), you will need to enter the password when entering the account and when activating the privileged mode for enable.
When configuring password access, it is strongly discouraged to use the password command .
It remains to hang the IP address on the device (it may also be dg, depending on whether you have an OOB management network or not), while it is desirable that the management network be allocated separately.
Everything, the device is ready for remote use.
Yes, if you suddenly forgot your passwords, then help is here . Of course, if you have not used no service password-recovery .
There are, let’s say, two approaches to the use of secure mechanisms for remote control of Cisco devices. Without AAA, we reviewed above. Now using AAA.
What is AAA ?- authentication, authorization, accounting or control over allocated resources. As you can see, AAA is very granular in terms of access, which just increases the level of security. How relevant is its use depends on the specific architecture. Everything is activated simply:
So, the commands on the screen: created 2 users, activated AAA and applied 2 methods (Method-List) with parameters - default local, which means that authentication and authorization will be checked by the local database on the entire iron, except for authorization on the console port, for this you need to enter aaa authorization console .
Actually, in a similar way, you can create custom Method-Lists and apply it to vty:
As you understand, you also need to configure the radius / tacacs server: radius-server host 192.168.1.100 .
Check order in Method-List: radius (yes / no), if not available, check in enable. The logic of the Method-List is such that the name sheets are checked first, and only then the default sheet.
Another interesting security command: aaa local authentication attempts max-fail 3 . If the user runs out of 3 attempts, his account will be blocked.
What else, to be honest, a lot of things ...
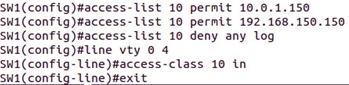
Remote control via vty can be limited using ACLs (what ACLs are and what they eat with can be found in the very first link, regarding NAT and ACLs), it does something like this:
And in principle, it is better to separate the control network from the rest of the data network.
Unused management ports must be disabled for entering commands:
line aux 0
no exec
no transport input
no transport output
Another good practice is to install various informational messages - banners. For what? Well, for example, in order to notify an “accidentally” administrator who got to the control interface of a piece of iron about this:
banner login c Warning! Non Authorization Access Is Restricted c
Cisco has such a good protocol as CDP , and from the point of view of information security, we need to put it out either globally no cdp run or separately on the interface
For management (if possible) we do not use HTTP, only HTTPS:
no ip http server
ip http secure-server
Disable Gratuitous ARP - this is from the category of "did not wait, but he pinned up", such packages can be used with APR Poisoning, it is disabled by the no ip gratuitous-arps command .
IOS also has an auto security configuration: auto secure - Wizard to configure basic security settings.
It is also necessary to inspect such parameters that it would be desirable to disable (in recent versions of IOS they are disabled by default and in most cases relate to L3): TCP / UDP Small-Servers, Finger, Identification (auth) Protocol, PAD, Autoloading Device Configuration, IP Source Routing, IP Directed Broadcast
And one more thing: disable all unnecessary services and protocols, administratively quench unused interfaces, do not forget about NTP (ntp server), logging and baseline config:
service tcp-keepalives in
service tcp-keepalives in out
snmp-server enable traps cpu threshold
.........
service timestamps log datetime
secure boot-image
secure boot-config
It seems to be all, if I forgot something, please unsubscribe in a comment, at least JDima , always made worthwhile comments.
L2 Security
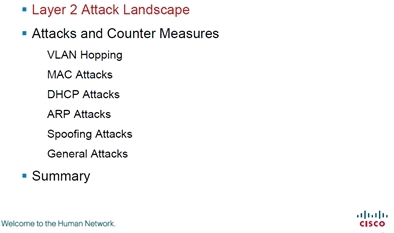
After we figured out safe access, let's proceed to L2 information security risk mitigation. There is such a document: CISCO LAYER 2 ATTACKS & MITIGATION TECHNIQUES, which reflects the following:
So, what is a switch, how does it work, a broadcast domain, VLAN and other basic theoretical part is abruptly described in ... yes yes yes “Networks for the smallest . Part 2. Switching. "
VLAN Hopping - a type of attack when an attacker gains access to a VLAN, for example, when a port mode is forced to negotiate. You can do this with this utility., she is in Kali. In general, on new switches this does not go very well, but the essence of the problem lies in the operation of DTP in auto default mode. But if you enter the switchport mode access command on user ports (it should work on trunk DTP, no negotiate ), then the attacker will not be able to negotiate the mode.
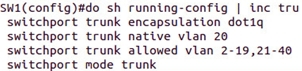
Also transfer all unused ports to some VLAN 2451, do not use or disable the VLAN1 interface ( interface vlan 1, shutdown ) anywhere and set the trunk port, for example, native vlan 20 , because by default native vlan has id = 1.
The vlan dot1q tag native command does the same thingfrom global configuration mode, but I didn’t have it ...
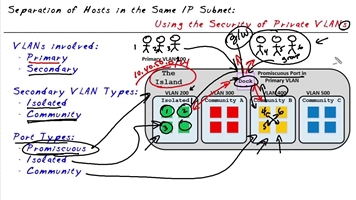
In addition to the usual VLANs, there are such ( Keith Barker copyright):
What can be seen from this illustration:
- Vlans are: Primary and Secondary: Isolated or Community.
- Vlans types: Isolated (can only be in a single copy, there is no connection inside vlan, only with Promiscuous), Community (many, there is a connection inside Vlan with Promiscuous)
- Ports Types: Promiscuous - Primary Vlan port is something like dg, also Isolated and Community
- Private Vlans require the inclusion of VTP transparent: vtp mode transparent .
I will not repeat much, everything is described in detail here or here . A small example:
vlan 101
private-vlan primary
vlan 201
private-vlan community
vlan 202
private-vlan community
vlan 301
private-vlan isolated
...........
vlan 101
private-vlan association 201-202,301
It is up to you to decide whether or not to apply.
Everything seems to be clear, but if we route the Promiscuous port, then there is the possibility of getting from ISOLATED to other VLANs by sending a crafted packet to the L3 device. This option is closed using the ACL on the router.
A similar functionality with Isolated VLAN is available when configuring PVLAN Edge or Protected port. This is configured on each interface separately with the command: switchport protected .
Well and in the end with VLAN we will consider ACLs for VLANs: VLAN ACL (VACL) or VLAN map and also MacSec.
If you need to control the traffic inside the VLAN, you need to determine the traffic and hang it on the desired VLAN, something like this:
access-list 1 permit 192.168.1.0 0.0.0.255
access-list 2 permit any
vlan access-map mymap 10
match ip address 1
action drop
exit
vlan access-map mymap 20
match ip address 2
action forward
exit
vlan filter mymap vlan-list 5-10
end
Create a regular access list that will be used in VACL. Define a VLAN access map. We define the action when traffic matches the list. Applicable to VLAN. Class 1 traffic will stop, all other traffic will be forwarded.
An interesting feature on iOS is MacSec .
Here is a set of commands (for example, on 2 devices):
int gig0/2
cts manual
sap pmk Qwerty123
Having configured on L2 devices, on the ports through which two switches are interconnected, we get a symmetrically encrypted channel (pmk on the devices should be the same).
CAM protection
If you take the macof utility (available in Kali) and run it to generate MAC addresses from a client connected to the switch, then depending on the model of the switch, after a while it will become a hub. Why? Due to the fact that the place in the CAM table will end. In order to prevent this, there is port security mode on the interface of interest to us:
and This mode only works on trunk or access port, but not on dynamic port.
The mode has parameters: Protect (no packets if violation, no log), Restrict (no packets if violation, log: snmp, sylog), Shut down port (default, max = 1, log: snmp, sylog), Shut down Vlan . There are modes Dynamic (memorize 5 first mac), Static (manually write into running config static mac) and sticky (brand new network -> auto write in running config).
And at the end of the setting you need to remember to activate the mode itself.
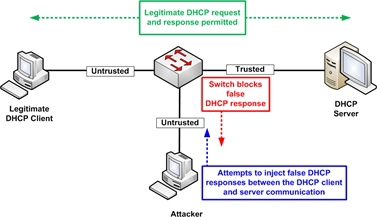
Snooping table
In order to protect yourself from attacks on dhcp, you can use dhcp snooping table . The bottom line is that the switch remembers for which port it has a legal dhcp server, thereby performing a dhcp starvation attack(well, or someone just brought dlink from home) from the access ports will not work.
The mode is turned on separately for all the hardware and vlans: You can
limit the number of dhcp requests with the ip dhcp snooping limit rate 20 command . And if necessary, look at the existing connections:
Initially, in this mode, by default, all ports are not trusted.
DAI
Based on the snooping table, DAI - dynamic arp inspection, i.e. dynamically compares MAC-IP and thereby prevents ARP poisoning: ip arp inspection vlan 456 .
This is a type of attack in which ARP packets with changed MAC addresses are sent; after updating the ARP table, MITM is performed.
If the infrastructure does not have DHCP, then a similar functionality can be achieved using arp access-list:
arp access-list NEW-ARP-ACL
permit ip host 10.1.1.11 mac host 0011.0011.0011
ip arp inspection filter arpacl vlan 456
There is also functionality for comparing ARP Validation Checks .
IP Spoofing / Source Guard
Again, based on the snooping table, IP Spoofing / Source Guard functions.
A vivid example of an IP spoofing attack is when an attacker generates different packets with different IP DESTINATION and the same IP SOURCE. In the end, all Destinations try to respond to Source and run their DDoS.
This set of commands will help protect against attacks like IP Spoofing.
STP
As you know, the main goal of STP is to eliminate loops in a topology that has redundant connections. But it is possible to implement such a scheme when the attacker becomes the root bridge and again implements MITM:
In order to activate protection globally on all ports, you must use the spanning-tree portfast bpduguard default command .
Next, put the port in portfast mode and get ... Instead of a thousand words:
Separately on the interface, this is done with the command: spanning-tree bpduguard enable .
Storm Control
This is another mechanism for controlling forwarded packets when STP is enabled, having the following parameters:
- Monitoring in progress: Broadcast / Multicast / Unicast
- Thresholds are set:% / PPS / BPS
- Selected action: Slow / Shutdown
storm-control broadcast pps 500 100
storm-control action shutdown
errdisable recovery cause storm-control
errdisable recovery interval 60
In addition to the above, there are such technologies as: Root Guard, EtherChannel Guard, Loop Guard, Port Blocking .
For sim everything, thank you for reading to the end. I hope the information is helpful.
PS It would be interesting to know what security mechanisms in the context of this material do you use in the infrastructure? Write in the comments.