Sharing cryptodisks on PC and Android
This article will consider an example of sharing cryptodisks CyberSafe Mobile on a personal computer and an Android device.

Using the CyberSafe program, as was already shown in the article “CyberSafe - an encryptor for all occasions,” you can create an encrypted virtual disk. In this article, we will consider sharing an encrypted cryptodisk on a PC and an Android device.
The scenario is as follows: a virtual disk file is created on the computer and placed in a certain folder, this folder is “shared”, and the CyberSafe Mobile program (from Cybersoft LLC) gets access to this folder and mounts the virtual disk file in it. Thus, data (even in encrypted form!) Is not stored on your phone at all, it is stored only on a computer, and when working with files on a mobile phone, the virtual disk container on the PC is not mounted. Thanks to this, additional protection is achieved: on the computer, the container does not even open and is not mounted, since the installation is carried out on the phone, and the phone does not physically have the virtual disk file itself.
To solve the problem we need:
The article will show:
Before we get down to CyberSafe Mobile, I want to make a few comments about the program itself. First, CyberSaft Mobile prohibits taking screenshots of some of its screens for security reasons. So, a screenshot of entering a password or selecting a virtual container file cannot be made. It would be possible to use an emulator, but I really wanted to test everything on real devices, so some screenshots will be taken by photographing when the screen of one device is captured by the camera of the second device. Because of this, quality suffers, but you can be sure that everything written in the article will work for you on real devices. If you're interested, then I used the Acer Iconia B1 tablet and the Fly Era Style 3 smartphone (IQ4415 Quad).
Secondly, CyberSafe Mobile requires root privileges to work, because without them you cannot mount the shared folder. You can read about how to obtain root privileges specifically for your device on the Internet. For my devices, I used the Universal Root program .
Thirdly, the article considers the full version of the program - CyberSafe Mobile. Google Play also has a free “lite” version of CyberSafe Mobile Lite, but it does not support mounting and cannot work with network folders.
Launch the CyberSafe TopSecret program and go to Disk Encryption, Virtual Disk . Click the Create button . In the window that appears, select the location of the virtual disk file, enter its name and click the Create button . Next, specify the parameters of the virtual disk (Fig. 1): password for access to the encrypted disk, size in megabytes, encryption type and file system (NTFS is used by default).
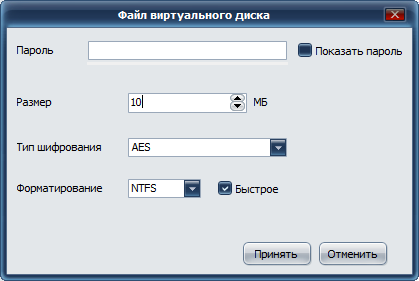
Fig. 1. Creating a virtual disk
I think you should not read a separate and long lecture on how to choose the right password. As for the size of the disk, it should be noted that the program does not limit the file size of the container. Therefore, you can not be afraid to set the size of the virtual disk in excess of the size of the RAM of the smartphone - there is no need to be limited to the device memory.
When set all the necessary parameters, click the Accept button . In fig. Figure 2 shows that two virtual disk files were created - one 100 MB in size, and the second 10 MB in size. Both files are placed in the C: \ test folder (Fig. 3).

Fig. 2. CyberSafe TopSecret program: created virtual disks
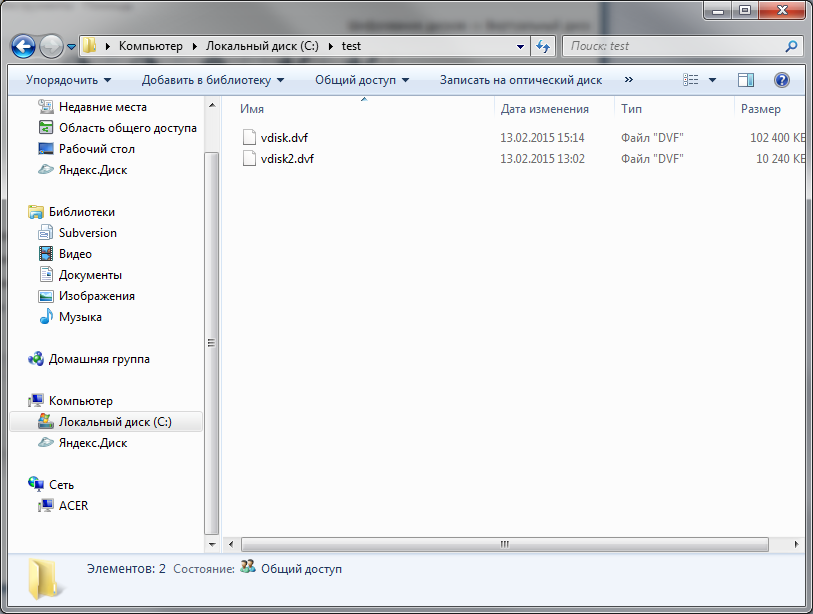
Fig. 3. Explorer: the location of virtual disks and their sizes
Highlight one of the virtual disks and click the Mount button . In the window that appears (Fig. 4), select a letter for the virtual disk. Next, the program will ask you to enter a password to access the disk.

Fig. 4. The choice of the letters for the virtual disk

Fig. 5. Password to access the virtual encrypted disk
In the program, the virtual disk will be marked as mounted, the letter to which this disk is mounted is also displayed (Fig. 6).

Fig. 6. Disk Z: mounted
Next with disk Z: you can work as with a regular disk, that is, write files to it, read files, etc. There are no restrictions, except that a virtual disk can work a little slower than a regular one. I put on disk Z: some photos (fig. 7).
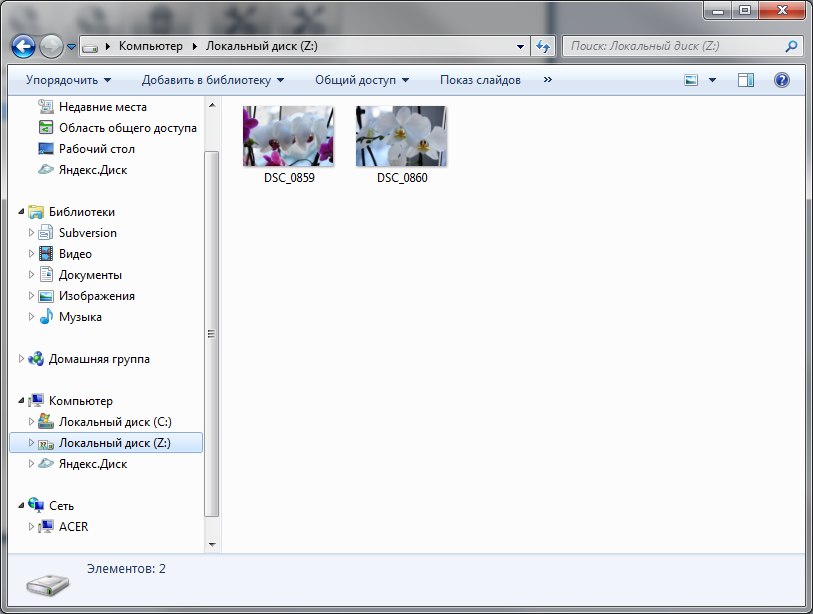
Fig. 7. The contents of the Z drive: (vdisk.dvf file)
This completes the participation of the CyberSafe TopSecret program in our script. The disk can be unmounted, and the program itself can be closed.
Since you can work with Z: drive as you would with a regular drive, you may come up with a rather simple solution: “share” Z: (Fig. 8) and mount it in ES Explorer on your Android device. In this case, the CyberSafe Mobile program does not seem to be needed at all. Consider this case in more detail so that you have no doubt.
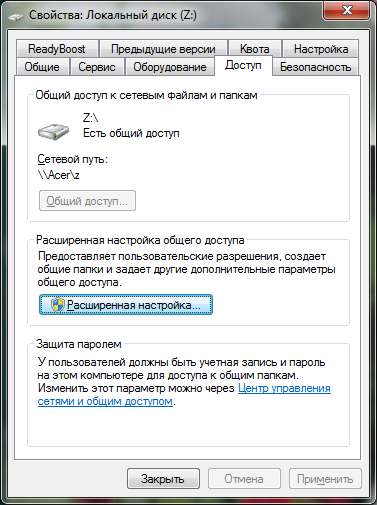
Fig. 8. To drive Z: shared access.
In ES Explorer, go to the Network, LAN section and click the Scan button.for scanning computers on the network (Fig. 9). Then everything, as usual - enter the username and password to connect to the shared resource (it all depends on the sharing settings). The program displays a list of shared resources (Fig. 9), select the Z drive and see its contents - previously copied photos onto it (Fig. 10).

Fig. 9. The result of scanning the network (left) and the list of shared resources (right)
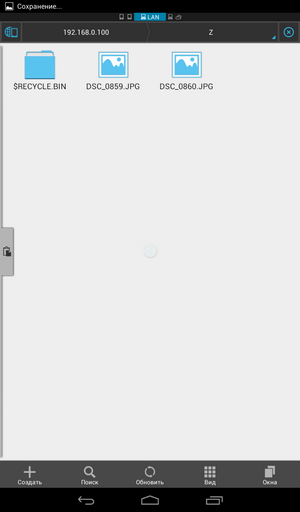
Fig. 10. Share content
Everything would be fine if not for one thing. On your computer, the virtual encrypted disk is mounted, and the files are accessible to everyone who has physical access to it. Maybe when you need to copy several files from a virtual encrypted disk to a smartphone (where they will not be encrypted!) This method is suitable, but it completely kills all the advantages of encryption. And over the network, data is transmitted in unencrypted form. More information about the vulnerabilities of cryptocontainers during a remote attack was written in this article . This method of sharing a cryptodisk is wrong and it is strongly discouraged to use it.
This section will show how to create an encrypted virtual disk file using CyberSafe Mobile and how to use it later. That is, the normal use of the program, not involving the use of network resources. These are the basics of using the program and without them you cannot fully use it.
Launch CyberSafe Mobile on your Android device. By default, you do not have registered safes (Fig. 11). The + button on the control panel allows you to create a new safe (that is, a virtual disk file), and the button that follows it adds an existing file. Using the add existing virtual disk button will be discussed later, for now, click the + button .
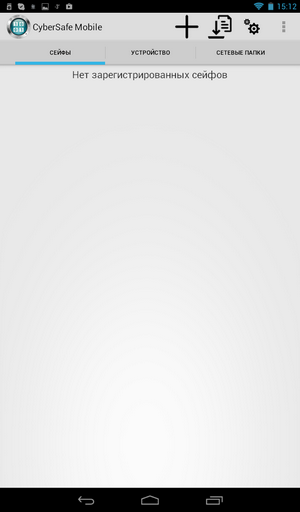
Fig. 11. No registered safes
Enter or select the path to the safe, specify its size (I left the default size of 5 MB, who are confused by such a small size, do not forget that we work with a mobile device) and password, see fig. 12. Next, the created safe will appear in the list on the Safes tab (Fig. 12).
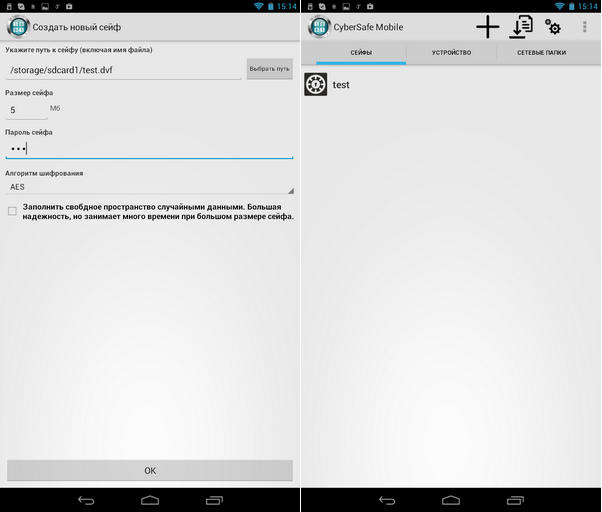
Fig. 12. Creating a virtual disk on an Android device (left) and the Safes tab (right)
Before opening the safe, you need to set some important program parameters. Press the button with the image of the gear and select Mount settings in the menu that appears (Fig. 13). Here you need to choose:
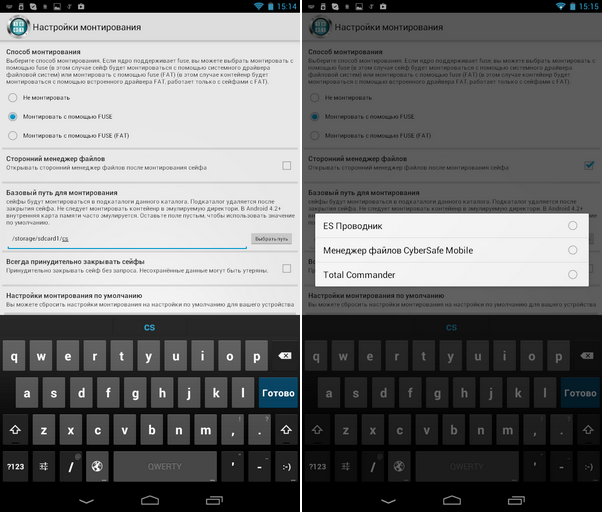
Fig. 13. Mounting options (left) and selecting a third-party file manager (right)
Next, go back to the Safes tab and click the test safe created to open it. The program will ask you to enter the password specified when creating the safe. After that, you will see the contents of the safe in the file manager of your choice (in our case, in ES Explorer), see fig. 14. Clear business, in the safe it is empty. Therefore, copy several files into it (Fig. 14).
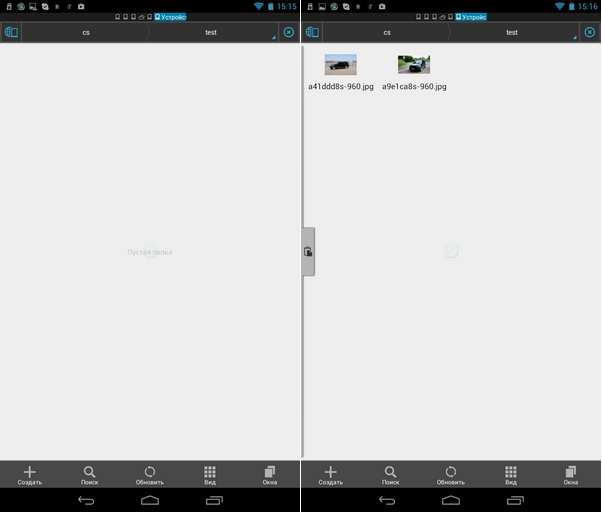
Fig. 14. The safe is open (left) and files are copied into it (right)
To close the safe, return to the CyberSafe Mobile program, press and hold the test safe. In the menu that appears (Fig. 15), select the Close command .
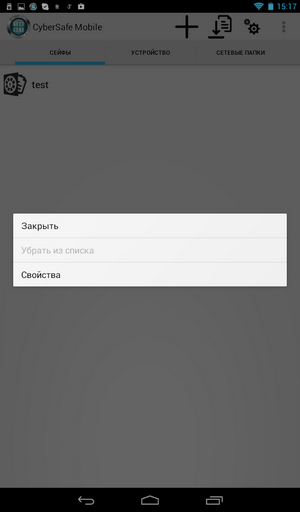
Fig. 15. How to close the safe
We just examined the usual sequence of actions when working with a safe. In the next section, the task will be a little more complicated - the safe will be on the remote computer.
Now it will be shown how to share the cryptodisk correctly. Let me remind you, we have two virtual disk files stored in the test folder. This folder is shared, and the folder itself is stored on the Acer machine (Figure 16).

Fig. 16. The C: \ test folder is shared.
It should also be noted that the virtual disk should not be mounted on a PC, and the CyberSafe TopSecret program on the Windows computer should be closed - for the purity of the experiment.
Go to the Network Folders tab (Fig. 17) of CyberSafe Mobile. By default, no network folder is registered.
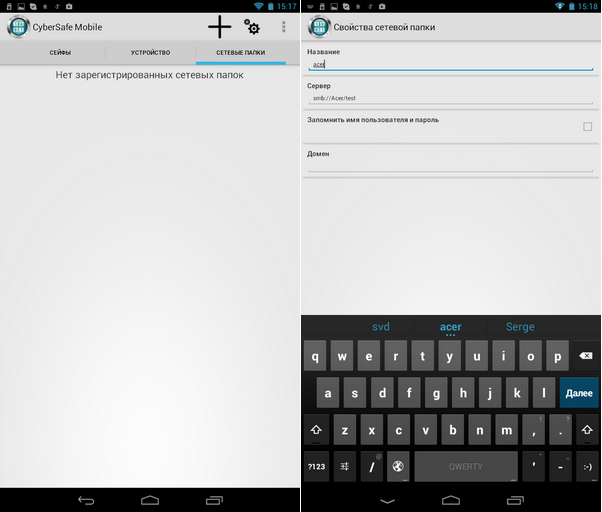
Fig. 17. No network folders (left). Adding a network folder (right)
Click the + buttonto add a network folder. Enter the path to the network folder in the format smb: // machine / resource. In our case, you need to enter smb: // Acer / test. As the name of the network folder, I used the name of the machine (Acer), you can use whatever you want. Please note that when mounting to the mount point specified in the settings, it will not use the name you entered (Acer), but the name of the "shared" folder (test).
The network folder will be added to the list (Fig. 18). If you “click” on this folder, you will see a window for entering a username and password for connecting to an Acer computer. After that, you will see the contents of the “shared” folder. And here I apologize for the quality of the illustration - the program does not allow you to take a screenshot and view the contents of the network folder, so I had to take a photo with a mobile phone. Everything was photographed on the Fly IQ4415 - in everything except the camera, an excellent phone (Fig. 19).

Fig. 18. The network folder is added to the list

Fig. 19. Network folder contents
As you can see, our network folder contains the very two files (vdisk.dvf and vdisk2.dvf) created at the beginning of the article. Now click the Back button (this is the Android button, not the program button) to return to the list of network folders. Press the folder and hold your finger for several seconds to display the folder menu (Fig. 20). Choose Mount .

Fig. 20. Mounting the folder (left). The network folder is mounted (on the right)
You can open ES Explorer to make sure that the folder has been mounted to the / storage / sdcard1 / cs directory and that these two files are located in it (Fig. 20).
The only thing left is to go to the Safes section and click the Add Safe button (it’s located to the right of the + button) A screen will appear again, a screenshot of which cannot be taken. Therefore, again - a low-quality illustration (Fig. 21a, 21b). Go to / storage / sdcard1 / cs / test and select the virtual disk file you need.

Fig. 21a. Selecting a virtual disk file
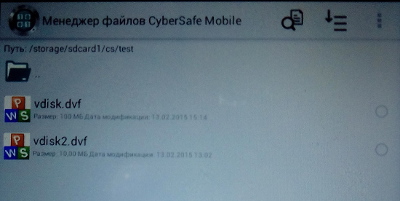
Fig. 21b. Selecting a virtual disk file
After that, the program will ask for a password to access the safe. If the password is correct, the program will place the safe in the list of safes, mount it and launch ES Explorer to work with its files (Fig. 22).
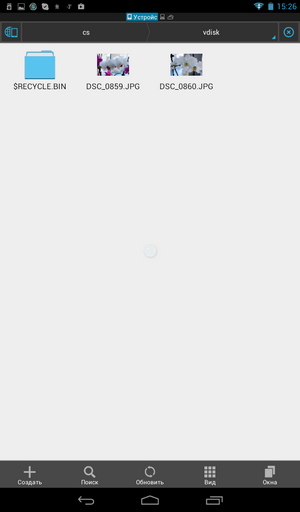
Fig. 22. The contents of the virtual disk
As you can see, we contemplate the very photos that I put on a virtual disk when I created it at the beginning of the article. It is worth noting that the program works equally well, both with large disks and relatively small disks, which I created to demonstrate the operation of the program. The performance of the program is enough to watch a movie stored in a safe without copying it to the device’s SD card.
The article “Protecting personal photos on Android phones” showed how to use URSafe Media Redirector to automatically redirect photos taken with your smartphone’s camera to a safe. So no one will be able to view your photos after closing the safe. In this article we will use the same principle, only the safe will be remote - it will be located on your computer.
First of all, install the URSafe Media Redirector program, start it and click the Add button to create a new redirect (Fig. 23).

Fig. 23. URSafe Media Redirector (left) and redirection settings (right)
By clicking the Browse Folder button next to Path From, select the folder where the Camera app places your photos. On my Acer B1 tablet, photos are placed in the / storage / sdcard0 / DCIM / Camera directory. You may have another folder. Next, click the Browse Folder button and select the folder to which you are mounting the safe (Fig. 23). Click the Save button to save the redirect.
Next you will see a list of redirects created. In the free version of URSafe Media Redirector, only the first redirect will work (in our case, the first and only). Highlight it and press the On / Off button to turn it on. In fig. 24 redirection is already on, as indicated by the green daw.
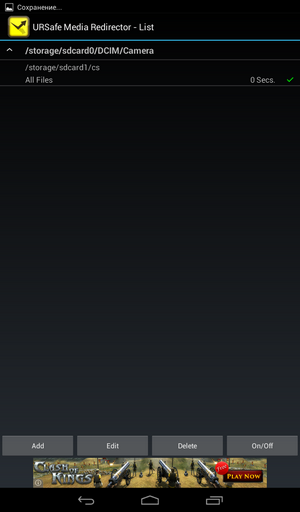
Fig. 24. Redirect active
Launch the Camera app and take any picture. Then close the safe and go to the computer. Mount the virtual disk file and view its contents - on it you will find a new photo (Fig. 25).

Fig. 25. A photo taken on an Android device
The task is completed. Data is not stored on the phone, but on the computer, and collaboration with the cryptocontainer is provided. If desired, you can not be limited to a local wireless network, but to create a remote "ball." You can read about this in the article “Storage of data in a cryptocontainer on a remote server and working with them from Android devices” .
Description of the CyberSafe Mobile program CyberSafe Mobile
program on Google Play
Mounting a safe (video)
Formulation of the problem
Using the CyberSafe program, as was already shown in the article “CyberSafe - an encryptor for all occasions,” you can create an encrypted virtual disk. In this article, we will consider sharing an encrypted cryptodisk on a PC and an Android device.
The scenario is as follows: a virtual disk file is created on the computer and placed in a certain folder, this folder is “shared”, and the CyberSafe Mobile program (from Cybersoft LLC) gets access to this folder and mounts the virtual disk file in it. Thus, data (even in encrypted form!) Is not stored on your phone at all, it is stored only on a computer, and when working with files on a mobile phone, the virtual disk container on the PC is not mounted. Thanks to this, additional protection is achieved: on the computer, the container does not even open and is not mounted, since the installation is carried out on the phone, and the phone does not physically have the virtual disk file itself.
To solve the problem we need:
- PC or laptop with Windows operating system (the article uses 64-bit Windows 7);
- Android device with root access (smartphone or tablet);
- CyberSafe TopSecret installed on the computer;
- Program CyberSafe Mobile , installed on a mobile device.
The article will show:
- How to use CyberSafe Mobile without mounting a remote container file (normal use of the program).
- Like a mounted remote virtual disk container and do it right.
- How to use folder redirection to automatically encrypt your photos
Before we get down to CyberSafe Mobile, I want to make a few comments about the program itself. First, CyberSaft Mobile prohibits taking screenshots of some of its screens for security reasons. So, a screenshot of entering a password or selecting a virtual container file cannot be made. It would be possible to use an emulator, but I really wanted to test everything on real devices, so some screenshots will be taken by photographing when the screen of one device is captured by the camera of the second device. Because of this, quality suffers, but you can be sure that everything written in the article will work for you on real devices. If you're interested, then I used the Acer Iconia B1 tablet and the Fly Era Style 3 smartphone (IQ4415 Quad).
Secondly, CyberSafe Mobile requires root privileges to work, because without them you cannot mount the shared folder. You can read about how to obtain root privileges specifically for your device on the Internet. For my devices, I used the Universal Root program .
Thirdly, the article considers the full version of the program - CyberSafe Mobile. Google Play also has a free “lite” version of CyberSafe Mobile Lite, but it does not support mounting and cannot work with network folders.
Creating a virtual disk container on a PC
Launch the CyberSafe TopSecret program and go to Disk Encryption, Virtual Disk . Click the Create button . In the window that appears, select the location of the virtual disk file, enter its name and click the Create button . Next, specify the parameters of the virtual disk (Fig. 1): password for access to the encrypted disk, size in megabytes, encryption type and file system (NTFS is used by default).
Fig. 1. Creating a virtual disk
I think you should not read a separate and long lecture on how to choose the right password. As for the size of the disk, it should be noted that the program does not limit the file size of the container. Therefore, you can not be afraid to set the size of the virtual disk in excess of the size of the RAM of the smartphone - there is no need to be limited to the device memory.
When set all the necessary parameters, click the Accept button . In fig. Figure 2 shows that two virtual disk files were created - one 100 MB in size, and the second 10 MB in size. Both files are placed in the C: \ test folder (Fig. 3).
Fig. 2. CyberSafe TopSecret program: created virtual disks
Fig. 3. Explorer: the location of virtual disks and their sizes
Highlight one of the virtual disks and click the Mount button . In the window that appears (Fig. 4), select a letter for the virtual disk. Next, the program will ask you to enter a password to access the disk.
Fig. 4. The choice of the letters for the virtual disk
Fig. 5. Password to access the virtual encrypted disk
In the program, the virtual disk will be marked as mounted, the letter to which this disk is mounted is also displayed (Fig. 6).
Fig. 6. Disk Z: mounted
Next with disk Z: you can work as with a regular disk, that is, write files to it, read files, etc. There are no restrictions, except that a virtual disk can work a little slower than a regular one. I put on disk Z: some photos (fig. 7).
Fig. 7. The contents of the Z drive: (vdisk.dvf file)
This completes the participation of the CyberSafe TopSecret program in our script. The disk can be unmounted, and the program itself can be closed.
Incorrect sharing of cryptodisk on PC and Android
Since you can work with Z: drive as you would with a regular drive, you may come up with a rather simple solution: “share” Z: (Fig. 8) and mount it in ES Explorer on your Android device. In this case, the CyberSafe Mobile program does not seem to be needed at all. Consider this case in more detail so that you have no doubt.
Fig. 8. To drive Z: shared access.
In ES Explorer, go to the Network, LAN section and click the Scan button.for scanning computers on the network (Fig. 9). Then everything, as usual - enter the username and password to connect to the shared resource (it all depends on the sharing settings). The program displays a list of shared resources (Fig. 9), select the Z drive and see its contents - previously copied photos onto it (Fig. 10).
Fig. 9. The result of scanning the network (left) and the list of shared resources (right)
Fig. 10. Share content
Everything would be fine if not for one thing. On your computer, the virtual encrypted disk is mounted, and the files are accessible to everyone who has physical access to it. Maybe when you need to copy several files from a virtual encrypted disk to a smartphone (where they will not be encrypted!) This method is suitable, but it completely kills all the advantages of encryption. And over the network, data is transmitted in unencrypted form. More information about the vulnerabilities of cryptocontainers during a remote attack was written in this article . This method of sharing a cryptodisk is wrong and it is strongly discouraged to use it.
Normal use of CyberSafe Mobile
This section will show how to create an encrypted virtual disk file using CyberSafe Mobile and how to use it later. That is, the normal use of the program, not involving the use of network resources. These are the basics of using the program and without them you cannot fully use it.
Launch CyberSafe Mobile on your Android device. By default, you do not have registered safes (Fig. 11). The + button on the control panel allows you to create a new safe (that is, a virtual disk file), and the button that follows it adds an existing file. Using the add existing virtual disk button will be discussed later, for now, click the + button .
Fig. 11. No registered safes
Enter or select the path to the safe, specify its size (I left the default size of 5 MB, who are confused by such a small size, do not forget that we work with a mobile device) and password, see fig. 12. Next, the created safe will appear in the list on the Safes tab (Fig. 12).
Fig. 12. Creating a virtual disk on an Android device (left) and the Safes tab (right)
Before opening the safe, you need to set some important program parameters. Press the button with the image of the gear and select Mount settings in the menu that appears (Fig. 13). Here you need to choose:
- Mounting method - the mount is turned off by default, so you need to enable it. Mounting with FUSE worked fine on my devices, but if you run into problems with this method, select FUSE (FAT).
- Base path for mounting - click the Select path button to select the folder to be mounted to. The folder must exist. I will mount safes and “shared” folders to / storage / sdcard1 / cs. For each safe / shared folder, a subdirectory will be created in the directory of your choice, the name of which will coincide with the name of the mounted resource. For example, if you try to mount the test.dvf file created earlier, it will be mounted to the / storage / sdcard1 / cs / test folder. After unmounting, this subdirectory (test) will be deleted.
- Third-party file manager - the CyberSafe Mobile program has a built-in file manager, but I think many Android users will be more used to using ES Explorer (Fig. 13).
Fig. 13. Mounting options (left) and selecting a third-party file manager (right)
Next, go back to the Safes tab and click the test safe created to open it. The program will ask you to enter the password specified when creating the safe. After that, you will see the contents of the safe in the file manager of your choice (in our case, in ES Explorer), see fig. 14. Clear business, in the safe it is empty. Therefore, copy several files into it (Fig. 14).
Fig. 14. The safe is open (left) and files are copied into it (right)
To close the safe, return to the CyberSafe Mobile program, press and hold the test safe. In the menu that appears (Fig. 15), select the Close command .
Fig. 15. How to close the safe
We just examined the usual sequence of actions when working with a safe. In the next section, the task will be a little more complicated - the safe will be on the remote computer.
Proper sharing of cryptodisk on PC and Android
Now it will be shown how to share the cryptodisk correctly. Let me remind you, we have two virtual disk files stored in the test folder. This folder is shared, and the folder itself is stored on the Acer machine (Figure 16).
Fig. 16. The C: \ test folder is shared.
It should also be noted that the virtual disk should not be mounted on a PC, and the CyberSafe TopSecret program on the Windows computer should be closed - for the purity of the experiment.
Go to the Network Folders tab (Fig. 17) of CyberSafe Mobile. By default, no network folder is registered.
Fig. 17. No network folders (left). Adding a network folder (right)
Click the + buttonto add a network folder. Enter the path to the network folder in the format smb: // machine / resource. In our case, you need to enter smb: // Acer / test. As the name of the network folder, I used the name of the machine (Acer), you can use whatever you want. Please note that when mounting to the mount point specified in the settings, it will not use the name you entered (Acer), but the name of the "shared" folder (test).
The network folder will be added to the list (Fig. 18). If you “click” on this folder, you will see a window for entering a username and password for connecting to an Acer computer. After that, you will see the contents of the “shared” folder. And here I apologize for the quality of the illustration - the program does not allow you to take a screenshot and view the contents of the network folder, so I had to take a photo with a mobile phone. Everything was photographed on the Fly IQ4415 - in everything except the camera, an excellent phone (Fig. 19).
Fig. 18. The network folder is added to the list
Fig. 19. Network folder contents
As you can see, our network folder contains the very two files (vdisk.dvf and vdisk2.dvf) created at the beginning of the article. Now click the Back button (this is the Android button, not the program button) to return to the list of network folders. Press the folder and hold your finger for several seconds to display the folder menu (Fig. 20). Choose Mount .
Fig. 20. Mounting the folder (left). The network folder is mounted (on the right)
You can open ES Explorer to make sure that the folder has been mounted to the / storage / sdcard1 / cs directory and that these two files are located in it (Fig. 20).
The only thing left is to go to the Safes section and click the Add Safe button (it’s located to the right of the + button) A screen will appear again, a screenshot of which cannot be taken. Therefore, again - a low-quality illustration (Fig. 21a, 21b). Go to / storage / sdcard1 / cs / test and select the virtual disk file you need.
Fig. 21a. Selecting a virtual disk file
Fig. 21b. Selecting a virtual disk file
After that, the program will ask for a password to access the safe. If the password is correct, the program will place the safe in the list of safes, mount it and launch ES Explorer to work with its files (Fig. 22).
Fig. 22. The contents of the virtual disk
As you can see, we contemplate the very photos that I put on a virtual disk when I created it at the beginning of the article. It is worth noting that the program works equally well, both with large disks and relatively small disks, which I created to demonstrate the operation of the program. The performance of the program is enough to watch a movie stored in a safe without copying it to the device’s SD card.
Using a redirector to protect your photos
The article “Protecting personal photos on Android phones” showed how to use URSafe Media Redirector to automatically redirect photos taken with your smartphone’s camera to a safe. So no one will be able to view your photos after closing the safe. In this article we will use the same principle, only the safe will be remote - it will be located on your computer.
First of all, install the URSafe Media Redirector program, start it and click the Add button to create a new redirect (Fig. 23).
Fig. 23. URSafe Media Redirector (left) and redirection settings (right)
By clicking the Browse Folder button next to Path From, select the folder where the Camera app places your photos. On my Acer B1 tablet, photos are placed in the / storage / sdcard0 / DCIM / Camera directory. You may have another folder. Next, click the Browse Folder button and select the folder to which you are mounting the safe (Fig. 23). Click the Save button to save the redirect.
Next you will see a list of redirects created. In the free version of URSafe Media Redirector, only the first redirect will work (in our case, the first and only). Highlight it and press the On / Off button to turn it on. In fig. 24 redirection is already on, as indicated by the green daw.
Fig. 24. Redirect active
Launch the Camera app and take any picture. Then close the safe and go to the computer. Mount the virtual disk file and view its contents - on it you will find a new photo (Fig. 25).
Fig. 25. A photo taken on an Android device
The task is completed. Data is not stored on the phone, but on the computer, and collaboration with the cryptocontainer is provided. If desired, you can not be limited to a local wireless network, but to create a remote "ball." You can read about this in the article “Storage of data in a cryptocontainer on a remote server and working with them from Android devices” .
References
Description of the CyberSafe Mobile program CyberSafe Mobile
program on Google Play
Mounting a safe (video)